
Bathroom DIY, Maintenance & Styling
Return to category.
Go to categoryA cistern that keeps running into the toilet bowl is one of those faults that seems minor at first, but in practice can waste a surprising amount of water. It does not always make much noise, it does not flood the bathroom, and it can go unnoticed for quite a while. You may only hear a faint hiss or see a thin line of water inside the bowl. But that continuous running means the cistern is constantly refilling and losing water for no reason.
In everyday use, the problem usually shows up in two ways. Either you hear the cistern refill itself every few minutes, or you see water constantly running at the back of the toilet bowl. In other cases, the first sign is the water bill. A small continuous leak can go unnoticed for weeks, especially in a second WC or in a home where the bathroom already has background noise from ventilation, a water heater, or pipework.
The good news is that with classic porcelain cisterns, meaning the visible cisterns mounted above or behind the toilet bowl and opened from the top, diagnosis is usually fairly simple. In most cases the problem is in one of two places: either the fill valve does not shut off the incoming water, or the flush valve does not seal properly at the bottom of the cistern.
The hard part is not buying a spare part. The hard part is identifying which part has actually failed. Many people replace the fill valve when the real problem is the flush seal. Others replace the flush seal while the water level is actually rising too high and spilling into the overflow. Others jiggle the mechanism, the running stops for a while, and a few days later the fault returns.
In this guide, we will look at how a classic porcelain cistern works, how to tell whether the problem is in the fill valve or the flush valve, how to do a hands-on check without special tools, what parts a careful owner can replace, and when a plumber is needed. We will also cover limescale, gaskets, proper shutoff, and the mistakes that can turn a small repair into a leak on the floor.
To make a proper diagnosis, we must first understand the basic function. A cistern has two main systems: the filling mechanism and the emptying mechanism. The filling mechanism is the float. This allows water to enter the cistern after pressing and stops the flow when the level reaches the correct height. The discharge mechanism is the valve that opens when we press the button or lever and lets the water escape to the basin.
When everything is working properly, the process is simple. You step on the cistern, the outlet valve opens, the water drains into the basin, the valve closes again, the float allows the cistern to fill, then stops the flow. From then on, the water must remain still in the cistern until the next tap.
If the float does not close properly, water continues to enter. Because the cistern cannot be filled indefinitely, excess water flows from the overflow to the basin. So we see water running, but the cause is water ingress. Conversely, if the outlet valve does not press properly, the water slowly escapes from the bottom to the basin. Then the float opens again to make up for the lost amount. The effect sounds similar, but the cause is different.
This is the point that confuses most owners. They see water in the toilet bowl and think that "the float is running." In reality, the bowl only shows the symptom. To find the cause, we need to look inside the cistern.
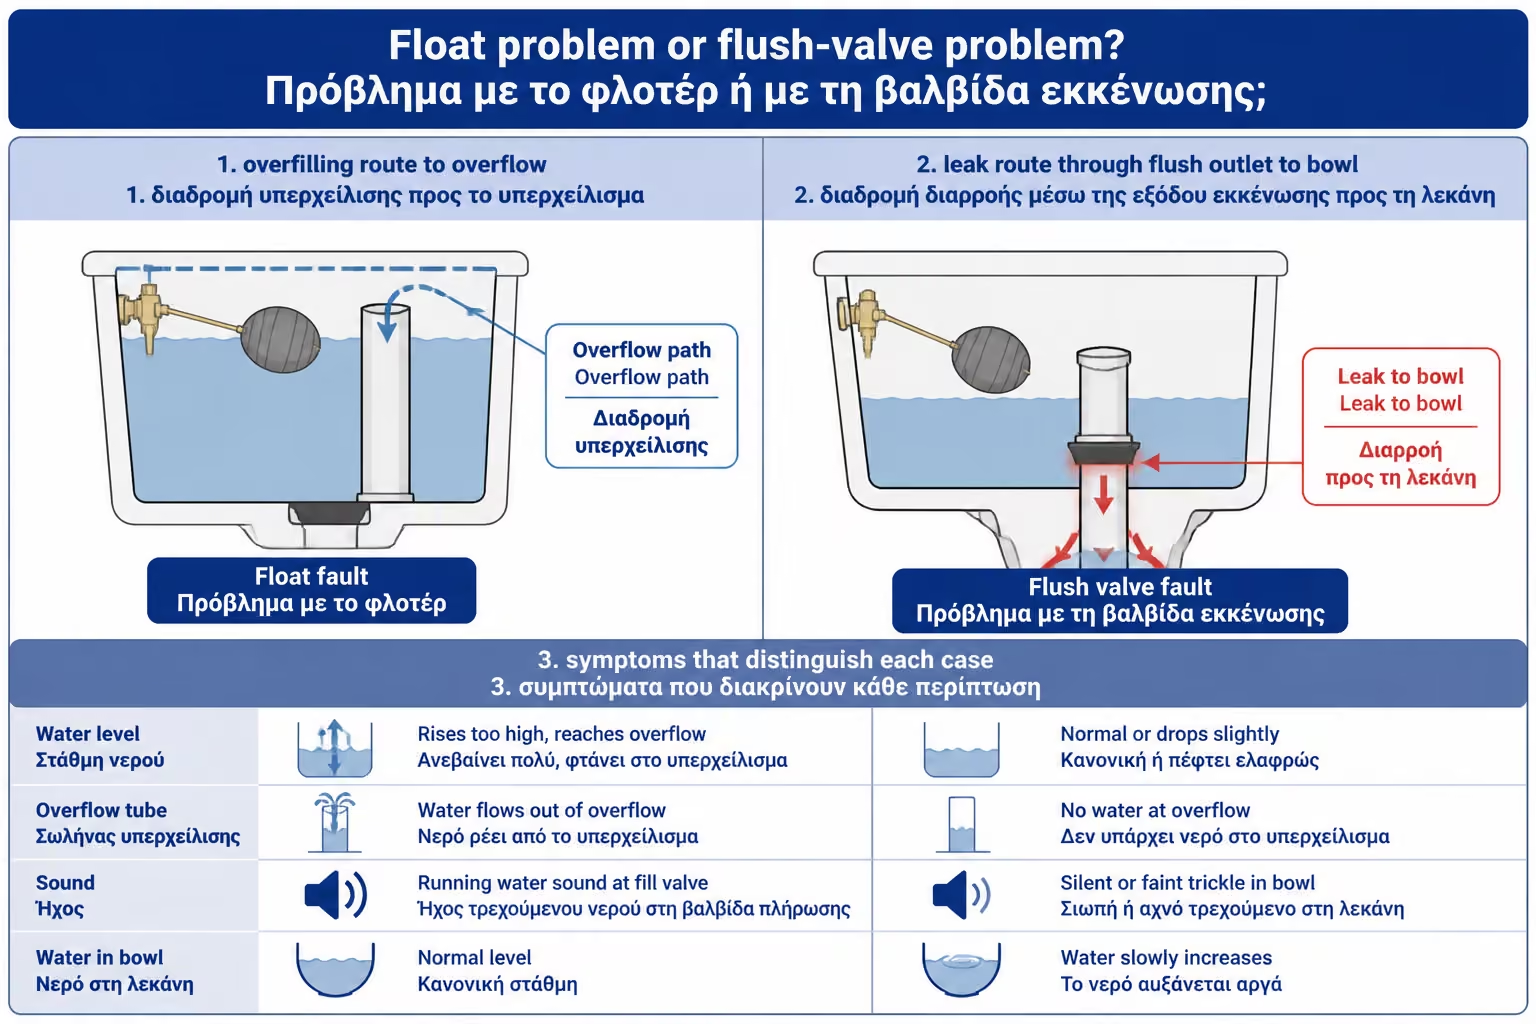
In most classic faucets, the continuous running comes from either the level rising too high or the outlet valve not sealing. These two scenarios have different behavior.
When the fill valve is at fault, the cistern fills normally but does not stop in time. The level rises to the overflow point and the excess water runs into the toilet bowl. You may hear a constant sound of water entering the cistern. It can also happen that the valve nearly closes, but not completely, leaving a faint continuous hiss.
When the flush valve is at fault, the water level may look correct at first, but it slowly drops as water leaks into the bowl. Then the fill valve opens again to replace the lost water. In that case you may hear the cistern refill for a few seconds every now and then, without anyone having flushed. This is the classic "refilling by itself" symptom.
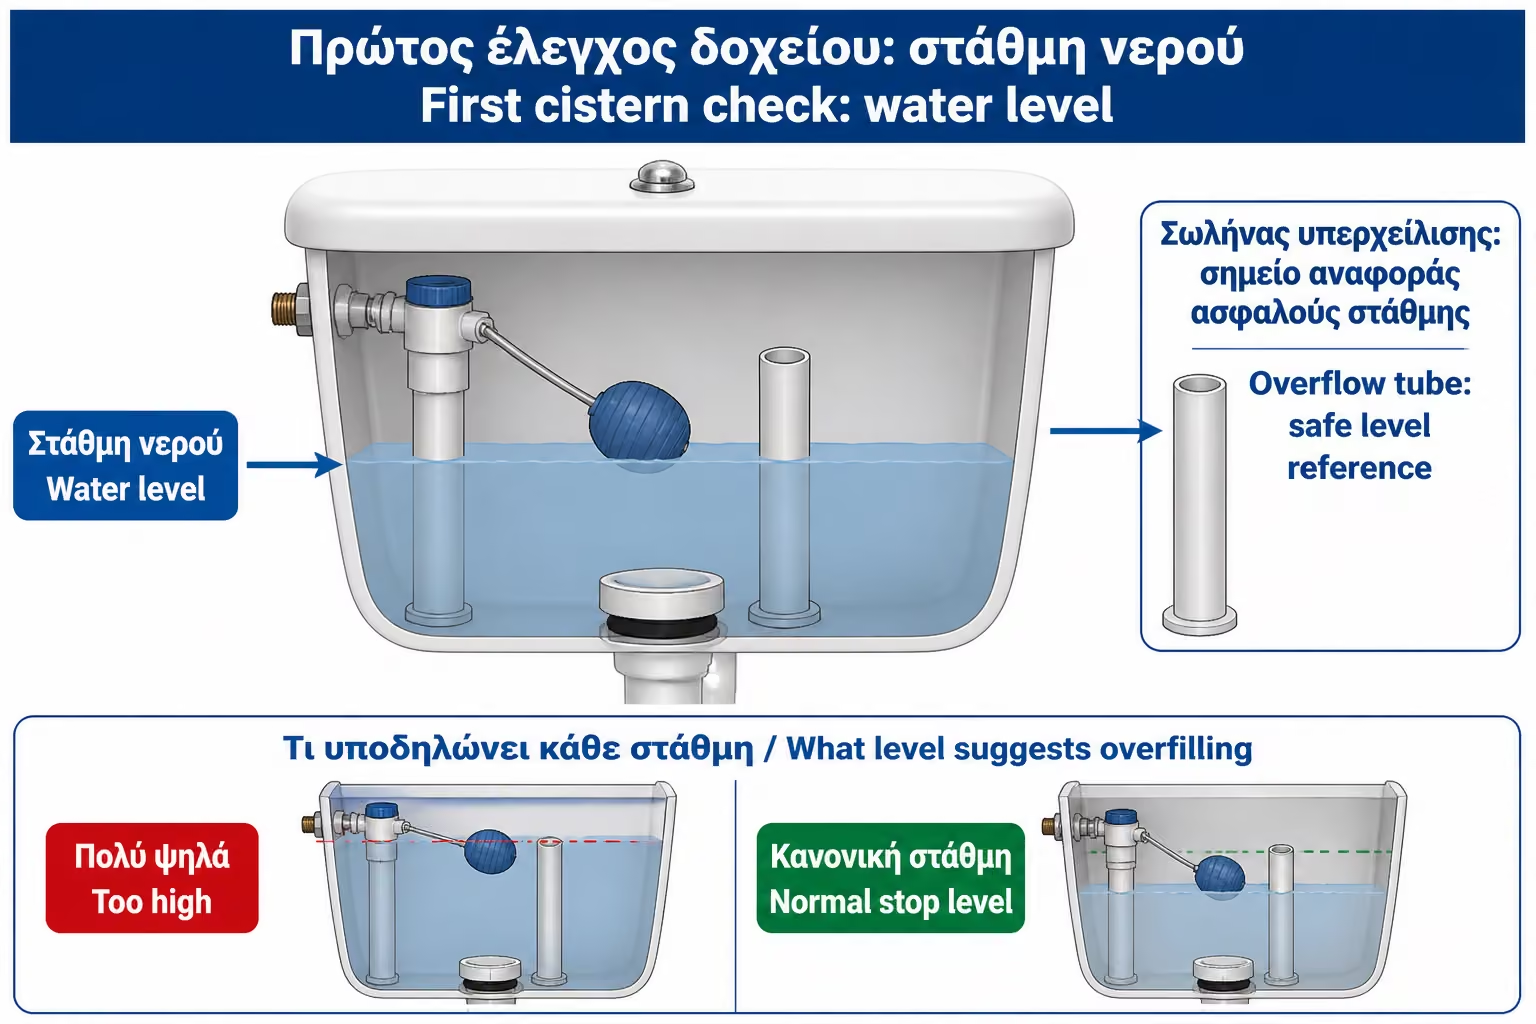
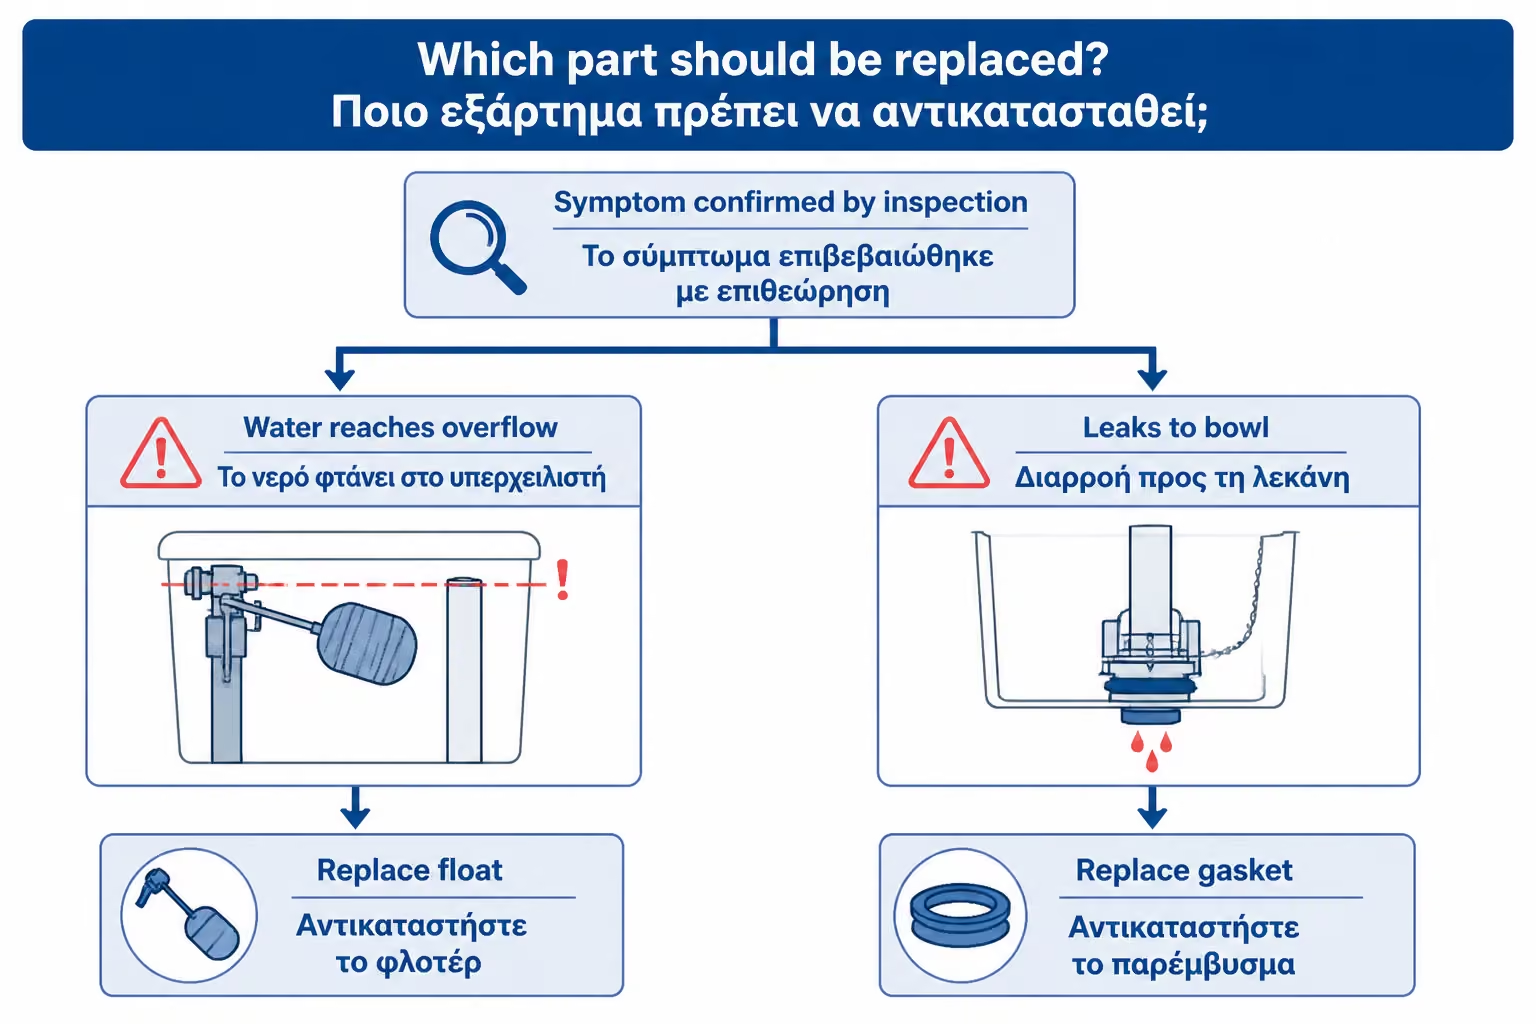
A practical example: if you open the lid and see that the water level is above the overflow tube or right up to its edge, attention goes to the fill valve. If the level is lower than the overflow but water is still visibly leaking into the bowl, attention goes to the flush seal or flush valve.
Correct diagnosis saves unnecessary spare parts. Before you buy anything, take a few minutes to look at the level, listen to the behavior and check if the water is coming out from above or below.
In classic porcelain cisterns, the lid is usually removed from the top. But we don't always just pull it up. On double button cisterns, the button ring or frame often needs to be unscrewed. On older models with a lever or string, the lid may come off more easily, but care is required.
The porcelain lid is heavy and breaks easily if dropped. Before removing it, make sure you have a clean place to touch it. Do not leave it upright behind the basin or rest it on the edge of the tub. A broken old cistern lid can be difficult to replace, especially if the model is no longer available.
After removing the cap, observe without immediately disturbing anything. See where the water is coming from, where the level is, if there is an overflow tube, how the button is connected to the mechanism, if the float is side or bottom feed, and if there is any visible scale. A phone photo before you start is very helpful, especially if you need to put a part back in place.
Do not put your hands inside if chemical cleaners have been used in the cistern. Some products in tablets or liquids can irritate the skin or stain the parts. Wear gloves and work with basic care.
The water level is the first and most useful indicator. In most cisterns, the water should stop just below the top lip of the overflow pipe. It should not go into the overflow or reach so high that it is constantly lost to the basin.
If you see water coming up and out of the overflow, the float is not adjusting or closing properly. It could be a setup issue, scale in the mechanism, a worn diaphragm, a damaged intake valve, or a float that gets stuck somewhere and doesn't rise freely. Sometimes the problem is solved by level adjustment. Other times the mechanism needs to be replaced.
If the level is normal but water still keeps flowing into the bowl, the water height is probably not to blame. In that case, check the outlet at the bottom of the cistern. The flush seal may be scaled up, hardened, deformed, or simply not sitting properly in its seat.
A simple test is to close the cistern's shutoff valve and watch the water level. If the level drops slowly with the supply closed and water appears in the bowl, the loss is through the outlet valve. If the level stays stable with the supply closed, but rises to the overflow when you open it again, the problem is in the filling mechanism.
The float is the mechanism that controls the water entry. In old cisterns it may be a plastic or metal arm with a ball. In more modern classic cisterns, it can be a vertical mechanism with a small float that rises and falls. In both cases, the principle is the same: when the level rises, the float must shut off the supply.
If the float does not close, scale, wear or poor adjustment may be to blame. In old ball floats, the arm may be bent or the ball may have water in it, so it does not float properly. In newer ones, the float can get stuck due to scale or found on the wall of the cistern.
Try lifting the float slightly by hand. If the water stops immediately, the mechanism may be working but the level is set too high or the float is not rising enough. If you lift the float and water continues to flow, then the mechanism is not closing properly and probably needs cleaning or replacement.
A telltale symptom of a worn float is a fine continuous hissing sound. The valve does not stay completely open, but allows a small amount of water to pass through. This may be due to dirt, scale or a worn inner membrane. If the problem returns after tweaking, replacement is usually more reliable than constant tinkering.
In many cases, the float is not broken but set incorrectly. If the level rises too high and the water goes into the overflow, it may just need to be lowered. Modern mechanisms usually have an adjustment screw or clip. This changes the point at which the valve closes.
The correct level should be below the overflow. The cistern does not need to be filled to the top to work well. If the level is too high, consumption increases and there is a greater chance of water going into the overflow. If it is too low, the cistern may not give enough volume for proper flushing.
Make small adjustments and test. Tap the cistern, let it fill and see where it stops. Don't change many things at once, because then you won't know what affected the function. Patience here is better than strength.
If the level is adjusted correctly but after a while the float still does not close, then the adjustment is not the solution. The mechanism may be worn or have scale inside. In such a case, replacing the float is a cleaner solution.
The outlet valve is the point where the water leaves for the toilet bowl when you press the flush button or lever. In many classic cisterns, there is a rubber or plastic sealing piece that lifts and then drops back onto its seat. If that part does not seal properly, water keeps passing into the bowl.
Limescale is one of the most common reasons for failure. It builds up on the sealing surface and creates a tiny gap. Even a tiny gap is enough for water to pass through. In other cases, the gasket has hardened, warped, or split. In older cisterns, it may have lost its elasticity completely.
To check this, close the cistern's shutoff valve, flush to empty it, and inspect the mechanism. If the seal or gasket can be removed on your type of cistern, check it for scale, dirt, or distortion. Clean the seating surface gently. Do not use a metal tool that might scratch the sealing area.
A simple practical test is this: with a full cistern, press the flush mechanism lightly downward. If the running into the bowl stops, the valve is probably not seating properly on its own. The cause could be the gasket, the mechanism, a button that stays slightly pressed, or scale on the seat.
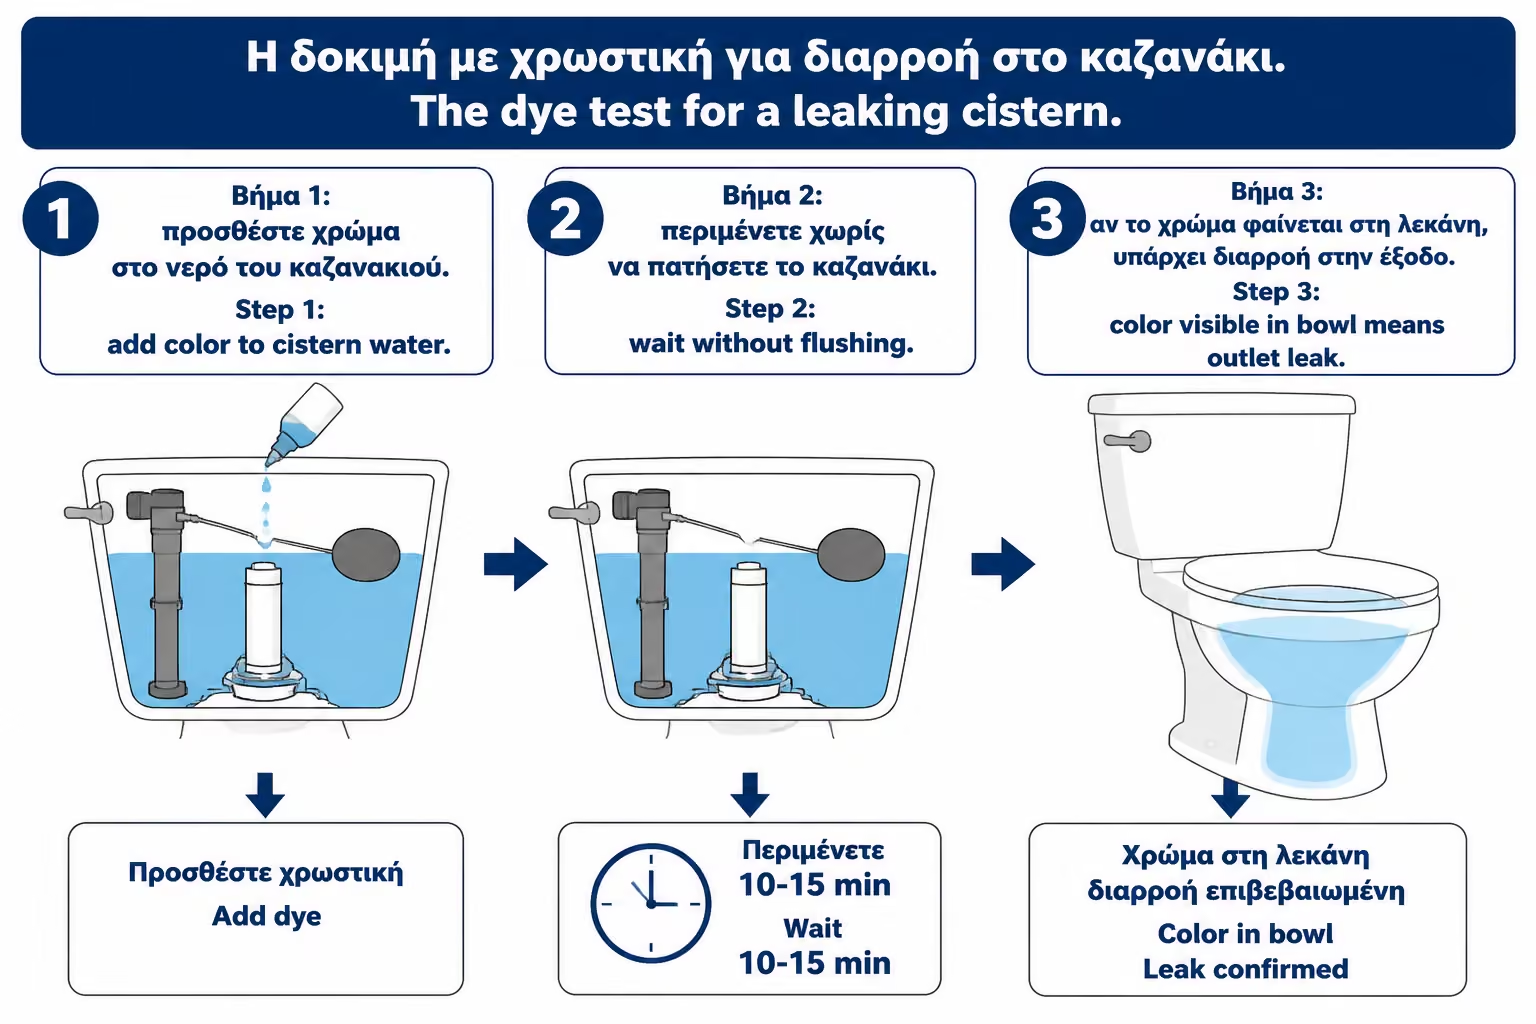
There is a simple test to help tell if water is leaking from the outlet valve. Pour a few drops of food coloring or some brightly colored liquid into the cistern, without stepping on it. Wait a few minutes and look at the basin. If color appears in the basin without pressing the faucet, then the water is passing through the outlet valve.
This test is useful for small leaks that are not easy to see with the naked eye. Sometimes the flow into the toilet bowl is so fine that you cannot hear it. The color, however, reveals whether there is a continuous loss. Just be careful not to use anything that stains the porcelain or the joints. A little food coloring and immediate rinsing after the test is usually enough.
If color appears in the sump and the level is not at the overflow, the problem is almost certainly in the exhaust. If no color appears but water rises and leaves the overflow, then the problem is in the filling.
This test helps to avoid buying the wrong one. Changing floats while colored water is passing underneath will not solve the problem. Changing the bubble while the level rises above the overflow will also not solve the problem.
Before loosening the mechanism, float or connection, you must turn off the water supply to the cistern. There is usually a small corner switch low, near the basin or behind the faucet. Turns clockwise to close. Then press the cistern to empty the water.
If the switch won't close, drips or is stuck, don't push it too hard. Old angle switches may start to run off the shaft or break. In this case, the central supply of the house must be shut off or a plumber must be called. We don't start work in the cistern if we can't control the supply.
After turning off the supply and emptying the cistern, wipe up the remaining water with a sponge or cloth if necessary. This way you work cleanly and have a better view of the components. Also put a towel on the floor around the basin. On bottom feed floats, when you loosen the nut, some water may run out of the cistern.
It's a good idea to have the spare part, basic tools and space to touch up the old parts ready in advance. Don't start with an open cistern, a half-assed mechanism, and then discover that a different type of floater or gasket is needed.
Floater replacement is relatively simple when access is good and the mechanism is modern. First, turn off the supply, empty the cistern and disconnect the tube or supply spiral from the float, depending on the type. Then unscrew the nut that holds the float to the cistern. In side feed, the float is inserted from the side. In bottom feed, it enters from the bottom.
Before removing the old one, observe its position and photograph it. The new float must be installed so that the float moves freely, without hitting the sump wall, the extraction mechanism or the cap. If it does, it may not close or hang.
Install the new float with the gaskets in the correct position according to the manufacturer's instructions. Tighten the nut firmly, but not overtighten. Porcelain should not be pressed with force. A common mistake is over-tightening the outer nut, which can stress or distort the gasket.
Reconnect the supply and turn on the water slowly. Check for leakage at the connection point and allow the cistern to fill. Adjust the level to stop below the overflow. Tap the cistern several times and check that the float closes firmly each time.
Replacing the exhaust valve can be from very simple to more demanding, depending on the type of mechanism. In some cisterns, only the rubber gasket or "bubble" is changed. In others, the entire extraction mechanism needs to be changed. If the base of the mechanism has wear or scale that does not clean, changing only the gasket may not be enough.
For a simple flange change, close the supply, empty the cistern and remove the rubber part according to the type of mechanism. Thoroughly clean the base where the flange fits. If there are scales, remove them gently. Do not scratch the base, as the scratch may become a new leak point.
The new gasket must be the correct size and type. Not all flanges fit all cisterns. If you get similar but not the same, it can go wrong. It's a good idea to take the old part with you to the store or have a photo and dimensions.
If the entire exhaust mechanism needs to be replaced, the job may require loosening the sump from the sump, especially if the valve seat catches underneath. This is not always suitable for a beginner. There are large flanges, cistern-basin connection screws and the risk of leaking onto the floor. In such a case, if you do not have experience, it is better to call a plumber.
In the Greek reality, salts are a very common cause of damage to cisterns. The water in many areas is hard and leaves deposits on floats, flanges, valves and guides. Salts don't always look like big white lumps. It can be a thin layer that prevents a gasket from pressing properly or a float from moving smoothly.
If the bubble is scaled, the first test may be cleaning. Remove the elastic part, clean it gently and see if it remains elastic. If the rubber has hardened, lost its shape or leaves a black residue on the hands, cleaning is not enough. Needs replacement.
On the float, salts can affect the closing of the small intake valve. A continuous hissing sound can be heard or the cistern fills very slowly. Cleaning helps in some cases, but if the mechanism is old, replacement is often more reliable and makes economic sense.
Be careful with very strong cleaners inside the cistern. They can damage rubber seals and plastic parts. If you use a descaler, follow the instructions, rinse thoroughly, and avoid contact with incompatible materials. Maintenance should help the mechanism, not wear it out faster.
The gasket is not always to blame. Sometimes the problem is in the button or the mechanism that connects the tap to the exhaust valve. If the button is left slightly depressed, if the cord is too taut, or if the cap presses against the mechanism, the valve will not return fully to its position. Then the water runs into the basin, but the bubble may be otherwise fine.
This often happens after cleaning or moving the lid. The cap goes back in a little crooked, the button doesn't sit right and the mechanism stays half activated. The owner thinks he broke the cistern, when in fact the button needs to be repositioned properly.
To check this, temporarily remove the cap and let the cistern run without it. If running stops when the lid is off, the problem is probably related to the button or its connection. If it continues, the cause lies elsewhere.
On double buttons, there are settings for short and long flushing. If the rods are too long or are constantly pushing on the mechanism, they may be holding the valve slightly open. The adjustment should be done in small movements so that the button activates the valve when pressed but does not depress it when it is at rest.
Before you go to the store, it's good to know what cistern you have. There are side-feed, bottom-feed floaters, push-button, dual-flow, old-lever mechanisms, different flange sizes, and different exhaust mounts. The phrase "I want a cistern float" is not always enough.
Take pictures of the inside of the cistern, the supply connection, the extraction mechanism and the button. If you can remove the old gasket or float, take it along as a sample. This greatly reduces the chance of a wrong purchase.
A typical repair may require one of the following:
| Spare part | When needed |
|---|---|
| Side feed float | When the supply enters from the side of the tank |
| Bottom feed float | When the supply enters from the bottom |
| Exhaust valve gasket / rubber | When the bubble does not seal due to wear |
| Complete extraction mechanism | When the base or mechanism is worn |
| A button or set of buttons | When pressing hangs or does not reset |
| Supply spiral | If the existing one is old, short, cracked or leaking |
| Corner switch | If it won't close or drips, it's usually from plumbing |
Don't go for the cheapest part without looking at quality. A very inexpensive float can work, but if it's noisy, sensitive to salt, or difficult to adjust, it can give you trouble. In such a small repair, the difference of a few euros in a better mechanism is often worth it.
Repairing a classic porcelain cistern is usually one of the most economical plumbing jobs, as long as there are no broken connections, seized shutoff valves, or a need to remove the cistern itself. If the owner handles the replacement alone, the cost is usually limited to parts and perhaps a few small tools.
A simple float can cost approximately €8–25, depending on the type and quality. An extractor or dual flow kit can run around €10–35, while specialty or branded parts can cost more. A simple gasket can be very economical, but it must fit exactly.
If you call a plumber, the price depends on the area, access, whether the job is a simple float change or a more complex mechanism replacement, whether materials are included, whether a corner switch needs to be changed, whether there is VAT and whether it is an urgent visit. For a simple repair, the work can be approximately €40-80. If parts, difficult access or additional repair are required, it can rise to around €80–150 or more, depending on the case.
| Case | Indicative cost picture 2026 |
|---|---|
| Simple exhaust flange / hose | around €2–10 |
| Simple type floater | around €8–25 |
| Extraction / dual flow mechanism | around €10–35 |
| Supply spiral | around €5–15 |
| DIY replacement with basic parts | around €10–50 |
| Professional simple repair | around €40–80 |
| More complex repair with materials or difficult access | around 80–150€+ |
The prices are indicative and vary by region, mechanism type and installation condition. A low price makes sense when it comes to simply changing a float to an accessible cistern. A higher price is justified when the technician has to deal with old parts, leaks, stuck nuts, changing a corner switch or untangling a cistern.
The first mistake is misdiagnosis. If you don't check for level and overflow, you may be changing the wrong part. The second is over-tightening. On a porcelain faucet, nuts and gaskets should be tightened as needed to seal, not hand tight.
The third mistake is reusing old flanges when they have already hardened. A gasket may look "whole", but no longer have the elasticity it needs. If you put it back in, it may leak. The fourth mistake is not to check after the repair. The fact that the cistern is full does not mean that everything is watertight.
| Error | What can it cause? | Correct practice |
|---|---|---|
| Change float without overflow check | Unnecessary expense, problem remains | Level check first |
| Bubble change while water is leaving from overflow | Wrong repair | Import / export distinction |
| Nuts overtightened | Flange deformation, risk of cracking | Stable, controlled tightness |
| Using the wrong gasket | Continuous leakage | Spare part of the same type |
| Poor descaling | The new gasket does not fit properly | Clear sealing base |
| No corner switch control | Inability to shut off water on failure | Check before work |
| Push button cap fitting | Continuous small discharge | Operation check with and without lid |
A typical case in practice is the cistern that stops running when the lid is removed. The owner has already bought a gasket and floater, but the problem was that the double button kept pressing the mechanism. That is why the diagnosis must be made before the purchase and not after.
Replacing a float or gasket on an exposed cistern can be DIY in many cases. But there are limits. If the angle switch won't close, if the supply connection is leaking, if the cistern is old and the nuts are stuck, if the cistern needs to be loosened from the basin, or if there is a leak on the floor, the job needs a plumber.
Also, if you have a built-in cistern, this guide does not fully cover the case. Built-ins have access from the button plate and different mechanisms. There the work may be simple for a technician, but for a novice there is a greater risk of breaking a plastic part or making a wrong adjustment.
A professional is also needed when the damage comes back often. If you replaced the gasket and after a few weeks the faucet is running again, there may be a problem with the outlet base, a warped mechanism, quick-returning salts, or water pressure affecting the float. There repeating the same minor repair does not solve the cause.
Finally, if you can't find a compatible replacement for a very old cistern, don't try random adaptations. It may temporarily work, but create a leak or poor flush. A plumber can recommend a compatible kit or, if necessary, a replacement of the entire mechanism.
After replacement or adjustment, the check must be done in three stages. First let the cistern fill and see if the float stops cleanly, without hissing. The level must stay below the overflow. Second, look at the basin for thin flow. Sometimes the water shows up as a slight sheen on the back of the porcelain.
Third, wait. Do not close the lid and leave immediately. Leave the cistern for ten to fifteen minutes and see if it refills on its own. If no top-up is heard and the level remains stable, the result is good. You can also retest with colored water to confirm.
Also check the outside of the cistern. If you changed a bottom feed float or disconnected a supply, run paper towels around the nut and spiral. Even a small drop should be fixed immediately. Don't think that it will "lay itself". Leaks in connections usually do not go away on their own.
For the first few days, take a look after use. If the faucet stays quiet, does not run into the basin, and there is no moisture on the floor, the repair has been successful. If you hear water filling again, go back to diagnostics: level, overflow, bubble, button.
| Inquiry | Yes / No |
|---|---|
| Have you opened the cap and checked the water level? | Yes / No |
| Does the water leave the overflow? | Yes / No |
| Does the water level drop in the cistern when the supply is closed? | Yes / No |
| Has the button or cap been checked to hold the valve open? | Yes / No |
| Does the float move freely without hitting the walls? | Yes / No |
| Is the exhaust gasket clean, elastic and free of scale? | Yes / No |
| Does the corner supply switch close properly? | Yes / No |
| Is the replacement the same type as the old one? | Yes / No |
| Has the level been adjusted below the overflow? | Yes / No |
| Was there a final check with a 10–15 minute wait? | Yes / No |
| Has the connection been checked with paper towels for external leaks? | Yes / No |
If you can't confidently answer the first four points, don't buy a part yet. Diagnosis precedes replacement. If the answer is “No” to closing the provision, do not start the work yourself.
If the faucet keeps running, don't start by randomly changing parts. First open the cap and check the level. If water goes through the overflow, check float and fill adjustment. If the level is correct but water is seeping into the sump, check the bubbler, gasket and outlet base. The critical point is to distinguish whether water is entering when it shouldn't or whether it's leaving when it shouldn't. On this distinction all correct repair depends.
A constantly running faucet is not just an annoying sound in the bathroom. It's constant water consumption, possible mechanism wear, and an indication that something isn't sealing properly. In classic porcelain cisterns, the fault is usually accessible and can be diagnosed by simple observations: water level, overflow, float behavior, gasket condition and button operation.
The best approach is to take your time. Carefully remove the cap, see if the water rises too much or is lost from the bottom, turn off the supply and check the parts in sequence. If the problem is a simple adjustment or gasket change, a careful owner can often fix it. If a float change is required, the job remains relatively simple, as long as the correct part is selected and not over-tightened.
But when there are old shutoff valves, seized connections, leakage at the base, a need to dismantle the cistern, or uncertainty about the mechanism type, the better choice is a plumber. A small repair should solve the problem, not create a new one. The goal is not only to stop the noise, but to make the cistern work correctly, quietly, and without water loss for the long term.
Return to category.
Go to categoryReturn to the central guide.
Go to guide