
Bathroom DIY, Maintenance & Styling
Return to category.
Go to categoryA bathroom door that has "fallen" a few millimeters is immediately visible. It can rub against the one next to it, not close properly, leave an uneven gap above, hit the side of the furniture, or just spoil the look of an otherwise new bathroom. The strange thing is that many times the problem is not due to poor construction or damaged furniture. It is simply due to hinges that need adjustment.
Bathroom furniture, especially vanity furniture and columns, work in a difficult environment. Moisture, vapors, weight from products, frequent opening-closing and small movements in daily use affect the doors. A door that was perfectly aligned when installed may look crooked after a few months. This does not necessarily mean that it "broke". It means the hinges need some fine tuning.
The good news is that most modern furniture hinges are adjustable. With a simple screwdriver you can move the door left-right, up-down or in-out, without unscrewing the whole door and without calling a carpenter for a simple fix. The difficult part is not the movement of the screw itself. It's about figuring out which screw does what and not randomly turning all the screws together.
Many owners see a hinge with two or three screws and hesitate to mess with it. Others do the opposite: they start to clamp down on everything they see, causing the door to go even further awry. Adjusting hinges requires small movements, observation and patience. Half a turn on the right screw can fix a door. Two turns on the wrong screw can throw it completely out of adjustment.
In this guide we will see how hidden hinges on bathroom furniture work, which screw adjusts the door right-left, which brings it in-out, how to fix the up-down, how to level double doors and when the problem is not solved by adjustment but indicates moisture, wear or poor support of the furniture.
Doors on bathroom furniture do not stay in the position they were set on day one forever. Every opening and closing creates small forces on the hinges. If the door is heavy, if it has a mirror, if it is a tall column door or if it is opened several times a day, the strain is greater.
Humidity also plays a role. Bathroom furniture can be made of MDF, melamine, marine plywood, bakelite or other surfaces, depending on quality and construction. If the material gets moisture, even a little, it can change its behavior. A door can "sit", a side can bulge or a screw can lose some of its grip.
In several cases, the problem appears after cleaning, moving or loading the furniture with things. A vanity unit can be filled with cleaners, detergents, cosmetics, hair dryers, bags and heavy objects. If the weight presses on the shelves or sides, the furniture may take small deformations and the doors may lose their alignment.
A typical example is a bathroom column with a tall door. The hatch may look good at the top but fail at the bottom. This does not always mean that the wood is warped. It may just be that the top or bottom hinge needs a little lateral adjustment. The difference of 2–3 millimeters at a height of one and a half meters seems much more than we think.
Hinge adjustment is sufficient when the door is stable, the screws hold well, and the problem is little displacement: uneven gaps, rubbing, slight sagging, or misalignment with the adjacent door. These are the usual cases.
But it is not enough when the material has swollen, when the screws just spin, when the hinge is broken, when the mounting plate has pulled away from the side panel, or when the furniture itself has warped from moisture. In those cases, adjustment may improve the look slightly, but it does not solve the real cause.
If, for example, the door of a vanity sink is on the bottom because the side of the vanity is bulging from a leak, it's not the hinge's fault. You might lift it a bit, but the problem will remain and probably get worse. That's where the moisture or leak should be located first.
A simple test is to grasp the door near the hinges and shake it slightly. If the hinge is stable on the furniture and only the door moves as intended, you can proceed with the adjustment. If the base of the hinge wobbles on the wood, if there is a creaking sound, or if the screw has overflowed the hole, it needs fixing repair first.
Most modern bathroom furniture uses hidden hinges, the well-known kitchen-style hinges. They are called hidden because they are not visible from the outside when the door is closed. They consist of a cup that goes inside the door, a bracket and a base that screws into the side of the furniture.
These hinges are practical because they allow adjustment in three directions. You can move the door to the right or left, move it further in or out in relation to the body of the furniture and, in several cases, correct its height. Adjustment is done with screws on the hinge or its base.
There are simple hinges and soft-close hinges. The soft-close have a mechanism that slowly closes the door without knocking. The basic adjustment is similar, but care must be taken not to force the mechanism and not to confuse the adjustment screw with a brake component.
On cheaper furniture, the hinges may have less adjustment or a simpler base. On better furniture, the adjustment is more precise and there is often a quick disconnect with a clip. But the logic remains the same: small movements on the right screws bring the door where it should be.
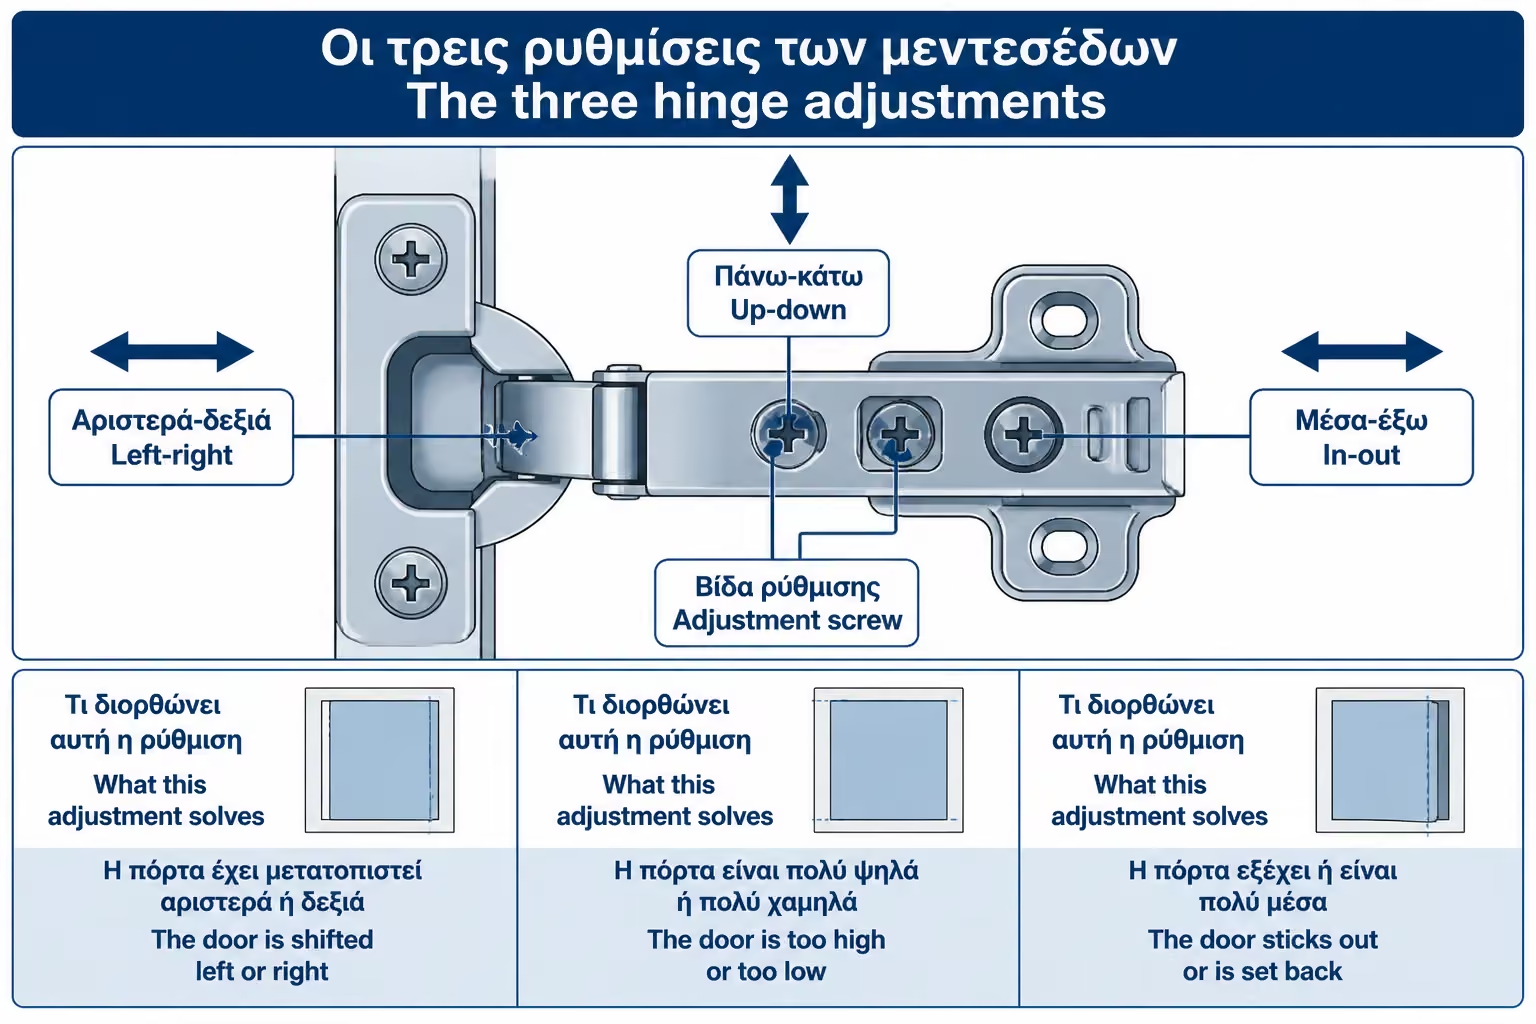
To keep the process clear, think of each door as being adjustable on three axes. First, left to right, so the gaps with the neighboring doors or cabinet sides stay even. Second, up and down, so the top and bottom lines follow the cabinet. Third, in and out, so the door sits at the correct depth and closes properly without sticking out or sitting too far in.
Side adjustment is the one used most often. If two doors touch in the middle or there is a large gap on one side, the correction is usually left to right. In-and-out adjustment helps when the door does not sit flush with the cabinet, hits the side, or protrudes. Up-and-down adjustment is needed when the door has dropped or when its line no longer matches the next one.
| Problem | Possible setting |
|---|---|
| The door is touching the one next to it | Right-left |
| The gap in the center is uneven | Right-left |
| The door has dropped | Up-down adjustment at the base |
| The door protrudes from the furniture | Inside-out |
| The door does not close properly | In-out or side adjustment |
| The top corner finds but the bottom doesn't | Combination top and bottom hinge |
| The door is crooked | Different top/bottom hinge adjustment |
The important detail is that a door usually has two or three hinges. You do not always adjust them all in the same way. If you want to correct a twist, the top hinge may need a different correction from the bottom one. This calls for observation, not blind turning.
Adjusting hinges is one of the simplest tooling tasks. Usually all you need is a proper screwdriver. But "right" matters. If the screwdriver is too small or worn, it may damage the screw head. If it's too big, it won't press properly.
For a simple setup you will need:
| Tool / Material | Use |
|---|---|
| Phillips screwdriver of good fit | Adjusting and tightening screws |
| Flat head screwdriver, if required | On some old hinges |
| Small or straight blade spirit level | Alignment check where it helps |
| Measure or ruler | Gap control |
| Lens | Better visibility inside the furniture |
| Soft cloth | Surface protection and cleaning |
| Pencil or tape | Note starting position if necessary |
If the cabinet is full of items, at least clear the area near the hinges. You need room for your hand and screwdriver. On a vanity unit, be careful not to hit the trap, the pipes, or the angle valves.
It's a good idea to clean the hinges first. In the bathrooms, moisture, dust and cleaning agents collect on the metal parts. If the screw has salt or dirt on it, the screwdriver will not grip well and may slip.
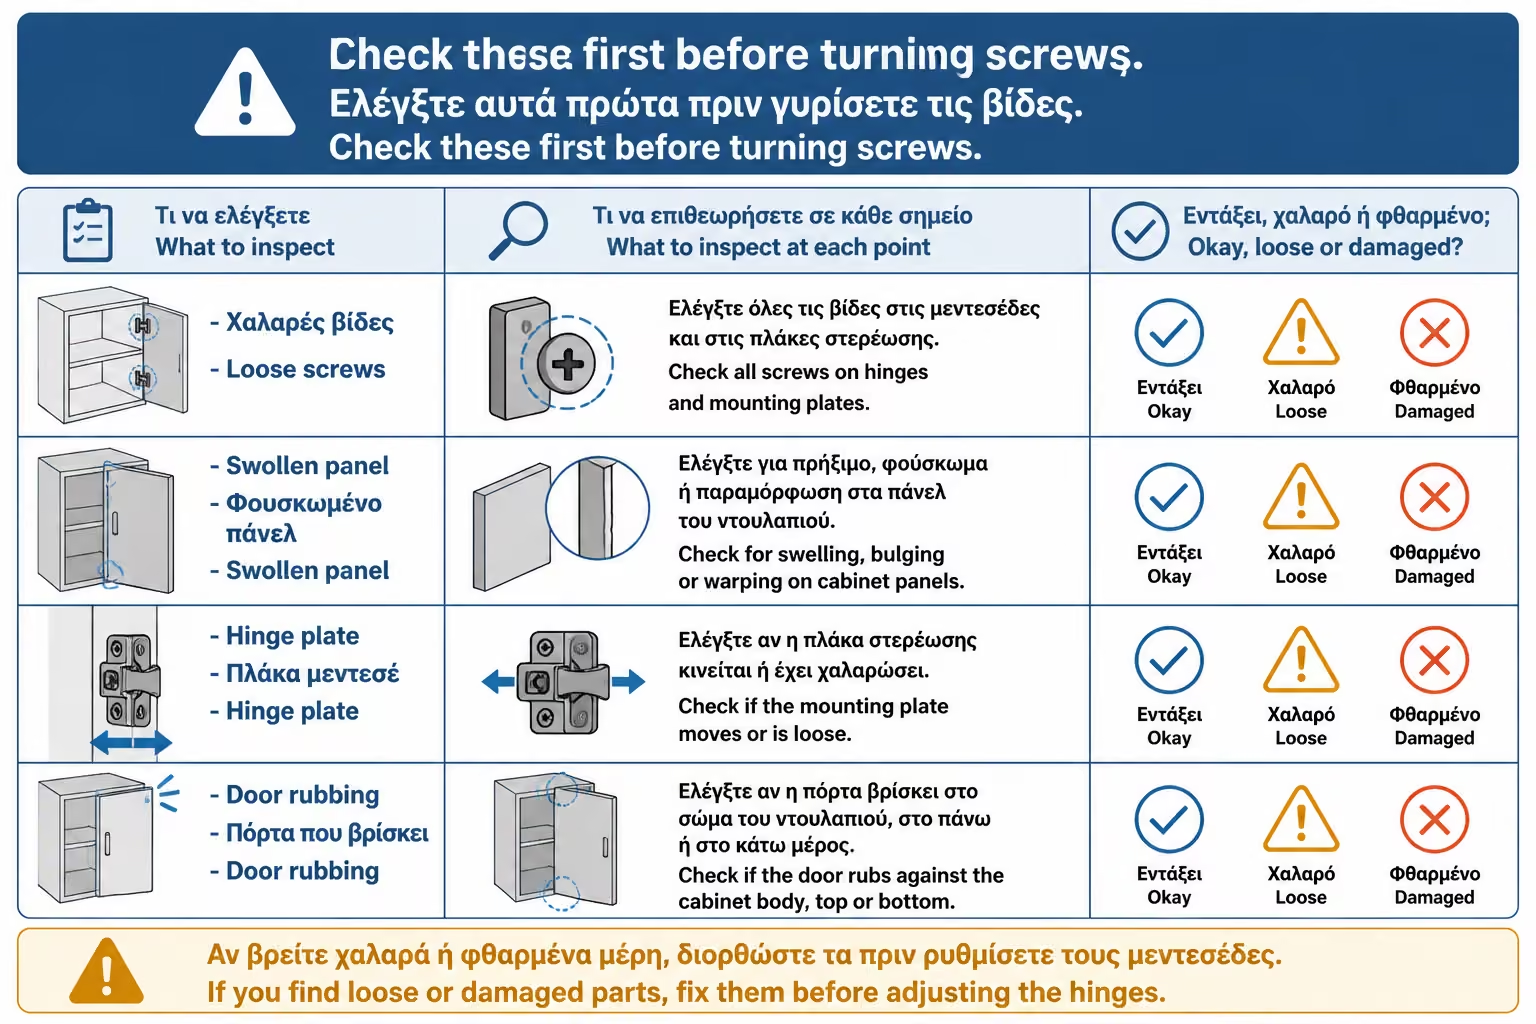
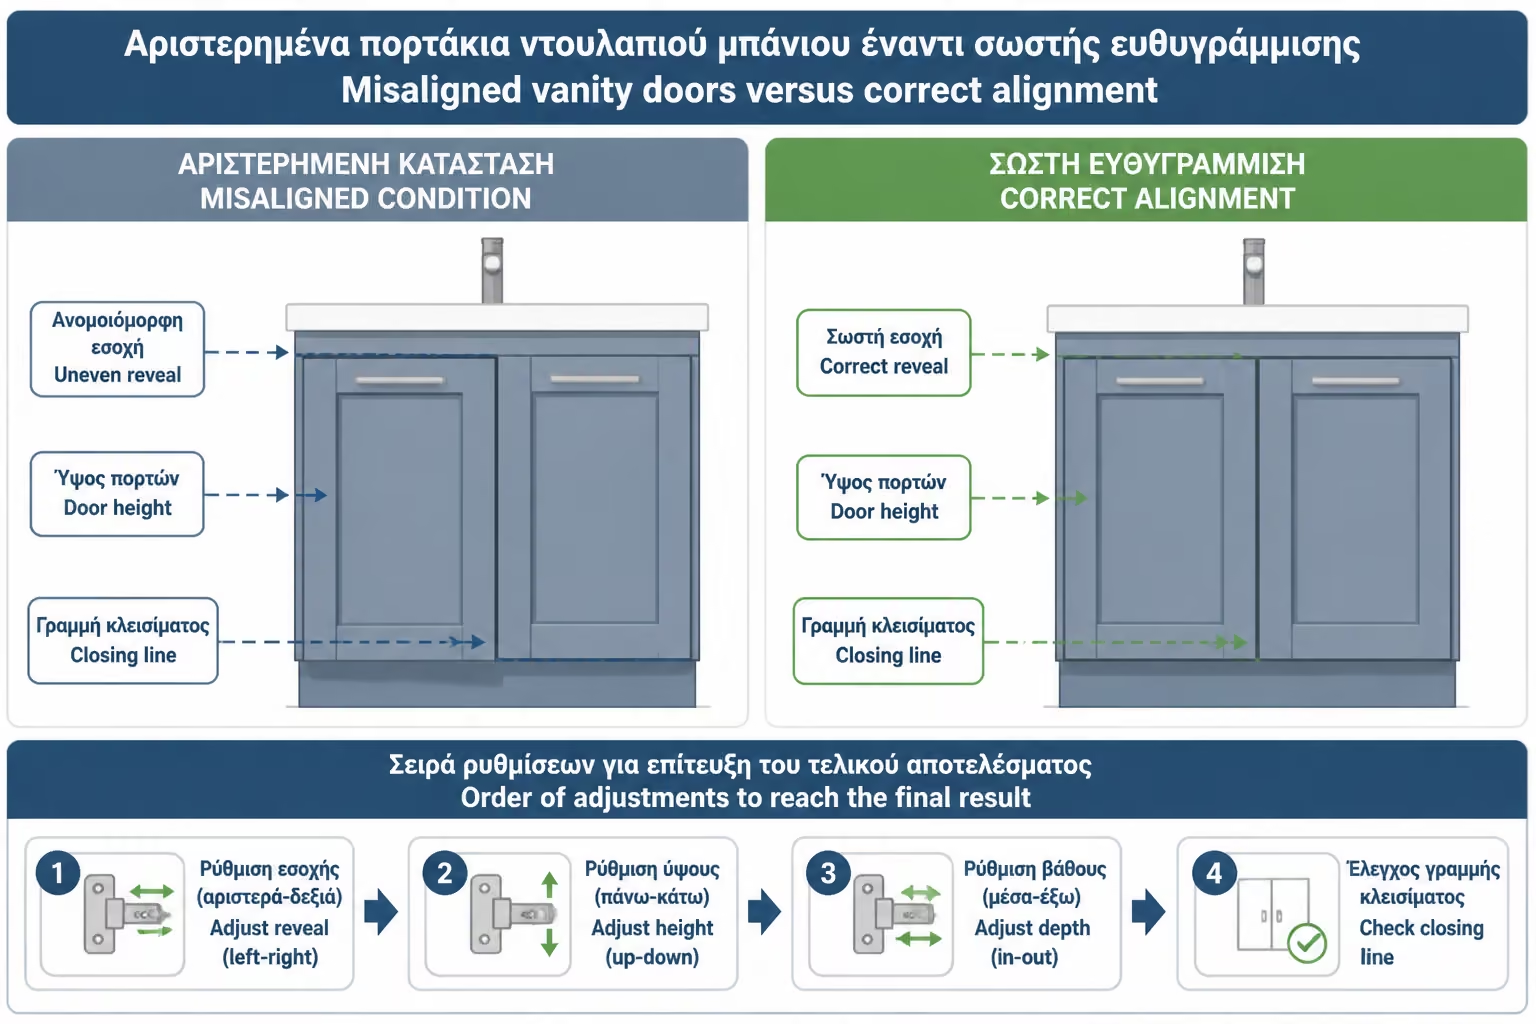
Before turning any screw, look at the door closed. Notice the gaps around it. Is the gap larger at the top or bottom? Is it touching the next door? Does it stick out on one side? The picture with the door closed shows you what needs to be fixed.
Then open the door and check the hinges. Are all the screws in place? Is there any slack? Does the base of the hinge press firmly against the side? Is the hinge cup inside the door stable? If a mounting screw is loose, tighten it first. There is no point in adjusting a hinge that is not properly attached.
Gently rock the door up and down. If you feel that the entire hinge is moving against the wood, there is a mounting issue. If it only moves within the normal limits of the mechanism, you can adjust. If the screws turn without tightening, the holes in the wood may have overflowed.
A good trick is to mark the starting position with a small piece of tape or a photo. If you screw something up, you can go back to roughly where you were. This is especially useful in double shutters, where one setting affects the image of both.
On most hidden hinges, lateral adjustment is done by the screw on the hinge arm near the front. By turning it, the door moves slightly to one side or the other. This is the screw most often used to straighten gaps.
If the door is touching the one next to it, you want to move it away. If it has a large gap from the side and a small gap from the side, you want to bring it inward. The timing varies depending on the hinge, so don't try to memorize it by theory. Turn the screw half a turn, close the door and see what happened. If it went in the wrong direction, turn back.
Lateral adjustment is best done with small movements. Half a turn may be enough. If you turn two or three sharp turns, you may lose track of what you changed. On double doors, adjust a little of one and a little of the other, rather than loading all the correction on one door.
If the top corner touches but the bottom doesn't, you don't necessarily adjust both hinges the same. You may need to bring just the top hinge slightly out or in laterally to straighten the line. This is where the adjustment feels more like a "detail" than a simple tightening.
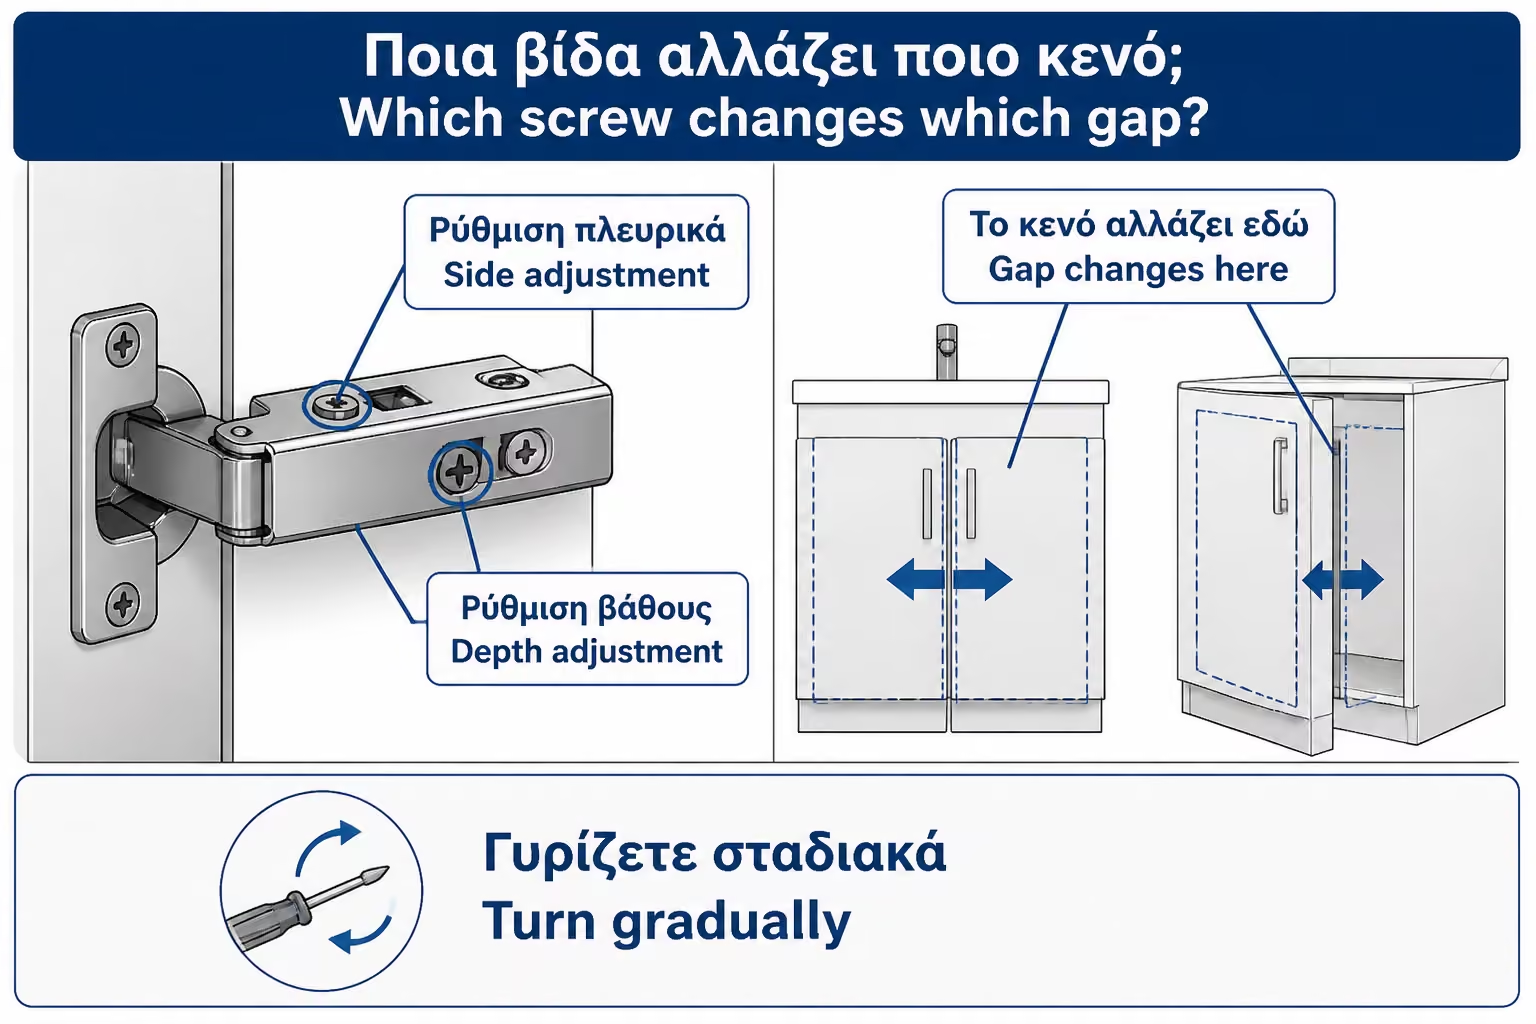
The in-out adjustment determines how close or far the door sits from the body of the furniture. If the door protrudes, if it does not close well, if it is on the side or if the front is not level with the adjacent ones, this adjustment is important.
On most hinges, the associated screw is further back on the arm or base connection. By loosening or turning it, the arm moves slightly in or out. On some hinges, there is a screw that first loosens the base and then needs to be retightened. In others, the adjustment is done by a mechanism without fully loosening the fastener.
The inside-out is especially useful when a door seems to "fly" from one corner. If the top is sticking out, you are mainly messing with the top hinge. If the bottom goes in too far, you are teasing the bottom. The purpose is for the door to come parallel to the body of the furniture.
Be careful not to bring the door in so far that it rubs against the side or shelf. Also, if there is a soft-close mechanism, the door must have the correct distance for it to function smoothly. If you press it too close to the body, it may not close properly or may remain slightly open.
The up-down adjustment is usually done from the base of the hinge, i.e. the part that screws into the side of the furniture. In many hinges, the base screws pass through elongated holes. If you loosen them slightly, you can raise or lower the door a little and then tighten them again.
This adjustment needs more care than the others, because if you loosen the screws too much, the door may fall or move suddenly. Hold the door with one hand or ask for help if it is heavy. Loosen slightly, move a little and tighten again.
On small sink doors, the up-down correction is usually a few millimeters. On tall column doors, finer work may be required, because the weight is greater. If the door has three hinges, they must all work together. We don't lift from just one, because the arm can bend or create tension.
If the door has fallen because the screws in the wood have come loose, simply adjusting up and down is not enough. The base must first be properly tightened. If the screw does not hold, the hole needs to be repaired or the part/part replaced by a technician.
Double doors are more demanding because the eye immediately sees the midline. If one door is slightly higher, if the gap opens upwards, or if the two doors touch in the center, the image looks sketchy. Adjustment should be done by comparison, not individually.
Start from the overall height. See if the top edges of the two doors are on the same line. If not, correct up and down first. Then look at the gap between the two doors. It should be even from top to bottom. If it opens like a “V”, lateral adjustment is needed on the top or bottom hinge.
Don't try to fix the whole problem from one door. If both doors have a small deviation, divide the correction. So the gaps on the sides stay more correct. If you bring only one door too far to the center, you may correct the midline but spoil the gap on the side.
After each small adjustment, close both doors and view the result from a distance. You can see the screw very closely. From half a meter you see the real image of the furniture. This is what counts in the final appearance.
Bathroom columns often have tall and narrow doors. This means that even a slight deviation in the hinge is clearly visible on the edge of the door. If the top hinge is pulled in or out a bit, the bottom corner can move quite a bit.
On a tall door, first check if the furniture itself is leveled. If the column does not press properly or is not well fixed to the wall, the door may appear crooked while the problem is in the body of the furniture. This is especially important on hanging columns or furniture that rests on adjustable legs.
If the furniture is correct, start with the hinges. On a three-hinged door, the middle one usually stabilizes and should not be ignored. If you only adjust the top and bottom, the middle one may create resistance or hold the door in the wrong position.
Large doors require small movements. Do not make sharp turns. The correction is more pronounced on the other side of the door. Every half turn is worth checking.
If the door does not close properly, the in-out adjustment may be to blame, but not only. It can be found on a shelf, in a siphon, in a bottle of cleaner, in a soft-close mechanism or in a side swollen from moisture. Before setting, make sure nothing is blocking the door.
If the door stays slightly open, check if the hinges are too far in or too far out. A little depth adjustment can get it in the right place. If there is a magnet or push-to-open mechanism, check that too. Sometimes the problem is not the hinge but the clasp.
On soft-close hinges, if the door closes to a point and then stays ajar, the mechanism may be missing or worn. Check that the hinge is clean, properly seated in the base, and that no clips have come off.
If the door swings out on one side, first adjust the depth on the corresponding hinge. If it continues, check if the door is cracked. A warped door is not completely fixed by the hinges. It can be improved, but not always perfect.
In wet or old bathroom furniture, the base screws may turn without tightening. This means that the hole in the wood has opened or the material has softened. If you keep turning the screw, you will only make the hole worse.
In simple cases, a minor repair can be done with a suitable wood insert, repair filler, a slightly larger screw, or by moving the mounting plate, depending on the cabinet. In a bathroom, though, you still need to be careful: if the material is damp, repairing the screw hole does not solve the underlying problem.
If the side panel is swollen, crumbly, or smells damp, the first job is to find out why it got wet. The cause may be a trap leak, a faucet leak, failed silicone, water from the floor, or condensation. If you simply screw the hinge back into wet material, it will loosen again.
On quality furniture, there may be replacement hinge bases or the ability to change a part. In very cheap furniture, when the hardware around the screws is damaged, repair may be limited. That's where a practical assessment is needed: is it worth repairing or changing the door/furniture?
If a hinge is replaced, the adjustment must be made from scratch. Even if the new hinge looks the same, it may have a slight difference in geometry. Don't assume that it will come in and sit just like the old one.
First install the new hinge without final tightening all adjustments. Close the door and see its location. Adjust sides, then depth, then height if needed. This order helps because first you see the spaces, then the tap and finally the final line.
If you are only replacing one of two hinges, the old one may pull the door to a different position. In some cases it is worth changing both, especially if they are old or have gambling. Otherwise, the new one may be tight and the old one loose, creating uneven operation.
After the change, open and close the door several times. The hinge should work smoothly, without squeaking, without finding and without moving the door. If after a few movements the door changes position, something is not tightened properly or the wood does not hold.
Soft-close hinges make the furniture look more quality, but they are not invulnerable. If someone constantly pushes the door to close quickly, the mechanism wears out. If the hinge has collected moisture or cleaners, it can lose its smoothness. If the door is incorrectly adjusted, the soft-close may not work properly.
Adjusting the position of the door is done in the same way as with simple hinges, but you need to check the operation of the brake after each change. If the door closes slowly but stays open a bit, it may need a depth adjustment. If it clicks at the end, the mechanism may be worn or the door may be too heavy for that particular hinge.
Do not indiscriminately lubricate soft-close mechanisms. Not all are designed for lubrication and the wrong material can attract dust or affect the brake. If the mechanism is broken, usually the solution is to replace the hinge, not "repair" with oil.
If a door has two hinges and only one is soft-close or only one works properly, the closing sensation can be strange. In many cases, it is better to have the hinges work symmetrically, especially on larger doors.
Do not turn all the screws without a pattern. It is the fastest way to completely detune the hatch. You screw in a screw, half a turn, close the door, check. If it didn't do what you wanted, go back or continue with a small movement.
Do not fully unscrew base screws while holding a heavy door without support. The door can fall, hit the sink, injure the furniture or break the hinge. If a lot of up and down adjustment is needed, hold the door or ask for a second person.
Do not use a powerful electric screwdriver for fine adjustments. It can overtighten, damage screw heads or overflow holes in wood. The manual screwdriver gives a better feel.
Don't ignore the humidity. If you see swollen material around the hinge, black spots, peeling surface or loose screws, the adjustment is only temporary. First the cause of wear must be stopped.
Simple hinge adjustment has virtually zero cost when done by the owner. All it takes is a proper screwdriver and a few minutes of attention. If hinges need to be replaced, the cost depends on the type, quality, whether they are plain or soft-close and whether they match the existing holes.
| Case | Indicative cost picture 2026 |
|---|---|
| Simple DIY setup | €0 |
| Simple furniture hinge | about €2–6 per piece |
| Better / soft-close hinge | about €5–15 per piece |
| Set of bases or screws | around €2–8 |
| Minor repair by technician, if combined with other work | usually a small charge |
| Independent technician visit | around €30–€60+, depending on area and minimum charge |
| Repair of inflatable furniture or change of upholstery | case by case |
Prices are indicative and vary by region, store, quality of fittings, whether VAT is included and whether the work is done alone or together with other bathroom work. For a simple setup, DIY makes perfect sense. For bulging furniture, broken bases, or replacing multiple hinges, a technician or carpenter may be worth it.
A technician is needed when the screws do not grip the wood, when the hinge has come off, when the door is scratched, when the furniture is damp or when the door is heavy and you cannot adjust it securely. Adjusting hinges is only simple when the furniture is sound.
A carpenter is also needed if a hinge needs to be repositioned, a hole repaired, reinforcement inserted or a door replaced. In bathroom furniture with special finishes, lacquer, veneer or custom dimensions, a rough operation can look a lot.
If the furniture is new and the doors keep warping, contact the supplier or installer. It may need proper initial adjustment, there may be a placement issue, or the furniture may not be properly supported against the wall.
If there is moisture, it is worth checking the plumbing cause before calling a carpenter. A trap leak or faucet leak can ruin the repair all over again. The cabinet should not just be "re-screwed." It has to stay dry.
| Inquiry | Yes / No |
|---|---|
| Has it been checked if the door is crooked or if the hinge itself is moving? | Yes / No |
| Do the hinge mounting screws grip the wood well? | Yes / No |
| Is the furniture dry, without moisture swelling? | Yes / No |
| Has the hatch gap been observed with the door closed prior to adjustment? | Yes / No |
| Is it adjusting one screw at a time and not all at once? | Yes / No |
| Was the lateral adjustment done with small movements and checking after every half turn? | Yes / No |
| Has the in-out adjustment been checked so that the door closes flush with the furniture? | Yes / No |
| Was the up-down adjustment made without the door becoming dangerously loose? | Yes / No |
| Do the double doors have an even center gap? | Yes / No |
| Does the door open and close without hitting a shelf, siphon or next door? | Yes / No |
| If there is a soft-close, does it work smoothly without staying ajar? | Yes / No |
If the answer is “No” to the points about moisture, loose screws, or a wobbly hinge on the base, don't limit yourself to the setup. There is an issue of mounting or wear, not just misalignment.
If you want to straighten bathroom doors, don't start turning all the hinge screws. Close the door first, see exactly what's wrong, then tweak one setting at a time: right-left for the gaps, in-out for the press, and up-down from the base when the door is down. Movements should be small. If the screw won't hold or the wood has swelled with moisture, the adjustment isn't a solution; it's just a temporary offset to a bigger problem.
Adjusting hinges on bathroom furniture is a simple but very useful task. With a screwdriver and a little patience, you can fix doors that have fallen, rubbed, left uneven gaps, or don't close properly. The difference in the image of the bathroom is immediate, because the straight doors make the furniture look more neat and quality.
The secret is the correct diagnosis. We don't turn random screws. We first see if the problem is lateral, vertical or depth. Then we tamper with the correct screw with small movements and check the result each time with the door closed. In double shutters, we adjust the image as a whole, not just one side.
If the hinges are solid and the furniture is dry, adjustment is an ideal DIY job. But if there are bulges, loose screws, broken bases or warped doors, then parts need to be repaired or replaced. Correct adjustment corrects the alignment. It cannot heal a piece of furniture that has already been damaged by moisture.
Return to category.
Go to categoryReturn to the central guide.
Go to guide