
Bathroom DIY, Maintenance & Styling
Return to category.
Go to categoryA wobbly toilet seat is one of those small bathroom problems people tolerate for far too long. At first it moves only slightly when someone sits down. Then it starts shifting left and right, making noise, knocking against the porcelain, or sitting visibly out of line. At some point everyday use becomes irritating and the owner assumes that "something is broken."
In most cases, the problem is not serious. The seat is held by two hinges, two screws and nuts, or a special fixing system. With use, small movements, cleaning, moisture, and repeated loading, those fixings loosen. The seat no longer feels stable, the hinges start to move, and the toilet begins to feel worn even if the porcelain itself is in good condition.
The important thing is not to tighten blindly. Some toilets use a Bottom-Fix system, where the screw passes through the top and the nut tightens from below. Others use Top-Fix, where everything tightens from above, usually with special expanding plugs or a mechanism inside the porcelain hole. If you do not understand which system you have, you may be tightening in the wrong place, spinning the screw for nothing, or breaking a plastic part.
Tightening or replacing a toilet seat is one of the simplest DIY jobs in the bathroom, but the small details still matter. You need to identify the fixing type, check whether the hinges have covers, align the seat correctly before final tightening, and avoid excessive force on the porcelain. Toilet bowls are durable in use, but they do not like crooked or aggressive tightening.
In this guide we will look at why a seat wobbles, how to tell Top-Fix from Bottom-Fix, how to tighten the hinges, when the screws or the whole seat need replacement, what to watch for with soft-close seats, and how to choose a new seat that actually fits the toilet bowl correctly.
The toilet seat takes more stress than it seems. Every time someone sits down, the seat is loaded. Every time the lid is raised or lowered, the hinges work. Every time the bowl is cleaned, water, detergent, and moisture pass around the fixing points. Over time, those points loosen.
The most common scenario is that the screws are loose. The seat is not necessarily broken. It's just that the hinges no longer firmly press against the porcelain. Sometimes the lid moves entirely to one side. Other times it seems stable when you hold it by hand, but it slides when you sit down.
On cheaper seats, plastic hinges may wear out more quickly. Older metal parts may pick up scale or rust. On soft-close seats, the damping mechanism may still work while the mounting base has loosened. The result is the same: the seat no longer sits properly on the toilet bowl.
There is another common cause: the wrong seat for that specific toilet. If the seat is slightly too small, too large, or simply the wrong shape, it may not sit properly on its rubber buffers. Then the load shifts back to the hinges and the seat loosens again even after tightening.
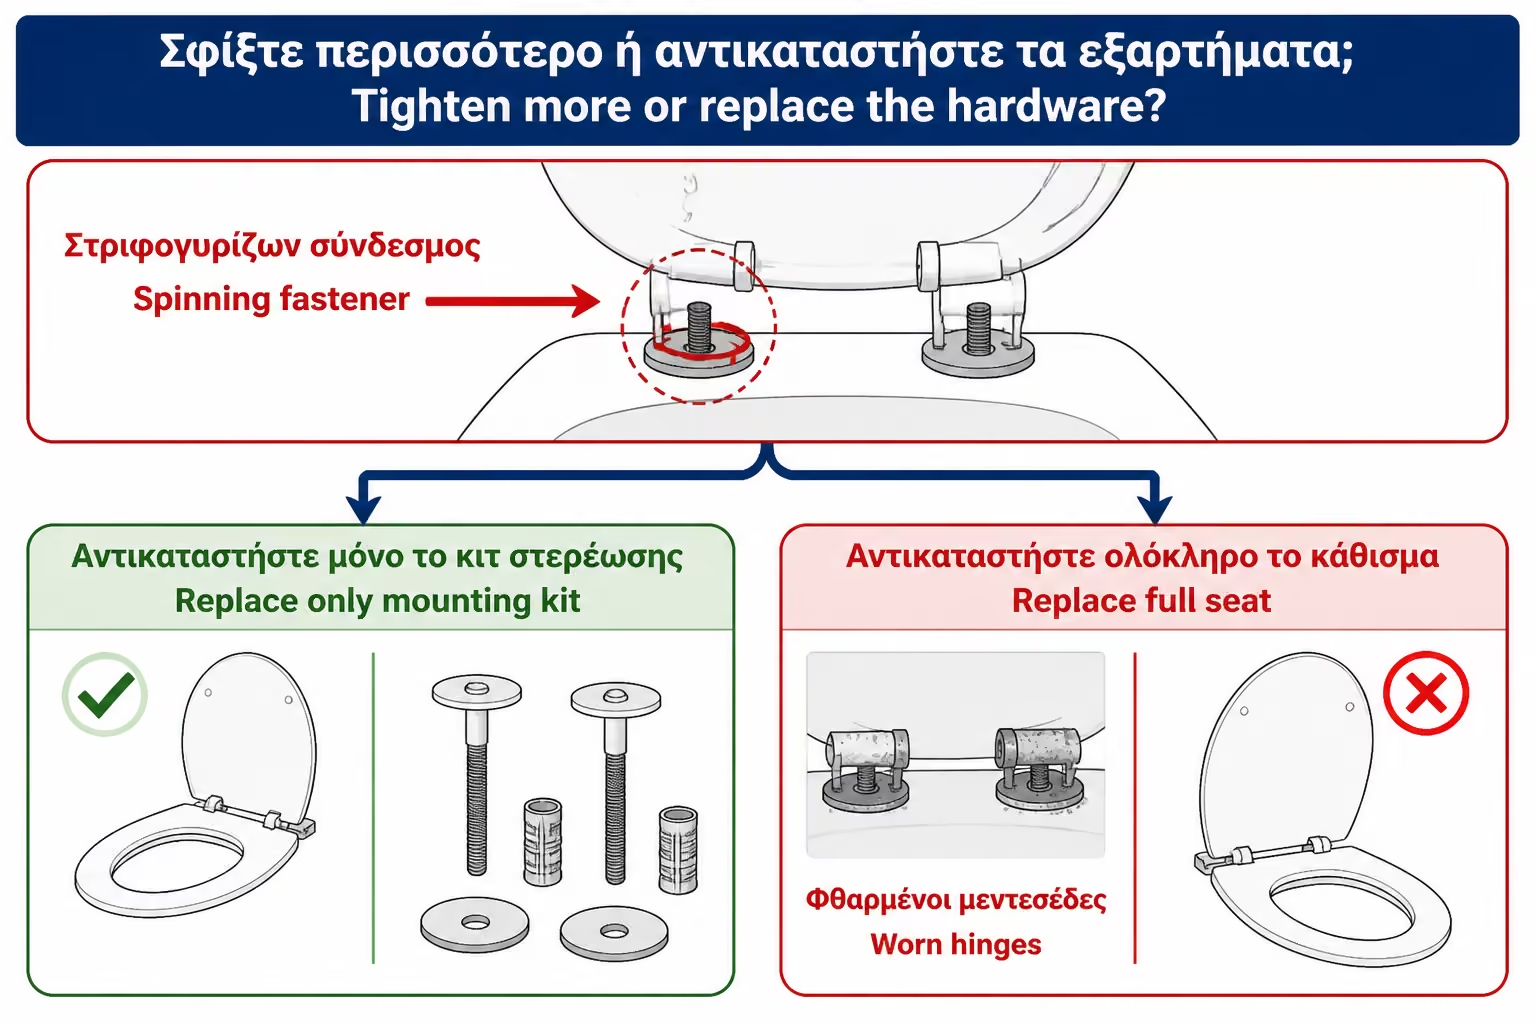
If the cap is in good condition, not cracked, hinges not broken and just moving, the first move is tightening. In many cases, two minutes of careful adjustment completely restores stability. You don't need to buy a new cap if the existing one is correct and functional.
But if the hinge bases are broken, if the screws turn loose, if the plastic caps are worn, if the soft-close mechanism does not hold or if the seat is cracked, tightening is a temporary solution. You tighten it today and it will be moving again in a few days. There it is necessary to replace parts or the entire seat.
A practical test is to grab the seat from both sides and gently move it from left to right. If you see the entire hinge base moving on the porcelain, it probably needs tightening. If the base remains firm but the seat itself has play on the hinge, then the mechanism may be worn.
Also, if the lid is yellowed, deeply scratched, the soft-close no longer works, or the seat does not match the shape of the bowl properly, replacement may make more sense than ongoing repair. A toilet seat is used every day, and the right fit affects both hygiene and comfort.
A toilet seat set consists of the seat, the top lid, the hinges, the fixing screws, and either nuts or special anchor pieces. It may use simple hinges or a soft-close mechanism that lowers the lid slowly without a bang. It may also be quick-release, meaning it can be removed easily from the bases for cleaning.
The hinges are the most critical point. They are where the seat joins the toilet bowl and where most movement is transferred. The hinge bases press against the porcelain, usually with rubber pads or plastic washers so they do not slip and do not damage the surface.
Under the bowl, or inside the fixing holes, sit the clamping elements. In Bottom-Fix systems, you can see nuts underneath. With Top-Fix, you often see nothing from below because the fixing is done from above. That difference is decisive for how you will work.
Some seats have small decorative covers over the screws. These hide the screw heads and give a cleaner finish. Before looking for fixings underneath, check whether the hinge bases open or whether a small cover lifts up.
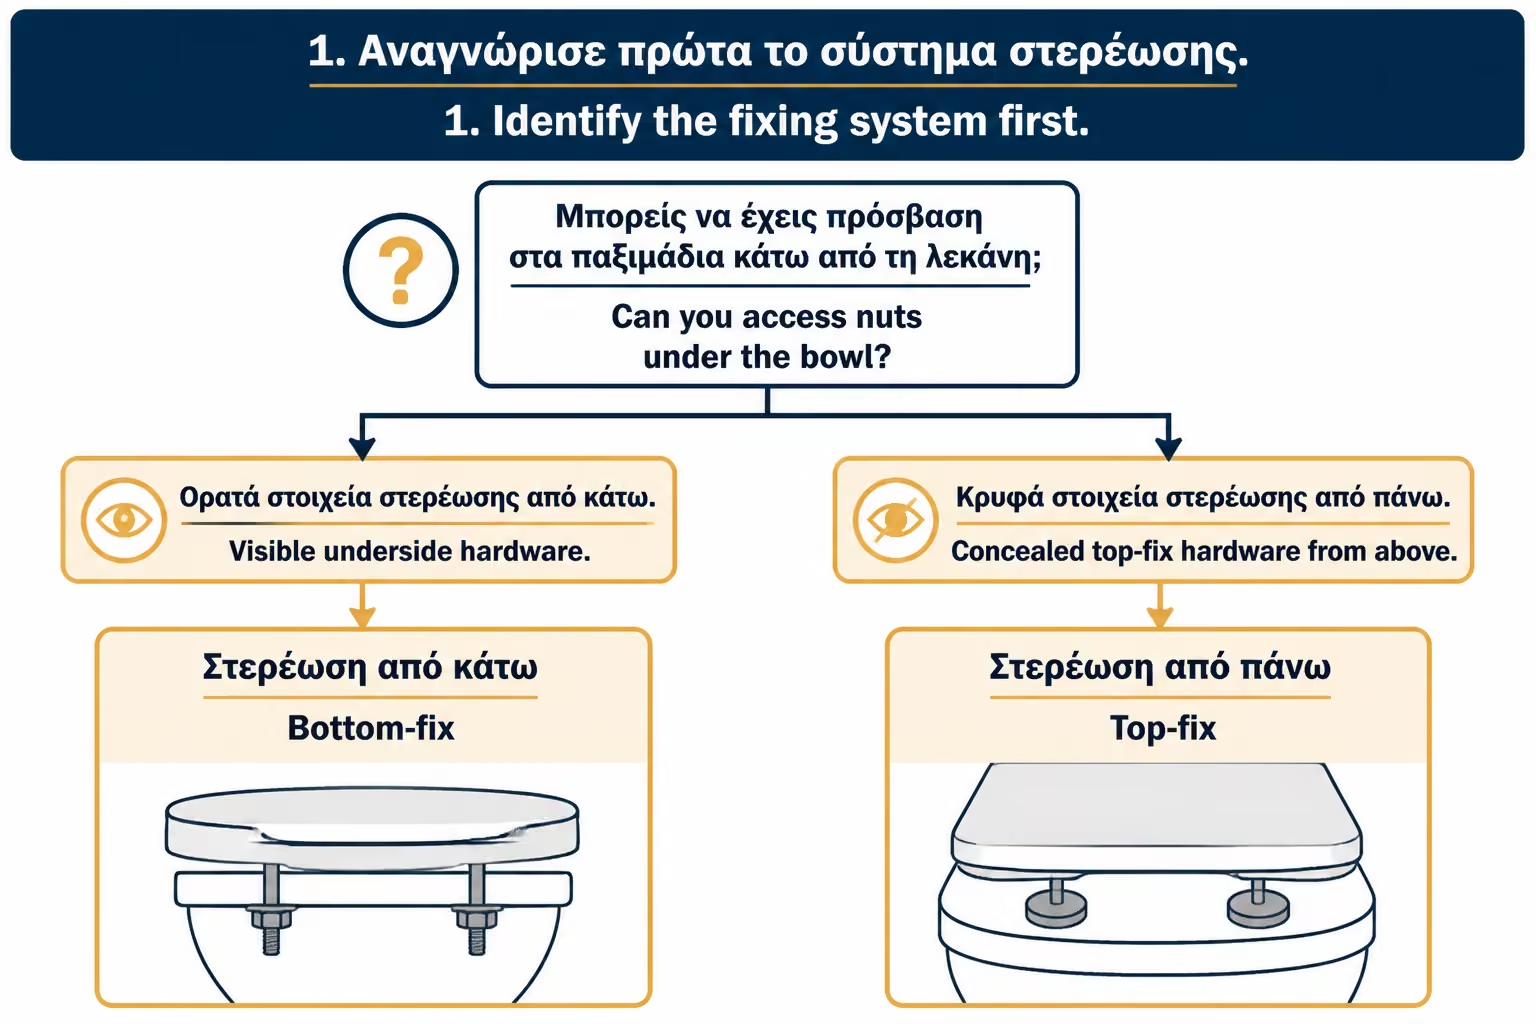
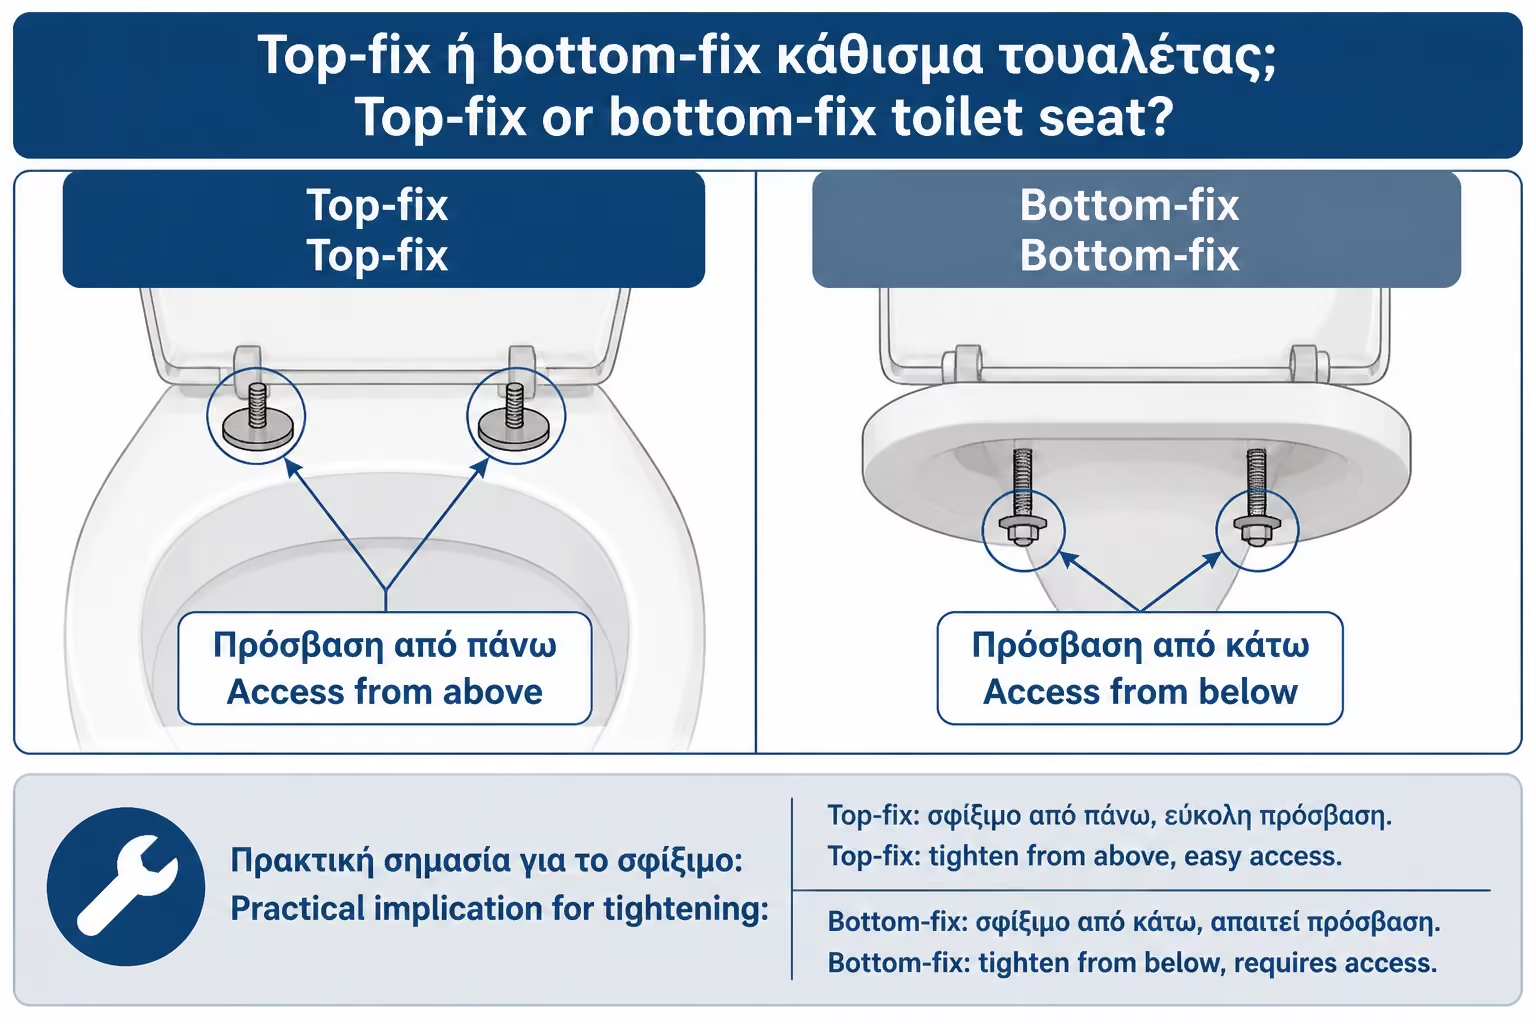
The main distinction in fastening systems is whether they tighten from above or below. Bottom-Fix is the classic arrangement: the screw is inserted from above, passes through the hole in the toilet bowl, and is tightened from below with a nut. To adjust it, you usually have to reach under the rear of the bowl.
Top-Fix is often used on modern toilets, especially wall-hung models or installations where there is no easy access from below. The screw tightens from above, and inside the hole sits a special anchor, usually a rubber or plastic expander that grips and holds the base in place. In this setup, all the work is done from the top side of the bowl.
The difference becomes obvious once you check access. If you can reach under the back of the bowl and find nuts, you probably have Bottom-Fix. If there is no access, nothing visible underneath, and the screws sit under the hinge covers, it is most likely Top-Fix.
| System | How it tightens | Advantages | What to watch out for |
|---|---|---|---|
| Bottom-Fix | Bottom with nut | Simple, classic, easy to understand | Difficult access behind the bowl |
| Top-Fix | Top with a special anchor | Ideal for wall-hung or hard-to-reach toilets | It needs proper fit and careful tightening |
| Quick-release | Snaps onto bases | Easy to clean | The base must be properly tightened |
| Soft-close | It has a slow closing mechanism | Comfort, less noise | It should not be forced to close |
The important thing is not to assume that every seat tightens the same way. If you try to tighten a Top-Fix from underneath, you will find nothing. If you try to force a Bottom-Fix from above, you may break a cover or hinge.
Start by looking at the hinge bases on the toilet bowl. If there are metal or plastic covers that lift up, screws are probably hidden underneath. Lift them carefully by hand or with a plastic tool, not a knife that could scratch the surface.
Then look underneath at the rear of the bowl. In floor-mounted toilets with open access, you can often see or feel the nuts. In wall-hung toilets, or bowls installed close to the wall, access from below may be almost nonexistent. Top-Fix is commonly used there.
If the seat is quick-release, it can usually be removed by pressing two buttons or pulling it upward. Do not yank it if you do not know the mechanism. Some lift straight off, some have a hidden clip, and some require small buttons on the sides of the hinges.
A simple example: in a wall-hung toilet, the owner searches for nuts underneath but there is no access. The seat actually has two small round covers on the bases, and under them sit the Top-Fix screws. If the covers are never opened, the fixing is never found.
Tightening or replacing a toilet seat does not require a large set of tools. But you do need to work cleanly, because the area is narrow, low, and close to the porcelain. The wrong tool can scratch the bowl or crack a plastic cover.
| Tool / Material | Use |
|---|---|
| Straight or Phillips screwdriver | Tightening of hinge screws |
| Allen key | On many modern Top-Fix or soft-close seats |
| Small spanner | Holding or tightening Bottom-Fix nuts |
| Pliers with care | Only helpful in difficult nuts |
| Soft cloth | Porcelain protection and cleaning |
| Plastic tool | Lifting covers without scratches |
| Gloves | Hygiene and better grip |
| Flashlight | Check under the bowl |
| Spare screws / washers | If the old ones are worn out |
| Tape measure | Check dimensions before buying a new lid |
Before you begin, clean the area around the hinges. Salts, dust, cleaning agents and moisture collect there. If you tighten on a dirty or slippery surface, the seat may loosen again more quickly.
If you use a tool on a metal base, put a cloth where there is a risk of it touching the porcelain. Porcelain does not scratch easily from simple use, but a metal tool can leave a mark or cause a small dent.
In the Bottom-Fix system, the screws pass through the holes in the bowl and tighten with nuts from below. Usually the problem is simply that the nuts have loosened. The difficulty is access, because the back of the bowl is often close to the wall and there is little room for your hand.
First align the seat on the bowl. Do not tighten it while it is crooked. Close the seat and lid, check whether they follow the contour of the toilet bowl, and correct the position. Then hold the screw from above with a screwdriver, if needed, and tighten the nut underneath by hand or with a small wrench.
Tightening should be firm, not aggressive. If the nut is plastic, it may crack or deform. If it is metal, it can put too much pressure on the washers. The goal is to stop the base from moving, not to crush the rubber parts.
After tightening both sides, test the seat. Sit lightly or push with your hands right-left. If it moves, check again. If it tightens but loosens after a while, the nuts or rubbers may be worn and need replacing.
In a Top-Fix system, the work is done from above. You usually remove the seat from the mounts first, especially if it is quick-release. Then you open or lift the hinge covers and expose the screws. These tighten the special anchors inside the holes of the toilet bowl.
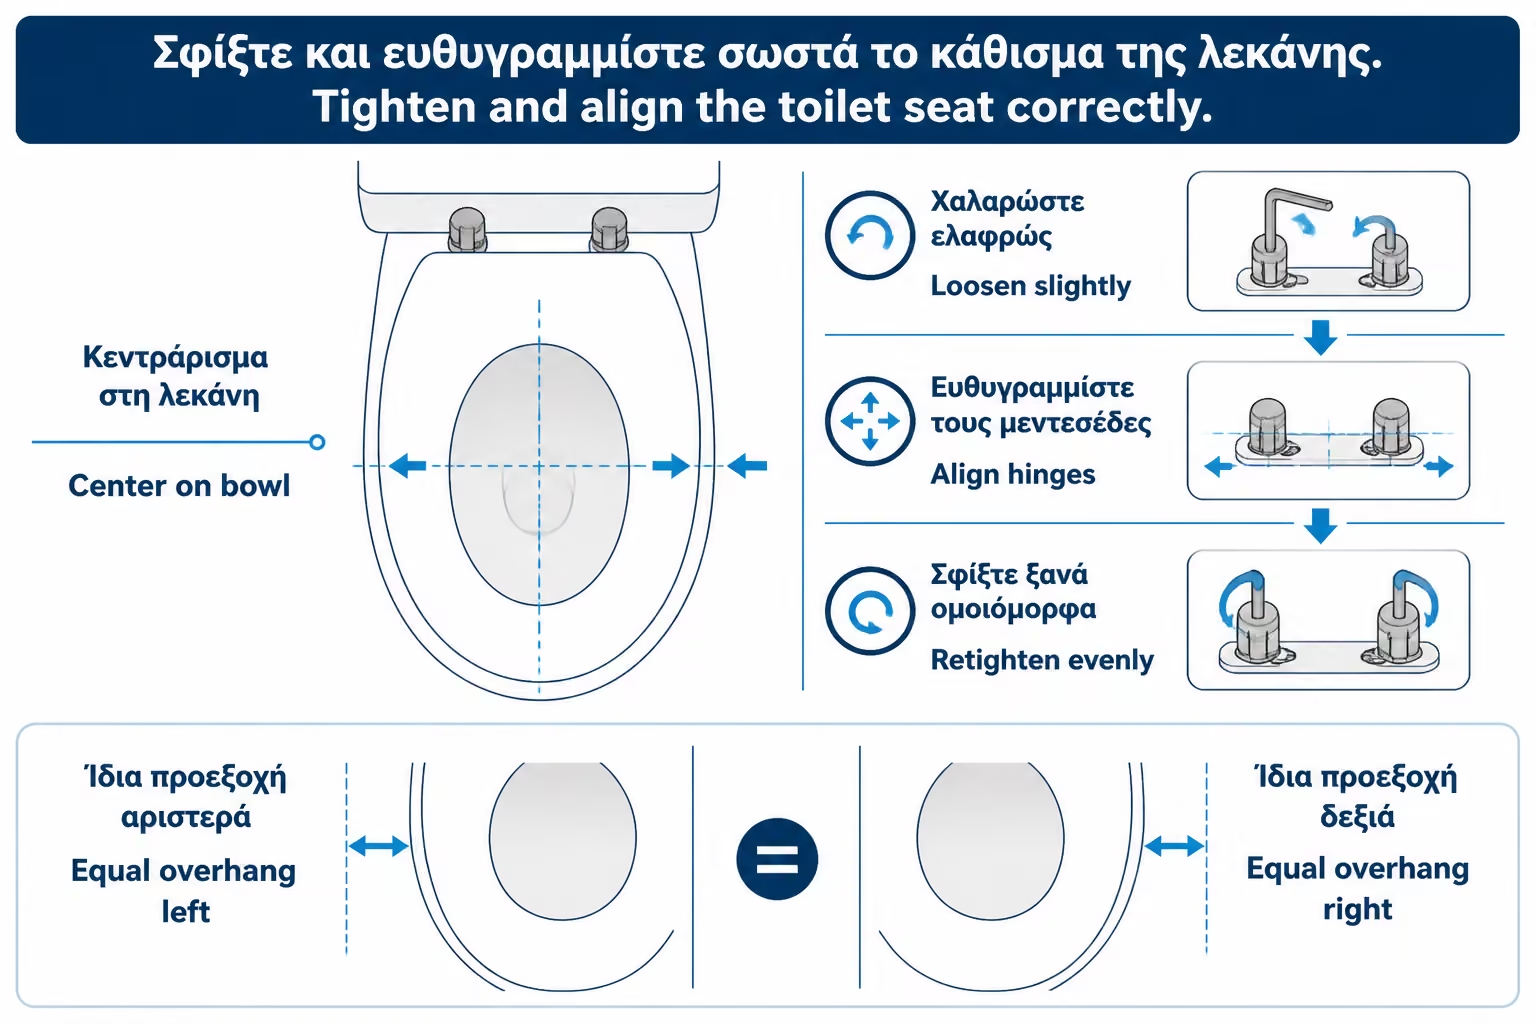
The first move is always alignment. Most Top-Fix systems allow slight front-back or side-to-side adjustment before final tightening. This matters because toilet bowls do not all share exactly the same spacing or shape. Put the seat in place, find the best position, and only then tighten.
Tighten the screws gradually, alternating from side to side. If you fully tighten one side while the other is still loose, the seat can pull crooked. You want both bases to clamp evenly. If the anchor is rubber, tightening expands it inside the hole and locks the base in place. If you overtighten it, it may deform or lose elasticity.
After tightening, fasten the seat again and test. If it still has play, check if the play is in the base or the quick-release mechanism. Sometimes the mounts are tight, but the seat is not properly snapped onto them.
Tightening alone is not enough if the seat is sitting crooked. Before the final tightening, you need to adjust its position. The seat should follow the contour of the bowl, not project too far at the front, not rest against the cistern when opened, and sit on its rubber buffers against the porcelain.
Hinges are often slightly adjustable. The bases can be eccentric, meaning they rotate a little and change the seat position. In other systems, the screws pass through elongated holes that allow movement. This adjustment is very useful when the seat is universal and not an exact match from the same manufacturer as the bowl.
A cap that has been tightened incorrectly will be annoying in everyday use and will loosen more easily. If it steps on only two of the four rubbers, the load is not distributed properly. If it touches the porcelain in the wrong place, it can make noise or wear.
Before you tighten up for good, sit back a little and look at it as an end result. Is it centered? Does it open and close without finding? Feet right? If not, fix it now. After final tightening, any correction means loosening and readjustment.
If you turn the screw and it doesn't tighten, there are a few possible scenarios. In Bottom-Fix, the bottom nut can turn with the screw. Then you need to hold it by hand or with a wrench and tighten from above. If the nut is worn, it may need to be replaced.
In the Top-Fix, the cap inside the hole may be broken or turning with the screw. This is common when the rubber or plastic expansion joint has aged, lost its elasticity, or is incorrect for the bore diameter. In this case, the screw turns but the base does not lock.
Sometimes the screw is the wrong length. If it's too short, it won't hold well. If it is too far, it may terminate without properly tightening the base. This often happens when a cap has been replaced with a rough set of screws that don't quite fit.
The solution is not to forcefully insist. Disassemble the system, check the components and replace screws, nuts or Top-Fix caps if necessary. Cover fixing kits are relatively inexpensive and often enough to change them without throwing away the whole seat.
Soft-close lids have a mechanism that slows down closing. They are practical, quieter and reduce knocks on porcelain. But they have more complex hinges than a simple seat. If they wiggle, it doesn't always mean that the soft-close is broken. Often the bases simply loosened.
In many soft-close seats, the seat is removed from the bases with a quick-release. You press two buttons or pull up, depending on the type. Then you can see the bases that need to be tightened. If you try to tighten without removing the seat, you may miss the screws.
Caution: do not force a soft-close lid to close quickly. This wears out the mechanism. If the lid starts to drop suddenly, the mechanism may be worn. In some models, only the hinges are changed. In others, the entire seat needs to be changed.
If the soft-close still works but the seat has play, focus on the base. If the base is stable but the lid wobbles at the hinge axis or drops uncontrollably, that points to mechanism wear. These are two different problems, and they are not solved in the same way.
Quick-release seats have a big advantage: they are easy to remove so you can clean around the hinges properly. That matters for hygiene, because limescale, urine residue, dust, and detergents all build up there. If the area stays dirty, the rubber pads can slip and the mounting bases loosen more easily.
To remove a quick-release seat, look for buttons on the hinges or instructions on the lid itself. Do not pull it hard if it resists. Each mechanism has its own way. Some lift vertically, some release with a push, some with a slight twist.
Once removed, thoroughly clean the bases and porcelain. Wipe and dry before re-fastening. Moisture and soaps can reduce gasket friction and speed up loosening.
If after cleaning the lid does not click properly, check if the bases have been moved. In many systems, the seat only snaps when the mounts are the correct distance and alignment. If you tighten the mounts a little wrong, the quick-release can be hard to grip or play.
If a replacement is needed, the right choice is not just about appearance. Toilet bowls come in different shapes, lengths, widths, and hole spacing. There are oval, square, D-shape, elongated, compact, and special models. A "universal" seat fits many bowls, but not all of them perfectly.
Before you buy, measure three main things: the distance between the two mounting holes, the length from the holes to the front edge of the bowl, and the maximum width. Also check the overall shape. A photo of the bowl from above helps a lot in the store.
| Measurement | What does it show? |
|---|---|
| Hinge hole spacing | If the mounting system fits |
| Bowl length | If the seat covers properly in front |
| Bowl width | If the seat presses correctly on the sides |
| Basin shape | If you need an oval, D-shape or special cap |
| Access from below | If you need Top-Fix or Bottom-Fix |
If you have a bowl from a well-known manufacturer, ideally look for a compatible seat from the same series or a similar model. It may cost more, but it usually works better. If you choose a universal seat, pay attention to the hinge adjustment range.
Don't just buy based on “looks the same”. Slight difference in geometry can be seen immediately when fitted. A cap that sticks out, leaves gaps, or sits crookedly will loosen faster and look sloppy.
Basin covers come in a variety of materials. Plain plastics are lightweight and economical, but may scratch or yellow more easily. Duroplasts are harder, have a better feel and often feel more like ceramic to the touch. It is a common choice for higher quality caps.
There are also veneered MDF or wood base caps, mainly for decorative options. These can be comfortable and stable, but in a wet environment they need attention. If the lining wears out or moisture gets in, they can swell. For everyday bathing with frequent cleaning, a good duroplast or quality plastic is usually more practical.
Weight matters. A very heavy lid with poor fastening can put more stress on the hinges. Too light can feel unstable. The quality of the hinges and bases is just as important as the material of the seat.
Also pay attention to hygiene. Quick-release systems are easier to clean. Hinges with many gaps and difficult corners collect more dirt. In bathrooms with frequent use, ease of cleaning is a practical criterion, not a luxury.
Change begins with the removal of the old. In Bottom-Fix, loosen the bottom nuts and lift the seat. If the nuts are plastic, they are usually loosened by hand or with a small tool. If they are metal and rusted, attention is needed. Do not apply enough pressure to break the porcelain or damage the surface.
In Top-Fix, first remove the seat if it is a quick-release, open the covers and unscrew the screws on top. The washers may stay in the holes or come out with the screw. If they are worn, remove them and clean the holes.
Before fitting the new one, clean the porcelain thoroughly around the holes. It is one of the areas that usually stays dirty while the seat is installed. Remove scale and residue, dry the area, and make sure the surface is clean.
Install the new mounts without fully tightening them. Put the seat on, align it with the toilet bowl, and only then do the final tightening. Do not tighten the mounts approximately and try to adjust the seat afterwards. The correct sequence is rough fitting, alignment, final tightening, then testing.
The most common mistake is over-tightening. Because the cap is moving, the owner thinks the tighter the better. But porcelain, plastic nuts and rubber bands need controlled pressure. If they are distorted, the result can be worse.
The second mistake is tightening without aligning first. The seat is fixed, but in the wrong position. Then it is awkward to use and loosens again. A third mistake is buying the wrong seat, usually because the hole spacing and bowl length were never measured. A fourth mistake is losing the rubber washers or putting them back incorrectly.
| Error | What does it cause? | Correct practice |
|---|---|---|
| Excessive tightening | Broken plastics, deformation, pressure on porcelain | Firm but controlled tightening |
| Tightening while the cap is crooked | Poor fit and quick release | First alignment, then final tightening |
| Top-Fix / Bottom-Fix error | Inability to properly position | Access and system control |
| Omission of rubber gaskets | Slip and noise | Installation of all gaskets |
| Pressure on soft-close lid for fast closing | Mechanism wear | Let the mechanism work |
| Purchase without measurements | Cap that doesn't fit properly | Measurement of holes, length, width and shape |
| Cleaning with strong products on the hinges | Deterioration of finish or plastics | Mild detergents and a good rinse |
A common example is the seat that loosens again every month. The owner keeps tightening it, but has not noticed that the rubber washers under the mounts are missing. The metal bases slide over the porcelain. The solution is not more force, but the correct washers.
Tightening a cap is practically zero cost if you have the basic tools. If spare parts are needed, such as screws, nuts or Top-Fix caps, the cost remains low. Changing the entire cover has a wide range, depending on the material, the mechanism and whether it is a simple or branded compatible model.
| Case | Indicative cost picture 2026 |
|---|---|
| Simple DIY tightening | €0 |
| Set of screws / nuts / washers | around €3–15 |
| Simple plastic cap | around €10–25 |
| Better duroplast cap | around €25–60 |
| Soft-close cap | around €35–90 |
| Branded special series cap | around 60–150€+ |
| Autonomous technician visit for change | around €30–€60+, depending on area and minimum charge |
The prices are indicative and depend on the region, the store, whether VAT is included, the material, the brand, whether the seat is universal or specific to a particular toilet bowl, and whether the work is done on its own or together with another plumbing or repair job. For a simple tightening or a replacement with a universal seat, DIY usually makes sense. For special seats, wall-hung bowls, or worn fittings, a technician may be worth it.
For simple tightening, a plumber is usually not needed. But a technician is worth calling when the screws are rusted and will not loosen, when the Bottom-Fix nut is inaccessible, when the Top-Fix anchor has broken inside the hole, when the seat is a special model and you cannot find a compatible part, or when there is a risk of damaging an expensive toilet bowl.
Help is also needed when the porcelain around the fixing holes is cracked. Pressure on a cracked area can make the damage worse. In that case, the problem is no longer the seat but the toilet bowl itself.
In commercial spaces or bathrooms with a lot of use, a more durable seat and better quality metal hinges may be worth it. Constant use loosens cheap parts faster. There the choice of cover is part of the maintenance of the space.
If you have a wall-hung bowl with a manufacturer-specific seat and mechanism, it is worth looking for a compatible part rather than a random universal one. Wall-hung bowls often have more specific geometry, and a wrong seat is immediately visible.
After tightening or changing, check the cap after a few days of use. If it has remained stable, everything was probably done correctly. If it has started to move again, something is missing or not pressing properly. It may need readjustment, better gaskets or a different mounting system.
Clean around hinges regularly, but avoid allowing strong cleaners to pool on metal or plastic parts. Descalers and bleach can affect finishes, rubber and plastics if left for a long time. Rinse and dry.
Do not use the lid as a step, support or surface for weight. It is not designed for such use. Especially soft-close lids and plastic hinges are strained when subjected to lateral forces.
If the cap has a quick-release, remove it periodically for cleaning and check the mounts. This little maintenance keeps the spot cleaner and helps spot sagging before it becomes a nuisance.
| Inquiry | Yes / No |
|---|---|
| Have you determined if the system is Top-Fix or Bottom-Fix? | Yes / No |
| Are the hinge covers and screws located? | Yes / No |
| Is the lid intact with no cracks in the seat or hinges? | Yes / No |
| Do the bases rest on clean and dry porcelain? | Yes / No |
| Are all rubber or plastic gaskets present? | Yes / No |
| Was the seat aligned before final tightening? | Yes / No |
| Were the screws gradually tightened on both sides? | Yes / No |
| Was excessive force on the porcelain avoided? | Yes / No |
| Does the soft-close, if present, work without brute force? | Yes / No |
| If replaced, were hole spacing, length, width and bowl shape measured? | Yes / No |
| After tightening was a right-left test done? | Yes / No |
If the answer is “No” to the points regarding the type of fastening, gaskets or alignment, do not proceed with further tightening. The solution may be proper placement or replacement, not strength.
If the toilet seat is loose, do not start tightening blindly. First identify whether it is Top-Fix or Bottom-Fix, then clean the base, align the seat, and tighten gradually. The seat must rest properly on its rubber buffers and the hinges must clamp evenly on the porcelain. If washers are missing or parts are worn out, the answer is not more force but the correct fixing kit or a new seat.
A loose toilet seat is usually a small and easy problem, but it still needs to be handled in the right order. First identify the fastening type, then check whether the hinges and washers are in good condition, align the seat, and only then tighten it gradually. That is how you avoid a crooked fit, quick re-loosening, and unnecessary damage.
The difference between Top-Fix and Bottom-Fix is critical. At Bottom-Fix we work from below, with nuts. At Top-Fix we work from above, with special tips in the holes. If you know which system you have, the task becomes much simpler. If you don't know, you could be wasting time or pressing the wrong part.
If the existing seat is the right one and only loose, tightening is enough. If it is broken, the soft-close is worn out, washers are missing, or it does not fit the bowl, replacement is the better solution. The goal is not only that it stops moving today, but that it sits properly, is easy to clean, and stays stable in everyday use.
Return to category.
Go to categoryReturn to the central guide.
Go to guide