
Bathroom DIY, Maintenance & Styling
Return to category.
Go to categorySome bathroom repairs need a tradesperson, tools, time, and a lot of attention. Others are small interventions that can improve daily use immediately, without opening a wall, shutting off the whole house, or turning into a renovation. Replacing the shower hose and handset is one of those jobs.
The problem usually starts quietly. The hose begins to split near the mixer, the shower handset clogs with limescale and sprays in all directions, the pressure drops, or the hose hardens and twists every time you shower. In many cases, the answer is not replacing the whole shower mixer. It is simply a matter of replacing the hose, the handset, or the small washers at the ends.
The job looks so simple that many people rush it. They unscrew the old hose, fit the new one, turn on the water, and if it drips they reach for pliers and keep tightening until it "seats." That is where most mistakes happen. These connections do not seal because the metal or plastic has been crushed harder. They seal because the correct washer is in place and presses evenly.
Replacing a shower hose and handset is indeed one of the easiest DIY jobs in the bathroom. Even here, though, some technical logic matters. You need the right length, the right material, a comfortable handset, the correct threads, and reliable washers. You also need to know when a leak really comes from the hose and when it is coming from the mixer, diverter, supply, or limescale build-up.
In this guide we will go through the replacement step by step: what tools help, how to choose between metal, stainless, aluminium, or PVC hoses, why end washers matter, how to clean the threads, and how to check the connection so it stays dry after a few days of use.
The shower hose is a wear part. Every day it deals with water pressure, temperature changes, twisting, pulling, limescale, and cleaning products. Over time it can harden, lose flexibility, split at the ends, or fray its outer sleeve. It does not have to be completely broken before replacement makes sense. If it is already awkward to use or has started dripping, it is at replacement age.
The shower handset, on the other hand, usually suffers from limescale. The small holes clog, the flow becomes uneven, water sprays sideways, or the pressure feels weak. In hard-water areas this is very common. Sometimes cleaning is enough. Other times, especially if the handset is old, cracked, heavy, or has a worn spray selector, replacement makes more sense.
A practical example: if water drips from the connection between the hose and the handset, it does not automatically mean the handset is faulty. The washer may be missing, hardened, misplaced, or cut. But if water comes out through the side of the hose itself, then the hose is worn and will not be fixed reliably by more tightening.
If the hose is frayed, has sharp edges, kinks when turned, or keeps twisting permanently, it is best to replace it before it fails completely. The fix is inexpensive and prevents an annoying leak during the shower.
Changing a shower hose and handset is one of the safest DIY jobs in the bathroom because it does not require opening the installation inside the wall. Usually you do not even need to shut off the mains, as long as the shower mixer itself is closed. You still have to work carefully, though, because the connections are on the mixer and the finish can be damaged by the wrong tool.
You can replace the hose yourself, the handset, the washers, the simple wall bracket, or a filter washer, as long as everything unscrews smoothly. What you should not do is force an old mixer that turns with the connection, interfere with concealed parts, or ignore a leak that seems to be coming from behind the wall.
If the leak is at the hose connection on the mixer, replacement is simple. But if water is dripping from the mixer control, the shower diverter, the mixer body, or the wall roses, a new hose will not solve the problem. That needs a different diagnosis.
The basic principle is not to turn a simple change into damage. If something will not unscrew with normal force, stop, clean away the scale, and try again with protection in place. If it still resists, it is better to have a plumber check it than to scratch or distort the mixer.
In most cases, the hose and shower handset can be unscrewed by hand. That is also the right place to start. The nuts at the ends usually have wide ridges or a smooth metal finish that is easy to grip. If they are caked with limescale, a tool may be needed, but carefully.
For a clean replacement you will find useful:
| Tool / Material | Use |
|---|---|
| Soft cloth | Protection of chrome surfaces from scratches |
| Wrench or pliers with protection | Only if it doesn't unscrew by hand |
| New washers | Sealing at both hose ends |
| Old toothbrush | Descaling of threads |
| Mild cleaner for salts | Cleaning before the new connection |
| Kitchen paper | Check for small leaks |
| Small bowl or towel | For the water left inside the hose |
The most important "tool" is the cloth. If you need to use pliers or a wrench on a chrome nut, place a soft cloth between the tool and the metal. Otherwise, a five-minute job can leave permanent scratches on the mixer or the new hose.
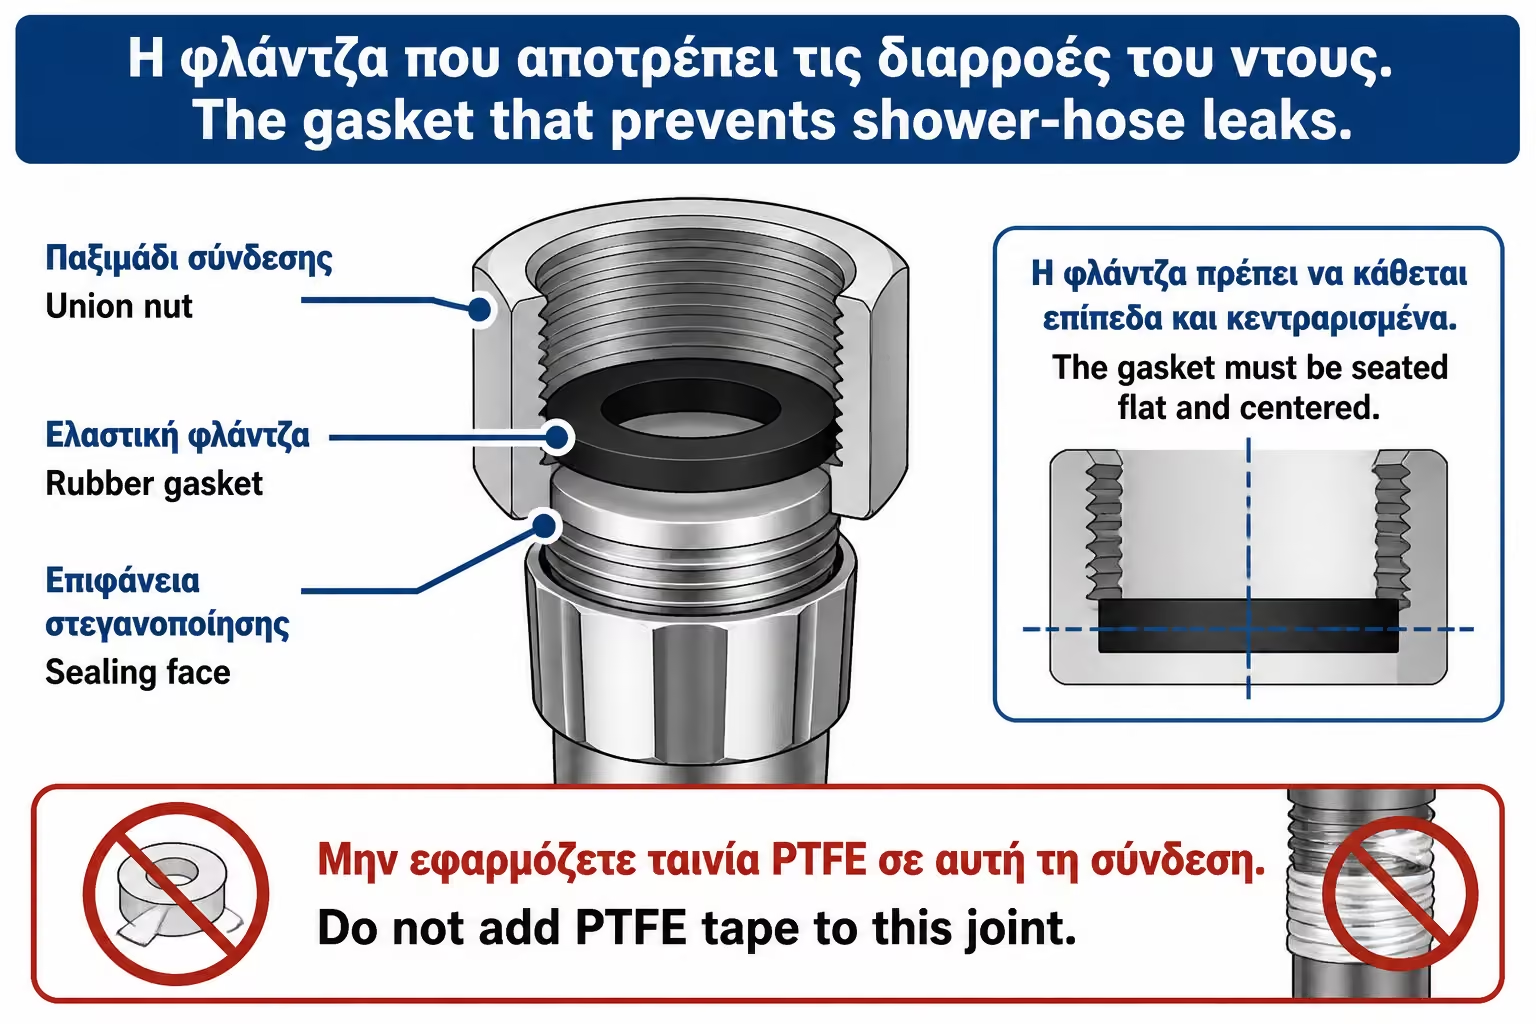
There is no need for Teflon tape on classic shower-hose connections when flat washers are used. The seal is made by the rubber pressing against a flat surface, not by the thread. Unnecessary Teflon can interfere with the fit or create a false sense of security.
The most common shower-hose length for home use is around 1.50 m. In many bathrooms this is enough for comfortable showering, rinsing the shower or bath area, and normal daily use. There are also longer hoses, around 1.75 m or 2.00 m, which are useful in larger showers, in bathtubs where easier rinsing matters, or where the handset is also used for cleaning.
A very long hose is not always better. Too much excess can hang down, rest on the floor, twist, or get tangled. In a small shower, an overly long hose becomes annoying quickly. On the other hand, a hose that is too short restricts movement and pulls on the connections.
Most hoses use standard 1/2" connections that fit most household mixers and shower handsets. Even so, it is smart to check the old connection before buying. If you have a special system, a filter attachment, an older accessory, or an unusual handset, it deserves a closer look.
Weight matters too. A very heavy metal hose may look sturdy, but on a light bracket or an older mixer it may be less practical. A very light PVC hose can feel comfortable, but if the quality is poor it may crack or yellow quickly. The choice should be based on use, not only on looks.
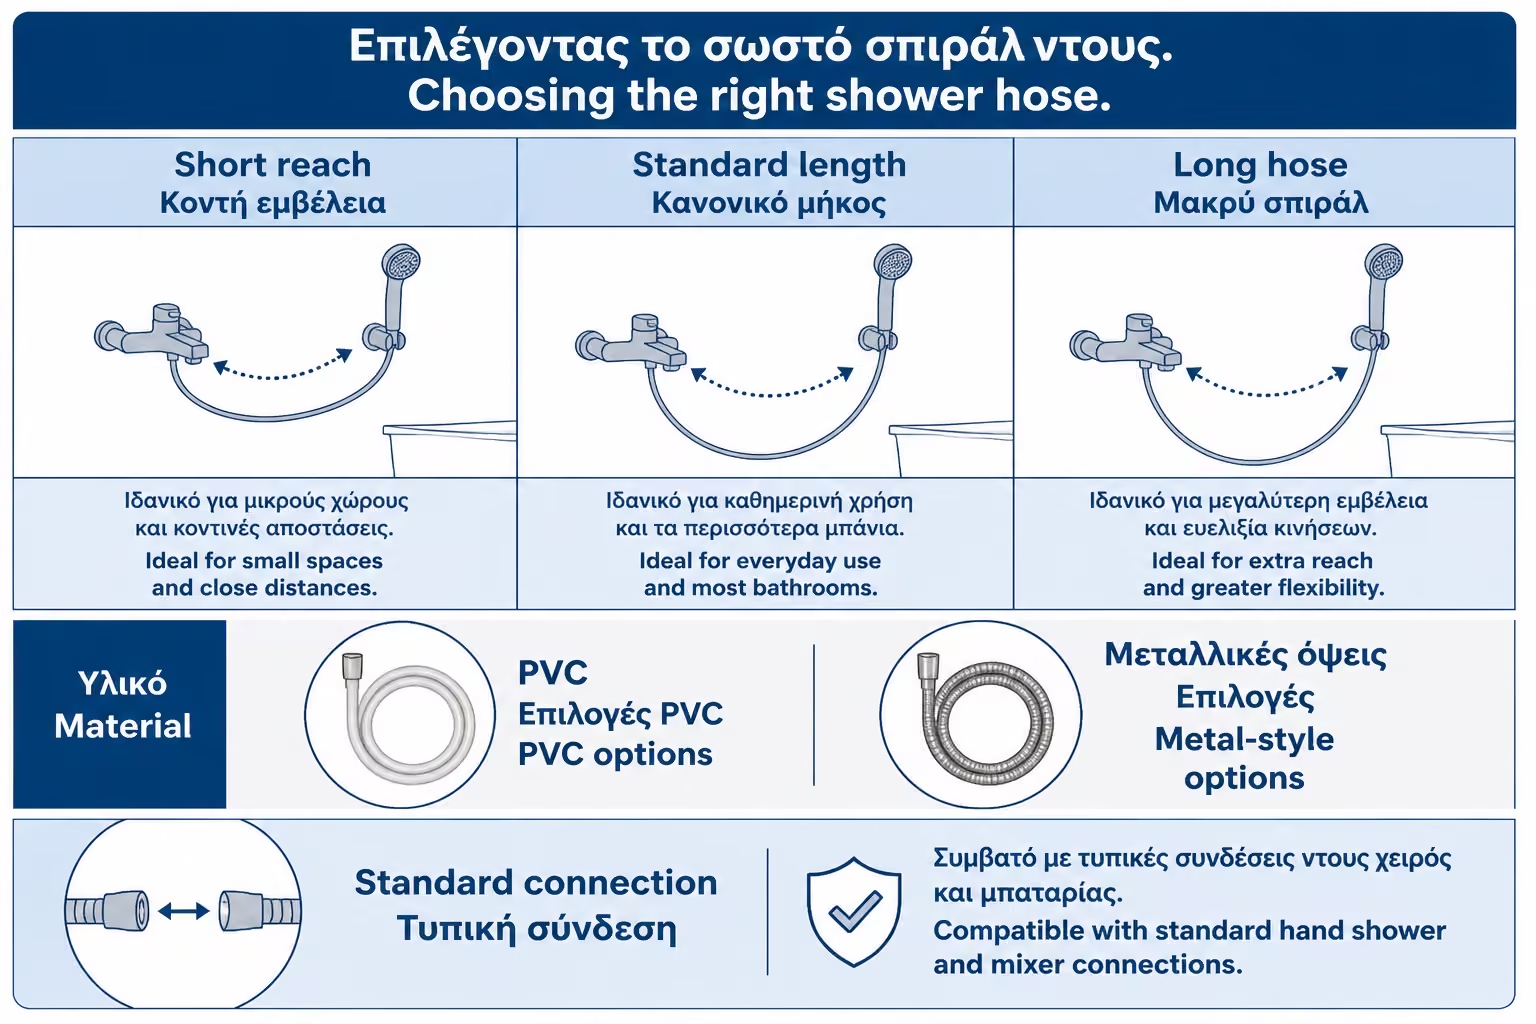
On the market you will find hoses with different materials and outer casings. Classic metal hoses have an outer braid or metal sheath and feel durable. Stainless or higher-quality metal hoses usually resist wear better, but they can be heavier and may mark sensitive surfaces if knocked against them.
Aluminium or lightly clad metal hoses try to combine a metallic look with lower weight. They can be practical for daily use, as long as the end fittings are well made. The outer shell alone is not enough. The critical points are the nuts, the inner tube, and the washers.
PVC hoses are often lighter, more flexible, and friendlier in baths or showers where you do not want metal parts knocking against surfaces. They can be very practical, especially in modern enclosures or bathrooms where comfort matters more than a classic metallic look. Good PVC hoses should not crack easily and should resist permanent twisting.
The table below gives a practical picture:
| Spiral type | Advantages | What to watch out for |
|---|---|---|
| Metallic / chrome | Classic look, durable feel | Weight, possible scratches, salts in the joints |
| Best quality stainless steel | Better durability in use | Higher cost, nut quality control |
| Aluminum or light metal | Good balance of weight and looks | Not to be thin and sensitive at the edges |
| PVC | Flexible, light, not easy to scratch | Not to crack, not to turn yellow quickly |
| Anti-twist | Reduces annoying twisting | It should be of real quality, not just an advertising sign |
For an everyday family bath, edge resistance and ease of use are more important than whether the spiral "looks expensive". A mediocre spiral that constantly twists will annoy you every day, even if it looks beautiful at first.
The shower handset affects the feel of the water more than most people expect. Two handsets on the same supply pressure can create a completely different experience. One may give a strong concentrated stream, another a gentler spray, another multiple modes, and another a simple steady flow.
For everyday use, a handset with good ergonomics, reasonable weight, and easy descaling is often a better choice than an oversized model with too many features. The more mechanisms it has, the more parts can scale up or wear out. That does not mean multiple spray modes are bad, only that they should be well made and genuinely useful.
If you have low pressure in the bathroom, do not expect a new shower handset to solve the problem on its own. It may improve the feel, but it will not magically increase flow. If there is limescale in the mixer, clogged filters, or a hot-water issue, those points still need checking.
Also watch the weight. A handset that is too heavy may fall out of old brackets or become tiring to use. A very cheap, very light one may have weak plastic, poor flow, or fast wear at the connection points. The best choice is usually somewhere in the middle: solid construction, clean flow, easy cleaning, and good hose compatibility.
The washer is the small rubber piece that sits inside the hose nut. It is cheap, small, and often overlooked. Even so, it is the basic sealing element. If it is missing, cut, hardened, or out of position, the connection will leak even if you overtighten it.
On most shower-hose connections, the seal is a flat washer. When you tighten the nut, the washer is compressed between the end of the hose and the flat face of the mixer or handset. That pressure creates the seal. The thread simply holds the parts together. This is not the place where Teflon tape does the sealing.
Many leaks after a hose change have a simple cause: the old washer stayed stuck to the mixer, and the owner added a new one on top of it. Or the opposite: the old washer fell away unnoticed, and the new hose was installed without one. In both cases, more tightening will not solve the problem.
Before fitting the new hose, look inside both nuts. There should be a washer at each end. If one is missing, fit new ones. If a washer looks thin, crooked, or poor quality, replace it with a better one of the same size. It is a small cost with a big effect.
First make sure the mixer is off. You do not usually need to shut off the mains supply, but there should be no water flowing. Keep a towel or small bowl nearby, because there will be water left inside the hose and it will spill out when you disconnect it.
Start at the shower handset end. Unscrew it by hand counterclockwise. If it will not turn, wrap a cloth around the nut and use a wrench or pliers carefully. Do not grip a chrome nut directly with plier teeth or you will mark it.
Then disconnect the hose from the mixer. Hold the hose so it does not pull down on the mixer. If the connection is crusted with limescale, work with small movements. Do not twist the whole mixer body. If you feel the mixer moving against the wall or turning together with the nut, stop.
Once the old hose is off, check both ends. You may find washers stuck either inside the hose or on the mixer and handset. Remove the old ones if they are worn. Clean the flat surfaces where the new washers will sit.
Before fitting the new hose, clean the threads and contact surfaces. Limescale can stop the washer from pressing properly or cause the nut to start crooked. An old toothbrush and a mild cleaner will remove most of the residue.
Pay particular attention to the mixer connection. Limescale often collects there, especially if the old hose had a slight leak. If the surface is rough or crusted over, the new washer will not seal properly. Clean it without scratching the metal.
Wipe thoroughly before assembly. You don't want cleaners, sand, hair or small particles on the seal. Even a small speck of dirt can create a subtle leak. Sealing on flat seals requires clean surfaces.
If the shower handset is old but you plan to keep it, clean its own connection as well. If it has a filter or small inlet screen, check whether it is clogged with limescale. A blocked filter can reduce the flow and make you think the mains pressure is at fault.
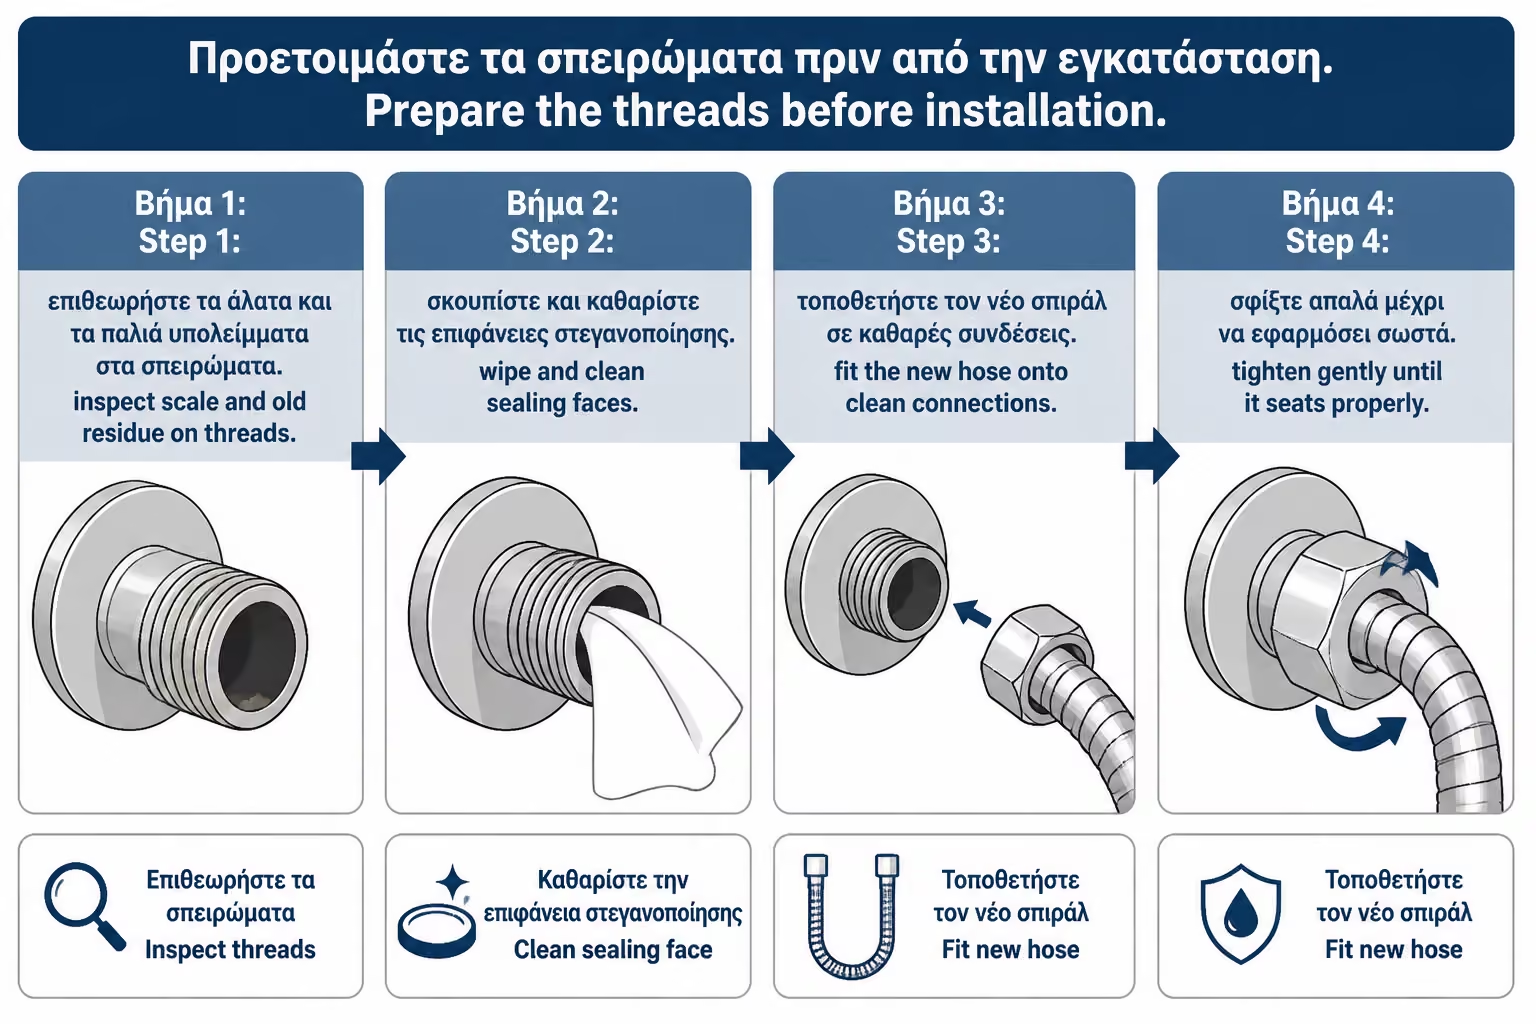
Before fitting the hose, make sure there are washers on both ends. Usually both ends are the same, but in some models one end is intended for the mixer and the other for the handset, especially on anti-twist designs. Read the instructions or check the packaging.
First screw the hose onto the mixer by hand. The nut should catch easily. If you feel resistance immediately, back off and try again. Do not force it with a tool just to make it bite. Cross-threading will damage the thread.
Tighten by hand until it clicks firmly. In many cases this is sufficient. If it drips afterwards, you can give a little extra tightening with a tool and cloth. No need to exaggerate. The seal should be pressed evenly, not crushed.
Then screw the shower handset onto the other end. The same logic applies: start by hand, make sure the thread catches properly, and tighten only until the washer seats. Put the handset back on the bracket and make sure the hose hangs naturally without heavy twisting.
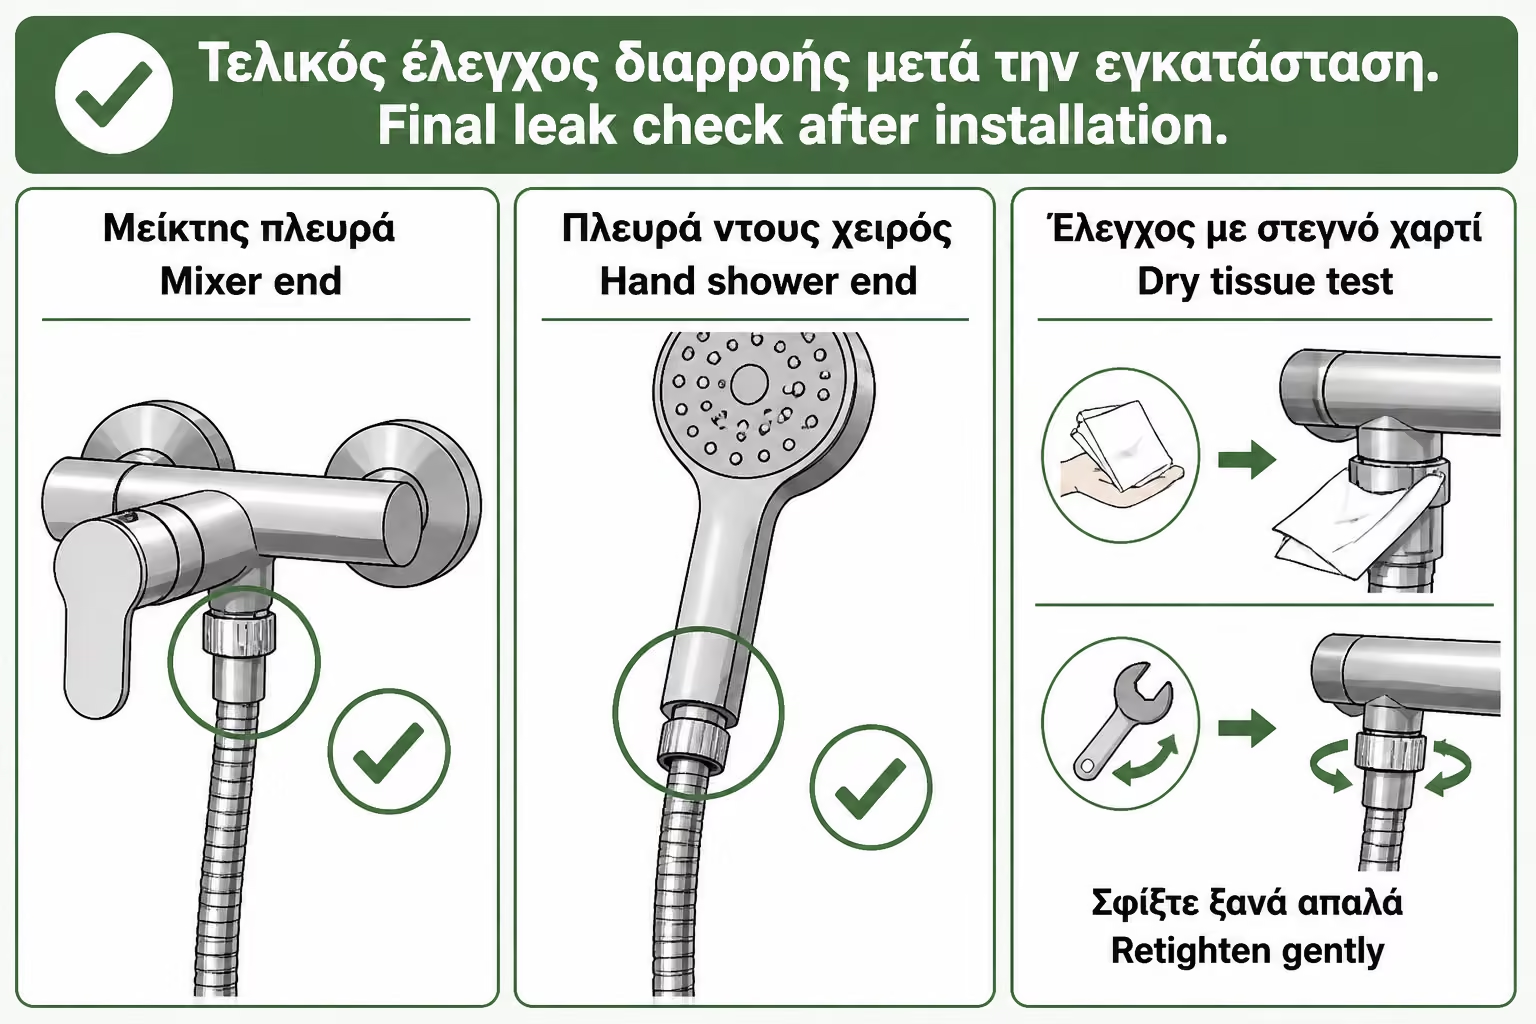
Turn on the water gradually. Do not open it at full pressure immediately, and do not point the handset toward places that should stay dry. Check the mixer connection first. If there is no drip there, check the handset connection. Then let the water run for a few minutes.
Paper towels are the best simple check. Loop it around each joint. If there is a little moisture, it will show immediately. Some leaks don't look like a drop, but like a thin "sweat" around the nut. If the paper gets wet, turn off the water and check the seal.
If it drips, don't immediately start squeezing hard. First loosen the connection and see if the seal is in place. Check if it is cut, folded, or if there is an old seal stuck underneath. If all is correct, carefully re-screw and give slight extra tightening.
If the leak continues despite a proper seal, the surface of the mixer or handset may be worn or scratched. It may also be that the hose nut does not tighten properly. In that case, try a better-quality washer or a different hose. If the problem is in the mixer itself, it needs a different repair.
In classic shower-hose connections with a flat washer, Teflon tape is usually unnecessary. The seal is not made on the threads but by the flat rubber pressed between the two surfaces. Wrapping Teflon around the thread can make the connection harder to start correctly without solving the real cause of the leak.
Teflon tape does have a place in other plumbing connections where the thread itself helps create the seal. A shower hose works differently. If it drips at the nut, the first things to check are the washer and the cleanliness of the mating surface, not the amount of Teflon.
A common mistake is a missing washer that the owner tries to compensate for with Teflon tape. It may reduce the leak temporarily, but the connection is still wrong. With pressure and movement in the hose, the problem usually returns.
The correct solution is simple: proper seal, clean surface, straight screw and reasonable tightening. If these are not enough, there is another problem with the component.
Many people replace the hose because they think the pressure has dropped. Sometimes that is true, especially if the hose has cracked internally or filled with scale. More often, though, the problem sits in the shower handset, the inlet filter, or the spray holes.
Before buying a new handset, remove it and run the water carefully for a moment. If the flow from the hose is strong but becomes weak with the handset attached, the problem is in the handset or its filter. If the flow is weak even from the hose alone, then the issue may be in the mixer, the hot-water side, the supply, or the hose itself.
Phone holes are often cleaned by scrubbing the rubber nozzles, if present, or descaling according to the manufacturer's instructions. On chrome or special finishes, avoid very strong cleaners that can dull the surface.
If the phone is old and has a lot of scale, replacement is often more practical than persistent cleaning. The difference in daily use can be immediate, especially if you choose a model with good flow distribution.
One annoying problem is a hose that keeps twisting around itself. This makes the handset spin in your hand, spray in the wrong direction, or strain the bracket. It is more common with low-quality hoses or hoses that have been left in the same position for years.
Anti-twist hoses are designed to reduce this problem by allowing freer rotation at the connection. Not all of them work equally well, but a good anti-twist hose can make a big difference in everyday comfort.
When fitting it, let the hose hang naturally before final tightening. If you install it while it is already twisted, it will keep that tension. Sometimes it helps to connect it to the mixer first, let it settle naturally, and only then attach the handset.
If the hose keeps twisting, check the handset bracket as well. If the cradle holds the handset at an awkward angle, or if the handset is very heavy, the hose may stay under constant tension. Proper function depends on the combination of hose, handset, and bracket.
After replacement, maintenance is simple. Clean the hose and handset periodically, especially around the connections. If limescale is allowed to build up for months, the fittings seize and the next replacement becomes harder.
Do not yank the handset sharply by the hose. The hose is not a rope. Repeated stress at the ends causes most failures. If you want more reach, choose a longer hose instead of pulling harder.
On black, gold, or other special finishes, use mild cleaners. Strong anti-limescale products and abrasive sponges can mark the surface. A good-looking shower handset can lose its finish very quickly if it is cleaned the wrong way.
If you notice a small leak after weeks, check the seals first. With use, a low-quality seal can be pressed, hardened, or moved. Replacing the seal is often enough.
Replacing the shower hose and handset is one of the most economical small repairs in the bathroom. If you do it yourself, the cost is limited to the parts. A simple hose can start at a very low price, while better options with greater durability, anti-twist design, or better finishing cost more. The same applies to handsets.
For a typical Greek bathroom, a sensible choice does not need to be premium. A good hose with proper washers and a reliable shower handset that is easy to descale are usually enough. Very cheap options may work, but they often wear out faster, twist, drip, or feel poor in use.
| Part / Job | Indicative cost picture 2026 |
|---|---|
| Simple shower spiral | around €5–12 |
| Better spiral / anti-twist | around €12–30 |
| Simple shower handset | around €8–20 |
| Average phone of good quality | around €20–50 |
| Spiral set + phone | around €15–60 |
| Sealed spare parts | around €1–5 |
| Professional replacement, if combined with another job | usually a small charge |
| Autonomous visit of a plumber for a simple change | around €30–€60+, depending on area and minimum charge |
Prices are indicative and depend on the area, the shop, the quality of the fittings, whether VAT is included, and whether the work is done as a standalone visit or together with other plumbing work. For such a simple change, DIY is usually the best route unless there is a stuck connection, an old mixer, or another leak that needs a technician.
The most common mistake is a missing washer or a washer in the wrong position. The second is overtightening. The third is using a tool without protection and scratching the chrome. The fourth is misdiagnosis, when the leak really comes from the mixer rather than the hose.
| Error | What does it cause? | Correct practice |
|---|---|---|
| Screw-in without seal | Direct leakage from the joint | Seal check on both ends |
| Two seals together | Bad press, bad connection | Removing old before new comes in |
| Excessive tightening | Deformation of seal or nut | Hand tightening and minor correction if necessary |
| Teflon instead of a proper seal | Temporary or incorrect sealing | Correct flat seal |
| Pliers directly on the chrome | Permanent scratches | Cloth between the tool and the part |
| Incorrect spiral length | Pulling or tangles | Choice depending on shower / bathtub |
| Buy a very cheap hose | Quick twist or leak | Quality control on edges and flexibility |
A typical occurrence in practice is the small leak in the connection with the phone. The owner tightens with pliers, scores the nut and the leak persists. When the connection is untied, it appears that the seal had fallen into the package and was never installed. The problem was not power. It was a detail.
In most cases, a plumber is not needed to change a shower hose and handset. But one is needed when the hose will not unscrew from the mixer, when the mixer moves at the wall, when there is a leak from the mixer body, when the diverter drips, or when water is coming from a point unrelated to the hose.
Extra care is also needed with old mixers heavily coated in limescale. If the connection is seized, brute force can do more harm than good. A plumber has the tools and experience to judge whether it can be freed safely or whether something is likely to break.
If the pressure is low only on the hot side, if the flow changes abruptly, or if there are temperature fluctuations, changing the shower head may have little effect. In that case the mixer, the water heater, the filters, the pipework, or the mains pressure need checking.
Replacing components is useful only when the problem really is with those components. If the symptom hides a fault in the mixer or the supply, what you need is diagnosis, not repeated purchases of new handsets and hoses.
| Inquiry | Yes / No |
|---|---|
| Is the problem really with the hose or the shower handset? | Yes / No |
| Have you chosen the right hose length for your bathtub or shower? | Yes / No |
| Does the new hose have washers on both ends? | Yes / No |
| Have any old seals stuck on been removed? | Yes / No |
| Have the threads and contact surfaces been descaled? | Yes / No |
| Was the nut screwed in by hand first without warping? | Yes / No |
| Was Teflon avoided in a flat seal connection? | Yes / No |
| Was a cloth used if a tool was needed? | Yes / No |
| Was it leak tested with paper towels? | Yes / No |
| Does the hose hang normally without severe twisting? | Yes / No |
| Is the leak not coming from the mixer or diverter? | Yes / No |
If the answer is “No” to the points about washers, cleaning, or proper thread engagement, do not try to solve the problem with more force. Undo the connection, correct the detail, and try again properly.
If you're changing a hose or shower head, don't think about the tool first; think about the washer first. In most leaks, the problem is not insufficient tightening but a missing washer, a misplaced washer, old rubber, or scale on the sealing face. Start by hand, clean the surfaces, use the correct washer, and tighten only as much as needed. Excessive force on chrome usually leaves marks, not better sealing.
Replacing a shower hose and handset is one of the quickest and most practical repairs a homeowner can make in a bathroom. With little cost and a few minutes of work, an annoying leak can be stopped, water flow can improve, and the daily shower can become more comfortable.
The key is not underestimating the details. Choose a good hose of the right length, choose a shower handset that suits your use, clean limescale from the connections, and always check the washers. Do not rely on overtightening, and do not use Teflon tape where sealing is done by a flat rubber washer.
If everything screws together smoothly and the leak is genuinely at the hose connections, the job is ideal for DIY. But if the mixer is old, the connection is seized, the leak is coming from the mixer body, or the pressure still seems wrong, then a different kind of check is needed. A quick fix works only when you know exactly what you are changing and why.
Return to category.
Go to categoryReturn to the central guide.
Go to guide