
Bathroom DIY, Maintenance & Styling
Return to category.
Go to categoryChanging a sink faucet seems, at first glance, to be one of the simplest jobs in a bathroom. You remove the old one, fit the new one, tighten the two braided hoses, and you are done. In practice, though, small details make the difference between a clean, safe replacement and a cabinet that starts dripping every time the tap is used.
The usual scenario is familiar: the old faucet has dulled, the handle has become stiff, the base is covered in limescale, or the water now comes out unevenly. The owner buys a new faucet, usually with the braided hoses included, and assumes the job will take half an hour. Sometimes that is true. Other times, the real issue is underneath: old angle valves that do not close properly, worn hoses, nuts seized with scale, or a sink with very poor access.
The difficulty here is not the basic technique. It is controlling the water. If you can safely close the angle valves, if the connections are accessible, and if the installation is in good condition, replacing a sink faucet is a task a careful owner can often handle. But if something will not shut off, if a fitting turns together with the pipe, or if a leak appears at the wall, the job stops being simple.
This guide explains the process step by step in a practical, realistic way. We will cover the tools you need, how to close the angle valves properly, how to remove the old faucet, how to fit the new one, and how to check the supply hoses for leaks. We will also focus on the points that deserve extra care, because that is where most mistakes happen.
The basic principle is simple: it is not enough for the new faucet to work the first time. It also has to stay trouble-free after a few days, when the cupboard is closed, the cleaning products are back in place, and nobody is checking under the sink every day. In plumbing work, real success means everything stays dry.
Not every faucet problem needs to lead to a full bathroom renovation or sink replacement. In many cases, replacing the faucet is a relatively simple, economical fix that immediately improves everyday use.
It is worth considering a faucet replacement when the old one shows obvious wear, when the handle no longer moves smoothly, when it drips from the body, or when its look no longer fits the rest of the bathroom. Many owners also replace the faucet because they want a higher spout, more comfortable handwashing, or a more modern look.
But before buying a new faucet, make sure the faucet is actually the problem. If, for example, there is moisture in the cabinet under the sink, the tap is not automatically to blame. The faucet may be dripping, the waste fitting may be loose, water may be seeping through the base, or the angle valves may be leaking.
A simple practical test is to wipe the whole area under the sink dry, turn on the water, and watch where the first drop appears. If the drip is coming from a hose connection or the base of the faucet, replacement or reseating may solve it. But if the water appears from the wall, the trap, or the waste, then the faucet is not the main cause.
Replacing a sink faucet is one of the few plumbing jobs that, under the right conditions, a careful beginner can attempt. The word "conditions" matters. We are not talking about rerouting pipes, cutting copper, changing manifolds, or opening the wall. We are talking about replacing a fitting on the existing connections, as long as those connections are still in good condition.
You can treat it as a DIY job if the angle valves close properly, the pipes are visible and accessible, the old faucet is not badly seized, and there is enough room to work under the sink. In a simple bathroom cabinet with an open bottom, access is usually easier. In a narrow vanity full of drawers, traps, shelves, and very limited hand space, the same task becomes far more awkward.
A plumber is needed when the angle valves will not close, when the old faucet nut is rusted or seized, when the pipe moves together with the wall connection, when the existing connections are too old, or when there is already an active leak. If the installation is in an older apartment and you do not know where the main shutoff is, do not start until you find out.
An owner can still do several useful things alone: check the condition, buy the right faucet, prepare the area, turn off the water, and carry out the initial checks. What they should not do is force old fittings, bend pipes, or continue once water is no longer under control. In plumbing, the most expensive mistake is often not the spare part but the water damage.
Many people buy a faucet based only on appearance. That is understandable, but it is not enough. A faucet can look great and still be wrong for the specific sink. It may be too low, too high, splash outside the basin, or sit awkwardly because the mirror or backsplash is too close.
The first thing to check is the mounting type. In most bathrooms, the faucet is deck-mounted, meaning it sits on the sink or countertop through a hole. But there are also wall-mounted mixers, which follow a different logic and are not replaced in the same way. This guide is mainly about the classic deck-mounted basin mixer.
Then check the faucet height and spout reach. In a small sink, a faucet that is too tall may cause splashing. In a deep countertop basin, a faucet that is too low can make washing awkward. The right choice is not always the most eye-catching one; it is the one that fits the basin geometry.
Also check what is included in the package. Most faucets come with braided supply hoses, a sealing gasket, and a fixing kit. However, not all hoses are equal in quality, and they are not always the right length. If they are too short, they stretch. If they are too long, they can bend too sharply inside the cabinet. In both cases, the connection becomes more vulnerable.
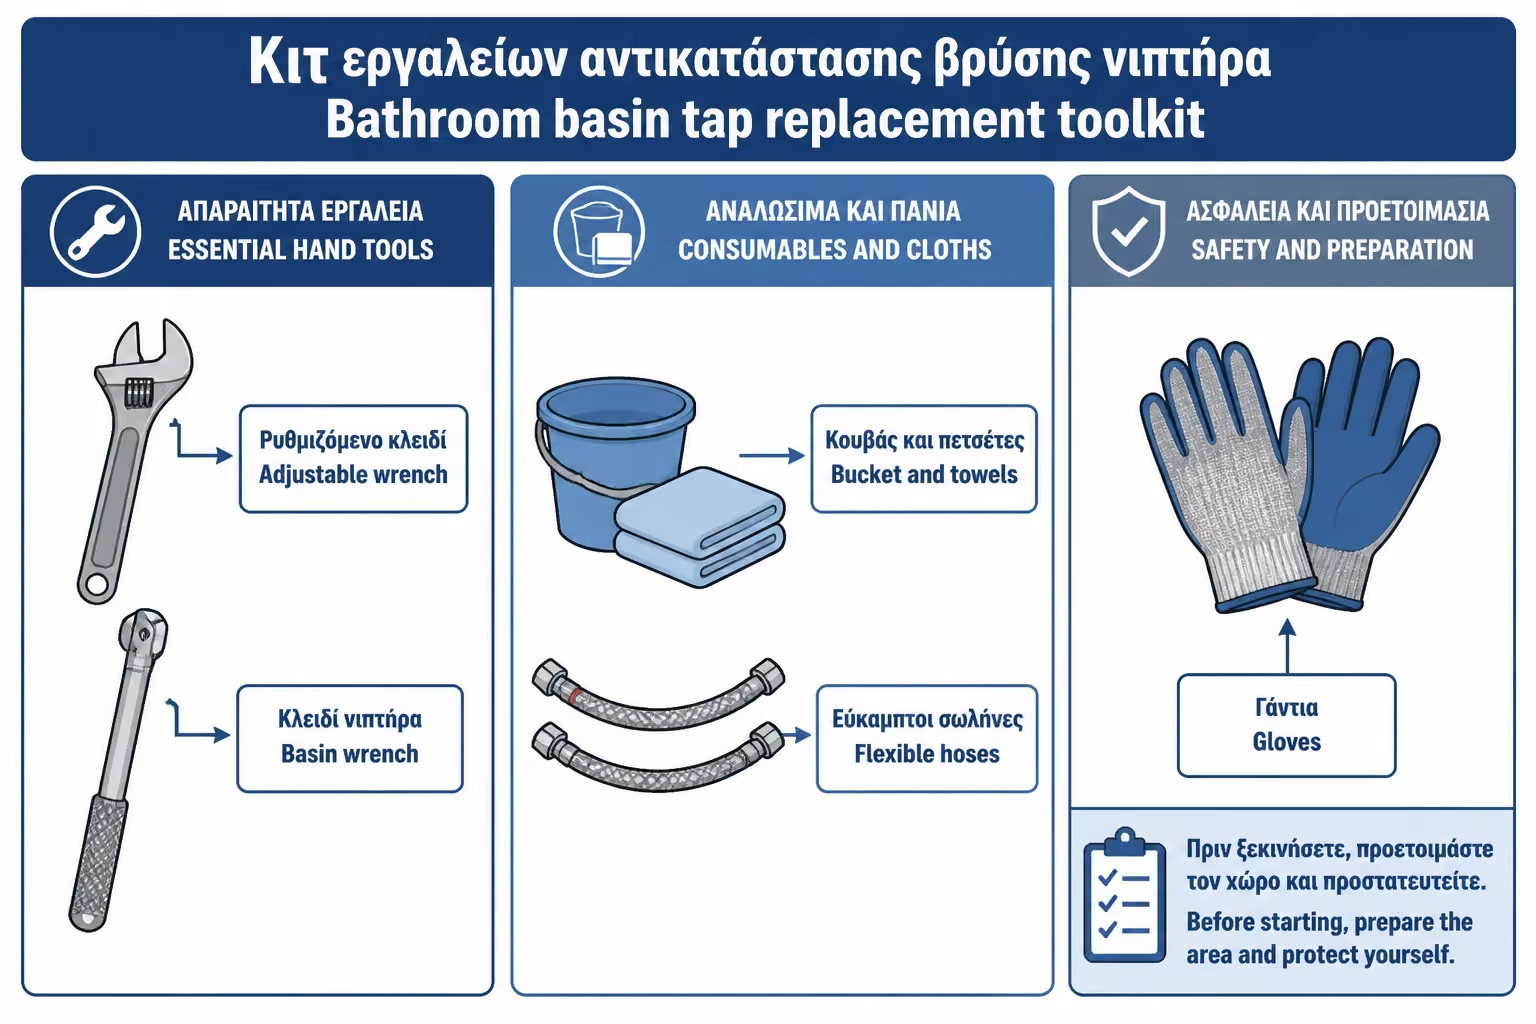
A simple basin faucet replacement does not require a full workshop of tools. It does, however, require the right ones, because the space under the sink is narrow and often awkward. The most common mistake is to start with random pliers and a random wrench, fail to grip the nut properly, and end up damaging the part or leaving it loose.
For most cases you will need:
| Tool / Material | Use |
|---|---|
| Wrench or small adjustable spanner | For hose nuts |
| Pipe wrench or special basin wrench | For difficult access under the faucet |
| Pliers | Auxiliary, not for over-tightening |
| Screwdriver | For removing drawers or accessories |
| Towels or cloths | For water and furniture protection |
| Small bucket or basin | For the water left inside the hoses |
| Flashlight | For checking under the sink |
| Kitchen paper | To detect small leaks |
| Spare hoses, if needed | In case the factory ones don't fit |
In some cases, the special sink wrench, which grips nuts in tight spots, is especially helpful. It's not necessary on every job, but when access is poor, it can make the difference between an easy change and an hour of hassle.
A small practical point: before you start, completely empty the cabinet under the sink. Cleaners, papers, baskets and bottles not only block access, they can hide a small spill. You want the area to be clean, dry and visible.
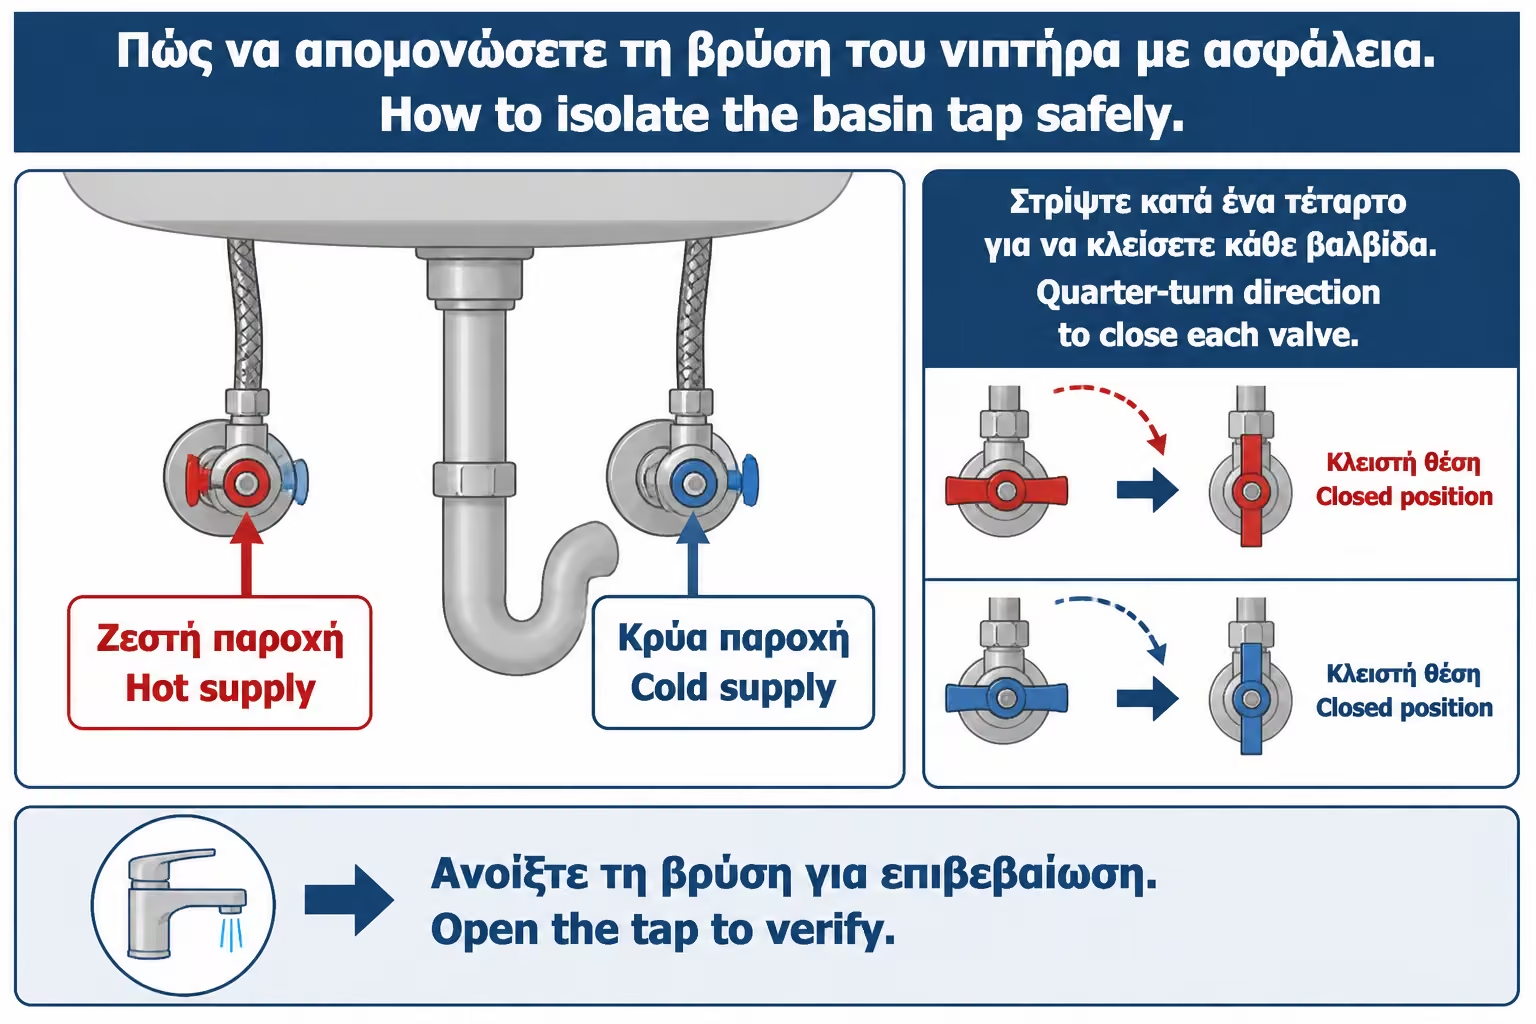
The angle valves are the small shutoff valves usually found under the sink, where the two faucet hoses connect. One serves the cold water and the other the hot. Before touching either connection, both must be closed.
They are usually closed by turning the handle clockwise. There is no need for excessive force. If the valve turns smoothly, close it until it stops normally. If it feels stuck, stiff, or as if the whole body is turning, stop. An old angle valve can break or begin to drip from the spindle if forced.
After closing the valves, open the faucet in both the hot and cold positions to release the pressure and any water left in the lines. If the flow stops completely, the valves are probably sealing properly. If a thin stream continues, one of the valves is not isolating the supply and you should not continue unless you can shut off the mains or bring in a plumber.
A classic problem in older homes is that the angle valves have not been used for years. They may look fine, but once turned they begin to "sweat" around the spindle. That does not always mean major damage, but it is a warning sign. If you see drops on the valve itself, the faucet replacement may need to be combined with angle-valve replacement too.
Before undoing anything, prepare the area as if water is going to come out. Even with the angle valves properly closed, there will still be some water inside the hoses and the body of the old faucet. That water will run out once you loosen the connections.
Place a towel or cloth on the bottom of the cabinet and a small bucket under the hoses. If the vanity is wood or melamine, be especially careful. Water that sits in the joints and cut edges of melamine can cause swelling. The job may be small, but the damage to the cabinet can be disproportionate.
It is also smart to take a photo before undoing everything. A simple phone picture shows which hose goes to hot, which to cold, and how the curves are routed. If you get confused later, the photo helps you return to the original logic of the installation.
If the sink has drawers, remove them if possible. Many bathroom furniture have drawers with a release mechanism. If you don't know how they come out, don't pull them hard. Look for the little clips or levers on the guides. Correct access reduces the risk of tightening incorrectly or working blindly.
The first real disconnection is usually at the hoses, where they screw onto the angle valves. Hold the valve body with one hand and loosen the hose nut with a wrench using the other. The reason is simple: you do not want all the force transferred to the pipe that disappears into the wall.
If the nut is tight, do not use sudden force. Apply steady pressure. If you feel the angle valve moving with it, or the wall connection starting to shift, stop there. That is the moment when a DIY job can become risky.
Once the first hose is disconnected, some water will run out. That is why the bucket is there. Repeat the process on the second hose. If the nuts are heavily scaled or the thread looks worn, take note. The new connection should not depend on a damaged thread.
A common mistake is trying to reuse old supply hoses because they "still look fine." That is not good practice, especially when replacing a faucet after many years. Hoses have an inner tube, rubber elements, and compressed fittings. They may look clean outside while being tired inside. When you already have a new faucet and new hoses of the correct length, a fresh connection is usually the better choice.
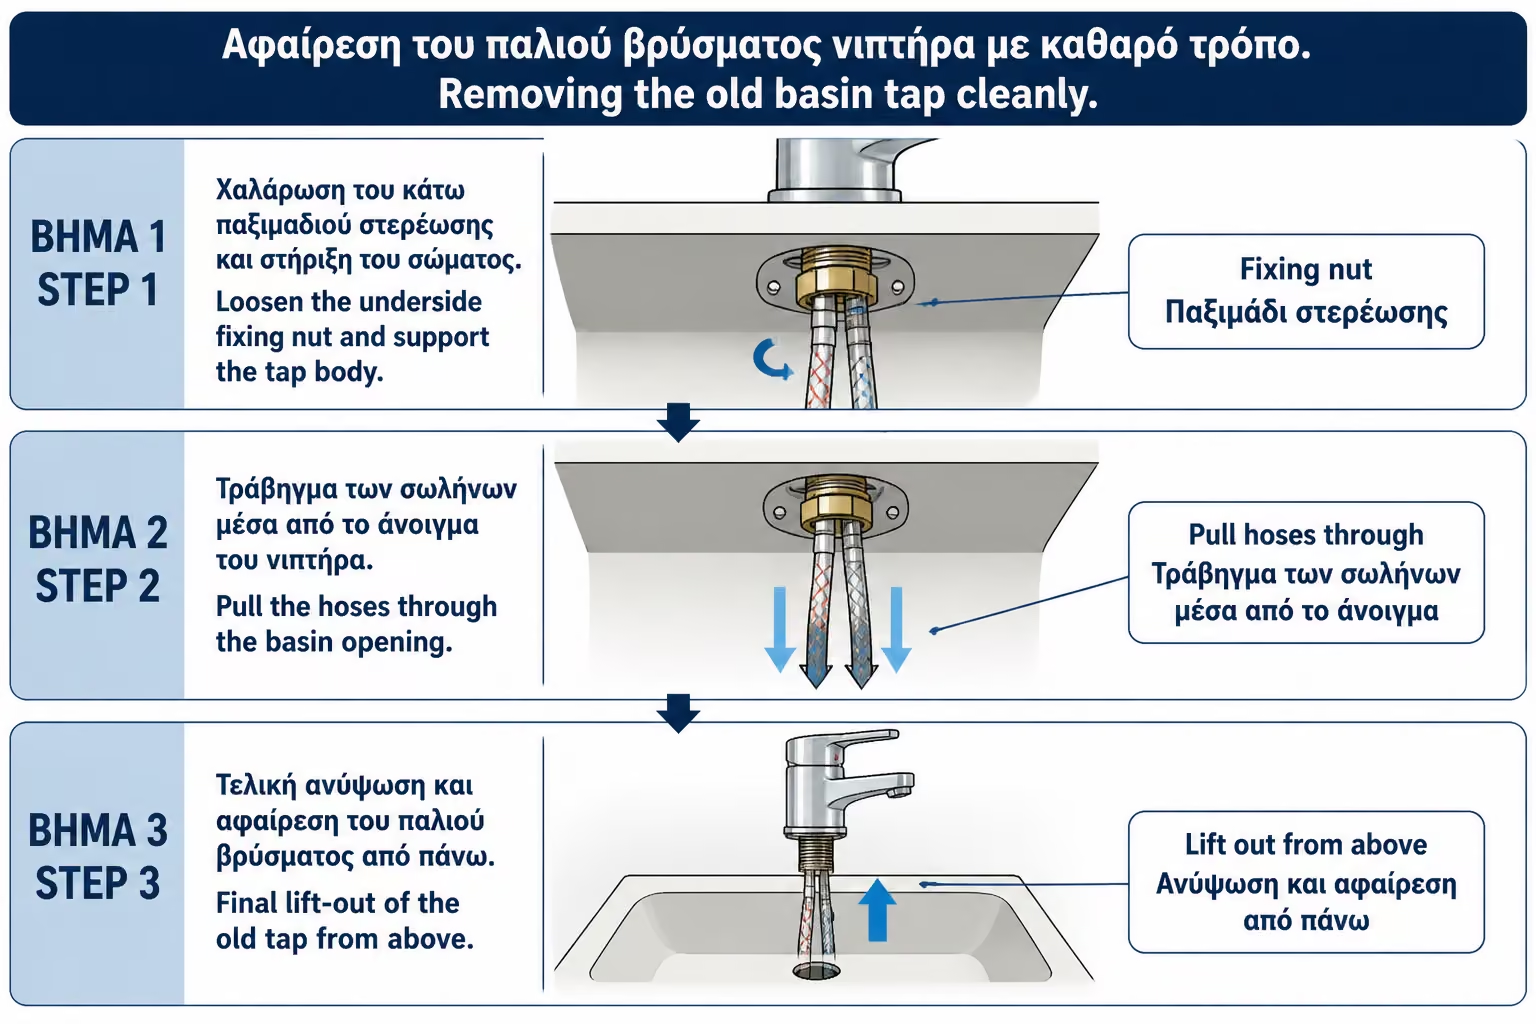
After the hoses are disconnected from below, the old faucet fixing must be undone. Most faucets have a nut, a metal or plastic retaining plate, and a rubber gasket under the sink that clamp the faucet in place. Reaching this point is often the hardest part.
If the faucet is old, the nut may be covered in scale or rust. Do not force it with a tool that does not grip properly. If you round off the nut, the job becomes much harder. Use a suitable wrench and work patiently. Sometimes it helps to clean the scale around the base first.
Once the fastener is undone, the old faucet lifts out. Pull it out carefully together with the hoses if they are still attached. The sink hole will probably have scale, old grime, or marks from the previous fitting. Clean the surface thoroughly before fitting the new one. The sealing of the new faucet also depends on how cleanly it sits on the base.
At this point it often becomes clear whether the old faucet was leaking at the base. If you see black marks, mold, swollen cabinet material, or heavy limescale underneath, water has been getting through for a long time. The new faucet can solve the issue, but only if the surface is cleaned properly and the sealing gasket is installed correctly.
Before placing the new faucet in the sink, read the instructions on the box. Not all faucets use exactly the same fixing system. Some use a threaded stud with a nut, others use two screws, others a metal fixing plate, and others a simpler clamp arrangement.
Usually, the braided hoses are screwed into the bottom of the faucet by hand first. This step needs attention: the hoses should not be overtightened at the faucet body. In many cases they rely on a small internal seal, so firm hand tightening, or only very light assistance, is enough depending on the manufacturer's instructions. Too much force can damage the thread or the seal.
Also fit the sealing gasket, if the model uses one, at the base of the faucet. This rubber matters because it helps stop water around the tap from passing through the sink hole. It is not magic, but it does contribute to a proper installation.
If the faucet has a pop-up waste rod, check its path before fully securing the body. In some basins, the mechanism can interfere with the trap or a cabinet drawer. It is better to spot that now than after everything is tightened.
Feed the hoses through the sink hole and lower the new faucet into place. From above, align the faucet so it faces the basin correctly. Underneath, fit the rubber, fixing plate, or clamp supplied in the box and begin tightening.
Tightening should be firm, not excessive. We want the faucet to not move when we open and close the handle, but we don't want to put too much pressure on the sink, especially if it's porcelain. Excessive force can create stresses, cracks or distortion in sensitive areas.
As you tighten from below, keep checking from above that the faucet has stayed straight. It is very common for the body to twist slightly while tightening, only for the mistake to become obvious at the end. Small corrections during tightening are much better than loosening everything again afterwards.
A practical trick is to tighten the faucet just enough for it to hold while still allowing a slight adjustment, align it perfectly from above, and only then do the final tightening underneath. That reduces the chance of ending up crooked.
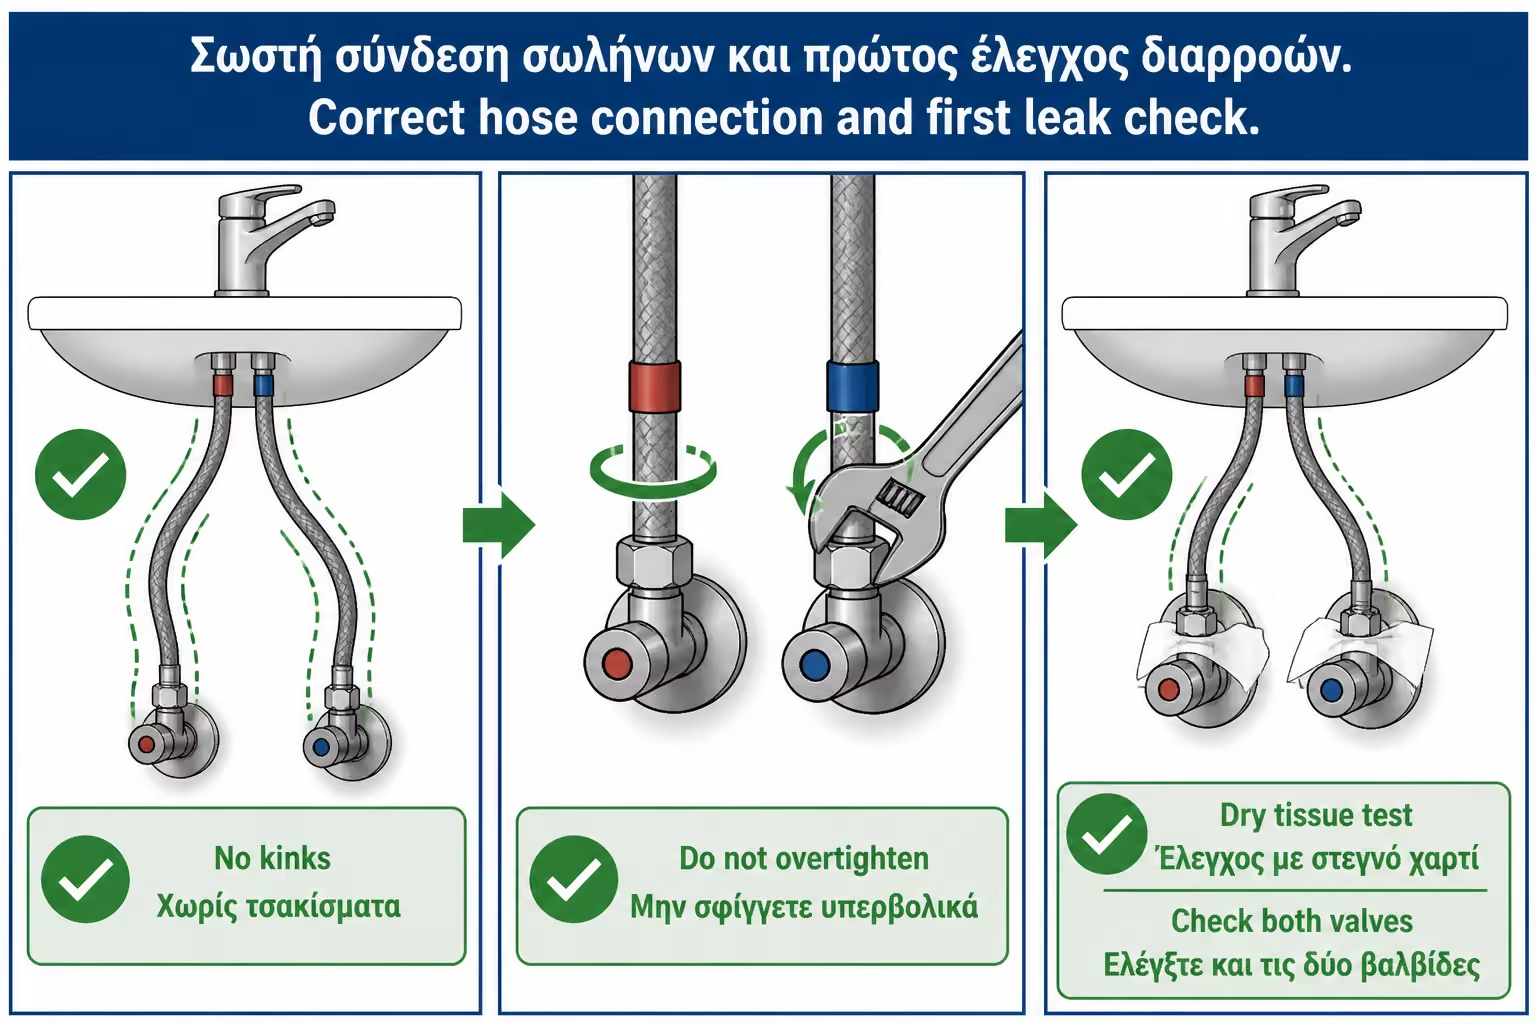
This is the point where most leaks are won or lost. The hoses must reach the angle valves without being stretched and without forming a sharp kink. A gentle curve is normal. A tight bend that looks as if the tube is folding is not.
Tighten the nuts by hand first. This is very important. If the nut does not easily grip the thread by hand, do not tighten it with a wrench. It may have been entered incorrectly. Crooked screwing injures the thread and can create a permanent tightness problem.
Once the nut has started correctly by hand, tighten it with a wrench. Again, there is no need to overdo it. Most hoses seal with an internal rubber washer. They do not seal because the nut has been crushed tighter and tighter. Overtightening can distort the washer and create the opposite result.
Pay attention to the correct hot-cold pairing. Usually, viewed from the front of the faucet, hot is on the left and cold is on the right. Under the sink, though, the route of the hoses can make this surprisingly easy to confuse. If you reverse them, the faucet will still work, but the hot-cold indicator on the handle will be wrong.
One of the most common questions is whether Teflon tape should be added to the hose threads. In most modern hose connections with a nut and internal rubber washer, Teflon is unnecessary and often unhelpful. The seal is made by the washer, not by the thread itself.
Teflon tape is mainly used where the thread itself is part of the seal, as in some metal threaded joints. On faucet hoses, if there is a flat rubber washer inside the nut, the important thing is proper contact between that washer and the face of the angle valve. Unnecessary Teflon can stop the nut seating correctly or create a false sense of security.
That does not mean Teflon tape is wrong in every plumbing job. It means it should be used only where it actually belongs. If you are unsure about the connection type, follow the faucet manufacturer's instructions or ask a plumber. The key is not to treat every leak by blindly adding material without understanding the leak path.
A practical example: if it drips where the hose nut meets the angle valve, the washer may not be seated correctly, the nut may be cross-threaded, or the face of the valve may be worn. Teflon on the thread may solve nothing because the leak is not coming from the place you assume.
Once the faucet is fixed and the hoses are connected, do not just open the water fully and assume the job is finished. The correct check is gradual. First make sure the faucet handle is closed. Then open one angle valve a little and watch the connection. If there is no drip, open it a bit more. Repeat on the second valve.
Then open the faucet and let water run for a few minutes, first on cold and then on hot. Look under the sink with a flashlight. Wrap paper towels around the connections. The paper will show even slight moisture that may be hard to spot directly.
Do not just check the hoses. Also check the base of the faucet, the area under the sink hole, the trap, and the shutoff valves. During the job you may have nudged the trap slightly, especially in a tight cabinet. It is not unusual for someone to replace a faucet and assume the new connection is leaking when the real issue is a loosened plastic drain fitting.
The first check should happen immediately. The second should happen after a few hours of use. The third should happen the next day. A very small leak may not show up in the first couple of minutes, but it will leave a trace over time. So do not immediately refill the cabinet. Leave the area clear for 24 hours and make sure everything stays dry.
Mistakes in faucet replacement are not usually dramatic. They are small omissions that show up later. A connection tightened slightly wrong, an angle valve forced too far, a washer that did not seat properly, or a hose stretched too tightly can all create a leak after use.
The table below summarizes the most common mistakes and their practical consequences:
| Error | What can it cause? | Correct approach |
|---|---|---|
| Angle valves are not checked before work | Inability to shut off water, leak, panic | Shut off first and test at the faucet |
| Tightening with excessive force | Washer deformation, thread wear | Firm tightening, not brute force |
| Hose started crooked | Damaged thread and leakage | First screwing by hand |
| Using old hoses | Future failure or hidden leakage | New hoses of the correct length |
| Poor faucet alignment | Aesthetic and practical problem | Check from above before final tightening |
| Refilling the cabinet immediately | Conceals a potential leak | Control for 24 hours |
| Use of Teflon for no reason | Incorrect sealing or false solution | Check connection type and hose |
A typical example is over-tightening. Many believe that "the more I tighten, the more certain it is". In rubber connections, however, this is not always the case. The rubber should be compressed enough to seal, but not so much that it deforms or cuts.
If a drop appears after installation, we do not panic but do not ignore it. Even one drop every few minutes can cause a problem on the furniture or floor if left for days. The first step is to locate exactly where the leak is coming from.
If the leak appears at a hose nut, close the relevant angle valve, open the faucet to release pressure, and inspect the connection. It may only need slight additional tightening. If it continues, undo the connection and check whether the washer is present, damaged, or seated incorrectly.
If it drips from the base of the faucet, the base gasket may not have seated properly, or water may be seeping through the sink surface. In that case, wipe everything dry and pour a little water around the base without opening the faucet. If moisture appears from below, the problem is at the base rather than in the hoses.
If the leak is coming from the angle valve itself, especially from the spindle or where it enters the wall, stop and call a plumber. Replacing an angle valve may sound minor, but it involves the wall supply. If it goes wrong, the leak can be much more serious than the faucet job you started with.
If you do the work yourself, the cost is mostly limited to buying the faucet and a few small materials. A simple basin faucet can start at a low price, while higher-quality or branded options rise significantly. In a typical Greek bathroom, many owners choose mid-range options where the cartridge, finish, and hoses are more reliable than in the very cheapest products.
For professional work, the price depends on the area, the difficulty of access, whether the job is only a faucet replacement or also includes angle-valve replacement, whether materials are included, whether VAT is included, and whether the visit is during normal hours or an emergency. As a rough picture for 2026, a straightforward basin faucet replacement often sits around €40–80 in labour, while difficult access, angle-valve work, or extra hardware can push the cost higher.
The faucet itself may cost roughly €25–40 for very budget options, around €50–120 for decent mid-range choices, and considerably more for branded products, special finishes, tall countertop faucets, or design ranges. Not every bathroom needs a premium model, but at the cheapest end you should check the quality of the mechanism, hoses, plating, and warranty.
| Case | Indicative picture of costs |
|---|---|
| Faucet purchase only | around €25–60 |
| Good-quality mid-range faucet | around €60–120 |
| Design or special-finish faucet | €120+ |
| Simple replacement job | around €40–80 |
| Replacement with extra difficulty or small materials | around 80–150€+ |
These prices are indicative and should not be read as a fixed price list. In an easy ground-floor bathroom with clean connections, the job is simple. In an older apartment, with seized nuts, angle valves that do not shut properly, and awkward cabinet access, time and risk both increase. In those cases a higher price is justified, because the technician is being paid not just for "tightening things up," but for avoiding damage.
The right faucet is not necessarily the most expensive one. It is the one that suits the basin, the way the bathroom is used, and the quality of the installation. In a small guest WC, a simple reliable faucet may be enough. In a family bathroom used every day, it is worth paying more attention to the mechanism, finish, and ease of use.
Check whether the handle moves smoothly, whether the body feels solid, whether the box includes decent-quality hoses, and whether spare parts are available. In hard-water areas, which are common in Greece, limescale is harder on faucets. A good aerator, easy cleaning, and a durable finish matter in daily use.
Also look out for black, gold or special finishes. They are aesthetically beautiful, but need more careful cleaning. Strong cleaners, hard sponges and salts can mark them. If the bathroom is heavily used and frequently cleaned with strong products, a classic chrome finish may be more tolerable in practice.
Finally, don't overlook ergonomics. A faucet with a spout that is too short can throw the water too close to the back of the sink. A faucet that is too tall in a shallow sink can splash. A very hard handle can be annoying for children or the elderly. Everyday comfort is more important than the first impression of the photo.
After the replacement, the key is monitoring. For the first few days, open the cabinet and inspect the connections. There is no need for anxiety, just practical follow-up. A dry piece of paper placed under the hoses will show moisture immediately if something is still wrong.
Clean the faucet with mild products and avoid very aggressive cleaners, especially on special finishes. If you have hard water, wipe the base and spout regularly to limit scale build-up. Many failures do not begin with a bad faucet, but with years of neglect, accumulated limescale, and harsh cleaners that damage seals and finishes.
If, after a few days, the handle is smooth, the flow is steady, and the cabinet stays dry, the replacement has been done correctly. If you do see moisture, do not immediately blame the “new faucet.” Check methodically: the base, the hoses, the angle valves, the trap, and the waste. Water often travels from one point and appears somewhere else.
| Inquiry | Yes / No |
|---|---|
| Do you know where the home's main water supply shuts off? | Yes / No |
| Are both angle valves fully closed? | Yes / No |
| Does the flow stop completely when you open the faucet after closing them? | Yes / No |
| Have you emptied and protected the cabinet under the sink? | Yes / No |
| Does the new faucet fit the height and size of the sink? | Yes / No |
| Do the hoses reach without stretching or kinking? | Yes / No |
| Were the nuts screwed in by hand first before being wrenched? | Yes / No |
| Did water turn on gradually and check with kitchen paper? | Yes / No |
| Was the siphon also checked after the job? | Yes / No |
| Was the cabinet kept empty for checking during the first 24 hours? | Yes / No |
If the answer to any of the first three questions is “No”, it is better not to start the replacement yourself. Being able to control the water is the key to doing the job safely.
If you keep only one idea from this guide, let it be this: before undoing anything, make sure you can actually shut off the water. Replacing a basin faucet is not difficult when the angle valves work, the connections are clean, and access is good. It becomes risky only when old components are forced without control. Do not measure success by whether the new tap runs, but by whether the cabinet is still dry the next day.
Replacing a sink faucet sits right on the line between simple DIY and proper plumbing responsibility. In a modern bathroom, with working angle valves and easy access, it can be done quite simply as long as there is patience, correct tightening, and careful checking. You do not need to be a technician to understand the process, but you do need to respect water and connections.
The real goal is not replacing the faucet quickly. It is replacing it without damaging threads, without forcing old fittings, without stretching the hoses, and without leaving a hidden leak under the sink. One overlooked drip can do more damage than the cost of the faucet itself.
If the installation is clean, the switches close, and you have the right tools, you can proceed methodically. If anything looks old, stuck, unstable, or suspicious, the best decision is to stop and call a plumber. Good technical judgment is not about doing everything ourselves, but about knowing when a simple task remains simple and when it starts to hide risk.
Return to category.
Go to categoryReturn to the central guide.
Go to guide