
Bathroom DIY, Maintenance & Styling
Return to category.
Go to categoryLow pressure in the faucet is one of the problems that immediately make everyday life more irritating. You wash your hands and the water comes out weakly. You fill a glass and it takes too long. In the bathroom sink the flow looks "tired", while in the kitchen the water is thrown sideways, foams or comes out as if something has blocked the end of the faucet.
Very often, the owner immediately thinks the worst: that the mains pressure has dropped, that the pipes are clogged, that the water heater is to blame, or that the faucet must be replaced. In many cases, though, the cause is much simpler and sits in the last part of the tap: the small filter at the spout, known as the aerator.
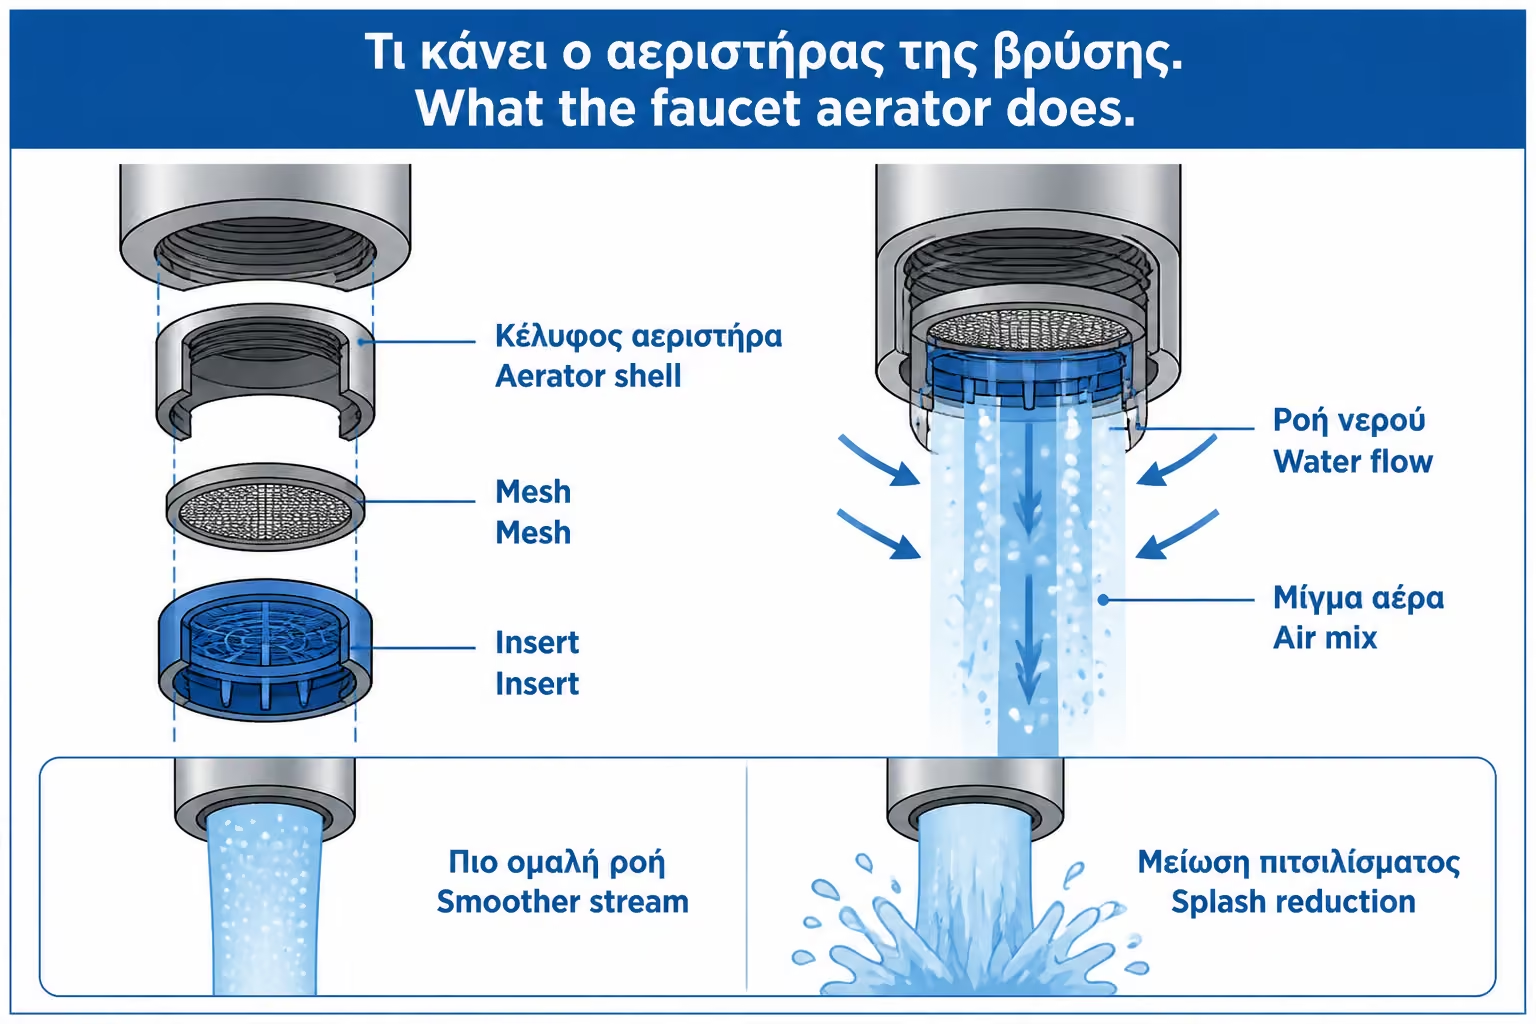
The aerator sits at the tip of the faucet, where the water comes out. Its role is to catch small particles, shape the flow, mix air with the water, and reduce splashing. When it is clean, the stream is even and pleasant. When it fills with limescale, rust, grit, or debris from plumbing work, the flow drops and the faucet starts to feel weak.
This is particularly common in the Greek reality, where in many areas the water is hard and quickly leaves salts. Also, after water breaks, work in the apartment building, pipe changes or water heater replacement, small particles can move through the network and end up in the faucet filter. The result is suddenly visible: yesterday the faucet worked normally, today the flow is half.
Cleaning the aerator is one of the quickest and most useful DIY moves around the house. It doesn't require special knowledge, you don't need to open an installation and it usually doesn't require shutting down a central supply either. However, a little care is required, as the nozzle can be caked with scale, scratched if you grab it with the wrong tool, or reinserted incorrectly if you don't pay attention to the order of the small parts.
In this guide we will see how to tell whether the aerator is to blame, how to unscrew it without damaging the faucet, how to remove limescale and grit, how to reinstall it correctly, and when low pressure points to a more serious issue in the installation.
The aerator is the small piece that screws onto the end of the faucet. From the outside, it looks like a metal ring or a small insert at the spout. Inside, though, it contains fine mesh, plastic or metal parts, and often a small sealing gasket. These elements shape the water before it leaves the tap.
Its main role is to make water more pleasant to use. Without an aerator, the stream can come out harshly, splash, or fall unevenly. With the aerator in place, the water mixes with air and feels fuller, more even, and easier to control. In many faucets it also helps reduce consumption without making the flow feel noticeably weak.
At the same time, its fine mesh traps particles. That is both useful and problematic. It is good to keep grit and debris out of the stream you use, but once those particles collect, the filter clogs. A component designed to improve flow ends up restricting it.
In a bathroom faucet, the aerator often clogs gradually with scale. In a kitchen faucet, it may also catch fine debris from the mains. In an older apartment building, work on the shared plumbing can suddenly send rust and small particles straight into the filter.
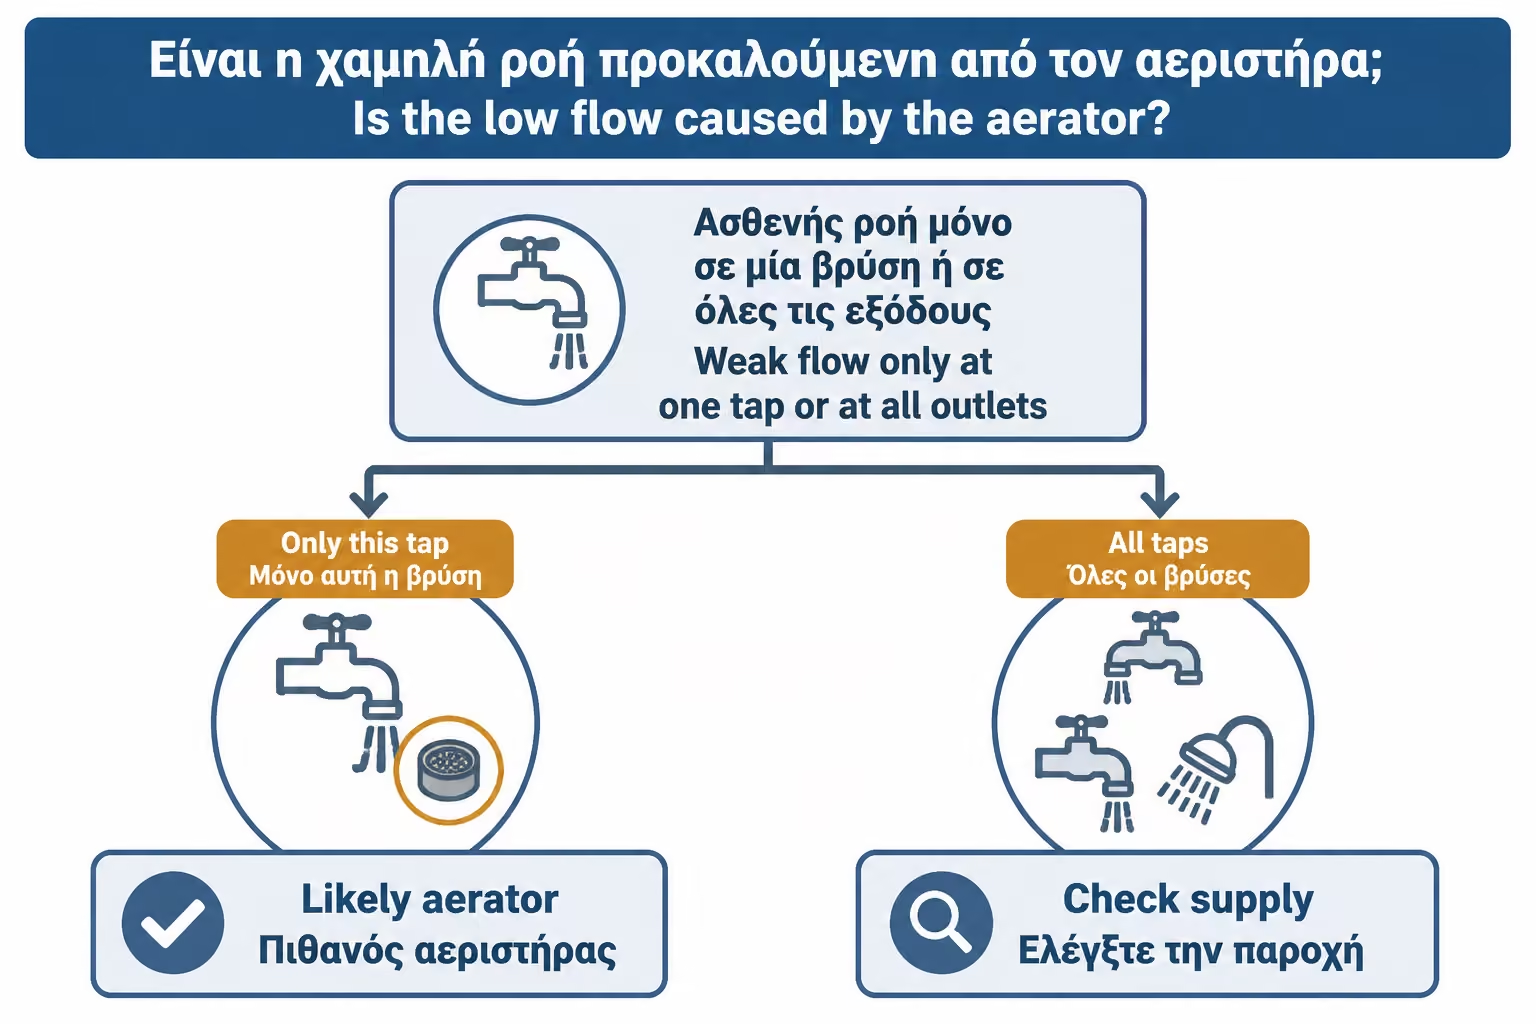
The first sign that the aerator is at fault is when the problem only occurs on one faucet. If the sink has a low flow, but the shower, kitchen and other faucets work normally, then it is very likely that there is a local problem in the filter of that particular faucet.
A second sign is irregular flow. If the water does not come out as a single stream but is thrown sideways, makes small "sprays", comes out of half the surface or changes direction, the nozzle probably has scale or debris. The mains pressure may be normal, but the water does not find a proper outlet.
A third sign is a sudden change after a water break. If there was a break in the area, work in the apartment building or opening-closing of services and after that the tap lost flow, the filter is one of the first places to be checked. Small particles dislodged from piping may have ended up there.
A simple test is to unscrew the aerator and briefly turn on the faucet without it. If the flow immediately returns strong and clear, the problem is in the filter. If the flow stays weak even without the aerator, the cause is further back: in the faucet body, the supply hoses, the angle valves, a line filter, or the supply itself.
We should not think that every low pressure is solved by the filter. If the problem occurs in all the taps in the house, it is most likely related to the central pressure, the pressure reducer, the mains of the apartment building or some general filter. If it's just the hot water, it could be related to the water heater, hot water pipes, salts in the supply or a clogged filter elsewhere.
If the pressure only drops when two taps are opened at the same time, the issue may be a pipe cross-section, old installation or general supply. If the flow is good at first and drops after a few seconds, there may be a problem with a valve, inlet filter, or pressurized supply.
On pull-out, detachable-spout, or specialty-filter faucets, the problem may lie in the hose or in an internal filter rather than in the final aerator. Those cases need a closer look because there are more components involved.
Cleaning the aerator is the first move because it is easy, quick and often effective. But it is not a diagnosis for the entire installation. If after cleaning the flow does not change, we do not blindly continue with more force or chemicals. We proceed to a more systematic check.
In many cases, the aerator can be unscrewed by hand. That is the safest method because it does not mark the faucet. If it is caked with limescale or has been in place for years, though, a tool may be needed. Most aerators have chrome or specialty finishes that scratch easily, so care matters.
For a proper cleaning you will need:
| Tool / Material | Use |
|---|---|
| Soft cloth | Protects chrome from scratches |
| Small pliers or wrench | Only if it doesn't unscrew by hand |
| Old toothbrush | Mesh and scale cleaning |
| Small bowl | Soaking the filter |
| Vinegar or a suitable mild descaler | Dissolving deposits |
| Toothpick or thin plastic tool | Remove small gems, with care |
| Kitchen paper | Control and drying |
| Lens | Check inside the faucet spout |
If the faucet has a black, gold, bronze, or other specialty finish, avoid harsh cleaners and tools on the surface. Many modern finishes are more delicate than classic chrome. You may clean the filter perfectly and still leave marks on the outside of the faucet.
A little trick is to put the plug in the sink or cover the drain with a cloth before loosening the filter. The aerator parts are small and if they fall into the siphon, a minute's work can become a drain solution.
First turn off the faucet. You don't usually need to turn off the water supply, as long as there is no water running while you are working. Grasp the nozzle with your hand and turn it counterclockwise, like unscrewing a cap. If the faucet is on top of you or the spout is upside down, the sense of direction can be confusing. Look down and work calmly.
If it will not turn by hand, wrap the aerator in a soft cloth and use pliers or a small wrench. Do not grip the metal directly with the plier teeth. That will leave marks, especially on chrome or painted finishes. Use controlled force. You do not want to distort the faucet outlet.
If the nozzle is clogged with scale, do not force it. Dampen a cloth with vinegar or a mild descaler and wrap it around the area for a while. This can soften the limescale in the thread. Then try again. On older faucets, patience works better than force.
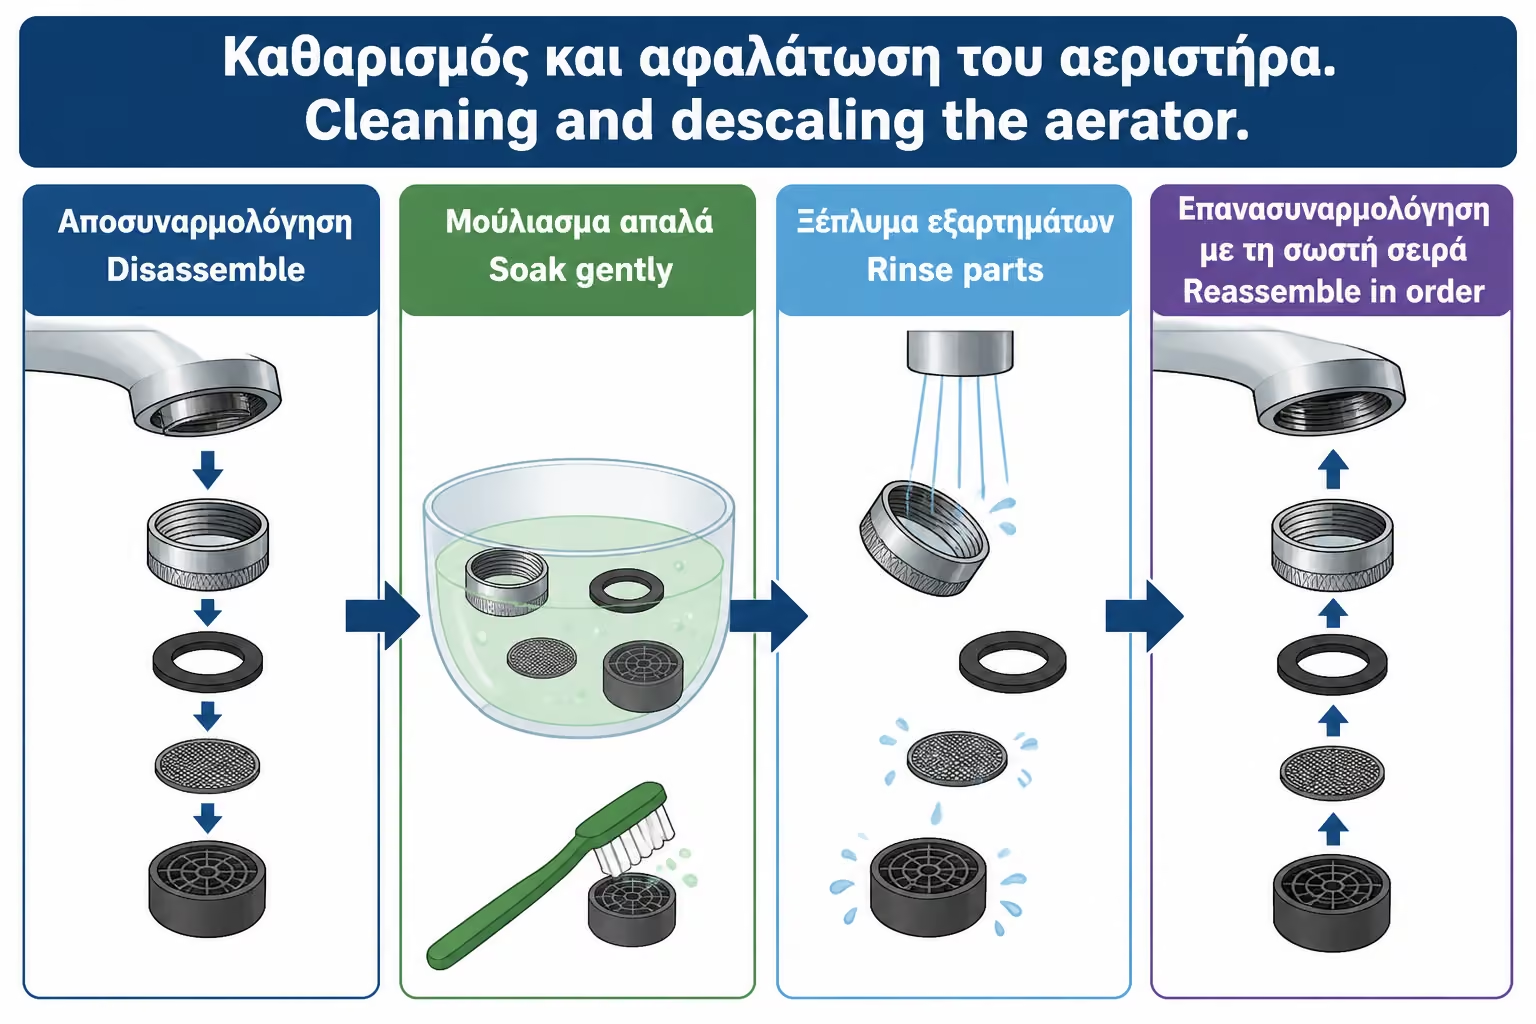
Once it is apart, note the order of the parts. There may be a metal ring, mesh, plastic inner piece, and a small seal. Line them up on paper in the order they came out. If you flip them over or lose the gasket, the nozzle may drip later or the flow may not sit correctly.
When you open the aerator, you will often see small white or gray pieces of scale, fine sand, rust, grit, or black particles. These are not necessarily signs of serious damage. They can simply be the result of hard water, old pipes, or a recent water outage.
Salts usually sit on top of the lattice and gradually reduce the cross-section. Pebbles and particles often get stuck in the small holes, so the flow comes out of only a few spots and is thrown awry. If the filter has too much material, it is natural for the faucet to appear as if it has no pressure.
A useful practical clue is the color of the residue. White or yellow deposits usually point to limescale. Brown or reddish particles may indicate rust from older metal piping or recent network work. Small black bits can come from worn seals, filters, or internal components. If they keep appearing, not just once, the installation is worth checking more closely.
Do not throw away the filter immediately if it looks dirty. Many are fully cleaned and run like new. But if the mesh is torn, the plastic is deformed or the seal is hardened, it is better to replace it.
Before tackling the limescale, remove the visible solid particles. Turn the filter upside down and rinse it under running water. If grit is stuck in the mesh, use a toothpick or a thin plastic tool. Avoid aggressive use of a metal needle that might widen or distort the holes.
In many cases, the filter clears immediately. You will see that the water is coming through all the little holes again. If the particles are mainly sand or rust, a simple mechanical cleaning may be sufficient. But if there is a hard white crust, it is necessary to deal with salts.
Also clean the inside of the metal ring. Salts don't just sit on the grid. They may have caught on the thread or on the sealing surface. If they stay there, the nozzle can be difficult to screw back on or drip.
If the problem appeared after network work, turn on the tap without the filter for a few seconds to remove any remaining particles from the spout. Do this carefully, because water without an aerator can be thrown more sharply. Then clean the nozzle again and proceed with the repositioning.
Salt is the most common cause of gradual flow reduction. To soften them, place the aerator parts in a small bowl of vinegar or a suitable mild descaler, depending on the product's instructions. Let them soak and then scrub them with an old toothbrush.
Vinegar helps with mild deposits, but is not always enough for very hard salts that have been left for years. In such cases, a special salt cleaner may be needed, but with attention to compatibility with the materials. If the aerator has plastic parts, filters, special finishes or rubber gaskets, do not leave it unattended for long hours in strong product.
Avoid using very hard metal tools. If you scratch the grid or distort the small holes, the flow may come out worse. We want to remove scale, not change the geometry of the filter.
After soaking, rinse all parts thoroughly with clean water. There should be no detergent residue left in the filter, especially if it is a kitchen faucet or a point used for drinking water. If the seal looks damaged after cleaning, replace it.
Many people clean only the removable filter and forget the faucet opening itself. There may still be limescale on the thread, small particles inside, or bits of an old gasket. Before screwing the aerator back on, inspect the opening with a flashlight.
Clean the thread with a toothbrush. If there is scale around the outlet, soften it with a little vinegar on a cloth and wipe it away. Do not pour harsh chemicals into the faucet and do not scrape visible areas with a metal tool. You can scratch or dull the finish very easily.
Turn on the water briefly without the aerator to remove any debris. This is especially useful after a water outage or work. If you see grit or brown water coming out, let it run until it runs clear. Then close and reinsert the filter.
If without the filter the flow remains weak, stop looking at the aerator as the main cause. The faucet shows you that the problem is before the spout.
Reassembly must follow the correct order of parts. If pieces go back upside down, the flow may look odd or the filter may not seal. The gasket should sit exactly where it belongs, usually at the top of the ring so it seals against the faucet opening.
Screw in by hand first. The nozzle should easily grip the thread. If you feel resistance at first, it probably went wrong. Solve it and try again. Crooked screwing can injure the thread and create a permanent leak.
Tighten until it's a good fit, not overtightening. On many nozzles, hand tightening is sufficient. If a tool is needed, use a cloth and make very little movement. It is the seal that seals, not excessive force.
Turn on the faucet gradually and observe the flow. If it comes out evenly and loudly, the cleaning was successful. If it drips around the ring, check the seal and screw. If the flow is still irregular, perhaps the filter is worn or a part was inserted upside down.
The aerator is a small and economical accessory. If it is cleaned and working properly, there is no reason to change. But if the mesh is broken, if the plastic interior is deformed, if the seal does not seal, or if the salts have become a very hard mass that cannot be removed, replacement is more reasonable.
Also, if the faucet is old and the nozzle is worn on the outside, it may be worth getting a new one in. The difference in flow can be dramatic. In some batteries, especially branded or design batteries, the aerator may be of a special type and require a specific spare part. Not all filters fit all faucets.
There are external aerators, hidden aerators that sit inside the spout, different flow-rate versions, and special keys for removal. If your faucet has a hidden aerator, do not try to remove it with a screwdriver or knife. You need the proper plastic key, otherwise you may damage the part.
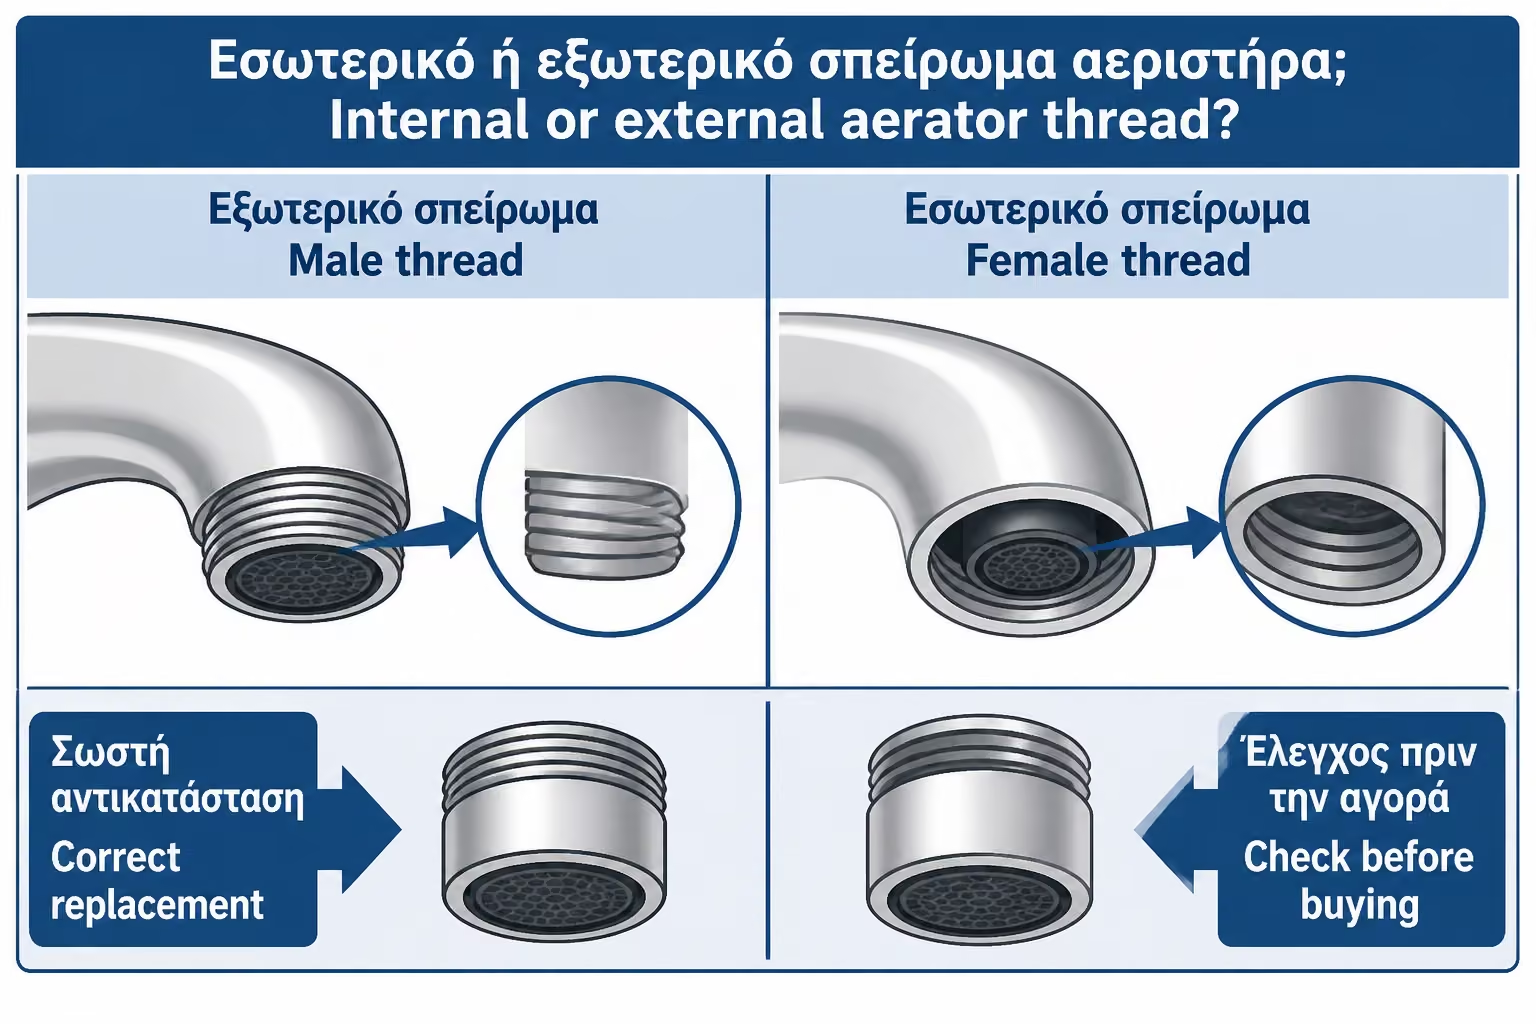
Replacement is a small expense, but it has to be done right. Take the old filter with you to the store or take a close-up photo of it. Note diameter, thread type, internal or external tap and whether it is plain or special flow.
Aerators do not all screw in the same way. On some faucets, the aerator has an external thread and screws into the spout. On others, it has an internal thread and screws onto the faucet's outer thread. The difference becomes obvious once you remove it.
If you buy the wrong type, it won't screw. Do not try to force it. The threads on the nozzles are small and can break easily. There are also different diameters, such as smaller filters for sinks and larger ones for kitchen or special batteries.
In modern faucets, the aerator can be "hidden," meaning it has no visible outer ring. In that case it is removed with a special key. If you do not have the key, it is often included in the faucet box or available from a plumbing supplier. Trying to remove it with a sharp tool may damage the aerator or the finish.
These details seem small, but they save a lot of trouble. A filter of a few euros can become irritating if it does not fit exactly.
If the faucet has good flow on cold but poor flow on hot, the aerator is not the most likely cause. The same filter serves both hot and cold at the faucet outlet. If it were clogged, it would usually affect both sides. When the problem appears only on hot, we need to look further back.
There may be scale in the hot line, an issue with the water heater, a partially closed angle valve, a clogged faucet inlet filter, or a problem with a supply-hose connection under the sink. In older installations, scale build-up is often worse on hot water because higher temperatures encourage deposits.
A simple test is to check whether the weak hot-water flow also appears at other faucets. If it does, the cause is probably more general. If it does not, it may be related to that specific faucet or its connection. In that case, cleaning the aerator is still a sensible first move, but it should not be treated as a final diagnosis.
If you do not have experience working under sinks or around water heaters, do not start dismantling hoses and valves without knowing exactly how to shut off the water. That is the point where the job changes and a plumber may be needed.
After a bathroom or kitchen renovation, pipe replacement, water heater replacement or apartment building work, it is very common for debris to appear in the filters. Even if the technicians have done a good job, small particles from pipes, valves, teflon, rust or scale can be moved when the water is turned back on.
For that reason, after plumbing work, it is often smart to remove the aerators temporarily and let the water run until it clears. If you skip that step, particles can get trapped in the filters immediately and make the faucet seem faulty. The owner may think the new faucet is bad when the filter has simply filled up in the first few minutes.
The same can happen after a water outage in the area. When the supply is restored, the water may briefly be cloudy or carry small particles. If you immediately turn on the faucet with the aerator in place, all of this can end up in the filter.
A practical measure is to first briefly turn on a faucet without a sensitive filter or remove the aerator before the water runs. It is not always possible, but in renovations and large works it is good practice.
Do not clean the nozzle with violent metal tools. Do not open the holes with a nail or thick needle. You can destroy the mesh and the flow will change. The filter is not a simple sieve; it has a specific configuration.
Do not use pliers directly on the chrome. Scratches on a faucet are more visible than you think, especially on a sink or kitchen tap in a prominent position. Always use a cloth or a proper protective tool.
Do not screw the filter in the wrong way. If it's not easy to grip, it's not in the right place or it's not the right part. Power does not correct a wrong thread.
Do not ignore recurring particles. If you clean the aerator and it fills up again after a few days with rust or grit, there is a reason behind it. The supply line may need cleaning, the filters may need checking, or the older piping may need a closer diagnosis.
Cleaning the aerator costs almost nothing if you already have the basics at home. A bowl, some vinegar, a toothbrush, and a cloth are enough in most cases. If replacement is needed, standard aerators are inexpensive, although specialty or branded parts may cost more.
| Case | Indicative cost picture 2026 |
|---|---|
| DIY cleaning with vinegar / brush | practically 0–5€ |
| Simple replacement aerator | around €2–8 |
| Better or special aerator | around €8–20 |
| Hidden aerator with special key | around €5–20, depending on type |
| Plumbing work if combined with another check | usually a small charge |
| Standalone visit to diagnose low pressure | around 40–80€+, depending on the region and case |
These prices are only indicative and depend on the shop, the quality of the part, the faucet type, the region, whether VAT is included, and whether the visit is for simple cleaning or a broader pressure diagnosis. For a straightforward clogged aerator, though, this is one of the cheapest fixes in the house.
A plumber is needed when low pressure does not improve after removing the aerator, when the problem affects multiple faucets, when it appears only on hot water, when rust and debris keep returning, or when the faucet has a special mechanism you cannot handle safely.
Extra care is also needed if the aerator will not unscrew with normal effort. On older faucets, scale may have bonded so firmly that force will scratch the finish or distort the outlet. If the faucet is expensive or has a delicate finish, it is better not to risk it.
If after cleaning the flow improves for a few days and then drops again, there is a possibility that particles are constantly coming from the installation. There cleaning the filter is only temporary relief. The cause must be checked.
The plumber can then check the angle valves, supply hoses, inlet filters, pressure reducer, water heater, faucet body, and the general supply. The aerator is the first checkpoint, not always the last one.
| Inquiry | Yes / No |
|---|---|
| Does low flow occur on only one faucet? | Yes / No |
| Is the flow erratic or thrown out of the spout? | Yes / No |
| Have you covered the drain so small parts don't get lost? | Yes / No |
| Have you tried unscrewing the nozzle by hand first? | Yes / No |
| If a tool was used, was a cloth inserted to protect the finish? | Yes / No |
| Was the order of the parts as they came out kept? | Yes / No |
| Removed grit and debris from the mesh? | Yes / No |
| Was it soaked for limescale and brushed? | Yes / No |
| Was the faucet outlet also cleaned before reinstalling? | Yes / No |
| Was the filter screwed on by hand first without warping? | Yes / No |
| Was a flow test done without the aerator to confirm the cause? | Yes / No |
| If the pressure remained low, was a deeper problem considered? | Yes / No |
If the faucet has normal flow without the aerator and low flow with it, the problem is in the filter. If the flow is low and without it, cleaning the nozzle is not enough and the test must be continued.
Before you assume the whole house has a pressure problem, first unscrew the faucet aerator and inspect it. In many cases, the solution is nothing more than limescale and grit blocking the filter. Clean it, flush the spout, test the flow without the aerator, and refit it with the gasket in the right place. If the flow returns, you have saved yourself unnecessary work. If not, then it is time to look further back in the installation.
Low faucet pressure does not always mean a serious plumbing fault. Very often, especially when only one faucet is affected and the flow is erratic or weak, the cause is the small filter at the spout. The aerator collects limescale, debris, rust, and grit, protecting the flow but slowly clogging over time.
Cleaning it is simple: unscrew it carefully, remove debris, soak away the limescale, brush it, rinse it, check the spout, and refit it correctly. The difference can be immediate. A faucet that seemed problematic can be restored in minutes.
But if the pressure stays low even without the aerator, if the problem appears only on hot water, or if it affects several faucets, then the aerator is not the cause. That is where a closer check of the faucet, the supply lines, the filters, the water heater, or the wider installation is needed. The sequence is simple: start with the easiest point, but do not stop there if the symptoms point to something deeper.
Return to category.
Go to categoryReturn to the central guide.
Go to guide