
Bathroom DIY, Maintenance & Styling
Return to category.
Go to categoryA stuck faucet button may seem like a minor inconvenience, but it can create a real waste of water. You press the button, the cistern empties, but the button does not immediately return to its position. Or it returns externally, but internally the mechanism remains slightly pulled. The result is familiar: the water continues to flow into the basin, the cistern does not stop filling or refills every few minutes without anyone stepping on it.
In modern classic porcelain faucets, the problem often occurs in the dual flow buttons. These are the buttons with two options, low and high flush, that activate the internal extraction mechanism. If the knob, strings, rods, or plastic guides are not properly adjusted, they may be constantly pressing on the exhaust valve. Then the "bubble" or the flange on the bottom is not pressed completely and the water passes quietly into the basin.
The confusion is that the symptom looks like a floater or exhaust valve failure. The owner sees water running and thinks the cistern is broken. In fact, many times it's just that the button is misaligned, the cable is too long, the rod is set too far down, or the sump cap isn't sitting properly. Small detail, big effect.
The repair may be simple, but it takes care. We don't start by pulling plastic pieces with force. We don't cut strings without knowing if they are adjustable. We do not tighten the button until it "sits". First we open the cap properly, observe the mechanism, see if the problem only occurs when the cap is in place, and then make minor adjustments.
In this guide we'll look at how a dual flow button works, why it can stick, how to adjust internal strings or rods, how to tell if the button or ejector is at fault, and when a part replacement is the right solution. The goal is to stop the water from running without creating new damage to the cistern.
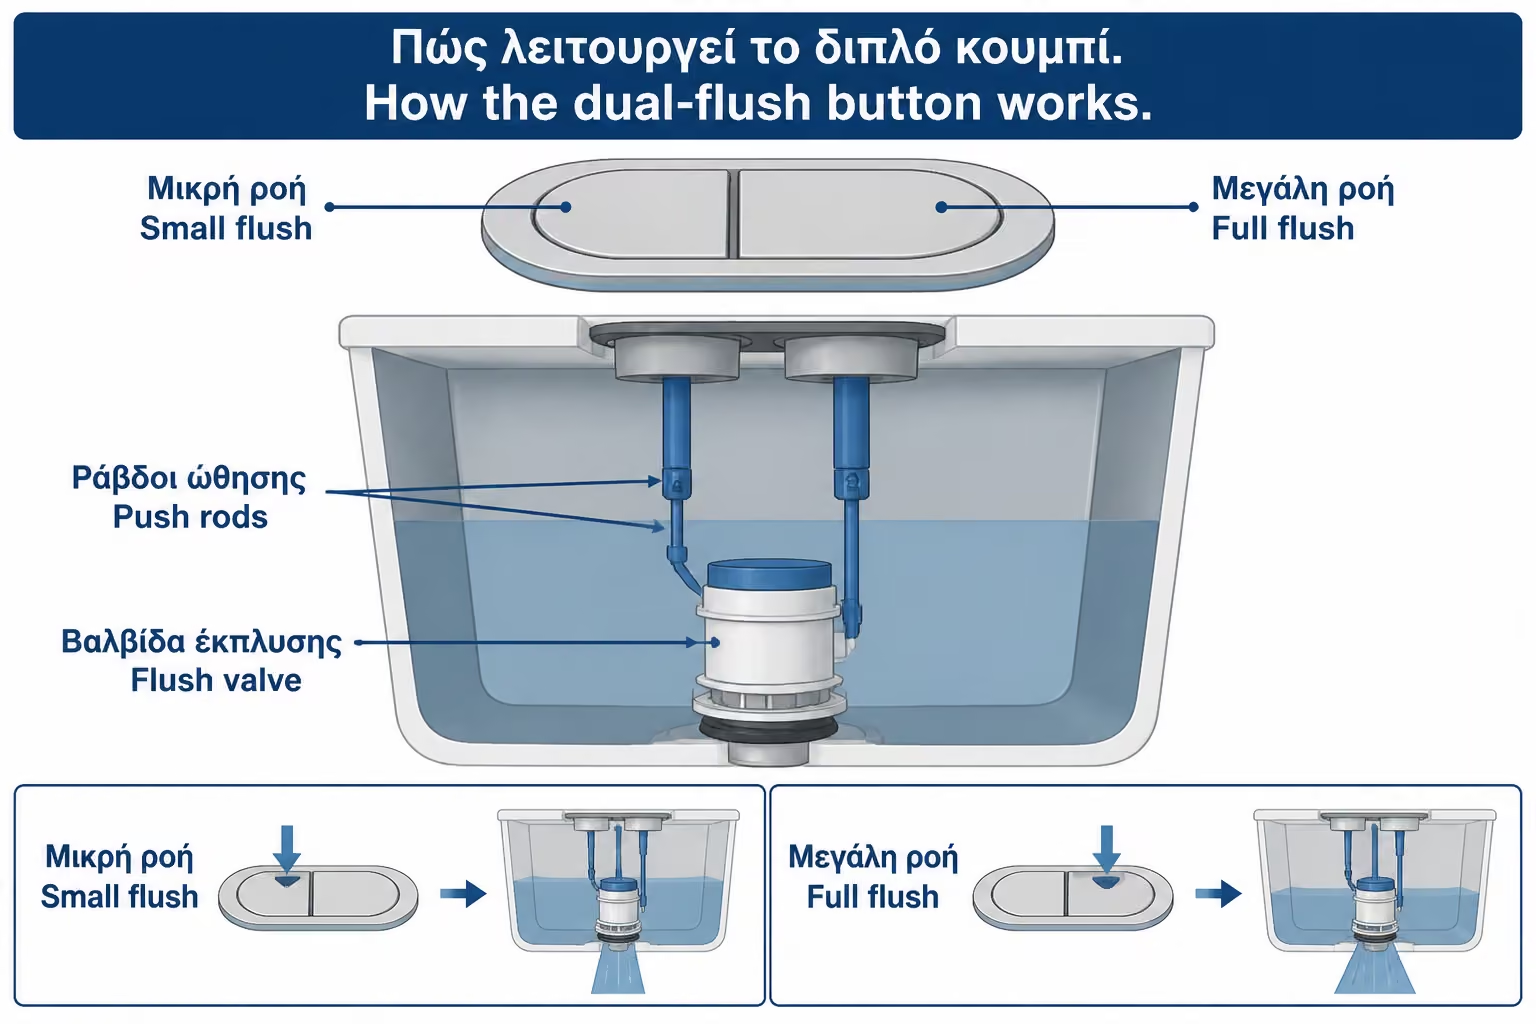
The dual flow button has two buttons or two pressure zones. The small button activates a smaller amount of water, usually for light use. The large button activates a full flush. Externally it looks like a simple round or oval button on the lid of the cistern. Internally, however, it is connected to the extraction mechanism by means of plastic rods, strings or small guides.
When you press the button, the force is transferred to the ejector mechanism. He lifts the valve at the bottom of the cistern and the water flows into the basin. When you release the button, the mechanism should return on its own, the valve should click into place, and the cistern should begin to fill again to the correct level.
If something on the button or strings is holding the mechanism down slightly, the valve will not close completely. It doesn't need to stay open long. Even a gap of half a millimeter can allow water to pass into the basin. The owner simply sees a thin stream or hears the cistern filling up with water.
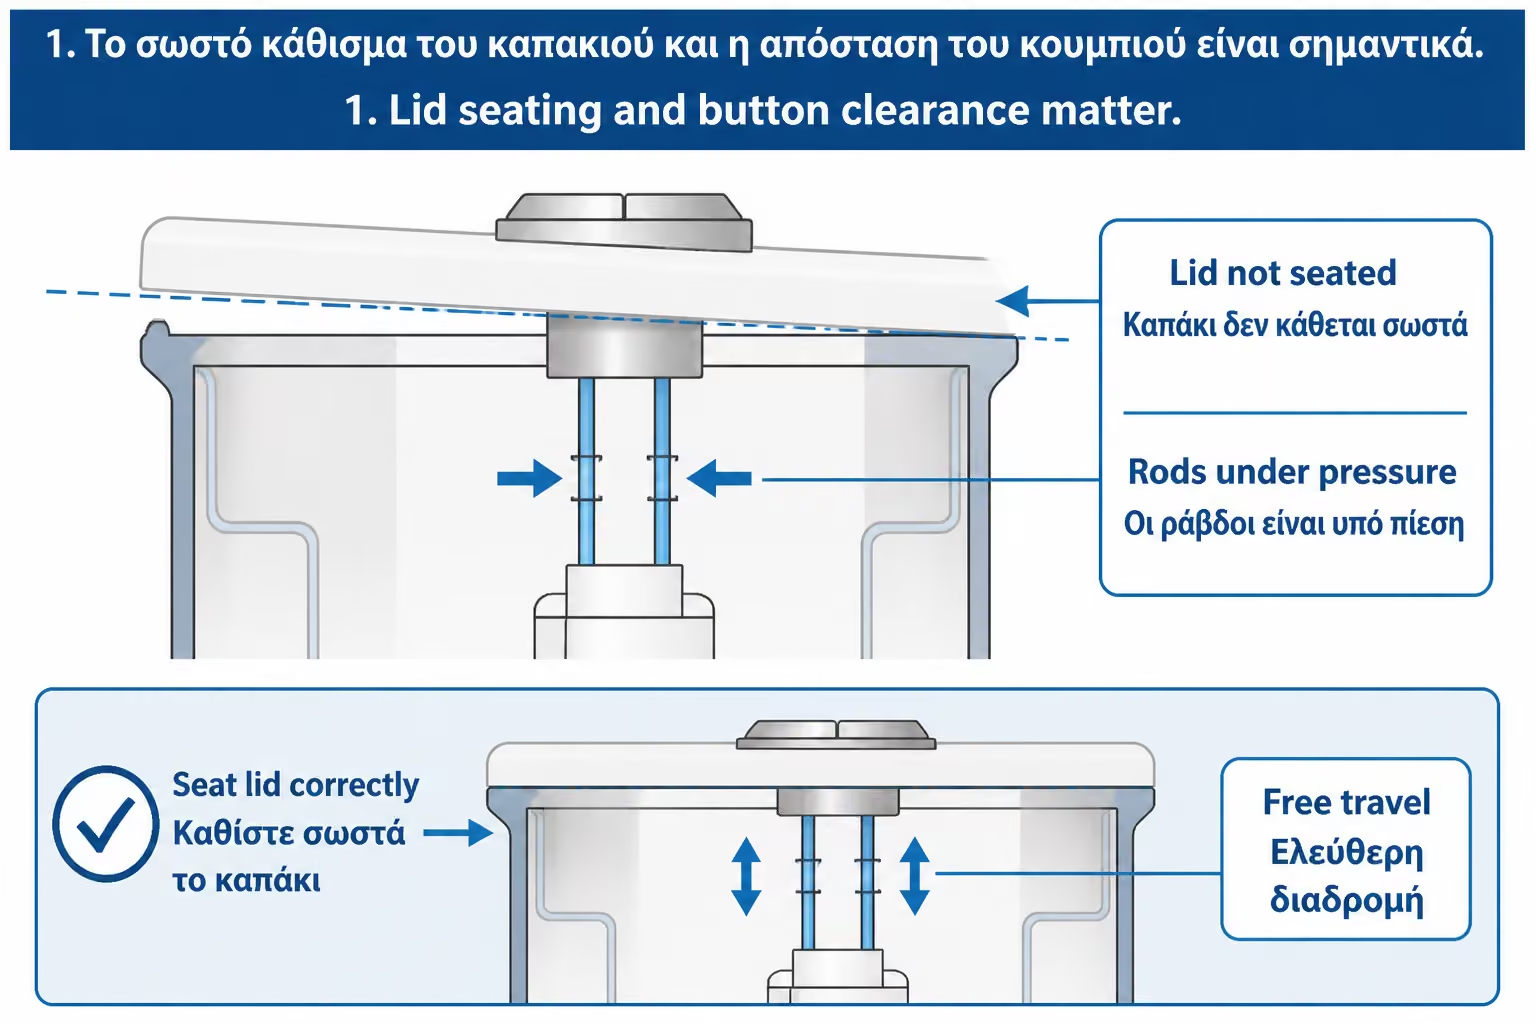
The important thing is that the button is not independent from the cap. The position of the lid, the height of the bars and the distance from the extraction mechanism must match. If the cap is moved, if the button is screwed wrong, or if the strings are set too "close", the mechanism can be permanently under pressure.
The most obvious symptom is the button staying pressed. You press it and it doesn't come back right away. You may need to tap it or pick it up with a finger. This can be due to scale, dirt, a worn spring, a crooked fit or a mechanism rubbing against the cap.
But there is a more insidious symptom: the button seems to return, but the faucet continues to run. In this case, the problem may be in the inner rods. Everything looks right on the outside, but inside the cable is slightly pressing the exhaust valve.
Another symptom is the faucet that only runs when the lid is in place. If you remove the lid and leave the mechanism free, the water stops. If you put the cap back on, it starts flowing into the basin again. This is almost a classic indication that the button or rods are pressing the mechanism.
It may also be that the large stream works fine but the small stream crashes, or vice versa. This indicates that one of the two settings, strings or pressure surfaces is not returning properly. It does not necessarily mean that the whole mechanism is broken. It may only need to be cleaned or adjusted on that particular side.
The causes are usually simple. The first is the salts. The cistern works with water and moisture, and in many areas of Greece the water is hard. Over time, scale can build up around the button, on the plastic guide points, or on the ejector mechanism. The button loses its smooth movement and starts to "scale".
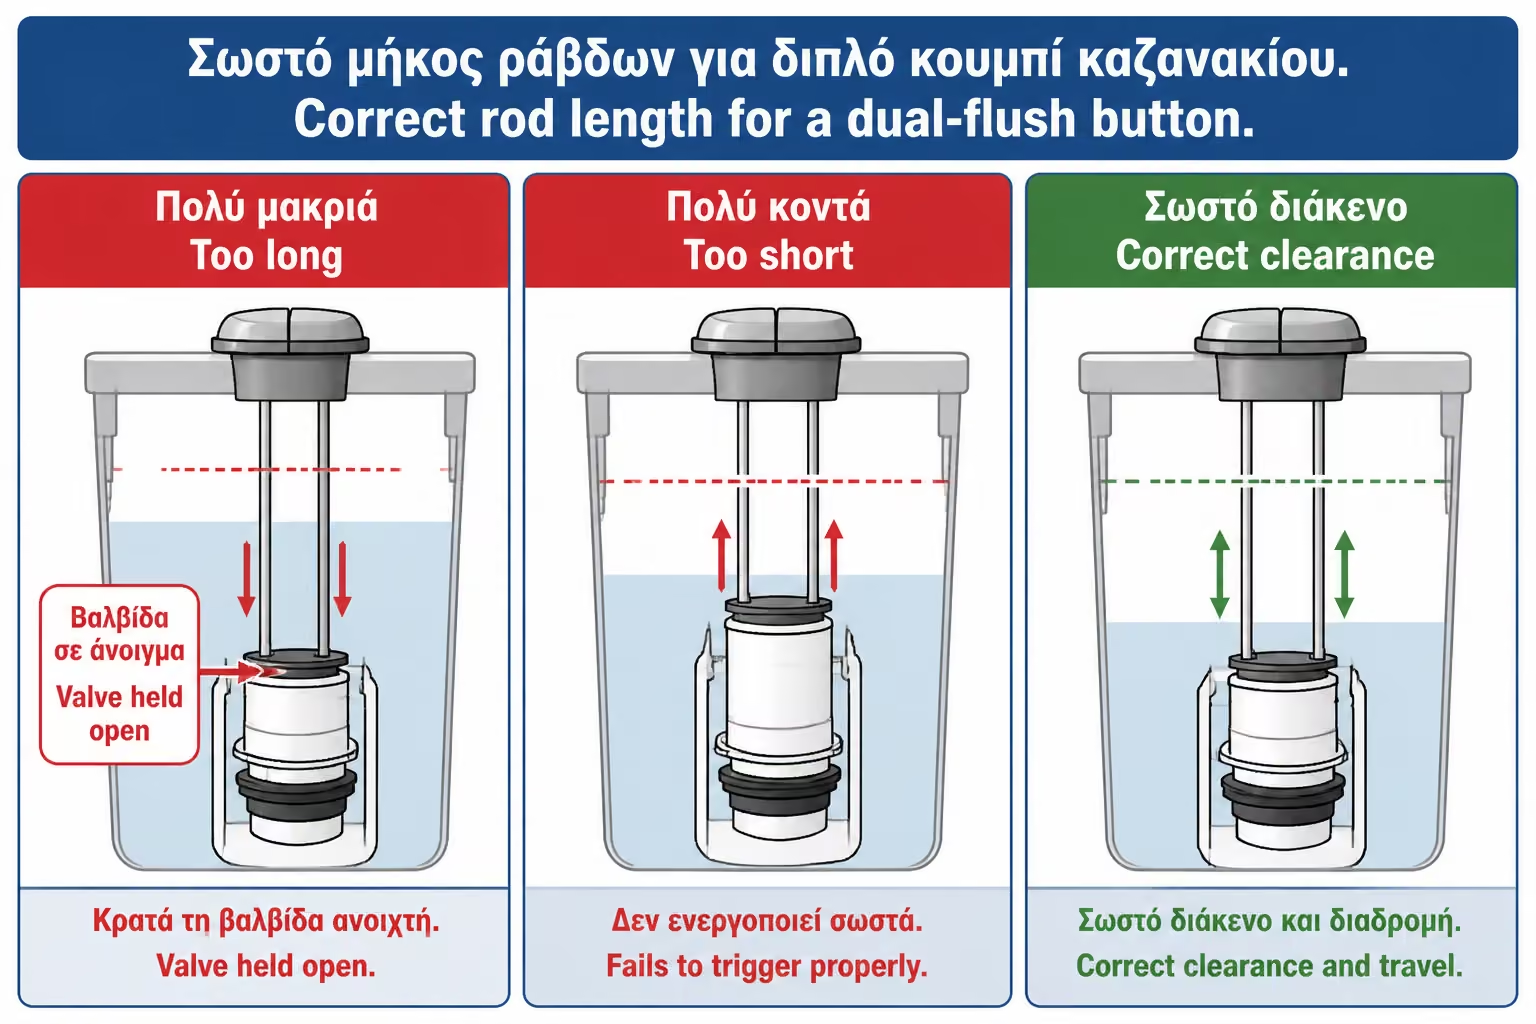
The second cause is the wrong setting. The strings or rods coming down from the button must be the correct length. If they are too long or set too low, they press on the mechanism even when you don't press the button. If they are too short, it may take too much pressure to activate the faucet or the low flow may not work properly.
The third cause is the cap not sitting properly. If the cap has gone in a little crooked, if the button wasn't screwed in the right place, or if something is preventing the cap from pressing flat, the rods can change angles and press incorrectly. This often happens after cleaning, when the owner takes the cap off and puts it back on without paying attention to the position of the button.
The fourth cause is wear and tear. Old plastic buttons may have loose springs, broken clips, worn guides or small cracks. There the adjustment can help temporarily, but the correct solution is usually to change the button or mechanism.
Before messing with settings, you need to figure out if the problem starts with the button or the exhaust valve. Carefully remove the cistern lid and set aside in a safe place. Do not lean it upright against the wall, because the porcelain breaks easily if dropped.
With the lid off, let the cistern fill and observe. If the water stops normally and does not go into the basin, but starts running when you put the lid back on, then the problem is with the button, rods or the position of the lid. If the water runs even without the cap, then the exhaust valve, gasket, bubble or float may be at fault.
Take a second test. With the cap off, press the ejector mechanism by hand where the button normally presses. Let him come back. If it returns smoothly and the flow stops, the internal mechanism is probably fine. If it hangs even without the button, then the problem is not only with the button.
A practical example: the cistern runs continuously. Owner replaces exhaust gasket but problem persists. When he removes the cap, the run stops. The cause was not the gasket, but the pushrods that were set too low and were holding the valve slightly open.
On many classic porcelain cisterns, the button holds the lid in place. To remove the cap, the button ring must first be unscrewed or the mechanism disconnected, depending on the type. Do not forcefully pull the cap upwards if it does not come off. It may still be connected to the rods.
On ordinary round buttons, the outer ring often unscrews counter-clockwise. In other systems, the two buttons are removed by pressing one and lifting the other to reveal a screw or clip. There are also caps where the rods simply press against the mechanism without being mechanically latched.
Before solving something, observe and take a picture. See how the strings are placed, which corresponds to the small and which corresponds to the long flow and how the button sits on the lid. The photo is very useful if a part comes off and you don't remember its location.
If the button has scale and does not turn, do not press it with pliers on the chrome or plastic ring. You might scratch or break it. Try cleaning around the joint and gentle movement first. If it resists strongly, it is better to stop and ask for technical help, especially if the cap is old and hard to find.
The strings or rods are the small plastic elements that transfer the movement of the button to the extraction mechanism. Many dual-flow faucets have two rods: one for the small flush and one for the large flush. Other times there are thin plastic strings that screw or snap onto the button.
Their work is simple: when you press the button, they go down and press the corresponding point of the mechanism. When you let go, they must rise or fully release the mechanism. If they are too long, they keep pressing. If they are too short, they will not trigger properly. If they are crooked, they may be on the side of the mechanism or on the lid.
In many models, the rods are adjusted with a screw. You turn them to make them longer or shorter. In others, they have notches and snap at different heights. In simpler systems, they may need to be cut to the correct length, but this should only be done when it is clear that this is what the manufacturer intended. If you make a mistake, there's no easy way back.
The goal is to have a small "safety gap" between the rod and the mechanism when the button is not pressed. Not so long that it presses, but not so short that the button doesn't work. This short distance is the secret to smooth operation.
Adjustment is done with small movements. Temporarily place the cap in place without fully tightening the button and see if the rods are touching the mechanism. If you see them pressing even without pressing, they need to be shortened or raised.
If the rods are bolted, turn them to reduce their length. Don't make a big change suddenly. Half or one turn may be sufficient. Put the cap back on, press the button and check. You want the button to actuate the mechanism cleanly, but when you let go it doesn't hold anything down.
If the bars have notches, move them one position higher or lower, depending on the problem. If the button is stuck because it keeps pressing, the active path usually needs to be shortened. If it does not activate the flush properly, it may need to be moved closer to the mechanism.
Practically, the correct check is as follows: press the small button, release it, see if the ejector mechanism has fully returned. Then you press the big button and do the same. If one side comes back and the other doesn't, adjust only the rod on the side causing the problem.
Strings that are too long are one of the most common causes of continuous flow in the sump after a cover change or cleaning. The symptom is that the cistern works fine without the cap, but runs when the cap is installed. This is because the rods push the exhaust valve before you even press the button.
You may also notice that the button has no “free travel”. That is, when you touch it, you immediately feel resistance or the faucet is activated without normal pressure. A properly adjusted button has a small, smooth movement and then depresses the mechanism. It should not be permanently stretched.
Another sign is the button not sitting well on the cap. If the rods are too long, they may push the button up or prevent the lid from pressing properly. The lid may appear slightly lifted or wobbly.
The solution is to make the setting smaller. We do not press the lid to "sit" on the bars. This just keeps the valve open permanently. The rods must fit the cap and mechanism, not the other way around.
If the strings are too short, the button may be pressed but not flush completely. Small flow may not work, large flow may require too much pressure, or the button may sink without properly lifting the exhaust valve. The user taps two and three times to empty the cistern.
In this case, the problem is not that the button is stuck down, but that it does not carry enough movement. The rod is not enough to press the mechanism properly. It needs to be lengthened or lowered slightly, always with small movements.
Beware: overcorrection creates the opposite problem. If you extend the line too much, it may start to press constantly and the cistern may leak. That's why the right setting lies between the two extremes: close enough to activate, loose enough not to press at rest.
A practical test is to press the button and observe if the ejector mechanism lifts as it should. If it doesn't rise enough, lengthen the rod a bit. If she gets up properly but doesn't come back, move her a little closer.
In dual-flow cisterns, the two functions are not the same. The small flow opens the valve for less water. High flow triggers full discharge. That is why both settings may have different sensitivity.
If only the small button sticks, check the small rod or corresponding point on the button. It may be crooked, on the edge of the mechanism, or set too low. If only the large one sticks, check the second rod. Do not change both if the problem affects only one.
In some mechanisms, the low and high flow are adjusted on the ejection mechanism as well, not just on the button. There are little plastic sliders that determine how much water will go out. These are not the same as button strings. If you don't know what they do, don't bother them to solve a stuck button.
The goal here is to make the tap work smoothly. You press small, it comes back. You press big, it comes back. Water stops after filling. If the amount of water changes too much after adjustment, the mechanism may have been set incorrectly.
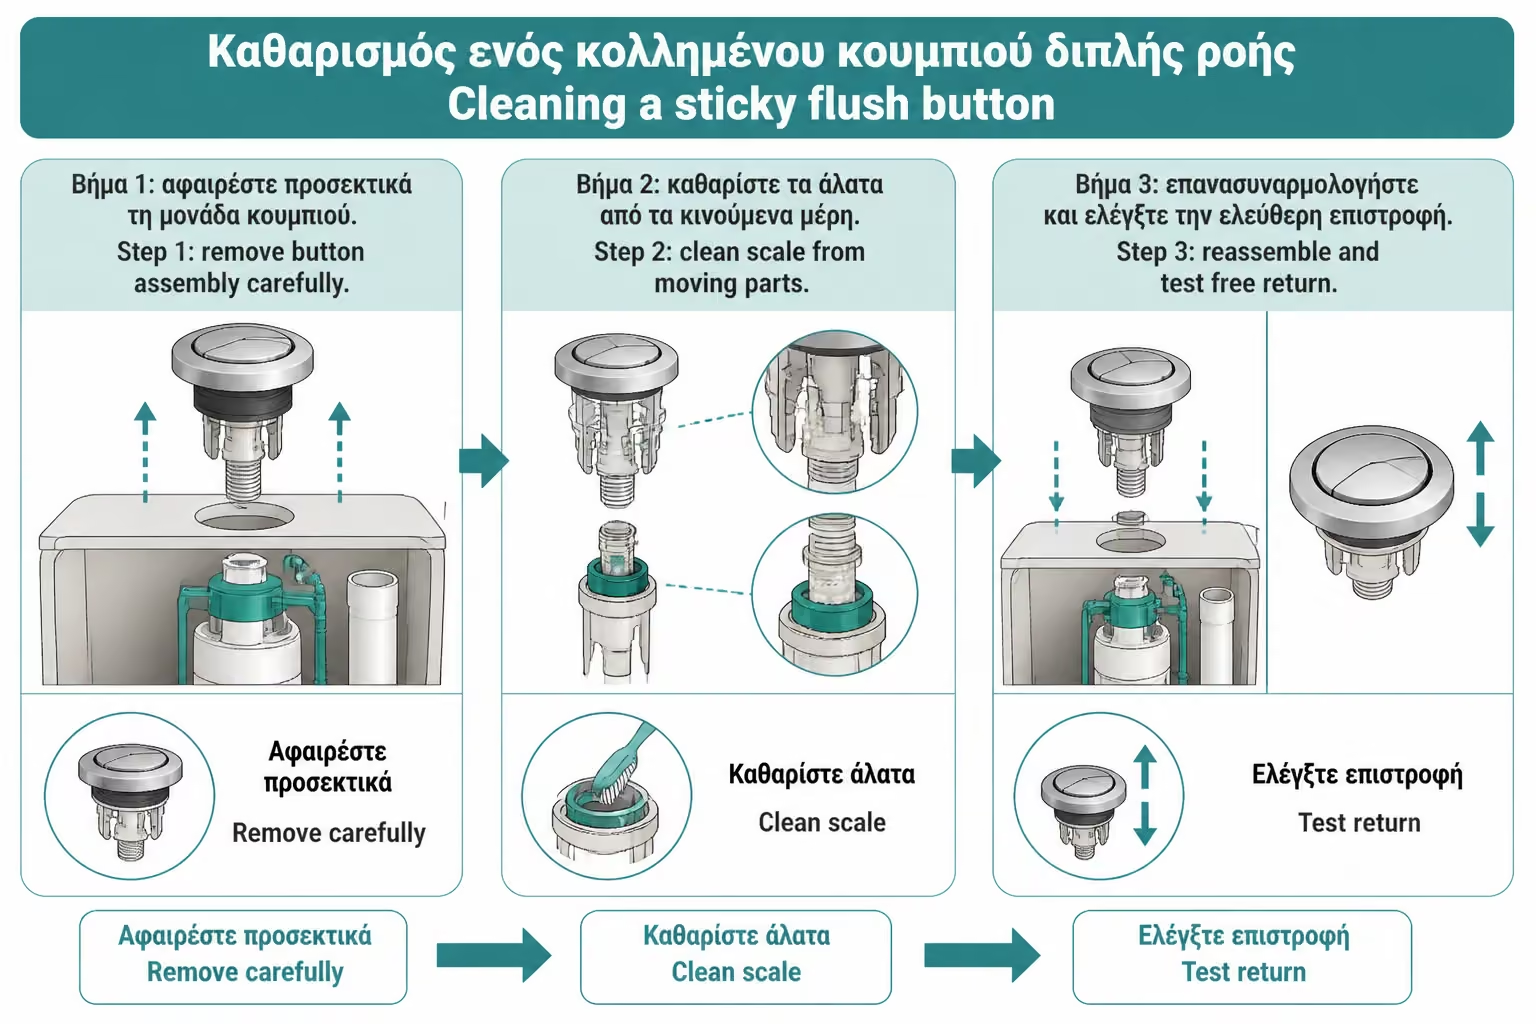
If the button moves hard even when not pressing the mechanism, it probably needs cleaning. Remove the button according to its type and clean the plastic parts gently. Salt, dust, cleaning residue and moisture can cause the button to “scratch” in motion.
You can use a soft cloth, old toothbrush and mild salt cleaner, being careful not to leave product on the plastics for a long time. In chrome or special finishes, avoid hard sponges and strong acids. The button is small, but the wear on the finish shows immediately.
After cleaning, rinse and dry well. Do not allow moisture or cleaner inside the button guides. If the button has a spring, see if it moves smoothly. If the spring has rusted or lost its return, cleaning may not be enough.
Do not use grease or oil unnecessarily. They may initially make the button move smoother, but on plastic mechanisms they can attract dust or be incompatible with the material. If the manufacturer does not provide for lubrication, prefer cleaning and proper adjustment.
Many times the problem is not in the button itself but in the cap. If the cap is slightly offset, if it is resting on the mechanism, if the button is not sitting vertically, or if the cap is pressing against something inside the cistern, the strings may be pressing askew.
Remove the cap and look at its underside. See if the button is properly tightened and if the bars go down vertically. Then look at the top of the ejector. The button must be pressed in the center of the trigger points, not on the edge or at an angle.
When you put the cap back on, put it on gently. Do not slide it sharply onto the mechanism. If you feel something coming before it sits, don't push it. Pick it up and see what it touches. The lid should rest on the porcelain, not on the bars.
A very common occurrence is the cistern that was working normally until it was cleaned. After cleaning, the lid goes in a little crooked and the button starts to stick. The "failure" was created by incorrect repositioning, not component wear.
There are cases where the setting is not enough. If the button is cracked, if the spring does not return, if the plastic clips are broken, if the rods do not hold the adjustment, or if the chrome ring is loose and turns, the correct solution is replacement.
Not all buttons are the same. There are different diameters, heights, connection types, rod lengths and ejector compatibilities. A button that "looks" the same may not press correctly on your mechanism. Therefore, before you buy, take pictures or take the old one with you to the store.
If the cistern is old and you can't find the same button, the entire extraction mechanism may need to be replaced. This is more complex work. In some cisterns, it is relatively easy to do from above. Others may require removing the cistern from the basin, which is not ideal for a beginner.
Button replacement makes sense when the problem is purely in the button. But if the button is sticking because the ejection mechanism is scaled, worn, or won't return, changing the button alone may not solve the problem.
If with the cap removed the ejector mechanism still sticks, then the problem is not primarily with the button. It could be that the exhaust valve has scale, the gasket is hardened, the guide is worn, or the mechanism is not returning smoothly.
In this case, manually press the trigger point and release. If it does not return quickly, descale the mechanism where it is accessible. If the movement remains stiff, the mechanism may need to be replaced. There's no point in constantly adjusting strings when the exhaust body itself isn't working properly.
If the bottom flange is scaled or warped, water can pass into the basin even with a proper button. In this case, the symptom looks like a stuck button, but the cause is valve sealing. The cap-off test helps make the distinction.
A proper cistern should work even without the lid, activating the mechanism by hand. If it doesn't work smoothly like this, check the ejection mechanism first. The button comes next.
Button and string adjustment costs zero when done by the owner. It just takes a little care and, in some cases, a screwdriver or simple button ring tool. If parts need to be replaced, the cost usually remains low, unless the entire mechanism needs to be changed.
| Case | Indicative cost picture 2026 |
|---|---|
| Simple DIY string / bar setup | €0 |
| Cleaning buttons from scale | around €0–5 |
| Dual flow replacement button | around €5–20 |
| Rod sets / spare parts, where available | around €3–15 |
| Dual flow extraction mechanism | around €10–35 |
| Better or special brand name mechanism | around 30–70€+ |
| Plumbing work for simple adjustment / change | around €40–80 |
| More complex change with cistern solution | around 80–150€+ |
The prices are indicative and depend on the region, the store, the type of tank, whether VAT is included, whether there is a compatible spare part and whether the work is simple or requires the removal of a mechanism. A simple setup worth trying before buying a new part. But if the plastics are broken or the mechanism does not return, replacement makes more sense than constant fixes.
The first mistake is to press the button with force. If it sticks, it is not fixed by pressing harder. It can break the plastic, bend the cable, or put more pressure on the exhaust valve. The second mistake is to cut the bars without testing. If they are cut too short, the button will not activate the mechanism properly.
The third mistake is to adjust with the cap out of position. The strings must be adjusted based on the actual position of the lid on the cistern. If you set them "in the air", they may press incorrectly when the lid is inserted. The fourth mistake is to ignore the distinction between a button and an extraction mechanism.
| Error | What does it cause? | Correct practice |
|---|---|---|
| Pressing hard on a stuck button | Breaking plastics or strings | Control and cleaning |
| Cutting bars without testing | Insufficient activation | First setting, cutting only if provided |
| Very long strings | Constant running into the toilet bowl | Small gap at rest |
| Very short strings | Poor flushing or need for strong pressure | Gradual long wind |
| Cap incorrectly placed | Oblique pressure on the mechanism | Correct cap position before adjustment |
| Setting both buttons while only one is stuck | Debug operation | Fixing only the problem side |
| Button change while ejector stuck | The problem remains | Function control without cap |
A typical example is the button that starts sticking after the flush mechanism has been changed. The new mechanism sits slightly higher than the old one, but the pushrods were left at their old length. The result is constant pressure and water running into the toilet bowl. The solution is not to replace the mechanism again, but to adjust the rods to the new height.
A plumber is needed when you can't remove the cap without danger, when the button has a special mechanism you don't recognize, when the ejector mechanism sticks even without the cap, when the faucet continues to run after adjustment, or when the entire mechanism that grips underneath needs to be replaced.
A professional is also needed if the cistern is built-in. In built-in systems, access is from the push-button plate and the mechanisms are different. Diagnostic logic is similar, but components and access require more experience. A broken plastic inside a built-in cistern can create more inconvenience.
If the corner supply switch does not close, attention is also needed. For a simple button setting you may not need to turn off the water. But if you go to change the mechanism or clean internal parts, you need to be able to check the supply. If it doesn't close, don't start deeper work yourself.
The right time to call a technician is before something breaks. If you can't figure out how the button snaps or if the plastic mounts seem fragile, the small savings of DIY effort can be lost if you need to change more parts.
| Inquiry | Yes / No |
|---|---|
| Does the button visibly stay pressed after use? | Yes / No |
| Does the faucet only run when the lid is in place? | Yes / No |
| With the cap removed does the ejector return smoothly? | Yes / No |
| Has it been checked that the strings press the mechanism without pressing? | Yes / No |
| Is there a small safety gap when the button is at rest? | Yes / No |
| Do the small and large buttons work separately without sticking? | Yes / No |
| Does the lid sit properly on the cistern without touching the mechanism? | Yes / No |
| Has the button been cleaned of scale and debris? | Yes / No |
| Were the adjustments made with small movements and testing after each change? | Yes / No |
| Bar cutting avoided if not sure if intended? | Yes / No |
| After the adjustment does the flow stop completely in the basin? | Yes / No |
If the answer is “No” to the check with the cap removed, the problem may not be the button but the ejector mechanism. If the answer is "Yes" to running with just the cap in place, focus first on strings, bars and proper button placement.
If the button is stuck to the cistern, do the simplest test first: remove the cap and see if the extraction mechanism returns on its own. If everything works fine without a cap, the problem is almost always in the button adjustment, the strings, or the position of the cap. The rods should only press the mechanism when you press the button, not press it at rest. Do not fix with force; fix with correct length, clean button and small safety gap.
The stuck button on the cistern is a small damage that can create a big waste of water. Especially on dual flow cisterns, the internal strings and rods must be properly adjusted to activate the small and large flush without holding the outlet valve open. When this doesn't happen, water constantly flows into the basin and the cistern refills for no reason.
Correct diagnosis starts with the cap. If the faucet works properly without it, attention goes to the button and rods. If it still sticks without the cap, then the exhaust mechanism, gasket and scale should be checked. This distinction saves unnecessary purchases of spare parts.
In many cases, the solution is simple: cleaning the button, correct placement of the cap and a small adjustment to the length of the strings. But if the plastics are broken, the button won't return, or the ejector mechanism is worn, replacement is a more reliable solution. The point is not just for the button to come off, but for the valve to close completely and stop any unnecessary water flow.
Return to category.
Go to categoryReturn to the central guide.
Go to guide