
Bathroom DIY, Maintenance & Styling
Return to category.
Go to categoryA sink that drains slowly is one of the most common small problems in the bathroom. At first it seems insignificant: the water takes a few seconds more to escape, a little foam remains around the valve, and then everything looks normal. After a few days, however, the water begins to stagnate. The toothpaste does not come off easily, there is a slight smell from the drain and at some point the sink almost stops emptying.
The first reaction of many homeowners is to buy a strong chemical sealant. They drop it in the valve, wait a while and hope the problem goes away. Sometimes the flow improves temporarily. Other times nothing changes. And in several cases, the chemical remains trapped inside the siphon, creating an additional hazard for anyone who later attempts to untangle the trap or use steel wire.
In practice, most bathroom sink clogs do not require toxic or caustic chemicals. They come from a mixture of hair, soap, toothpaste, shaving residue, creams, scale and small particles that collect in either the valve or the "U" siphon under the sink. These materials are often removed mechanically, by cleaning, suction, or proper use of steel wool.
The goal is not just to "open" the sink for a day. The goal is to figure out where the problem is, address it without damaging piping, flanges, or threads, and avoid moves that could lead to a leak under the furniture. Unclogging a sink is a simple task only when done in order and calmly.
In this guide we will look at how to distinguish a simple clog from a more serious drain problem, how to use the suction cup correctly, how to loosen and clean the “U” siphon, when steel wool helps and when to stop and call a plumber. We will also see why caustic chemicals are not always the best solution, especially in old installations or when we do not know the condition of the pipes.
The bathroom sink doesn't get the same debris as the kitchen sink, but it has its own problems. In the kitchen, fats and foods dominate. The bathroom is dominated by hair, soaps, toothpaste, shaving foam, cosmetics, salts and small fibers from rags or papers. Over time, these build up a sticky layer inside the valve and siphon.
Hair alone does not always clog the sink. The problem starts when the hair acts like a "net" and soaps and other residues stick to it. This creates a mass that gradually reduces the cross-section of the tubing. At first, water still flows through. Then the flow becomes slow. In the end, a small extra amount of foam or hair can close the passage almost completely.
A typical example is the wash basin used daily for shaving. Small hairs don't look dangerous, but they stick to toothpaste, soap, and salt around the valve. The owner cleans the surface of the sink and everything looks clean, but a few centimeters below a solid dam has formed.
In homes with hard water, salts make the situation worse. They do not always create a complete plug by themselves, but they do make the internal surfaces rougher. Soaps and hairs stick more easily to these rough surfaces. Thus, a siphon that is never cleaned can fill up with material without anyone realizing it until the flow delay begins.
Before you untie pipes or use steel wire, you need to figure out roughly where the problem is. You don't need to make a professional diagnosis, but a basic observation helps to avoid unnecessary moves.
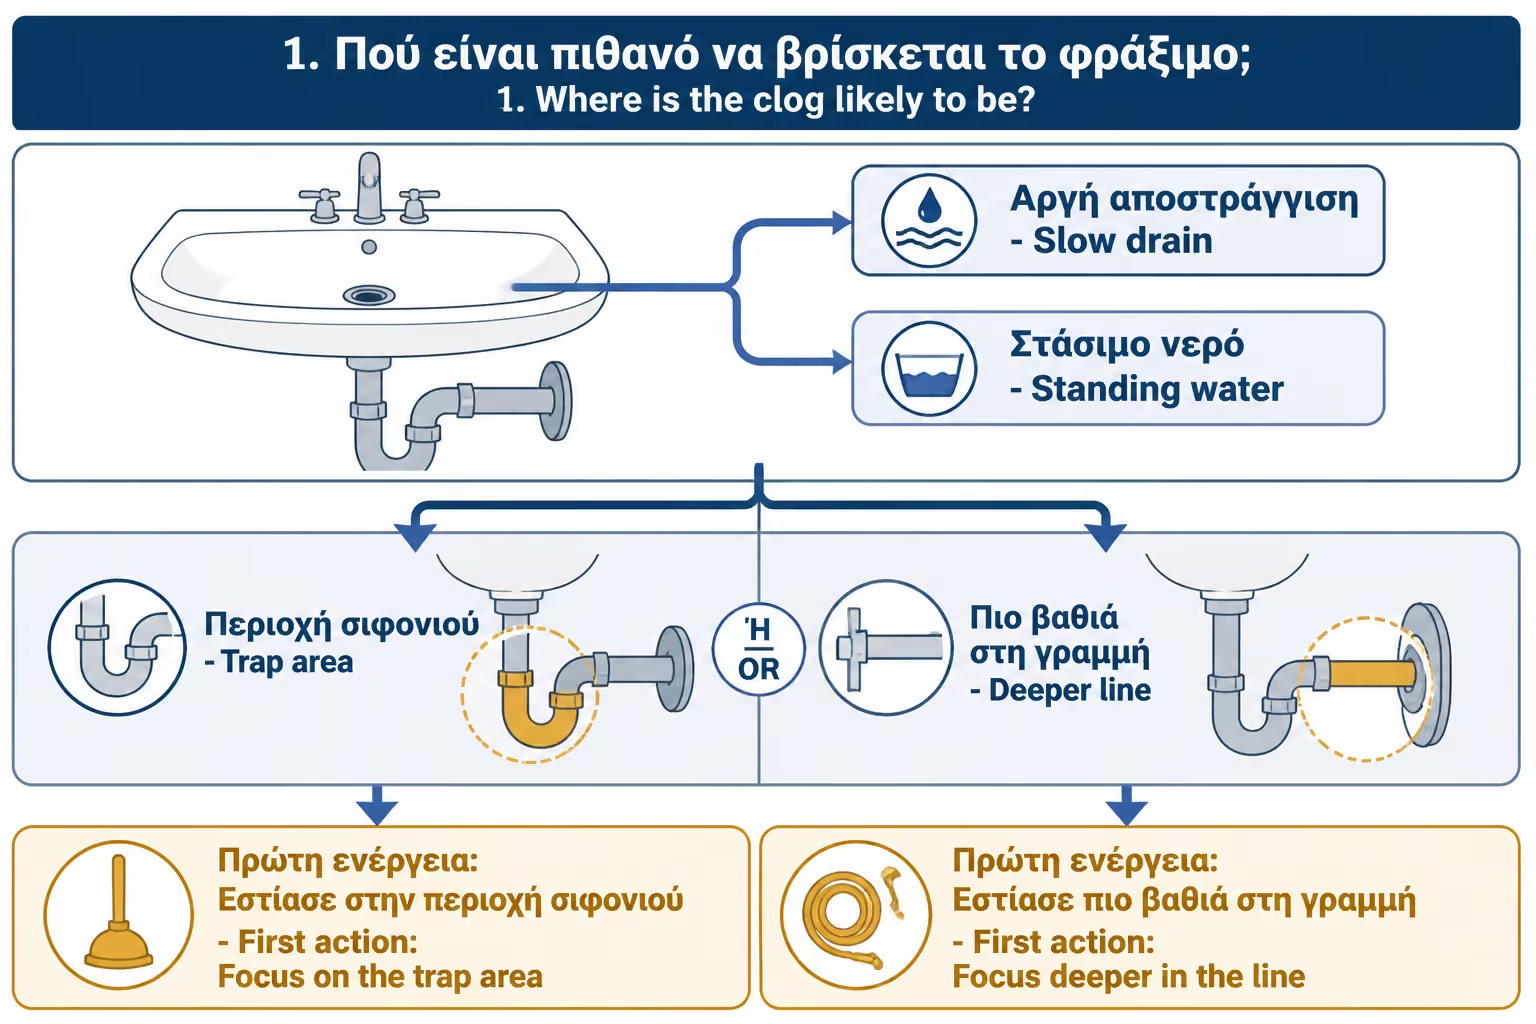
If the water drains slowly only in the specific sink and all other parts of the bathroom work normally, the problem is probably local: in the valve, the siphon or the first part of the drain. But if the water is slow to leave the shower, if there are gurgling sounds or if there is a smell rising from more siphons, then there may be a more central problem in the drainage.
The behavior of the water also gives clues. If the sink fills quickly and barely empties, the clog is often near the valve or siphon. If it empties at first and then slows down, there may be a narrowing a little further down the tube. If air is heard from the overflow after using the suction cup, there may be an obstruction in the siphon.
On vanity sinks, look down before doing anything. Is there a plastic “U” siphon? Is there a siphon bottle? Are there old metal parts? Are salts or drips visible in the joints? A modern plastic siphon is relatively easy to solve. An old rusted metal siphon can break or start to drip if pressed.
This first diagnosis determines the approach. We do not blindly use steel when the problem may lie in the simple siphon. We do not forcefully loosen old nuts when we have not checked whether there is a central water break or whether the siphon is fragile. And we don't pour chemicals when we might have to put our hands in the same spot later.
Strong caulking chemicals promise a quick fix, but they aren't always the safest option for a homeowner. Many products are caustic, generate heat, have strong vapors and can cause burns on contact with the skin or eyes. If the stopper is not opened, the chemical remains in the siphon. Then the next task becomes more dangerous.
There is also a technical issue. In old plastic or metal installations, worn gaskets or pipes in poor condition, chemicals can stress the materials. It does not mean that every use will destroy a drain, but it is not a neutral process. Especially when repeated often, it can create more problems than it solves.
In addition, chemicals do not always remove the mass of the plug. They may open a small passage through the material, so the water temporarily drains better. But the rest remains on the walls and quickly catches again. So the owner enters a cycle: pours chemical, improves for a few days, re-clogs, pours again.
The most logical sequence for a simple sink is different: first check the valve and plug, then try the plunger, then remove and clean the trap, and only after that consider careful use of a drain snake in the next section. If all that fails, or if there are signs of a wider problem, what you need is a plumber, not a stronger chemical.
Before you go under the sink, start with the simple checks. Remove the plug or valve cap if it comes off easily and look for hair just underneath. In many sinks, the main blockage sits in the first few centimeters. With a glove and a small plastic tool, you can remove quite a bit of material without dismantling anything.
If the waste is a click-clack type, meaning it is pressed to open and close, it often unscrews carefully from above, depending on the model. Do not grip it with pliers against the chrome finish, because you will scratch it. If it does not come out easily, do not force it. There may be a mechanism underneath, or it may need a different removal method.
Then pour hot water, not boiling water, especially if you have plastic piping or sensitive joints. Hot water can soften soaps and greasy residue from cosmetics. It won't solve a solid plug of hair, but it can help with a slight narrowing.
A gentle practice is to clean the valve thoroughly and test flow with enough water. If the improvement is large, the problem was near the entrance. If almost nothing changes, the clog is probably at the siphon or just below.
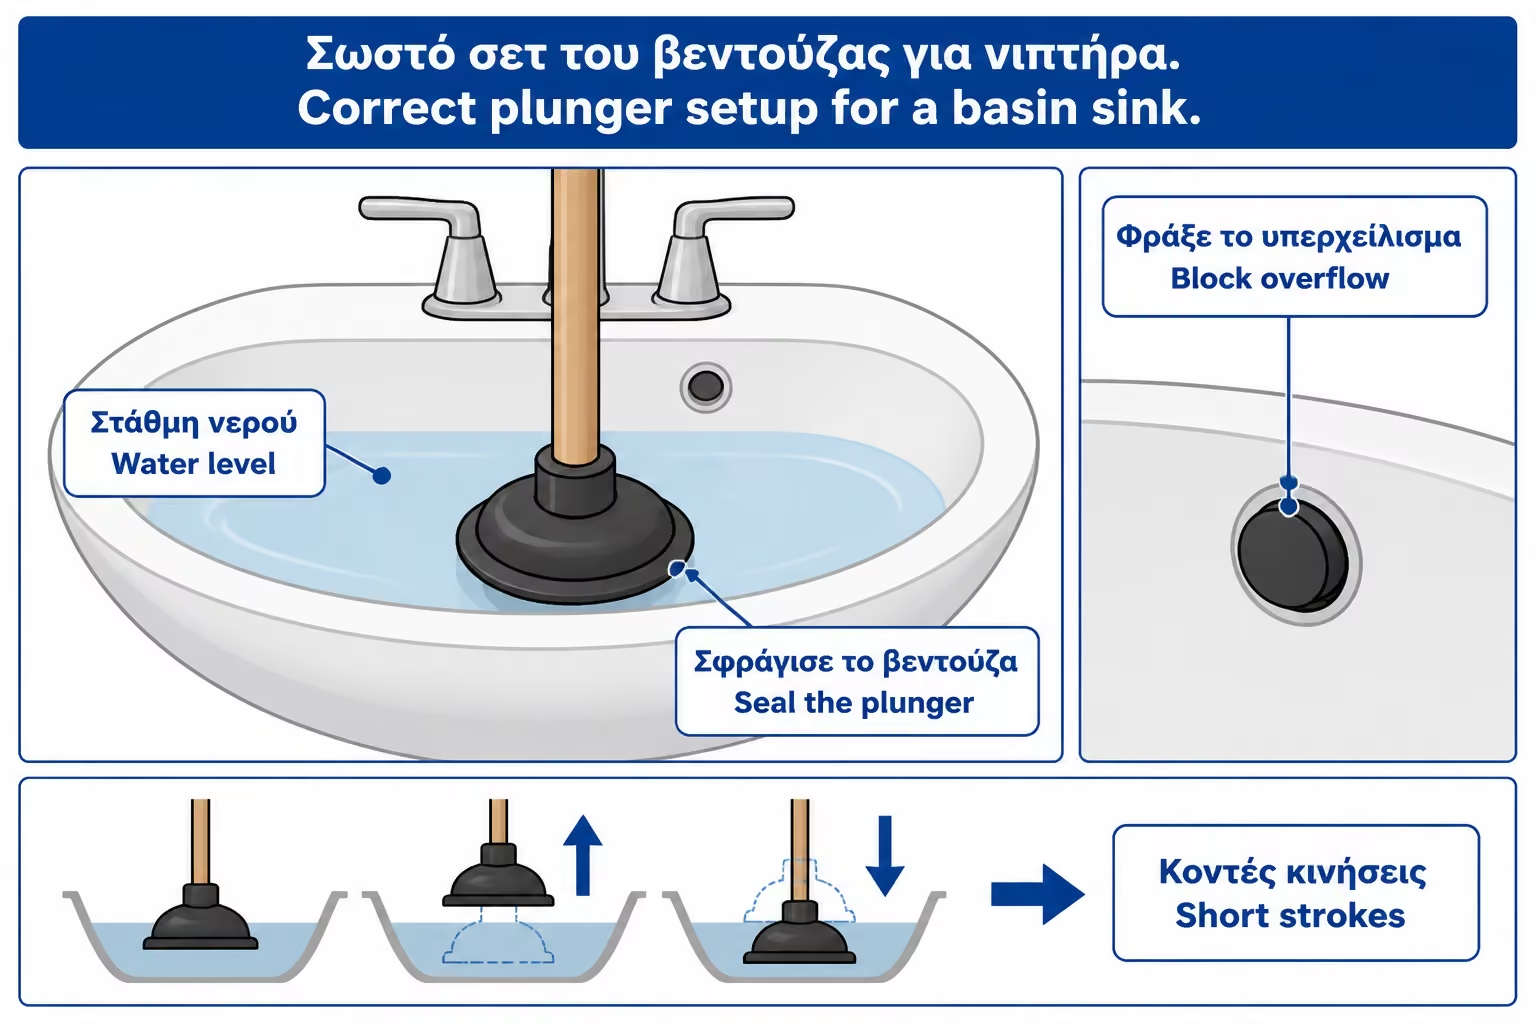
A plunger is a simple tool, but one that is often misused. It does not work because it simply "pushes" the blockage downward. It works because it creates alternating pressure and suction, which can move the blockage or break it up enough to pass through.
To work properly, there must be enough water in the sink to cover the plunger cup. If you try it on a dry surface, it will not seal properly. You should also block the sink overflow, meaning the small hole near the top of the basin, with a wet cloth. If you leave it open, air escapes there and the pressure drops.
Place the plunger over the drain opening and press until it seals well. Make firm up-and-down movements without lifting it off the surface. No extreme force is needed. What you want is steady, rhythmic pressure. After a few strokes, pull it up sharply to create suction.
If the water starts to drain, run enough hot water to flush away the residue. If there is no improvement after several attempts, do not keep going indefinitely. A plunger can help, but if the trap is full of dense hair, it often needs to be removed and cleaned.
A common mistake is to use a plunger after a caustic chemical has already been poured into the drain. That is dangerous, because pressure can throw the chemical back upward. If such a product has already gone in, do not treat the sink as if it contains plain water. It requires caution, protective gear, and in many cases professional handling.
If the suction cup does not solve the problem, the next practical step is to clean the siphon. Before solving anything, completely empty the cabinet under the sink. Remove cleaners, papers, towels and items. You want room to work and a clear picture to see if there is a leak afterwards.
Lay towels or absorbent cloths on the bottom of the furniture and put a bucket or basin under the siphon. Even if the sink looks empty, there is always water in the siphon. This is normal, because the trap holds water to keep odors from coming up the drain. When you solve it, this water will fall.
Wear gloves. The water in the siphon is not clean. Contains soaps, hair, bacteria, toothpaste and organic debris. If there are strong odors, ventilate the bathroom. There is no need to panic, but basic hygiene and caution is needed.
Before you start dismantling, take a photo with your phone. It shows how the trap is arranged, which side goes to the wall, where the nuts are, and what the washers look like. If something shifts or gets mixed up, the photo will help you put it back correctly.
The "U" trap, often known as a trap, is the curved fitting under the sink that always holds a small amount of water. This water acts as a barrier against sewage odors. Without it, air from the drainage system could rise towards the bathroom.
But the same curve that holds water also holds residues. The heaviest mass of hair, soap and small objects often collects at the lowest point of the “U”. That is why cleaning the siphon is one of the most effective solutions for local sink clogging.
In many modern bathrooms, the faucet is plastic and is secured with hand-turned plastic nuts. In others, it is metal or a combination of metal and plastic parts. Plastic siphons are usually easier to clean, but can break or warp if pressed incorrectly. Old metal ones may have rust or stuck joints.
Not all siphons are the same. There are classic "U", bottles, decorative visible siphons and special solutions for furniture with drawers. But the logic is similar: there is a point where water is held and that's where debris often accumulates.
Start by loosening the connection nuts. There is usually one nut on the connection to the sink valve and one on the connection to the pipe that goes to the wall. In plastic siphons, test by hand first. If it won't turn, you can carefully use pliers or an adjustable tool, but with a cloth in between to avoid damaging the plastic.
Do not apply excessive force. If the nut is old and stuck, it may break. If you see the part distorting, stop. A broken siphon can turn a simple clog into a mandatory component replacement.
As you loosen the low point of the trap, hold the siphon with one hand and the bucket underneath. The water will drop sharply once the joint is opened. If there is solid material inside, it may come out with the water. Do not pour it into the same sink that is clogged. Dump it into a basin or bag and clean up in a way that won't send the same material down the drain again.
If the siphon has flanges, note their position. The gaskets must be reinserted correctly on reassembly. If they are dried out, cut, warped or too hard, they may need to be replaced. Many small leaks after siphon cleaning are due to a gasket that did not fit properly or was already worn.
After the siphon is removed, clean it somewhere else, not over the clogged sink. You can use warm water, a brush, an old sponge or a long flexible brush. The goal is to completely remove hair, slime and debris from the inner walls.
Don't settle for just a little water. Many times the siphon looks open, but it has a thick layer on the walls that will quickly catch up again. Mechanically clean as much as you can. If the material is too sticky, leave it in warm water for a while and then scrub.
Also check the sink valve from top to bottom. Very often the mass of hair hangs just below the valve and not inside the “U”. If you clean only the siphon and leave this mass, the problem may return soon. With a glove or plastic tool, remove whatever is on the vertical piece.
Also check the spigot going into the wall. If it looks clean there and the problem was in the siphon, the work will probably pay off. But if you see that the horizontal pipe to the wall has material deeper, you may need a careful use of steel or a plumber, depending on the situation.
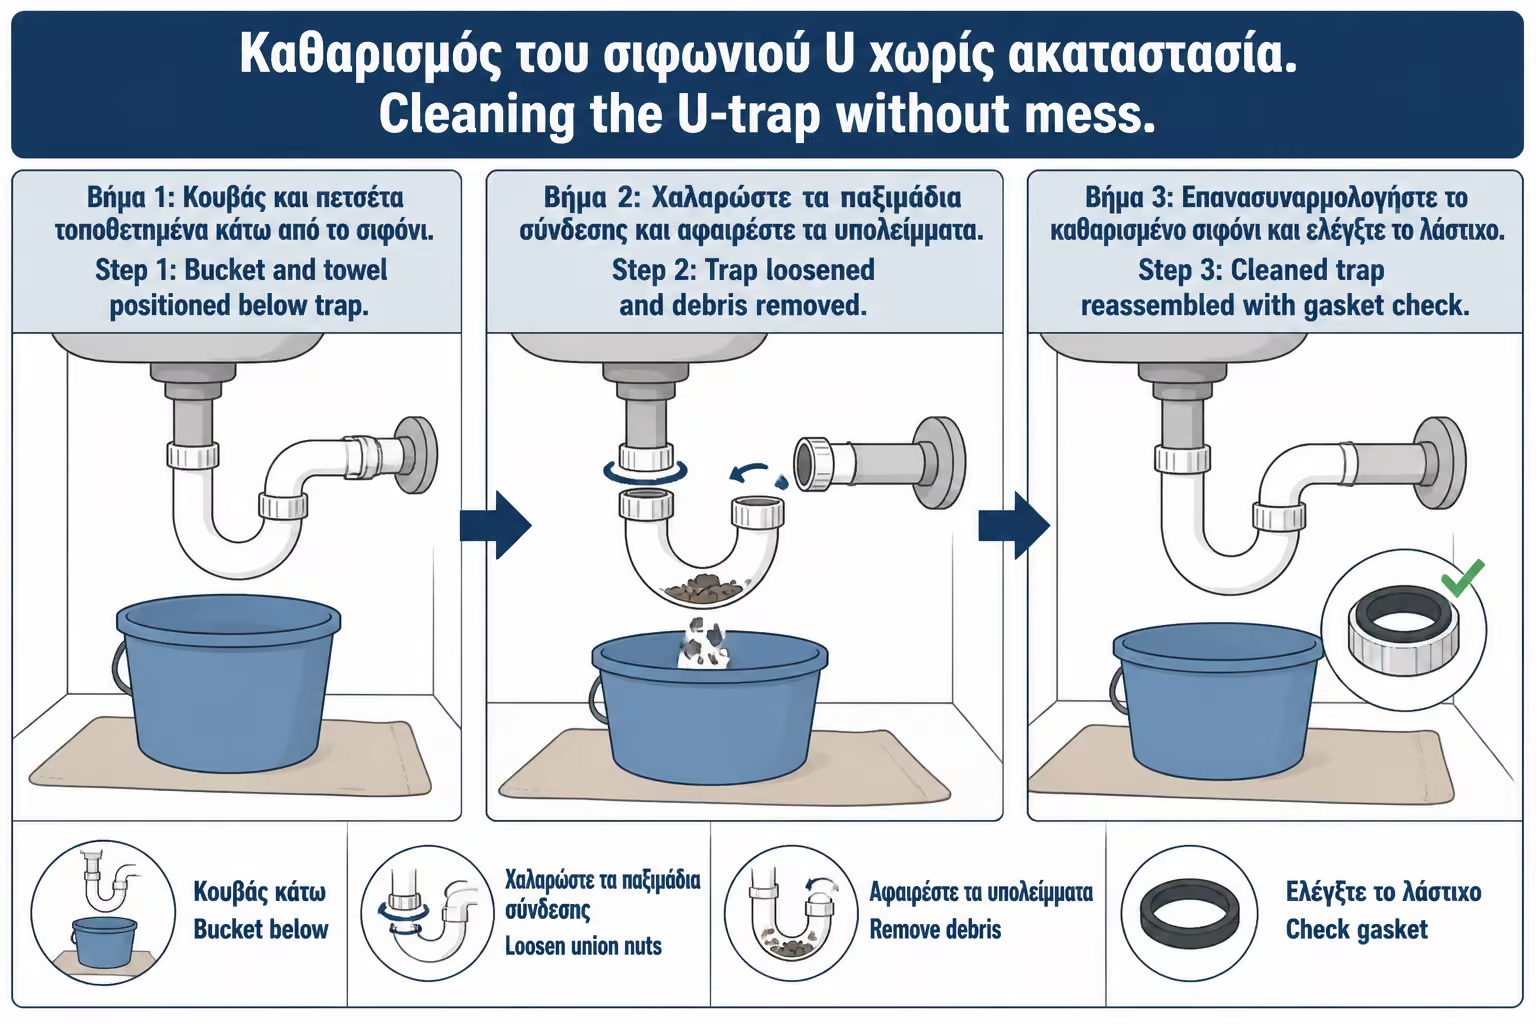
Re-installation must be done with clean surfaces. Wipe the lips of the pipes, clean the flanges and make sure there is no hair or debris at the sealing point. A small residue on the gasket can create a drip.
Place the siphon in place without pushing it crooked. Nuts should be easy to screw on at first. If they don't hold hands, something is out of alignment. Do not "grab" them with a tool from the beginning, because they may twist and injure the thread.
Tighten by hand first. In many plastic siphons, hand tightening is sufficient. If a tool is required, make minimal additional movement. Over-tightening distorts gaskets and plastic nuts, and often creates a leak instead of stopping it.
After reconnecting, pour some water into the sink and observe. Do not fill the sink immediately. Start with a small flow. Wrap paper towels around each joint. The paper shows immediately if there is moisture. If everything is dry, increase the flow and try again.
At the end, fill the sink a little and let it drain. This test puts more water into the siphon and reveals leaks that cannot be seen with low flow. Leave the cabinet empty for a few hours to check if a drop appears after use.
The steel is a useful tool, but it should not be used lightly. It is a flexible metal cable that passes through the pipe to dissolve or pull out clogs. In the wash basin it is usually used after the siphon has been removed so that it can be inserted into the pipe leading to the wall. It's not always a good idea to go over the top, through the valve, because it can get stuck, scratched, or not hit the spot properly.
Basic movement is advance with rotation. We don't just push hard. We turn the steel so that it passes curves and works on the material. If it encounters resistance, it does not always mean that it has found a blockage. It may have reached a pipe angle. There you need gentle rotation and small movements, not violent pushing.
If the steel blade catches hair or slime, slowly pull it out and clean it. Do not pull it suddenly on bathroom surfaces, because it will get dirty. Have a bag, paper and gloves nearby. Repeat until you see improvement in flow.
Be careful with old pipes, thin plastics, flexible connections and unfamiliar installations. Steel can help, but if used with too much force it can injure weak points or disconnect a bad joint. If you feel that it sticks strongly or does not return easily, do not continue to twist it with force. It is better to stop there.
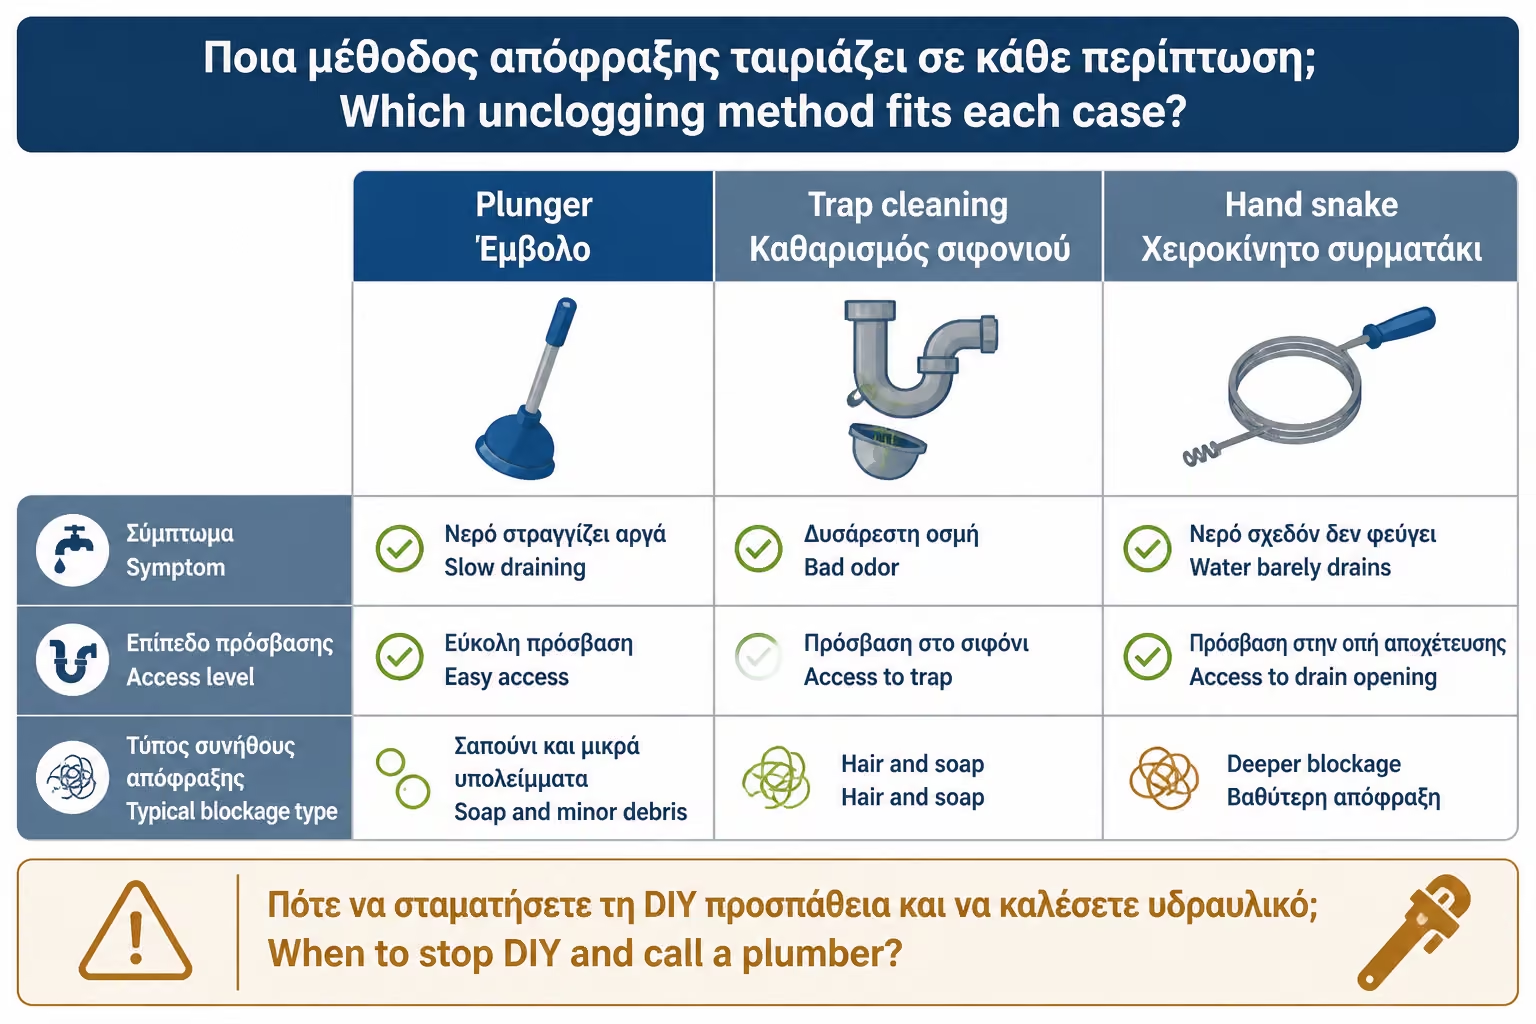
There is no one method for all clogs. The correct choice depends on the symptom, access and condition of the facility. In a simple slow emptying, the suction cup may be enough. In a sink with a lot of hair, the siphon often needs cleaning. If the siphon is clean but the water continues to drain slowly, then the problem may be further down the pipe.
| Symptom | Possible cause | First logical move |
|---|---|---|
| Water leaves slowly but leaves | Constriction from soaps / hair | Clean the drain opening and use a plunger |
| Water almost does not leave | Clogged siphon | Remove and clean the trap |
| Smell from the sink | Dirty siphon or trap problem | Clean the trap and check the water seal |
| Siphon clean but flow poor | Plug to the wall | Careful drain-snake use or a plumber |
| Murmurs in many places | Possible central drainage issue | Plumber inspection |
| Water return from another siphon | More serious network problem | Immediate technical investigation |
Order matters. We don't start with the most aggressive tool. We start with the simplest and least intrusive. This reduces the risk of damage and increases the likelihood that the real cause will be identified.
Many clogs are not created by one wrong move, but by small daily habits. The bathroom sink is not a bin for hair, cotton balls, wipes, creams, face masks, wax residue or amounts of styling products. Even if something passes through the valve, it does not mean that it will pass through the siphon without consequences.
Flushable wipes and cotton pads need special attention. They should not end up in the sink. Their fibers can get caught in small irregularities and create a basis for a plug. The same applies to hair after combing or shaving. Better to collect them with paper and throw them in the garbage.
Face masks, thick creams and some cosmetics leave a thick residue. If they are systematically washed in the sink, they stick to the walls of the siphon. It is not visible from above, but over time a layer forms that holds hair and salts.
Prevention is simple: clean the valve, use a small grate where appropriate, avoid throwing solid debris, and rinse well with water after using soaps or shaving products. No extreme measures are needed. It is necessary not to turn the drain into a micro-waste bin.
Many recommend baking soda and vinegar as a natural remedy for any clog. The reaction foams and gives the feeling that it is "working". In practice, it can help with light odors or small residues, but it will not dissolve a serious mass of hair in the siphon. It should not be presented as a magic solution.
Hot water can help with soaps and light grease from cosmetics, but it won't solve a mechanical clog. Suction and siphon cleaning are usually more effective. If solid material is present, it must be removed, not simply "softened".
Natural solutions have a place mainly in maintenance, not in dealing with a complete blockage. For example, after a good mechanical cleaning, you can periodically run hot water and clean the valve so that no material builds up again. However, this does not replace the periodic check of the siphon, especially in heavily used bathrooms.
It is important not to combine different products with each other, especially if a chemical occlusive has been used before. Mixing cleaners can create hazardous fumes or reactions. If you don't know what's in the drain, don't blindly add another product.
The plumber is needed when the problem goes beyond the local faucet or when the installation is old, difficult or delicate. If the siphon is metal and rusted, if the nuts do not loosen, if there is a leak at the joints, if the water is returning from another place, or if there are gurgling sounds in several drains, it is not wise to proceed on your own.
Also, if you already used a chemical clog and the sink remains clogged, the situation needs attention. The siphon may contain caustic liquid. Solving without protection can cause injury. In this case, if you are not absolutely sure how to handle it, call a professional and let them know that a chemical has been used.
A technical check is also needed when the plug returns too often. If you clean the siphon and within a few days or weeks the problem returns, there may be a wrong slope, a drain vent problem, a blockage deeper in the pipe, or a bad connection. There, simply repeating the cleaning does not solve the cause.
A professional can use more appropriate tools, larger steel, drain cam where needed, or replace worn parts. The cost of a visit may seem more than a chemical product, but it is often less than the damage caused by a leak in a piece of furniture or a wall.
If the work is done by the owner, the cost is small. A simple suction cup, gloves, cloths and maybe a small hand steel are inexpensive tools that can be reused. If a siphon replacement is needed, a simple plastic siphon is usually not expensive, but it must fit the dimensions and layout of the sink.
For professional unclogging, the cost depends on the area, time, access, whether it is a simple siphon cleaning or a clog deeper in the drain, whether parts are required, whether VAT is included and whether the work is urgent. For a simple wash basin, a visit can roughly range from €40-80. If a more extensive blockage, siphon change, work in difficult access or an emergency call is needed, the cost can rise to around €80–150 or more, depending on the case.
| Case | Indicative cost picture 2026 |
|---|---|
| DIY with suction cup and valve cleaning | around €5–20 for basic tools |
| DIY with a small hand iron | about €10–30 more |
| Replacement of simple plastic siphon | around €10–€35 for material, depending on the type |
| Professional cleaning / simple sink unclogging | around €40–80 |
| Difficult blockage or additional repairs | around 80–150€+ |
Low prices are reasonable when the problem is simple and readily accessible. The higher ones are justified when there is an old installation, difficult access, a worn siphon, a need for parts, an emergency call or a suspected deeper blockage. The important thing is to know what is included in the price: unclogging only, siphon cleaning, part replacement, materials, VAT or labor warranty.
Prevention is much easier than blockage. No complicated habits needed. Hair and thick residue should not constantly reach the siphon. A small hair collector on the valve, where it fits aesthetically and practically, can greatly reduce problems.
After shaving, collect the hair from the sink with paper instead of flushing it with water. After using products that leave residue, let plenty of water run for a few seconds. Periodically clean the plug, especially if it is click-clack, because a ring of slime and hair often collects there.
If the sink is used by several people or daily for shaving and cosmetics, a preventive cleaning of the siphon once a year can avoid unpleasant surprises. It is not necessary in every home, but in bathrooms with frequent clogs it is a practical solution.
Also be aware of odors. If the sink smells when it's not clogged, the faucet may be dirty or trap water is evaporating in a seldom-used bathroom. In a guest toilet that is not used often, periodically pour a little water to keep the trap full.
| Inquiry | Yes / No |
|---|---|
| Is the problem only with this particular sink? | Yes / No |
| Have you avoided using a caustic chemical before untying the siphon? | Yes / No |
| Have you checked and cleaned the plug and valve first? | Yes / No |
| Did you close the overflow with a cloth before using a suction cup? | Yes / No |
| Have you emptied the cupboard and put a bucket under the faucet? | Yes / No |
| Did you take a picture of the siphon layout before you solved it? | Yes / No |
| Do the gaskets look clean, soft and free of tears? | Yes / No |
| Do the nuts screw in by hand without warping? | Yes / No |
| Was it leak checked with paper towels after refitting? | Yes / No |
| If the problem persists, have you avoided brute force? | Yes / No |
If the answer is “No” to the items regarding chemicals, old parts, gaskets or leakage, do not proceed mechanically. Better to stop and assess the situation than to damage a connection that until recently just needed cleaning.
If you have to keep only one thing, keep this: in the bathroom sink, the most common clog does not need "strong" chemical, but proper mechanical cleaning. Start at the valve, try cupping with a closed overflow, loosen and clean the siphon if necessary, and use steel wool only carefully towards the wall pipe. If there is an old metal siphon, chemical in the drain, water back up, or a multi-point problem, stop and call a plumber. Correct unclogging is not a matter of strength, but of correct order.
Unclogging a sink without toxic chemicals is completely doable in many everyday situations, as long as it is done methodically. Most local clogs are caused by hair, soap, and debris collecting in the valve or siphon. Suction cupping, cleaning the “U” trap and careful use of steel can solve the problem without burdening pipes, flanges and the user with caustic products.
The crucial point is not to get carried away by the rush. First we notice the symptom. Then we clean the simple spots. Then we use a suction cup correctly, with water and a closed overflow. If necessary, loosen the siphon with a bucket, gloves and pay attention to the flanges. Steel has its place when the siphon is clean but the problem continues deeper inside, not as a blind and violent solution from the beginning.
If after cleaning the water drains normally and there is no leakage under the sink, the job has been successful. But if the clog returns, if there are odors, gurgling sounds, water back up, or old parts that don't come out securely, then the problem needs professional investigation. The best decision is not always to proceed alone, but to recognize when the simple local clog has become an indication of a larger drainage problem.
Return to category.
Go to categoryReturn to the central guide.
Go to guide