
Bathroom Fixtures & Water Equipment
Return to category.
Go to categoryA dripping faucet is one of those small breakdowns we all put off. At first it's one drop every few seconds. Then it becomes more frequent. At night you hear it at the sink. In the end it leaves limescale, stains and water around the tap. Many people assume that the solution is to replace the whole tap. In fact, in many cases the problem is solved by replacing the internal mechanism, namely the cartridge or ceramic disc cartridge.
Most modern single-lever faucets do not work with old rubber washers like classic two-handle taps. Inside they have a cartridge with ceramic discs. These discs open, close and mix hot and cold water. When they become worn, scratched, scaled or leaky, the tap begins to drip or become difficult to move.
Changing the cartridge is one of the most common minor repairs to a sink, kitchen or shower faucet. It's not always difficult, but it does require attention. The supplies must be shut off, the handle removed without scratching the finish, the retaining nut unscrewed, the old cartridge removed and an exact same or fully compatible replacement inserted. GROHE in a guide to changing a basin faucet cartridge describes the process by removing the plastic cover, loosening a 3 mm Allen screw, removing the lever and cap, unscrewing a nut with a 32 mm nut and pulling the cartridge out.
The basic principle is simple: if the tap is of good quality and the body is in good condition, it often does not need a new tap; it needs a new cartridge. This saves money, reduces waste and preserves the existing installation. But not every case is suitable for DIY. If the tap is built-in, if the screws are stuck, if the shut-off valves do not close, if there is a leak under the counter, or if you cannot find an identical part, it is better to call a plumber.
In this guide we will see why the faucet drips, when the cartridge is at fault, how to find the right part, what tools are needed, what the replacement steps are and what mistakes can turn a simple repair into damage.
The cartridge is the internal mechanism of the tap. In single-lever taps, it controls two things at once: flow and temperature. When you lift the lever, the supply opens. When you turn it left or right, the ratio of hot and cold changes. All this is done inside the cartridge.
It is often called a "ceramic disc" because inside it there are ceramic surfaces that slide over each other with great precision. When the disc holes line up, water passes through. When they close, the flow stops. The tightness is based on the clean and smooth contact of these surfaces.
Ceramic discs are very durable compared to old rubbers, but they are not indestructible. Salt, particles from old piping, sand, metal filings or poor water quality can cause wear or prevent proper contact. If the cartridge does not close completely, the faucet is dripping.
There are many types of cartridges: 25 mm, 35 mm, 40 mm, special cartridges of specific companies, thermostatic cartridges, diverter cartridges and cartridges for taps with two handles. Not all are the same. The most important step in the repair is to find the right part.
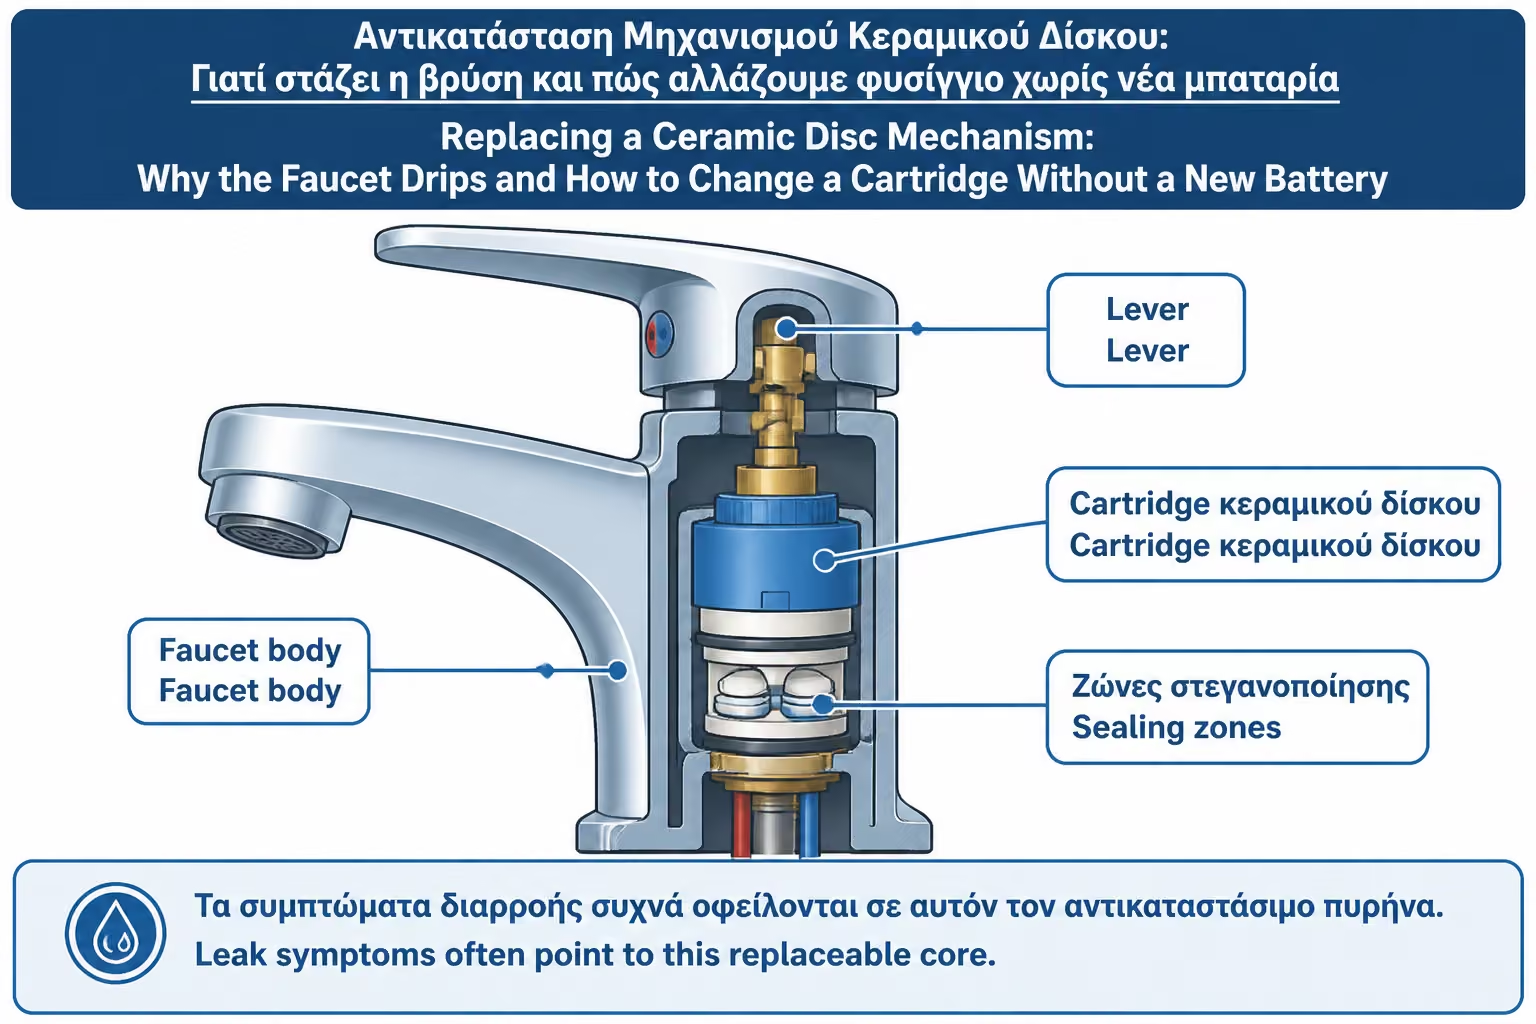
A faucet can drip for different reasons. If it drips from the nozzle while the lever is closed, the cartridge is very often to blame. The ceramic discs do not close perfectly or the internal seals are worn. If it's dripping from the tap base or under the counter, it could be O-rings, tubing, nuts, a connection, or some other point, not necessarily the cartridge.
If the tap only drips when it is open, the problem may be elsewhere: in the spout, swivel joint, hose, aerator or gaskets. If the lever is very stiff or squeaks, there may be scale or wear in the cartridge. If the temperature is not set correctly, there may be a problem with the mixing mechanism.
On two handle taps, the drip can come from the hot or cold cartridge/valve. There it must be identified which side does not close. In thermostatic shower mixers, the failure can involve the thermostatic cartridge, filters or non-return valves and is usually not such a simple DIY job.
The diagnosis therefore begins at the point of leakage. If water drips from the spout while the tap is closed, changing the cartridge is a very likely solution. If you see water under the counter, stop and check connections or call a plumber.
Many try to solve the dripping by pushing the lever harder or tightening the handle. This does not fix the cartridge. If the ceramic discs do not close properly, the extra force does not restore the seal. Instead, it can stress the lever, screw or internal mechanism.
Modern taps should not require force to close. If you have to push the lever to stop the drip, something is wrong. The closure should be smooth and clean. The tap should stop with normal movement, not pressure.
The same applies to the cartridge retaining nut. If the cartridge is dripping, it doesn't mean you just have to overtighten the nut. Over-tightening can break plastic parts, deform the cartridge or make it difficult to move the lever.
If the cartridge is worn, it is changed. Repair is not about strength. It's a matter of correct spare part and correct placement.
Changing cartridges is worth it when the tap is of relatively good quality, the body is in good condition, the finish is not severely worn, the features are correct and you find a replacement available. In such a case, for a small cost you can extend the life of the tap for years.
It is not always worth it in very cheap taps without spare parts. If the cartridge costs nearly as much as a new tap, or if a compatible replacement is not available, replacing the entire tap may make more sense. Also, if the body is cracked, if the finish is peeling, if the tubing is old and hard to access, or if there are multiple leaks, the repair may not be worth it.
In concealed mixer taps, the cartridge change can be done from the front, but requires more care. No components should be lost inside the wall, rosettes scratched or the wrong cartridge used. If you have no experience, better a plumber.
In premium taps, changing the cartridge is usually the right solution. On a cheap 10-year-old tap with general wear and tear, replacement may be an opportunity to install a better new model.
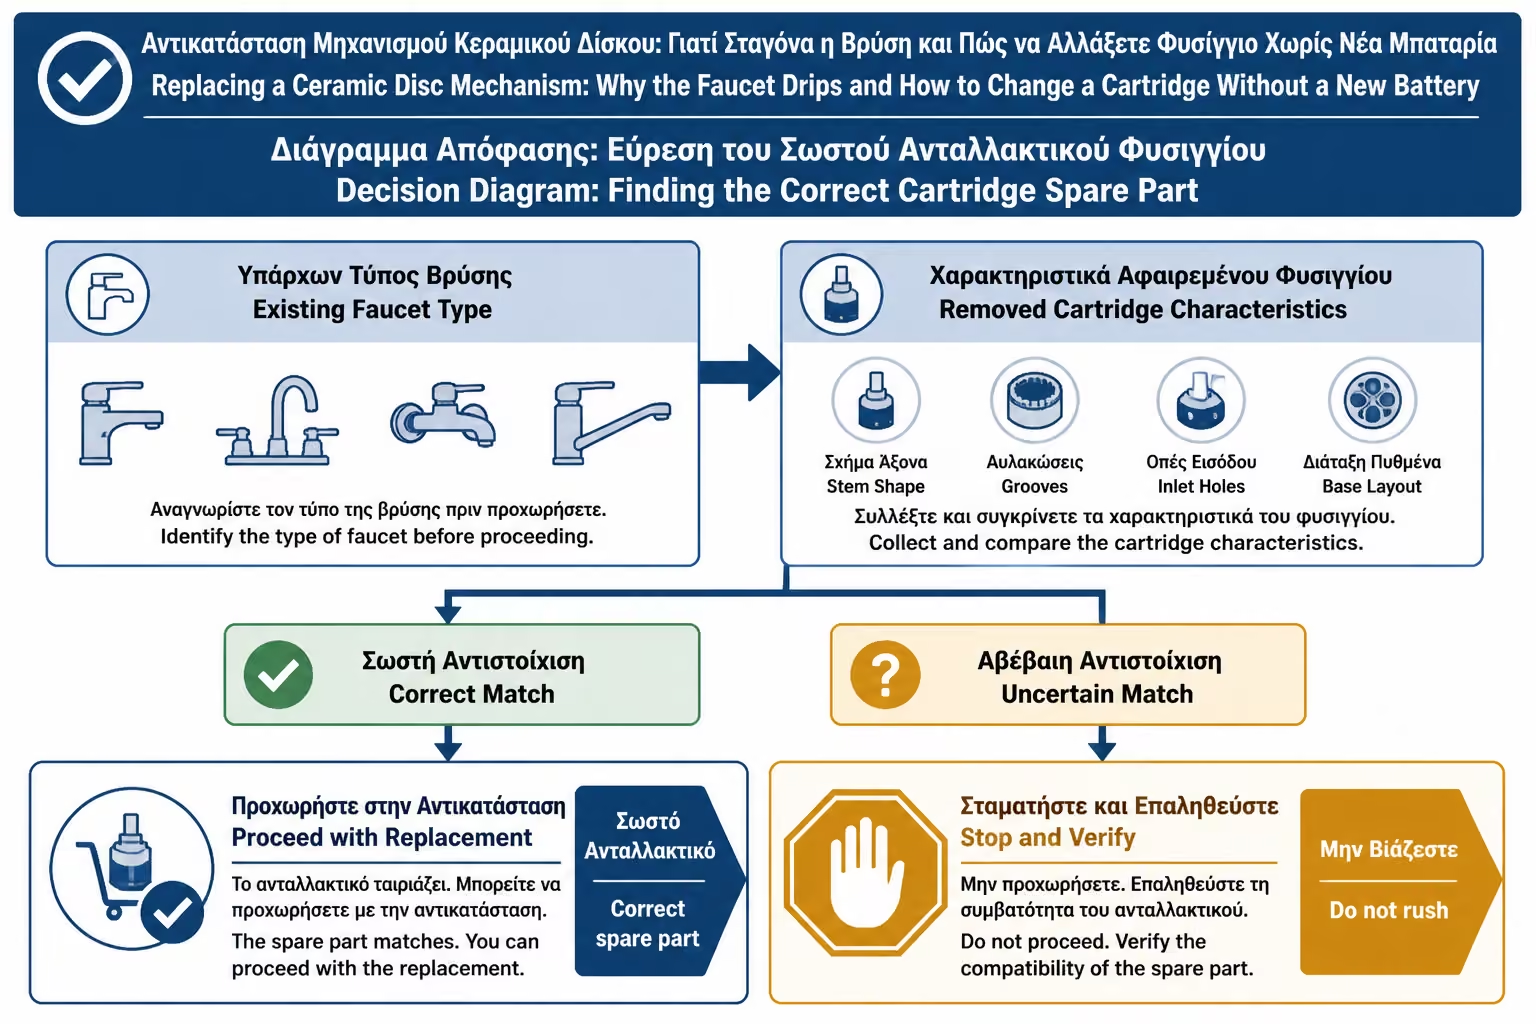
The cartridge is not "one size fits all". It may look the same but have a different diameter, height, base, alignment pins, water inlets or method of attachment. If you put in the wrong cartridge, it may not go in, not seal, turn the hot/cold upside down, or drip more.
The best way is to find the tap or part code. Look at the receipt, box, manual, manufacturer's website or code on the tap. If it is not there, remove the old cartridge and take it with you to the plumbing store. Don't just rely on a photo.
Measure the diameter, usually 25, 35 or 40mm on single lever taps, but don't think this is enough. The bottom is also important. The pins must snap into the tap base properly. Screwfix points out that when fitting a new cartridge you need absolute precision, because even the slightest misalignment can lead to leaks, rough operation or a problem with hot/cold flow.
For branded taps, prefer a genuine spare part. "Compatibles" may work, but they are not always the same in tolerances and duration. In daily use taps, the difference is worth it.
A simple cartridge change on a single-lever basin faucet usually requires a few tools: a flathead screwdriver or small pointed tool for the plastic cap, an Allen wrench for the handle screw, a wrench or socket wrench for the retaining nut, a soft cloth to protect the finish, the new cartridge, and possibly some silicone hydraulic grease for O-rings if the manufacturer allows it.
On many taps, the handle screw is a small Allen. GROHE states in its own cartridge change guide that the plastic cover is removed and the screw is loosened with a 3mm Allen, while the nut may need a 32mm nut. These sizes don't apply to all taps, but they show the logic: you need the right tool, not pliers on the chrome.
It is also a good idea to have a towel or basin under the tap, because some water will come out when you open the mechanism. Also, put a plug or cloth in the sink so that a small screw does not get lost down the drain.
Do not use tools directly on the finish. If you need to touch a lid or rosette, protect with a cloth. A scratch on the tap can be more annoying than the drop you were trying to fix.
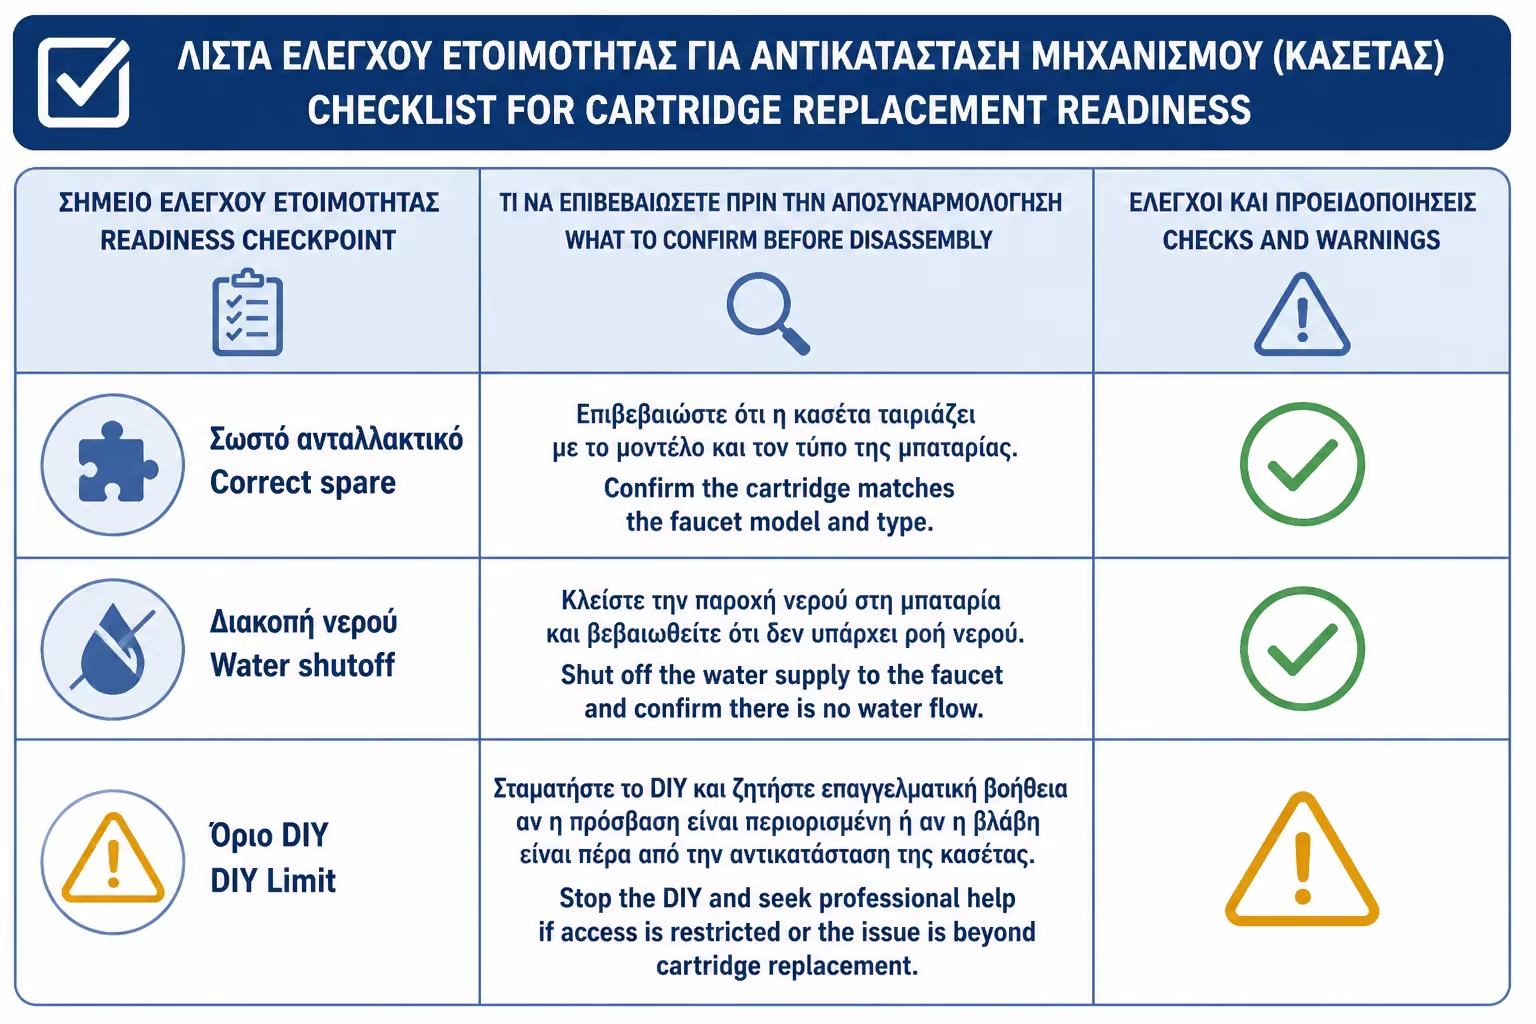
The first and absolutely necessary step is to turn off the water. Close the corner switches under the sink, hot and cold. If they do not exist or do not work, turn off the central supply of the apartment. Then open the tap to release the pressure and confirm that no water is coming in.
Don't rely on the feeling that "it's closed". Try it. Turn on the hot and cold faucet. If it continues to run, the switches are not closing properly. In this case, do not disassemble the tap. Call a plumber or turn off the mains supply. Changing cartridges with a pressurized supply can cause flooding.
If the angle switches are old and stuck, don't over tighten them. They may break or start to leak. This is common in old bathrooms. The small repair then becomes a bigger job: changing switches, hoses and possibly the tap.
If you can't safely shut off the water, stop. This is the basic limit of DIY.
Most single lever taps have a small plastic cap with a hot/cold indicator, usually blue-red. Behind this is the screw that holds the handle. With a small flathead screwdriver or plastic tool, carefully remove it.
Care is needed here because the cap is small and can be lost. Put it in a bowl together with the screw. If you scratch around the cap, it will show in the final result. On black, gold or PVD taps, use an even softer tool, ideally plastic, not metal.
If you don't see a cap, the screw may be behind or under the handle. Some taps have a small hole on the back. In others, the handle unscrews differently. Do not pull hard unless you have found the screw or the way to hold it.
If you have a manual, look at it before you start. Taps are not all solved the same way.
After removing the cap, you will see the small handle screw. It's usually Allen. Insert the correct wrench and loosen the screw enough to release the handle. You don't always have to take it off completely. In some taps it is enough to relax.
Then pull the handle up or out, depending on the model. If it has scale, it can stick. Do not hit it with a metal tool. Gently rock left-right. You can put some warm water with a cloth around the base to soften any scale, but without getting the inside too wet.
If the handle does not come out with reasonable force, do not continue with force. There is a risk of breaking the lever or the cartridge. In such a case, a specialist puller or plumber may be needed.
GROHE, in their guide, describes that after loosening the screw the lever is removed by pulling up and then the cap is removed. This is standard logic, but we always check our own model.
Below the handle is usually a decorative cover or cap. This can be unscrewed by hand. If it is stuck with limescale, protect it with a cloth and try gently. Do not grab it with bare pliers or you will scratch it.
Under the cover is the cartridge retaining nut. This keeps the cartridge pressed against the tap base. It must be unscrewed with a proper tool. Some models require a large nut, such as 32 mm in a specific GROHE instruction. In others, a wrench or special tool.
Before you loosen it, note its position. Do not use excessive force if it is stuck. Limescale, old threads or corrosion can make it difficult. If the tool slips, you may damage the nut or the tap body.
When you remove it, set it aside and note the order of the parts. If there is a washer or ring, note how it was.
After the nut is removed, the cartridge is usually pulled up. It may come off easily or it may be stuck with scale. If it does not come out, gently rock it left and right and pull firmly. On some faucets it may help to temporarily put the handle back on the shaft and use it as a pull point, as the GROHE guide states.
Do not drill it with a screwdriver into the tap body. You may scratch the seat where the new cartridge seals. If the seat is scratched, it may leak even with a new part.
When the old cartridge comes out, note its position. Where were the pins? Where was the hot and the cold? Take a photo before removing it completely if necessary. This photo can save you repositioning.
Check the old cartridge. If it has scale, broken seals, scratches or wear, that's probably where the problem was. But even if you don't see obvious wear, it may not be sealing properly internally.
Before inserting the new cartridge, gently clean the inside where it sits. There may be limescale, small particles or debris. Use a soft cloth or cotton swab. Do not use a metal screwdriver, wire or hard tool on the seat.
If there is a lot of limescale, clean very carefully. We don't want to scratch the surface. If mild descaling is needed, it must be done in a controlled manner and rinsed completely before inserting the new cartridge. Be careful not to leave any cleaner inside the body.
Open the water supplies for a second? No, unless you know exactly what you are doing and have checked that the water will drain safely. At DIY level, it is better to clean manually and not create uncontrolled flow from an open tap without a cartridge.
A clean seat is critical. If a new cartridge is put on top of trash or limescale, it may not seal properly.
The new cartridge must be inserted in the same slot as the old one. The pins on the bottom should go into the corresponding holes on the tap. We don't push if it doesn't click. If it doesn't sit properly, it's probably the wrong cartridge or the wrong orientation.
Check if hot and cold will work properly. If the cartridge is inserted upside down or misaligned, the lever may give the wrong temperature or not work properly. Some cartridges have markings or notches.
If the new cartridge has O-rings, make sure they are in place and not bent. If the manufacturer recommends silicone hydraulic grease, a minimal amount may be used on the O-rings. Do not accidentally use greases, oils or petroleum jelly if they are not allowed, as they may affect the tires.
Place the cartridge calmly and vertically. Accuracy here is more important than power.
After the cartridge is seated, replace the retaining nut. Tighten it firmly, but not overtighten. It should hold the cartridge in place and ensure a seal, but excessive force can distort parts or make the lever stiff.
If there is a torque specification in the manual, follow it. If there is none, tighten reasonably with a tool, without "going all the way". Over-tightening is a common DIY mistake. Taps are not water pipes that need violence. They are precision mechanisms.
Then put the decorative cap, the handle, the screw and the small plastic cap. Before fully tightening the handle, make sure it sits in the correct position and that the movement is natural.
If the handle moves too hard, something went wrong. The cartridge may not have seated properly or the nut may have been overtightened. Don't leave it at that.
Slowly open the corner switches. Do not suddenly open full pressure. First check for leaks around the handle, at the base of the faucet and under the sink. Then open the tap in cold and hot. Run some water to remove air or small particles.
Close the tap and observe the orifice. If it doesn't drip, the repair was successful. If it still drips, there are a few possibilities: wrong cartridge, misalignment, scale on the seat, wear on the tap body, or another problem. Do not immediately tighten more without diagnosis.
Also check the temperature. If hot and cold are reversed or the movement is not correct, the cartridge may be inserted incorrectly or be the wrong type.
After a few hours, check again under the sink. Some small leaks are only visible when the tap is used several times.
If the tap continues to drip from the spout after changing the cartridge, don't panic, but don't ignore it. First make sure the cartridge is correct and inserted in the correct slot. If you have the old one, carefully compare base, pins, height and diameter.
Then check if the retaining nut is properly tightened. If it is too loose, it may not seal. If it is too tight, it can make the mechanism difficult. Also check if there is any debris or scale under the cartridge. Even a small residue can create a leak.
If everything looks good and the tap continues to drip, the internal body of the tap may be worn or there is another point of failure. In this case, a plumber or battery replacement is needed.
If the leak is under the counter, in the tubes, or in the base, the cartridge may not have been the problem. There you need to check connections, O-rings or base tightness.
Changing a cartridge in a shower faucet can be similar, but often has more specifics. On wall-mounted mixer taps, the mechanism can be accessed from the front. In a thermostatic mixer, there is a thermostatic cartridge, filters, non-return valves and temperature regulation. It is not the same process as a sink battery.
In a concealed mixer tap, access is from the rosette. There you have to be careful not to scratch the finishes, not to drop screws into the wall and not to loosen unnecessary parts. If the body is an iBox, SmartBox or other system, it needs the correct manufacturer part.
In such cases, DIY has more risk. If you are unsure of the model or the water won't shut off locally, call a plumber. A wrong move on a concealed mixer tap can lead to a much more expensive repair than a cartridge change.
This guide is more suitable for simple single lever basin mixer. For thermostatic and built-in, keep the logic but not necessarily the same steps.
The cost depends on the brand of battery, the type of cartridge, whether it is original or compatible, and whether you will do it yourself or with a plumber.
| Labor / spare part | Indicative cost of Greece 2026 | Practical observation |
|---|---|---|
| Simple 35/40 mm compatible cartridge | 5–20€ | For economical taps, it needs proper matching |
| Best/brand compatible cartridge | 15–40€ | Best choice for frequent use |
| Original branded battery cartridge | 25–80€+ | Preferred to GROHE, hansgrohe, Ideal Standard etc. |
| Thermostatic cartridge | 50–150€+ | More complex, often needs a technician |
| Special concealed mixer tap cartridge | 40–150€+ | He wants an exact code |
| Plumbing work for cartridge change | 30–80€+ | It depends on access, area and difficulty |
| New simple basin faucet | 30–150€+ | Sometimes good for very cheap old batteries |
| Brand-new tap | 100–300€+ | If the old one has general wear and tear |
The prices are indicative and are affected by VAT, availability, brand, whether additional hoses or angle valves are needed, and whether the work is done in easy or difficult access conditions. In many cases, changing the cartridge is much cheaper than buying a new tap. In others, especially when the tap is very cheap or of an unknown brand, a new tap may make more sense.
Stop if the water does not turn off. This is absolute. Also stop if the handle or nut won't loosen with reasonable force, if you can't find a matching cartridge, if you see a leak under the counter, if the tap is built-in and you don't know the system, or if there are old corner switches that are leaking.
Call a plumber if it continues to drip after changing, if the tap makes noise, if the flow has dropped too much, if it has reversed hot/cold and won't fix it, or if you fear breaking a part. DIY should save money, not create more damage.
Especially in a rental, hotel, Airbnb, or commercial space, plumbing work is usually preferable. There is liability for leaks and damage.
The cartridge is a small part, but water can do a lot of damage. Confidence is good. No rush.
| Inquiry | Yes / No |
|---|---|
| Does the tap drip from the spout while closed? | Yes / No |
| Have you turned off both hot and cold water? | Yes / No |
| Have you tested that the tap no longer has pressure? | Yes / No |
| Have you found the tap code or same cartridge? | Yes / No |
| Do you have the right allen tools, screwdriver and wrench/socket? | Yes / No |
| Have you protected the finish with a soft cloth? | Yes / No |
| Have you blocked off the drain so small screws don't get lost? | Yes / No |
| Do you know how the handle is removed on this particular model? | Yes / No |
| Does the nut loosen without excessive force? | Yes / No |
| Does the new cartridge sit exactly where the old one was? | Yes / No |
| Have you checked for leaks after reopening the water supplies? | Yes / No |
| Do you know when to stop and call a plumber? | Yes / No |
If the first four are not yes, don't start. Changing cartridges is easy only when the preparation is correct.
If you have to keep only one thing, keep this: do not buy a new tap before checking the cartridge. If the faucet drips from the spout while it is closed, it is very often the ceramic disc mechanism that is to blame, not the entire tap. First shut off the supplies properly, find an exact match, protect the finish and do not force anything. If the water will not shut off or if you cannot find the right cartridge, stop and call a plumber. A small repair is economical only when it is done in a controlled manner.
A leaking tap does not necessarily mean it needs to be replaced. In many modern single-lever taps, the cause is the ceramic disc cartridge. With the right part and careful work, the faucet can be restored without buying a new tap.
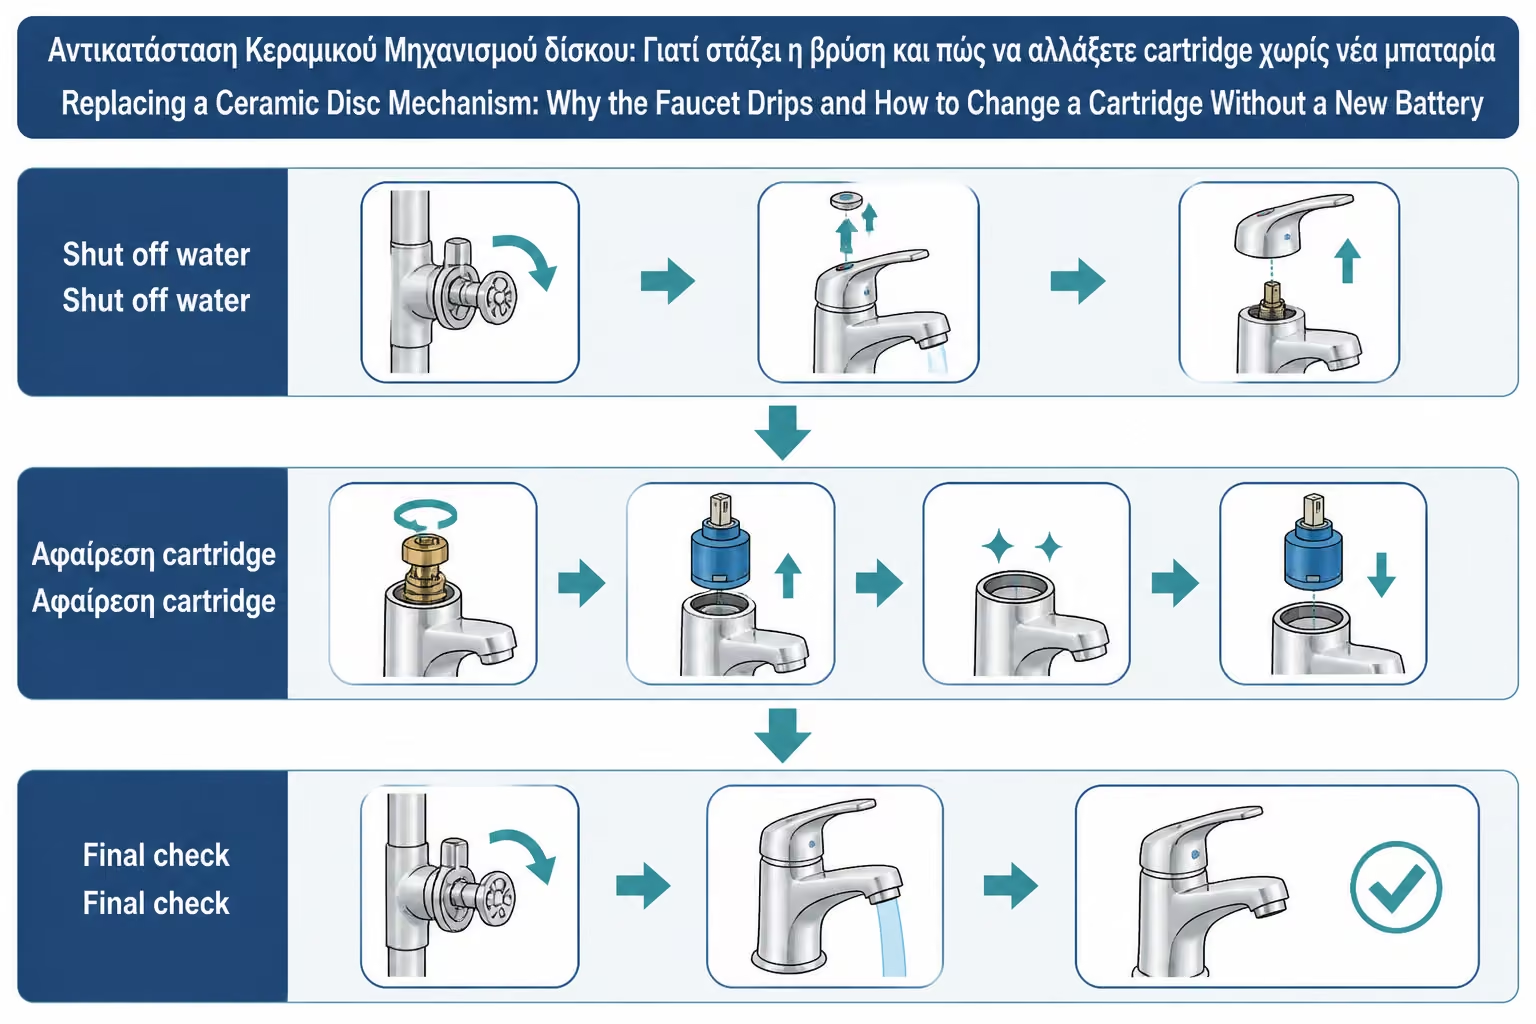
The process is relatively simple: we close the supplies, remove the cap and the handle, unscrew the nut, take out the old cartridge, clean the seat, install the new one and check for leaks. The hard part is not the theory. It's the detail: correct part, correct tools, clean seat, correct alignment and not too much force.
DIY makes sense on simple sink or kitchen faucets, when the supplies are closed properly and the cartridge is available. Not a good idea on inbuilt, thermostatic or taped taps without experience. There the operation can become more expensive if something goes wrong.
The best repair is one that keeps the existing quality battery running. But the best insurance is knowing when to stop. If all goes well, changing the cartridge can be a quick and inexpensive repair. If something resists, water is not a field for experiments.
Return to category.
Go to categoryReturn to the central guide.
Go to guide