
Bathroom Fixtures & Water Equipment
Return to category.
Go to categoryThe countertop basin is perhaps the most characteristic image of the modern bathroom. A bowl on a wooden countertop, a slim oval basin in matte white, a black basin on stone, or a round basin paired with a tall tap. It is the solution we often see in hotel bathrooms, architectural photography, and modern renovations because it immediately gives the space character.
That is exactly why many owners are drawn to it so quickly. Compared with a simple inset basin, a countertop sink feels more distinctive. It creates a stronger composition with the countertop, gives the vanity more presence, and opens up more options in shape, colour, and material. Even a small WC can look more refined without expensive decoration.
But a countertop basin is also one of the least forgiving options when something is miscalculated. If the vanity ends up too high, the rim becomes uncomfortable. If the tap is too tall or too far back, it splashes. If the countertop is not moisture-resistant or easy to clean, the area around the base quickly collects limescale and soap residue. And if the distance from the wall or mirror is wrong, everyday use becomes far less elegant than the photo suggested.
The most common mistake is that the owner first buys the sink, and then tries to fit the furniture and faucet. The correct procedure is the reverse: we decide the final height of use, choose a washbasin, calculate the height of furniture and counter, and then choose a faucet that works with the trough. The washbasin, the cabinet and the faucet are a system, not three independent products.
In this guide, we will look at how to calculate the final height correctly, when you need a tall deck-mounted tap and when a wall-mounted tap makes more sense, how to avoid splashing, which countertop materials are safer, and when the most beautiful solution can become tiring in daily use.
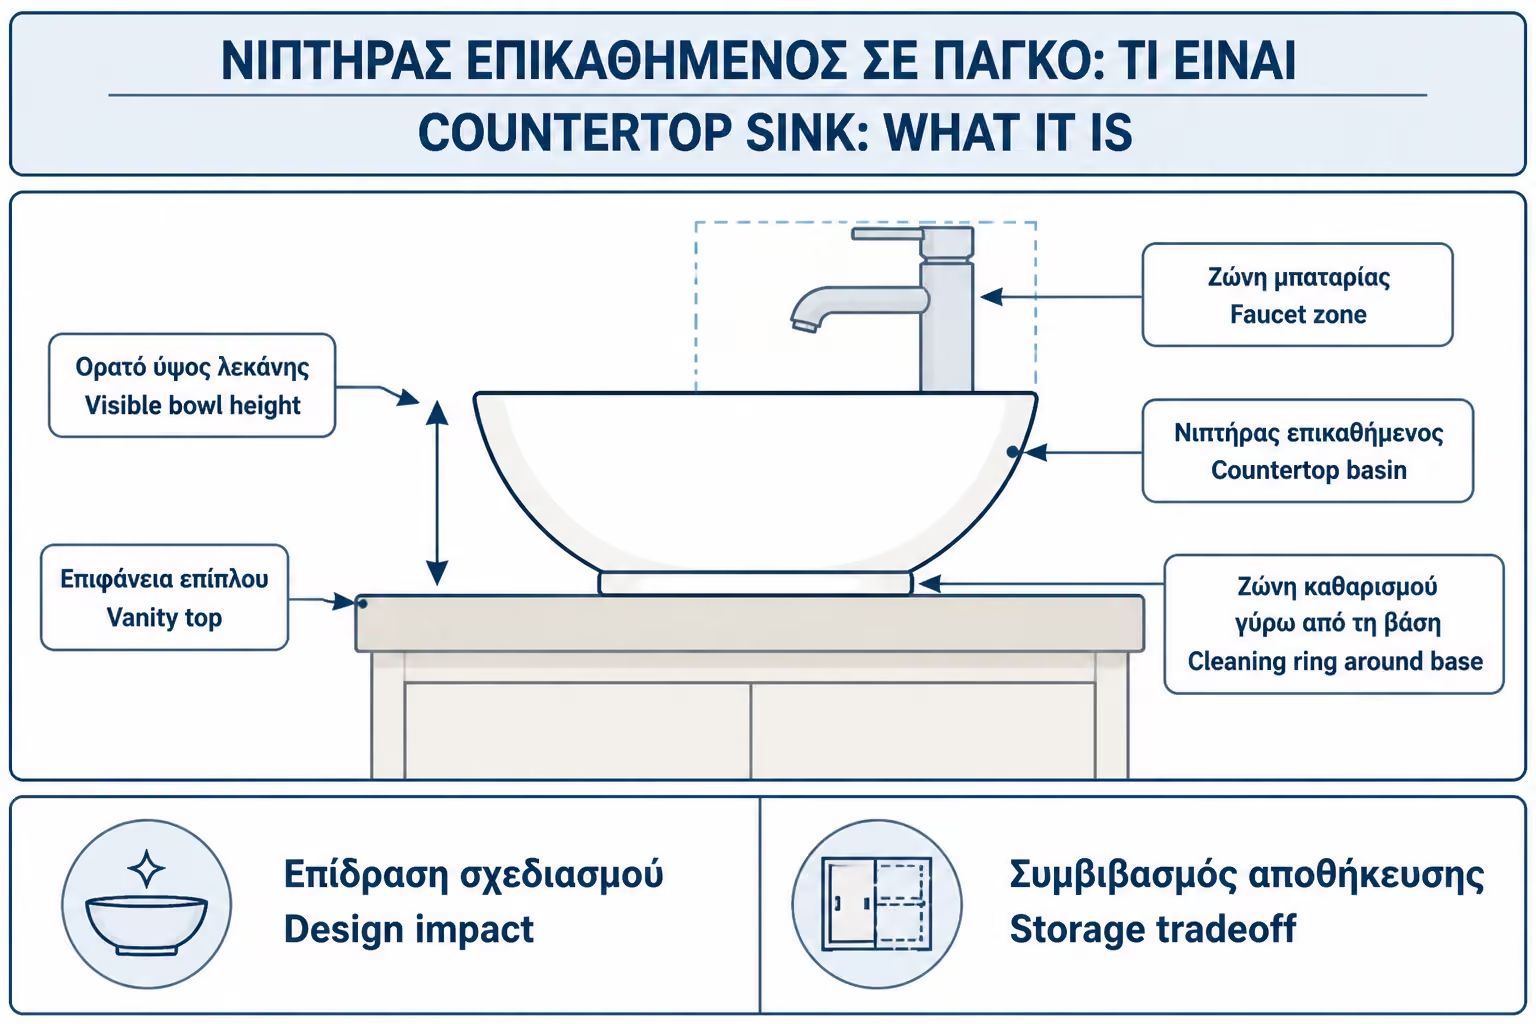
The countertop basin, or countertop basin, is the sink that is placed on the counter or furniture, instead of going into an opening or under the surface. The trough remains visible as a separate object and becomes part of the aesthetic composition of the bathroom.
This placement is what makes it special. It is not just a utility item. It is almost a decorative object. It can have a bowl shape, rectangular geometry, a thin rim, a deep basin, a matte texture, a stone-like feel, coloured porcelain, or a more minimal line. For that reason, it works especially well in bathrooms where the vanity and countertop play a central role in the design.
Installation is often simpler than an undermount sink because it doesn't require a lot of precise cutting to get the counter edge to look perfect. It usually requires a proper hole for the valve and drain, a firm press, a seal at the base, and a careful connection. Countertop basins buying and installation guides state that the final installation is often influenced mainly by the drain hole, the silicone on the base and the correct alignment on the counter.
But simple does not mean foolproof. A countertop basin can be installed relatively easily, but if the height, tap, and countertop are not calculated correctly, the result will be uncomfortable. In practice, the problems with countertop basins usually come less from the installation itself and more from the wrong combinations.
The most common mistake is to use a standard-height bathroom cabinet and place a 12-16 cm high countertop basin on top of it. The result is that the finished rim ends up too high. This may not be obvious on paper, but it is obvious in daily use: hands have to lift higher, children cannot reach comfortably, washing your face becomes awkward, and the mirror can end up at the wrong height relative to the basin.
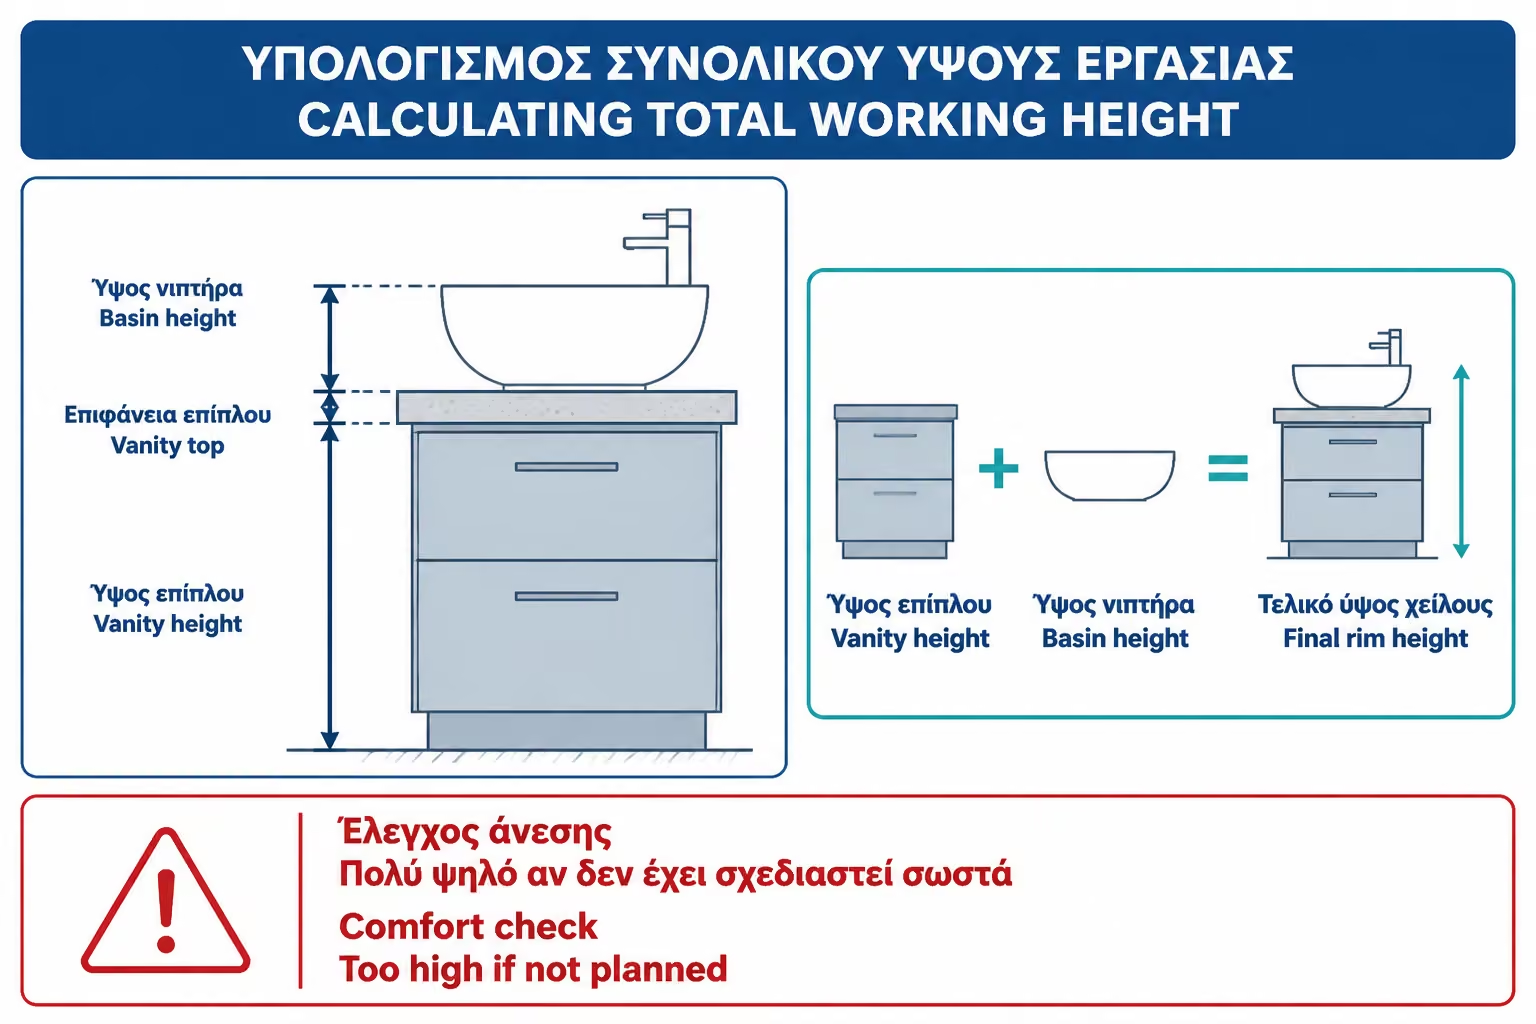
In a classic inset basin, the final usable height is roughly the height of the unit or the basin rim. With a countertop basin, the height of the basin is added on top of the counter. That is the point that has to be calculated from the start. If the vanity is 85 cm high and the basin is 14 cm high, the finished rim reaches about 99 cm. For many users, that is too high.
International ergonomic guides for washbasins often state a comfortable final height of around 85–87cm from floor to top lip, adjustable to around 90–92cm for taller users. Especially for countertop basins, it is emphasized that the height of the sink itself can add about 5–20 cm, so the furniture must be lowered accordingly.
In Greek practice, for most homes, a safe goal is for the finished rim of the sink to be approximately 85–90 cm from the finished floor. For very tall users it may go up a bit. For children or shorter people, a lower solution or step may be needed. The crucial thing is to measure the final edge, not just the furniture.
The calculation is simple, but it has to be done before the vanity is ordered. The final usable height is the distance from the floor to the top edge of the basin. It equals the height of the vanity or countertop plus the height of the basin.
If we want a final height of 88 cm and the basin is 14 cm high, then the countertop should sit at about 74 cm. If the basin is lower, for example 10 cm, the countertop can rise to 78 cm. If the basin is very tall, for example 18 cm, the countertop has to be lowered even more to keep the final height comfortable.
| Target final height | Washbasin height | Indicative countertop / vanity height |
|---|---|---|
| 85 cm | 10 cm | 75 cm |
| 85 cm | 14 cm | 71 cm. |
| 88 cm | 10 cm | 78 cm |
| 88 cm | 14 cm | 74 cm |
| 90 cm | 12 cm | 78 cm |
| 90 cm | 16 cm | 74 cm |
| 92 cm | 14 cm | 78 cm |
The table shows why ready-made vanity units do not always suit countertop basins. Many are designed for inset basins. If a tall bowl is placed on top of them, the final height is thrown off. For that reason, the unit often has to be lower or custom-made.
A practical test is to put a box or object at the height of the finished sink and make the hand washing motion. If you need to raise your shoulders or your elbows come up uncomfortably high, the height is not right. This simple test can save expensive failure.
When the vanity has to be lowered to keep the basin at the right height, storage is often reduced as well. That compromise is not always obvious during the first showroom selection. A unit that would normally have two generous drawers may become shallower or lower just to make the basin work. In a small bathroom, that matters.
In a guest WC, storage is less critical. That is where a basin on a slim countertop can work beautifully. In a main bathroom, however, where you need space for towels, a hair dryer, cosmetics, paper goods, cleaners, and daily clutter, a lower vanity can limit functionality.
A common scenario goes like this: a countertop basin is chosen for a family bathroom, but to keep the height comfortable, the vanity is made lower with smaller drawers. After installation, the countertop fills up with daily items because storage is no longer sufficient. The clean image disappears.
The solution is to design the vanity together with the basin. You may need a wider unit, a side storage column, a shelf, a mirror cabinet, or even a different basin type. The aesthetic effect is only worth it if the bathroom stays functional.
Not all countertop basins have the same daily behavior. A deep oval sink can hold the flow of water better than a very shallow thin sink. A round sink can be beautiful, but if the faucet doesn't fall in the right spot, water can hit the curve and splash out.
Splashes are not just a tap issue. They come from a combination of water pressure, spout height, basin depth, drop point, and surface slope. A very shallow designer basin with a tall tap may look great in a photo, but it can leave the countertop wet after every use.
In a master bathroom, the basin should have enough usable depth. It does not have to be very tall, but it should accept the water flow comfortably. In a guest WC, where use is mostly limited to handwashing, a shallower or smaller solution can work as long as the tap has a gentle flow and is correctly positioned.
The ideal is to see the sink up close. Photos often show the shape, but do not convey well the actual depth of the trough. If buying online, check dimensions, height, internal depth and if there is an overflow hole.
The tall countertop faucet is the most common solution for countertop sinks without a faucet hole. It is placed on the counter, next to or behind the sink, and has a higher height so that the spout goes over the rim of the sink.
Its advantage is that it is relatively simple to install and does not require wall mounting. It is easier to replace later and comes in many designs, heights, and finishes. In renovations where we do not want to open the wall for a concealed tap, it is usually the most practical solution.
The critical factor is the height and projection of the spout. It should be high enough to fit hands comfortably, but not so high that the water falls from too great a height and splashes. It should also reach toward the inside of the basin, usually near the centre or just behind it, not too close to the rim.
In a countertop basin, the tall mixer has to be chosen together with the bowl. We do not buy a "tall tap" in the abstract. We buy a tap with a specific body height, a specific spout projection, and a specific flow pattern that suits the basin.
Tap placement affects both appearance and use. The most classic solution is to place the tap behind the basin, centred or slightly off-centre. It creates a symmetrical look and works well when there is enough countertop depth. But if the countertop is shallow or the basin is too close to the wall, there may not be enough space for the tap or for comfortable cleaning behind it.
Side mounting is often more practical on round or oval washbasins. It leaves the washbasin closer to the wall and can give a more modern composition. But it requires attention to the direction of use, especially if there are right-handed/left-handed users or if the space next to the sink is limited.
The tap should not be placed so close to the basin that you cannot clean around its base. This area collects limescale, water, and soap. If it is squeezed behind the basin, cleaning becomes difficult and over time the silicone can dull or blacken.
A good rule of thumb is to leave enough space behind or next to the sink to comfortably fit a washcloth. This sounds simple, but in practice it is one of the points that distinguish a functional bathroom from a photo bathroom.
The concealed wall-mounted mixer is the cleanest and most architectural option for a countertop basin. Its mechanism sits inside the wall, while only the control and spout remain visible. The countertop stays freer, there is no tap base on the surface, and the whole composition looks more minimal.
This solution suits modern bathrooms especially well, particularly where there is a large mirror, large-format tile, or clean geometry. It also helps with cleaning because it reduces the number of components on the surface. With a basin on a stone or wooden countertop, the absence of a tap base can make maintenance easier.
The downside is that it has to be decided early. A concealed tap needs the right height, the right distance from the basin, the right projection from the wall, and access for future servicing of the mechanism. It is not an option that can easily be added after tiling. If the height or projection is wrong, correction is difficult.
In installation guides, a common reference point is to place the spout of a wall-mounted tap roughly 25-35 cm above the rim of the basin, depending on the basin and the intended use, so that there is enough freedom of movement without excessive splashing. It is not an absolute rule for every product, but it shows the logic: the tap should not go where the tile line or plumber finds it convenient; it should go where the finished basin height requires it.
The choice between a tall deck-mounted tap and a concealed wall-mounted tap should be made based on the stage of the renovation, budget, design priorities, and maintenance.
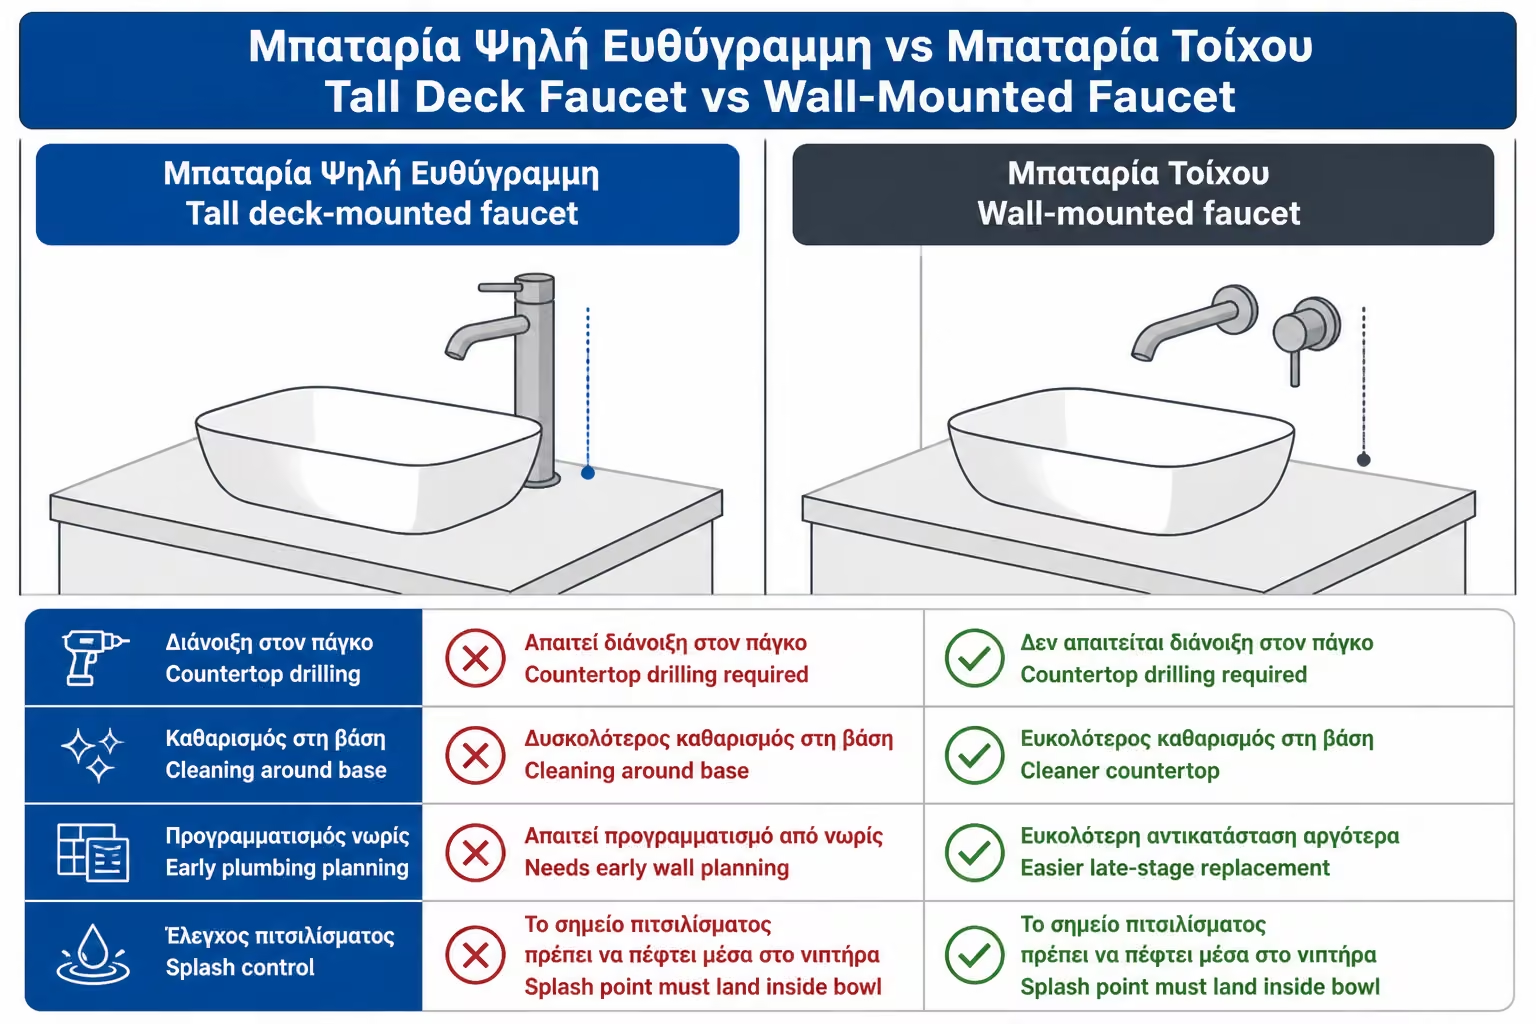
| Criterion | Tall deck-mounted tap | Concealed wall-mounted tap |
|---|---|---|
| Installation | Simpler, on the counter | It needs built-in and proper forecasting |
| Aesthetics | Bold decorative element | More minimal and clean image |
| Counter cleaning | Needs cleaning around base | The countertop stays freer |
| Service / replacement | Usually easier | More complex, depends on the mechanism |
| Labor cost | Usually lower | Usually higher due to built-in |
| Risk of altitude error | It exists, but it's easier to fix | Large if not studied before the tiles |
| Suitable for | Simple/medium renovations, custom countertops | Premium or full renovations with a clean line |
In an already finished bathroom, or in a light renovation, a tall deck-mounted tap is usually the more realistic option. In a full renovation, where the walls are open and the plumbing is being planned from scratch, a wall-mounted tap can create a cleaner and more premium result.
The important thing is not to decide at the last minute. If you are considering a wall-mounted tap, the plumber needs to know before the pipework is set and the tiles go on. If you are considering a tall deck-mounted tap, the countertop needs the correct tap hole and enough space below for the connections.
The right tap is not judged only by its colour or height. It is judged by where the water lands. If the water falls too close to the back rim, the basin is uncomfortable to use. If it lands too far forward, it may splash out. If it falls from too great a height into a shallow bowl, it creates spray.
With a tall deck-mounted tap, you should check the total height, water outlet height, and spout projection. With a concealed wall-mounted tap, you need to check the height from the basin rim and the spout length from the wall. If the basin is too wide or sits too far from the wall, a short spout will not reach the right spot.
Water pressure matters too. A tap with too much flow in a small basin can still cause problems even if the dimensions are theoretically correct. The plumber can adjust the flow or check that the tap has a suitable aerator or restrictor.
A good practical point is this: the water should fall where the trough naturally receives it, not on a vertical side or too close to the rim. If the flow hits a curved surface at the wrong angle, splashes are almost certain.
The countertop basin leaves much of the surface exposed. That is aesthetically appealing, but in practice it means the countertop will receive water. If the material is not suitable or properly protected, moisture can cause swelling, staining, darkening, or wear around the base of the basin and tap.
The safest solutions are materials that resist moisture well: quality compact surfaces, quartz, granite, properly protected natural stone, solid surface, or dedicated bathroom panels and countertops. Wood can be very beautiful, but it needs the right species, proper sealing, careful fabrication, and regular wiping. A simple top not designed for moisture can deteriorate quickly.
The waste opening and tap hole must be properly sealed. It is not enough for the basin to sit on the countertop and look beautiful. Water always finds weak points. Around the base of the basin, around the tap, and at the rear contact with the wall, detailing makes the difference.
In a countertop-basin setup, the countertop is part of the wet-area system. It is not just a decorative board. It has to be chosen with the same seriousness as the basin and the tap.
The main practical disadvantage of the countertop basin is the area around its base. Water, soap, toothpaste, limescale, and dust can collect there. If the bowl is too close to the wall or tap, cleaning becomes difficult.
The solution isn't necessarily to avoid the incumbent. It is to leave proper distances. There must be space behind and around the sink for a cloth to pass through. If the sink is stuck too close to the wall to gain 2–3 cm of counter space, those cm will be lost in everyday inconvenience.
In dark or matte sinks, the salts are more visible. If the sink is matte black and the counter is also dark, every drying drop can be seen. This does not mean that the solution is wrong, but it does require frequent wiping with a soft cloth and mild detergents.
A countertop basin is a bit like a beautiful kitchen worktop: it looks excellent when it is clean, but because the surface stays visible, it also shows water marks more easily. If you accept that small routine, you will probably be happy with it. If you want a more forgiving everyday solution, an inset or undermount basin may be more practical.
In a small guest WC, a countertop basin can be a very good choice. Use is limited, the space benefits from a feature element, and the basin does not face the same daily stress as one in a main bathroom. A small round or oval basin on a narrow countertop can dramatically upgrade a simple WC.
But there you need to pay attention to the dimensions. A very large sink on a small counter can make the WC cumbersome. A sink that is too shallow can splash water. If the door passes close to the furniture, the total depth must be measured. In a small WC, every centimeter counts.
In a small WC, the tap can be deck-mounted or wall-mounted. The wall-mounted option gives a cleaner countertop, but it requires more planning and installation work. A tall deck-mounted tap is simpler, but it should not overcrowd a small surface. In very tight spaces, a compact basin-mounted tap can sometimes be more practical if the model allows it.
The criterion is simple: in the guest WC you can choose a more design solution, as long as you don't sacrifice hand washing. The WC should be beautiful, but not so "special" that the visitor is afraid to use it.
In a master bathroom, the countertop sink needs more thought. It is used many times a day, by different people, often in a hurry. There the image must be balanced with durability and ease of cleaning.
If the master bathroom is for a space-conscious adult couple, the vanity can work just fine. However, if it is a family bathroom with children, toothpaste, water, toys and daily chaos, the solution can become more demanding. It is not prohibitive, but a more practical sink should be chosen: a deeper trough, a durable counter, an easy faucet and not too delicate a finish.
In double sinks, the countertop can give a very nice image with two bowls on a large counter. But it needs enough length, correct distances between the two sinks and two batteries in the correct position. If the counter is small, two overhead sinks may leave little space for items.
In a master bathroom, a countertop basin makes more sense when the countertop is generous enough and the vanity is designed specifically for it. When it is forced onto a typical small unit just to follow the trend, it often loses its practicality.
Countertops are perfect for color. Because they function as an object on the counter, a black, charcoal, beige, terracotta or matte sink can become the focal point of the bathroom. This is one of the great advantages of the class.
However, dark and matte surfaces show more salts. In the sink, this can be seen around the valve, where drips dry, and around the base of the faucet. If the water in the area is hard, the black undermount sink will need frequent wiping to stay as pictured.
Earth tones are often more practical. A beige, greige or light gray washbasin gives a special design without the strong contrast of black with salts. In bathrooms that want a warm, natural aesthetic, this is a very good intermediate solution.
If you choose black or matte, pay more attention to the manufacturer's cleaning instructions. Avoid hard sponges, strong abrasives and cleaners that are not suitable for this particular finish. Improper maintenance can damage the surface faster than use itself.
Countertop sinks have a wide variation in price. In the Greek market there are simple porcelain options under €100, medium options around €100–250, while stone, solid surface, black matte, colored or branded washbasins can go up to €300–600 and above. Greek stores display freestanding washbasins at prices such as €76, €106, €161 and €310 for different materials and series, showing the range from simple porcelain to natural stone or special materials.
| Category | Indicative cost of Greece 2026 | What to watch out for |
|---|---|---|
| Simple porcelain table top | €60–€150 | Good solution for WC or medium bathroom |
| Mid-range porcelain / design shape | €120–€280 | Check bowl depth and tap compatibility |
| Black, matte or colored | 150–350€+ | Needs attention to salts and cleaning |
| Solid surface / artificial stone | 180–500€+ | Check care instructions and scratches |
| Natural stone / marble | 250–700€+ | Weight, absorbency, protection, special care |
| Tall deck-mounted tap | 60–250€+ | Height, projection, mechanism quality |
| Concealed wall-mounted tap | 120–400€+ | It wants a built-in body and proper work |
The prices are indicative and depend on the region, store, VAT, transport, brand, material, finish, availability and whether the offer includes only product or installation. The real cost is not just the sink. It is the sink, the faucet, the counter, the cabinet, the valve, the siphon, the holes, the sealing and the work.
Be careful with comparisons. A 90 euro countertop basin with a 180 euro tall tap and a custom countertop can end up costing more than a pricier inset basin in a ready-made vanity. Always compare the complete system, not just the bowl.
The first mistake is miscalculating height. If the height of the sink is not subtracted from the height of the furniture, the final result is too high. This is the most classic and most annoying mistake.
The second mistake is buying a tap without checking how it will actually land in the basin. A tap can be beautiful and expensive, but if the water falls in the wrong place, it is still a bad choice.
The third mistake is choosing too shallow a basin for a master bathroom. Ultra-slim bowls look stylish, but they are unforgiving of high pressure, rushed use, or the wrong tap.
The fourth mistake is choosing the wrong countertop material. If the surface is not water-resistant or not properly sealed, wear will show around the base of the basin and tap.
The fifth mistake is choosing too large a basin for a small vanity. The basin may look good on its own, but it can leave no usable countertop space for daily life.
| Inquiry | Yes / No |
|---|---|
| Have you decided on the final usable height from the floor to the rim of the sink? | Yes / No |
| Have you subtracted the height of the sink from the height of the furniture? | Yes / No |
| Is the vanity designed for a countertop basin rather than an inset one? | Yes / No |
| Is there enough free counter space around the sink? | Yes / No |
| Is the countertop suitable for continuous contact with moisture? | Yes / No |
| Have you chosen the tap together with the basin? | Yes / No |
| Is the tap the correct height and projection for this bowl? | Yes / No |
| If the tap is wall-mounted, are the plumbing provisions in place before tiling? | Yes / No |
| Can the area around the sink base be easily cleaned? | Yes / No |
| Is the trough deep enough for the daily use you want? | Yes / No |
| Have you checked if there is an overflow or if a special valve is needed? | Yes / No |
| Does the total cost include sink, faucet, countertop, valve, faucet, and labor? | Yes / No |
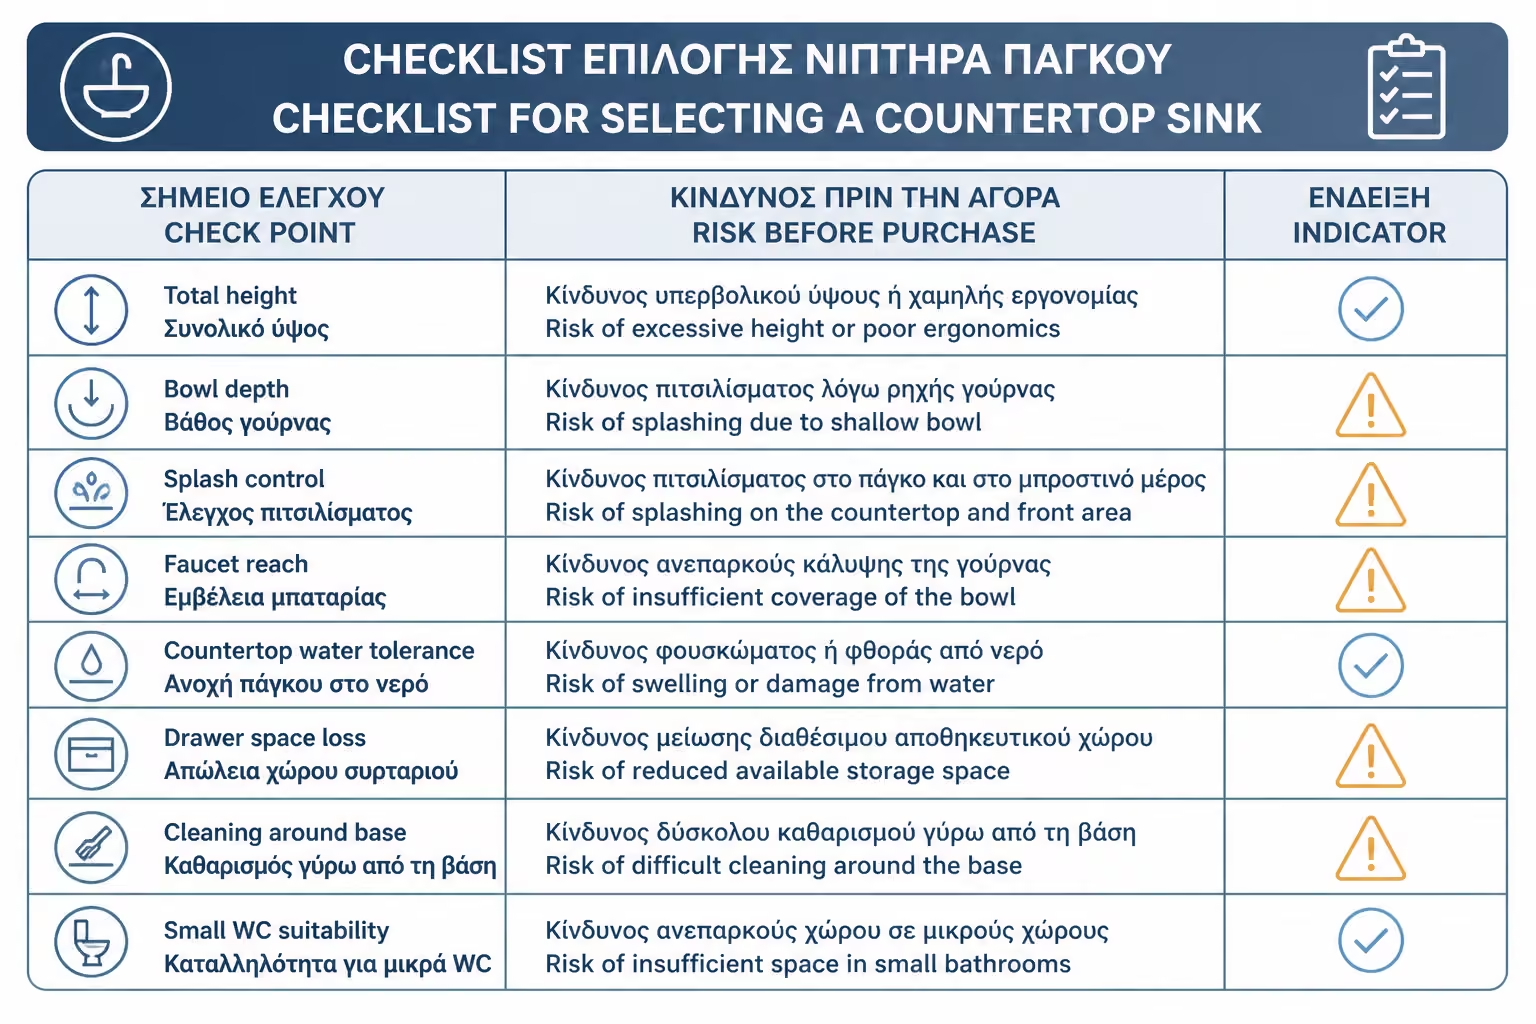
If you cannot answer the height, tap, and countertop questions, do not buy yet. With countertop basins, success lies in the combination.
If you keep only one idea from this article, make it this: with a countertop basin, you do not measure only the vanity height, you measure the finished rim height.
A good target is usually around 85-90 cm from the finished floor, adjusted to the people who will use it. Then choose a tap that lands the water in the correct part of the bowl. If the tap is tall, check both height and reach. If it is wall-mounted, decide that before the walls are closed.
Even a beautiful basin becomes a daily annoyance if it sits 10 cm too high or splashes water every time someone uses it.
The countertop basin is one of the strongest aesthetic choices in the modern bathroom. It can elevate a simple countertop, give character to a small WC, and make a bathroom look more architectural and refined. But its value does not lie in its shape alone. It depends on whether it is placed at the right height, paired with the right tap, and set on the right surface.
The first checkpoint is the overall height. A countertop basin adds height because it sits above the vanity. If that is not calculated properly, daily use becomes awkward. The second point is the tap. Whether deck-mounted or wall-mounted, it has to suit the bowl, reach the right point, and avoid splashing. The third point is the countertop itself, because it receives the water and suffers first if the detailing is poor.
In a guest WC, a countertop basin is often an excellent choice because it delivers strong design with relatively light daily use. In a main family bathroom, shape, depth, and material need more practical thinking. In every case, the purchase should be treated as one system: basin, vanity, countertop, tap, waste, and trap.
The right solution is not necessarily the most expensive or the most impressive. It is the one that remains comfortable, clean and functional after months of use. If you calculate the height correctly and choose a faucet that really fits the trough, the countertop sink can be not only beautiful, but also completely practical.
Return to category.
Go to categoryReturn to the central guide.
Go to guide