
Bathroom Surface Materials & Finishes
Return to category.
Go to categoryLarge format tiles have greatly changed the image of modern renovations. Where in the past a bathroom was dressed with 20×30, 25×40 or 30×60, today we see dimensions 60×120, 80×80, 120×120, and even porcelain slabs that resemble marble slabs. The result can be impressive: fewer joints, a cleaner surface, a sense of luxury and a space that looks bigger, calmer and more modern.
But what is often not seen in photographs is the technical requirement behind this effect. A large tile does not behave like a small one. It does not easily "take" the imperfections of the wall or the floor, it does not forgive a crooked substrate, it does not easily hide mistakes in the corners and it cannot be placed correctly with hasty logic. The larger the dimension, the smaller the margin of error.
This is why many failed applications of large tiles are not due to the hardware itself. They are due to preparation. A homeowner can buy a great 60×120 porcelain, pay for more expensive material, and end up seeing “teeth” between the tiles, voids below the surface, broken corners, or bad cuts around faucets and fixtures. The problem is not that large tile is a bad choice. It is that it calls for a more correct work.
In the Greek reality, where many houses have old plaster, sloping floors, crooked walls, old coatings or rough previous renovations, large format tiles should be treated as a technical system and not as a simple change of dimension. Before buying them, one needs to know if the space can accept them, what preparation is needed and how much the installation cost will increase.
In this guide we'll look at what large-format tiles are, what their real benefits are, where they're worth it, where they create difficulties, why the substrate needs to be perfectly level, what role adhesive, double-coating, leveling systems and joints play, and how a homeowner can avoid pitfalls before committing to an expensive option.
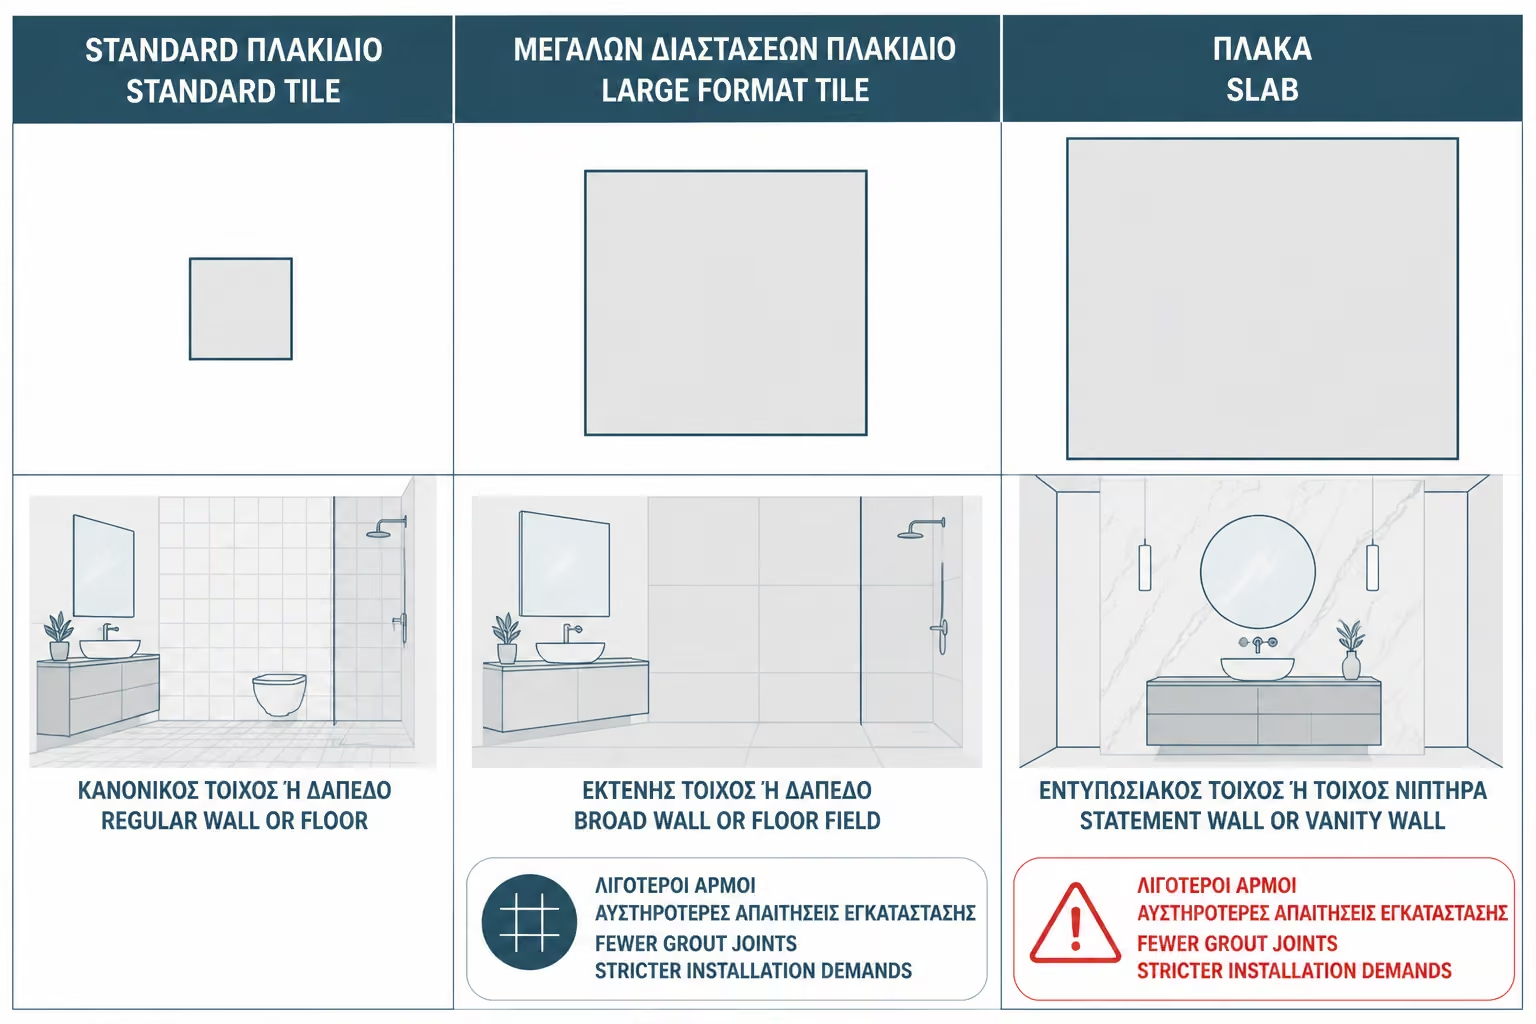
In the market, as large format we usually consider tiles that have at least one side longer than 60 cm or general tiles that, due to their dimensions, require special attention when laying. Common dimensions are 60×60, 60×120, 80×80, 90×90, 120×120 and 120×240. In addition to these, there are porcelain slabs, i.e. very large plates of porcelain material, which can reach dimensions such as 120×278, 160×320 or even larger, depending on the manufacturer.
The difference is not only aesthetic. A 30×60 tile can be handled relatively easily by an experienced tiler. A 60×120 requires better carving, more careful gluing and often two people. A 120×280 slab is no longer just a "big tile". It is large thin plate that needs special transport tools, suction cups, cutting benches, proper storage and craftsmen who have worked on such applications.
Thickness is also important. There are large tiles of classic thickness, but also thin tiles of 6 mm or even thinner for special applications. Thin slab can be very beautiful and lighter than a thick slab, but it is also more demanding to transport, cut and fully contact with the glue. If left empty below, it can become vulnerable to knocks.
The sense of luxury does not only arise from the cost. It arises from the continuity of the surface. When there are fewer joints, the eye reads the space more calmly. A bathroom with large imitation marble slabs can resemble natural stone, a hotel spa or a minimal architectural space. Accordingly, a living room floor with large porcelain tiles can give a clean, unified image without the "break" created by the many joints.
This is especially pronounced in small bathrooms. Although it sounds paradoxical, a large tile can make a small space seem larger, because it reduces the lines that visually divide it. A WC 2 sq.m. with many small tiles it can look more "loaded". The same WC with a few large surfaces can look cleaner and calmer.
But there is a catch here. Optical zoom only works when the cuts are correct. If a large tile is inserted into a small wall and we end up with a narrow strip of 4 cm in the corner, the result loses its luxury. If the joints don't run properly from wall to wall, or if the cuts around the shower seem haphazard, the large tile instead of upgrading the space, makes it look sketchy.
One of the main advantages of large format tiles is that they reduce joints. This is practical and aesthetic. Fewer joints mean a more uniform look, fewer places to collect dirt and easier cleaning, especially on bathroom or kitchen walls.
But fewer joints doesn't mean no joints at all. This is a common misunderstanding. The joint is necessary to absorb micro-tolerances, movements, temperature changes and manufacturing deviations. In rectified tiles, i.e. tiles with precise edges cut, a finer joint can be made, but not eliminated. The larger the tiles and the finer the joint, the more precision is required in the substrate and placement.
In a bathroom, joints also play a practical role. They help transition from surface to surface, at corners, at material changes and at points with gradients. Obsessing over "not showing a joint at all" can lead to wrong choices. The right thing is not to make the joint disappear, but to design it correctly.
On large tiles, the substrate is decisive. A crooked wall or undulating floor may not stand out with small tiles. With 60×120 or slab, however, it will be seen immediately. The large tile is rigid over a large area. It cannot easily "follow" bellies and irregularities without creating dents, gaps or poor contact.
According to technical instructions for large format tiles, the flatness of the substrate is a key success factor, because the larger the tile, the more difficult it is to cover discrepancies with the adhesive. Installation instructions often state that very small flatness tolerances are required for large dimensions, such as around 3mm on a 2m rule in UK practice specifications or even tighter tolerances on large slab systems.
In practice, this means that before installation begins, the wall or floor must be checked with a large ruler, laser or suitable tool. If there are bellies, cracks, old plasters that come off, uneven cement mortars or old glues, "putting more glue" does not solve the problem. Tile adhesive is not a building material to correct large irregularities. First the substrate is fixed and then the tile is glued.
One of the most common mistakes in installing large tiles is trying to correct a crooked substrate with thicker adhesive. This may seem practical on the construction site, but technically it is problematic. The glue has a specific application thickness, a specific workability time and specific requirements for proper adhesion. It is not designed to fill large gaps.
When too much adhesive is put in, the risk of shrinkage, tile subsidence, voids, slow curing and uneven support increases. In a large tile this can lead to "hollow" areas. If a heavy object is later dropped on the spot where there is a gap underneath, the tile may break more easily.
The correct procedure is different. If the substrate has a problem, it is first leveled with a suitable repair mortar, self-leveling material on the floor or proper leveling on the wall. An appropriate adhesive is then selected for the size, weight, substrate and use. Tile adhesives are classified in Europe based on EN 12004, which defines performance classes for ceramic tile adhesives so that the right material can be selected depending on the application, substrate and requirements.
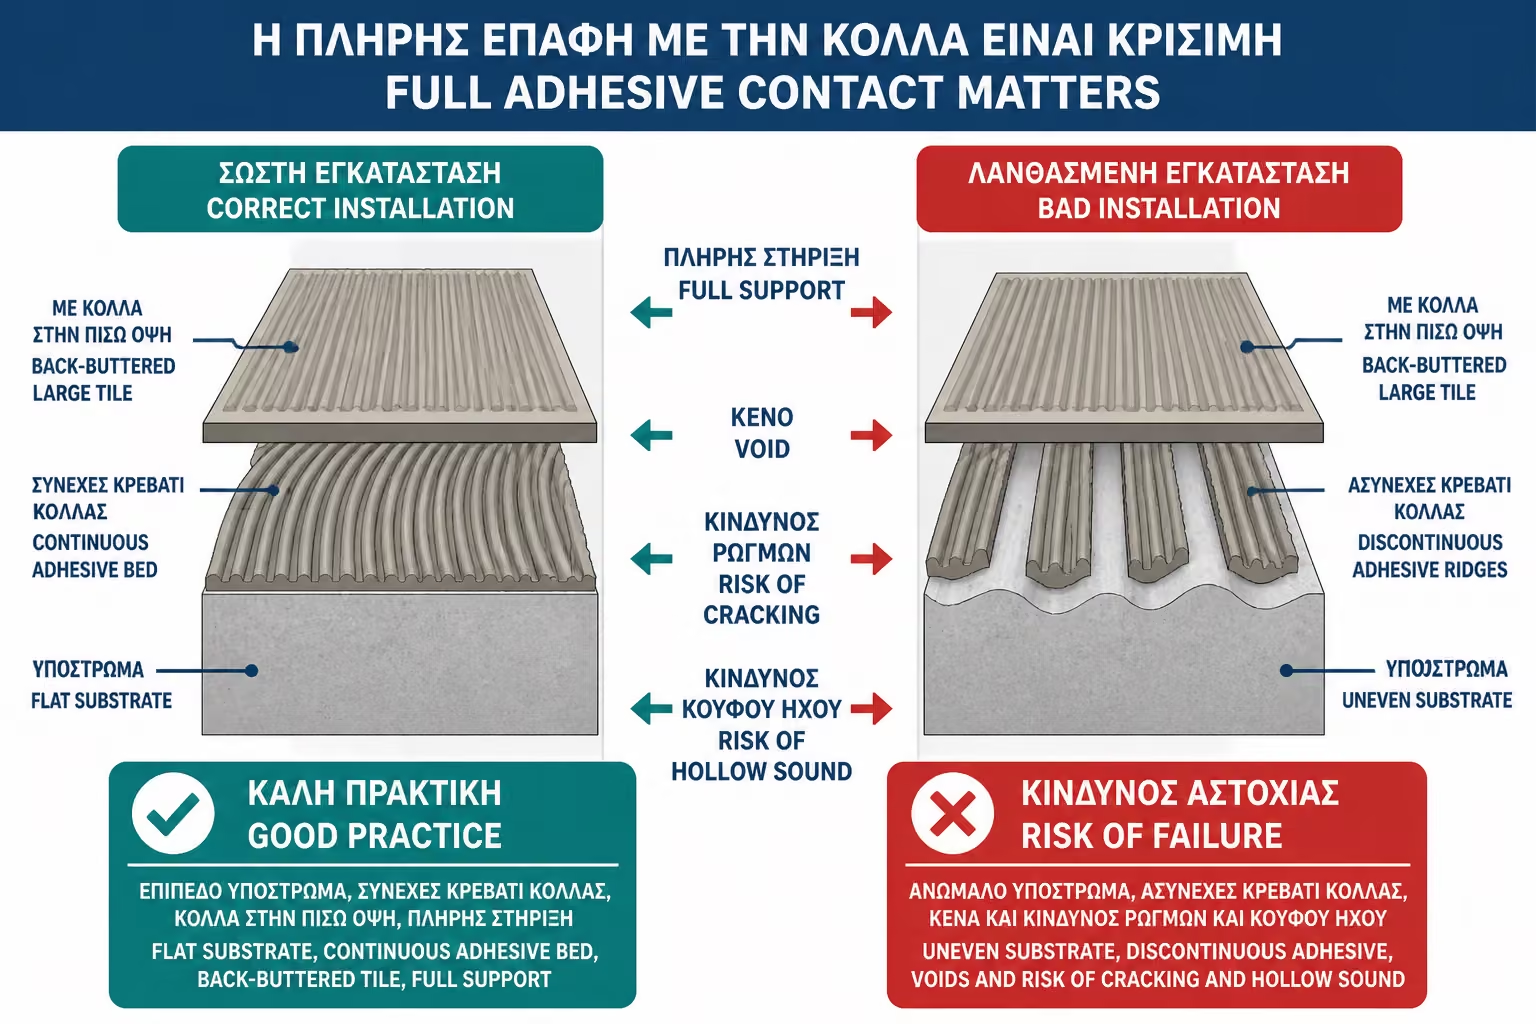
On large format tiles, full and even contact with the adhesive is critical. It is not enough for the tile to rest on a few "lines" of glue. We want as much coverage on the backside as possible, with no gaps, especially on floors, exteriors, bathrooms and cargo areas.
For this, the technique of double spreading, also known as back-buttering, is often used. That is, glue is added to both the substrate and the back side of the tile, in order to increase the contact. Mapei, in a technical analysis for the correct distribution of adhesive, emphasizes that one of the main objectives in laying ceramic tiles is to cover as much surface as possible on the back side, so that the mechanical properties of the system are properly exploited.
An owner does not need to know all the technical details of the spatula. But he needs to understand the following: on large tiles, the gluing must be complete and serious. If the craftsman works in a hurry, with a small amount of glue, without checking coverage and without properly pressing the tile, the result may look good on the first day but have a hidden problem.
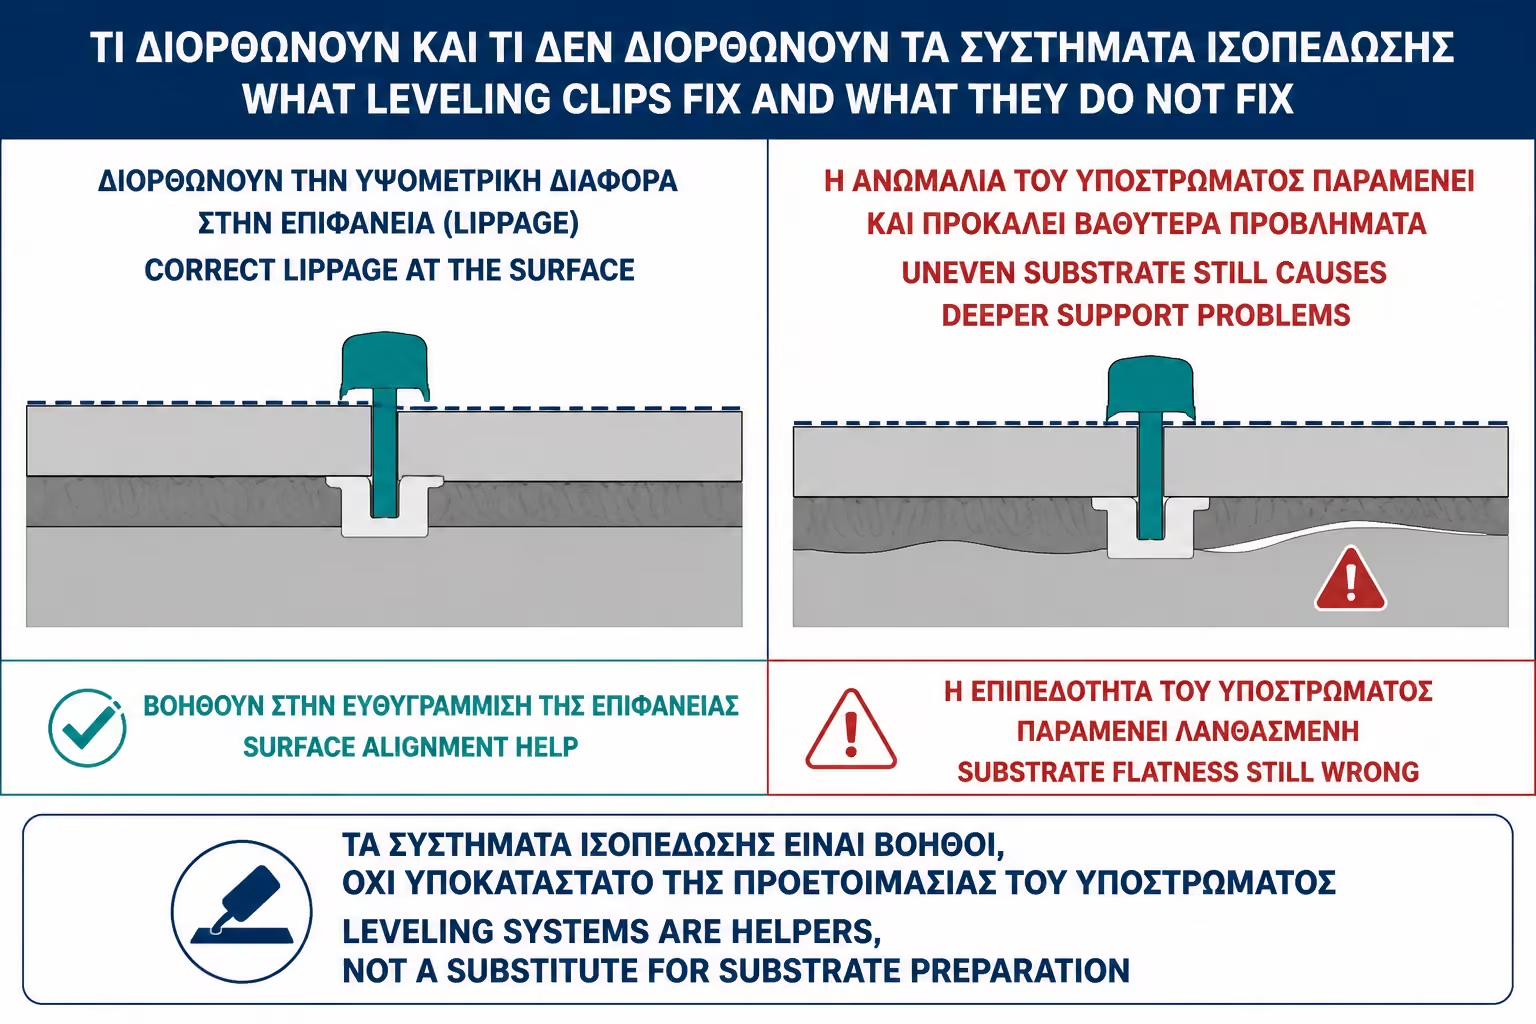
Tile leveling systems, with clips and wedges or screw caps, are very often used on large tiles. They help keep the edges level while the glue dries and reduce the risk of lippage, that is the phenomenon where one tile protrudes slightly from the next.
They are useful tools, but not a magic solution. They can't fix a crooked wall, a bad grout, or the wrong amount of glue. If the substrate has undulations, leveling systems may simply push the tiles together without solving the real problem. In some cases, they can even create trends if used incorrectly.
The correct logic is: first a level substrate, then a suitable adhesive, then a correct spatula and technique, and finally a leveling system as an auxiliary tool. When this order is reversed, the play rests on chance.
Lippage is the height difference between two adjacent tiles. In small tiles, small deviations are often lost within the many joints. In large tiles, especially rectified and with a thin joint, the eye catches them immediately. Even 1–2mm can be seen sharply when the light falls sideways.
In bathrooms this is very common. A wall with a large tile and hidden LED lighting can reveal every little difference. The light "scratches" the surface and shows shadows on the edges. What on the day of installation looked acceptable, in the evening with the lighting may look crooked.
In flooring, lippage is not only aesthetic. It can also be functional. A floor overhang can be uncomfortable to walk on, collect dirt or create a minor tripping hazard. That is why in large tiles the placement must be done more precisely than in a simple small dimension.
There is a common impression that large tiles do not suit small bathrooms. That is not necessarily correct. If they are planned well, they can make a small bathroom look more spacious and cleaner. The key is careful layout planning.
Before buying the tiles, it must be considered where the joints will fall, where the cuts will be made, how the corners will meet, how the tile will "sit" around the sink, sink, shower and faucet. In a small bathroom, a few centimeters make a big difference. A bad cut next to the door or a thin strip in the most visible place can spoil the whole picture.
In practice, it is often worth making a simple layout plan before purchasing. It doesn't always need a full architectural study, but it does take thought. In more expensive options, especially with slabs, pre-planning of cuts is essential. The large tile is not placed correctly by "seeing and doing".
Large slabs on bathroom walls can give an impressive effect. A slab behind the sink or inside the shower can create the feel of natural stone without many joints. In hotel-style bathrooms, this option is particularly popular.
But slabs have a high technical responsibility. They need proper transportation, dimensional control, a clean workspace, special cutting tools, and usually a team of two or more people. It is not a material that should be placed by a workshop without experience on large slabs. A mistake in cutting around a battery, built-in cistern or alcove can be expensive, because we are not talking about a small piece but an entire slab.
In addition, the walls must be very well prepared. If there is loose plaster, moisture, old paint, bad plasterboard or a substrate with small deformations, the slab will not correct the problem. It will make it more obvious or more dangerous.
On the floor, large tiles have special requirements. If the floor has irregularities, the tile does not tread evenly. This can create gaps, noises, cracks or breaks over time. Especially in areas where heavy furniture, kitchens, dining rooms or professional use will be placed, the right base is essential.
In old apartments, the floor may have small height differences, old adhesives, mosaic, old tiles or cement mortar that is not flat. The solution may be stripping, priming and self-leveling material, or other appropriate preparation as appropriate. There is no one-size-fits-all solution.
If the owner wants to install a large tile over an old tile, even more careful inspection must be done. We need to see if the old tiles are well bonded, if there are hollow spots, if the height affects doors and frames, if a special adhesion primer is needed and if the new weight is acceptable for the application. "We put it on top and we're done" is not always the right solution.
The shower is probably the most demanding spot for large format tiles. That's where slopes, waterproofing, proper drainage, anti-slip and precise cuts are needed. A large tile on a shower floor may look great, but technically it is not always the best solution.
If there is a central drain, the floor needs slopes from several sides. With a large tile this is difficult, because the tile cannot be "broken" easily without cuts. That is why smaller tiles or mosaics are used in many showers, which follow the slopes more easily. If there is a linear drain, large tiles can work better, because the slope can be done in one direction, but again it needs a lot of proper study.
Anti-slip is also important. A large shiny slab on the shower floor may be aesthetically pleasing but practically unsuitable. For the shower you need material suitable for wet use with bare feet, the right texture and careful design. Luxury should not come at the expense of safety.
Large tiles usually cost more, but the real difference is mainly seen in the overall project. You are not paying only for the material itself. You are also paying for transport, waste allowance, special cuts, possible extra preparation, better adhesives, more installation time, and more installer responsibility.
In the Greece of 2026, a good 60×120 porcelain can start from around €25–45/sq.m. in medium options, while more branded ranges, marble imitations, special textures or rectified options can move higher. Slabs have much more variation and are often priced differently, not only per square foot but also based on cuts, transportation and difficulty of application.
In the works, the simple installation of smaller tiles can in easy cases be found at around €10–15/sq.m. as a realistic basis for typical residential work, with lower bids on very simple surfaces. For large tiles, many cuts, difficult substrates, bathrooms, showers or slabs, the cost goes up. It is not unreasonable to ask for a higher fee when two people, special tools, more preparation and more precision are required.
The key is to compare offers with the same content. A quote can seem expensive because it includes leveling, high quality adhesive, grout, primers and proper preparation. Another may seem cheap because it leaves everything out. In large format, this makes a huge difference.
Before you review the table, keep the following points in mind:
| Case | Large tiles are worth it when… | They want attention when… |
|---|---|---|
| Small bathroom | A proper layout study is done and awkward cuts are avoided | There are many corners, facilities and small surfaces |
| Shower wall | We want fewer joints and a clean image | The substrate is not level or there is moisture |
| Shower floor | There is a linear drain and a correct slope | There is a central drain with many slopes |
| Living room / single room | We want visual continuity and durable porcelain | The floor has old irregularities or elevation differences |
| Kitchen | We want durability and easy cleaning | The surface is too shiny or slippery |
| Slabs | There is an experienced workshop and the right equipment | The project is treated as simple tiling |
The table shows the bottom line: large format tiles are not "good" or "bad" in themselves. They are demanding materials that perform very well when the space, substrate and workshop are suitable.
Tiles always need an extra amount for cuts, breaks and future replacement. On large tiles this is even more important, because each cut consumes a larger piece and each mistake costs more.
On simple surfaces, a friction of about 10% can be calculated. In areas with many cuts, diagonal placements, a design that needs to be continued, or large slabs, 12–15% or more may be needed. For slabs, the thickness should be calculated based on a cutting plan, not a simple percentage.
It is also a good idea to keep some pieces after the project. If a tile breaks years later, the series may have stopped or the batch shade may not be found. In large tiles, replacement without identical material available is very difficult.
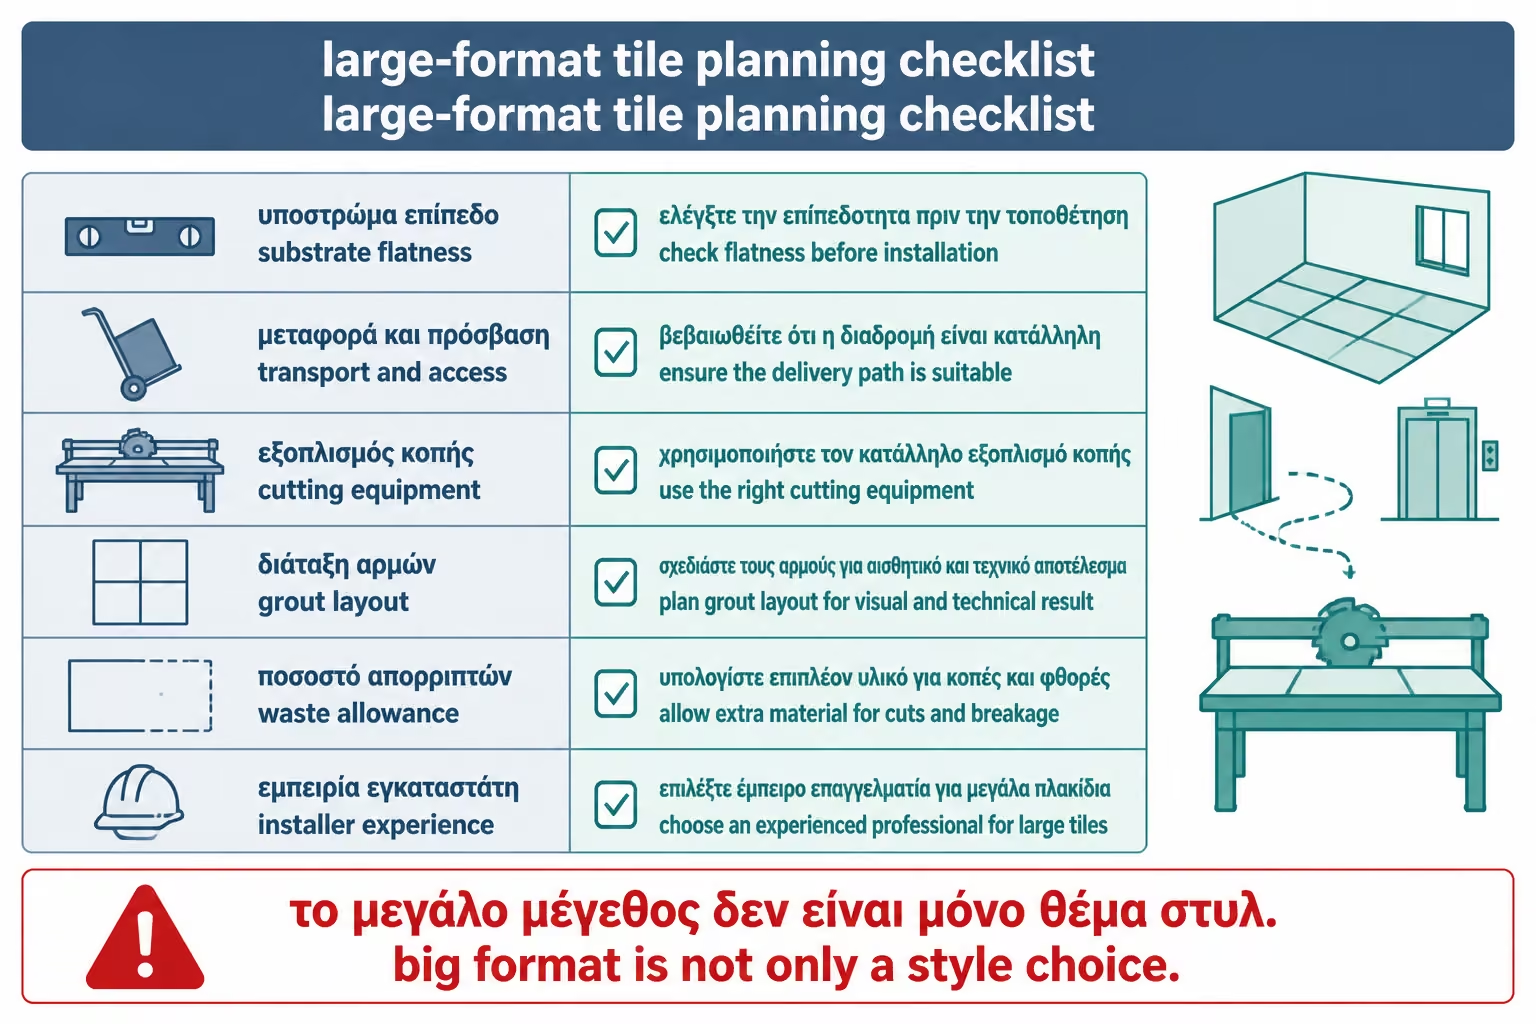
Not every installer who works well with standard tiles has experience with slabs. That does not reduce their value; it simply means each application has its own demands. With large tiles you need experience in layout planning, substrate flatness, correct adhesives, double buttering, leveling systems, large-format cuts, and handling without breakage.
The owner would do well to ask directly: have you installed this dimension again? Do you have tools for such cuts? Will you be working alone or with a second person? Will there be a substrate test before installation? What glue will be used? Will it be double coated? Will there be a drawing plan?
These questions are not excessive. It's the way to distinguish a serious technical approach from a tentative promise. On large tiles, the cheap workshop can be very expensive if stripping and re-laying is required.
Before you review the table, keep the following points in mind:
| Question | Yes / No |
|---|---|
| Has it been checked that the walls or floor are really level? | Yes / No |
| Has the craftsman seen the space before you buy the tiles? | Yes / No |
| Has a drawing and cutting plan been made? | Yes / No |
| Have you calculated enough waste allowance for large cuts and potential losses? | Yes / No |
| Is the glue suitable for large format porcelain or slabs? | Yes / No |
| Will it be double coated where required? | Yes / No |
| Will a leveling system be used as an aid and not a substitute for leveling? | Yes / No |
| Has the shower been sloped, drained and non-slip tested? | Yes / No |
| Has the additional substrate preparation cost been calculated? | Yes / No |
| Does the workshop have experience in this dimension? | Yes / No |
If most of the answers are “no”, the choice of a large tile needs to be reconsidered. It doesn't mean you should reject her. It means that proper preparation must precede.
If you want a large tile, don't start from the exhibition plan. Start from your space. Put a rule on the wall, check the floor, see the angles, slopes, supplies and cut points. Large format tiles give an excellent result when the substrate is correct and the placement is done precisely. But if they get on the wrong footing, they don't hide the problem; they magnify it. It is better to pay for proper preparation before, than to dislodge afterwards.
Oversized tiles and porcelain slabs can dramatically upgrade a space. They reduce joints, give a clean and luxurious image, visually enlarge small bathrooms and create modern surfaces with an architectural character. When chosen and placed correctly, they are among the most powerful aesthetic solutions in a renovation.
But it is not a simple choice. They want a flat substrate, proper adhesive, full contact, careful etching, installation experience and a realistic budget. It is not a material that forgives sloppiness. The larger the tile, the more visible any mistake.
The right decision is not "I put a large tile because it is fashionable" nor "I avoid it because it is difficult". The right decision is to see if the venue can support it technically and financially. If it can, the result can be excellent. If not, a more reasonable dimension, properly placed, will show better than an expensive slab that went into the wrong base.
Return to category.
Go to categoryReturn to the central guide.
Go to guide