
Bathroom Surface Materials & Finishes
Return to category.
Go to categoryRectified tiles are among the options that we meet more and more often in modern renovations. The owner sees them in exhibitions, in photographs of bathrooms, on large porcelain floors and on uniform surfaces that look clean, elegant and luxurious. Their main advantage is that they allow a very thin joint, usually 1–2 mm in interior applications, giving the impression of an almost continuous surface.
But this image also creates a big misunderstanding. Many homeowners believe that "rectifier" means tile without a joint. This is not the case. Rectified tile has more precise and straight edges, but the joint is still necessary. Without a joint, the system becomes more vulnerable to micro-movements, expansions, subgrade deviations, trapped stresses and future cracking. The correct goal is not to completely eliminate the joint, but to make it thin, straight, clean and technically correct.
In the Greek market, the term "laser cut" is often used to describe rectified tiles. Technically, however, rectification does not always mean that the tile is cut exclusively by laser. It usually means that after firing the edges of the tile are cut, ground or smoothed with mechanical precision so that the pieces have more uniform dimensions and more vertical edges. The laser can be used in industrial inspection or as commercial precision marking, but the point is to treat the edges after firing. Rectified tiles are generally defined as ceramic or porcelain tiles that have been cut or ground after firing to obtain more precise dimensions and straight edges.
The result can be excellent, especially in large tiles, bathrooms, living rooms, kitchens and minimal spaces. But the rectified tiles are more demanding to install. They want a properly leveled substrate, careful carving, good workmanship, proper glue and joint that fits fine lines. If placed casually, their advantages are reversed: instead of looking expensive, they reveal every little mistake.
In this guide we will look at exactly what rectified tiles are, why they cost a little more, when they are worth it, what joint they need, what mistakes are made in practice and what a homeowner should look out for before choosing them for a bathroom, floor or large single surface.
The term "rectified" comes from rectified, i.e. corrected or precisely processed. In tiles it means that after firing, their edges go through additional processing to get more accurate dimensions and straighter sides.
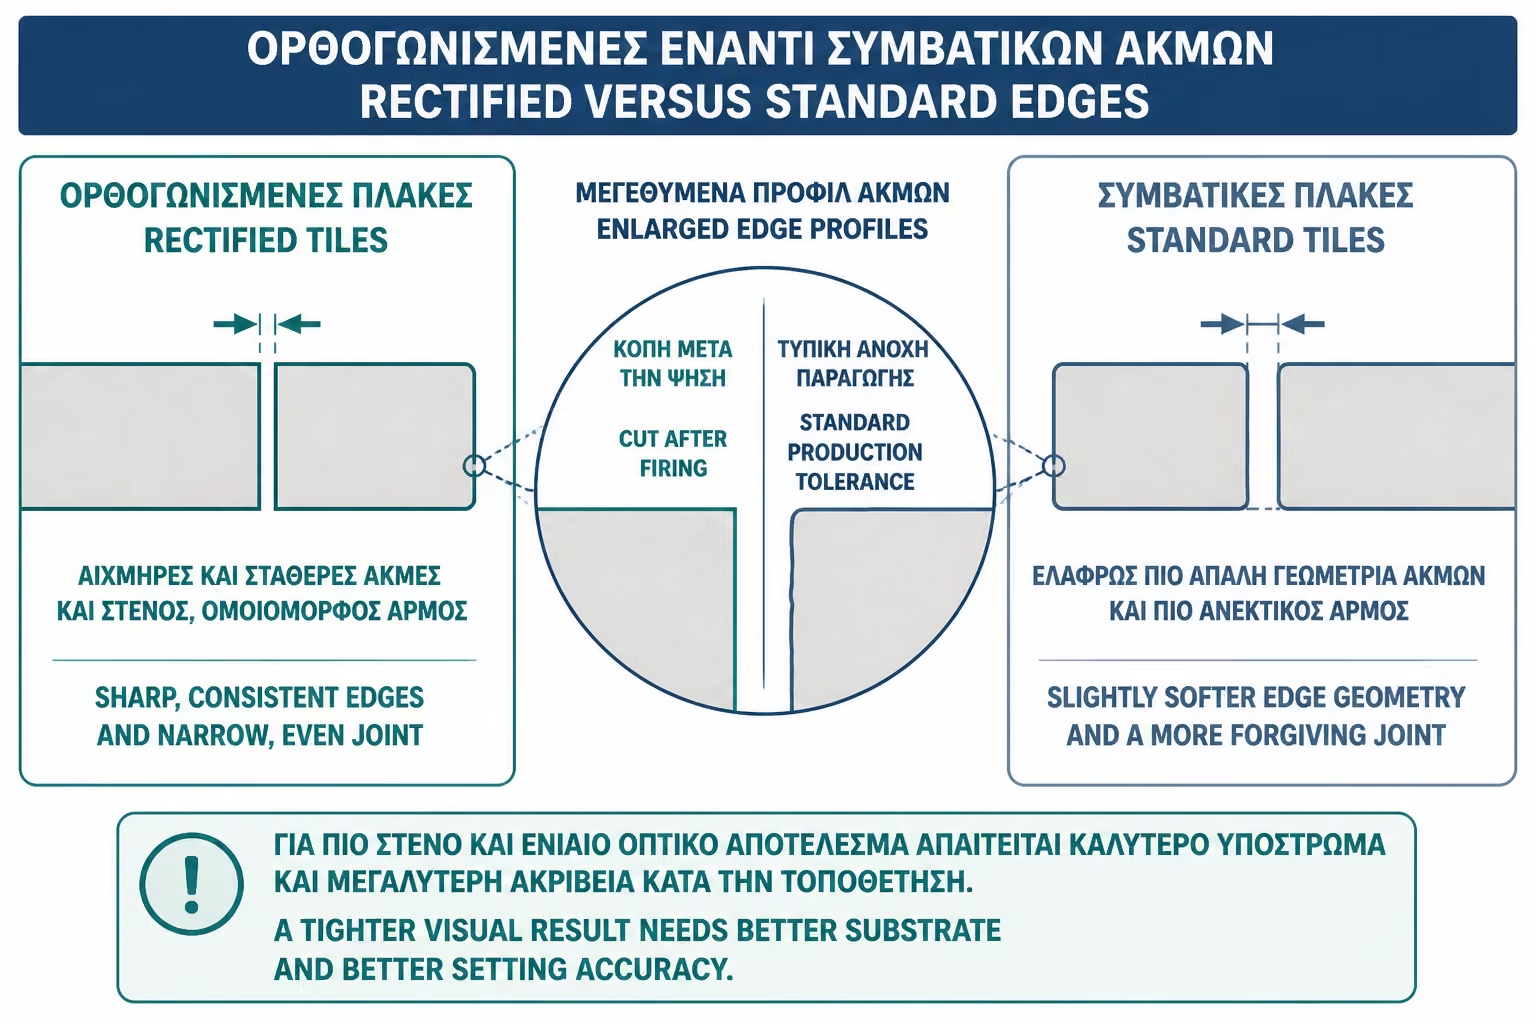
This is important because ceramic and porcelain tiles, when fired at high temperatures, undergo small changes. There may be slight differences in final dimensions from piece to piece. On simple unground tiles, the edges may be slightly rounded or have small dimensional tolerances. That is why they usually need a slightly larger joint, so that these small deviations are "lost".
In rectified tiles, the edges are processed after firing so that all pieces are more uniform. This allows for a thinner and more stable joint, because the sides of the tiles "sit" more cleanly next to each other. The difference is especially visible on large surfaces, where the joints form long continuous lines.
Practically, the rectified tile is a choice of precision. It is not necessarily more durable than a non-rectified just because it is rectified. Durability depends on material, grade, surface, absorbency and use. Rectified is mainly about the edge and the possibility of a finer joint.
In the market you will often hear the phrase "it's laser cut". It's a phrase that has passed into the commercial vocabulary to describe the precision of acne. But technically we shouldn't always take it literally. Rectified edge usually results from mechanical cutting, grinding or grinding after firing, with high precision equipment. The important thing is not whether a literal laser was used, but that the tile has machined, straight, almost vertical edges and a more stable dimension.
This is worth knowing for the owner, because it helps not to get carried away by impressive words. "Laser" sounds technological and expensive, but what one should ask is simpler: is it really rectified? What joint does the manufacturer recommend? Is it suitable for the application we want? Does it have a technical data sheet? What is its dimension and what tolerance is provided?
The right question is not "is it laser cut?". The correct question is "is it rectified and with what minimum joint is recommended to be installed?".
Rectified tiles allow a fine joint because their edges are more precise. When two tiles have almost the same dimensions and straight sides, they can be placed closer together without showing sharp differences in the width of the joint.
In an unground tile, a very thin joint can immediately reveal tolerances. If one tile is slightly larger or its edge has a slight curve, the joint line will look uneven. That is why a joint of 3-5 mm is most often used in simple tiles, so that these small deviations are visually and technically absorbed.
In rectified, the joint can usually go down to 1.5–2 mm in interior applications, as long as the manufacturer allows it, the substrate is correct and the craftsman works accurately. Many technical guidelines and suppliers state typical joints of around 2–3 mm for rectified tiles, while some manufacturers give even finer possibilities in specific products and controlled conditions.
But here you need to be careful. "Can" does not mean "always must". A floor with underfloor heating, an outdoor area, a large open-plan living room or a subfloor with micro-movements may need a larger joint or additional expansion joints. The thin joint is an aesthetic advantage, not an end in itself.
Jointless installation is one of the most dangerous requests heard in renovations. The owner sees a sample of a rectifier at the exhibition, is impressed by the straight edges and asks that it "go in tightly, so that nothing shows". But this is technically not correct.
The joint is needed for many reasons. It absorbs small dimensional tolerances, allows minimal movement, protects the edges from mutual pressure, gives room for the grout to work and reduces the risk of stresses in the system. The technical instructions of the market generally avoid the installation of "butt joint" tiles, i.e. completely glued without a joint. Even joint instructions state that joints should not be below a minimum width and that tiles should not be in direct contact with each other.
In practice, the absence of a joint can create problems after months. With temperature changes, small substrate movements or expansions, the edges of the tiles can be pressed together. The result can be broken edges, swelling, peeling or cracking. Outdoors or on large surfaces, the risk increases.
The correct rectified result is not "seamless". It is a thin, straight, properly filled joint that is almost lost visually because it is the right color and fits well.
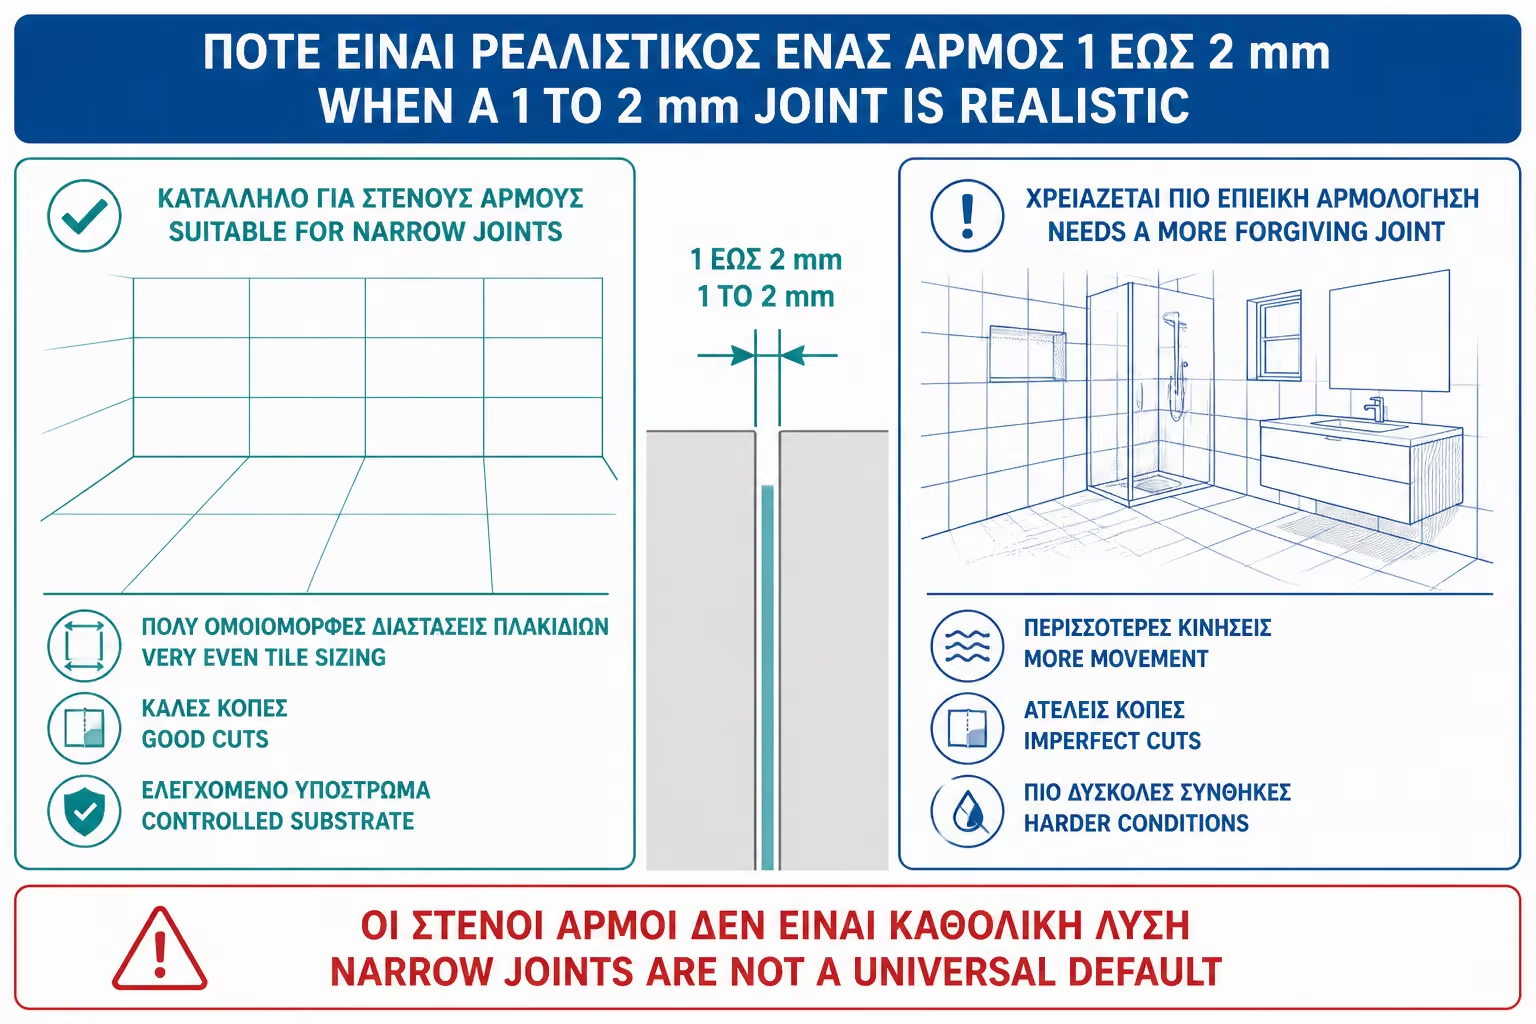
The 1–2 mm joint is realistic mainly in interior applications, on flat substrates, with quality rectified tiles and an experienced craftsman. We usually see it on bathroom walls, interior floors, large porcelain slabs, kitchen linings and minimal spaces where a clean surface is required.
But he is not realistic everywhere. In outdoor spaces, balconies, roofs and surfaces with strong temperature changes, the joint usually needs to be larger. The same applies when the substrate is not perfect, when there are large uninterrupted surfaces, when there is underfloor heating or when the manufacturer's instructions call for a greater width.
In a bathroom, a 1.5-2 mm joint can look excellent on walls. But on the floor, especially where there are slopes towards the drain or small irregularities, the installation becomes more demanding. The finer the joint, the more visible every small mistake becomes. A 2 mm joint can look luxurious when everything is right. But it can look careless if the lines drift or if there is lippage between the tiles.
Rectified tiles usually cost a bit more because they go through an additional production process. After firing, the edges must be cut, ground or precisely machined. This means additional machinery, time, quality control and production time.
The price difference is not always huge. In many porcelain lines, especially in medium and large sizes, rectified is now quite common. But it remains a more demanding product category. It is usually found in larger size tiles, modern aesthetics and better dimensional accuracy.
In the Greece of 2026, a simple unrectified ceramic wall tile can be quite economical, while a rectified porcelain with a modern surface can start from mid-range prices and go up depending on the brand, dimension, country of origin, texture and design. For ordinary options, one can find rectified porcelain from around €20–40/m², while more special series, large dimensions or marble imitations can move quite a bit higher.
Placement costs must also be calculated. Fine joint requires more precision, more careful layout planning and better substrate. If the wall or floor needs leveling, this is a separate cost. So the rectifier doesn't just cost a little more in the box. It can raise the overall project if we want it to look right.
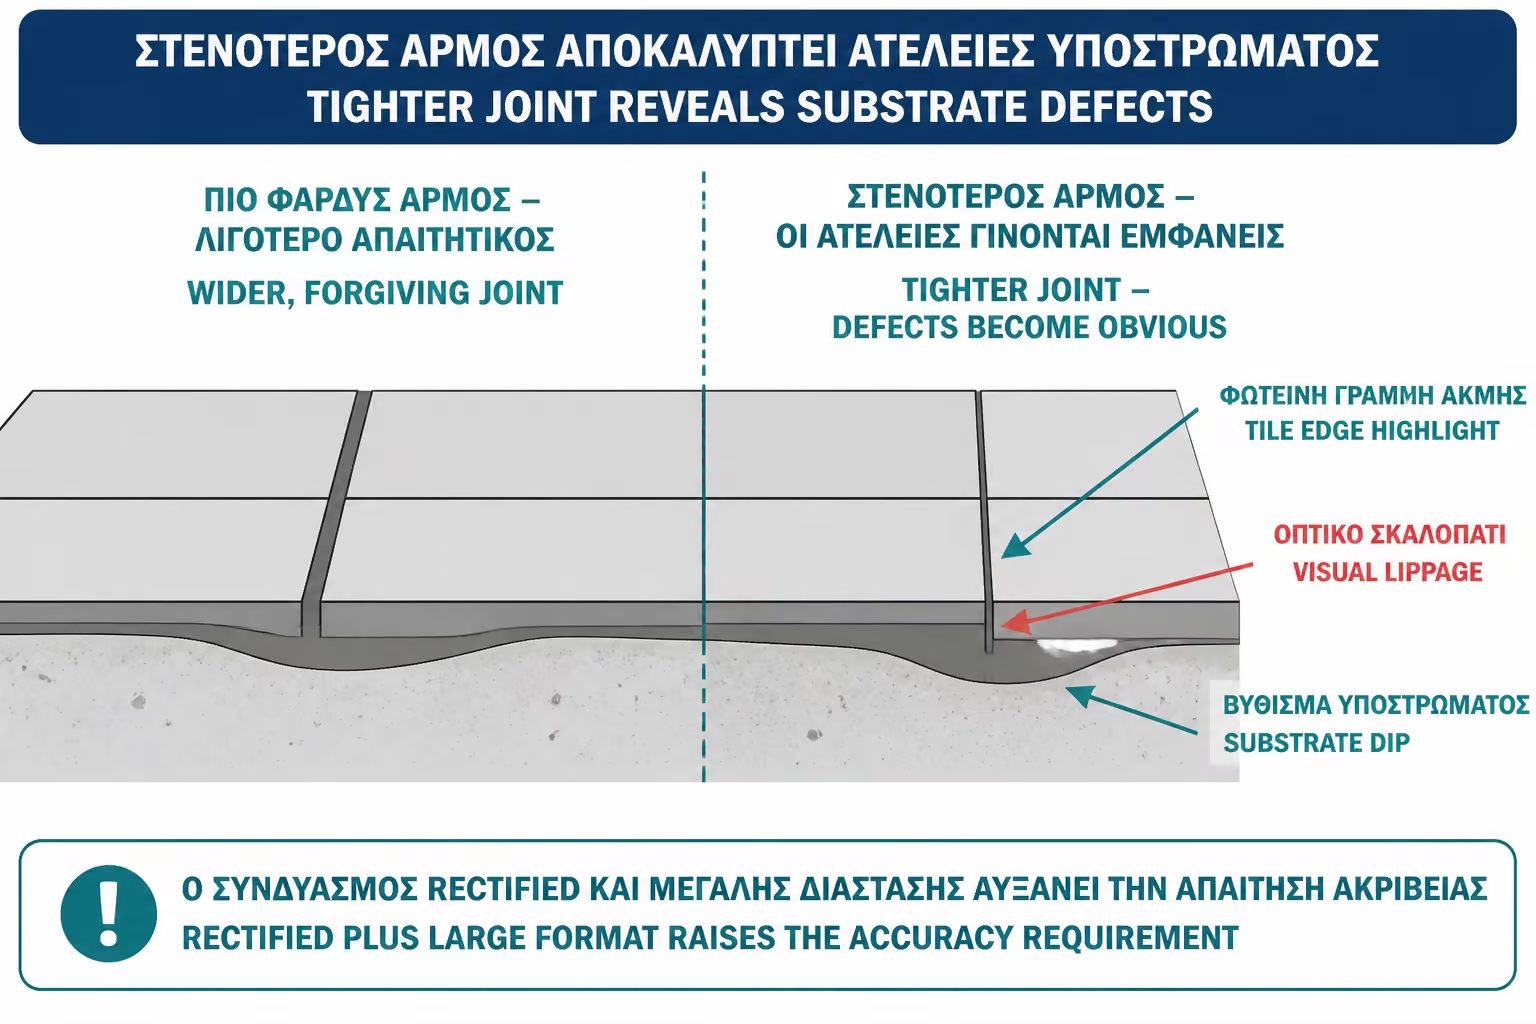
Rectified tiles reveal the imperfections of the substrate. Because the edges are straight and the joint thin, there isn't much room to hide crooked walls, bellies, slats or bad corners. In a simple tile with a larger joint, small deviations can be "lost". In a rectified 60×120 with a joint of 2 mm, they are shown.
This is especially important in bathrooms. Many old bathrooms have walls that aren't level, corners that aren't 90 degrees, old plaster with ripples, or surfaces that have been patched up in previous renovations. If a rectified tile is put on top of them without preparation, the result can be crooked lines, uneven joints and teeth.
Tile adhesive should not be used as a plaster to straighten large deviations. If there is a problem, the substrate should first be corrected with suitable materials and then the installation should be done. This can add to the cost, but it's the difference between a professional result and a surface that "screams" it was done in a hurry.
Rectified tiles are very often found in large dimensions. This is no accident. When a tile is 60x120, 80x80 or 120x120, joints play a big role in the final image. If the edges are not precise, the joint lines on a large surface will be immediately visible.
Large tiles need clean edges to give the result the owner expects. A marble-look porcelain, for example, with a wide and uneven joint, loses some of the feel of a natural slab. With a rectified edge and proper joint, the surface looks much more uniform.
But the combination of a large tile and a thin joint is also the most demanding. It needs a flat substrate, proper glue, full contact, leveling system where needed and very careful handling. If the craftsman is not experienced in such dimensions, the rectifier can become a trap. It does not forgive sloppy placement.
In the bathroom, rectified tiles are especially valuable on the walls. There the thin joint gives a clear image, especially in large dimensions. A shower wall with 60×120 rectified porcelain can look much more elegant than a wall with many small tiles and bold joints.
In the bathroom floor, the choice needs more attention. If the floor is flat and the slopes are properly designed, the result can be very good. However, if there is a floor drain, many slopes or a small space with many cuts, the large rectified tile can make application difficult. There maybe a smaller dimension or a different solution to the shower zone is needed.
A practical example: in a 5 m2 bathroom, the owner chooses 60x120 rectified for all walls and floor. On the walls the result can be excellent. However, in the shower, if there is a central drain and slopes are required on four sides, the same tile may need many cuts and lose its cleanliness. In this case, it may be better to use the large tile on the walls and a smaller non-slip dimension on the shower floor.
In living rooms, kitchens and open spaces, rectified tiles can provide a very beautiful continuity. With a thin joint, the floor looks calmer and closer to a natural slab or pressed surface. This is especially useful in open spaces where the same tile goes from kitchen to dining room and living room.
But on floors flatness is critical. A large rectified porcelain with a fine joint will immediately show if the substrate has undulations. Also, in areas with large surfaces, proper provision is needed for expansion joints and perimeter gaps. It is not enough that everything fits "tightly" to look beautiful. The floor must be operable.
In the kitchen, it is good to pay attention to the surface. A rectified tile can be matte, satin, glossy or embossed. The acne says nothing about slip resistance. A rectified tile may be very beautiful but too shiny for a kitchen or bathroom floor. So we always look at usage, not just acne.
Outdoors, rectified tiles should be treated with more care. Balconies, roofs, courtyards and external stairs receive sun, rain, temperature changes and contractions. There the very thin joint is not always the right choice.
Even if the tile is rectified, the outdoor space needs more room for movement. A larger joint is usually chosen than in an internal bathroom or wall. Expansion joints, correct slopes, suitable outdoor adhesive and weather-resistant grout must also be provided.
The mistake is to see an interior minimal result with a 1.5 mm joint and want the same on a balcony. The outdoors doesn't work by the same rules. There, durability comes before aesthetic detail.
Before you review the table, keep the following points in mind:
| Criterion | Rectified tiles | Unrectified tiles |
|---|---|---|
| Acne | Straight, precisely cut/trimmed after baking | A more natural or slightly rounded edge |
| Anchorage | It can be thin, typically 1.5–2 mm in suitable interior applications | Usually larger, about 3–5 mm |
| Aesthetic effect | More minimal, uniform and modern | More classic or "softer" visually |
| Substrate requirements | Very high | More tolerant of small deviations |
| Difficulty positioning | Bigger | Usually smaller |
| Material cost | Usually a bit higher | Usually cheaper |
| Where does it fit? | Large tiles, modern bathrooms, open spaces | Walls, classic applications, more economical solutions |
| Danger if done wrong | It appears immediately | It's a little more forgiving |
The table shows that the rectifier is not "best" in all cases. It is more accurate, cleaner visually and more modern, but requires more proper preparation and placement.
Thin joint does not fill properly with any material. A grout suitable for a small joint width is needed. In very thin lines, the grout must be able to enter, compress and completely fill the gap without leaving gaps or surface application.
In some cases, fine-grained grouts or special products for narrow joints are used. For joints smaller than about 1/8 of an inch, that is, about 3 mm, technical instructions often state the use of a non-sanded or suitable fine-grained grout, because sanding in coarser materials may not work well in very narrow gaps.
In the bathroom, the choice of grout is even more important. We want material that is easy to clean, has good moisture resistance and applies correctly. Thin joint may look impressive, but if it is not properly filled, it can become discolored, collect dirt or develop micro-cracks.
The color of the grout also plays a big role. If we want an "invisible" effect, we usually choose a color close to the tile. If a strong contrast is chosen, the thin joint will be more visible, which can be a design choice but not always the calmest solution.
Rectified edges are straighter and sharper. This gives a clean result, but also makes them visually more sensitive to bumps and micro-breaks. On a tile with a rounded edge, a small bump may not be noticeable. On a rectifier, the same wear may appear as a small “tooth” on the joint line.
That is why care is needed in transport, cutting, storage and installation. Tiles should not be knocked at the corners, dragged roughly or cut with an inappropriate tool. Especially on shiny or dark surfaces, a small edge damage can be more visible.
In spaces with a very thin joint, the edges are almost side by side. If there is lippage, i.e. if one plaque protrudes a little from the other, the acne can be annoying to the light or even to pressure. That is why accuracy in positioning is essential.
Placing tile grout can cost a bit more, not because the tile is "luxury" in itself, but because it requires more precision. The craftsman must better control the substrate, etch correctly, use correct spacers, avoid lippage and work with greater attention to detail.
In Greece in 2026, a realistic base for simple tile installation on an easy surface can often be around €10-15/sq.m., with lower offers only in very simple cases. For large rectified porcelain, fine joints, difficult cuts, bathrooms, showers, or demanding layout work, the cost can rise. If substrate leveling is required, that should be calculated separately.
The mistake is to compare only the price per square meter. An inexpensive installation may not include preparation, proper materials, detailed layout work, or time for corrections. On rectified tiles, these omissions are immediately visible. A tile bought to look minimal and expensive can lose all its value with a sloppy application.
The first mistake is the requirement for zero joint. As good as the tile is, it needs a joint. The very thin joint must be technically acceptable, not just aesthetically desirable.
The second mistake is mounting on a crooked substrate. Concealers do not hide imperfections. They show them more clearly. If the wall is not straight, if the floor is undulating or if the corners have not been checked, the result will betray the problem.
The third mistake is choosing an unsuitable craftsman. It is not enough for someone to "lay tiles". Must have experience in rectified, large dimensions and fine joint. The detail makes the difference.
The fourth mistake is the wrong choice of grout or paint. A joint that doesn't fill properly, that casts a shadow or that gets dirty easily can spoil the clean image we wanted in the first place.
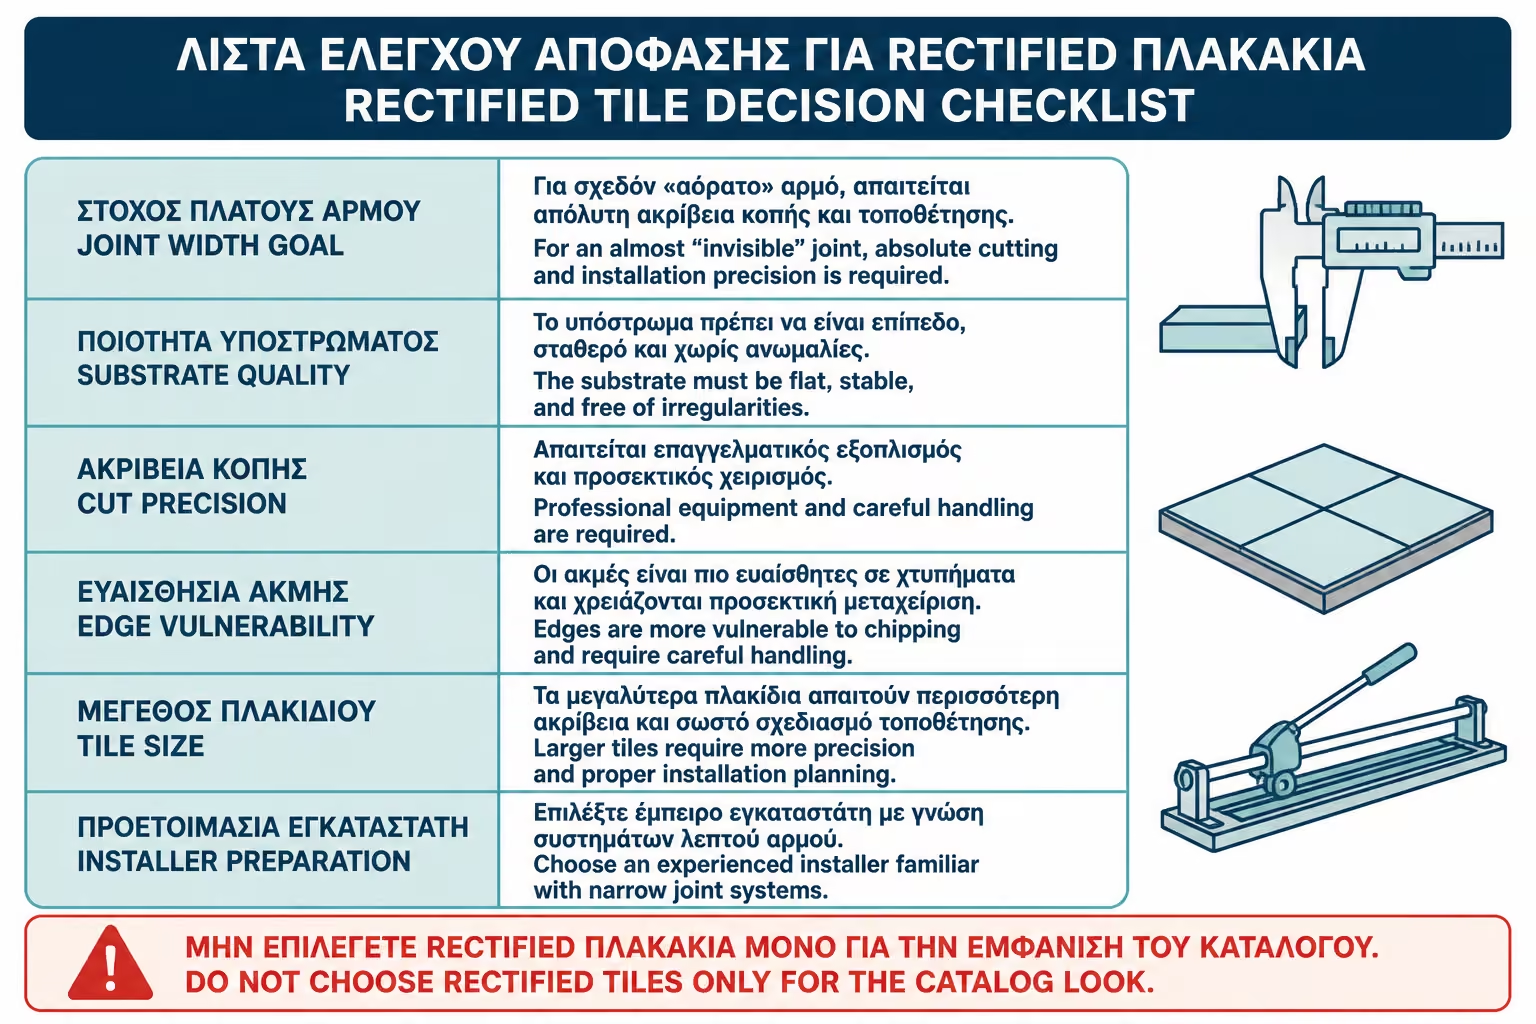
Before you review the table, keep the following points in mind:
| Question | Yes / No |
|---|---|
| Have you confirmed that the tile is indeed rectified? | Yes / No |
| Do you know what minimum joint the manufacturer recommends? | Yes / No |
| Have you avoided the zero joint requirement? | Yes / No |
| Has the flatness of the wall or floor been checked? | Yes / No |
| Has proper marking been done before placement begins? | Yes / No |
| Does the craftsman have experience with fine joint and rectified tiles? | Yes / No |
| Has a suitable grout been selected for a narrow joint? | Yes / No |
| Has allowance been made for cuts and possible damage to the edges? | Yes / No |
| Has a larger joint and expansion joints been provided for outside? | Yes / No |
| Has the color of the joint been chosen based on the final aesthetic result? | Yes / No |
If the answer to most of the questions is "no", it is better not to rush. Rectified tiles can give an excellent result, but only when the selection and placement are done accurately.
If you choose rectified tiles, do not ask for "jointless". Ask for a proper, thin joint. The difference is huge. The rectified tile gives you the option for a clean, minimal image, but doesn't break the rules of placement. Check the substrate first, ask for the manufacturer's recommended grout, use a suitable grout and choose a handyman who has worked on such applications. The almost "invisible" joint is only achieved when everything else is properly visible in the pre-installation inspection.
Rectified tiles are an excellent choice when we want clean lines, fine joints and a more modern aesthetic. They give a particularly good result in large porcelain tiles, bathrooms, single rooms, kitchens and minimal applications where the continuity of the surface plays an important role.
But it is not a simple detail. The rectified edge increases accuracy, but at the same time reduces error tolerance. The crooked wall, the uneven floor, the bad carving and the rough joint are much more visible. That is why the rectified tile must be accompanied by proper preparation and technically careful installation.
The best choice is not always the smallest possible joint. It is the smallest correct joint for the specific tile, the specific space, and the specific substrate. When that rule is followed, the result can look expensive, clean, and timeless. When it is ignored, even the best tile can look careless.
Return to category.
Go to categoryReturn to the central guide.
Go to guide