
Bathroom Surface Materials & Finishes
Return to category.
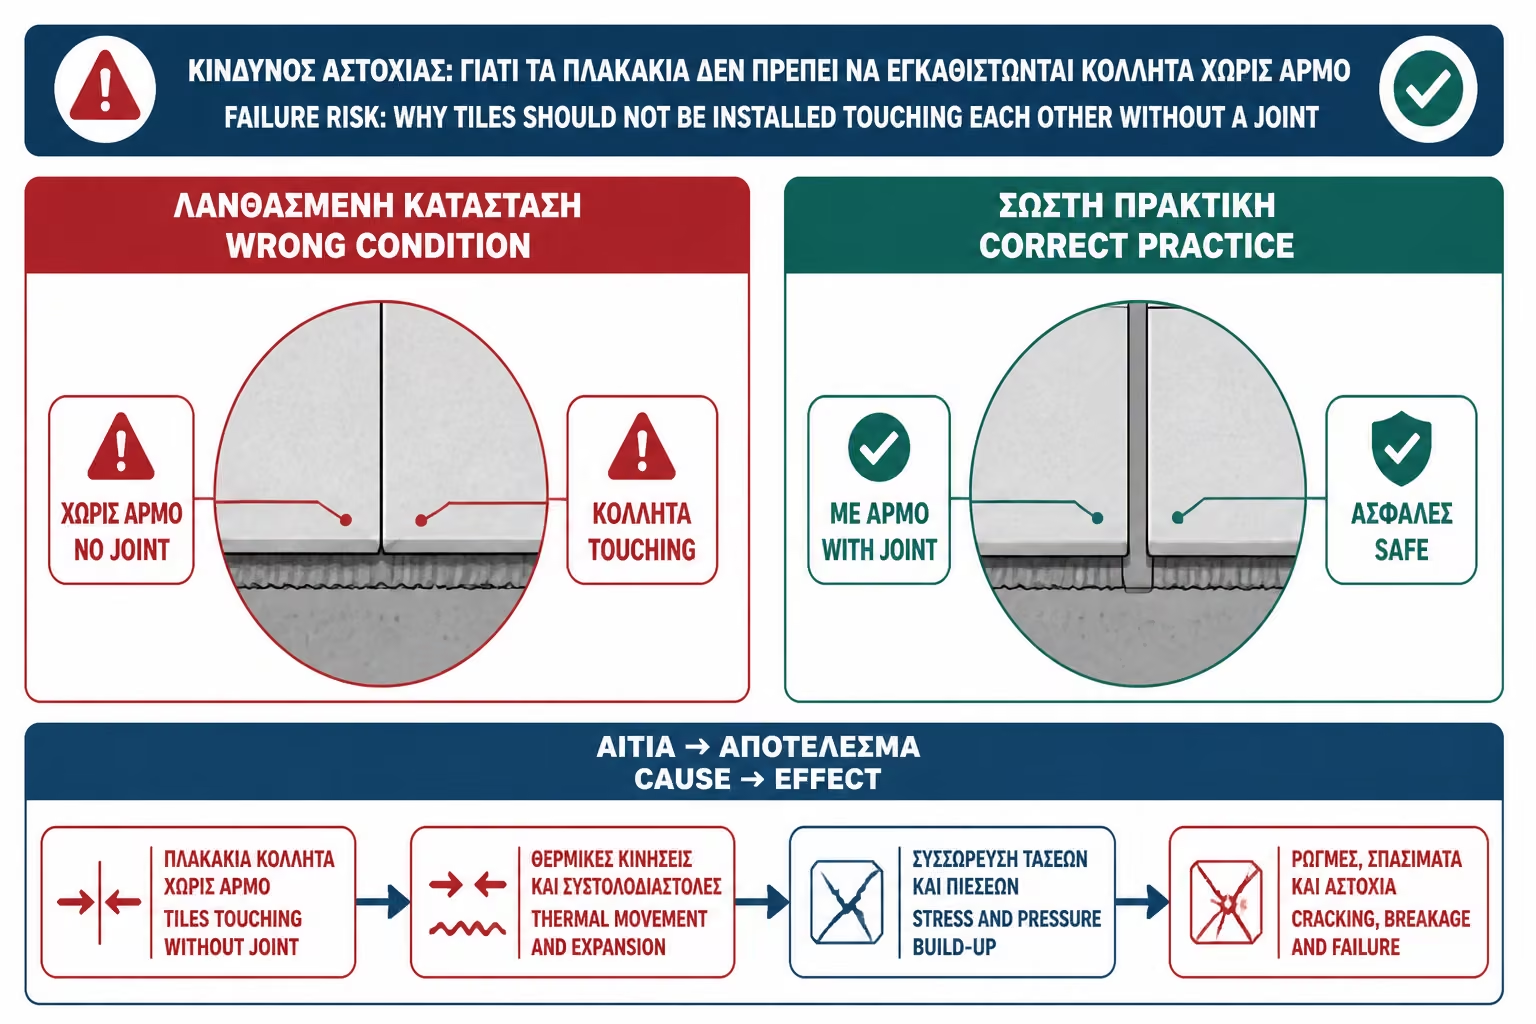
Go to categoryThe phrase "I want seamless tiles" is heard very often in bathroom renovations. The owner sees large rectified tiles, marble look surfaces, slabs or minimal floors and wants the result to look as uniform as possible, without lines. The desire is completely understandable. The joint, especially when it is the wrong color or wide, can "break" the image. But the technical answer is clear: installation without a joint should not be done.
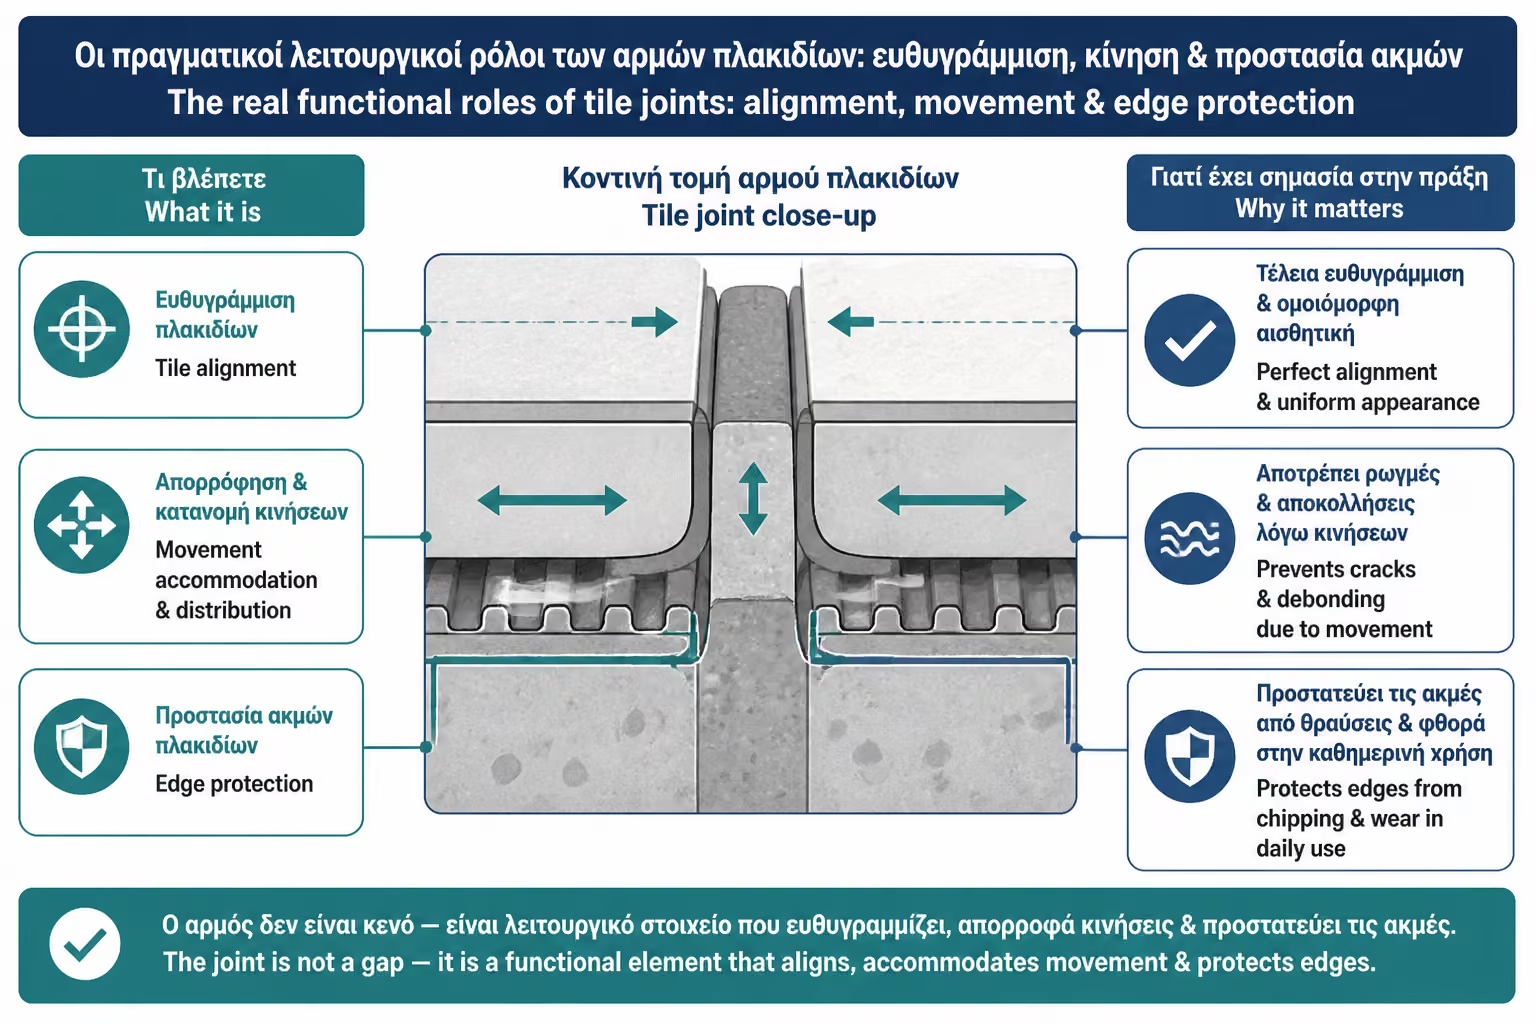
The joint is not a decorative evil that we put in because we cannot do anything better. It is a necessary technical element of paving. Absorbs dimensional tolerances, small movements, expansions, imperfections of the substrate, differences in temperature and humidity. It gives room for the grout to fill properly, protects the edges of the tiles and reduces the risk of the tiles being pressed together. When the tiles are laid together, without a real joint, the whole structure becomes more vulnerable.
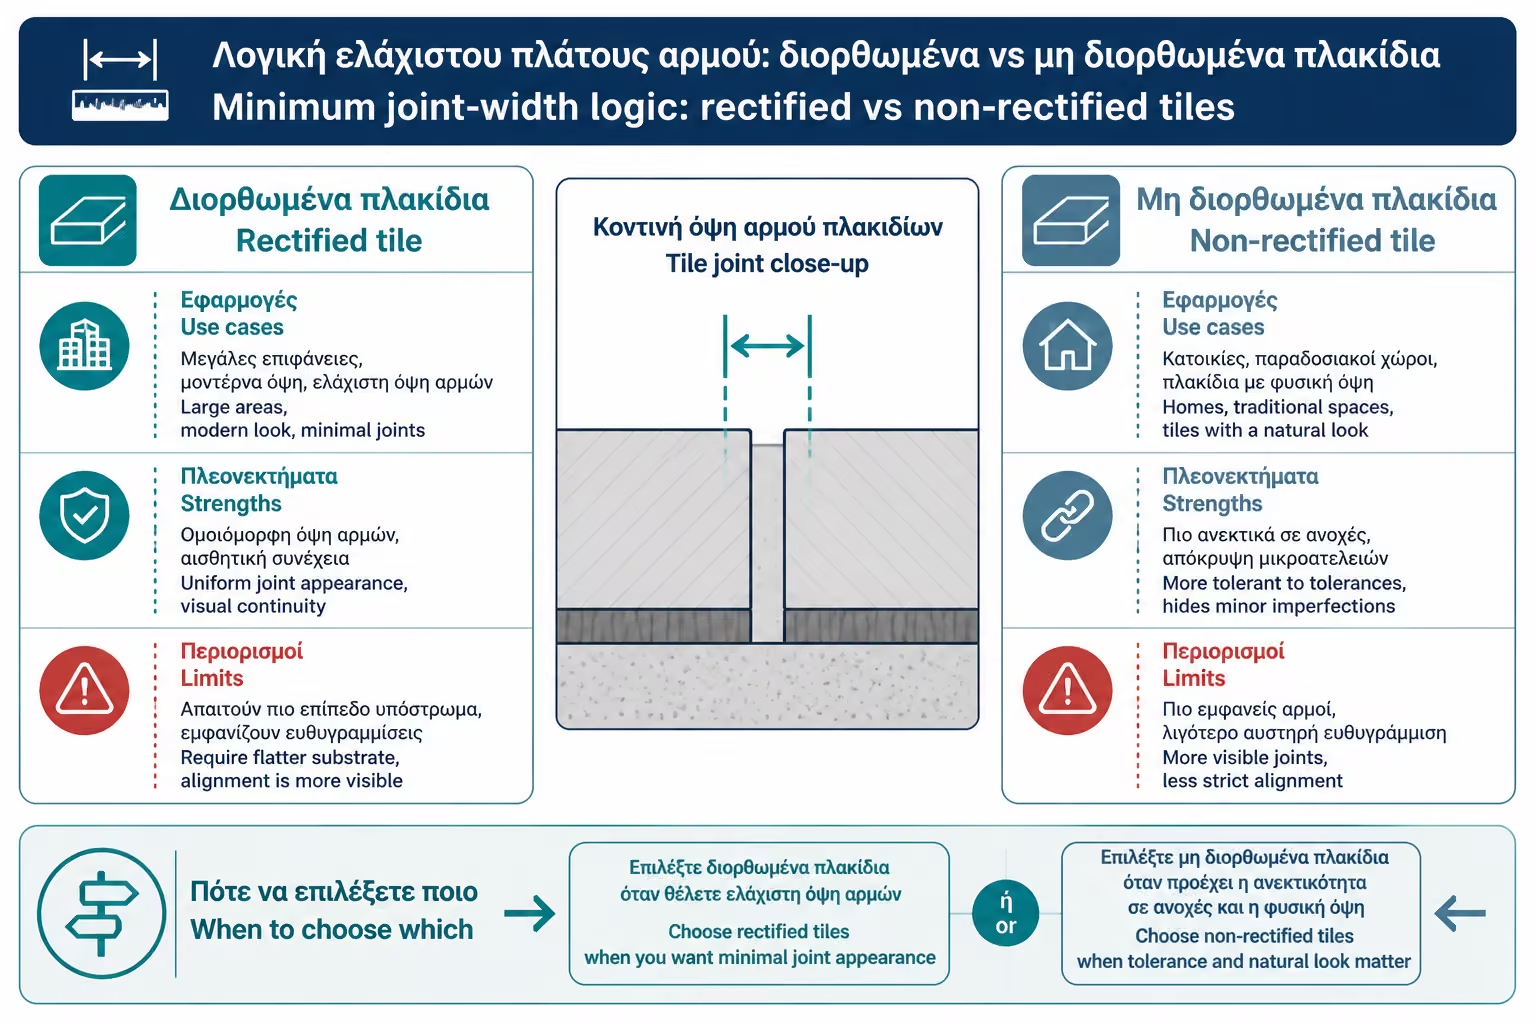
The confusion begins with the rectified tiles. Because they have cut/machined edges and more precise dimensions, many believe they can be installed without a joint. In fact, rectified tile allows for a thinner and more even joint, not zero joint. Several tile manufacturers give a guideline of at least 2mm for rectified products and around 3mm for unrectified or exterior applications, while stressing that jointless installation is not recommended.
An important clarification about the word "legislation" is also needed here. In everyday language we often say "forbidden". Technically, for a private house, the matter usually does not appear as a simple law of the type "if you lay a tile without a joint you have a fine". It derives mainly from technical standards, manufacturers' instructions, application specifications and rules of good practice. But if damage, detachment or failure occurs, jointless installation is very difficult to support technically, because it goes against the basic guidelines of tile systems. Even industry guides emphasize that "groutless" installation is not really acceptable and that even very thin joints should be of minimal width.
So the goal is not to say "put a big joint". The goal is to achieve a correct, thin, functional and aesthetically distinctive joint. We can have an almost invisible look with rectified tiles, correct placement, proper width, tone-on-tone joint color and good grout. But this is different from the tiles touching each other.
The joint is the space between the tiles. It is filled with grout and acts as a tolerance zone. It allows the installer to absorb small dimensional differences, maintain the correct geometry and avoid forcing the tile edges against each other. On a floor or wall, nothing is absolutely perfect: not the tile, not the substrate, not the room itself.
Even the best tiles have tolerances. Ceramic firing, cutting, transport, temperature and storage create subtle differences. Rectified tiles have more precise dimensions, but do not eliminate the need for a joint. Unrectified ones have more variance and need a wider joint to point correctly.
The joint also protects the edges. If two tiles are touching each other, the slightest movement can cause pressure on the edges, micro-breaks, "pinches" or cracks. On glossy, polished, rectified or large tiles, these marks are immediately visible.
Jointless mounting creates a rigid surface with no tolerances. The tiles have no room to move, "work" or fix small differences. If the substrate expands, if the temperature changes, if there is moisture, or if a tile has a slight difference in dimension, the stresses are transferred directly from edge to edge.
This can lead to various problems: peeling, cracking, lifting tiles, broken edges, "hollow" spots or joints that open randomly. The phenomenon may not be seen in the first week. It can appear after months, when the floor goes through cycles of heating, humidity and use.
In a bathroom, the problem becomes more important because there is water. Without a joint, there is no proper space for grout. If the edges are almost touching each other, the grout cannot go deep enough to work. The result can be surface filler that comes off, cracks, or lets water and dirt get between the edges.
In many articles and shops you will see the phrase "no joint installation". Technically, the bottom line is correct: it shouldn't be done. From a legal point of view, however, in a private renovation, the matter usually does not appear as a simple police prohibition. It is derived from standards, technical instructions and manufacturers' requirements.
If a tile or adhesive manufacturer says a minimum joint is required and the craftsman installs without a joint, then the application may fall outside the technical guidelines. If later there is a failure, liability will hardly be covered by a product warranty. The manufacturer may claim that the product was not applied as directed.
So for the owner, the practical conclusion is simple: don't ask the craftsman "jointless". Ask for the minimum correct joint that the tile, space and system allows. This is technically safe and aesthetically very close to the desired effect.
Rectified tiles have machined edges and more precise dimensions. That is why they can be installed with a finer joint than the simple non-rectified ones. Indoors, many manufacturers' guidelines state a minimum joint of around 2mm for rectified tiles. In a more practical application, especially on floors or large formats, 2–3 mm is often the safe zone.
2 mm is aesthetically very thin. With proper joint color near the tile, it can give almost uniform image. But to be successful, a very good substrate, precise placement, a flat surface and a quality tile are required. The thinner the joint, the less forgiving of imperfections.
In large tiles, slabs or floors with underfloor heating, the very thin width should be considered carefully. We may aesthetically want 2mm, but technically the project calls for 3mm or more expansion joints. The craftsman must evaluate the whole, not just the desired image.
Unrectified tiles have natural tolerances from their production. Their edges are not as perfectly cut as in rectified ones. This means that they need a wider joint to absorb the small differences and the placement does not look crooked.
In many practical guidelines, for unrectified tiles a joint of about 3 mm or more is indicated, depending on the dimension, type, pattern and use. In rustic, handmade, zellige-look, cotto, stone or more "irregular" tiles, the joint may need to be even larger to look natural and correct.
If we try to lay simple tiles with a very thin joint, the small differences of the pieces will be immediately visible. Sometimes the joint will narrow, sometimes it will open, the lines will look crooked and the craftsman will have trouble keeping geometry. The result may be aesthetically worse than a slightly wider but correct joint.
Large tiles and slabs need special attention. On the one hand, because they have large surfaces, the owner often wants a very thin joint to make them look like single slabs. On the other hand, because they are large, they carry greater stresses, show lippage more easily and require a flawless substrate.
In large format tiles, the joint must allow correct placement and function. If it's too narrow, every little difference in flatness becomes apparent. Also, the grout must be able to fill the gap properly. A very thin and shallow joint is not functional.
On slabs, especially on shower walls or large marble surfaces, joint planning must be done in advance. We don't just look at width. We look at where the joints will fall, how the veins continue, where there are internal corners and where a rubber sealant is needed instead of hard grout.
Indoors, the temperature changes are smaller. In an outdoor area, balcony, roof or area with sun, rain and cold, the tile and the substrate accept much greater movements. That is why in external applications the joints must be wider and the expansion joints more carefully designed.
Several manufacturers' guidelines recommend larger joints for exterior use, even when the tiles are rectified. For example, there are guides that state that for external floors the minimum should rise significantly due to thermal changes and rain, with frequent practical values around 5mm or more, depending on the system and the tile.
In an indoor bathroom, the changes are smaller, but not zero. There is hot water, steam, sub-floors in some cases, and humidity changes. So even there the joint remains necessary.
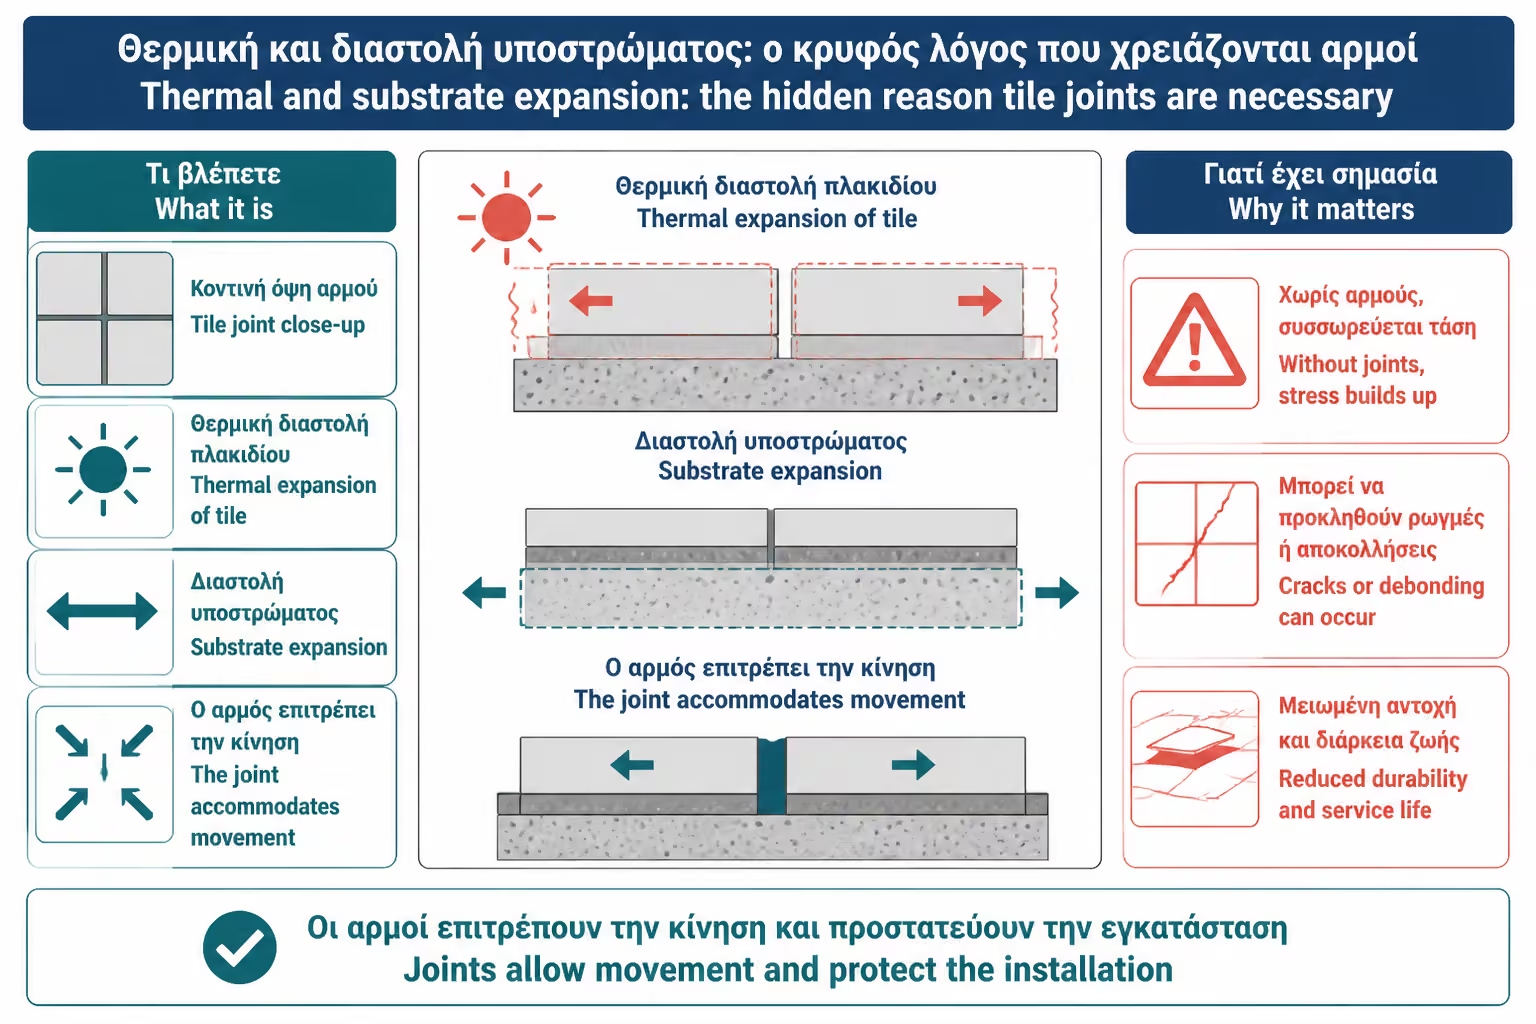
All materials move a little. Tile, adhesive, grout, concrete, drywall, wood, metal and piping change dimensions with temperature and humidity. These movements are small, but on a large surface they become important.
The joint between the tiles is not the only movement absorption mechanism, but it helps. Together with perimeter joints, expansion joints and elastic seals at level changes, it creates a system that allows the lining to function without breaking.
If the tiles are installed glued together, the expansions and contractions do not disappear. They just have nowhere to vent. Then tenting, i.e. lifting of tiles, or cracks in the weakest joints can occur. This is particularly dangerous on sun floors, underfloor heating or large continuous surfaces.
We must distinguish the normal tile joint from the expansion joints. The normal joint is between the tiles and is usually filled with grout. The expansion joint is a special gap or zone that is filled with elastic material and allows greater movements of the structure.
In corners, room perimeters, substrate changes, large surfaces, underfloor heating and outdoor areas, expansion joints are critical. They should not be filled with hard cementitious grout when they are to be operated elastically. A suitable silicone or rubber sealant is required.
A thin regular 2mm joint cannot replace a true expansion joint. If the floor needs a perimeter gap or an expansion joint, it must be provided separately.
Lippage is the height difference between two adjacent tiles. The thinner the joint, the more pronounced any small difference in height is. A wider joint visually "softens" the transition. A very thin joint makes every acne more visible.
On large rectified tiles, this is especially important. The edge is clean and straight. If there is lippage, the foot and the eye understand it. Mapei, in technical material for joints and flexible joints, lists acceptable lippage limits linked to joint width, which shows how directly related the two issues are.
If the substrate is not very flat, the thin joint can make the result look worse. Before asking for 2mm on a large floor, make sure the base can support it.
Each grout has a width range in which it can be used. Not all products work for all joints. For example, Mapei states for Ultracolor Plus a recommended joint width of 2 to 20 mm, while other products are for thinner or more specialized joints.
If the joint is too narrow, the grout may not go deep enough. If it is too wide for the product, it may crack, shrink or not give a proper surface. Therefore, the joint width must be selected together with the grout, not after.
In a bathroom, especially a shower, we want the joint to be completely filled. A very thin, poorly filled joint can collect dirt and water. The aesthetic "subtle" should not become technically "inadequate".
Use the table below as a quick reference for the key points of this section.
| Case | Indicative practical price | Comment |
|---|---|---|
| Rectified interior wall tile | 2 mm | It needs very correct placement and a flat base |
| Rectified indoor floor tile | 2–3 mm | 3mm is often more practical on floors |
| Unrectified ceramic tile | 3 mm and above | Depending on tolerances and dimension |
| Rustic / handmade / zellige-look | 3–5 mm or more | The wider joint hides unevenness |
| Large formats / slabs | 2–3 mm or according to manufacturer | With substrate and system control |
| Exterior floors | 4–5 mm and above | Due to temperature changes and water |
| Natural stone | Depending on cut and use | It usually requires special specification |
| Mosaics | Predefined by the grid | The joint is a big part of the final picture |
Prices are practical guidelines. The final selection should follow the instructions of the manufacturer of the tile, the grout and the conditions of the project.
1mm joint sounds ideal for those who want "almost no joint". In practice, however, it is a very difficult and often problematic choice. It doesn't leave enough room for tolerances, it doesn't fill easily, it doesn't forgive the slightest difference and it can create the illusion of "no joint" without the technical security it needs.
In very special applications, with specific products, perfect base and manufacturer's instructions, there may be exceptions. For a typical bathroom renovation though, 1mm is not a practical option. If the goal is an invisible joint, it is better to go with 2 mm with the correct color of grout than with 1 mm which does not work properly.
The difference to the eye between 1 and 2 mm, when the joint has the right color, is smaller than many people think. However, the difference in technical security is great.
If you want the joint to show as little as possible, color is just as important as width. A 2mm joint in the right color can look more subtle than a 1.5mm joint in the wrong color. Tone-on-tone is key.
In marble look tiles, we choose a shade close to the base, not the vein. In concrete look, close to the average gray tone. In wood effect, close to the middle tone of the wood. In beige stone, sand or greige. Thus the joint is visually lost.
If you choose a strong contrast, the joint will be visible even if it is thin. This can be beautiful in subway or herringbone, but it is not the right choice for an "invisible" surface. So first we decide if we want to hide or highlight the joint.
In the shower, the joint should be large enough to properly fill and clean. We don't want a fake thin joint that leaves gaps. Water, soaps and salts find the weak points. If the joint is not properly filled, it will collect dirt and wear more quickly.
Also, level changes such as floor-to-wall, inside corners, shower surrounds and around faucets should not all be treated as simple tile joints. A rubber sealant is often needed there, not a hard grout.
In a bathroom with underfloor heating, joint width and expansion joints must be carefully considered. "Thinnest possible" is not always "correctest possible".
At internal corners, two surfaces meet and often move differently. For example, the wall and the floor do not always behave the same. If the corner is filled with hard cementitious grout, it may crack. That is why an elastic sealant, such as silicone suitable for the bathroom, is often used in level changes.
This is especially important in showers. The corner is a high risk point for water. If the hard joint cracks, it can create a path for moisture. Getting the detail right is just as important as the width of the joints in the rest of the tile.
Many bathroom failures start at the corners, not the center of the tile. That is why the design of the joints must also include the perimeter details.
The first mistake is the "no joint" requirement in rectified tiles. Fine joint is correct, not zero.
The second mistake is too thin a joint on unrectified tiles. The tolerances will show and the placement will look crooked.
The third mistake is using the same width in an indoor bathroom and an outdoor balcony. The circumstances are different.
The fourth mistake is to ignore expansion joints. The joint between the tiles is not enough for all movements.
The fifth mistake is to choose a width without checking the grout. Each product has a specific scope of application.
Use the table below as a quick reference for the key points of this section.
| Question | Because it matters |
|---|---|
| Is the tile rectified or unrectified? | Defines tolerances and minimum practical width |
| Is it an internal or external project? | Thermal changes change the requirements |
| Is it a wall or a floor? | The floor receives more mechanical stress |
| Is there underfloor heating? | Increases the importance of contractions |
| How big is the tile? | Large formats require more careful planning |
| What grout will be used? | It must support width |
| How flat is the substrate? | A thin joint requires a better base |
| Are there construction joints in the substrate? | They must be transferred/respected to the finished surface |
| Do we want the joint to be seen or lost? | It affects color and final aesthetics |
| Are there angles/level changes? | A rubber sealant may be needed there |
If the answers are not clear, the joint width should not be decided based on the catalog photo alone.
Use the table below as a quick reference for the key points of this section.
| Control | Yes / No |
|---|---|
| Is the tile rectified? | Yes / No |
| Does the manufacturer allow a 2mm joint? | Yes / No |
| Is the substrate too flat? | Yes / No |
| Does the tile not have strong curvature or tolerances? | Yes / No |
| Is the grout suitable for such a narrow joint? | Yes / No |
| Will the placement be done with spacers/leveling where needed? | Yes / No |
| Are perimeter joints and expansion joints provided? | Yes / No |
| Will appropriate silicone be used in the corners where required? | Yes / No |
| Is the joint color tone-on-tone for a more invisible effect? | Yes / No |
| Can't it be glued on, without a real joint? | Yes / No |
If several answers are "no", the thin joint may create more problems than it solves.
If you want a "seamless" result, don't ask for a zero seam. Ask for rectified tile, very good substrate flatness, 2–3 mm joint and grout in the correct tone-on-tone color. This is the technically correct path for discrete image. Sticky placement, edge to edge, is a risk: it leaves no tolerances, does not absorb movements, makes filling difficult and can lead to broken edges or detachment. A good joint doesn't damage the tile; it protects it.
Jointless tiling is not a modern technical luxury. It's a technical error. Tiles need a joint to absorb tolerances, micro-movements, contractions and differences of the substrate. Rectified tiles allow for a fine and even joint, not zero joint. Plain unground tiles usually need a wider width to show properly.
In practice, for internal rectified tiles, 2 mm is often the technical minimum found in manufacturers' guidelines, while 2–3 mm is a safer practical zone for many projects. For unrectified tiles, 3 mm and above is a more realistic base. For outdoor areas, large surfaces, underfloor heating or special substrates, requirements may increase and product and technician instructions must be followed.
The aesthetic goal of the "invisible" joint is achieved with proper design: rectified tile, thin but real joint, correct color, good placement and respect for expansion joints. If the joint is done correctly, it is not an enemy of minimal aesthetics. It is the reason that the investment will remain beautiful and stable for years.
Return to category.
Go to categoryReturn to the central guide.
Go to guide