
Bathroom Surface Materials & Finishes
Return to category.
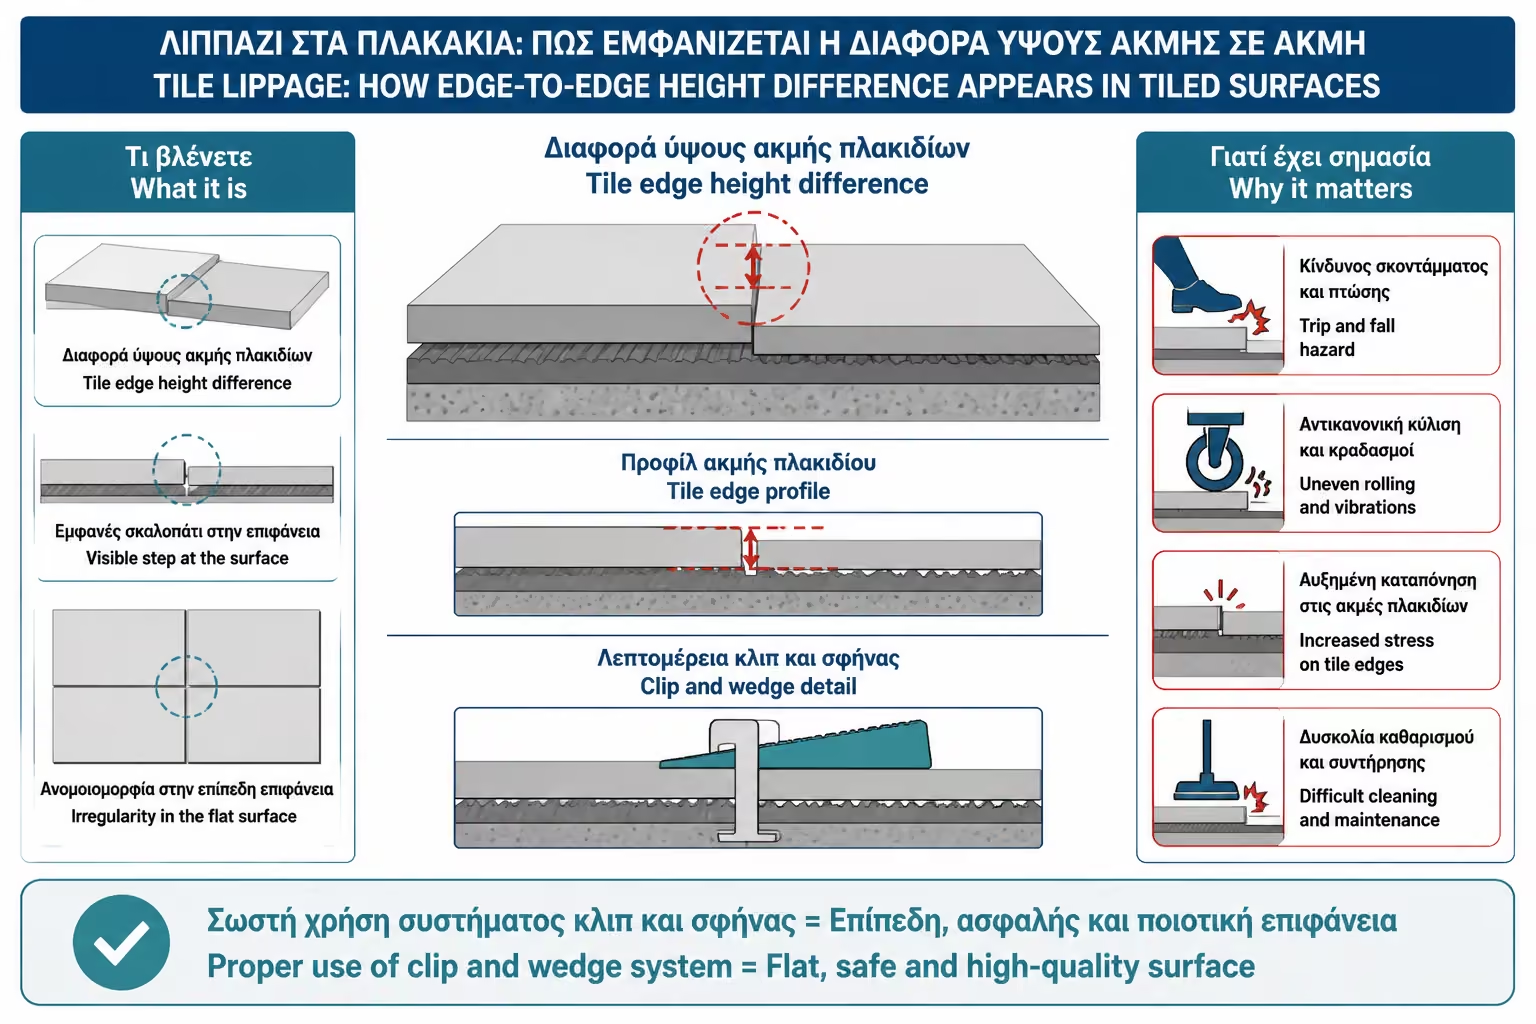
Go to categoryTile leveling systems, also known as tile leveling systems, have become almost essential in modern installation. As the tiles get larger — 60x60, 60x120, 80x80, 120x120, slabs and large granite tiles — the more difficult it becomes for the craftsman to achieve a perfectly flat surface without "teeth". Even small height differences between the edges of two adjacent tiles are immediately caught by the eye and foot. This phenomenon is called lippage.
In the simple language of the construction site, lippage is the “tooth”: one edge of the tile is slightly higher or lower than the other. In small tiles the problem is less severe, because the surface is divided into many small pieces and the tolerances are more easily hidden. On large tiles, however, every difference is visible. In fact, if the tile is glossy, polished, lappato or has strong lighting from the side, even a small unevenness becomes annoying. TCNA notes that substrate irregularities directly affect lippage and that when tile is installed with thinset over an uneven substrate, the finished surface often cannot meet lippage requirements.
Leveling systems were designed to help with just that. They usually consist of clips, wedges, caps, spacers or screw systems that grip two adjacent tiles during installation and hold them at the same level until the glue sets. It is not a magic tool that straightens a crooked floor. It is a tool for checking the relative level between tiles. RUBI describes tile leveling systems as systems that help with uniform flatness, identical tile gaps and limiting tile lippage, holding tiles in place during the bonding and drying process.
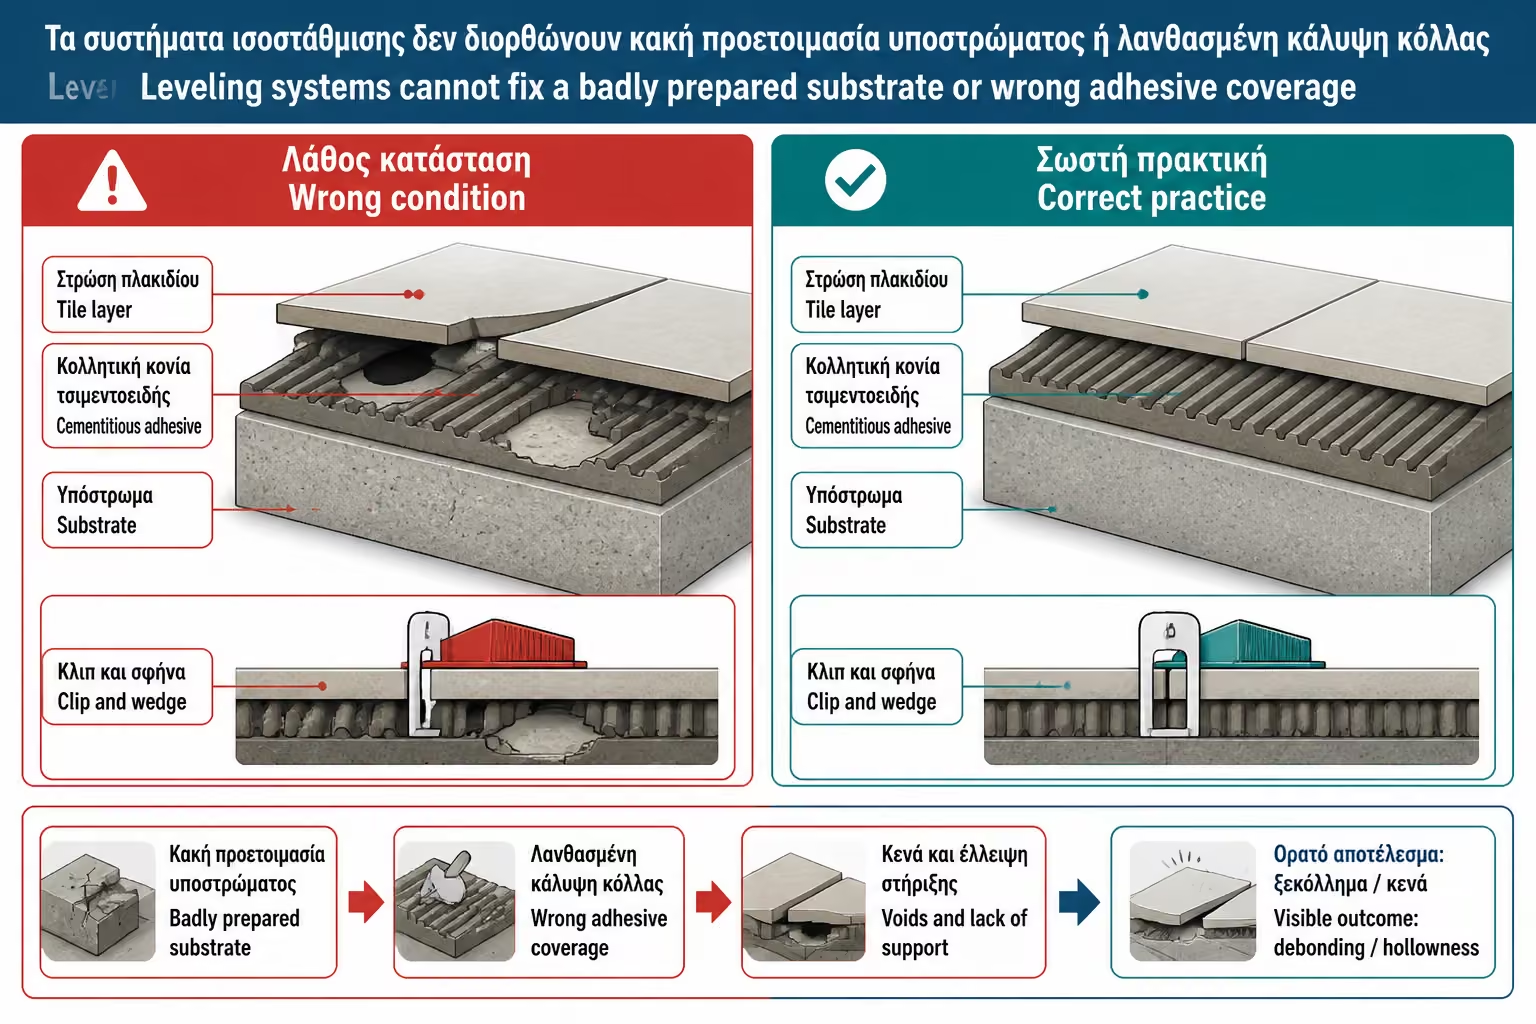
The big trap is to believe that wedges are a substitute for preparation. They don't replace it. If the substrate is crooked, if the adhesive is not spread properly, if the tile is curved, if the pattern is wrong or if the adhesive coverage is insufficient, the leveling system will not save the project. It can reduce the optic tooth, but it cannot turn a bad base into a proper fit. Mapei emphasizes that for large tiles, floor preparation is mandatory, not optional, stating that for tiles with an edge of 15" or longer, TCNA standards call for flatness of 1/8" in 10' — about 3 mm in 3.05 m.
In this guide we'll look at what leveling systems are, how wedges and clips work, when they're worth it, where they shouldn't be used as an excuse, how they relate to glue and coverage, what mistakes are often made and what to ask the handyman for a proper installation of large tiles.
Lippage is the difference in height between the edges of two adjacent tiles. If you pass your hand or foot over the floor and you feel that one slab "lifts" in relation to the other, this is lippage. It's not just an aesthetic issue. On floors it can disturb walking, make cleaning difficult, keep dirt on the edge and, in more severe cases, create a tripping point.
Acceptable lippage is not zero. There are tolerances, because the tile also has its own natural deformation, especially in large formats. CTaSC states that, based on ANSI A108.02, for floors with a joint from 1/16" to under 1/4", the acceptable lippage is 1/32" plus the allowable inherent deformation of the tile. This shows that the technical discussion is not "to see or not to see". There are measurable limits.
In the residence, of course, the owner will not usually measure with a caliper. He will see it with the eye and feel it in the foot. That is why, especially in bathrooms with side lighting, shiny tiles and large formats, the prevention of lippage is a basic condition of good aesthetics.
Old bathrooms often had 20x20, 25x33 or 30x30 tiles. Today we see 60×120, 75×150, 80×80, even slabs that cover entire walls. The larger the tile, the more it depends on the flatness of the substrate. A small tile "follows" small irregularities more easily. A large tile bridges them and, if the base is not level, some edge will inevitably rise or fall.
In addition, many large tiles have little inherent curvature. This is a natural result of production and baking. If a long narrow tile has a slight curvature and is placed in a 50% brick-bond arrangement, the highest point of one tile may meet the lowest point of the other, increasing lippage. That is why manufacturers often recommend an offset of 1/3 instead of 1/2 in long and narrow formats.
Leveling systems help keep adjacent edges at the same level, but do not eliminate the deformation of the tile itself. If the plate is curved, the system can reduce the tooth at the edges, but it will not make the surface perfectly flat like glass.
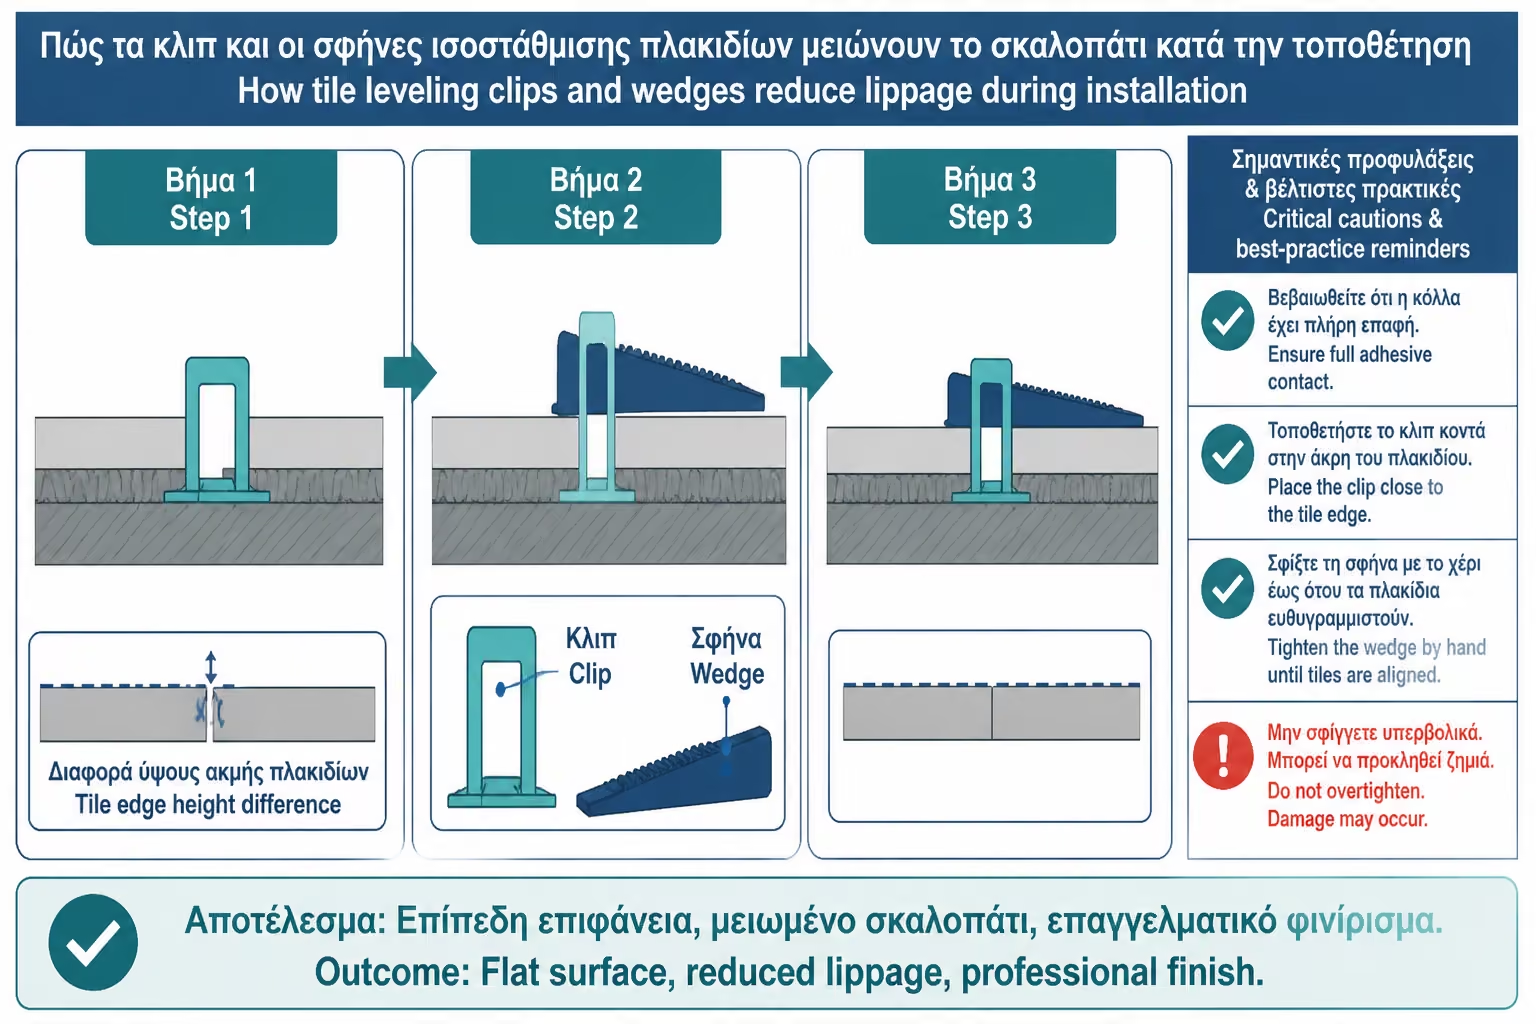
The classic system consists of a plastic clip that is placed under the edges of two adjacent tiles and a wedge that passes through the clip. The clip simultaneously determines the width of the joint, depending on its thickness. The wedge clamps the two tiles to the same level. When the glue hardens, the top part of the clip breaks and the bottom part is buried under the surface.
There are also screw systems with caps, where instead of a wedge, a screw element is used that tightens down. The logic is similar: we keep the adjacent tiles on a common level while the glue is fresh. Then we remove the upper part.
The system does not simply "pull" one tile to the height of another. It presses and holds. If the craftsman overtightens it, it can create other problems: lift tile from the adhesive, reduce coverage, undesirably open the joint, or stress the edges. So it takes experience, not just buying a tool.
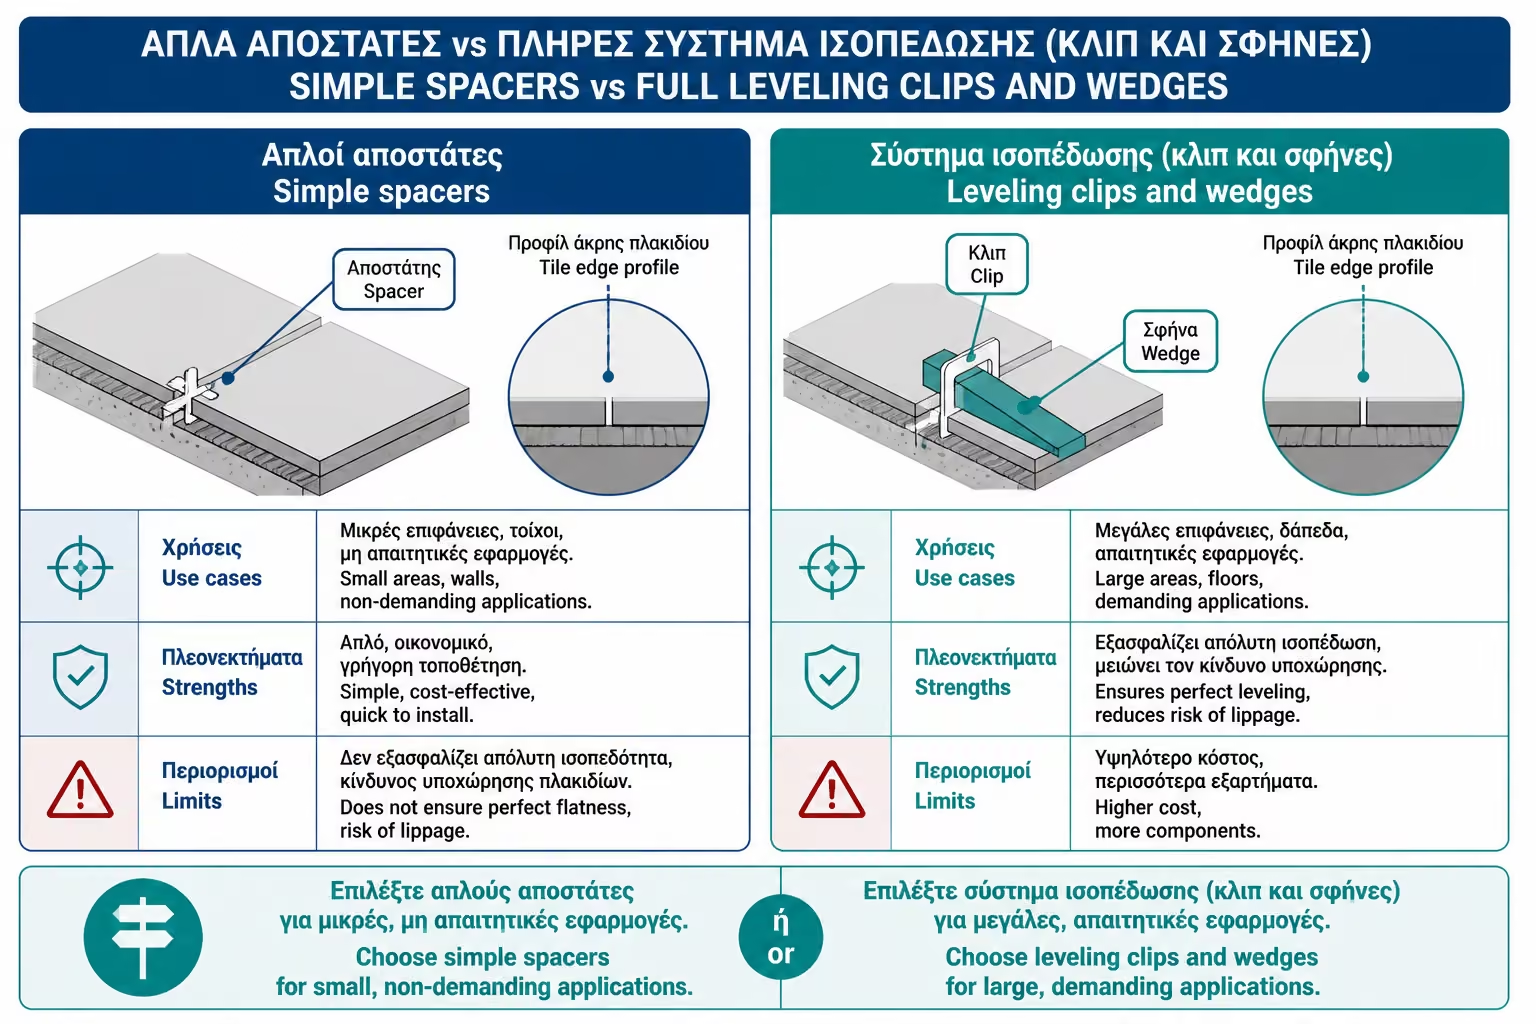
Simple spacers keep the joint width constant. They do not level the edges. Leveling clips, in contrast, usually combine two roles: they hold both distance and level. But this does not mean that every clip is suitable for every joint. There are clips for 1 mm, 1.5 mm, 2 mm, 3 mm and different tile thicknesses.
If the desired joint is 2 mm, a clip corresponding to 2 mm must be selected or properly combined with spacers. If the wrong clip is used, we may end up with a different joint width than we wanted. In rectified tiles, where the joint width is aesthetically critical, this is of great importance.
Also, spacers do not replace expansion joints. The leveling system keeps the normal joint of the tiles. Perimeter joints, expansion joints and level changes must be provided for separately.
Leveling systems are most useful on large tiles, rectified edges, glossy surfaces, floors with side lighting, slab walls and applications where lippage will be very visible. They are particularly useful on tiles 60×60 and above, 60×120, 80×80, 120×120, wood-look boards, marble look of large dimensions and single room floors.
On small tiles, their value is less. Not because they don't help, but because the format itself is more forgiving. They are not used in mosaics. In rustic, handmade or zellige-look tiles, where unevenness is part of the aesthetic, the leveling system can be less useful or even wrong, because it tries to impose absolute flatness on a material that is not made for it.
In bathrooms, they are great on walls with large tiles, because the side reflection from the lighting shows every tooth. They are also suitable for walk-in shower floors only if the format allows it and the slopes are properly designed. They are not used to "break" a large slab on slopes that do not suit it.
Does not correct crooked substrate. If the floor has bulges, bumps or large deviations, preparation must be done: sanding high points, repair mortars, self-leveling or another leveling method. Mapei emphasizes that for large format tiles the flatness of the substrate is mandatory and that grinding, patching or self-levelers are needed to achieve the required preparation.
Does not fix a curved tile. If the plate has inherent distortion, the leveling system can reduce the tooth at the edges but not eliminate the surface curve. It does not correct a wrong pattern. If long narrow tiles with camber are inserted at 50% offset, lippage can be increased independently of wedges.
It does not replace glue. If there is insufficient coverage underneath, the tile may appear flat at first but be hollow, weak or vulnerable to breakage. The leveling system is an alignment tool, not a guarantee of traction.
The adhesive must be applied properly before the leveling system is installed. On large tiles, a suitable adhesive, a correct spatula, a correct combing direction and often a double application are required. The TCNA, in a guide to ceramic tile, states that the correct trowel size should be used, enough mortar should be spread so that the tile is properly pressed for flatness, and that large tiles need more adhesive than small ones.
If the craftsman applies some glue and then tightens the wedges, he can pull the boards flush but leave gaps underneath. This is bad practice. The tile must press on a full and even layer of adhesive. Wedges help the edges stay flush, not create artificial wobble.
The right adhesive must also have an appropriate open time. If the adhesive dries before the tile is inserted, the leveling system cannot correct the loss of adhesion. On large tiles, a C2TE or C2TE S1 is often a more sensible choice than a simple adhesive, depending on the space and substrate.
Indirectly, yes, but that is not their main role. When the tile is placed correctly on the adhesive, the leveling system helps to maintain its position while it sets. It reduces small settlement or variation between adjacent tiles and helps the surface stay more even.
However, it does not distribute the glue by itself. The distribution of the adhesive is done by trowel, direction of the grooves, pressure, movement of the tile and double application where necessary. The well-known NTCA/TCNA “trowel and error” guideline emphasizes that successful coverage is achieved by combing the adhesive in straight lines, especially on large tiles, so that air can escape and better contact can be achieved.
So the correct wording is: leveling systems help to keep the tiles level while the adhesive is working, but the full coverage of the adhesive depends on the installation technique.
A floor can be "leveled" but not level. May have correct general level, but small bellies and bulges. For tile, especially large format, this is a problem. We want flatness, i.e. flatness along the length of the rule.
The Ceramic Tile Education Foundation explains that for large format tiles, meaning tiles with one side 15" or longer, the flatness requirements are stricter and that deviations should not exceed 1/8" in 10' and 1/16" in 24". This information is critical: before the tile is inserted, the base must be checked with a large rule.
If the substrate is not flat, the leveling system will try to pull the edges together. This can create stresses, glue gaps or difficulty fitting. The correct thing to do is to fix the base first and then use the leveling system as a precision tool.
The name “leveling” can be confusing. Many people think that the system levels the floor. He doesn't. It plumbs or, more correctly, aligns adjacent tile edges. If the floor is sloped, the system will follow the slope. If she has a belly, it won't really fix it.
To level a floor requires preparation: self-levelling, repair, sanding, new underlayment or proper cement mortar. CTEF explains that self-leveling underlayments are used to flatten or level a surface before tiling, with proper preparation and primer according to the manufacturer.
So the leveling system is the ultimate tool when placing. It is not substrate preparation.
Installation begins with proper adhesive application. The craftsman applies glue to the substrate, often also to the back of the tile for large formats. He places the first tile, then puts clips on its edges, usually at a distance from the corners and in sufficient numbers per side, depending on the dimension. Then he places the next tile and drives the wedge into the clip.
The wedge is tightened by hand or with special pliers. The pressure should be enough to bring the edges flush, but not so much that it lifts the tile, breaks the clip prematurely, or overstresses the adhesive. The tiles must be constantly checked with a rule and by hand.
After the glue has set, the upper sections are removed by tapping in the direction of the joint or as specified by the manufacturer. If they are removed incorrectly, plastic may be left in the joint or the clip may break badly.
The number of clips depends on the dimension of the tile. Smaller large tiles may need 2 per side. Very large formats need more. There is no fixed answer because it depends on edge length, thickness, weight, flatness and system.
If few clips are used, the system does not adequately control the edge. If too many are used, it increases cost and difficulty, without always commensurate benefit. Manufacturers of leveling systems usually give consumption tables per tile dimension.
In projects with 60×120 or 120×120, the number of clips must be calculated before bidding. It is not a negligible consumable. If the craftsman estimates this roughly, he may run out of materials or try to work with less than is needed.
Wedge systems are very common. They are relatively cheap, fast and familiar to craftsmen. The clip is disposable, the wedge is usually reused. Pliers or manual pressure are required.
Screw-in systems use a screw-on base and top cap. They have the advantage of more controlled pressure and are often more friendly to DIY or in cases where we want a gradual tightening. But they can be slower or more expensive, depending on the system.
There is absolutely no better. The experienced craftsman can work flawlessly with wedges. In very large slabs or special applications, specific systems may be preferred depending on the tile and site.
Yes, leveling systems are also used on walls, especially with large tiles. On a bathroom wall with 60×120 or slabs, they help to avoid small edge differences that can be seen with the lighting. They are especially useful on glossy marble look tiles, where the reflections show every irregularity.
But there are other demands on the wall. The adhesive should have reduced slip, usually T, and the substrate should be flat. The leveling system does not hold a heavy tile on the wall by itself. It needs the right glue, the right support and the right order of installation.
On very large slabs, wall mounting requires additional tools, suction cups, transport frames and experienced crew. Wedges are only part of the process.
The leveling clips have a certain thickness and often define the width of the joint. This means they must agree with the joint choice of the project. If the tile is rectified and we want a 2 mm joint, the clip must be 2 mm or a suitable combination must be used. If the tile is unground and needs 3 mm or more, the clips must support it.
Clips should not be used to force an excessively narrow joint into a tile that does not allow it. Joint width is determined by tile, tolerances, space and grout. The leveling system just helps keep that width even.
If after breaking the clips there are plastic residues in the joint, they must be removed before jointing. Grout needs clear depth.
The clips go under the edge of the tile, so they take up a little space in the glue and the joint. This is one reason that there must be sufficient glue and a proper joint. If the joint is too narrow or the glue is too little, the clip can cause problems rather than help.
After the clip is broken, the lower part remains inside the system. This is normal. However, it must not protrude into the joint or obstruct the grout. If it breaks by mistake and plastic is left on top, it must be cleaned.
In showers and wet areas, it is even more important that the joints are filled properly. The clips must not leave gaps that will only be superficially filled with grout. Proper cleaning of the joints before grouting is essential.
Use the table below as a quick reference for the key points of this section.
| Case | Useful? | Comment |
|---|---|---|
| Large tiles 60×60 and above | Yes | They noticeably reduce lippage |
| Rectified tiles | Yes | They help in thin uniform joints |
| Polished tiles | Yes | They hide unevenness less |
| Slabs on a wall | Yes, with an experienced crew | They are not enough by themselves |
| Small classic tiles | Not always | Simple spacers are often sufficient |
| Mosaics | No | The system is not implemented |
| Rustic / handmade tiles | With care | The unevenness is part of the aesthetic |
| Crooked substrate | Not as a solution | First the base is leveled |
| Insufficient glue | No | They do not fix gaps under the slab |
| Wrong pattern / 50% offset on curved tiles | Limited | The layout must be changed |
The tool is useful when the system is already properly designed.
Use the table below as a quick reference for the key points of this section.
| Error | What does it cause? |
|---|---|
| Using leveling on a crooked floor without preparation | Trends, glue gaps, disappointing result |
| Excessive wedge tightening | Raised tile, reduced adhesive coverage |
| A few clips per side | Partial control, lippage remains |
| Wrong clip thickness | Incorrect joint width |
| Removing clips in the wrong direction | Debris inside the joint |
| Grouting without cleaning clips/glue | Weak or shallow joint |
| Trying to straighten the glue instead of the substrate | Thick layer, subsidence, failure |
| Use on tiles with a large curvature without changing the pattern | Lippage remains |
Leveling systems require technique. It's not just "putting wedges".
In the Greek market of 2026, leveling systems add costs in both materials and time. The clips are consumable. Wedges or caps are reusable but must be purchased. In a large bathroom or floor with large tiles, the amount of clips can be significant.
The labor may also cost a little more, because the craftsman needs time to install clips, tighten, check, remove and clean joints. But on large tiles, this cost is often very small compared to the cost of lippage correction afterwards. If a large plaque is inserted with a tooth, it is not easily corrected without extraction.
For economical small tiles, the system may be unnecessary. For 60×120, large format or rectified floors, it should almost always be included in the offer discussion.
A proper quotation for large tiles should not simply say “tiling”. It should state if substrate testing and preparation will be done, what adhesive will be used, if double coating will be done, what joint width will be applied and if a leveling system will be used.
It should also be clear if the cost of leveling clips is included. In many offers, consumables are not listed and then listed as extra. It is good to mention: "use of leveling system with clips/wedges for large format tiles", especially if the tiles are rectified or over 60×60.
If the craftsman says that "no wedges are needed" in 60x120, it does not necessarily mean that he is wrong, if he has an excellent foundation and experience. But he needs to explain how he will control the lippage. The answer "we see it with the eye" is not enough in a demanding project.
Use the table below as a quick reference for the key points of this section.
| Question | Yes / No |
|---|---|
| Has the substrate been tested with a large rule? | Yes / No |
| Are the deviations within tolerances for large format? | Yes / No |
| Has the correct adhesive been selected for the tile and substrate? | Yes / No |
| Will it be double coated where needed? | Yes / No |
| Does the clip fit the joint width we want? | Yes / No |
| Are there enough clips for the tile dimension? | Yes / No |
| Does the pattern reduce the risk of lippage? | Yes / No |
| Will the joints be cleaned before grouting? | Yes / No |
| Are there perimeter and expansion joints where needed? | Yes / No |
| Is the use of leveling included in the offer? | Yes / No |
If the answers are "no", the leveling system can give the illusion of control without solving the real problem.
Leveling systems are an excellent tool for large and rectified tiles, but they should not be used as a "crutch" for poor preparation. First we level and check the substrate, then we choose the right glue and spatula, then we ensure full coverage and finally we use clips and wedges to keep the edges flush while the glue sets. If we overtighten the wedges on a little glue or a crooked base, we may temporarily hide the tooth but create gaps under the tile. Proper leveling does not begin with the wedge; it begins with the rule on the substrate.
Leveling systems with clips, wedges and spacers have changed the quality of modern tiling. In large formats, rectified edges, glossy tiles and demanding bathrooms, they can significantly reduce lippage and give a cleaner, professional surface. They help the tiles stay level while the glue sets and keep the joint width uniform.
But it is not a magic solution. They do not straighten a crooked floor, correct curved tiles, replace adhesive, provide full coverage on their own, or eliminate the need for expansion joints. If used incorrectly, they can create gaps, tensions or a false sense of security.
The correct sequence is always the same: substrate inspection, preparation, proper adhesive, proper trowel, proper application technique, adequate coverage, and then leveling system. When all these work together, the wedges and clips can give the result the owner wants: clean lines, a flat surface and tiles without annoying "teeth".
Return to category.
Go to categoryReturn to the central guide.
Go to guide