How to Crimp Ethernet Cables: DIY Guide with RJ45 Plugs (Pass-through vs. Standard) and Using a Crimp

You have run the cables (eg Cat6) through the walls and now you see them hanging bare. To be able to connect them to your Router, Switch or a security camera, you need to put the classic, transparent plastic plug on them. This process is called "Termination" or in technical slang, "Crimping".

In the past, making an Ethernet cable was a process that required absolute precision and patience, often causing frustration for beginners when one of the 8 tiny wires didn't make good contact. Today, the tools have evolved dramatically.

Let's take a look at the equipment you'll need, the trick that will save you from countless mistakes, and the international color code you should follow reverently.

1. The Essential Networking Tools

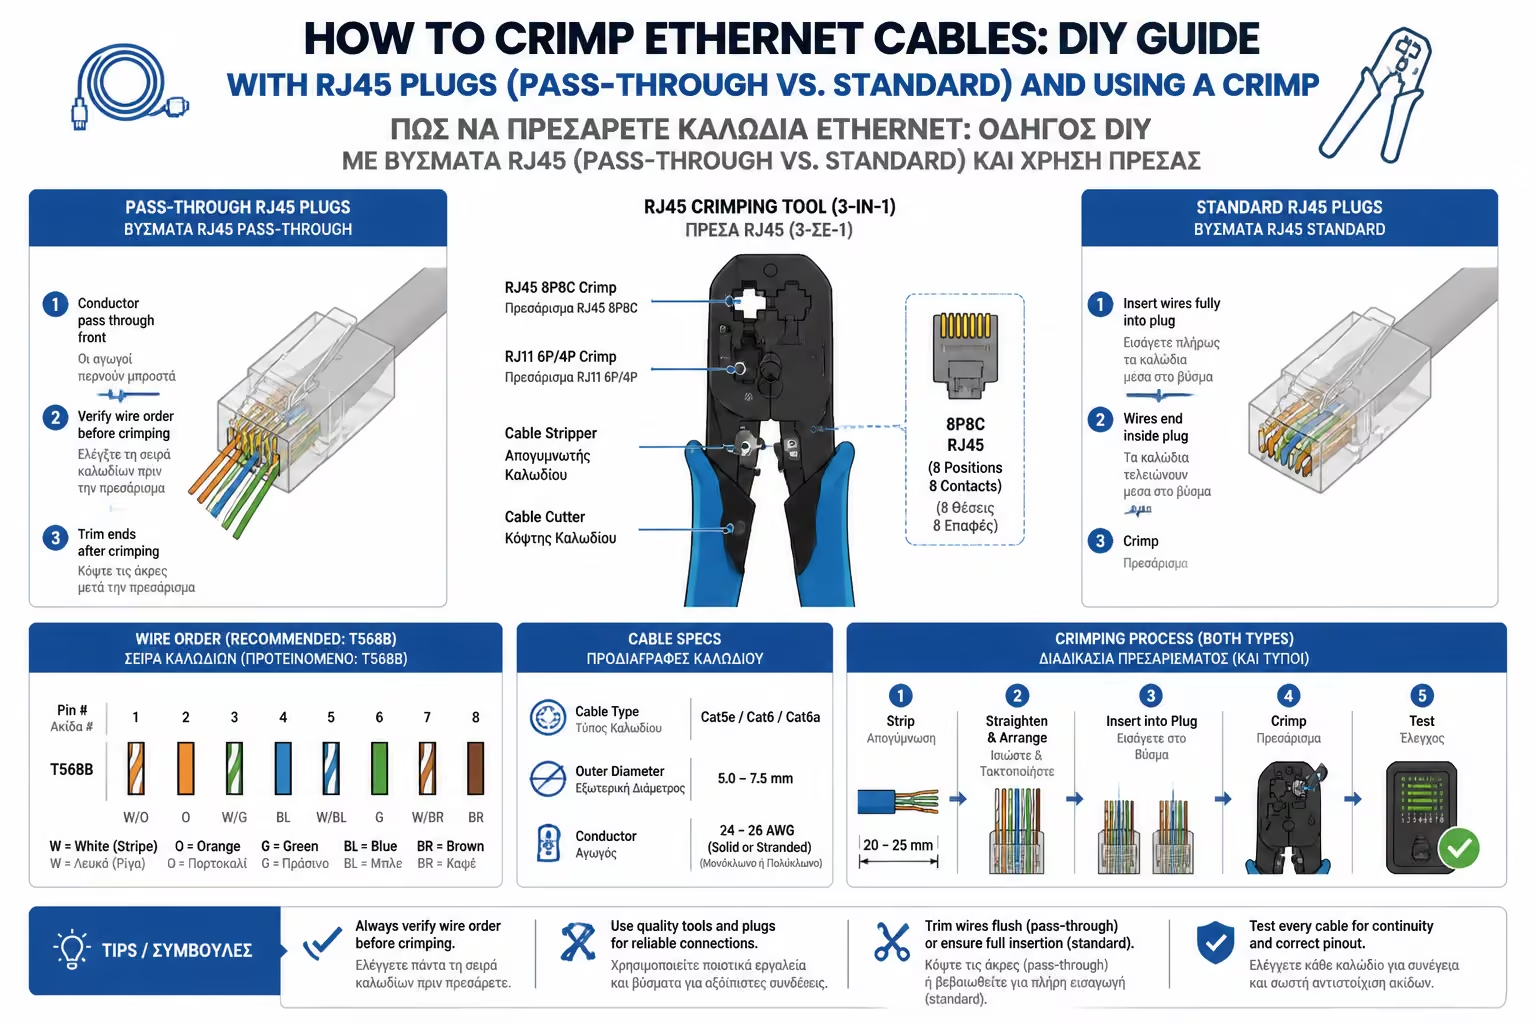
To do a proper job, forget the kitchen knives and scissors. You will need a basic "Network Tool Kit" (which costs around €20-30):

  1. Wire Stripper: A small, usually yellow tool that removes the outer plastic sheath (jacket) of the wire without cutting the inner wires.
  2. Flush Cutter: A small flush cutter that cuts perfectly straight.
  3. Network Crimper (RJ45 Crimper): The heavy duty tool. With this you "pull" the plug so that the metal contacts (teeth) are pinned onto the cables.
  4. Cable Tester: A small device with lights (1 to 8). Put one end of the cable into one socket and the other into the other. If the lights come on in the correct order (1-1, 2-2, etc.), the cable is perfect.
Illustration for 1. The Essential Networking Tools

2. The Big Secret (Standard vs. Pass-through RJ45)

Illustration for 2. The Big Secret (Standard vs. Pass-through RJ45)

When you go to buy the transparent plugs (RJ45), you will be faced with a huge dilemma that determines how easy your life will be:

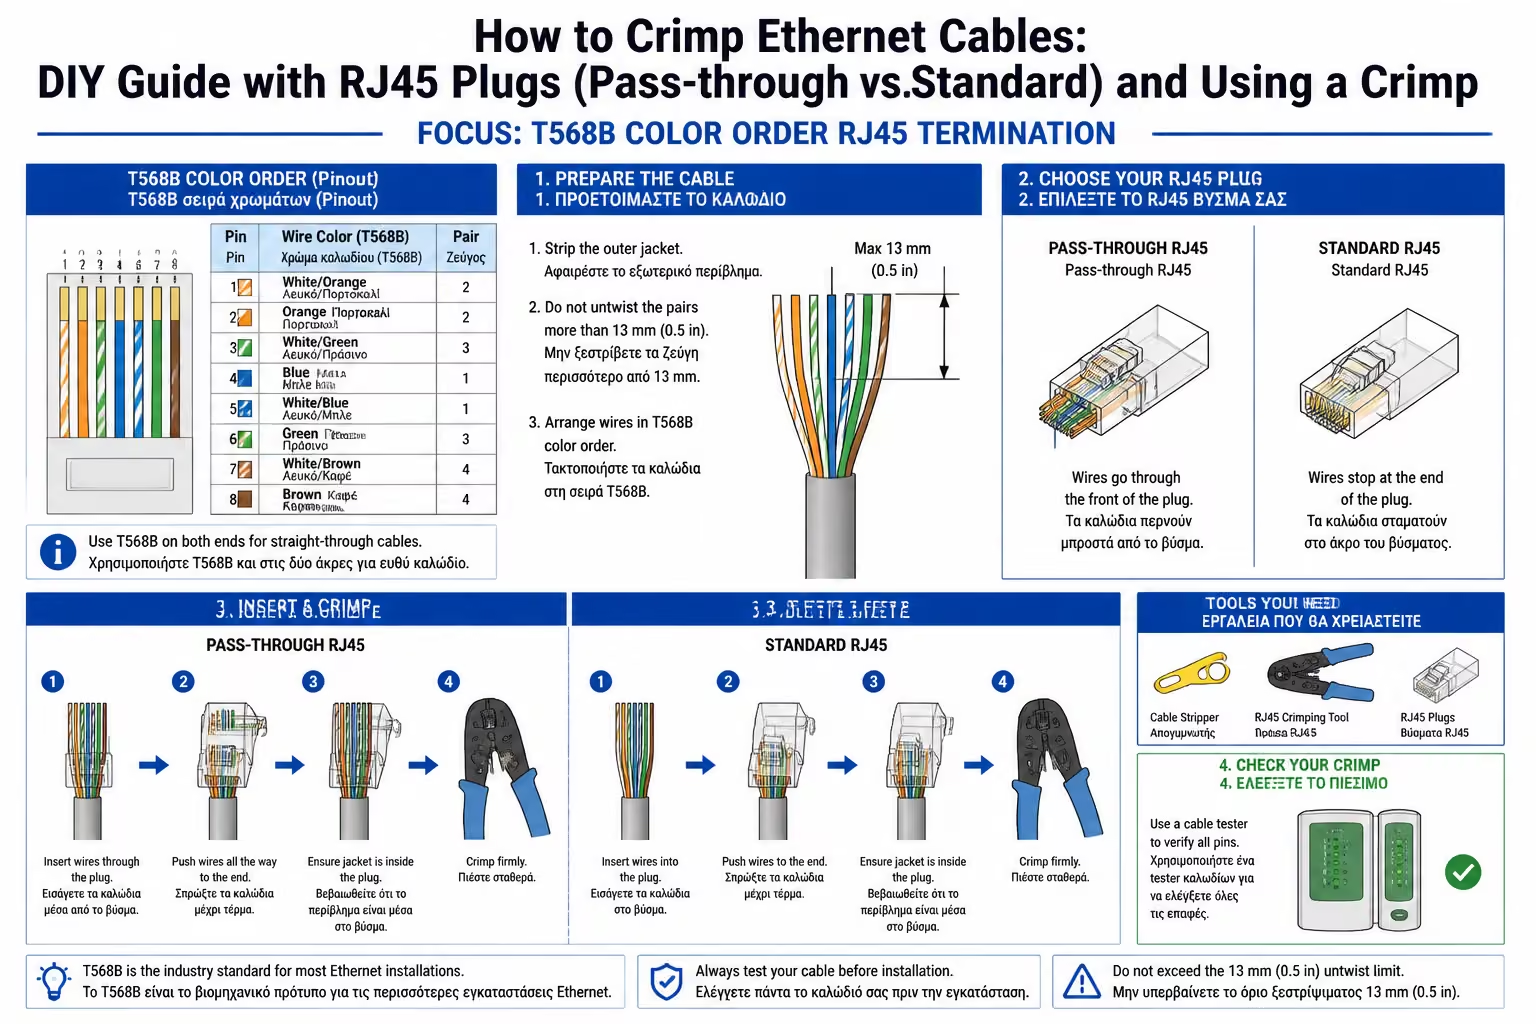
The Traditional Plugs (Standard/Closed End)

They are closed in front. You have to cut the 8 wires to exactly the right, straight length (about 1.2cm), push them into the plug blindly, and hope they all go all the way without bending. They require vast experience.

The Modern Plugs (Pass-through RJ45)

The DIYer's salvation! These plugs have holes in the front. You just straighten the wires (leave them out) and thread them out of the plug. So you can visually check if the color sequence is correct before you hit the press! (Caution: They require a special Pass-through Press, which has a blade that cuts the excess wires at the same time as pressing).

3. The Golden Rule of Colors: T568B

If you open a UTP cable, you will see 4 pairs: Orange, Green, Blue, Brown (with their corresponding white-stripes). We don't put them in the order we like!

In Europe and America, the absolute standard is T568B. To make a straight cable (Straight-through), the order (from left to right, looking at the plug with the "clip" down) should be as follows on both ends of the cable:

  1. White-Orange (White/Orange)
  2. Orange
  3. White-Green (White/Green)
  4. Blue
  5. White-Blue (White/Blue)
  6. Green
  7. White-Brown (White/Brown)
  8. Coffee

(Note: Notice that the Green pair "breaks" and enters on either side of the Blue pair. This is not random, it is mathematically designed to avoid interference).

Illustration for 3. The Golden Rule of Colors: T568B

4. The Step-by-Step Process

Illustration for 4. The Step-by-Step Process

Since you have selected Pass-through plugs, follow these simple steps:

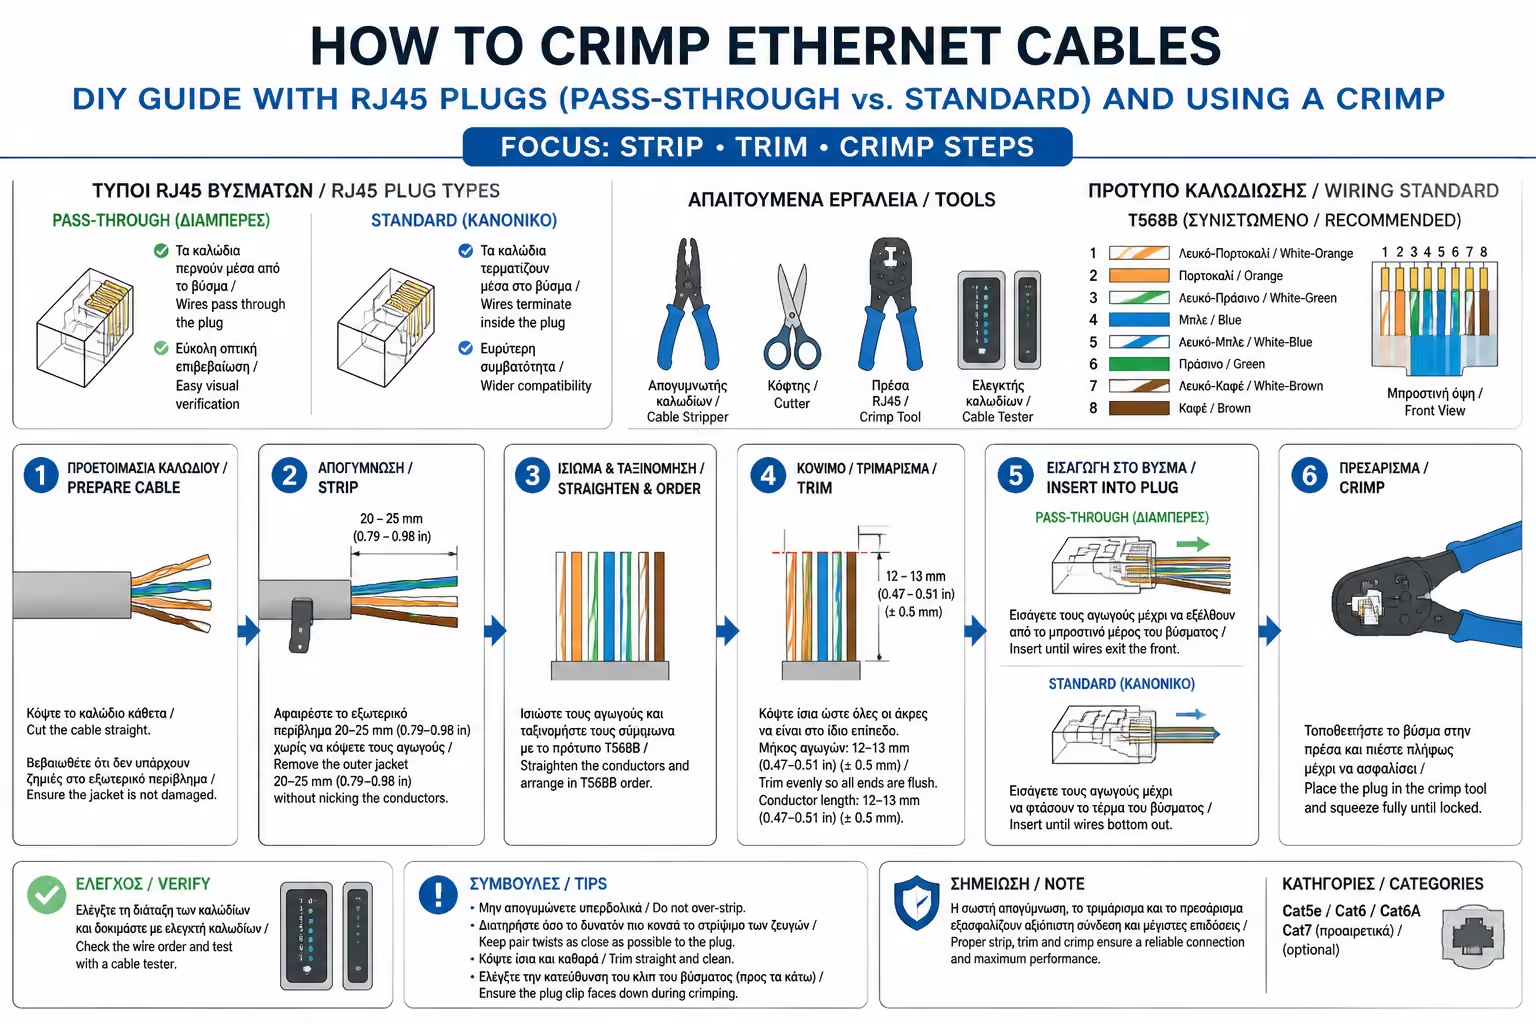
  1. Stripping: Remove about 4-5cm of the outer sheath of the cable using the stripper. Cut the central plastic cross (if present, on Cat6) and the thread.
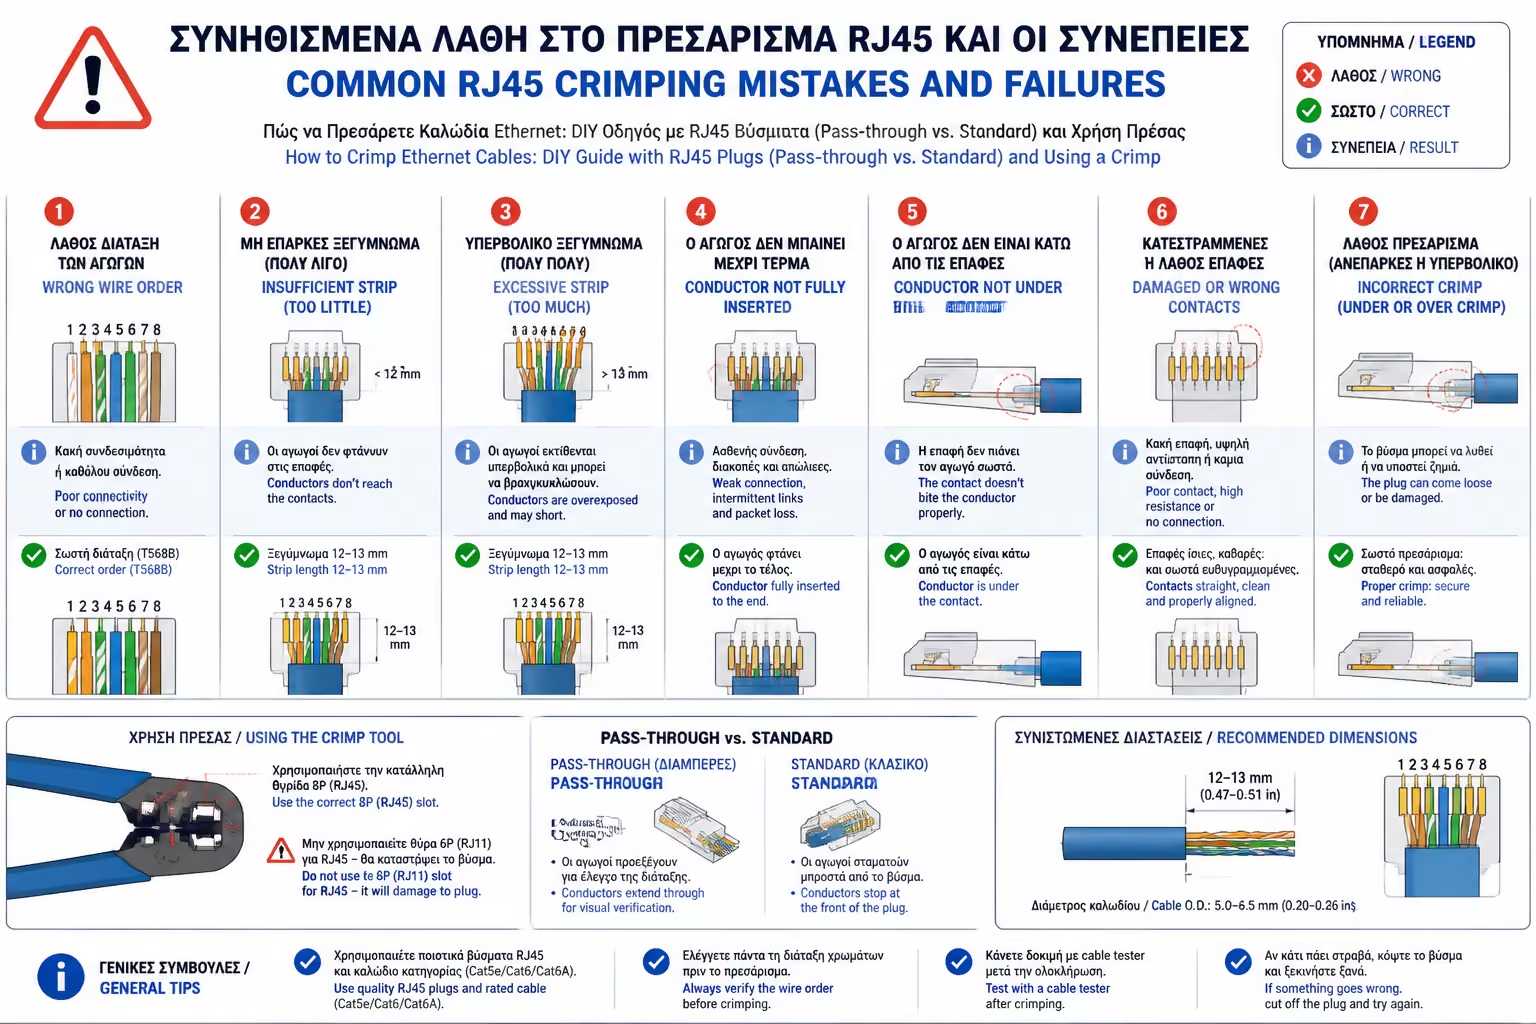
  2. Unwind and Straighten: Unwind the 4 pairs. This is the most important step. Straighten the wires with your fingers by pulling them until they are perfectly straight, like needles.
  3. Layout (T568B): Put the wires in the correct color order (as mentioned above). Hold them firmly with your thumb and forefinger.
  4. Cutting: With the cutter, cut their ends (at an angle if you want, so that they pass more easily through the holes of the Pass-through plug).
  5. Plug Insertion: Holding the RJ45 plug with the plastic clip facing the floor and the copper contacts facing you, push the wires in. Let them come out the other side.
  6. Check and Press: Check the colors again from the top side of the plug. Push the cable all the way in (so that the outer sheath is pressed into the plug for strength). Insert the plug into the crimper and press firmly until you hear a "click" (the crimper will cut the excess wires automatically).
  7. Testing: Do the same on the other end and pass the cable through the Tester. If the lights come on 1-8 in a row, congratulations, you've just made your own network cable!

Summarizing

Crimping can seem intimidating the first time, but by using Pass-through plugs and following the T568B rule, the learning curve is dramatically reduced. Take the time to properly straighten the wires (it's the key to success) and you won't have to call a technician again for a cut wire.

Next Step: We saw how to make "male" cables with plugs (patch cords) to connect our Router. But what about the wires coming out of the walls in the rooms? We don't put plugs there, but sockets!

We continue to the next guide: Network Sockets (Keystone Jacks): How to correctly connect them to the wall based on color standards T568A vs. T568B.

Related Articles

Preview