Network Sockets (Keystone Jacks): How to properly connect them to the wall based on T568A color standards vs. T568B

In the previous article, we learned how to "make" cables with male plugs (RJ45). However, there is one unbreakable rule in structured cabling: Cables buried inside walls are NEVER terminated in male plugs.

When the UTP cable comes out of the wall in your living room or bedroom, the correct, professional way is to terminate it in a female socket, which we call a Keystone Jack. This little socket then "snaps" into the switch's plastic frame on the wall.

Let's see why Keystones are the only right choice, what tools you need, and how to read the "encrypted" colored stickers on the side of them.

1. Why Keystones and not Male Plugs?

The logic is simple: Cables (such as Cat6a) that go into walls are solid and rigid. They are made to carry a signal over long distances, but they break easily if you constantly bend them. If you pulled the cable out of the wall and plugged it into a male plug to connect to your laptop, the constant movement would break the copper within a few months.

With the socket (Keystone), the hard cable stays stationary and secure inside the wall. You, to connect your device, use a small, flexible, ready-made patch cord, which if it breaks, you just throw it away and get another one for 2 euros!

Illustration for 1. Why Keystones and not Male Plugs?

2. T568A vs. T568B: The Color War

Illustration for 2. T568A vs. T568B: The Color War

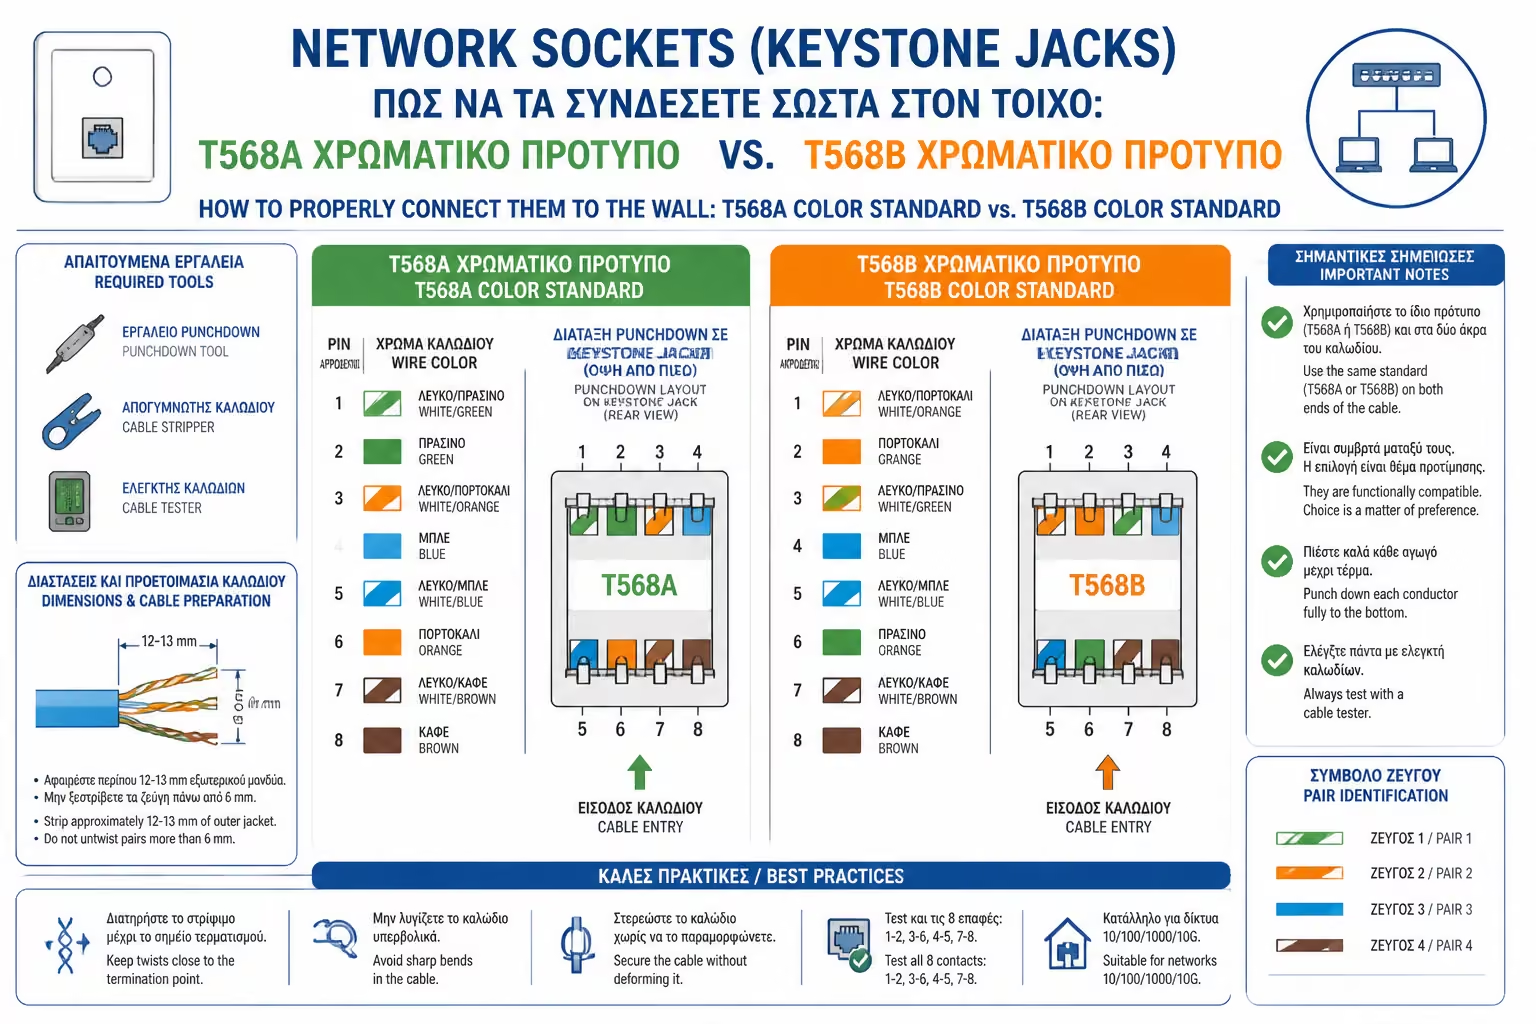
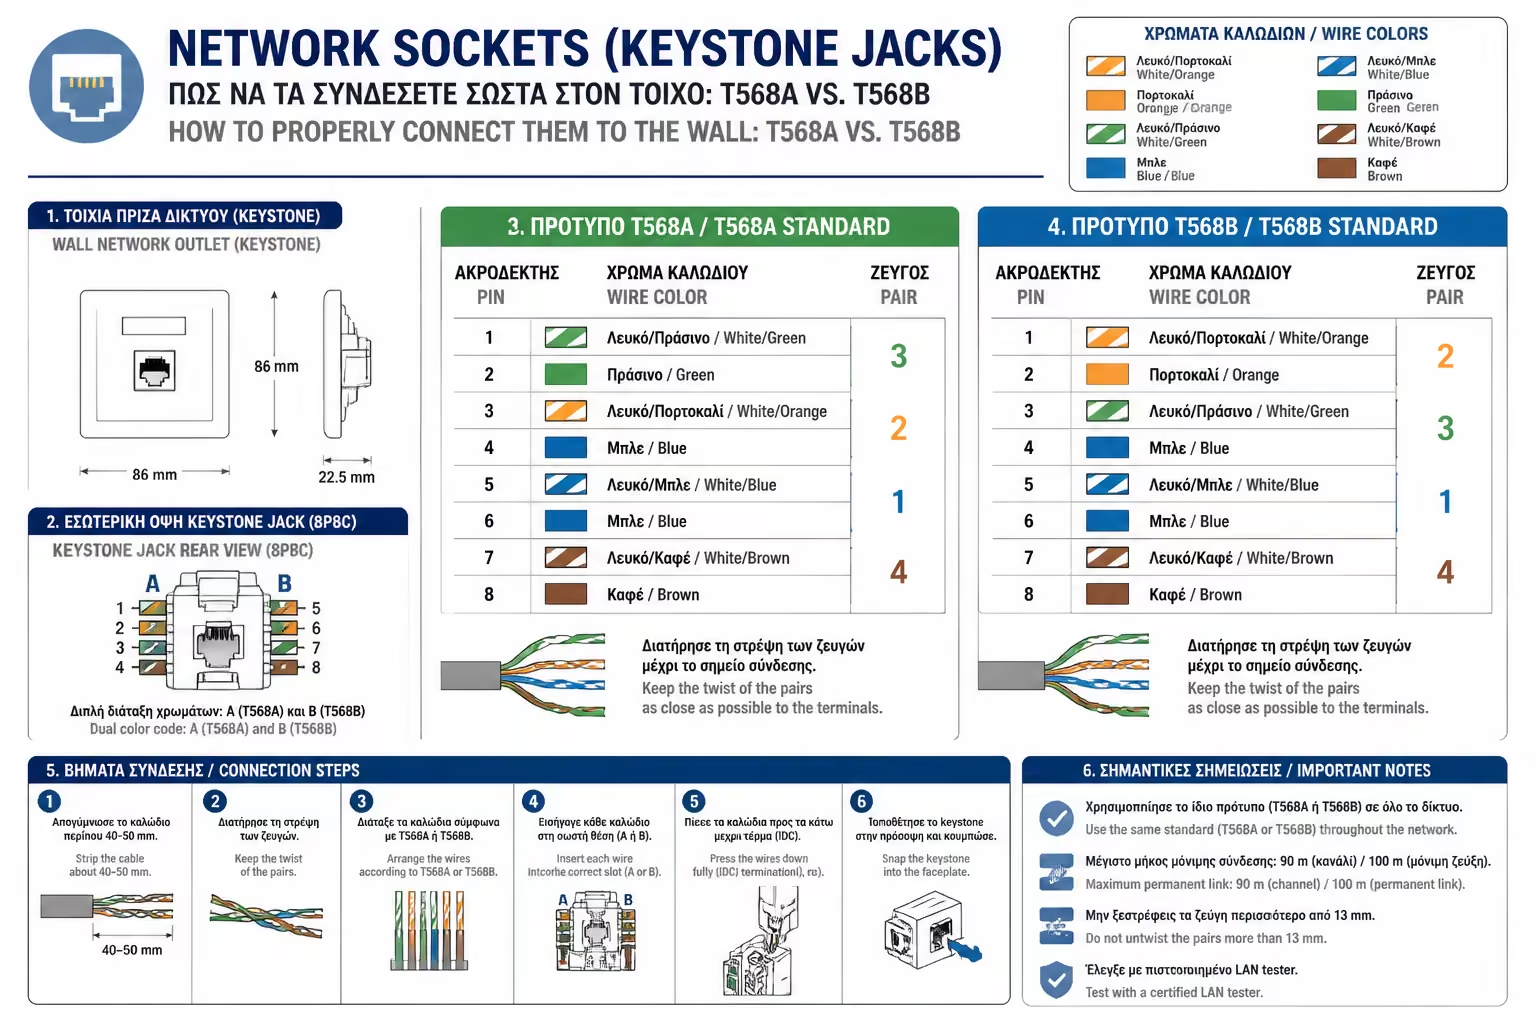
When you get your hands on a Keystone Jack, you will notice that on its sides there are some small colored stickers (Orange, Green, etc.) and two markings: "A" and "B".

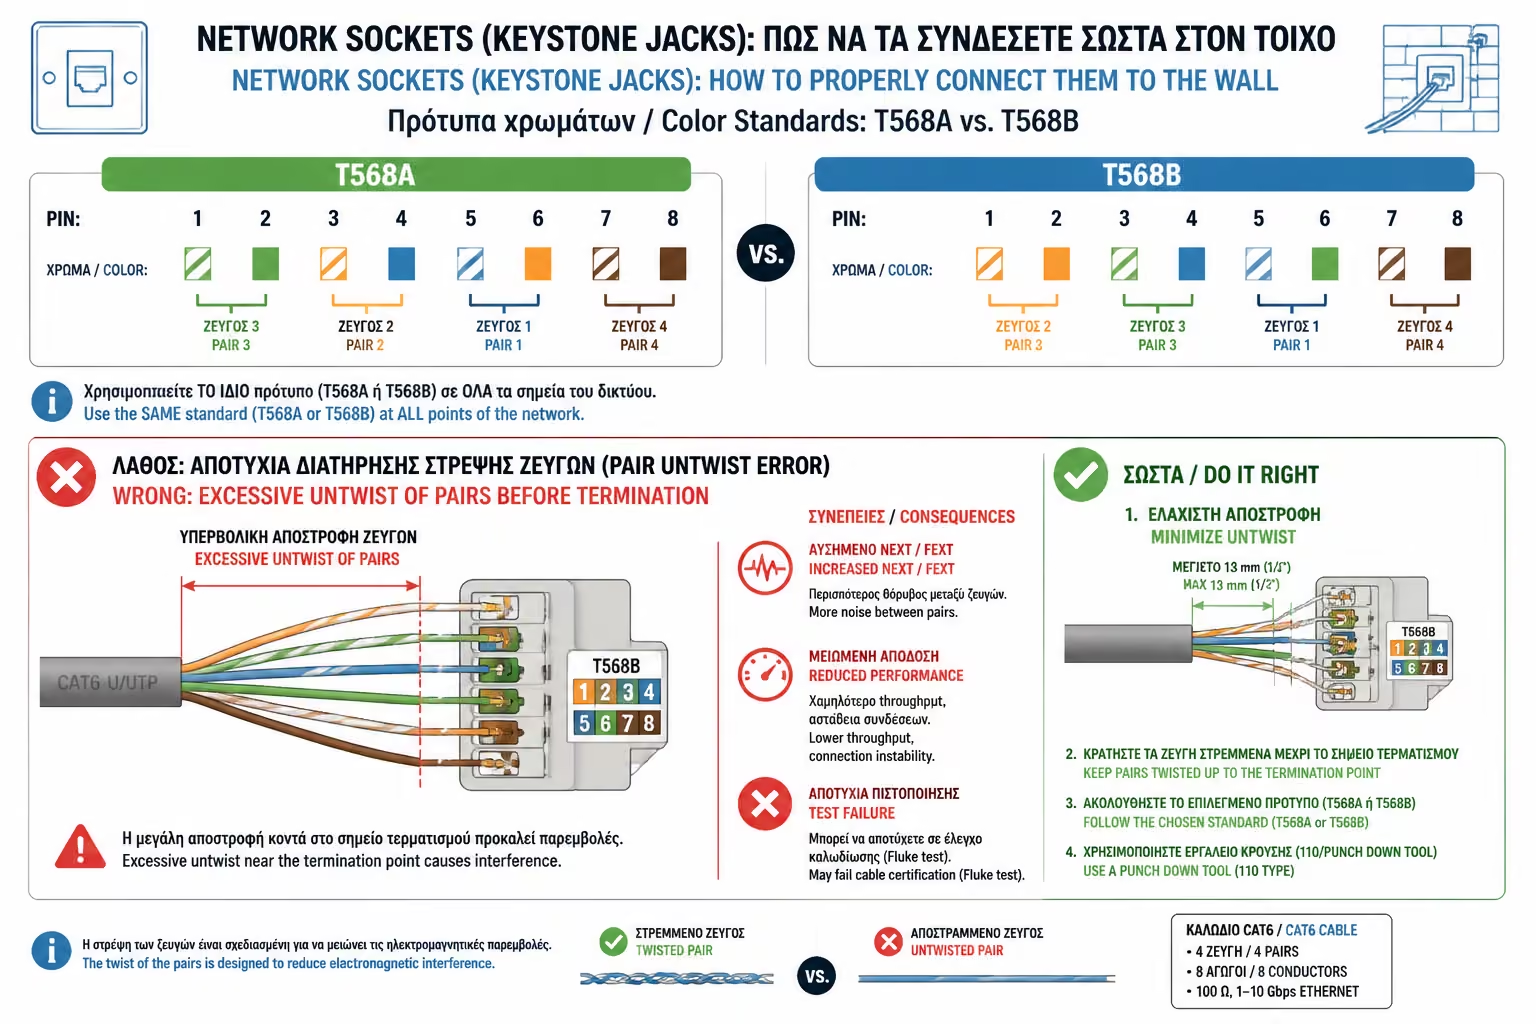
These are the two global termination standards (T568A and T568B). Their difference lies solely in where the green and orange pair are placed.

  • Which one to choose? The T568B standard has almost completely prevailed in Europe and Greece for commercial and residential installations.
  • The Golden Rule: Electrically, there is no difference in speed. It is absolutely critical that you use the SAME pattern on both ends of the cable. Since in the previous article we learned to make the plugs at "B", we will also terminate our socket by looking exclusively at the bottom row of colors of the sticker that says "B".

3. Toolless vs. Punch-Down Keystones

There are two plug technologies on the market:

Illustration for 3. Toolless vs. Punch-Down Keystones

Toolless Keystones

Here you just run the wires through the correct holes in the plastic cover. When you close the lid with your fingers (or a pair of pliers), the pressure itself takes over to "pin" the wires to the metal contacts (IDC). They are ideal for DIYers and beginners.

Punch-Down Keystones (With Tool)

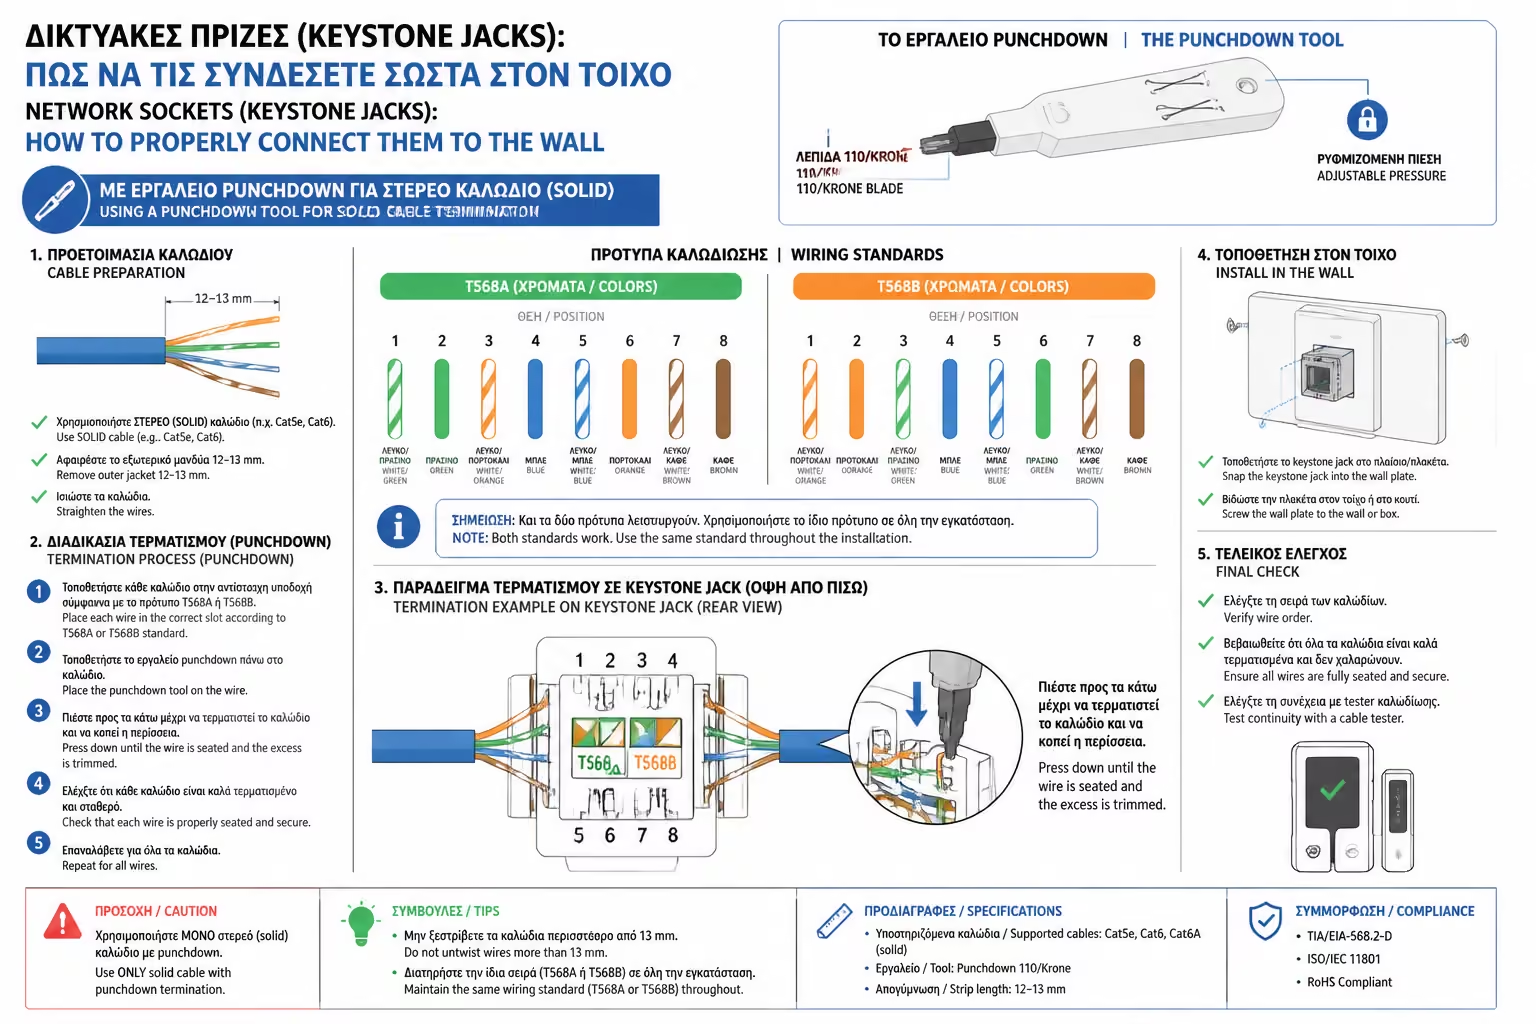
It's the choice of professionals (and usually more reliable over time). To connect them, you need a special tool called a Punch-down tool or Krone tool.

4. How to Finish with a Staple Tool (Step-by-Step)

Illustration for 4. How to Finish with a Staple Tool (Step-by-Step)

If you chose a professional Keystone type 110/Krone, follow these steps:

  1. Stripping: Remove 4-5 cm of the outer sheath of the UTP cable. Cut the plastic cross (if Cat6).
  2. Separation: Separate the 4 pairs. Caution: DO NOT unwrap them completely. Unroll them only as much as necessary (about 1 cm) to fit into the slot. The twisting of the copper is what protects the internet from interference (Crosstalk)!
  3. Placement: Look at the "B" sticker on the side of the Keystone. Place each wire (eg White-Orange) in its corresponding slot. Just touch it on top, don't try to push it deep with fingers.
  4. The Punching Down: Take the punching tool (Krone). Note: One side of the nose has a "scissors" (blade). Place the tool over the slot, making sure the blade is facing OUT (toward the excess wire). Press down firmly with a sharp motion. You will hear a "Clack!". The tool pushed the copper into the contact, stripped its plastic to make a circuit, and cut off the excess at the same time!
  5. Check & Close: Repeat for all 8 cables. Put the plastic protective cover (dust cover) included in the package. Your Keystone is ready to "clip" to the wall face.

Summarizing

Connecting a network socket is actually easier than making a male plug, as long as you have the right tool and don't mix up the A and B stickers. Choosing quality Keystones (of the same class as your cable, eg Cat6a) guarantees that the contacts will not oxidize and your network speed will remain "pinned" at maximum for decades.

Next Step: We've learned how to plug in, but how exactly does the wire get there? In traditional telephony, electricians connected the socket in the living room to the bedroom. In data networks, this is disastrous!

We continue with the rule that separates the proper installers from the amateurs: Star Wiring vs. Daisy Chain: Because in data networks we never branch from socket to socket (like in telephone).

Related Articles

Preview