
Stair & Corridor Lighting: Ideas for recessed wall spots and automation with motion detectors
Corridors and internal stairs are the "arteries" of your home. They unite rooms and define the flow of traffic. However, they are probably the most unfaired spaces when it comes to lighting study, as most people simply install 1-2 powerful ceiling lights and consider the matter over.
But what about when you wake up at 3:00 in the morning to go to the kitchen for a glass of water? If you turn on the main hallway light, you will go blind, your brain will be violently "awakened" and you may disturb those who are sleeping. If you don't turn it on, you risk tripping on the stairs.
Modern architecture solves this problem by eliminating (or supplementing) ceiling lighting with Low-Level Lighting and "smart" automations. As engineers, let's see how you can give your home the luxury of a 5-star hotel while offering total security.
1. Recessed Wall Spots (Step Lights): The Rule of Safety
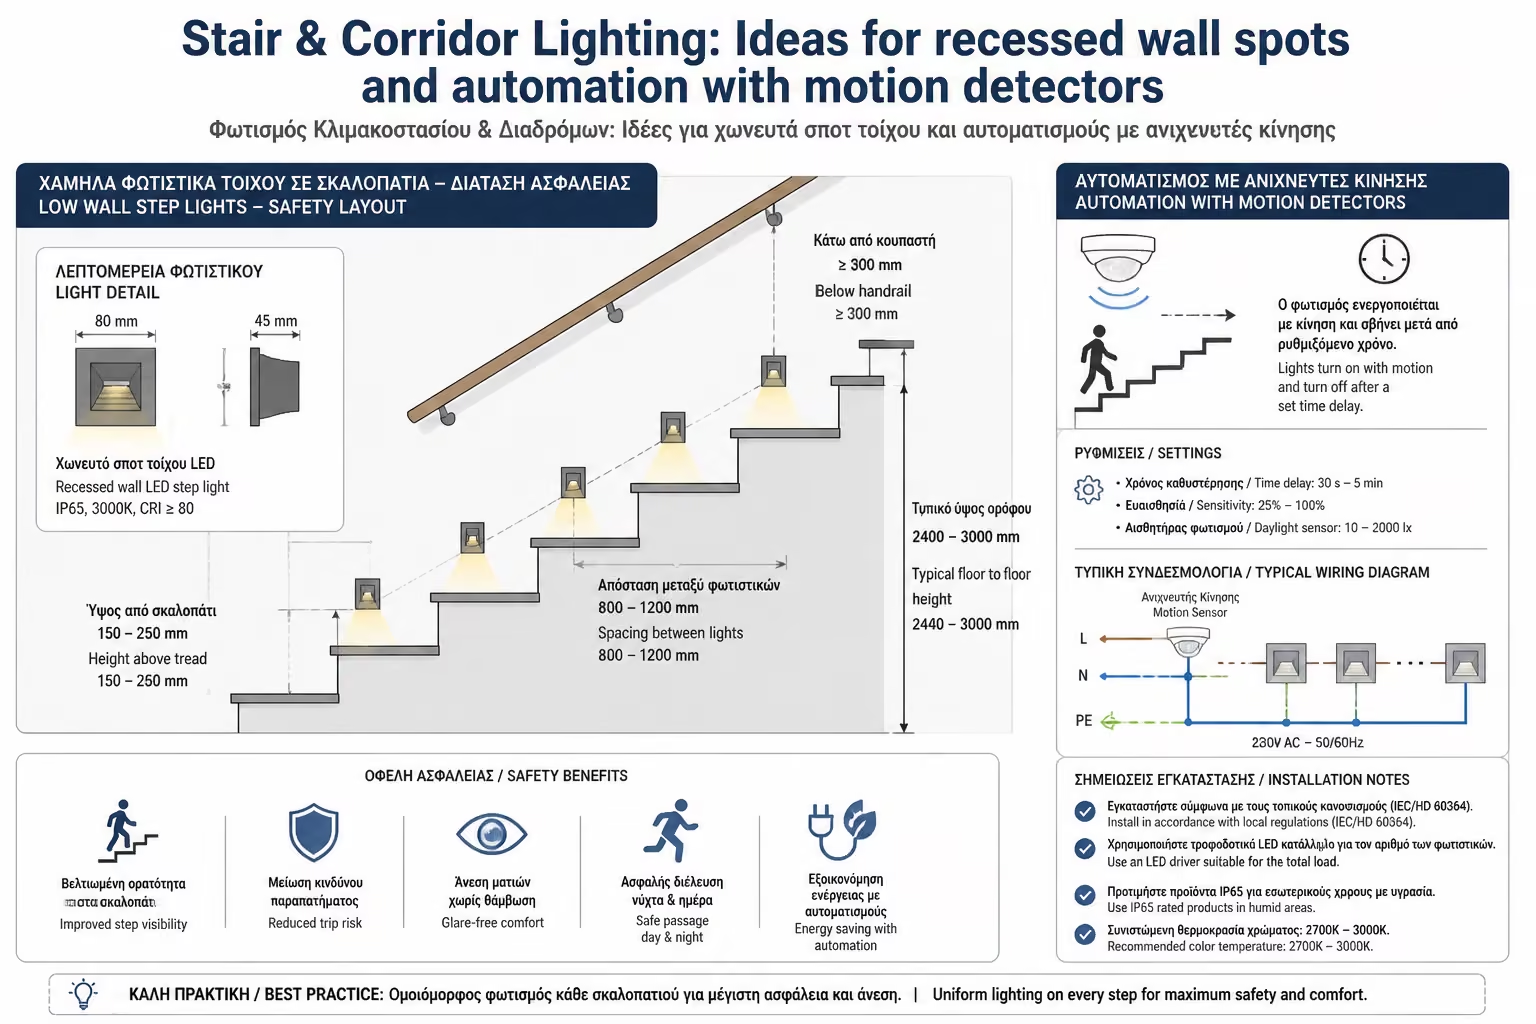
Instead of casting light from the ceiling (which creates harsh shadows on our bodies as we walk), we "build" the light into the wall, near the floor. Recessed wall spotlights (Step lights / Wall washers) have a single purpose: to illuminate the "step" of the stairs and the obstacles on the floor, without shining the light into our eyes.
The Height
They should be placed 15 to 20 cm above the floor of the corridor or above each step.
The Distance (Frequency)
On stairs, the golden rule is a spot every 2 or 3 steps (depending on their strength). If you put them on every step, the effect will look like an airstrip and it will be excessive. In corridors, they are placed every 1.5 to 2 meters.
The Direction of Light
Choose spotlights that have a small "grid" or slope (asymmetric beam) so that the light "hits" strictly downwards (on the floor) and not straight across.
Color Temperature
Here we want absolute relaxation. Choose strictly Warm White (2700K or 3000K) and minimal Lumens (no more than 1W-3W each needed).
2. Alternative: LED strips on the Staircase
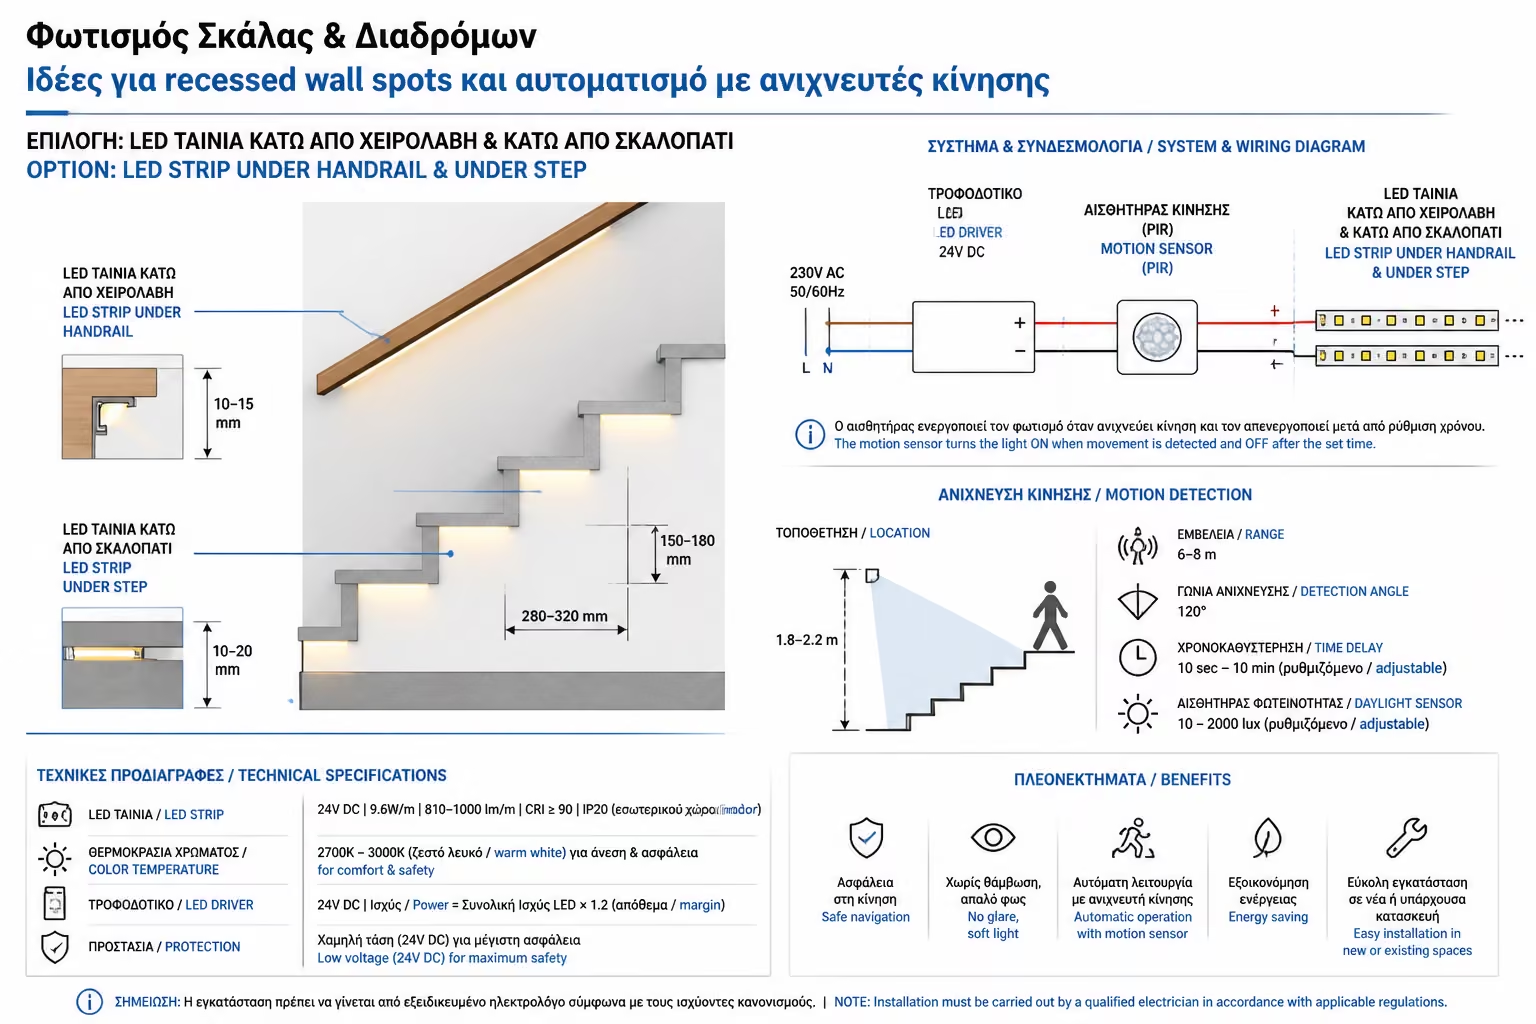
If you don't want to dig up the wall for recessed spotlights, an extremely impressive and modern solution is linear lighting with LED strips.
Hidden lighting in the handrail
If your staircase has a handrail (handrail) that protrudes from the wall, the electrician can integrate an aluminum profile at the bottom. As you climb, the handrail itself "bathes" the steps in light.
Concealed lighting in the "throw"
If you have wooden steps that stick out (have a "nose"), the LED strip hides just below that overhang, shining the light onto the step below. The effect makes the ladder look like it is "floating" in the air.
3. The Ultimate Comfort: Motion Detectors (PIR Sensors)
Low level lights only make sense if you don't have to fumble for their switch in the dark. This is where Motion Detectors (PIR - Passive Infrared Sensors) come into play.
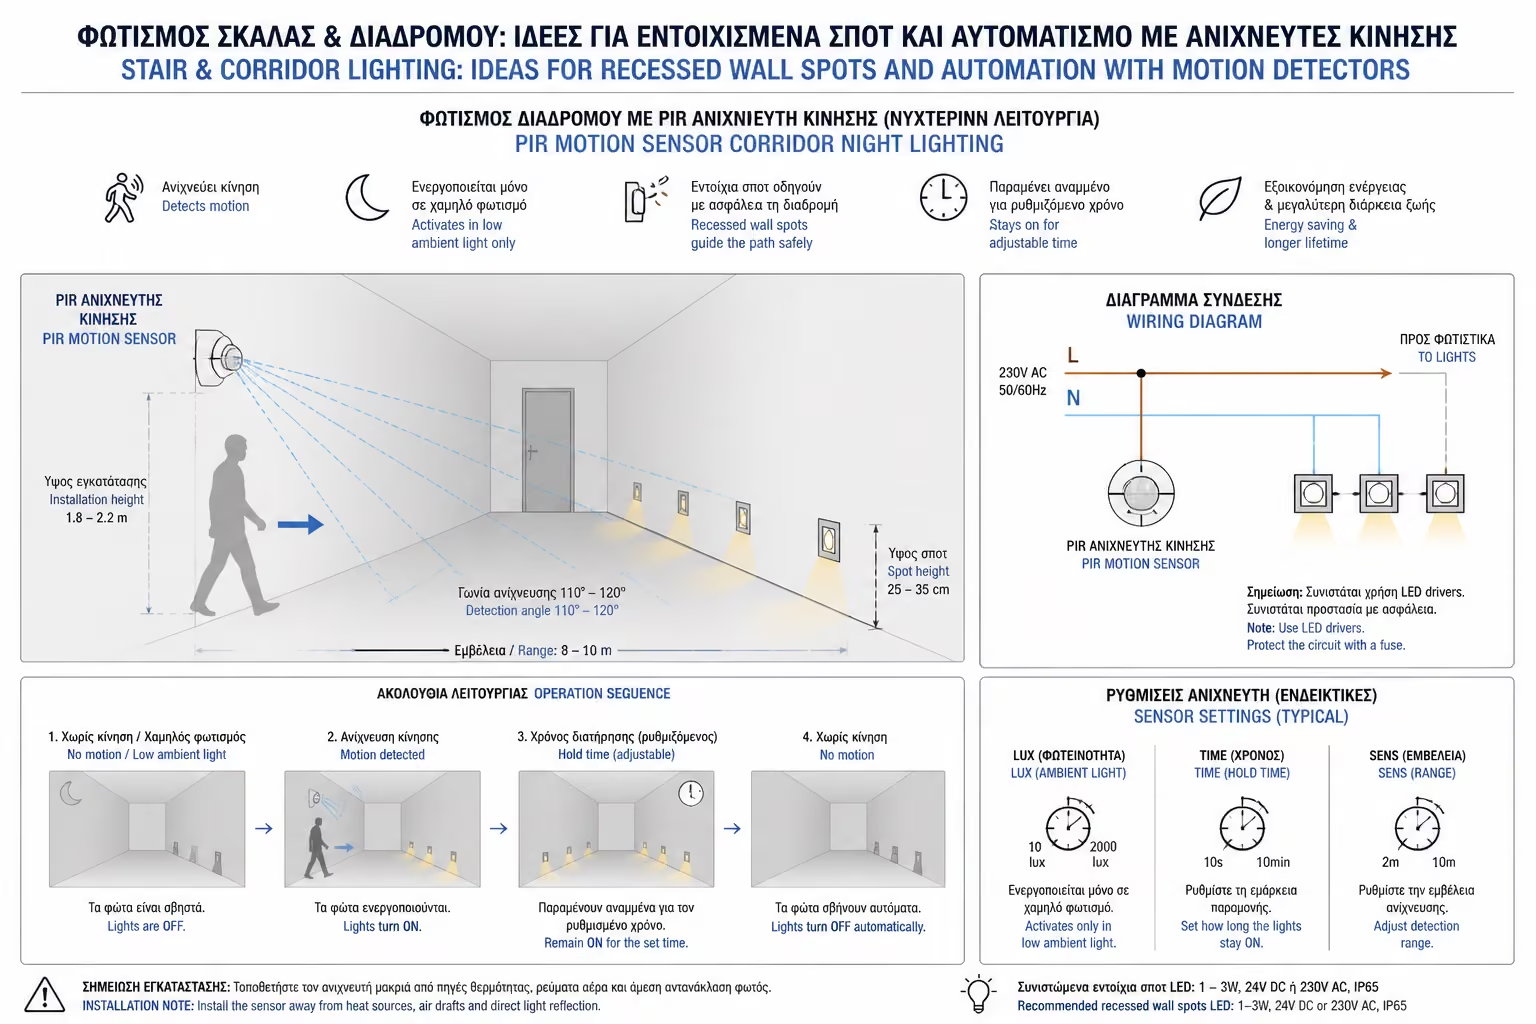
You can replace the classic ale-retour switches at the beginning and end of the corridor (or staircase) with wall-mounted motion sensors. Once the system detects your body heat, the spotlights automatically turn on to guide you, and turn off on their own after you pass.
However, in order for the system to work properly and not needlessly light up in the middle of the day, you need to make the 3 basic settings that are usually found under the sensor cover:
1. TIME setting: Determines how long the lights will stay on after motion stops being detected. On a treadmill, 30 to 45 seconds is usually more than enough. We don't want them burning electricity unnecessarily. 2. LUX (Luminosity/Day-Night) Setting: This is the most critical setting! It determines how dark the room must be to allow the lights to turn on. If you turn it to "Sun", the lights will turn on every time you pass, even at noon. You have to turn it to the "Moon" (or some intermediate low position) so that the "eye" tells the system: "There's still light from the window, don't turn on the spotlights, it's a waste." 3. SENS adjustment (Sensitivity/Range): Depending on the size of the runway, you adjust how far the sensor "sees". If you set it to maximum and you have pets (eg cats) roaming around at night, the lights may turn on for no reason. Adjust it to "catch" mostly the height of an adult.
Summarizing
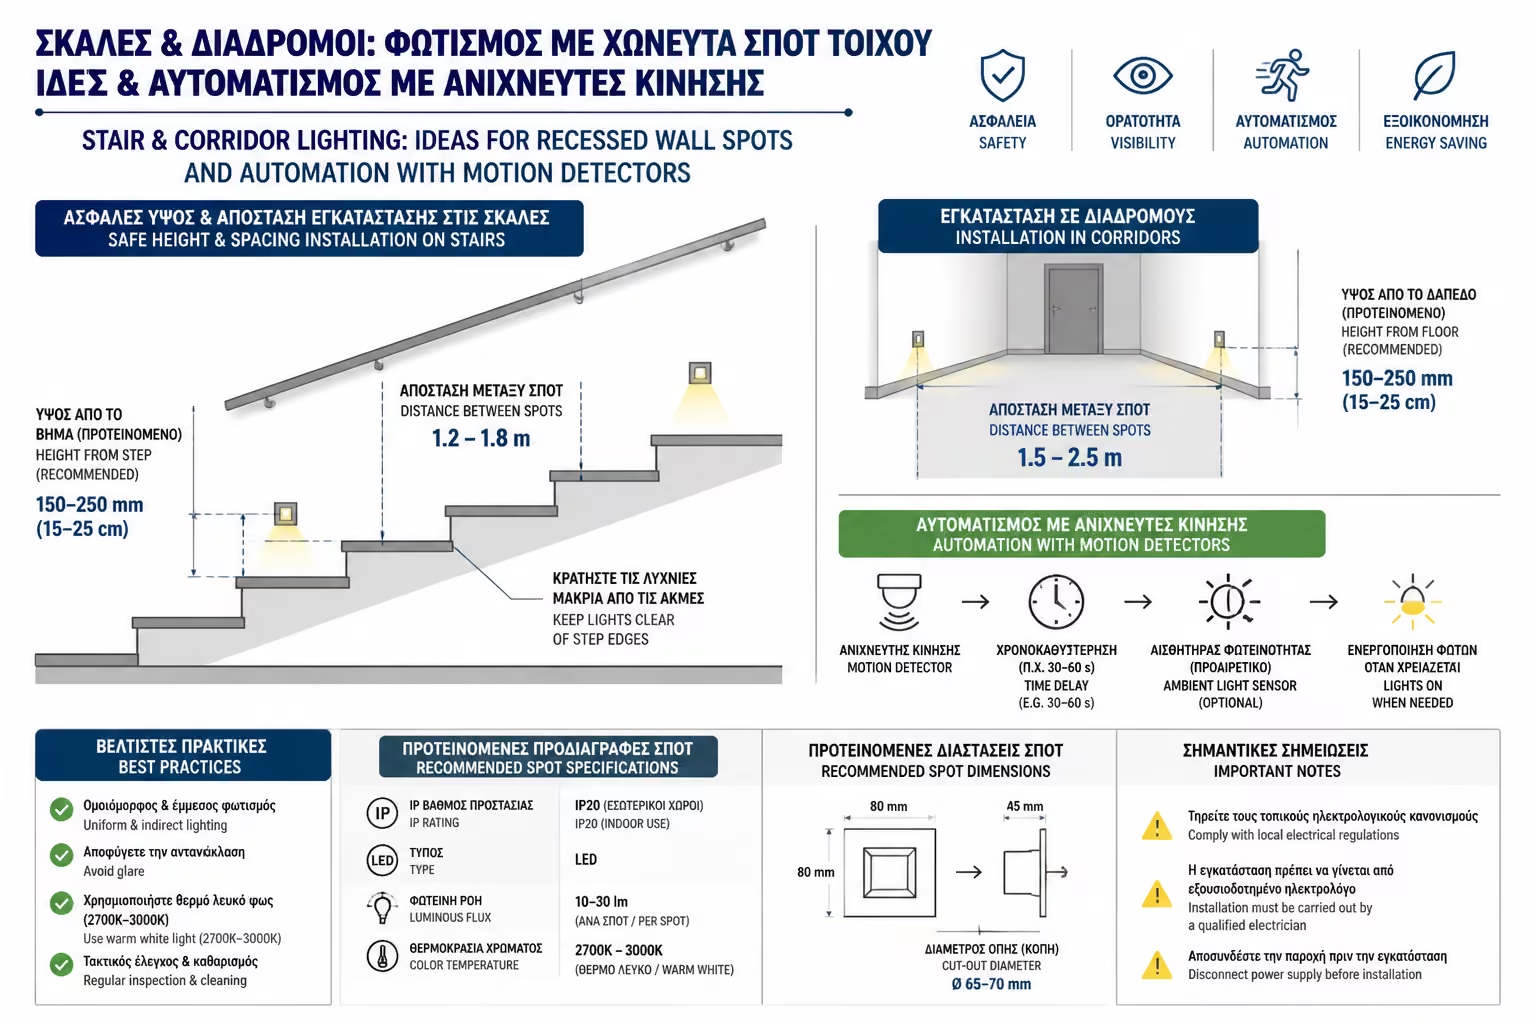
Lighting in corridors and stairs should be discreet and "smart". Invest in recessed spotlights low on the walls (Step lights) and "marry" them with properly adjusted motion sensors. Your home will "welcome" you in the evenings by offering a safe path, while saving energy since you'll never forget the switch on again.
Next Step: We talked about the recessed spotlights on the walls. But when we come to install spotlights on the central ceiling, we are often faced with a construction dilemma. Continue to the last article in this category: Cast vs. Outdoor Ceiling Spots: Advantages, Disadvantages and Ceiling Depth Requirements.
Related Articles
Basic, Functional & Atmospheric Lighting (Layered Lighting): The 3-layer rule for a perfect living room Bathroom Lighting & IP Ratings: What lights are allowed above the shower and mirror (Zones 0, 1, 2) Changing Halogen Spots with LEDs: How to do it yourself (DIY) and what applies to transformers Infused vs. Outdoor Ceiling Spots: Advantages, Disadvantages and Ceiling Depth Requirements
Lighting & Control
Return to category.
Go to categoryCentral Guide
Return to the central guide.
Go to guide