⚡ The golden rule
Every large, energy-hungry appliance needs its own dedicated circuit back to the main electrical board. That single rule separates a professional kitchen installation from a fragile one.
The kitchen is the heaviest-loaded room in the house, and the familiar scene of the oven, dishwasher and kettle tripping the breaker is usually not bad luck but bad electrical design.
If all loads are grouped together in the name of “economy”, nuisance trips and daily frustration are inevitable, which is why a modern kitchen needs clearly separated circuits and proper future-proofing.
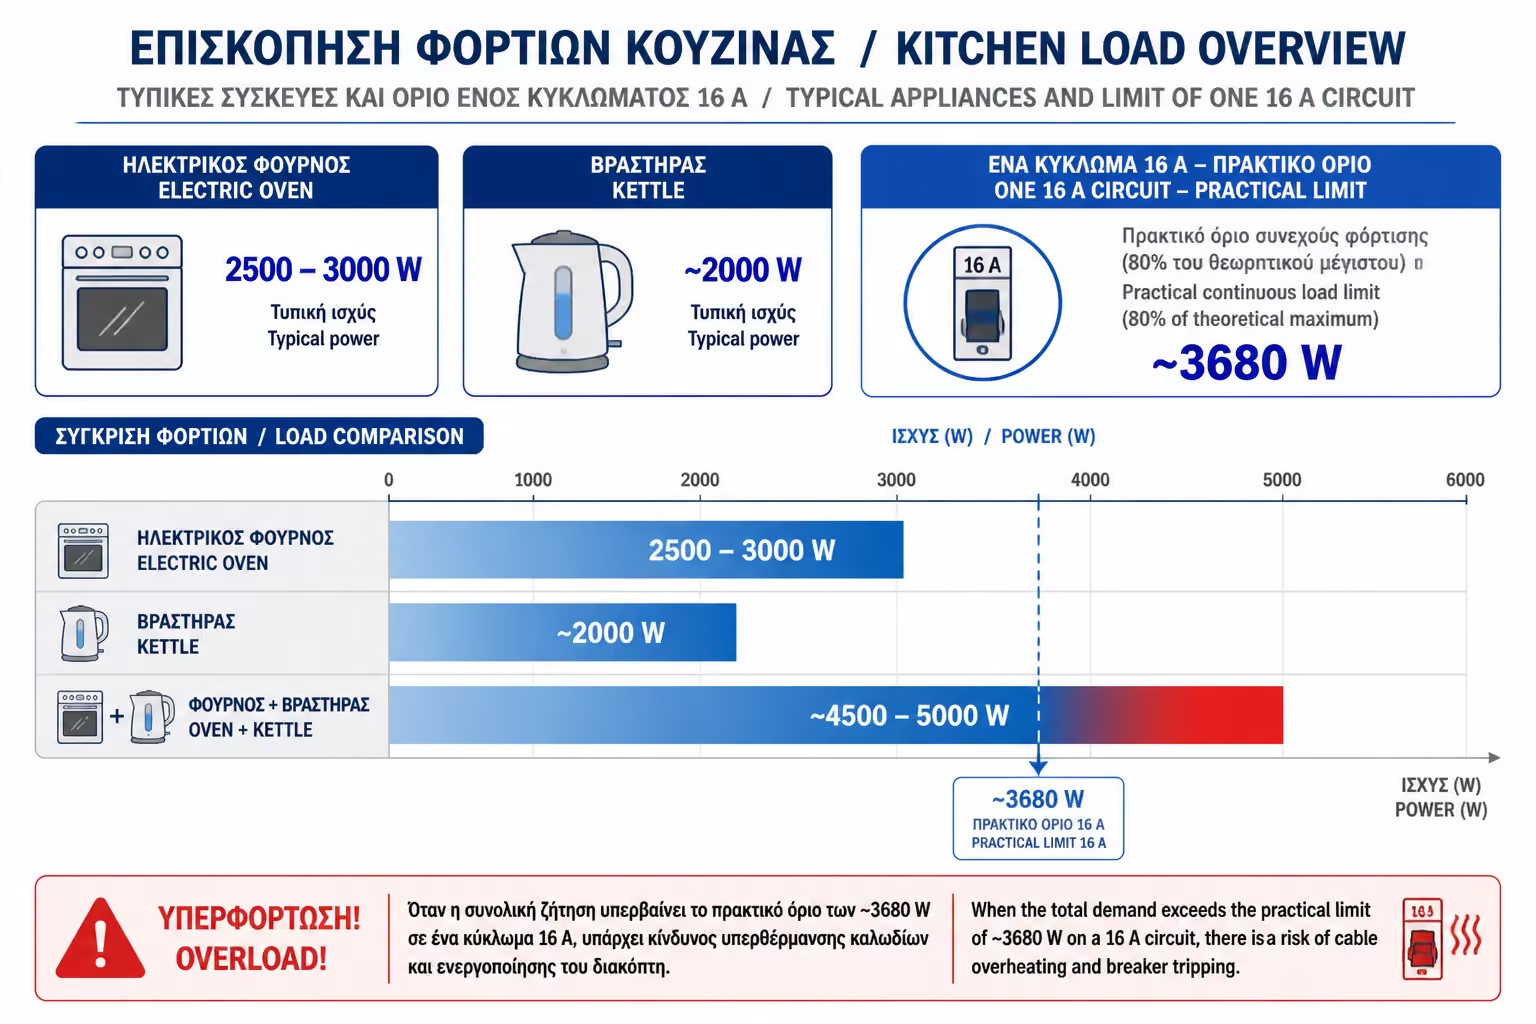
The average electric oven draws roughly 2,500W to 3,000W, while a simple kettle adds another 2,000W. If both sit on the same 16A line, which practically supports around 3,680W, the breaker will trip to protect the cable from overheating and potential fire risk.
That is the whole point of correct design: not to stop trips by fitting arbitrarily larger breakers, but to size each circuit properly so the protective device disconnects at the right time instead of allowing hidden overheating inside the wall.
Every large, energy-hungry appliance needs its own dedicated circuit back to the main electrical board. That single rule separates a professional kitchen installation from a fragile one.
The dangerous shortcut is increasing breaker size without increasing cable size. If a 3x2.5 mm² circuit is overloaded beyond what it was designed for, overheating can build up invisibly inside the wall long before the homeowner notices anything is wrong.
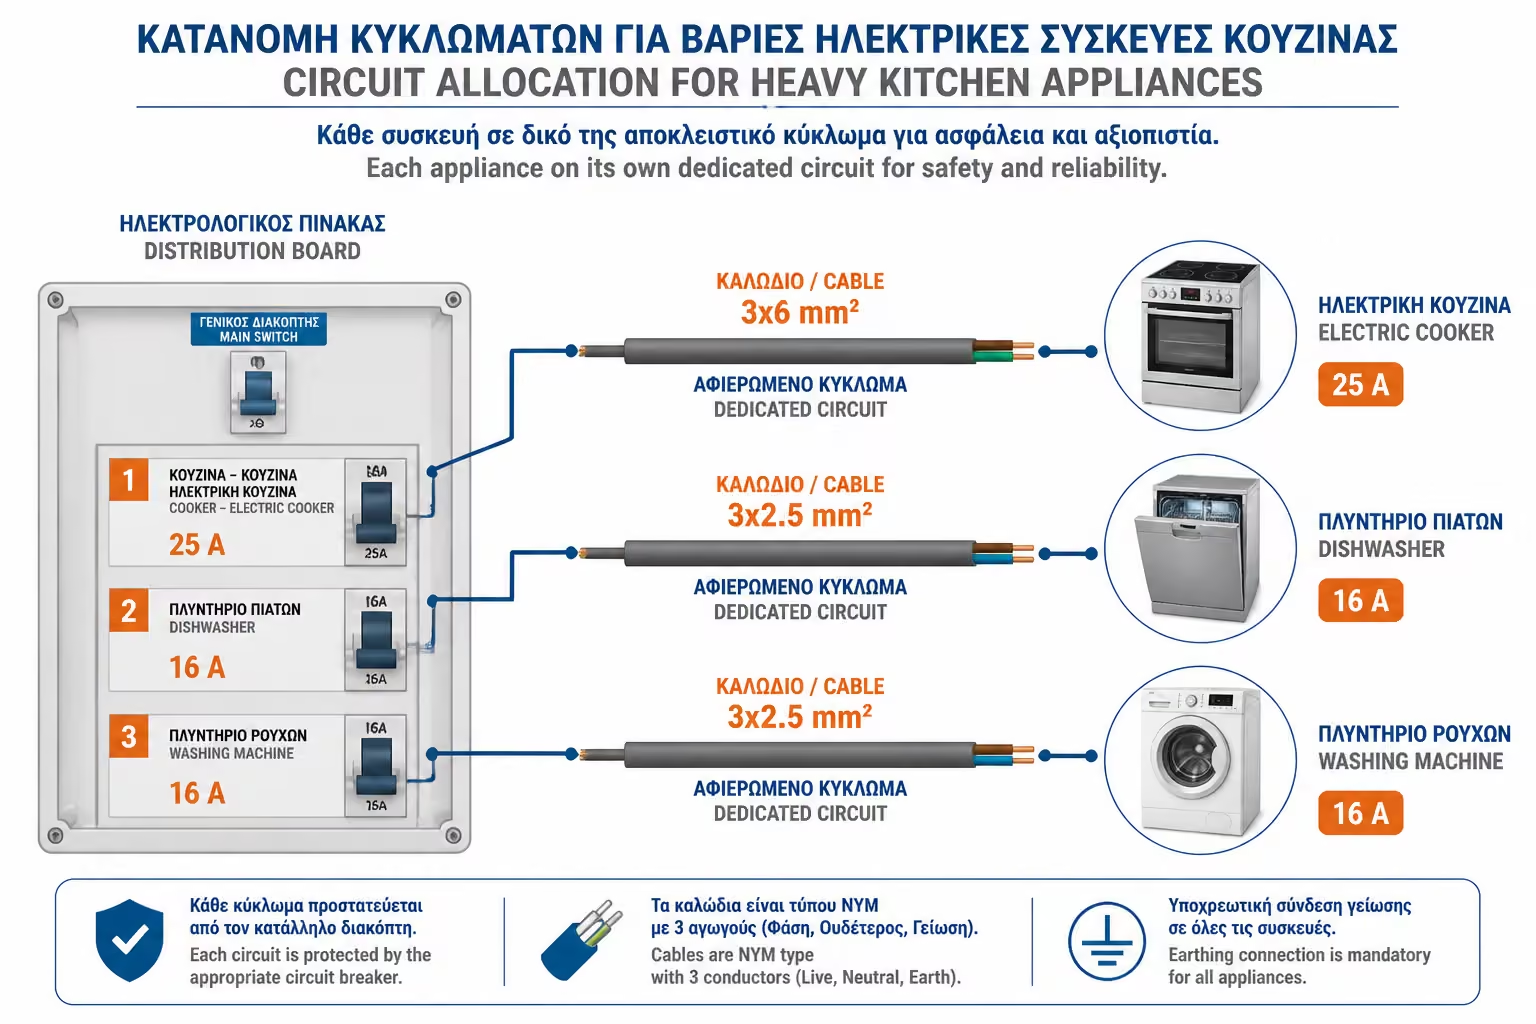
Modern practice treats each major kitchen appliance as a separate technical load with a specific cable size and a specific protective device at the board.
The most demanding appliance in the home typically needs a dedicated 3x6 mm² cable for single-phase supply and its own 25A breaker. In a three-phase home with heavy induction hobs, a 5x2.5 mm² line with a 3x16A breaker is common so the load is split properly. That prevents a single phase from being overstressed every time the cooking zone is used at full output.
Each appliance needs its own 3x2.5 mm² circuit and its own 16A breaker, because the water-heating element is a substantial load. If both share one circuit, simultaneous operation can trip it immediately. The mistake happens because they look like ordinary plug-in appliances, but electrically they should be treated as major dedicated loads.
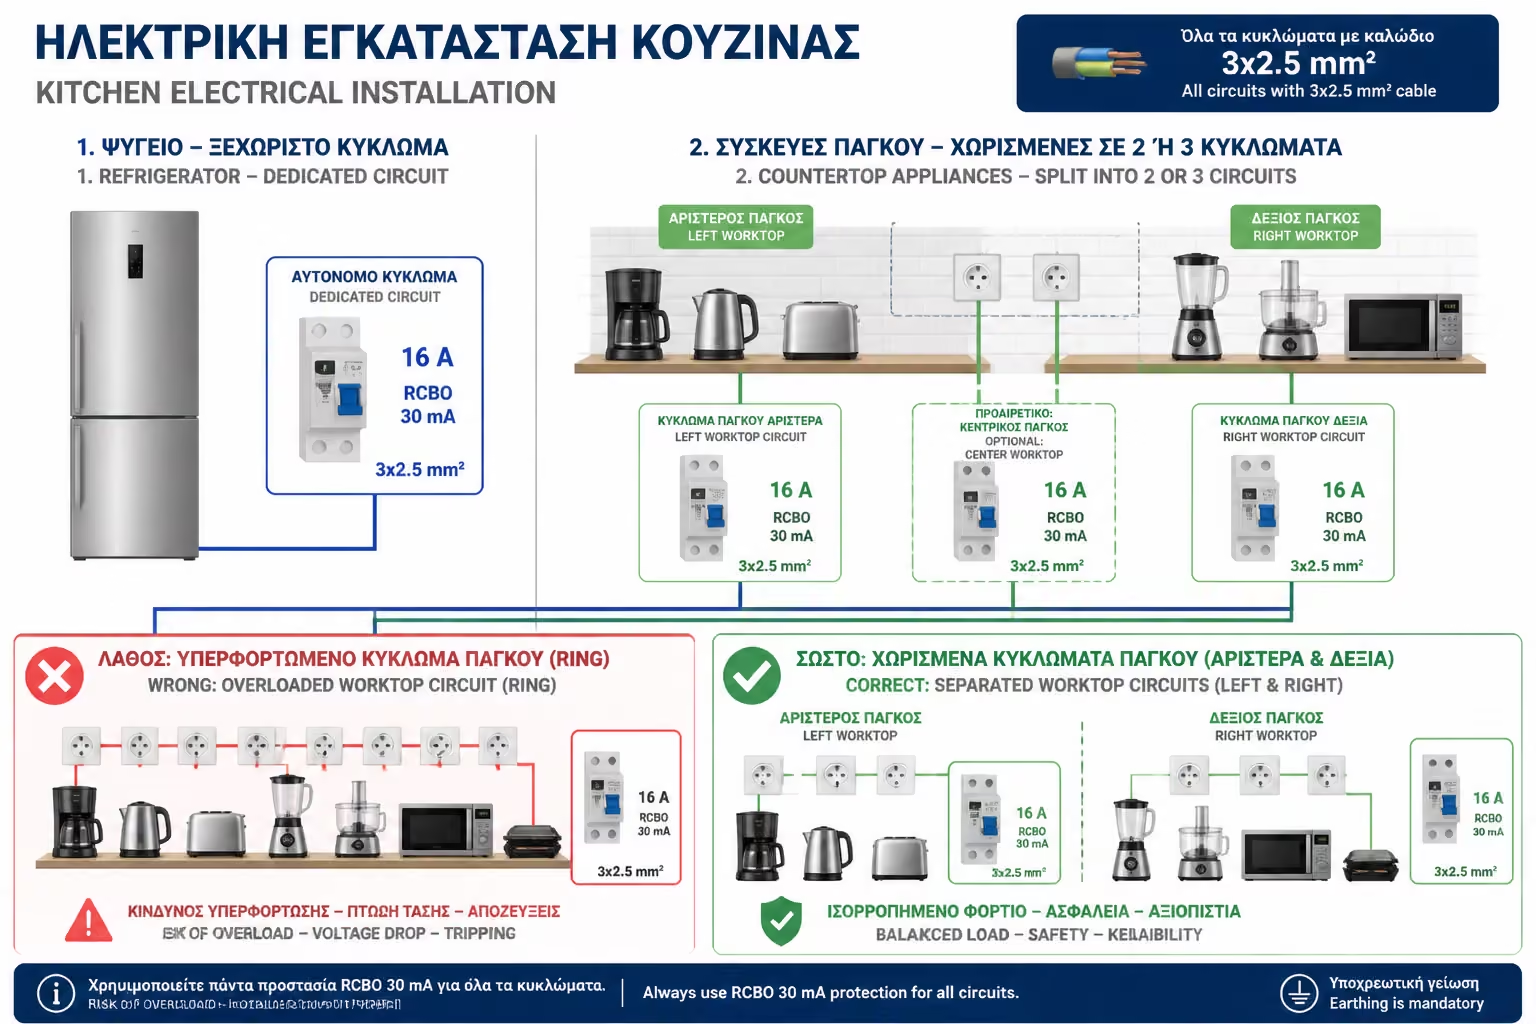
Although a fridge typically consumes only 150W to 400W, best practice is to keep it on its own circuit so it can remain live when other circuits are isolated and so it does not lose power because of another appliance fault. It is a small design upgrade that protects food, time and peace of mind when the house is unattended.
The common mistake is installing many countertop outlets but feeding them all from one 16A circuit. Once a kettle, coffee machine, Air Fryer and mixer overlap, the limit is exceeded. A proper design uses at least two, and often three, separate 3x2.5 mm² / 16A countertop circuits. That lets the loads be split across different parts of the worktop instead of relying on one fragile line.
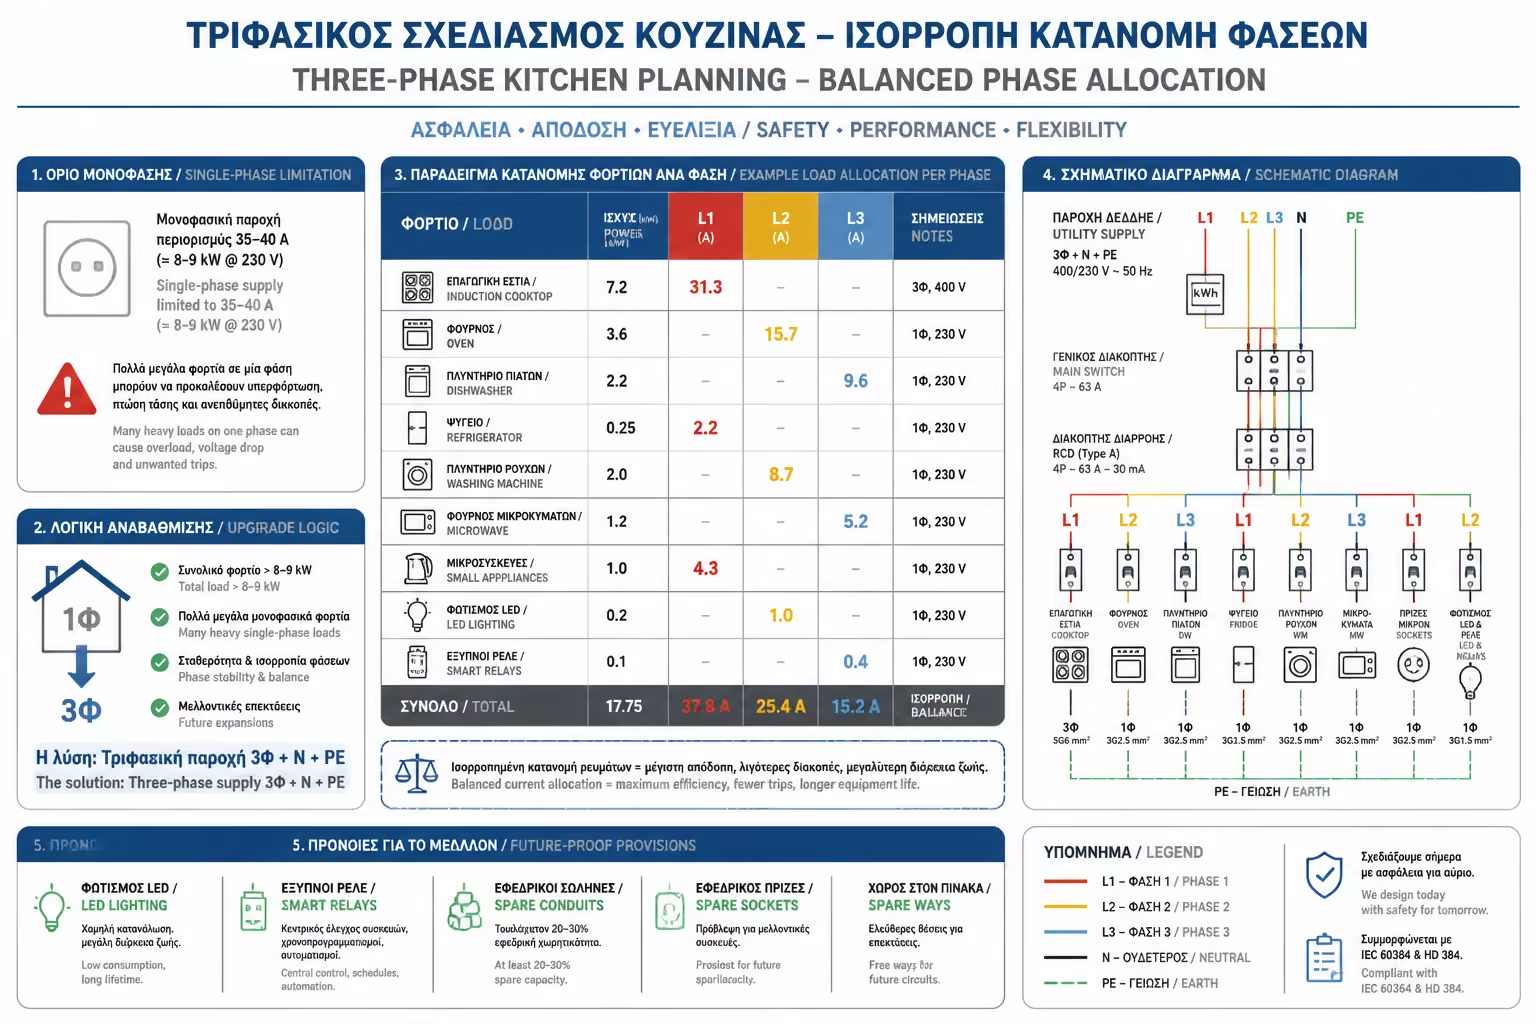
In many older Greek flats, the incoming single-phase supply is limited to 35A or 40A. If the kitchen alone draws around 25A, there is very little left for lighting, entertainment or air-conditioning elsewhere in the home.
That is why some upgrades that initially look excessive are actually logical: the modern appliance mix in a renovated home is far more demanding than the original supply design from decades ago ever anticipated.
In major renovations with many modern appliances, the electrician often recommends a three-phase upgrade so the home can operate comfortably without overstressing the incoming supply.
Phase L1 may carry the oven and lighting, L2 the dishwasher, fridge and living-room A/C, and L3 the water heater plus countertop outlets. That distribution helps the installation stay balanced instead of overloading a single phase.
A properly designed kitchen is built not only for today’s appliances but also for what will likely be added later, so the space does not need to be opened up again.
It needs a high-level power point that can be supplied from the lighting circuit or, even better, from a dedicated outlet circuit depending on the final equipment arrangement.
Ask for power provisions below the wall cabinets. LED strip lighting over the worktop is no longer a luxury but a basic functional requirement.
Leave deep switch boxes so they can later accept smart relays such as Shelly modules for remote control and automation of kitchen equipment.
If there is any chance of adding a second oven, a wine cooler or extra island sockets later, it is worth installing spare conduits and reserve cabling now. The cost during construction is small compared with reopening a finished kitchen later.
⚠️ After the kitchen, the next critical space is the bathroom, where heavy electrical requirements meet the most dangerous domestic element of all: water.
Return to category.
Go to categoryReturn to the central guide.
Go to guide