🎛️ Lighting switches
They are usually placed at 1.05m to 1.10m above floor level so the light can be operated with a natural hand movement. They should also sit 15cm to 20cm away from the door frame and always on the opening side of the door.
Nearly everyone has moved into a new home only to discover that the only outlet in the room is hidden behind the headboard, or that the bathroom light switch disappears behind the open door.
These irritating problems are not bad luck but bad ergonomic planning, because the placement of electrical points is a matter of function and safety, not just visual symmetry on a wall.
Before going room by room, there is a baseline rule followed by Greek installers in entrance areas and corridors. Every dimension is measured from the finished floor level, meaning after tiles or timber flooring are installed.
That detail matters, because if measurements are taken from the structural slab or a temporary site level, the final installed heights can shift enough to make the switch feel awkwardly low or unnecessarily high once the real floor buildup is complete.
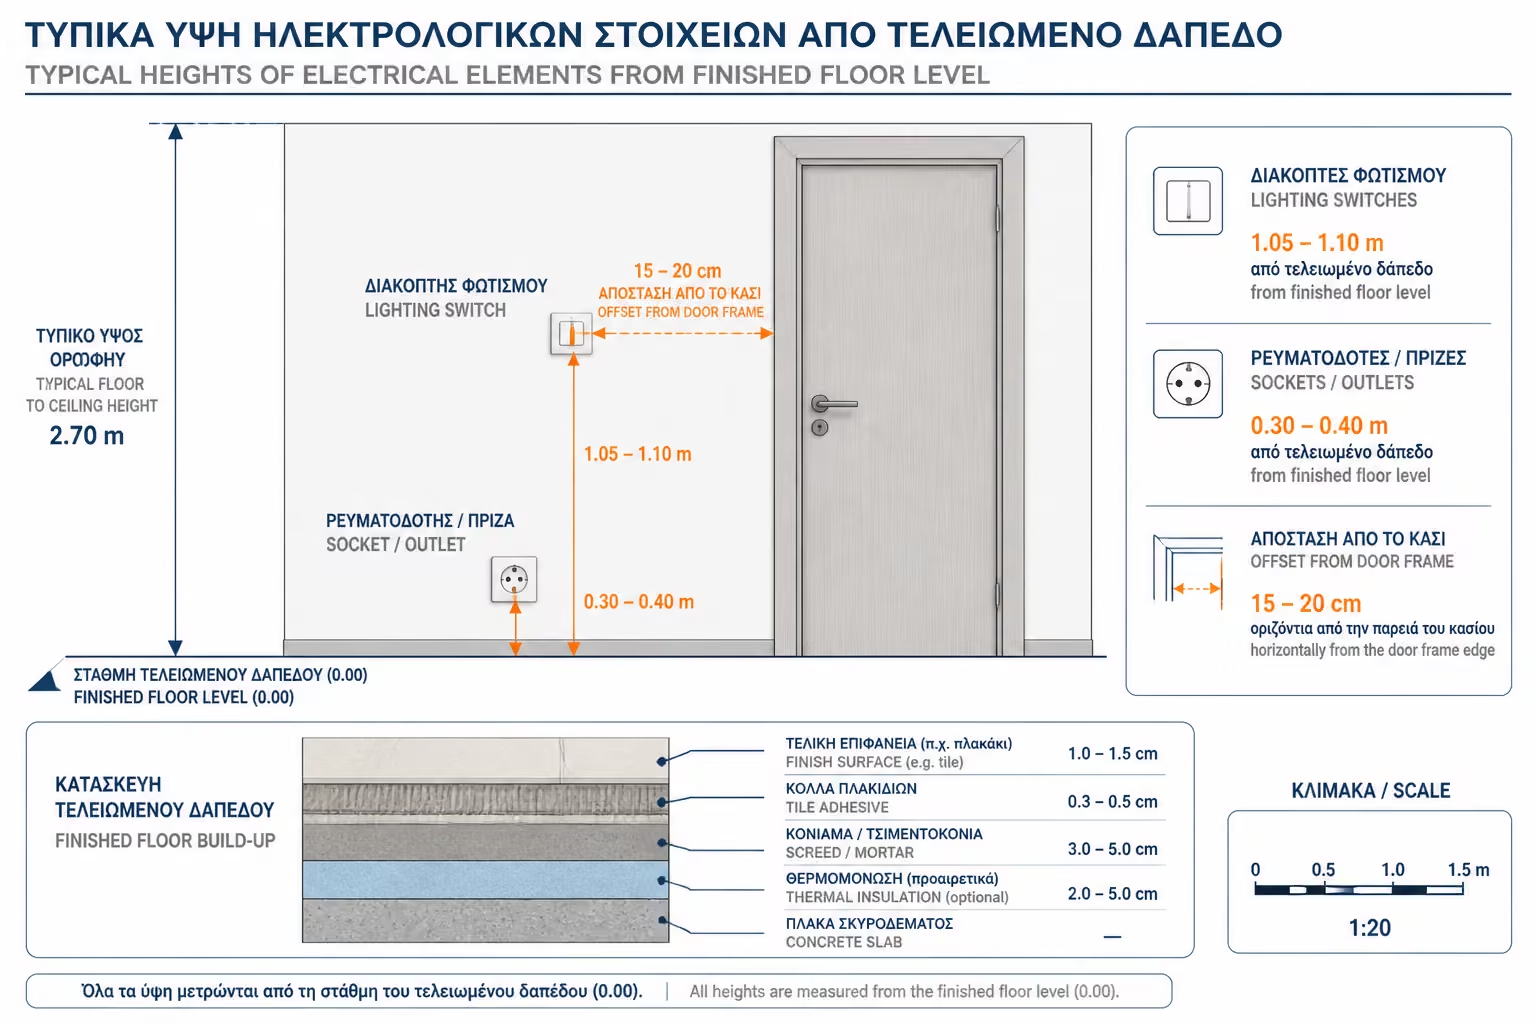
They are usually placed at 1.05m to 1.10m above floor level so the light can be operated with a natural hand movement. They should also sit 15cm to 20cm away from the door frame and always on the opening side of the door.
General-purpose outlets are usually placed low, at 0.30m to 0.40m above the floor. This keeps cables visually discreet while leaving enough room so the plug does not clash with the skirting board or cleaning tools. If they are pushed too low, every cleaning cycle or minor floor spill exposes the fitting to unnecessary moisture risk.
Every room has different priorities. A mistake in the kitchen can waste valuable worktop space, while a mistake in the bathroom can become a genuine safety issue.
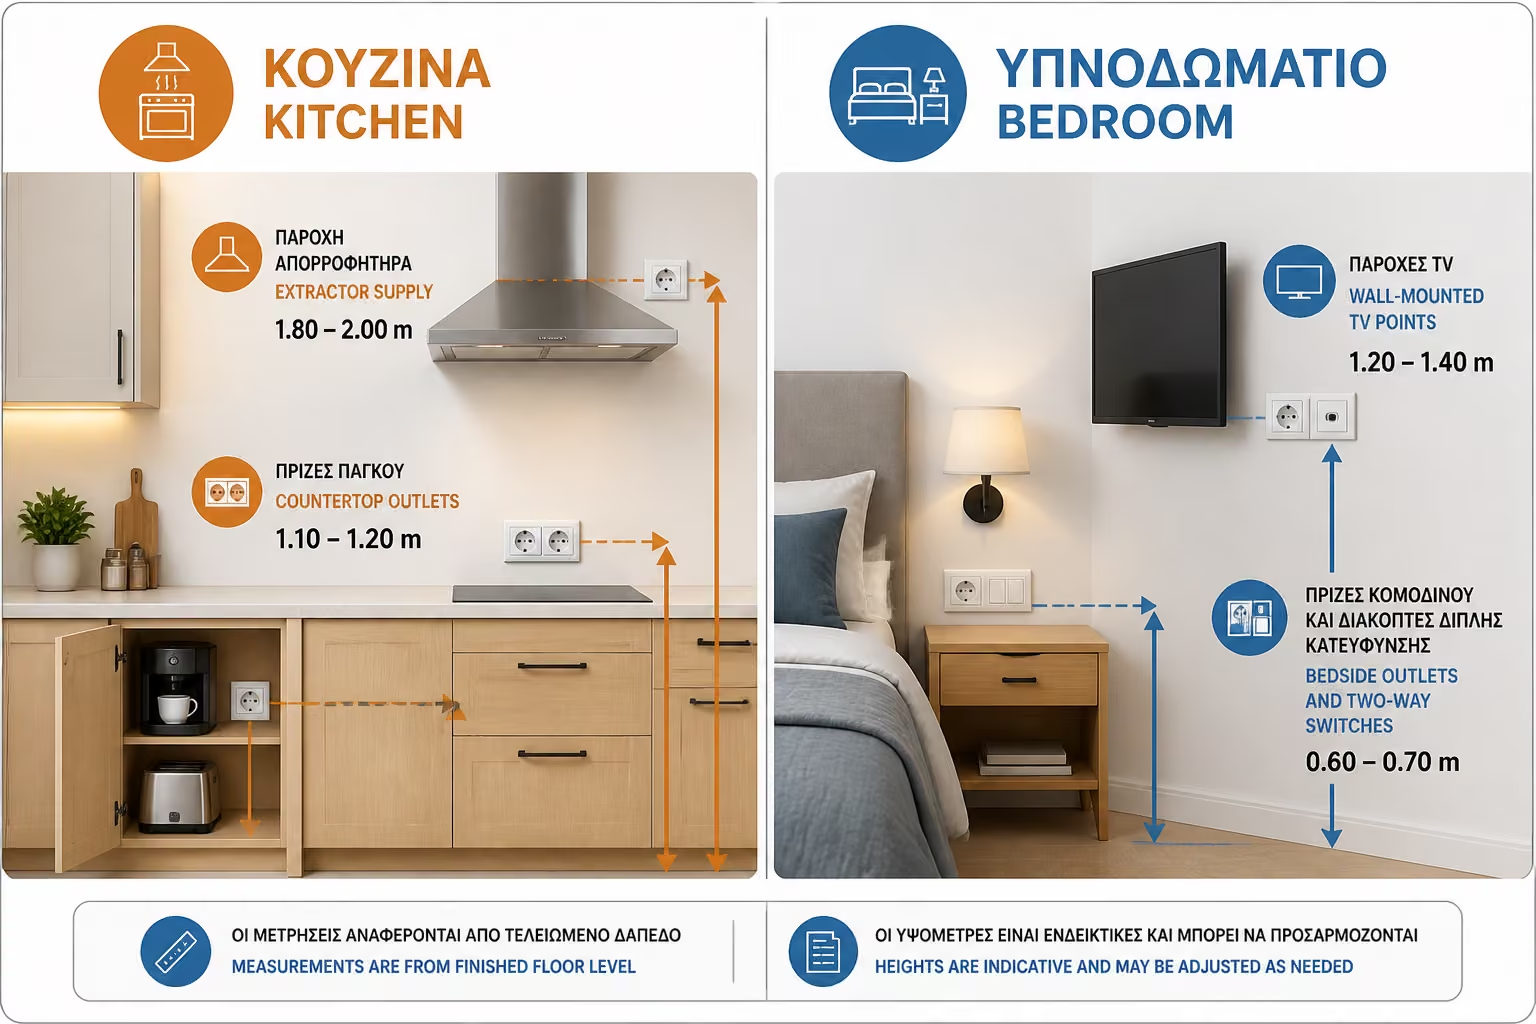
Countertop outlets for small appliances should be placed at 1.10m to 1.20m above the finished floor so they sit above the worktop upstand, which is usually around 90cm high. The extractor hood supply is left high at roughly 1.80m to 2.00m so the cable can hide inside the cabinet, while fridge and oven outlets are often better located in the adjacent unit for easier access. That avoids the common mistake of needing to drag out a heavy built-in appliance just to unplug it.
By the bedside tables, outlets and two-way switching should not stay at 30cm but rise to about 0.60m to 0.70m, directly above the bedside surface, so phones can charge easily and the main light can be controlled from bed. If the TV is wall-mounted, outlets and data points should rise to about 1.20m to 1.40m to hide the cables behind the screen instead of leaving them visible and hanging down the wall.
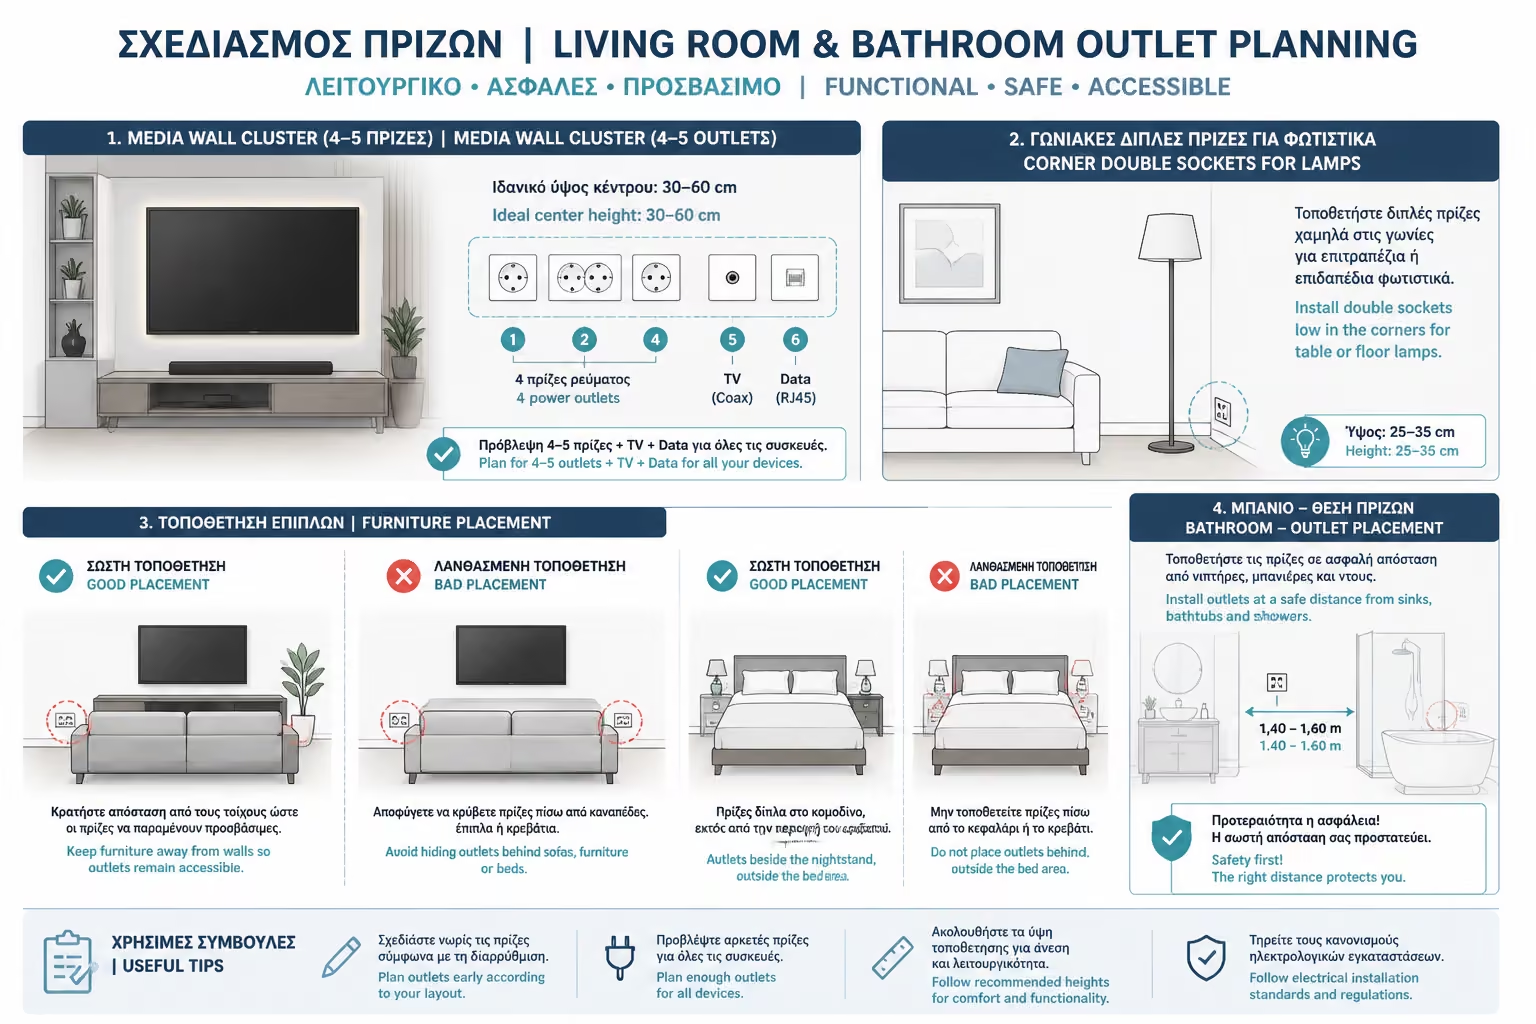
At least one double outlet low on the wall should exist in every corner for floor lamps and cleaning. If the sofa stands freely in the middle of the room, a floor box may make sense. At the media wall, a grouped set of 4-5 outlets plus TV and data points should be provided for the decoder, router and soundbar. If that concentration is not planned upfront, the usual result is extension strips, adapters and a visible cable mess behind the furniture.
The outlet for a shaver or hair dryer is placed next to the mirror, never below 1.40m and ideally around 1.50m to 1.60m, with an IP44 protective cover and safe clearance from the basin. The washing machine outlet should be beside, not behind, the appliance at around 0.80m to 1.00m, so it can be disconnected quickly if water leaks.
Ergonomics becomes even more important when a space is designed for users with reduced mobility, elderly residents or wheelchair users. In these cases the standard dimensions need deliberate adjustment.
This is not a cosmetic refinement. A fitting that feels perfectly normal to a standing user can be effectively unusable to someone seated or struggling with limited reach.
Lighting switches drop to around 0.90m to 1.00m above the floor so they remain easily reachable from a seated position.
Outlets rise to around 0.45m to 0.50m above floor level so the user does not have to bend deeply every time a device needs to be plugged in or removed. A few centimetres on paper may seem minor, but in daily use they make a major difference to autonomy and comfort.
In Greek construction with double brick walls and exposed structural beams, theoretical planning often collides with the actual geometry of the building shell. A classic mistake is insisting on visual symmetry while ignoring where furniture will really end up.
Good planning therefore starts from real use rather than abstract alignment: where the bed will sit, how doors swing, where the sofa lands and which walls must stay accessible once the home is actually furnished.
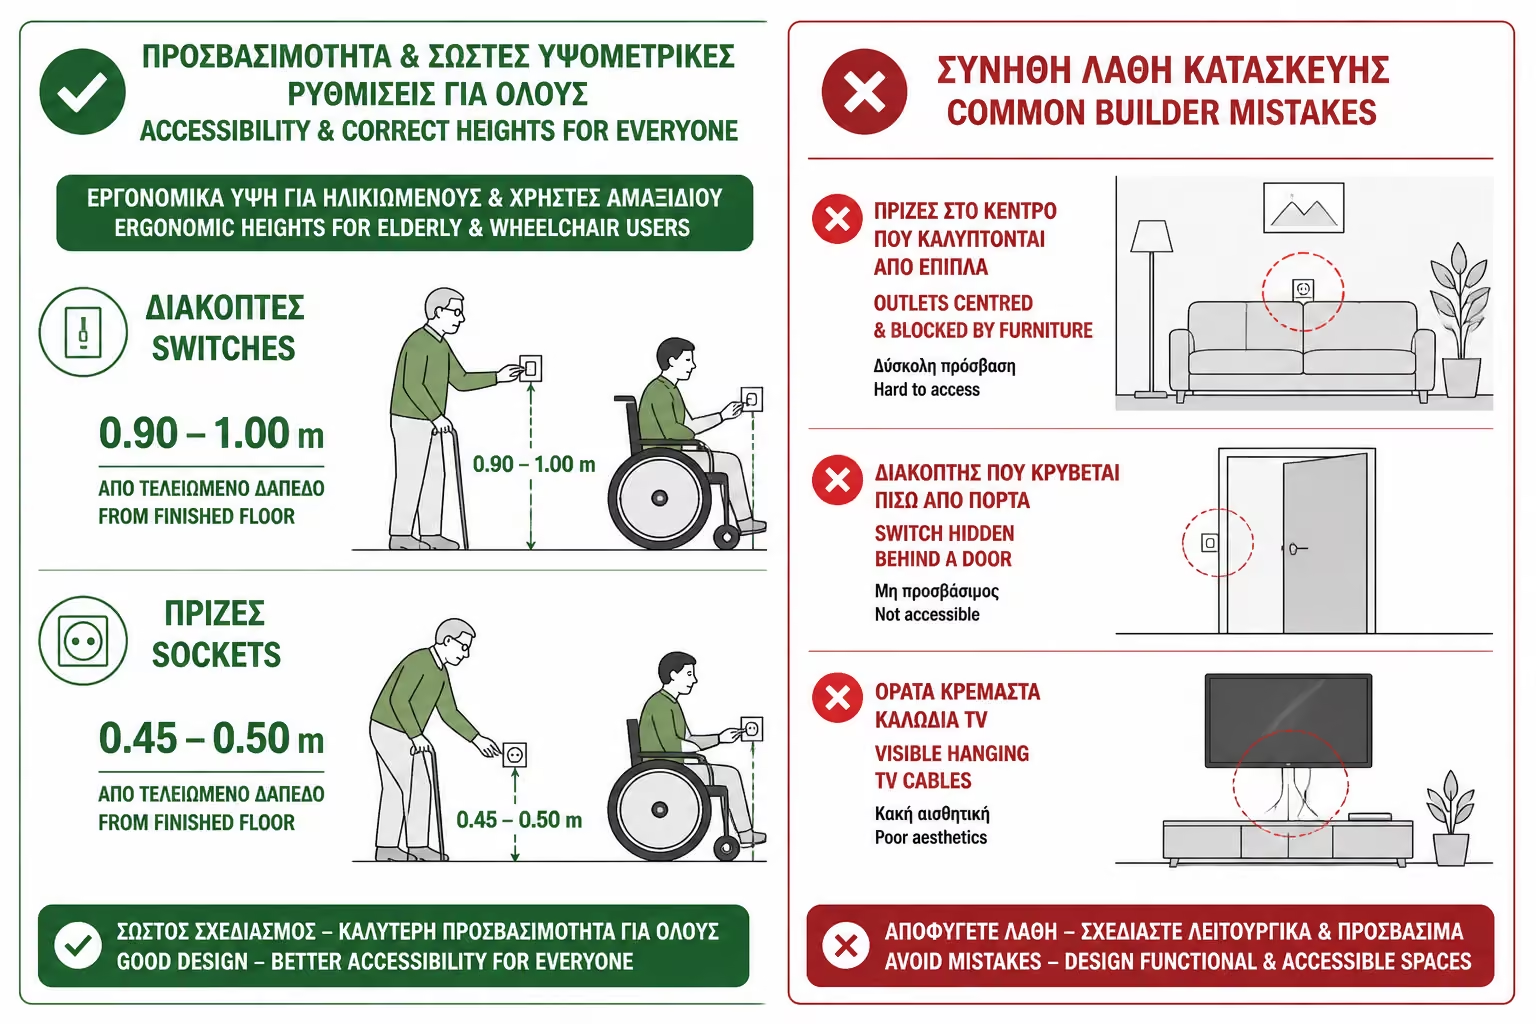
An outlet perfectly centred on a wall may look correct on paper but become useless behind a wardrobe, sofa or bed. Ergonomics should always beat abstract geometry.
Before chasing starts, mark the bed, door swings and sofa positions directly on the masonry with chalk. That simple simulation can prevent dozens of ergonomic mistakes and expensive relocations later.
💡 Once bedroom and living-room ergonomics are resolved, the next major challenge is the kitchen, where high loads, many appliances and proper circuit allocation all come together.
Return to category.
Go to categoryReturn to the central guide.
Go to guide