Where do we run cables
In all external openings. Doors, patio doors, windows, skylights.
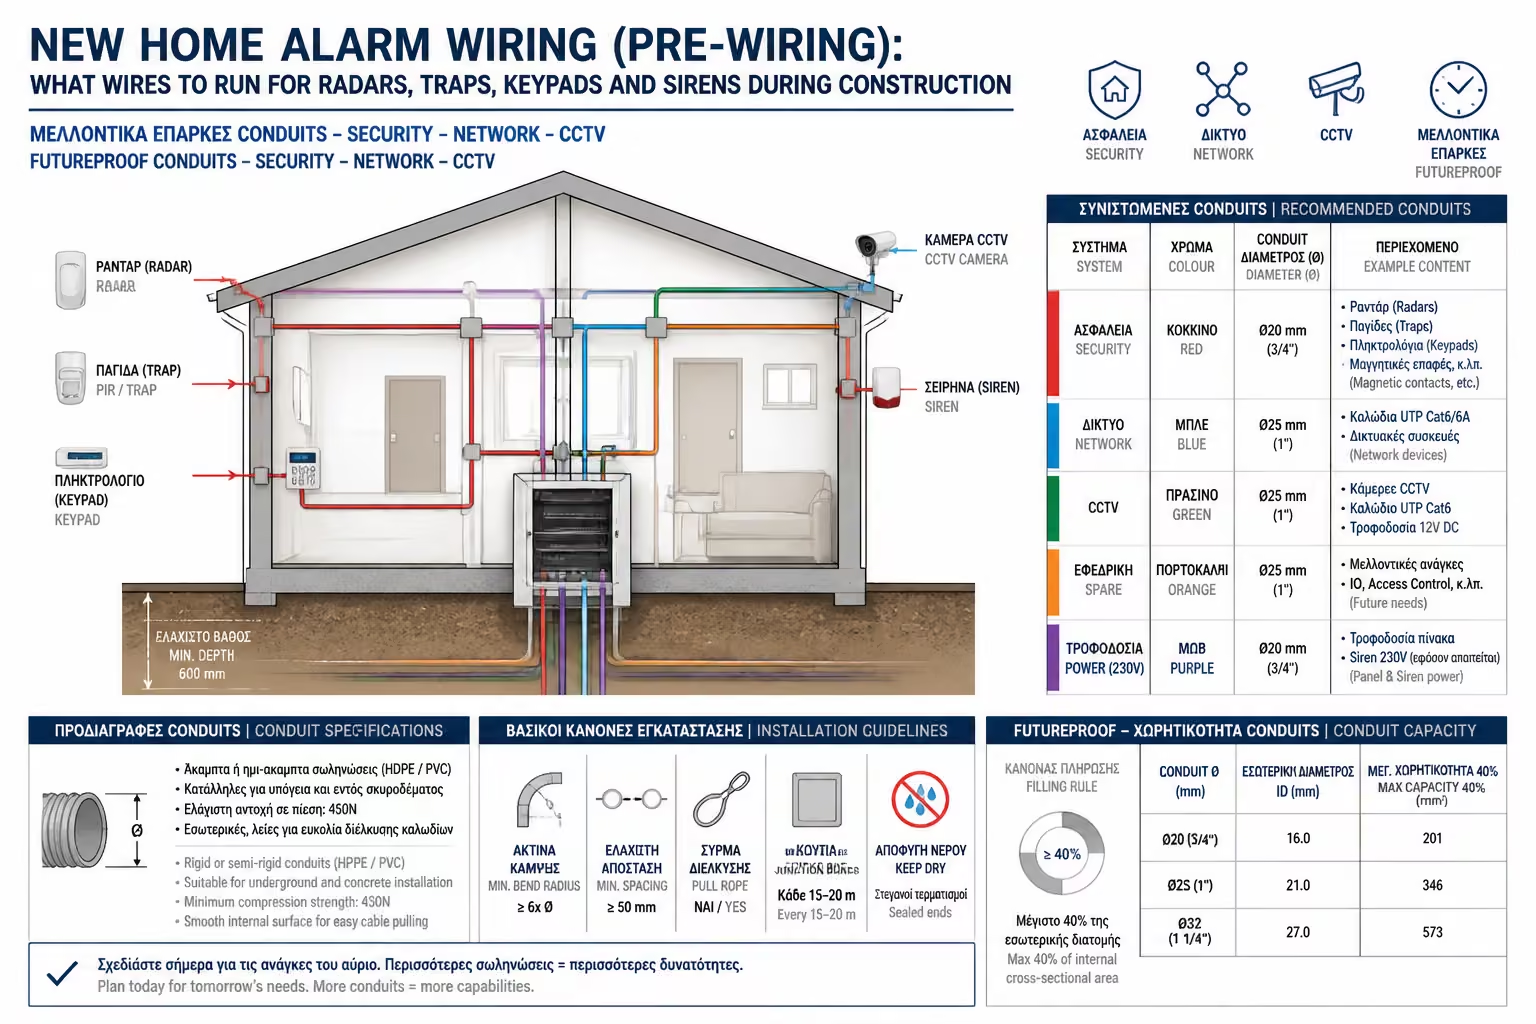
If you are in the phase of building a new home or undergoing a radical (from the ground up) renovation, you are in the most advantageous position that a homeowner can find. You have the opportunity to build your home security literally within the walls.
Today, wireless alarms are great (and we'll talk about them in detail in a later chapter). But the indisputable truth of security engineers is one thing: The wired alarm is the absolute King of Reliability. It is not affected by interference (Jamming), it never loses its signal, and most importantly? You don't need to change dozens of batteries every two years.
The secret, however, is proper planning before the plaster falls. If you forget a cable, the mistake is not corrected later. Let's take a step-by-step look at the topology of a proper alarm wiring (Pre-wiring) and the specifications you should give your electrician.
The biggest mistake we encounter is placing the alarm center next to the electrical panel or... behind the central door.
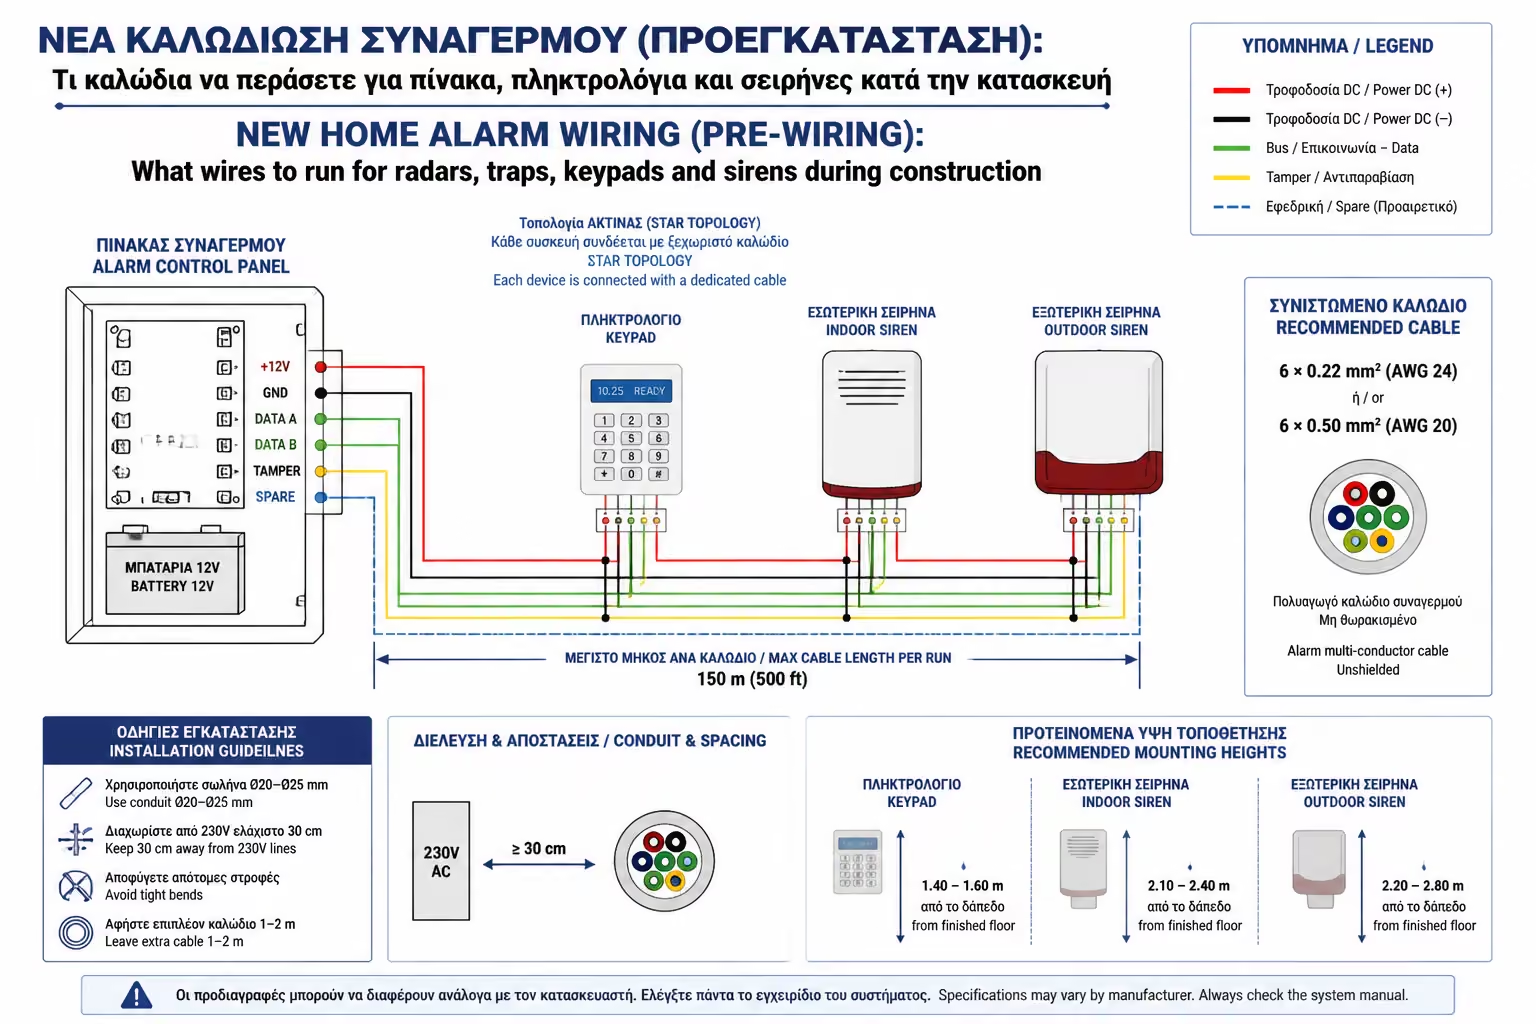
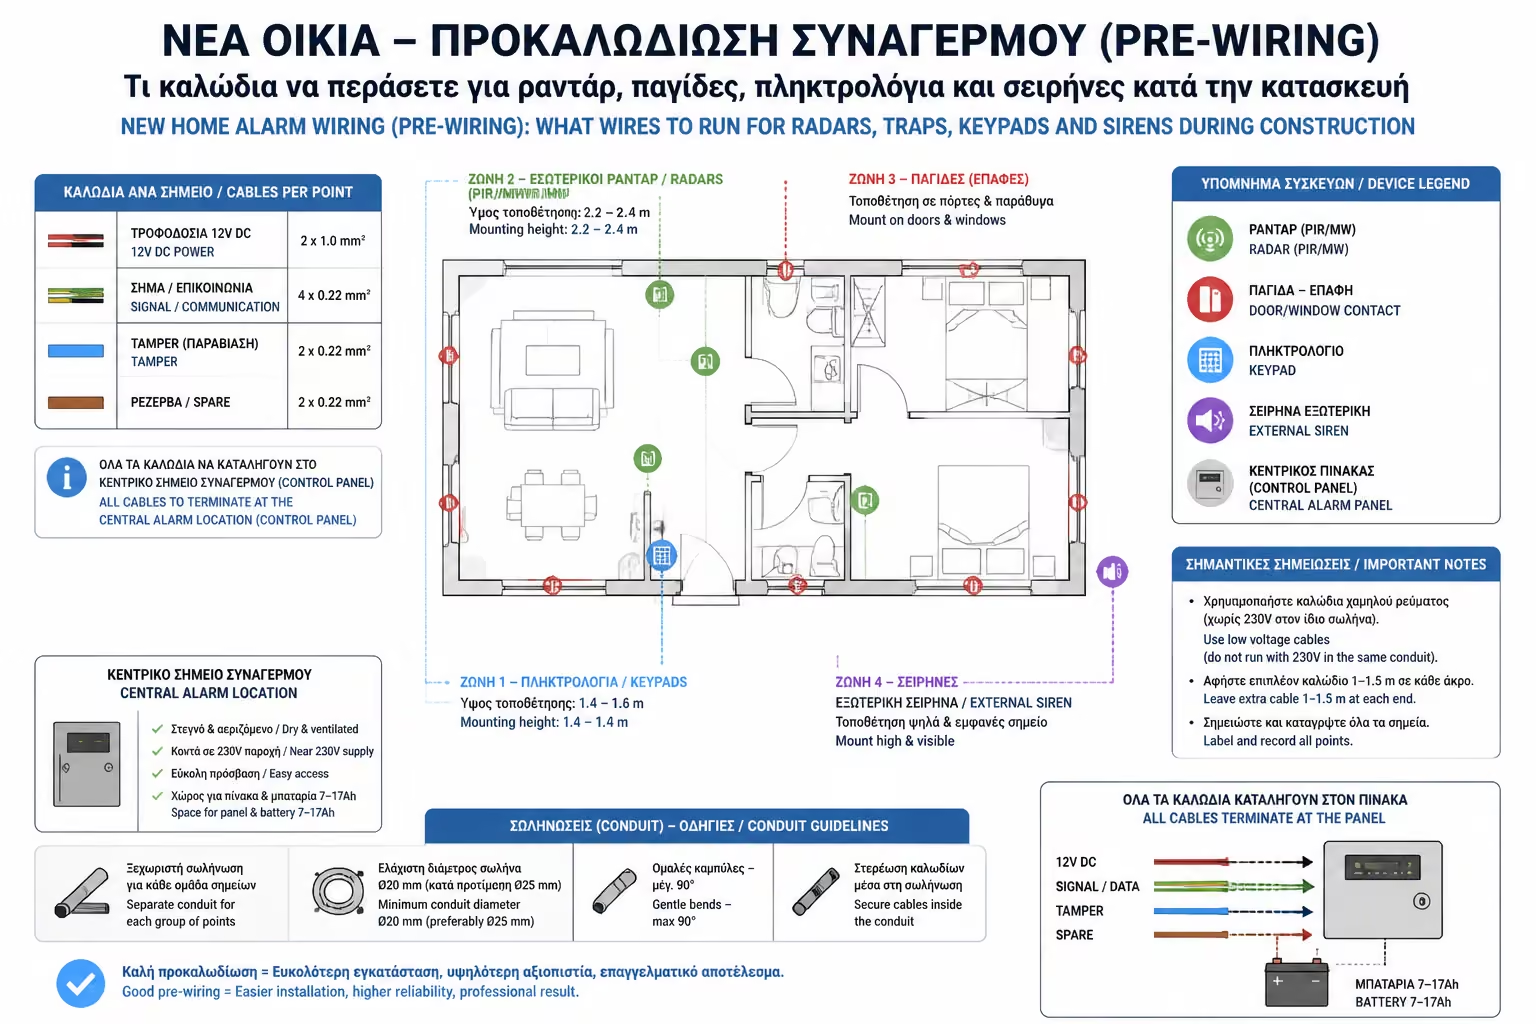
The Right Place: The metal box (the unit) of the alarm should be hidden (eg on the top shelf of a wardrobe, in an internal storage room or in the attic). The reason is obvious: We don't want the burglar to know where the brain is in order to destroy it in the first seconds. It all boils down to this: The topology is of the "Star" type. Every cable from every radar and trap in the house starts from that point and ends independently in the main box. * What cables the box needs: At the point where the center will be inserted, the electrician must bring: 1. A permanent 230V power supply. 2. A network cable (UTP) that goes to your Router (to have internet and mobile control). 3. (Optional) A telephone cable, if you intend to put a traditional line for calls to the Signal Reception Center (although it is now over IP/GPRS).
The first line of defense. The goal is to sound the alarm before the thief gets in while trying to break the frame.
(Engineer's Tip: If you have aluminum tilts or screens, have the aluminum and electrician work together before installation. There are special tilt traps that allow you to sleep with the window half open while the alarm is armed).
In all external openings. Doors, patio doors, windows, skylights.
The cable comes out of the wall and pierces the aluminum/wooden casing. Thus, the installer will put "recessed" magnetic contacts (they go inside the aluminum profile). When the patio door is closed, the cables and contacts are 100% invisible.
We use classic alarm wire, usually 4 x 0.22mm² (two for contact and two for protection/tamper).
The second line of defense. If someone breaks the glass (without opening the sash to activate the trap), the radar will pick up their movement and body heat inside the room.
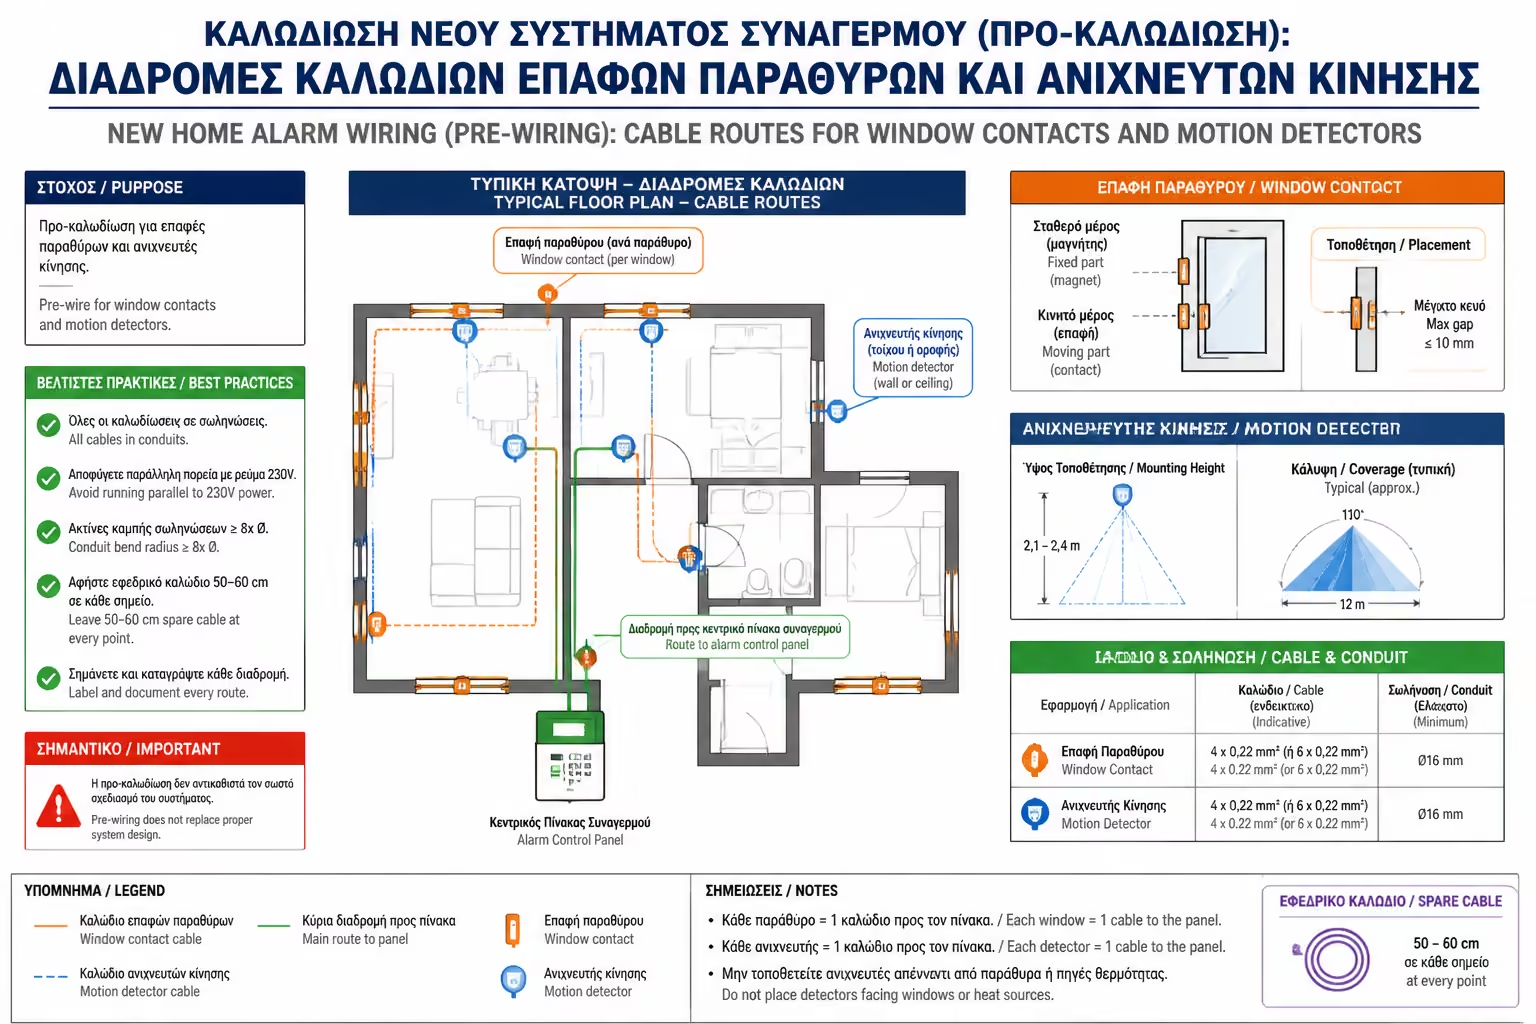
In the corners of the main rooms (Living room, corridors, Master Bedroom). The purpose is to create "traversal traps" – so that someone cannot walk from one room to another without being "seen".
Usually at 2.10m to 2.20m from the floor. We strictly avoid them looking directly at windows that are hit by the sun (risk of false alarms from reflections) or being directly above/opposite heat sources (Air Conditioners, Fireplaces, Radiators).
We usually use 6 x 0.22mm² (two for power, two for the belt, two for the tamper protection).
The keyboard is the "switch" of the system, from which you arm and disarm.
Definitely one next to the Main Entrance (Front Door), at eye/hand height (about 1.50m). Ideally, we're waiting for a second keyboard in the master bedroom. It's a huge convenience to arm the alarm for "Night Mode" (Stay Mode) next to your bed, without running to the front door in your pajamas, but also pressing the Panic button if you hear a noise.
Modern keyboards (with touch screens) require a good power supply. We use 8-core cable or better yet a UTP (Cat 6) cable so we are covered for any technology in the future.
It is placed high, in a visible part of the building. Its purpose is to "shout" to burglars that the house is protected (deterrence) and, of course, to stir up the neighborhood if it is broken into. It gets to a point where someone with a simple stool can't reach it to spray it with foam.
The most "satanic" weapon. A small siren hidden inside the house (usually high up in a hallway). Its sound (over 110 dB) in a closed space is unbearable, causing pain in the ears and panic, forcing the burglar to flee immediately, without having time to search.
For the external siren, a strong cable is required, usually 6 x 0.22mm² (ideally with a larger cross-section in the power cables, e.g. 2x0.50 + 4x0.22), to "stand" the current drawn by the speaker and the beacon.
Not all alarm cables are the same. Cheap CCA (Copper Clad Aluminum) cables are available on the market. These break easily (they are hard) and oxidize over the years.
Ask your electrician for cables made of 100% Pure Copper (Pure Copper/BC) or Tinned Copper. The difference in cost for an average house is 30-50 euros, but you save yourself from "False Alarms" (False Alarms) caused by changes in cable resistance after 10 years. And most importantly: Each cable must be labelled/marked on the edge of the panel, so the installer knows which goes where.
Cable is cheap. Excavation after the house is completed is very expensive. Even if you don't have the budget to buy the main alarm equipment (the boards, the radars, the batteries) now, drop the wiring and leave it "blind" behind the plasterboards (taking pictures of exactly where they are). It is the wisest, "Future-Proof" investment you can make in your property security.
Next Step: The alarm keeps intruders out. But what about cameras that record the perimeter of your property? And there, the wiring hides its own secrets.
Moving on to the next tech guide: Wired vs. Wireless Security Cameras (PoE vs. Wi-Fi): Why professional installers prefer Power over Ethernet (PoE) and how to set up an NVR.
Return to category.
Go to categoryReturn to the central guide.
Go to guide