Phase 2 - New Plumbing & Electrical Passages: The
"Arteries" of the New Bathroom
After the old bathroom has been gutted and the space has been cleaned,
we move on to the most critical stage of the infrastructure: the
installation of the new plumbing and electrical network. These are the
"arteries" and "nervous system" of your bathroom.
If a mistake is made at this stage, correcting it after the tiles are
installed will cost thousands of euros. Here, the plumber and the
electrician must work together with surgical precision, as the
coexistence of water and electricity in a wet space requires strict
adherence to safety regulations.
1. The Hydraulic Network: Goodbye to Intermediate Unions
In the old installations, the pipes ran from one wall to the other
with continuous joints and corners (tau, muffs) hidden in the plaster.
Any such joint is a potential point of future leakage.
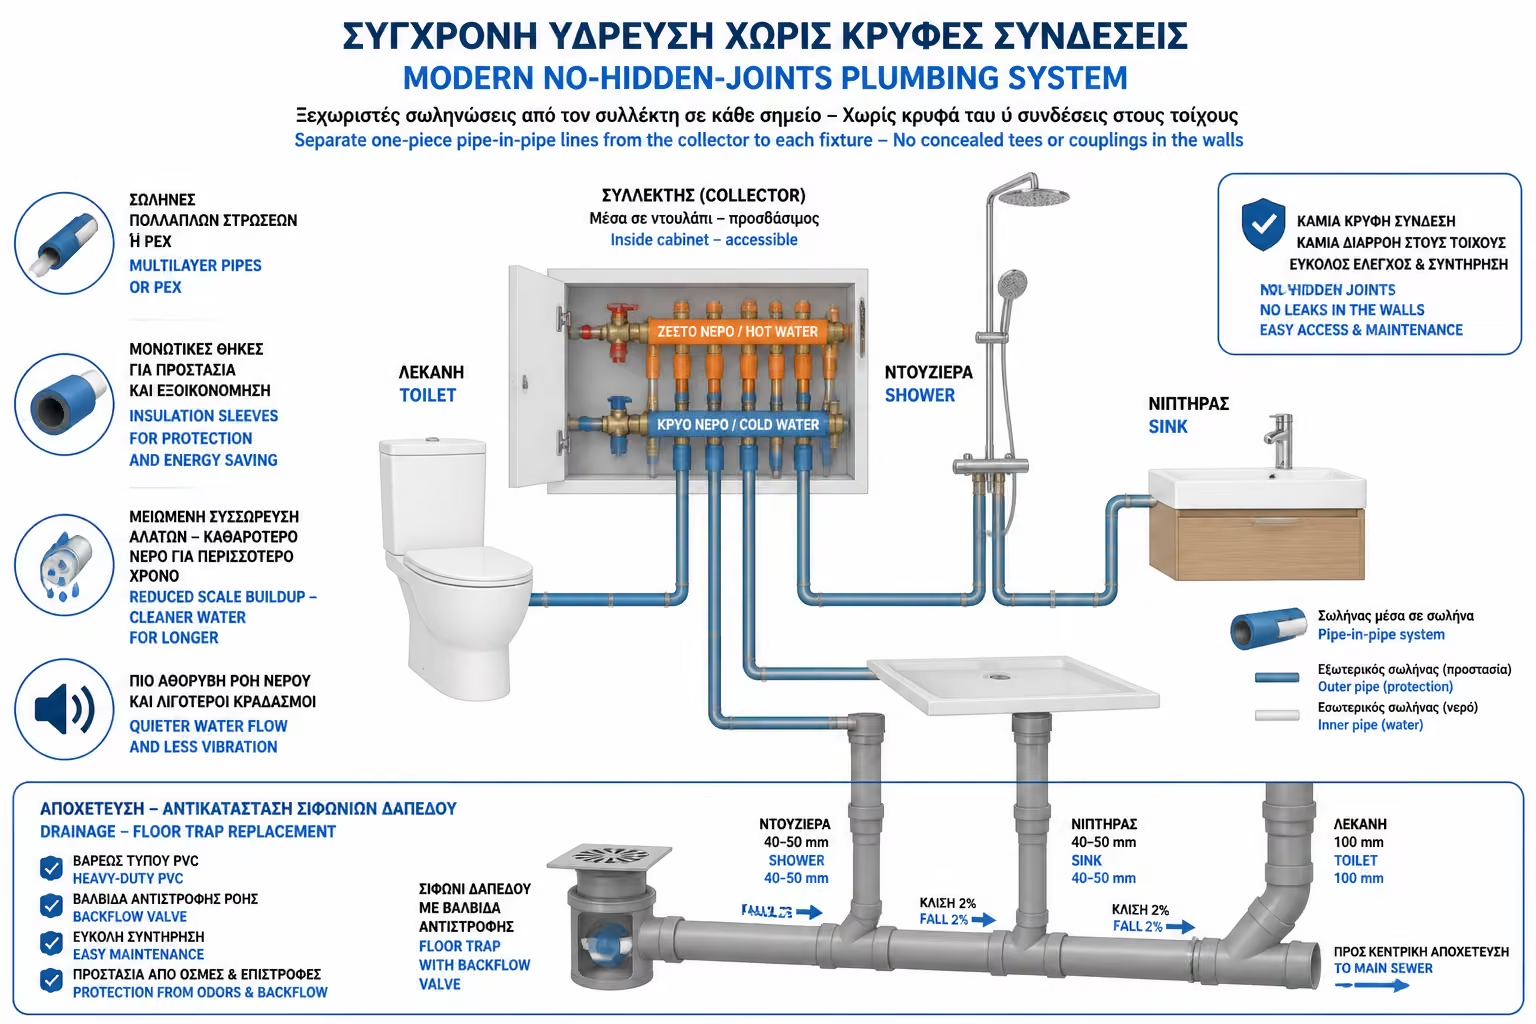
The Collector System
In the modern renovation, the installation is done by the
"pipe-in-pipe" method (pipe in a pipe) through a central
collector. The collector is placed in a hidden place (eg under the
furniture or in a special glove box) and from there a separate,
one-piece pipe starts for each device (one for the basin, one for
the shower, one for the washbasin). Thus, there is absolutely no
joint inside the walls.
The Materials
Laminated or cross-linked polyethylene (PEX) pipes with strong
insulation are used. They are resistant to high temperatures, do not
catch salts (puri) and dampen the noise from the flow of water.
The Drainage
The old lead or plastic floor drain is replaced with a new,
heavy-duty PVC one with a non-return valve (to prevent odors). The
drainage pipes of the basin (Φ100) and the sinks/showers (Φ40 or
Φ50) are installed with the correct angle of fall.
2. The Electrical Network & IP Security Zones
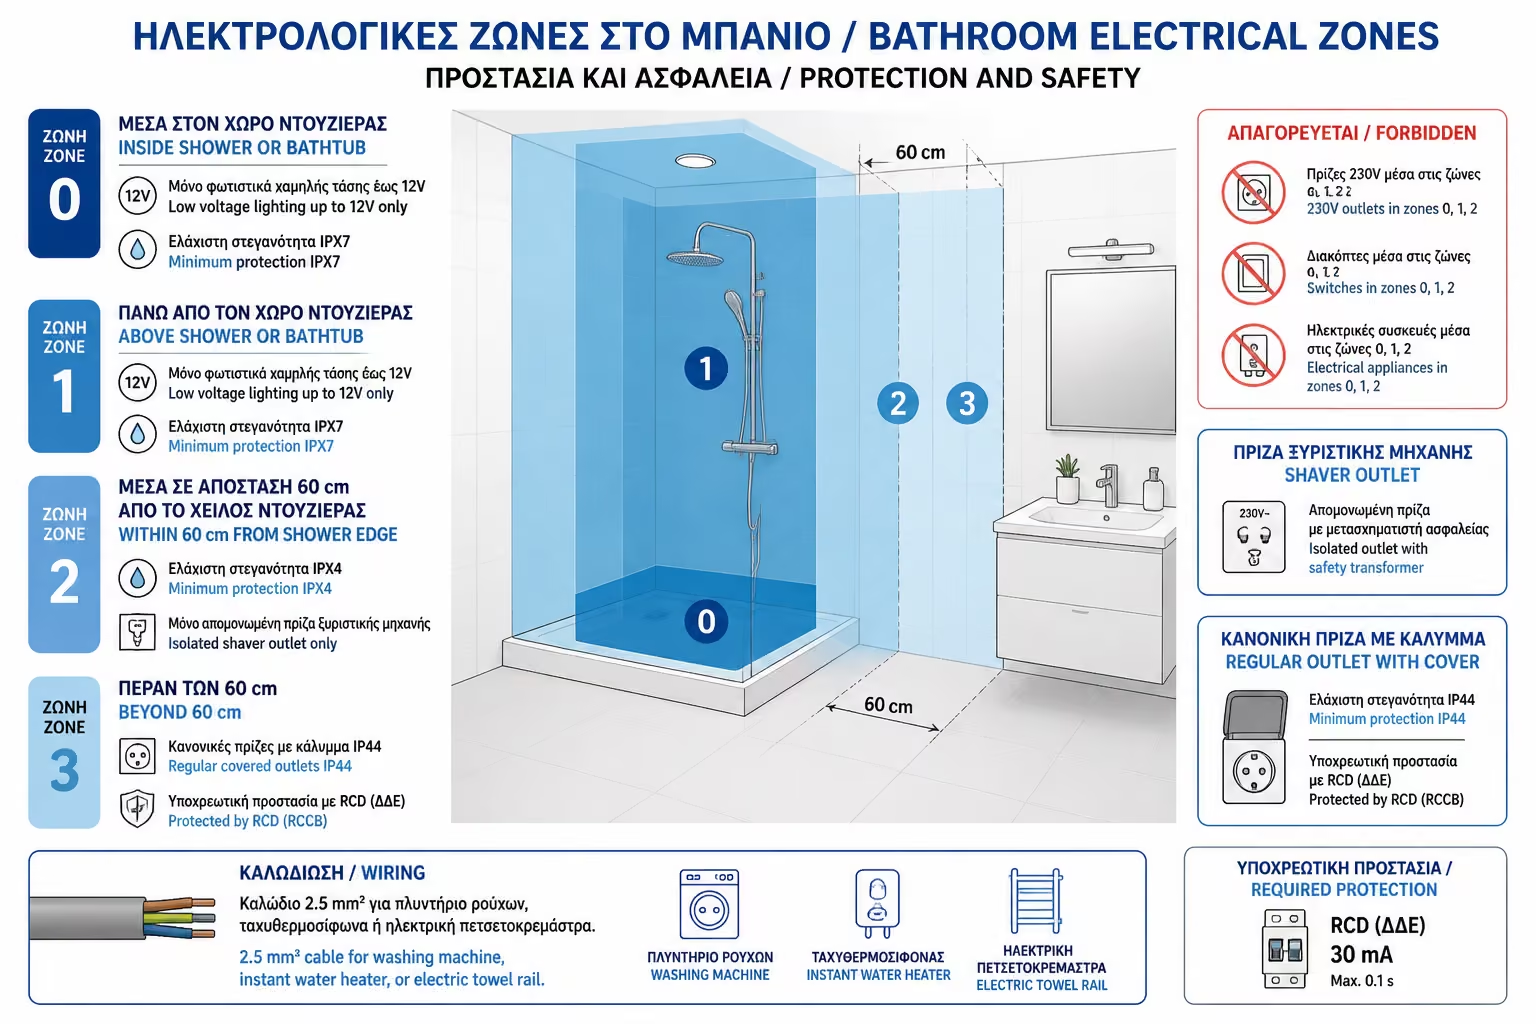
The bathroom is strictly divided into Protection Zones (Zones 0, 1, 2,
3) based on the European regulation HD 384, depending on the distance
from the water source (bathtub or shower).
At the same time, the electrician draws new, reinforced lines (2.5 mm²
cables) for the operation of the washing machine, the water heater or
the electric towel rail.
Zone 0 & 1 (Inside the shower)
Any 230V switch or socket is prohibited. Only low-voltage waterproof
lamps (up to 12V) with a waterproof index of at least IPX7 are
allowed.
Zone 2 (Up to 60 cm from the shower)
Only special lamps (IPX4) and sockets for shavers with isolation
transformer are allowed.
Zone 3 (Beyond 60cm)
Normal sockets can be placed here (e.g. for a hair dryer or washing
machine), but they must be sealed with a cover (IP44) and covered by
the general Safety Relay (SSR) of the electrical panel.
3. "The Golden Test": Pressing Under Pressure
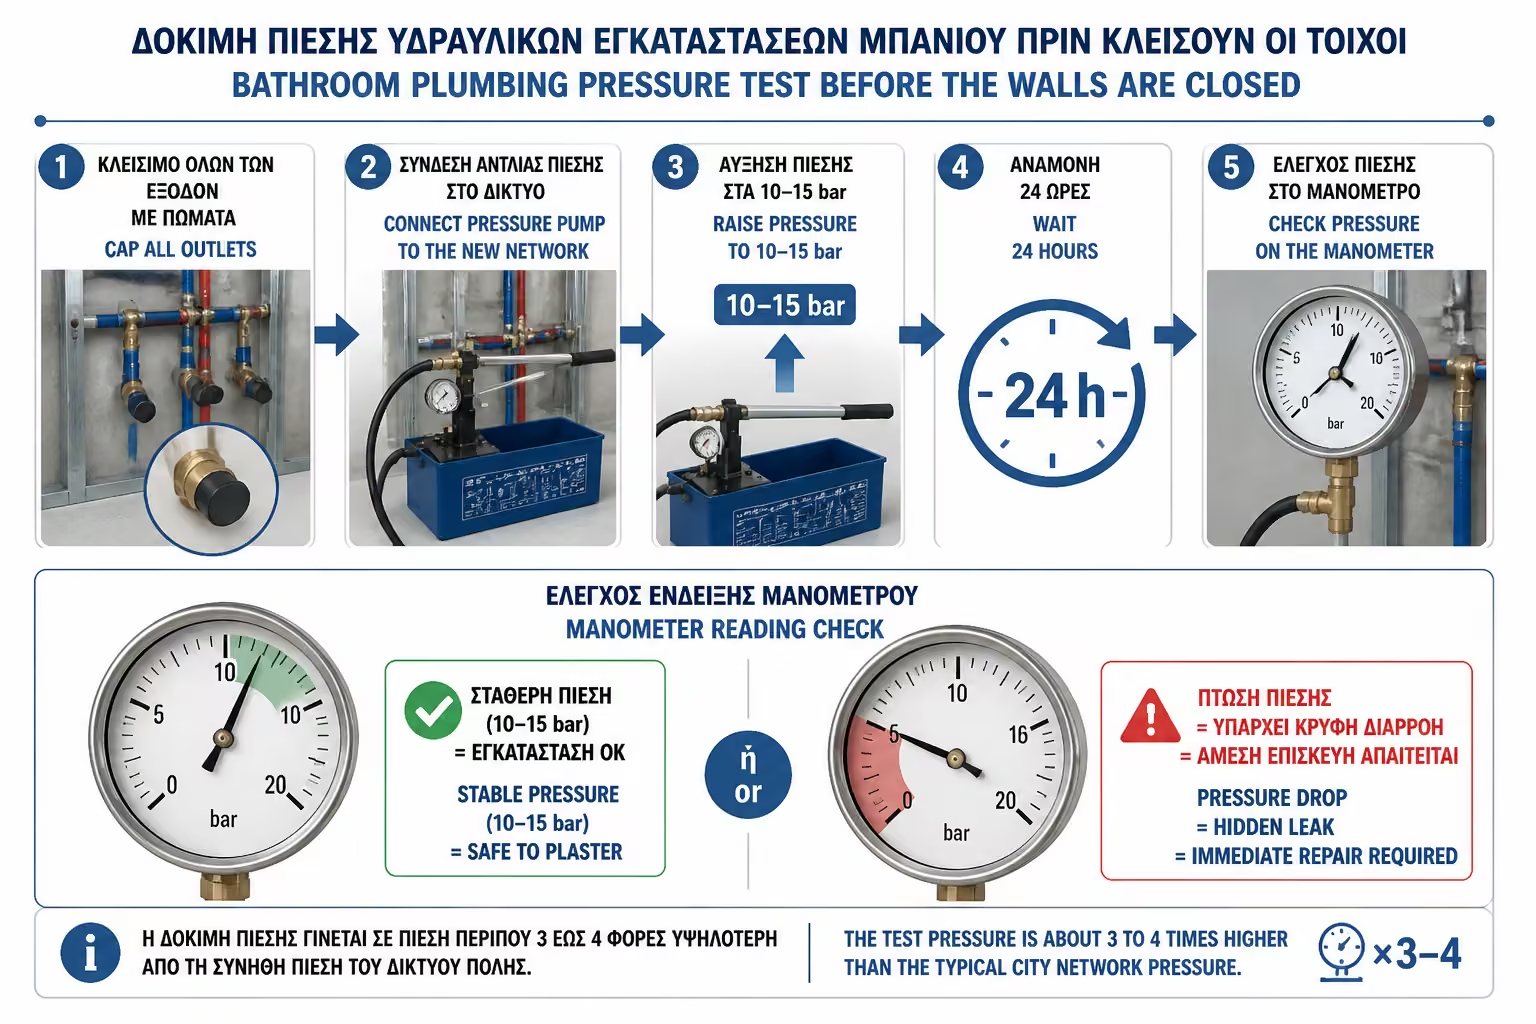
This is the most critical step of Phase 2. Once the plumber has
completed the connections, he is not allowed to close the walls.
Places special plugs on all waits and connects a manual or electric
pressure pump (press). It fills the network with water and raises the
pressure to 10 to 15 bar (about 3-4 times higher than the normal
pressure of the city network).
The installation is left under this pressure for at least 24 hours. If
the manometer (the pressure indicator) does not drop at all, it means
that the network is 100% watertight and safe to cover with plaster.
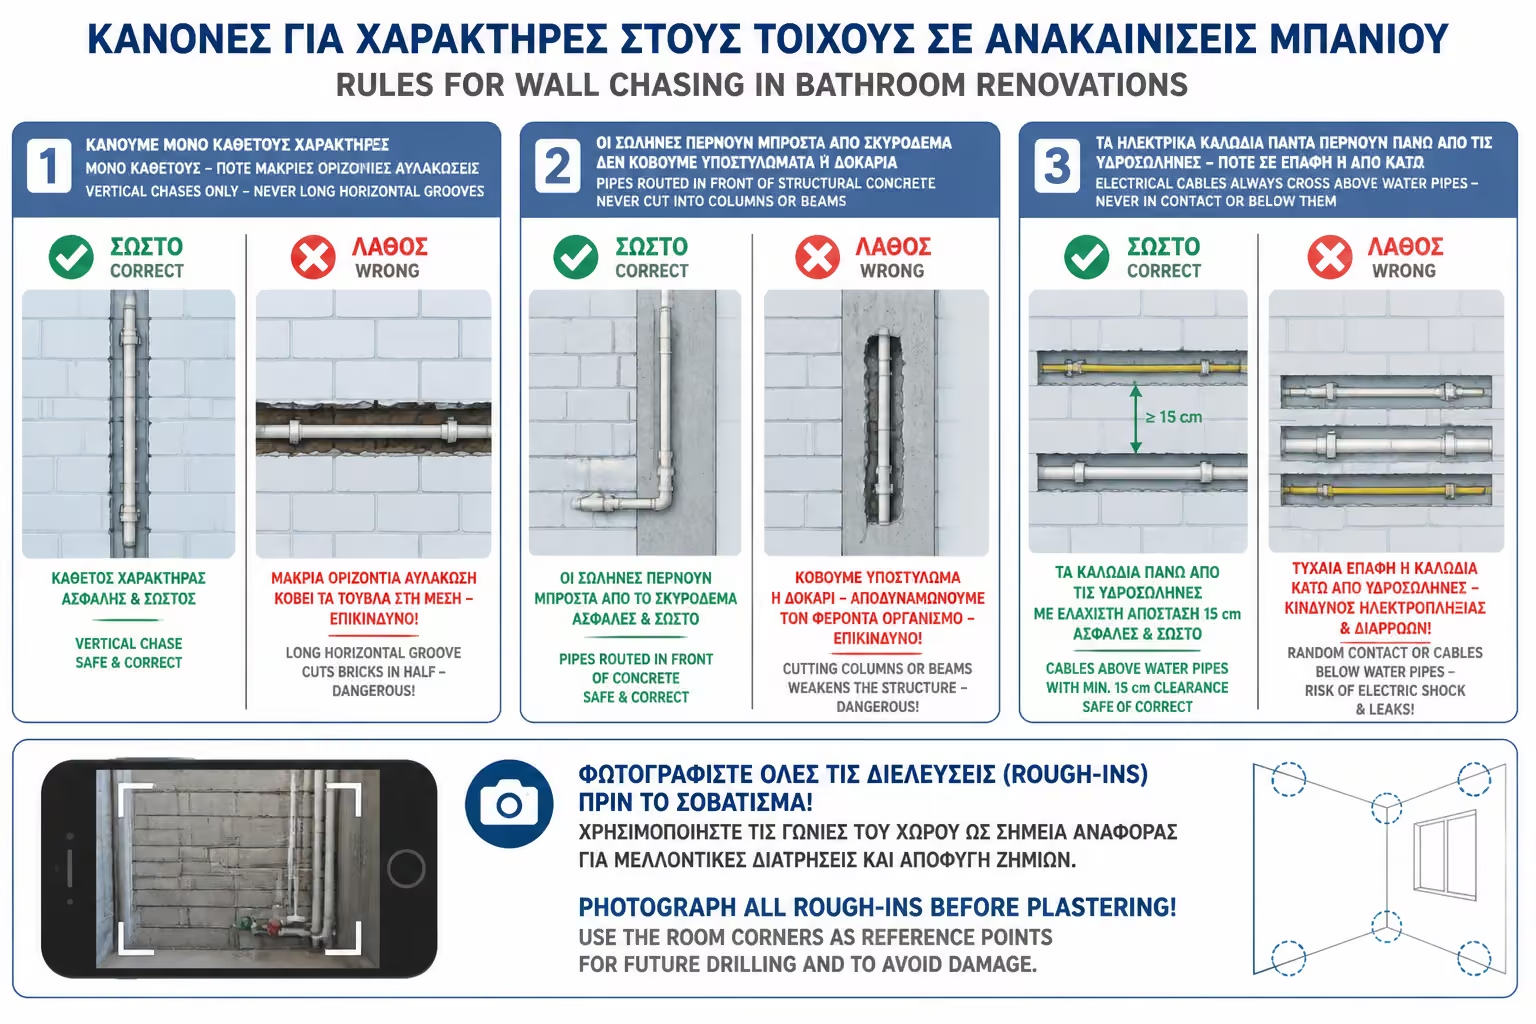
Chasing Rules Summary
Technical Rule
Correct Practice
Malpractice (Dangerous)
Digging Direction
Strictly vertical (vertical) routes.
Long horizontal grooves that "cut" the bricks in
half.
Concrete Elements (Feron Agency)
Passage of pipes in front of the concrete (with subsequent
plastering or plasterboard).
Digging into columns or beams and cutting rebar.
Intersection of Pipes/Cables
The cables always go above the water pipes (never below, in
case of leakage).
Random crossing and contact of bare tubes with cable spirals.
> ⚠️ The Engineer's Tip: Once the plumbing and electrical lines are
complete and before the plasterer arrives, take detailed photos and
videos with your phone. Keep the corners of the walls as a reference
point. In 3 years, when you want to drill a hole in the wall to hang a
mirror, toilet paper holder, or shelf, you'll open the photos and know
exactly where a pipe or cable goes so you don't drill them.
In the next article we move on to Phase 3 - Masonry Repair &
Plastering. We will see how they properly close the channels that have
been opened and why the absolute "levelling" of the walls is
the only way to avoid problems with the slab later on.