Inside the structure
Very often the leak is hidden:
- inside a wall,
- under tiles,
- under the floor,
- inside plasterboard,
- behind bathroom furniture,
- behind a concealed mixer.
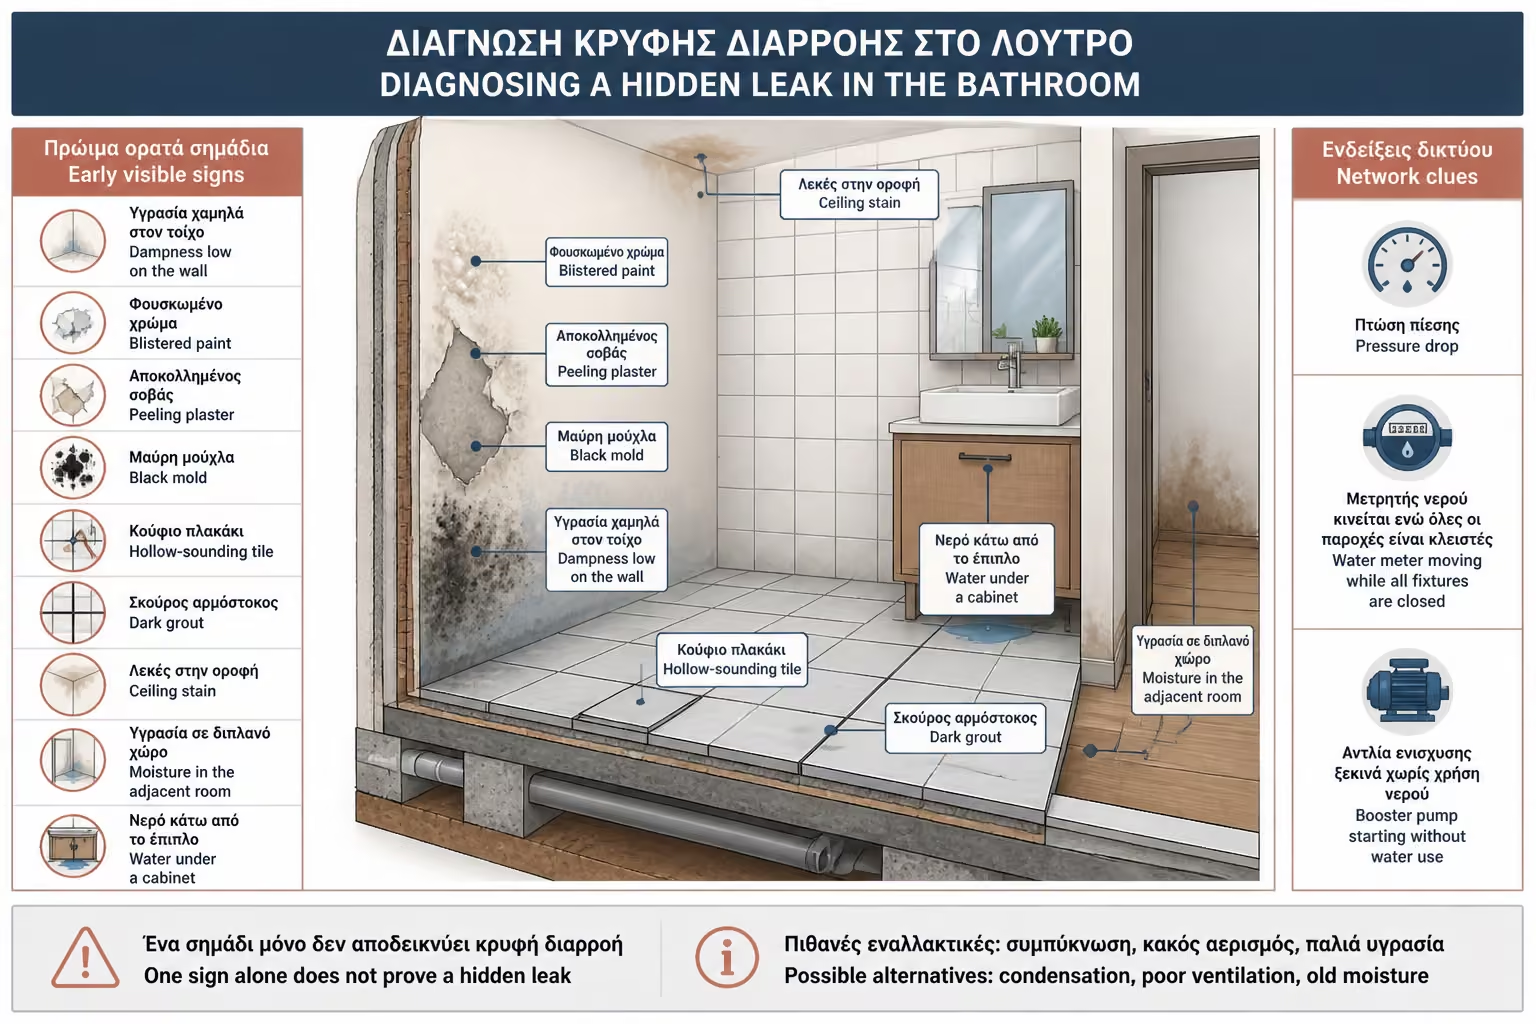
A hidden leak is one of the most stressful problems in a home. You don't see water running, but you do see signs: peeling paint, moisture on the wall, blackened joints, mold, a stain on the downstairs ceiling, or an unexplained increase in your water bill.
The owner's big worry is usually one: "Should we tear the whole bathroom apart to find where it's leaking?"
Today, in most cases, the right approach is not to start digging blindly. There are detection methods that can significantly narrow down the problem area before any opening is made.
With thermal imaging, moisture meters, acoustic systems, pressure testing, and proper technical diagnosis, we can often identify whether the leak is coming from a water pipe, a drain, a trap, a joint, the shower zone, or the waterproofing layer.
The goal is not always to not break anything. The goal is not to break unnecessarily. In other words, to perform the most targeted intervention possible.
A hidden leak is a leak that is not immediately visible at the point where it occurs.
In practice, it is usually found in locations such as:
Very often the leak is hidden:
It may also be located:
The water may appear in a different place than where the actual damage is. For example, the leak may be in the shower, but the moisture appears in the next room or in the ceiling of the lower apartment.
That's why we shouldn't just break where the stain is visible. Where the water is coming from must first be diagnosed.
A hidden leak rarely begins with something dramatic. It usually starts with small signs that seem unrelated at first.
One sign on its own does not always prove there is a leak. It may be condensation, poor ventilation, or old dampness. But when the signs persist or grow, the system needs checking.
The most common early warning signs are the following:
Moisture appears low on the wall or close to the floor line.
The paint lifts, bubbles, or starts losing adhesion.
Plaster begins to break down or detach for no obvious reason.
Dark marks appear and keep returning even after cleaning.
Some tiles sound hollow when lightly tapped.
Grout lines keep darkening again and again.
The room has a persistent smell of dampness or mold.
A stain appears on a ceiling or wall without a clear cause.
The problem shows up in an adjacent room or on the other side of a wall.
Moisture or small amounts of water collect under cabinets or furniture.
The water supply seems to lose pressure without a clear explanation.
The water meter continues to move while all outlets are closed.
The booster system starts up even when no water is being used.
Before we talk about a broken pipe, we need to distinguish leakage from condensation.
A real leak usually persists or becomes worse when water is being used, while condensation can appear on cold surfaces even when no pipe has actually failed.
Because the two can look similar, proper diagnosis has to come before any opening work.
The basic distinction is this:
A leak means that water is coming out of a pipe, connection, drain, siphon, or poor seal.
Condensation occurs when water vapor in the air turns to moisture on a cold surface. It can happen on uninsulated cold-water pipes, cold walls, or in poorly ventilated bathrooms.
If we mistake condensation for leakage, we may accidentally break tiles. If we mistake leakage for condensation, we can let damage grow.
One of the simplest first checks is the water meter.
Turn off all taps, mixers, appliances, cisterns, and supply points. Make sure that no water is being used anywhere in the property.
Then look at the water meter.
If it keeps moving, there may be a leak in the water supply network.
If the water meter does not move, that still does not rule out every type of leak. The problem may be on the drainage side, at a trap, or in failed waterproofing.
This check mainly shows a leak in a network under pressure, i.e. water supply. It doesn't always detect drain leaks or shower seal problems because these only occur when water is used.
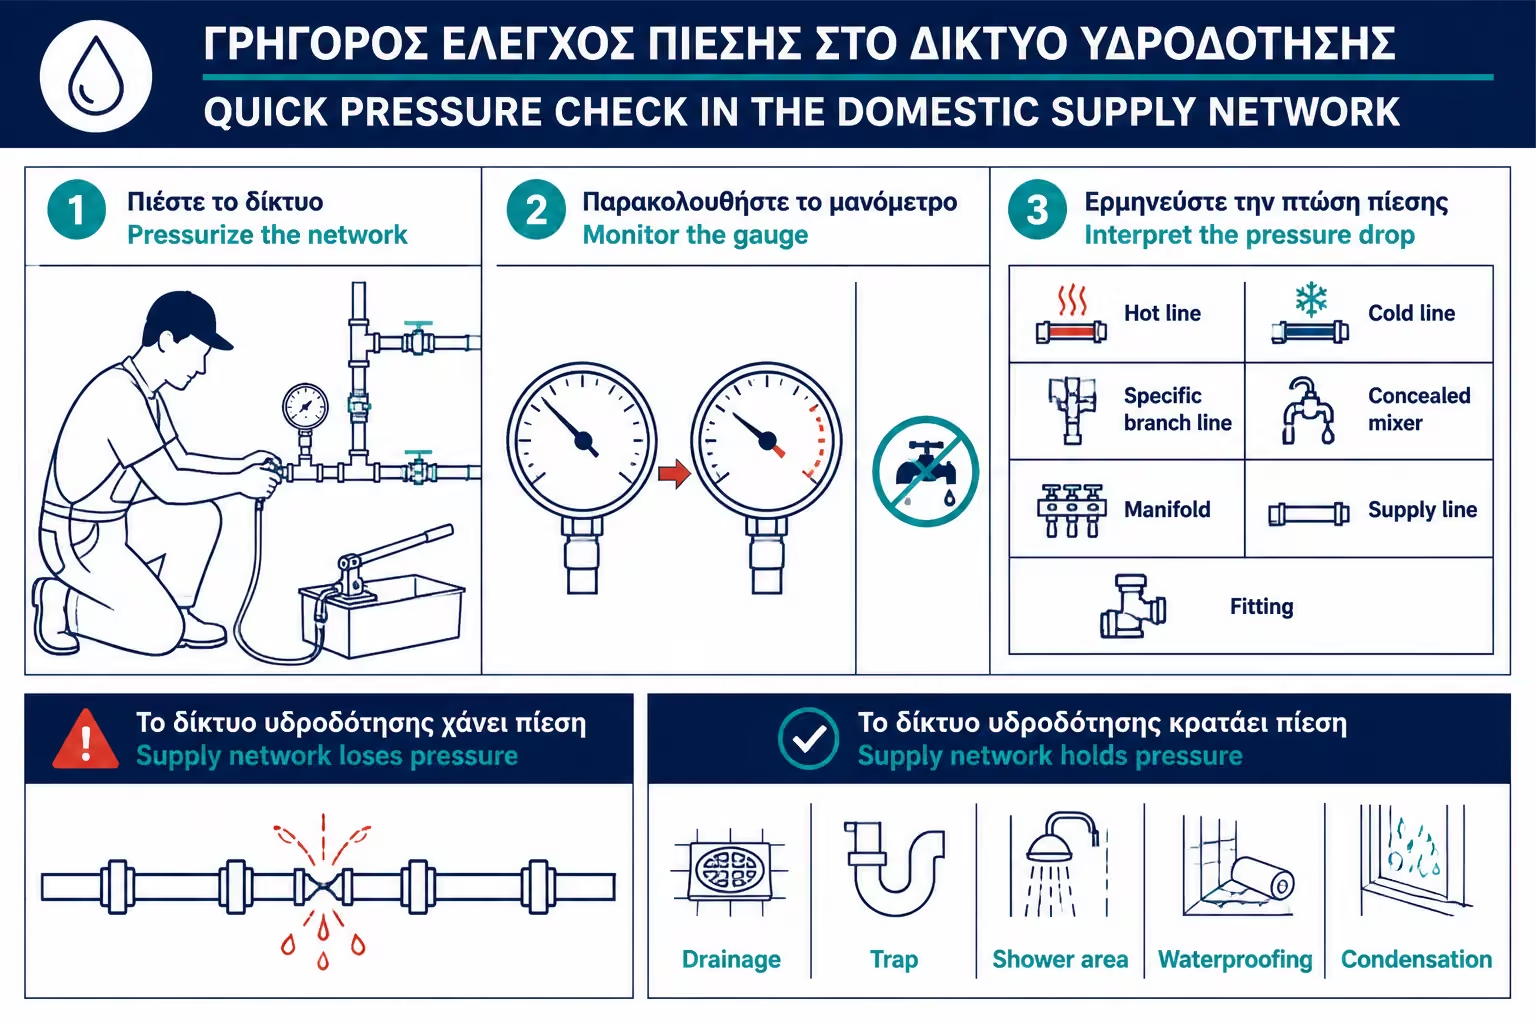
Pressure testing is one of the most basic checks for confirming whether there is a leak in the water supply network.
The plumber pressurizes the system and watches whether the pressure falls.
If the pressure drops without using water, there is an indication of a leak.
If the water supply network holds pressure, the moisture may instead be coming from a drain, a siphon, the shower area, failed waterproofing, or condensation.
This test helps narrow the possible loss down to the following points:
The loss may be on the hot-water line.
The leak may instead be on the cold-water line.
The test can isolate a particular branch or supply line.
It can indicate that the problem is linked to a concealed tap body or its connections.
The manifold and its connections can also be identified as suspect points.
A specific outlet or supply connection may be isolated without blind demolition.
Even a small connection fitting can turn out to be the real weak point.
Thermal imaging is one of the best-known detection tools, but it does not "see water" inside a wall in the way many people imagine.
What it actually reads is temperature variation on the surface. Those differences may point to dampness, a hot-water leak, cold zones, or likely pipe routes.
Thermal imaging is most useful in the following situations:
Temperature differences are often clearer when the leak is on the hot-water line.
It can help show the approximate route of concealed pipework.
Moisture changes the thermal behavior of the surface and may leave a visible clue.
The technician can narrow the suspect zone before any opening work begins.
It is useful when the pipe route is complex or completely hidden.
It helps limit where intervention should happen instead of forcing blind demolition.
At the same time, the reading can be influenced by factors such as the following:
Direct solar heating can distort the thermal image easily.
Ambient conditions change how thermal zones appear and need to be interpreted.
Recent use can create temporary patterns that need careful reading.
Different materials transfer and store heat in different ways.
The presence or absence of insulation changes how the image behaves.
Tiled finishes can hide or redistribute the surface temperature pattern.
A non-leak source of dampness may produce a similar thermal signal.
Thermal bridges can create misleading cold areas that are not leaks.
That is why a thermal imager is a diagnostic tool, not a magic detector.
A moisture meter measures moisture in materials such as plaster, masonry, flooring, or wood.
There are simple surface tools and more specialized instruments. A technician can measure multiple points and build a rough "moisture map" of the area.
A moisture meter helps clarify the following:
It shows how wide the affected area really is.
It helps reveal whether the dampness is rising, dropping, or spreading sideways.
It may indicate that the area is still receiving new moisture.
It helps distinguish a concentrated problem from a broader one.
It can reveal whether the problem is extending beyond the visible zone.
It allows follow-up checks to see whether the area is actually drying out.
But a moisture reading can still come from more than one source, such as the following:
The dampness may come from an active water loss.
The surface may be getting wet from vapor rather than from a pipe failure.
Materials can hold moisture from an earlier incident long after it happened.
The moisture may be coming up from lower levels and not from the bathroom installation itself.
Failed sealing or grout can create the same type of reading.
Regular shower use may wet the area without a supply-side leak.
The source may be on the drainage side rather than the supply side.
That is why a moisture meter shows moisture, not necessarily the real cause by itself.
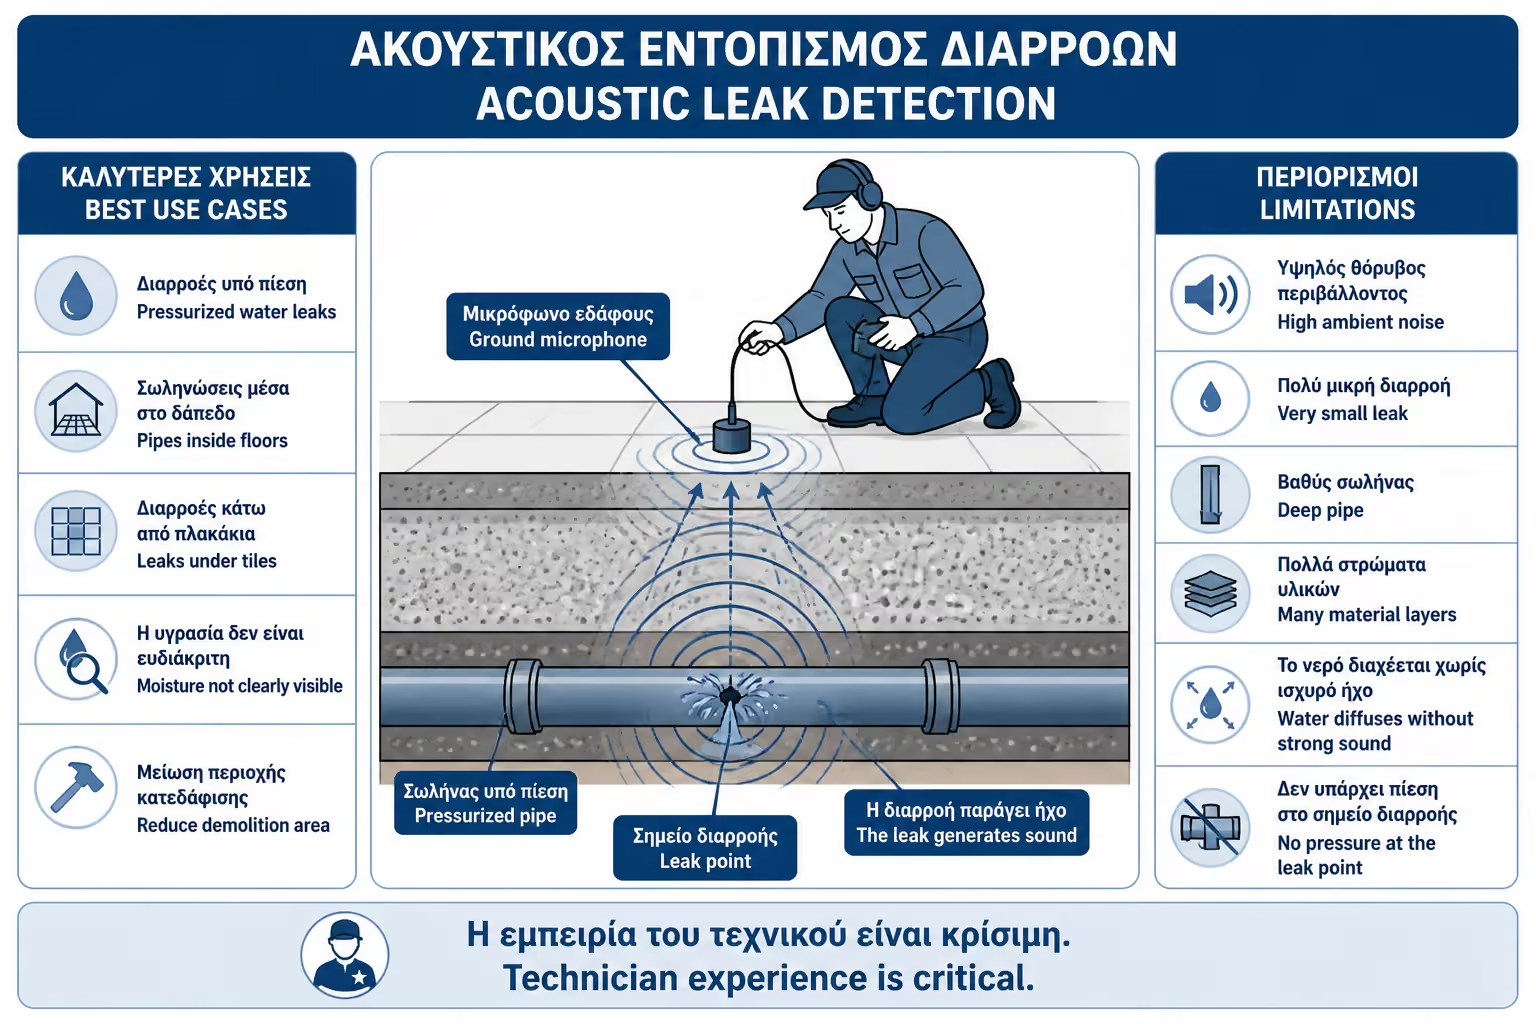
Acoustic leak detection systems use microphones or special acoustic instruments to detect the sound of water escaping from a pipe under pressure.
When there is a leak in a water pipe, the water can make a characteristic sound, especially when the network is under pressure.
Here again, the experience of the technician plays a big role.
Acoustic systems are most useful in the following situations:
The method works best when the leak is on a live pressurized line.
It can help with concealed routes running under floor surfaces.
It is useful when you want better targeting before opening a tiled area.
It helps when the visible surface clues are still weak or unclear.
The goal is to narrow down the intervention area before demolition starts.
On the other hand, acoustic detection becomes harder when:
Surrounding noise can mask the real acoustic signature of the leak.
The sound may simply be too weak for a clean reading.
The deeper the line, the harder the signal becomes to interpret.
Different layers can absorb or distort the transmitted sound.
Some leaks do not create a clear enough acoustic pattern.
Without pressure, the value of acoustic detection drops sharply.
In more specialized cases, a tracer gas may be used.
The logic is that the network is filled with a special gas and then the point from where it escapes is detected.
This method can help when other methods do not give a clear answer.
It is mainly considered in situations such as:
It is a more specialized method and is usually used by leak-detection teams.
A dye test can help with drainage points, shower areas, or any place where we suspect water is passing through a specific path.
A special dye is added to the water and then we check whether it appears elsewhere.
It is most useful when checking points such as:
For example, if a stain appears in the apartment below only when the shower is used, the dye can help confirm the route of the leak.
For leaks or drainage problems, a drain camera can be used.
The camera enters the pipe and can reveal issues such as:
It is usually worth using when:
A drain camera does not inspect pressurized supply pipes. It is a drainage tool.
This is the most critical step.
If you are seeing signs like the following, the problem most likely points to the water-supply side:
By contrast, when the next pattern appears, the issue fits drainage or waterproofing more closely.
This distinction saves many unnecessary breaks.
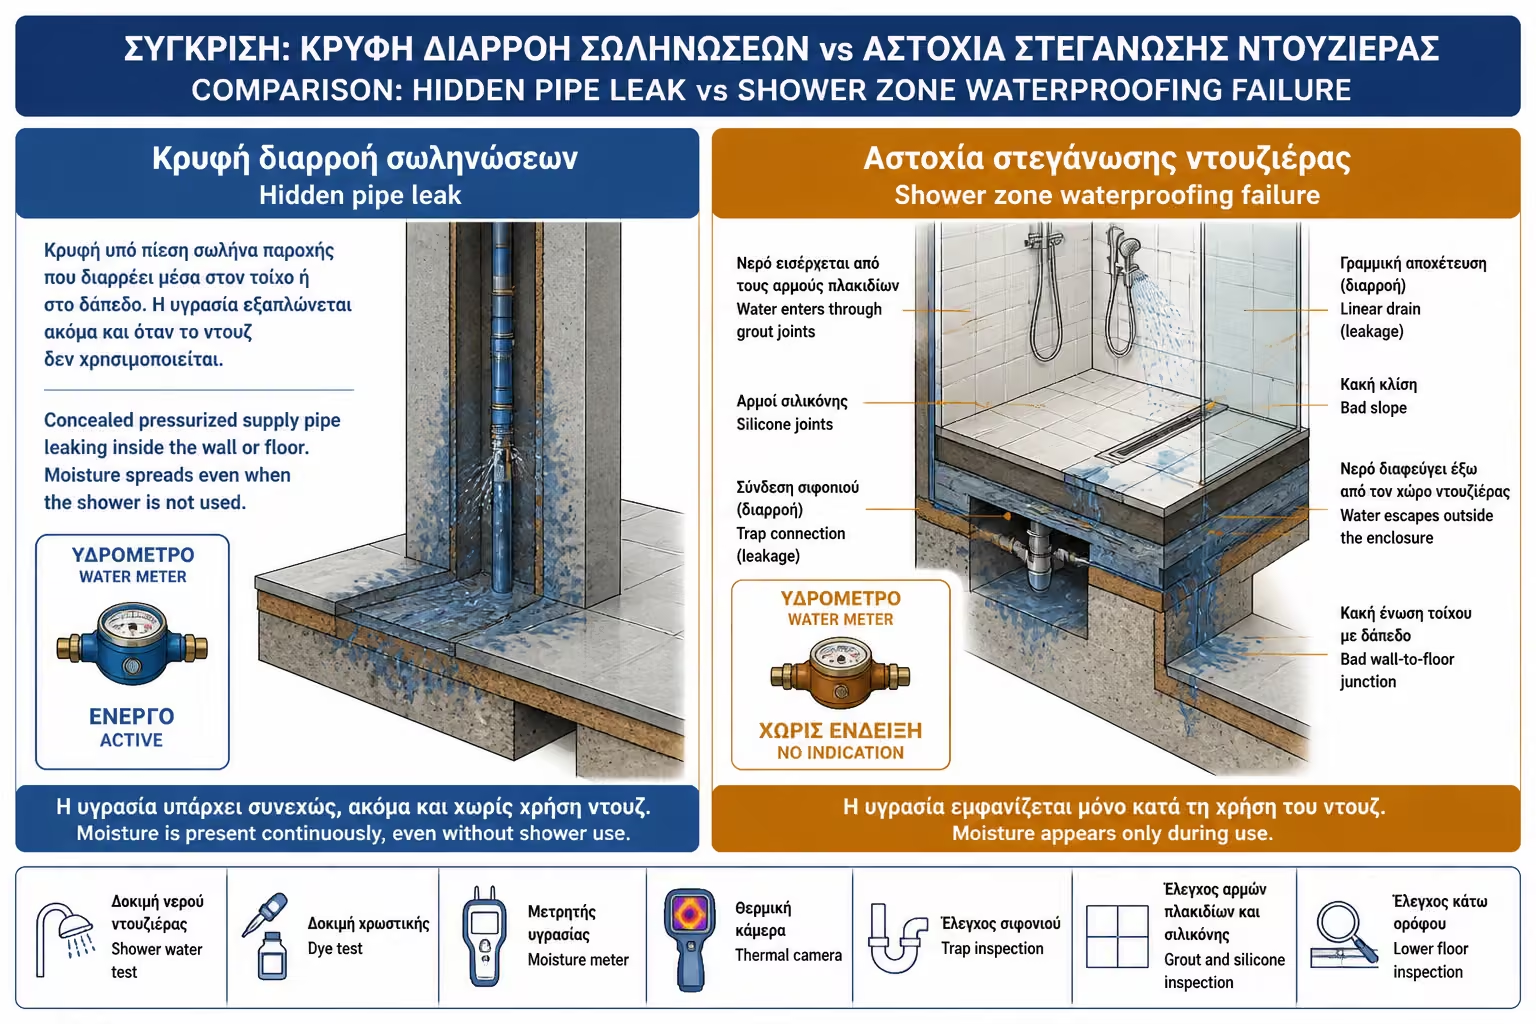
Very often, the "hidden leak" is not coming from a pipe at all. It is coming from the shower zone.
In this case, the water meter will not show anything, because there is no loss from a pressurized supply pipe.
Moisture usually appears only when the shower is actually being used.
In this zone, the most common causes are the following:
Failed waterproofing allows water to pass into the substrate below.
Worn or open joints allow water to keep passing through.
Old or badly applied silicone stops sealing properly.
A fault at the siphon connection can leak only during use.
The channel or linear drain may hide a construction weakness.
Water ponds or runs toward the wrong parts of the floor.
Normal shower use may throw water outside the shower area and mimic a hidden leak.
The change-of-plane junction is a common entry point for water.
To check this case properly, the usual controls are the following:
Water is used in a controlled way to see exactly when the dampness appears.
Dye can reveal where the water is actually travelling.
It helps measure which zones have the highest moisture concentration.
It can help narrow the suspect area when temperature clues exist.
The siphon and its connections should be ruled out by direct inspection.
Grout and silicone are checked for gaps, cracks, or local failure.
The pattern downstairs often shows when and where the moisture is moving.
Concealed mixers are one of the most critical hidden points in a bathroom installation.
If there is a leak in the mixer body or its connections, moisture usually appears behind the tiles and spreads indirectly.
The most common signs in this case are the following:
The visible sign appears on the wall directly behind the concealed mixer body.
Water may show up on the rear side of the same wall.
The supply network may show a loss that points back to this branch.
The dampness becomes stronger when the outlet is in use.
A recent renovation is often a clue that the issue may be installation-related.
Thermal imaging and pressure testing can help, but many cases still require a targeted opening at the mixer position. That is why pressure testing before the wall is closed is so important. If that step was skipped, finding the fault later becomes much harder.
Sometimes the moisture does not come from the bathroom but from a water heater, boiler or hot water pipes.
The leak is often found at points such as:
In these cases, thermal imaging can help if hot water is present, but a plumbing inspection is still needed.
No-dig methods greatly reduce the risk, but do not repair the leak.
If a point of damage is confirmed, a targeted opening is usually required for repair.
The difference is that the opening is made where there are indications, not blindly.
A targeted opening is usually justified when there are indications such as the following:
The diagnosis has already narrowed the problem down to one clear line.
The test shows a real loss and the fault now has to be confirmed locally.
Thermal imaging concentrates the suspect area enough to justify an opening there.
The moisture readings point clearly to the strongest concentration zone.
Acoustic tracing has already narrowed the problem to a small area.
The fault is related to a hidden body or connection that cannot be checked any other way.
The cause has already been traced to the drainage side or the floor outlet area.
The aim is to open the smallest possible area and only where the evidence already points.
Before a technician arrives, you can organize a few basic observations that make the diagnosis much faster.
The most useful first actions are the following:
Shut off all outlets and see whether the water meter is still moving.
Note exactly when the dampness appears or becomes worse.
See whether it is related to the shower, toilet, basin, or another specific use.
Notice whether a sewer smell appears together with the dampness.
Take photos over time so the pattern can be compared properly.
Check whether the stain expands after a certain water use.
Look under furniture, cabinets, and around siphons for visible signs.
Do not paint over or hide the dampness before it has been diagnosed.
This information helps the technician get to the real cause faster.
It is just as important to avoid actions that hide the symptom but make the real diagnosis harder.
The most common mistakes are the following:
Do not start breaking surfaces without real indications of where the fault is.
Paint may hide the visible mark for a while, but it does not solve the cause.
Random sealing without diagnosis can make the real source harder to trace.
Repeated use of chemicals does not solve every drainage issue and can create new ones.
Do not block ventilation that may be relevant to condensation or odor problems.
A stain downstairs is important evidence and should never be ignored.
If the dampness is growing, waiting usually makes the damage and cost worse.
Do not accept a repair unless the supposed cause has first been explained clearly.
The wrong intervention can hide the symptom temporarily while allowing the damage to continue.
The cost depends on the equipment, the difficulty and whether a detailed report is needed.
As a general guide:
| Service | Realistic cost |
|---|---|
| Basic plumbing check | €50 – €120 |
| Moisture-meter check | €80 – €180+ |
| Thermal-camera inspection | €100 – €250+ |
| Acoustic leak detection | €150 – €350+ |
| Tracer gas detection | €200 – €500+ |
| Sewer camera | €120 – €300+ |
| Detailed technical report | additional cost per case |
The prices are indicative. Costs increase if the leak is difficult, if there are multiple spaces, or if a specialized safety, apartment building or landlord/tenant report is needed.
Before agreeing to any work, ask for clear answers on the following points:
Do not stop at "we'll find it." Ask for a method, a sequence, and a clear explanation.
Use the short checklist below to see whether the diagnosis is moving in the right order:
| Inquiry | Yes / No |
|---|---|
| Does the water meter read while everything is closed? | Yes / No |
| Has it been pressure tested? | Yes / No |
| Does the moisture appear after using a shower? | Yes / No |
| Does moisture appear after using a basin? | Yes / No |
| Has the siphon been checked? | Yes / No |
| Has the drainage been checked? | Yes / No |
| Has it been checked with a moisture meter? | Yes / No |
| Has there been a thermographic check? | Yes / No |
| Has it been audio checked if needed? | Yes / No |
| Is condensation blocked? | Yes / No |
| Has a targeted opening been proposed? | Yes / No |
| Is there photographic documentation? | Yes / No |
If the answers are unclear, there is a risk of unnecessary digging.
A homeowner notices dampness on the wall next to the bathroom. Without any real diagnosis, the crew breaks tiles in the shower area. It finds no obvious leak, so it opens a second spot. Again, nothing is found.
Eventually, proper measurement shows that the moisture was caused by condensation on an uninsulated cold-water pipe inside a false wall.
The demolition was unnecessary because the diagnosis had not been done first.
In another case, a stain appears on the ceiling of the apartment below. The owner of the upstairs bathroom fears that the whole floor will have to be opened.
The technician first checks the water meter. It stays still. He then pressure-tests the water supply, and the network holds. After that, he runs a controlled shower-use test with dye and checks the surrounding zones with a moisture meter.
The readings point to a problem around the linear drain. A targeted opening is made at that exact point, and failed waterproofing around the outlet is confirmed.
The whole bathroom did not need to be broken. What was needed was a proper diagnosis.
Never start digging blindly. A hidden leak has to be diagnosed before anything is opened.
The first step is to distinguish whether the problem comes from the water supply, the drain, a siphon, the shower area, or condensation. Each case needs a different control method.
A thermal imager, a moisture meter, and acoustic systems are not magic tools, but in the hands of an experienced technician they can greatly narrow the problem area.
The goal is not necessarily to avoid breaking anything at all. The goal is to open only the point that truly needs to be opened.
Detecting hidden leaks without digging is now possible in many cases, as long as a proper diagnosis is made.
In summary, the main diagnostic tools are the following:
It gives the first simple indication of a possible supply-side leak.
It helps confirm whether the water supply network is losing pressure.
It narrows suspect zones through temperature differences.
It measures how far the dampness extends and how it behaves in materials.
It helps locate leak sounds in pressurized pipework.
It is useful in harder cases and in very small leaks.
It is especially useful for siphons, showers, and drainage paths.
It inspects the drainage line without blind demolition.
No method is perfect on its own. The correct diagnosis is usually made with a combination of tools and experience.
Before breaking tiles or walls, the key questions that need answering are the following:
You first need to know whether the pressurized water supply is actually losing water.
Pressure behavior often shows whether the problem belongs to the supply side.
This helps separate water-supply faults from drainage or sealing problems.
The drain system has to be ruled out or confirmed with its own checks.
The failure may be in the shower zone rather than in a buried pipe.
Making this distinction correctly prevents unnecessary demolition.
The highest concentration often points to the next correct diagnostic step.
A hidden leak can be very costly if left alone. But it can cost even more if digging begins without a diagnosis.
The correct order is: detection, documentation, targeted opening, then repair.
Return to category.
Go to categoryReturn to the central guide.
Go to guide