Leak
Even a small loss of water is enough to pull the reading down.
Pressure testing, often referred to on site as pressing the plumbing network, is one of the most important checks in a bathroom renovation.
It does not show up in the finished look of the room and it will never get the attention that tiles, shower screens or fixtures get. Even so, it is the check that can save you from the most expensive and disruptive failures.
Whenever water lines are replaced, new supply points are added, joints are made, press fittings are installed, a manifold is added or a concealed mixer is fitted, the network should be tested before it is sealed inside walls or floors.
The right time is before plaster, screed, waterproofing and tiles, while the installation is still accessible and any issue can be corrected without demolition.
A small leak that goes unnoticed at this stage can later show up as dampness, swollen walls, mold, damage to an adjacent room or even leakage into the floor below.
That is why pressing is not an optional extra. It is a check you should request explicitly, ideally in writing, before the chases are closed.
A pressure test is the technical check that confirms whether the water supply network can hold and remain watertight under controlled pressure.
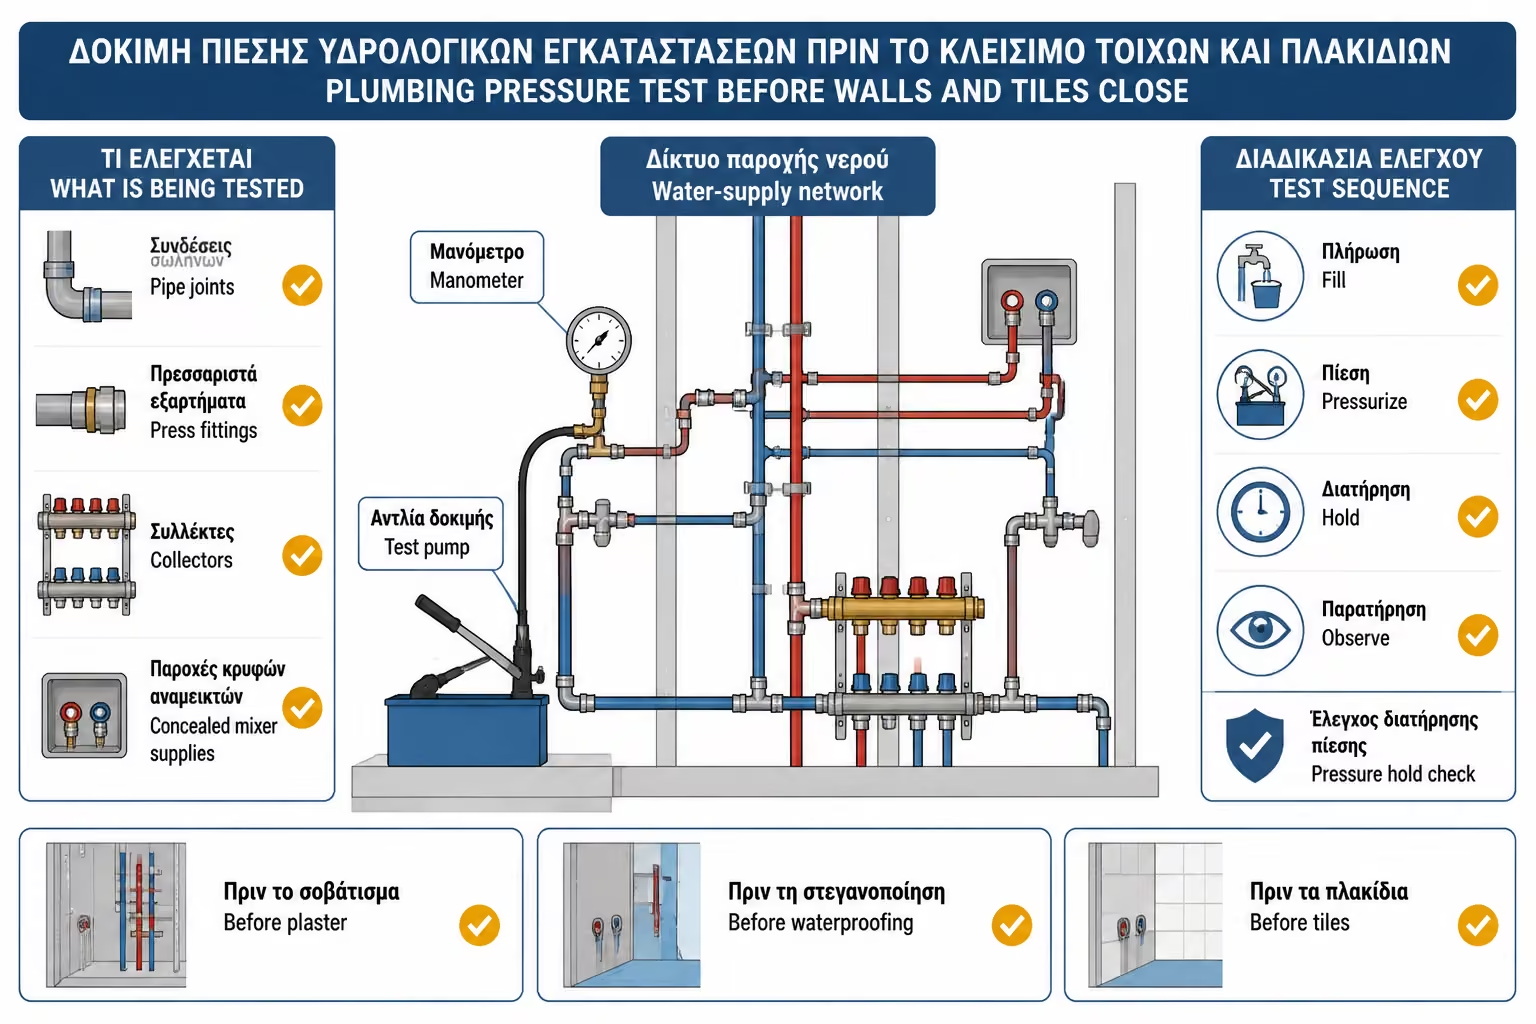
The plumber connects a pump or pressure gauge, fills the network with water or, where appropriate, air, and raises the pressure according to the system method. The reading is then monitored to see whether it stays stable for the required period.
If the reading drops, the cause may be minor or serious, but it is never something to wave away. The point is not that the installation “looks dry”, but that measurement and visual inspection confirm it can hold safely before it disappears behind finishes.
Some of the most common points the test can expose are the following:
Even a small loss of water is enough to pull the reading down.
A connection that was not tightened properly is exposed quickly during testing.
A weak connection may look acceptable until the line is actually pressurized.
If a press fitting was not made properly, this is where it usually shows.
A bad or incompatible part can affect the test result immediately.
A small injury in the pipe may stay hidden until pressure is applied.
Poor capping or incomplete closure can imitate a leak in the network.
A weak valve or auxiliary part may also be responsible for the pressure loss.
If the pressure remains stable and the joints pass a visual inspection, that is a strong indication that the network is watertight under the conditions of the test.
Water lines end up hidden behind walls, floors, tiles, furniture and fixed construction. Once the area is closed, direct access is gone.
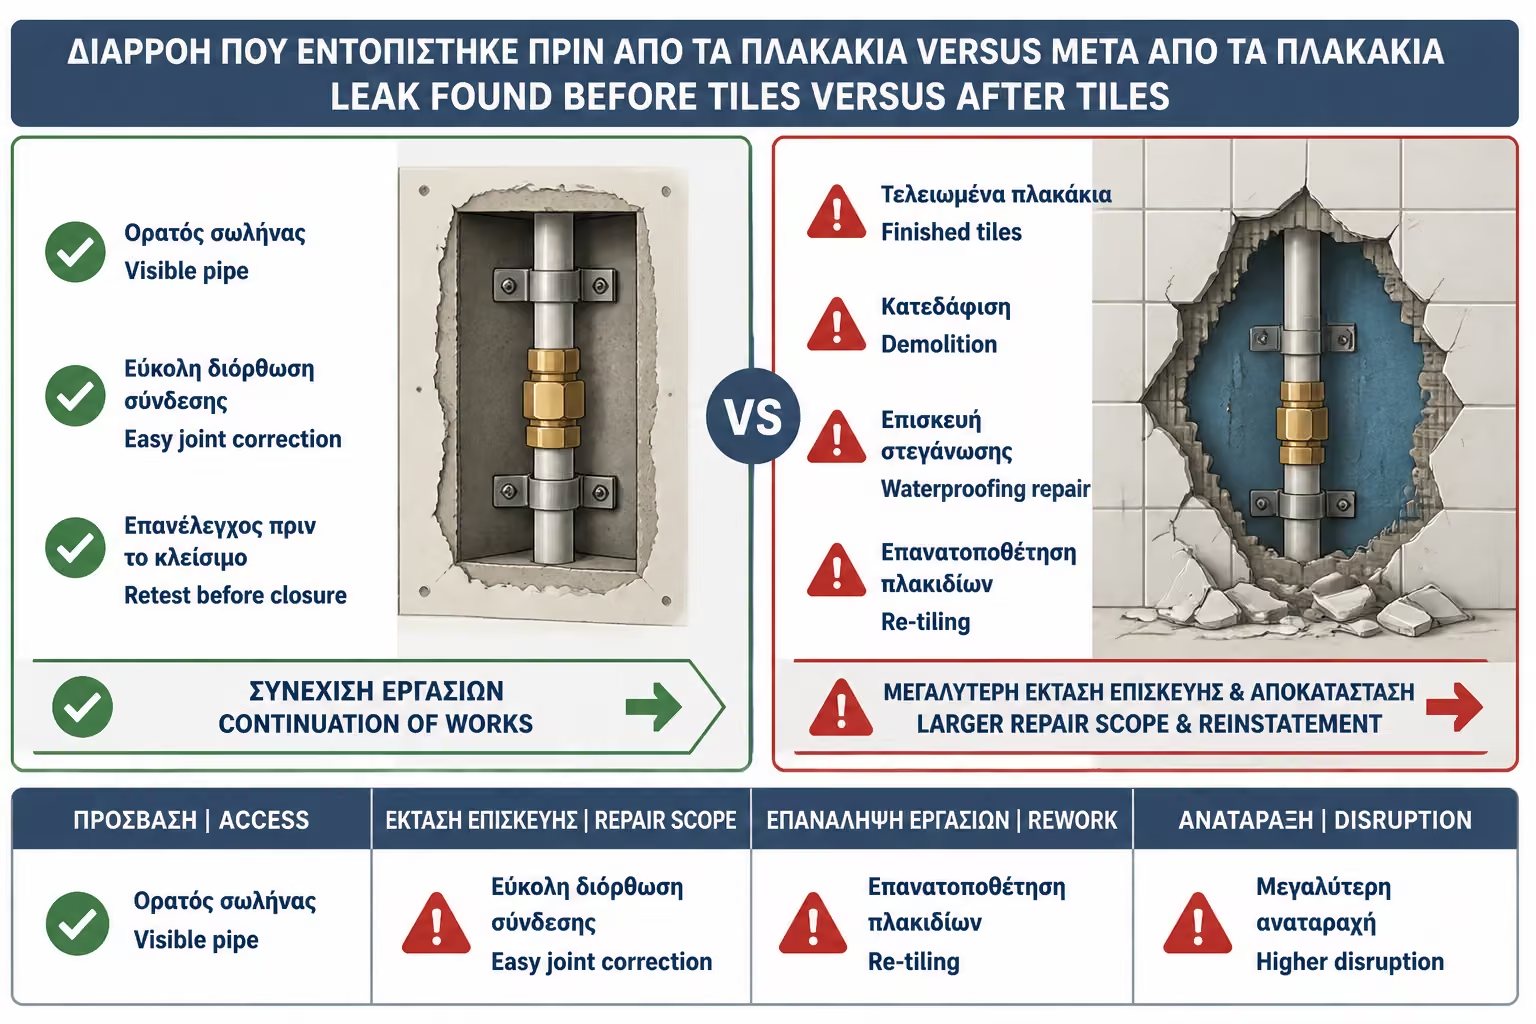
If the network is tested while everything is still open, a leak can be found quickly and corrected cleanly. If the same issue appears after finishes are complete, the repair becomes far more expensive, disruptive and time-consuming.
The difference between those two moments is usually dramatic, which is why testing before closure should never be skipped.
The practical difference becomes very clear in the two scenarios below:
The pipe and fitting are still visible, the joint can be corrected, the test can be repeated and the rest of the work can continue without tearing out finished surfaces.
The repair may involve finding the leak, breaking tiles, opening the wall, replacing materials, redoing waterproofing and possibly restoring damage in nearby areas.
Pressure testing should be carried out after the new plumbing work is complete, but before the pipes are covered and access to the critical points is lost.
That side of the network needs to be complete before the test means anything.
The second main branch must also be ready for a proper full check.
Local supply points should already be in place at this stage.
If one exists, it should already be connected and ready to be tested.
You do not wait for the wall to close before checking them.
Shower, basin, cistern and washing machine lines should already be part of the network.
Where they are involved, those related lines belong in the same test.
The same logic applies to the stage of the project when the test should come first:
No closing-up work should start before the test has passed.
The lines and joints should still be visible at this point.
Covering the network comes only after confirmation.
There is no value in building finishes over an untested installation.
This is the major point of no easy return.
Final installation should rest on a network that has already been verified.
The correct sequence is straightforward: install the pipework, pressure test it, correct anything that needs attention, repeat the test and only then close the installation.
A pressure test checks whether the network can hold pressure without losses and without hidden weaknesses at its joints.
The main question is whether the lines can hold pressure without loss.
This is where installation mistakes or weak pressing often show up.
Every connector is tested in practice, not just assumed to be sound.
The central distribution points must remain watertight under load.
Changes of direction and branch points are common stress locations.
Their hidden connections have to be checked before closure.
Basin, shower, cistern and washing machine lines all belong in the test.
Where relevant, those connected points must also be verified.
It does not, however, automatically test the drainage system. Drainage needs its own flow and watertightness check, based on a different logic and different failure points.
In other words, a water pressure test and a drainage test are separate controls and should not be confused.
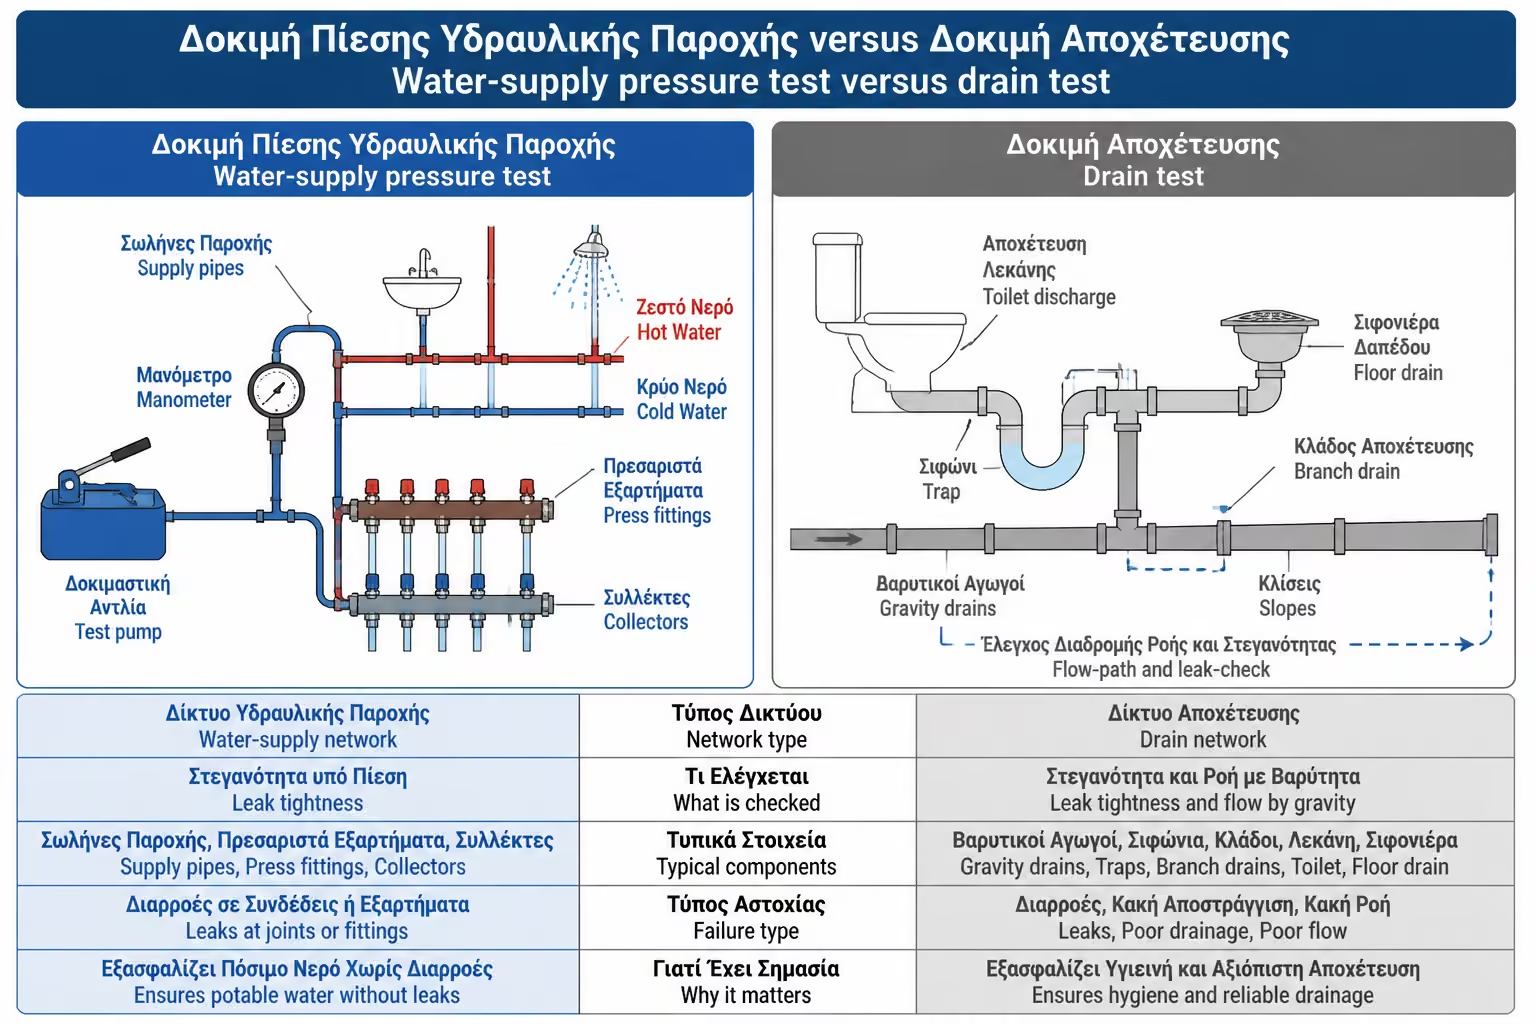
In a bathroom renovation, one test is not enough. Water supply and drainage are assessed separately because they serve different functions and fail in different ways.
Both tests matter, but they do not measure the same thing and they do not reveal the same failures. In a proper renovation, you check both the pressurized supply network and the gravity-based drainage network.
The breakdown below shows what belongs to each type of test:
The supply test covers the lines that carry water under pressure.
Every connection and terminal point belongs in the pressure test.
The central distribution elements are part of the water-side check.
Their hidden supply connections are classic pressure-test territory.
The drainage test checks whether wastewater moves away properly.
This is where poor drainage flow or weak waste connections appear.
The final drainage points need their own practical performance check.
Those are drainage symptoms, not water-pressure-test findings.
If you want a short summary, the core distinction is this:
It covers the pipes, supply points, joints and fittings that carry water under pressure.
It covers the pipework that removes wastewater by gravity and must work without backflow, odor or trapped water.
Every new or modified water line should be tested, not just the main runs that seem most important at first glance.
Both the hot and cold supply lines should be tested.
Its lines are critical, especially if they feed a concealed mixer.
This supply should not be skipped just because it looks simple.
Every new or modified supply point belongs in the test.
Where present, those lines are checked like any other branch.
Related supply lines should be included where relevant.
Every shutoff or distribution point should hold pressure properly.
With a manifold system, the test does not stop at the visible outlets.
Pressing is especially valuable in multilayer or PEX systems with press fittings, because it confirms in practice that every joint and every branch was made correctly.
At bathroom or manifold level, that translates in practice into the following points:
This usually includes the supply lines for the basin, shower, cistern, washing machine and, where applicable, a bidet or hygienic shower.
The manifold, valves, outgoing branches, individual connections and the tightness of each line should all be checked, either separately or as a complete set.
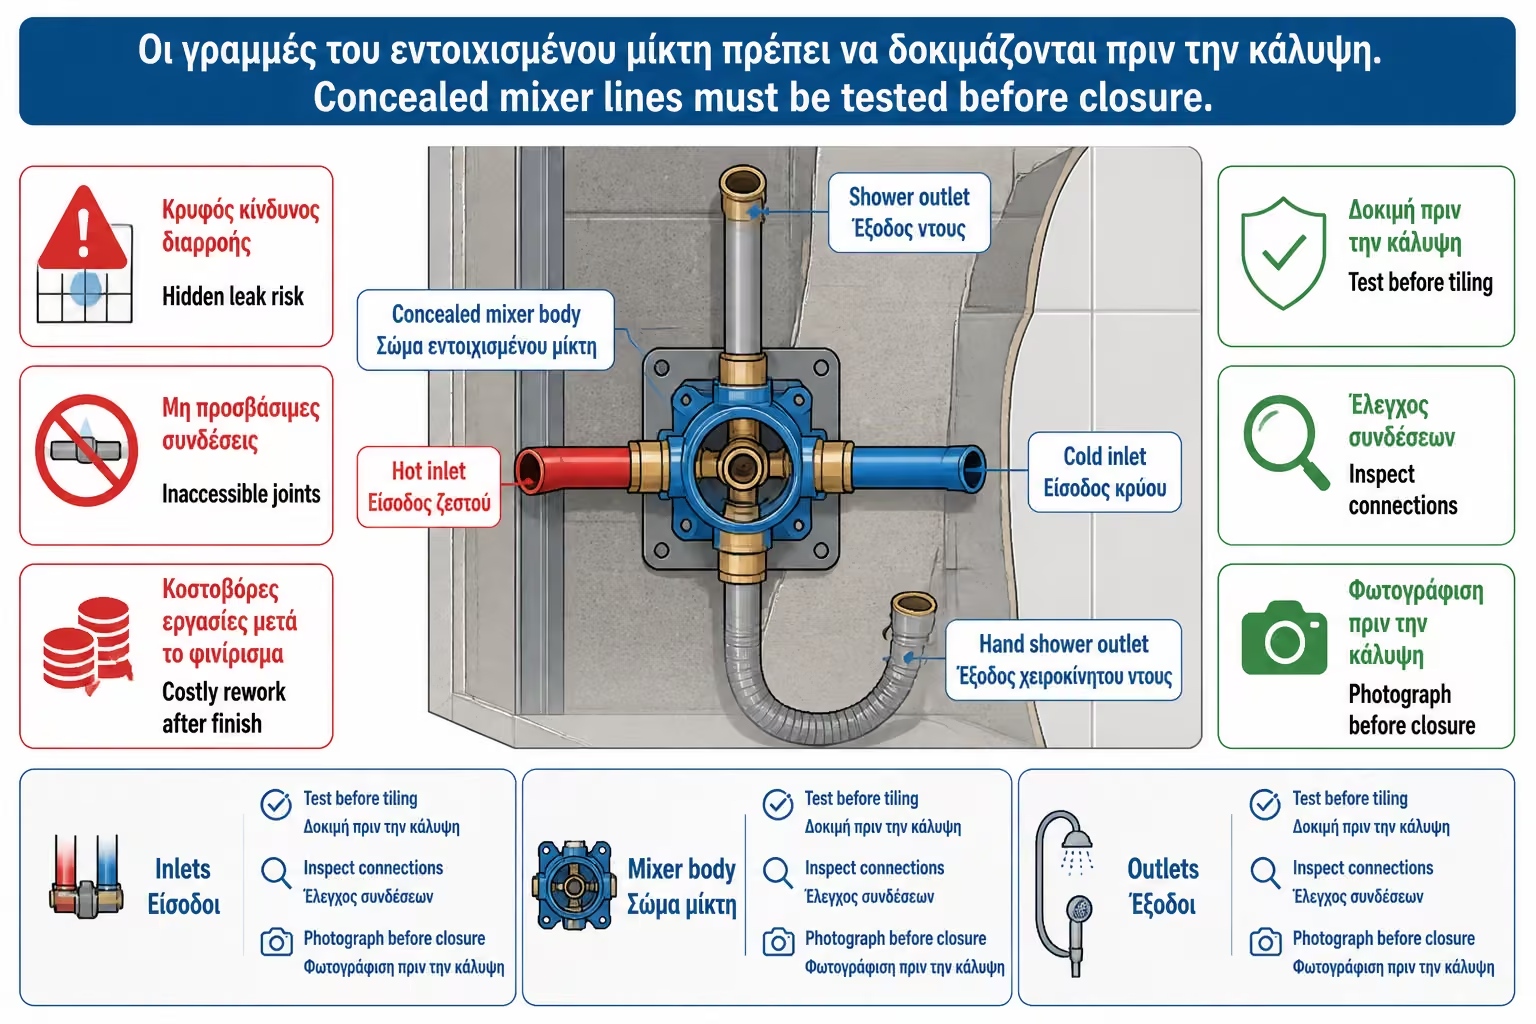
Concealed mixers are among the most sensitive points in the network because everything behind the trim becomes difficult to access later.
The mixer body, the hot and cold connections and the outlets to the shower head or handset all end up behind tiles. If a leak is hidden there, the repair usually means opening a finished wall.
That is why a concealed mixer should never be covered until the pressure test and visual inspection of all connections have been completed properly.
Before the wall is closed, the correct procedure can be summed up as follows:
Before the wall is closed, the mixer body should be connected correctly, the outlets should be capped, the network should be pressure tested, every joint should be checked and the installation should be photographed.
The exact test pressure is not one arbitrary number that suits every project. It depends on:
Each system comes with its own limits and test method.
The pressure should come from the specification, not guesswork.
The test should relate to how the network will actually perform in use.
A small bathroom and a more complex system are not tested blindly the same way.
The test medium affects both the procedure and the pressure used.
The process should be correct, repeatable and properly documented.
In many domestic installations, the test is carried out at a pressure above normal operating pressure so that weak points show up before the system is concealed.
The owner does not need to impose a number without knowing the system. What matters is asking the plumber to follow the material specifications, use the correct method and record the outcome clearly.
From the owner’s side, these are the main points worth asking for:
Ask what value will actually be used.
Get a clear answer on how long the system will be monitored.
It should be explicit what counts as success or failure.
Find out whether the network will be tested with water or air.
Confirm that the right specification is being followed.
The outcome should be documented clearly, not left as a verbal claim.
If you want to reduce that to one short question for the plumber, the core point is this:
Ask for clear answers about the pressure, the duration, the test medium and how the result will be documented.
The duration of the test depends on the system, the method and the manufacturer guidance, so there is no single answer for every installation.
What is clearly not enough is a rushed “we put pressure on for two minutes and everything looked fine”. That kind of shortcut often misses slow drops and weak joints.
In proper practice, the network should stay under pressure long enough to stabilize, allow the joints to be inspected and reveal even a small change in the gauge reading.
Larger projects or more critical installations may require an even stricter process and a longer observation period.
The key point is that the test should not be treated as a box-ticking exercise carried out in a hurry.
In practical terms, that means at least the following:
The plumber should raise the pressure, let the network stabilize, inspect the joints and return to the gauge before anything is closed up.
If the pressure drops, that does not automatically mean a major leak, but it always means something needs to be checked before the work continues.
A slight loss at one joint is enough to lower the reading.
A temporary cap on a supply point can easily distort the result.
A simple operational mistake can affect the whole test.
The network may need to stabilize before you can judge it properly.
Reading changes sometimes need careful interpretation, not panic.
A weak joint or wrong part is a common source of pressure loss.
An impact from later work may show up only once the line is tested.
Sometimes the pump or gauge needs checking before blaming the network.
The plumber should identify the real cause, correct it and repeat the test until the result is stable.
If there is an unexplained pressure drop, the next stages of the renovation should not continue until the issue is resolved.
Modern plumbing systems often use press fittings, especially in multilayer pipework, and they are reliable only when every installation step is carried out correctly.
For them to perform properly, the fitting itself is not enough. You also need the correct press, the correct jaw, proper pipe cutting, proper cleaning and preparation, and a clean pressing operation without an incompatible or defective part anywhere in the chain.
If a fitting is not pressed correctly, it may not fail dramatically on day one. In many cases it shows up later as a small, persistent leak.
Pressure testing is the practical way to catch that kind of mistake before the installation disappears behind finished surfaces.
The test can be carried out with water or with air, depending on the system, the stage of the project and the specified method.
A water test is closer to real operating conditions and usually reveals an obvious leak more directly. The tradeoff is that if something has a major failure, the space may get wet, so more care is needed around finished areas.
An air test is useful when water should not yet enter the network and it can still reveal pressure loss. Because air is compressible, however, the process needs even more discipline and safe handling.
The owner does not need to choose the method personally. The important thing is to insist that the test is done correctly, safely and in line with the system specifications.
It reflects real operating conditions, reveals obvious leaks more directly and is the most common choice for domestic plumbing networks.
It can be useful when water should not enter the network, but it requires more care because of compressibility and must follow a safe procedure.
The owner does not need to perform the test personally, but it is entirely reasonable to ask for evidence that it was done properly.
It shows the official starting point of the test.
It documents whether the reading stayed stable.
Those should exist before walls and floors are closed.
A verbal reassurance is not enough without a clear statement.
The owner should know the test covered the whole network, not part of it.
The test should also appear in the project paperwork.
That is not a sign of distrust. It is basic technical documentation for a part of the project that will soon be hidden.
If a problem appears later, the photos and record help clarify what was checked and in what condition the network was handed over.
In many cases, plumbers leave the network under pressure during some of the following work so that any new damage becomes visible immediately.
This can be useful because a pipe that was originally sound may be damaged while the chases are being closed or while another trade is working nearby.
The network should not remain under pressure if it creates a site risk.
All outlets must be closed correctly before the system is left that way.
Nothing exposed should be left in a condition that can fail easily.
The pressure still needs monitoring while other work continues.
The practice should protect everyone working around the installation.
It is not always necessary to keep the system pressurized for the entire interval, but a final recheck before permanent closure is good practice.
If the network remains under pressure, the outlets should be properly capped, open points should be made safe and the system should be checked periodically without creating risk for other trades.
If any change is made after the initial test, the network needs to be tested again. The earlier result no longer covers the revised installation.
One relocation is enough to invalidate the previous certainty.
Every new branch creates a fresh point that needs checking.
Changing a fitting can alter connections and loads.
If the line was opened or cut, the test starts again from zero.
The central distribution point affects multiple lines at once.
Later impact is not covered by the earlier successful test.
Every added connection must prove its tightness again.
Every new intervention resets the previous certainty because it introduces a new potential failure point or changes the old result.
“We tested it earlier” is not enough. If something changed, it has to be checked again before it is hidden.
In an installation with a manifold, pressure testing is even more useful because the network is organized into individual lines that can be checked in a targeted way.
The central distribution unit itself must remain fully watertight.
Isolation points directly affect the credibility of the result.
Each line should be checked like its own route through the system.
Final supply points should not be skipped because they look small.
The temporary closures used during the test must also hold properly.
That makes it much easier to isolate the source of a problem.
The main advantage of a manifold is that the lines are clearer and diagnosis is more organized than in a more scattered pipe layout.
If there is a leak, it is usually easier to isolate the affected line and correct it without unnecessary guesswork.
Pipe insulation is important, but it should not cover joints that have not yet been tested and confirmed.
The correct order of work is:
In some projects, part of the insulation may be installed in parallel with the pipework. Even then, the critical points should remain visible and accessible until the test has been completed successfully.
A plumbing quote should not remain vague. Ideally, it should state clearly that a pressure test of the water supply network will be carried out.
It should be stated directly, not vaguely implied.
The quote should cover both sides of the network.
It should be clear that the test happens at the critical stage.
Hidden points deserve an explicit mention.
The central distribution point should not be ignored.
Documentation is part of the proper process, not a bonus extra.
If the network is altered, it should be checked again.
A general phrase like “new plumbing” does not automatically mean that a full pressure test with proper documentation is included.
If you want to be covered, ask for it clearly and make sure it is written down.
In a well-organized plumbing job, pressure testing is often treated as part of the normal process and included in the plumber’s scope.
If it is requested as a separate visit or used to assess an existing installation, there may be an additional charge depending on scale and difficulty.
As a broad market indication, the picture is usually as follows:
| Case | Realistic cost |
|---|---|
| Pressure testing as part of a new installation | Usually included |
| Separate small-network check | €50 – €150 |
| Check of a larger network or multiple lines | €100 – €300+ |
| Leak detection after test failure | Depending on the case |
| Repeat test after changes | Usually small cost if they are in the same project |
Even when it is billed separately, the cost of testing is small compared with the cost of repairing hidden leakage behind newly finished surfaces.
Some of the most common mistakes that undermine the value of the test are the following:
The network is closed without technical control.
The pressure is on for a few minutes and there is no real monitoring.
A supply point or concealed mixer is left out of the test.
A new connection is made, but the system is not tested again.
Later, it is no longer clear where the pipes run or what was actually checked.
The technician says "it's nothing" without finding the cause.
There is no time left for a problem to appear.
Before the network is closed, it is worth getting clear answers to the following:
The basic question before any closing-up starts.
Ask for a specific number and the technical basis behind it.
The duration shows whether the process is serious or rushed.
No line should be treated as optional.
That is where some of the most expensive hidden failures occur.
If one exists, it should be included explicitly.
Documentation protects both the owner and the project.
You want a process answer, not a vague reassurance.
Every intervention calls for a new check.
Ask whether intermediate protection of the network is planned.
If it is not written, it is easier for it to be treated as optional.
If the answer is “there is no need”, ask for a technical explanation. In a new water supply installation, this is generally a check that should be carried out.
Use the checklist below to make sure the test covers all the critical points:
| Question | Yes / No |
|---|---|
| Has the new water supply been completed? | Yes / No |
| Are all supply points properly capped? | Yes / No |
| Has it been pressure tested? | Yes / No |
| Was the hot water checked as well? | Yes / No |
| Was the cold water checked as well? | Yes / No |
| Have the concealed mixers been checked? | Yes / No |
| Has the manifold been checked? | Yes / No |
| Has the pressure remained constant? | Yes / No |
| Were the joints visually inspected? | Yes / No |
| Are there photos before the wall was closed? | Yes / No |
| Retried after any changes? | Yes / No |
| Is the test mentioned in the quote? | Yes / No |
If most of the answers on this checklist are “no”, the installation should not be closed yet.
A homeowner is carrying out a full bathroom renovation. The plumber installs new pipework, connects the supply points and fits a concealed shower mixer, but no proper pressure test is performed because “everything looks dry”.
The chases are closed, waterproofing is applied, tiles are laid and the bathroom is handed over without real proof that the hidden network was tested.
Two months later, damp appears on the wall behind the shower and a small leak is eventually traced to a joint on the concealed mixer.
The repair now requires tile removal, local rebuilding and a much higher cost than the original check would have involved.
If a proper pressure test had been carried out before the wall was closed, the issue would most likely have been caught in time.
In another renovation, once the pipework is complete, the plumber caps all supply points and carries out a proper pressure test on the network.
In practice, a proper test covers at least the following points in an organized way:
One main side of the network is checked both separately and as part of the whole.
The second main branch goes through the same discipline.
The final points of use are confirmed in practice.
The most critical hidden point is not left to chance.
Support lines are checked with the same seriousness as the main ones.
The central distribution point is part of the full verification.
The network remains under pressure, the gauge is photographed, the joints are visually inspected and no pressure drop appears.
After that, the pipes are insulated, the routes are photographed and only then are the chases closed and the finishing works allowed to continue.
That is the safe, logical procedure that greatly reduces the chance of hiding a problem inside the wall.
Do not allow the water supply lines to be closed without a pressure test.
Pressing is one of the most important checks in a bathroom renovation. It is not enough for a contractor to say “it is not dripping”. The network should be pressurized, monitored and confirmed stable without pressure loss.
Ask for photos of the pipework and the pressure gauge before the walls are closed. If there is a concealed mixer or a manifold, the check becomes even more important.
If anything changes after the first test, ask for the test to be repeated. Every new joint should be checked before it is hidden.
Pressure testing, in other words pressing the network, is an essential step in any serious bathroom plumbing installation.
It confirms that the hot and cold water lines, joints, fittings, supply points, concealed mixers and manifold are watertight before they disappear behind tiles and built elements.
In final summary, these are the main points that should stay in place:
The test belongs in the stage where the network is still accessible.
No supply point should be treated as secondary.
The reading should remain stable for the required period.
The gauge alone is not enough without practical checking.
Any intervention resets the earlier certainty.
The hidden network should remain documented.
Proper procedure should also appear in the agreed scope.
The time and cost involved in pressing are minor compared with the damage caused by a hidden leak behind new finishes.
In a proper bathroom renovation, pipes are not closed because they “look fine”. They are closed only after they have been tested and documented as safe.
Return to category.
Go to categoryReturn to the central guide.
Go to guide