What the “system” really is
Not only the tank, but the whole frame, flushing assembly, WC connection and service opening.
Concealed cisterns are now a very common choice in modern bathroom renovations. They are usually combined with a wall-hung toilet and give the room a cleaner, more minimal look.
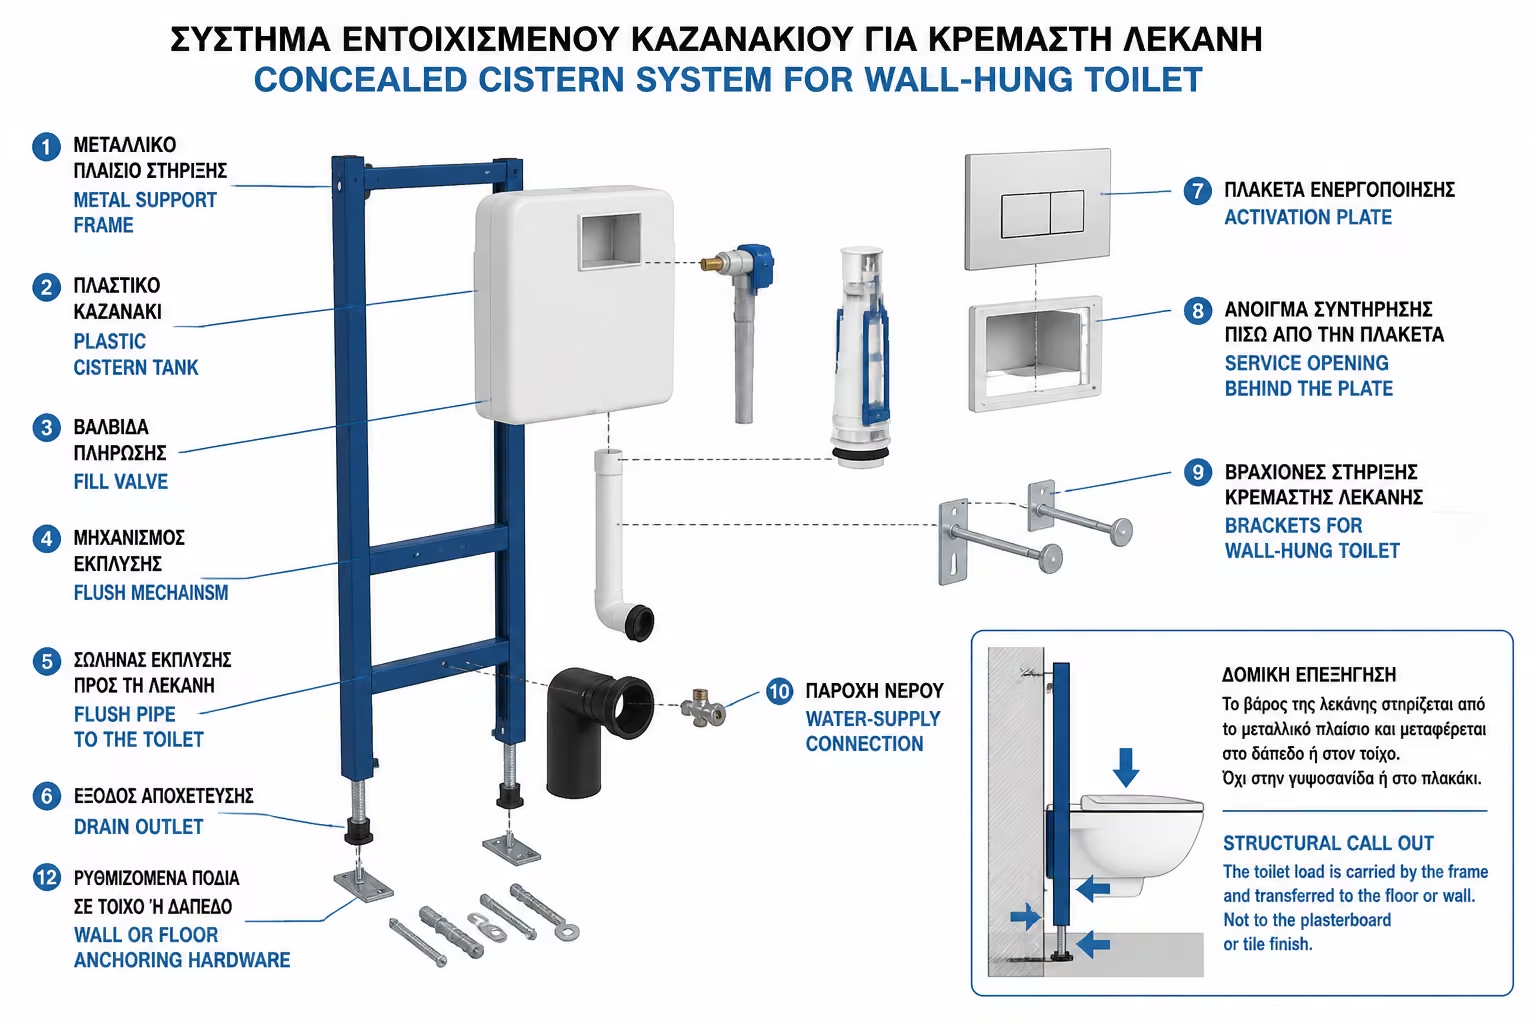
But a concealed cistern is not just an aesthetic choice. It is a complete technical system hidden inside the wall or inside a pre-wall build-up. That system includes the support frame, the cistern, the water supply, the flush mechanism, the flush plate, the drain connection and the toilet support points.
If the system is installed correctly, it can operate for many years, with maintenance access through the flush plate opening. But if the depth, support, drainage or build-up is wrong, the consequences can be serious: leaks, poor flushing, odors, an unstable toilet, broken tiles or the need to reopen the wall.
For this reason, before choosing a concealed cistern, three main points must be checked technically: whether there is enough depth in the wall or build-up, whether the installation is going into brickwork or drywall, and whether the drain can be connected correctly to the main stack.
A concealed cistern is not just a water tank.
It normally includes the metal support frame, the plastic cistern, the fill and flush mechanisms, the flush pipe to the WC pan, the drain outlet, the brackets for the wall-hung toilet, the water supply, the flush plate, the service opening, the adjustable feet and the fixing hardware.
The toilet does not rest on the drywall or the tiles. It rests on the metal frame, so the first critical issue is proper anchoring and proper load transfer to the floor and wall or support structure, not to the decorative finish.
If you keep only the basics, these are the first two points that must stay clear.
Not only the tank, but the whole frame, flushing assembly, WC connection and service opening.
The metal frame and its anchoring. If that part is wrong, a clean tiled finish will not rescue the installation.
In a simple exposed cistern, most parts are visible and relatively easily accessible.
In a concealed cistern, most of the system is closed behind tiles.
Before the structure is closed, the installer must have checked the height, the depth, the frame support, the water supply, the drainage connection, the flush plate position, the service access, the toilet position and the finished floor level.
That is why a concealed cistern should never be installed "by eye". It has to follow the manufacturer's technical manual and the actual bathroom layout.
Before the wall is closed, the main checks can be summarised as follows.
Height, depth, support, water supply, drainage, flush plate and service access all have to be resolved before the wall is closed.
If any of those points is wrong, the correction usually means opening the wall again after the finishing work is done.
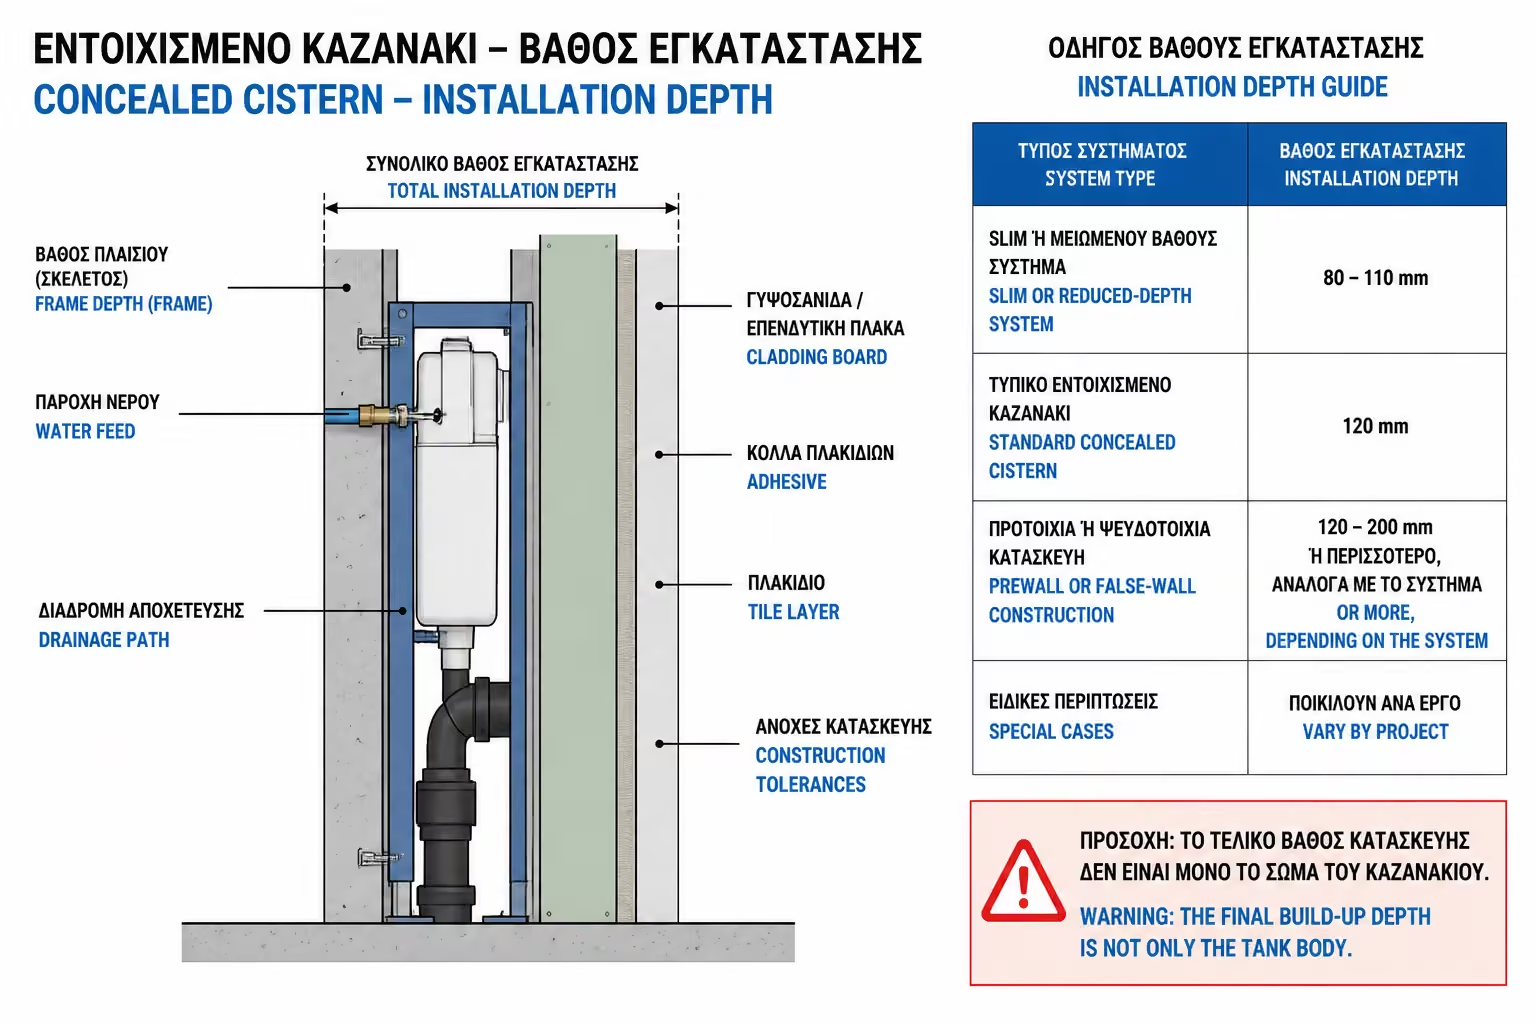
Depth is one of the first things to check.
Most concealed cistern systems have a specific installation depth. A typical system is around 12 cm deep, while reduced-depth solutions for special cases can be closer to 8-10 cm, depending on the product.
But the final wall build-up is not determined by the cistern body alone.
You also need to account for the frame depth, the water supply, the drain connection, the cladding build-up, the cement board or drywall, the tile adhesive, the tile thickness, the tolerances and the final alignment in the room.
These values are only indicative. The technical sheet of the exact system must always be checked.
“The cistern is 12 cm deep” is not enough. You have to measure the full wall build-up, from the back of the frame to the finished tiled face.
The table below gives a few indicative depth categories for a first orientation.
| System type | Indicative depth |
|---|---|
| Slim / reduced-depth system | Approx. 80 – 110 mm |
| Standard concealed cistern | Approx. 120 mm |
| Framed pre-wall construction | Approx. 120 – 200 mm+, depending on the system |
| Special construction with extra pipework | Case by case |
A common mistake is to say:
The cistern is 12 cm deep, so I only need 12 cm.
In practice that is not enough. You also need to account for the tile finish, the cladding build-up, the drainage connection, the supply pipes, the brackets, any wall irregularities and whether a pre-wall structure will be built.
In practice, the basic questions are the following.
Not only the cistern body, but the drain connection, the water supply, the cladding build-up and the final alignment in the room.
The system may not fit properly, pipes can be compressed, the toilet can fall out of alignment and service access can become inadequate.
The depth must be designed before construction closure begins.
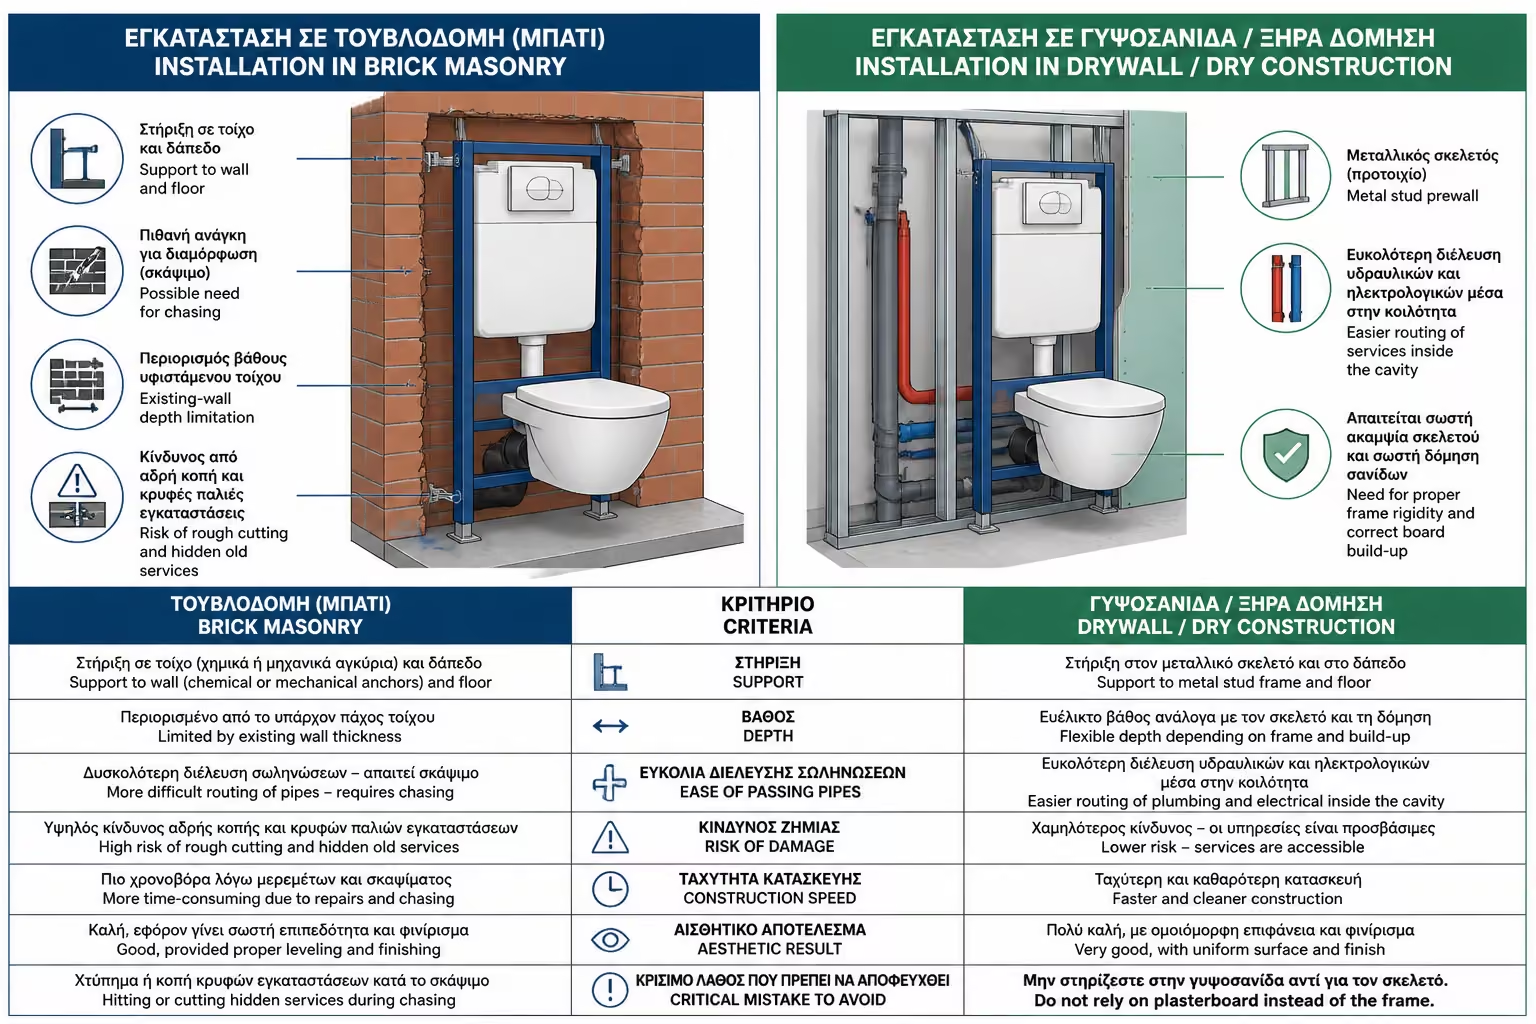
In older apartments, the built-in cistern is often placed in front of a brick wall or inside a structure that abuts existing masonry.
There are two main approaches: fully recessing the system into the wall where that is technically possible, or placing the frame in front of the wall and closing it with a suitable build-up. In practice, the second approach is the one used in many renovations.
No beams, columns or bearing elements should be dug to accommodate a cistern.
In masonry, the most critical checks are the following.
Check whether the wall can take anchors, whether old pipes or electrical lines pass through it, whether there is enough depth and whether the main stack or a structural element would be affected.
You do not carve into structural elements just to gain space for a concealed cistern.
In drywall construction, the concealed cistern must be installed with a suitable metal frame and proper support.
The toilet cannot simply be supported by the finishing layer. It needs a frame designed for dry construction, proper anchoring to the floor, correct fixing to the wall or support structure and a wall build-up that can absorb daily loads without flexing.
If the frame is left only loosely supported, the symptoms show up gradually: the toilet starts to move, joints crack, tiles are stressed, noises appear and the whole installation feels unstable. In drywall construction, the key issue is not just making the system fit, but giving it enough rigidity.
For this, a system suitable for dry construction must be used and the manufacturer's instructions must be followed.
To achieve that rigidity, the following points need to be checked.
Use a frame for dry construction, proper anchoring, moisture-resistant drywall or cement board where needed and reinforcement at the main load points.
Once rigidity is lost, the result is creaking, cracks, instability and long-term stress on the drainage connection.
Both solutions can work well, provided the system really matches the construction type.
The mistake is not choosing brick or drywall. The mistake is treating them as if they had the same structural limits, the same routing freedom and the same support requirements.
The table below shows, in simple terms, where the logic changes from one solution to the other.
| Criterion | Brick / Masonry | Drywall / Dry construction |
|---|---|---|
| Support | It can be supported on the wall and floor | It requires a proper support structure and cistern frame |
| Depth | Often limited by an existing wall | A false wall can be created with the correct depth |
| Ease of routing pipes | Needs digging or adjustments | Easier inside the frame |
| Risk of damage | Watch for structural elements and old installations | Watch rigidity and the correct wall build-up |
| Construction speed | Depends on chasing and site adjustments | Usually faster |
| Aesthetic effect | Very good if done right | Very good if done right |
| Crucial point | Avoid rough chasing into the wall | Do not rely on the drywall instead of the frame |
The mounting height of the frame must be calculated based on the final floor level.
If the plumber installs the frame before the floor is finished, he must know how much the screed will rise, how thick the waterproofing, adhesive and tile will be, and what final toilet height is required.
If calculated incorrectly, the toilet can end up too low or too high.
In special cases, such as elderly, disabled or tall users, the height can be adjusted.
The critical thing is to measure from the finished floor, not the old floor or raw sub.
In practice, the most useful reference points are the following.
In many applications, the finished seat height ends up around 40-43 cm above the finished floor, depending on the WC model and the user's needs.
The reference is always the finished floor level, not the old tile and not the raw substrate.
A wall-hung toilet takes significant daily loads.
The user's weight is transferred to the frame and from there to the floor and the wall or support structure.
The frame therefore has to be suitable for a wall-hung toilet, correctly anchored, correctly adjusted, aligned and compatible with the chosen WC pan.
There should be no movement when someone sits. If the toilet shifts, there is a serious support problem.
The support must be checked before the structure is closed.
If support fails, the most common consequences are the following.
Tile breakage, cracked joints, leakage at the connection, noise, instability and gradual loosening over time.
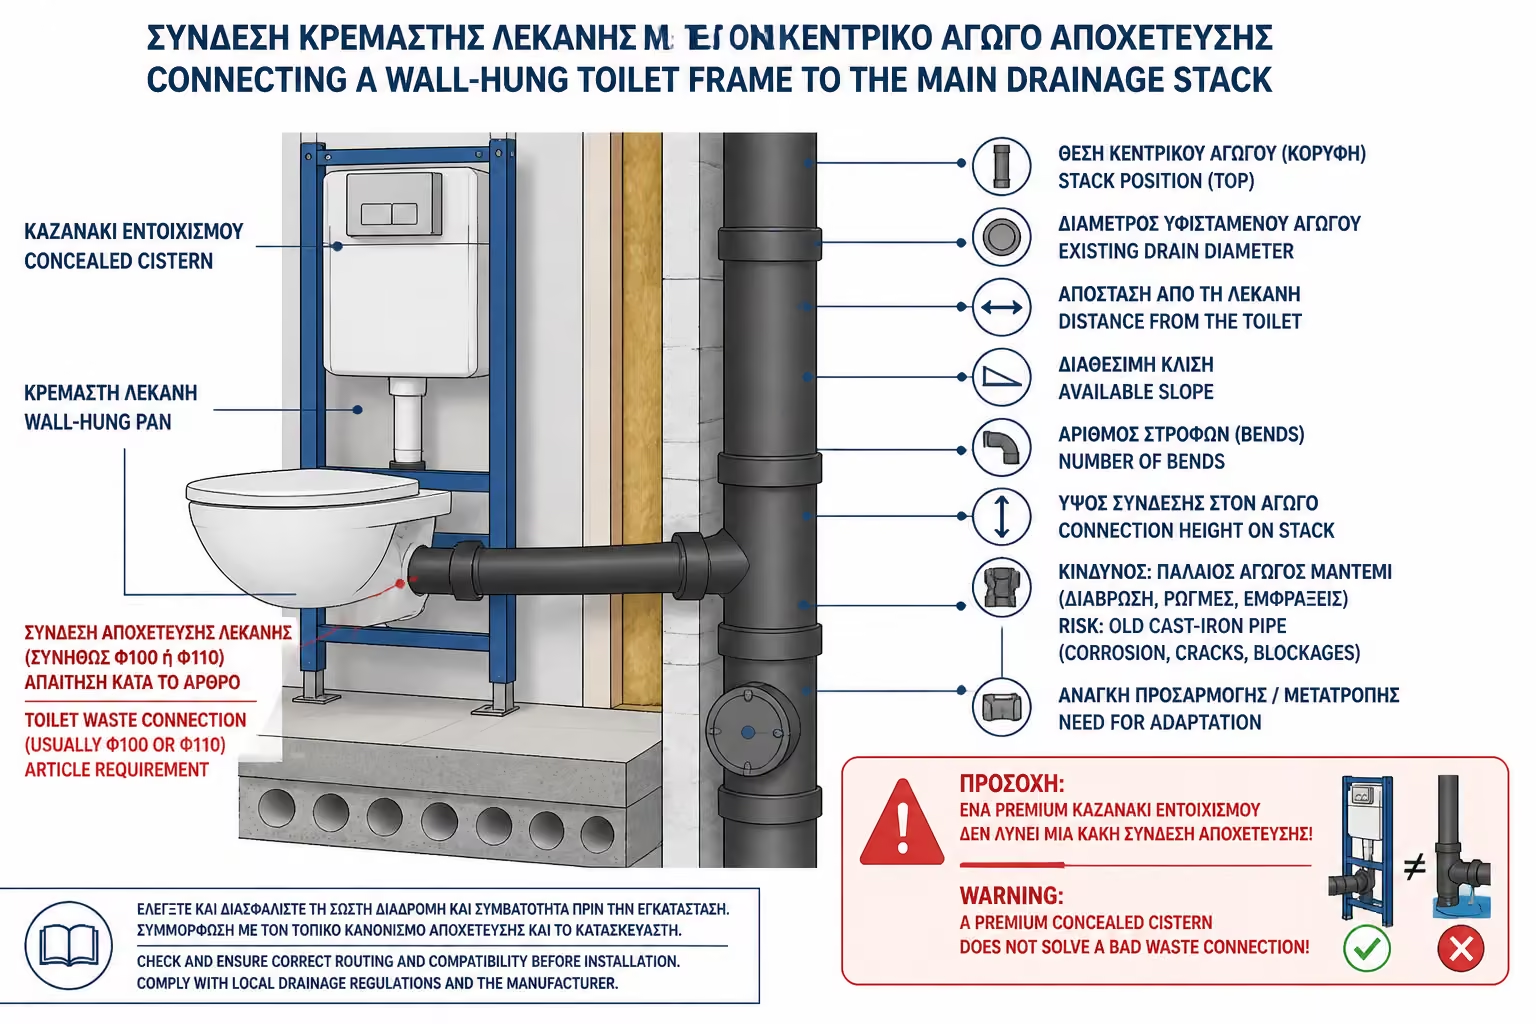
The connection to the sewer is perhaps the most critical technical point.
The toilet needs a large diameter drain, usually DN100/110, and a proper connection to the main stack.
A concealed cistern does not solve any drainage issue by itself. If the toilet connection to the stack is wrong, problems will appear no matter how good the cistern is.
Moving the toilet away from the stack is always a point of caution.
Before the connection is finalised, at least the following points should be checked.
The stack position, the existing drain diameter, the toilet-to-stack distance, the available fall, the number of bends, the connection height and whether old cast-iron pipework or shared services are involved.
In many renovations, the owner wants to change the toilet position for a better layout.
This can be done in some cases, but it is not always simple.
Toilet drainage is not like a water-supply line that can be moved more easily with a smaller pipe. It is a large drain that needs a proper slope.
If the toilet is moved too far from the stack, there may not be enough height available for the required fall.
The toilet position should be decided with the plumber, not only from an aesthetic point of view.
If the relocation is done without proper planning, the following problems usually appear.
Frequent blockages, slow discharge, noise, odor return, poor flush performance, the need to raise the floor or intervention in a shared stack.
The toilet drain must be properly sloped towards the stack.
If the slope is small, the sewage may not drain properly.
If the slope is too high, the water may run too fast and not transport the solids properly.
In many cases, a practical slope of around 1%–2% is a common reference for horizontal sewer runs, but the final application depends on diameter, length and layout.
The plumber should check the actual route.
It is not enough that the pipe "fits". It must work properly.
The WC drain should have the simplest route possible.
Too many bends or abrupt changes in direction increase the risk of blockage.
A concealed cistern should not make us forget that the WC outlet remains one of the most hydraulically demanding parts of the bathroom.
Best practice can be summarised in the following points.
Keep the route short, use smooth curves, minimise bends, maintain correct slope, allow for cleaning where possible and avoid improvised extensions.
The cistern needs a water supply. The connection must be made as provided by the system.
Before the wall is closed, the installer should already have clarified from which side the supply enters, whether an isolation valve exists, whether that valve remains accessible through the flush plate opening, whether the connection is stress-free and whether the line has proper sealing and pressure.
The water supply should not be improvised or inaccessible.
In many systems, key components are accessed through the flush plate opening. This should stay functional.
Before the wall is closed, the following points should already be resolved.
Entry side, valve position, access through the flush plate opening and a clean connection without stress on the line.
The flush plate is not just the visible button. In practice, it is the main maintenance opening of the whole system, the point through which a technician will one day need to inspect the mechanism, adjust the flush, isolate the water supply or replace service parts.
If the flush plate is installed badly, if the opening is narrowed or if it becomes trapped by the finished tile work, routine maintenance stops being routine and turns into a future headache.
Service access is required, not optional.
The main control points are the following.
Do not block removal with grout or adhesive, do not narrow the opening, do not place furniture in front of it, make sure the plate matches the cistern and test it before handover.
A built-in cistern can transfer sounds to the wall, especially in an apartment building.
The noise does not come only from the flush itself. It can come from cistern filling, vibrations, pipe contact with the structure or a generally rough installation that transfers every movement into the wall.
Soundproofing is not easily fixed after tiling, so it must be foreseen by the installation.
To limit noise transfer, the following measures help most.
Proper fixing, anti-vibration components where specified, pipe isolation, a quality mechanism and no unprotected contact with hard building points.
Once the wall is closed and tiled, noise problems are difficult to correct without opening the build-up again.
Good built-in cisterns usually have condensation protection or proper tank insulation.
This matters because hidden moisture inside the wall is never welcome, especially where the mains water is very cold, the room is humid or the ventilation is weak.
Choosing a branded system with the right specifications reduces the risk.
Extra caution is mainly needed in the following situations.
In humid rooms, on very cold networks, in poorly ventilated spaces and on cheap systems with questionable insulation.
The offer should not simply say "concealed cistern".
It should state the system type, whether it is for brick or drywall, the frame height, the required depth, whether the frame and flush plate are included, whether the wall-hung toilet is included, whether the drain connection is included, what drain diameter will be used, whether a false wall is required, how support will be achieved, whether service access remains available and what is excluded.
That way the owner knows what is being bought and can compare offers properly.
The reason that detail matters can be summed up in the following point.
That is the only way to compare two offers that may look similar in price but differ heavily in what they actually include.
Cost depends on the system, the WC pan, the flush plate and the difficulty of installation.
The table below gives a few indicative cost ranges for orientation.
| Work / Material | Realistic cost |
|---|---|
| Built-in cistern / frame | €150 – €350 |
| Higher-end branded frame | €300 – €600+ |
| Flush plate | €40 – €180+ |
| Wall-hung toilet | €150 – €500+ |
| Installation work | €200 – €500+ |
| False wall construction / closing | €150 – €500+ |
| Complete package with toilet, frame, plate and labor | €700 – €1,800+ |
The prices are indicative. In difficult drainage, special frame or premium options, the cost can go up.
No savings should be made on support, drainage or service access.
The most common failures seen in practice are the following.
System does not fit properly or piping is pinched.
Dry construction needs one type of system, while solid masonry needs another.
The toilet moves or cracks appear.
The toilet ends up too low or too high because the finished floor was not calculated.
Creates clogs, odors or poor flushing.
Service becomes difficult or impossible.
The layout improves visually, but the drainage logic gets worse.
Before choosing a concealed cistern, do not ask only which model will be installed. Ask for clear answers about the system depth, the wall type, the support method, the final toilet height, the stack location, the drain diameter and slope, the future service access, the spare parts policy and the checks that will be done before handover.
If there are no clear answers, the installation has not been designed well enough.
Before you approve the installation, it is worth clarifying at least the following two areas.
Depth, wall type, pre-wall or existing wall, support method and the final toilet height.
Stack position, drain slope, service access through the flush plate, spare parts availability, site photos and final testing.
Before the wall is closed, go through the following questions one by one.
| Question | Yes / No |
|---|---|
| Has a specific cistern system been selected? | Yes / No |
| Do we know the required installation depth? | Yes / No |
| Is it suitable for the type of wall? | Yes / No |
| Is the frame properly supported? | Yes / No |
| Has the final floor height been calculated? | Yes / No |
| Will the toilet end up at the correct height? | Yes / No |
| Is the drainage Φ100/110 or a suitable cross-section? | Yes / No |
| Is there a proper slope toward the stack? | Yes / No |
| Are many corners avoided? | Yes / No |
| Does the flush plate allow service access? | Yes / No |
| Has it been tested for tightness and function? | Yes / No |
| Are there photos before the construction is closed? | Yes / No |
| Is the system mentioned in the quote? | Yes / No |
If most of the answers are "no", the wall should not be closed yet.
An owner wants a wall-hung toilet for a more modern bathroom. The crew chooses an economical concealed cistern without properly checking the depth and the position of the main drain.
To make the layout work, the toilet is moved further away from the stack. The drainage path gains too many bends and only a marginal slope. The frame is closed with drywall without proper reinforcement.
The bathroom is delivered beautiful.
After a while, the toilet starts to move slightly, the drainage is not ideal and small cracks appear in the joints.
The problem wasn't the built-in cistern as an option. It was the poor technical implementation.
In another renovation, the team checks the construction depth, the wall type, the stack location, the drain diameter, the finished floor height, the flush plate and the service access before selecting the cistern.
The frame is fixed correctly, the drain is connected with a suitable diameter and slope, the water supply remains accessible through the flush plate opening and the structure is closed only after photographs and testing.
The result is modern, but above all technically safe.
A concealed cistern is an excellent solution when it is treated as a technical system and not only as a design feature.
Before installation, check the required depth, the wall type, the frame support, the final toilet height and above all the connection to the main drainage stack.
The wall-hung toilet must sit on the frame, not on the cladding. The drainage needs the correct diameter and slope. And the flush plate must remain a real service opening.
If any of those points cannot be guaranteed, a simpler solution may be technically safer.
Concealed cisterns can upgrade a bathroom both aesthetically and functionally. They create a cleaner look, allow a wall-hung toilet and make floor cleaning easier.
But they require proper technical planning.
If you keep only the essentials, these are the most critical points.
Installation depth, wall type, frame support, finished floor level and final toilet height.
Water supply, drainage diameter, slope to the stack, service access through the flush plate and the possibility of future maintenance.
The concealed cistern should disappear visually, but remain technically correct and accessible.
The right installation is the one that can't be seen — but has been working properly for years.
Return to category.
Go to categoryReturn to the central guide.
Go to guide