Example
The shower floor may have the correct fall toward the drain, but the pipe after the drain may be under-sloped or wrongly pitched. In that case, the water reaches the drain correctly but is not carried away correctly through the system.
Slopes are among the most critical technical points in a bathroom renovation. They are not visible in the final result, but they determine whether the bathroom will function properly every day.
If the floor falls are wrong, water remains on the floor after every shower. If the slopes of the drainage pipes are wrong, water may drain slowly, blockages may appear, odors may develop and waste can remain in the pipework.
The most common mistake is to treat slope as something simple: "make it lean a little toward the drain". In reality, there are two different categories: floor falls, which guide water over the tile to the drain or linear channel, and pipe slopes, which move water and waste correctly through the drainage network.
Both need to be done correctly before the tiles go in and before the pipes are closed.
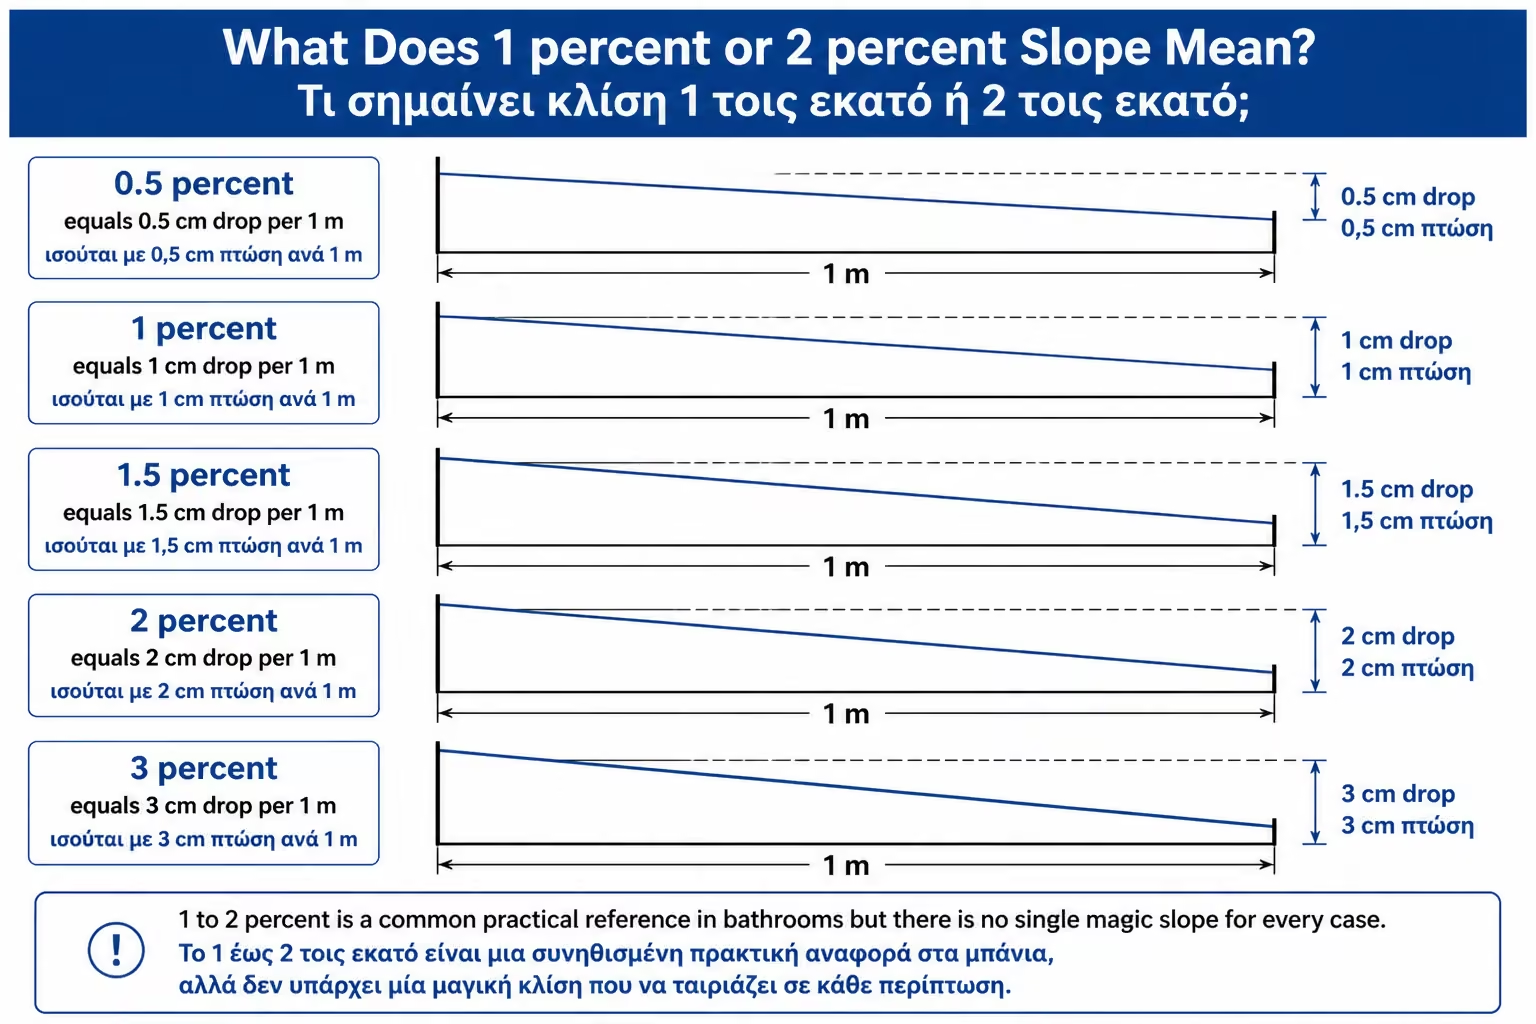
When we say that a floor or a pipe has a slope of 1%, it means that for every 1 meter of length there is a height difference of 1 centimeter.
Accordingly, a 2% slope means a 2 cm drop per 1 meter of length.
The table below shows how these percentages translate in practical terms.
| Slope percentage | What does it mean practically? |
|---|---|
| 0.5% | 0.5 cm drop per 1 m |
| 1% | 1 cm drop per 1 m |
| 1.5% | 1.5 cm drop per 1 m |
| 2% | 2 cm drop per 1 m |
| 3% | 3 cm drop per 1 m |
In bathrooms, slopes of around 1%–2% are a common practical reference for shower floors and several drain routes, always depending on diameter, length, connection point and use.
But there is no single magic slope for every case. A shower floor follows one logic, while a toilet drain line follows another.
This distinction is critical.
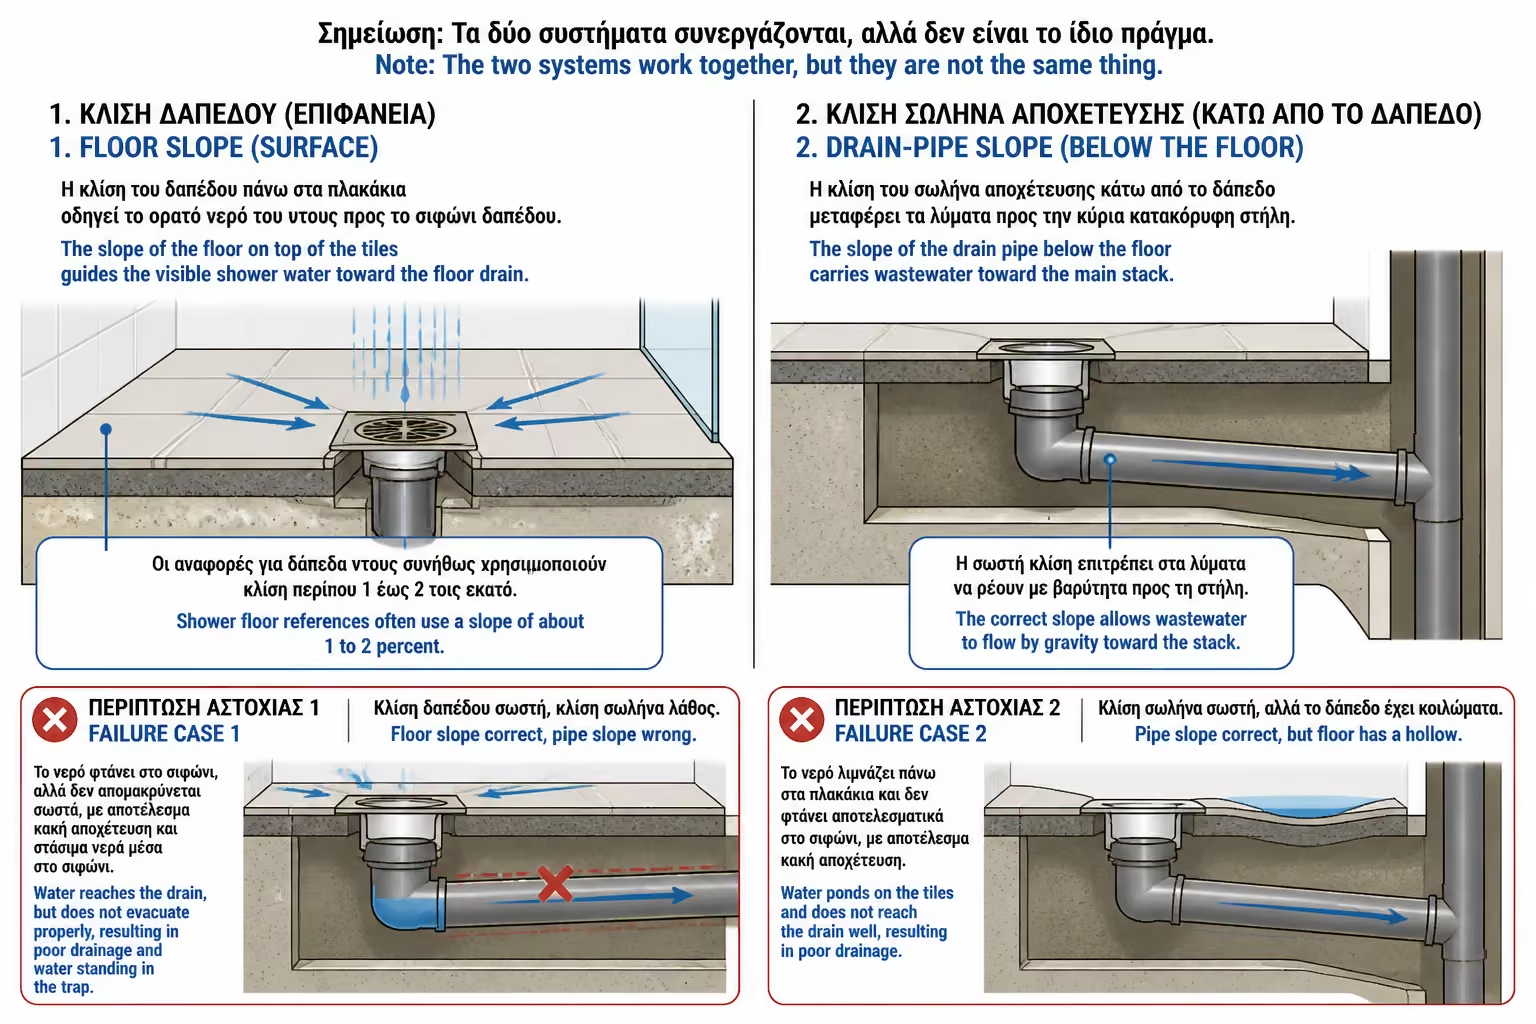
The slope of the floor is intended to direct surface water towards the siphon. That is, the water from the shower must flow over the tile towards the drain.
The slope of the sewer pipe is intended to transport water and sewage through the pipe to the central sewer.
The two systems work together, but they are not the same thing.
The reverse can also happen: the drain pipe may be correct, but the floor may have a low spot. Then the water never reaches the drain properly and stagnates on the tile surface.
You need both systems to work correctly together.
The example below shows how one part of the system can work while the other still fails.
The shower floor may have the correct fall toward the drain, but the pipe after the drain may be under-sloped or wrongly pitched. In that case, the water reaches the drain correctly but is not carried away correctly through the system.
Incorrect slopes create different problems depending on whether the failure is on the finished floor or inside the hidden drainage network.
What's worse is that both problems are often seen after completion, when the tiles are already in place.
The most common consequences usually show up in the following ways.
When falls are wrong, water remains on the surface, leaves limescale and dirties the shower faster.
Persistent moisture darkens grout lines and increases slip risk in the shower area.
Water can reach the rest of the bathroom and damage furniture, frames and nearby finishes.
The owner ends up wiping up a problem that should have been solved during construction.
Bad slope reduces self-cleaning flow and makes regular blockage far more likely.
Poor network behavior often appears as unpleasant smells and odd drainage noises.
If the system misbehaves, traps can be disturbed and water can even reverse direction locally.
Debris remains in the line and turns a bad slope into a permanent maintenance problem.
In the shower zone, the slope of the floor should lead the water to the siphon or linear channel.
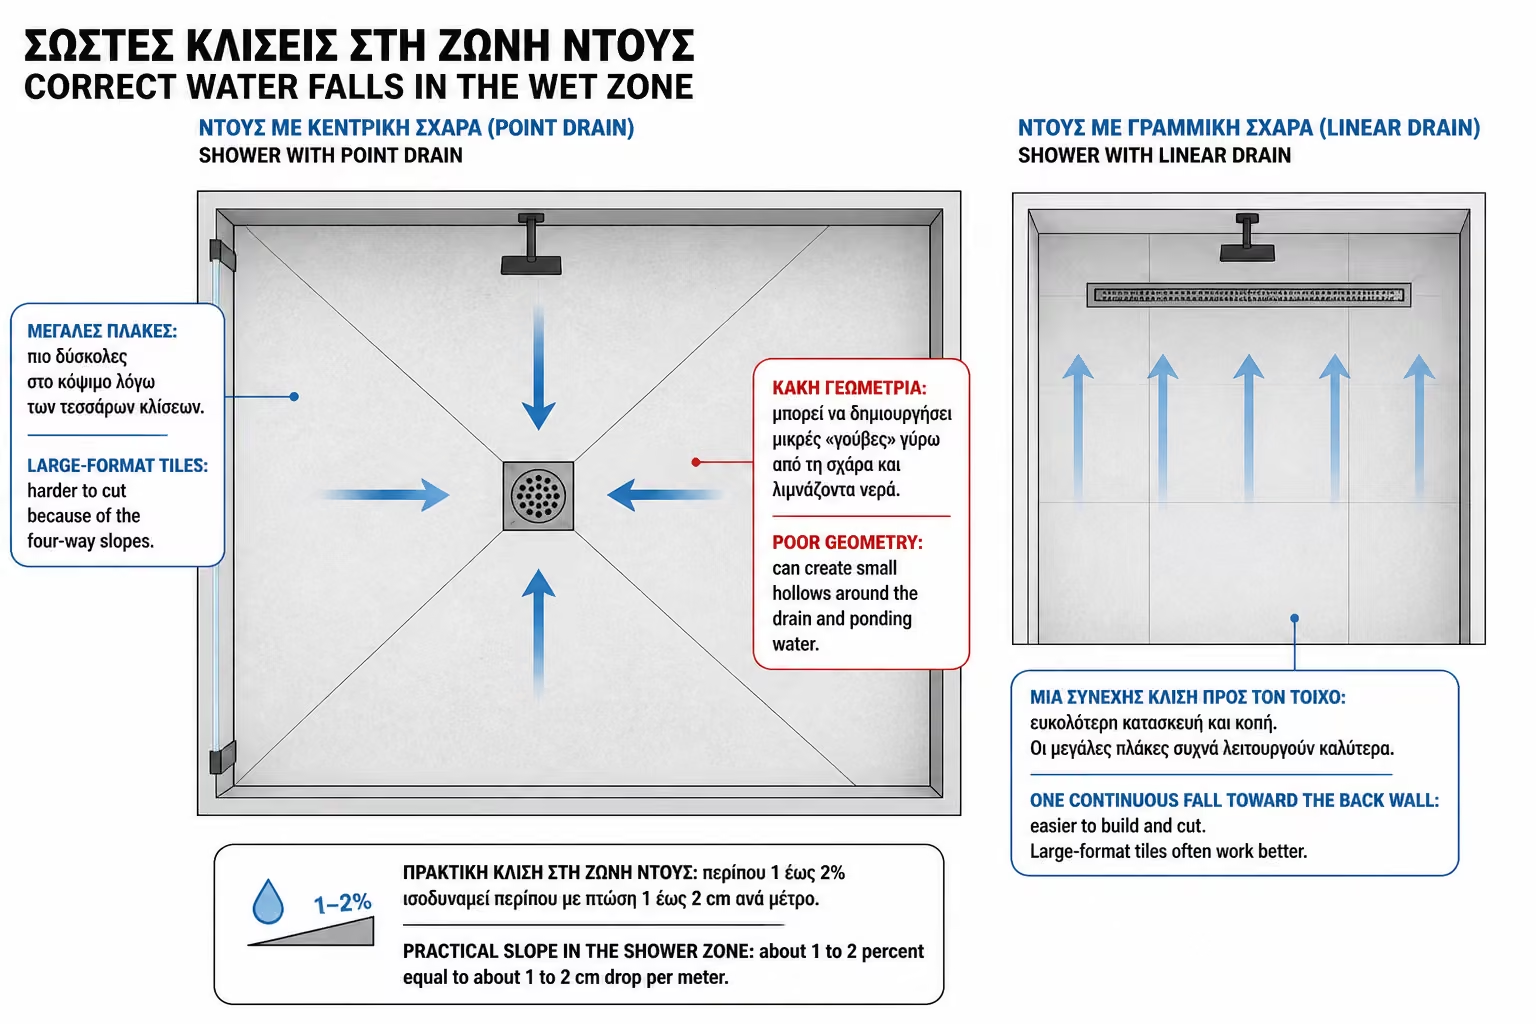
In many applications, a practical slope of about 1%–2% is sufficient to move water without the floor becoming uncomfortable to step on.
In practical terms, over a distance of 1 meter, a 1% slope means about 1 cm of fall, while a 2% slope means about 2 cm. If the distance is 1.20 m, the corresponding falls become about 1.2 cm and 2.4 cm.
This difference must fit into the finished floor, along with grout, waterproofing, adhesive and tile.
In practical terms, that usually translates into the following checks and dimensions.
If the distance from the start of the shower to the siphon is 1 meter:
Allow about 1 cm of fall for every 1 m of water travel.
Allow about 2 cm of fall for every 1 m, with a stronger but often safer water path.
The slope still has to work together with screed, waterproofing, adhesive and the finished tile.
In a walk-in shower, many owners want the floor to look completely flat and uniform. This is aesthetically understandable, but technically the floor must be sloped.
If it's really flat, the water will stay.
A minimal visual result does not mean zero fall. It means the fall is carefully hidden and properly designed.
The slope should be enough for the water to go down the drain, but not so steep that the user feels they are stepping on a "ramp".
When using a classic square or round floor drain, the floor often needs to be sloped from multiple sides to one point.
This can create difficulty when using large tiles.
The most common practical difficulties in that setup are the following.
Multiple falls make clean tile layout much harder, especially with large-format tiles.
The tile has to follow several falls without producing awkward or weak-looking cuts.
If the shaping is imprecise, local puddling points appear around the drain area.
Corners become easy problem spots when the different falls do not meet correctly.
If the cuts are not organized carefully, the finished floor looks improvised rather than intentional.
For that reason, with a classic floor drain, smaller tiles or mosaic tiles usually make it easier to form multiple falls correctly.
A linear drain usually allows a simpler and cleaner floor fall.
If the channel is in the rear wall, the floor can be sloped with a single slope to the rear.
This is especially helpful when the goal is large tiles, a cleaner visual result, fewer cuts and a walk-in shower with a single-direction fall.
For this solution to work properly, the following points still need attention.
A linear drain does not solve the problem by itself. If the fall is wrong or the channel does not have enough flow capacity, water will still remain or escape the shower zone.
It works best when the project is aiming for a more contemporary look, less visual clutter and cleaner floor geometry.
With a wall drain, the floor directs water toward the low opening in the wall.
The slope is usually one-sided, towards the wall.
This can give a very clean result, but requires a lot of precision.
For a wall drain to perform properly, the following points need attention.
The water must be guided decisively into the wall opening and not spread across the shower area.
Any local dip before the outlet immediately undermines the effectiveness of a wall drain.
This junction detail is critical if the installation is to remain dry over time.
The wall drain still has to handle the actual water output of the shower.
A clean visual result is not enough if the drain cannot be maintained properly.
If the slope does not properly direct the water to the wall, the wall siphon loses its main advantage.
Sewer pipes need their own slope.
The goal is to move water and sewage fast enough to run away, but not so fast that the water "runs" and leaves behind solid debris.
In many horizontal drainage runs, practical slopes of around 1%–2% are a common reference. For a 2-meter drain pipe, that means about 2 cm of fall at 1% or about 4 cm at 2%.
This must fit within the floor or structure.
The final slope choice is mainly affected by the following factors.
The required slope depends partly on how much water and what kind of waste the pipe carries.
The longer the route, the more important consistent fall becomes along the whole line.
A washbasin, shower and toilet line do not have the same functional demands.
The actual route geometry affects how the drainage performs in real life.
The available construction depth can make the ideal slope easier or harder to achieve.
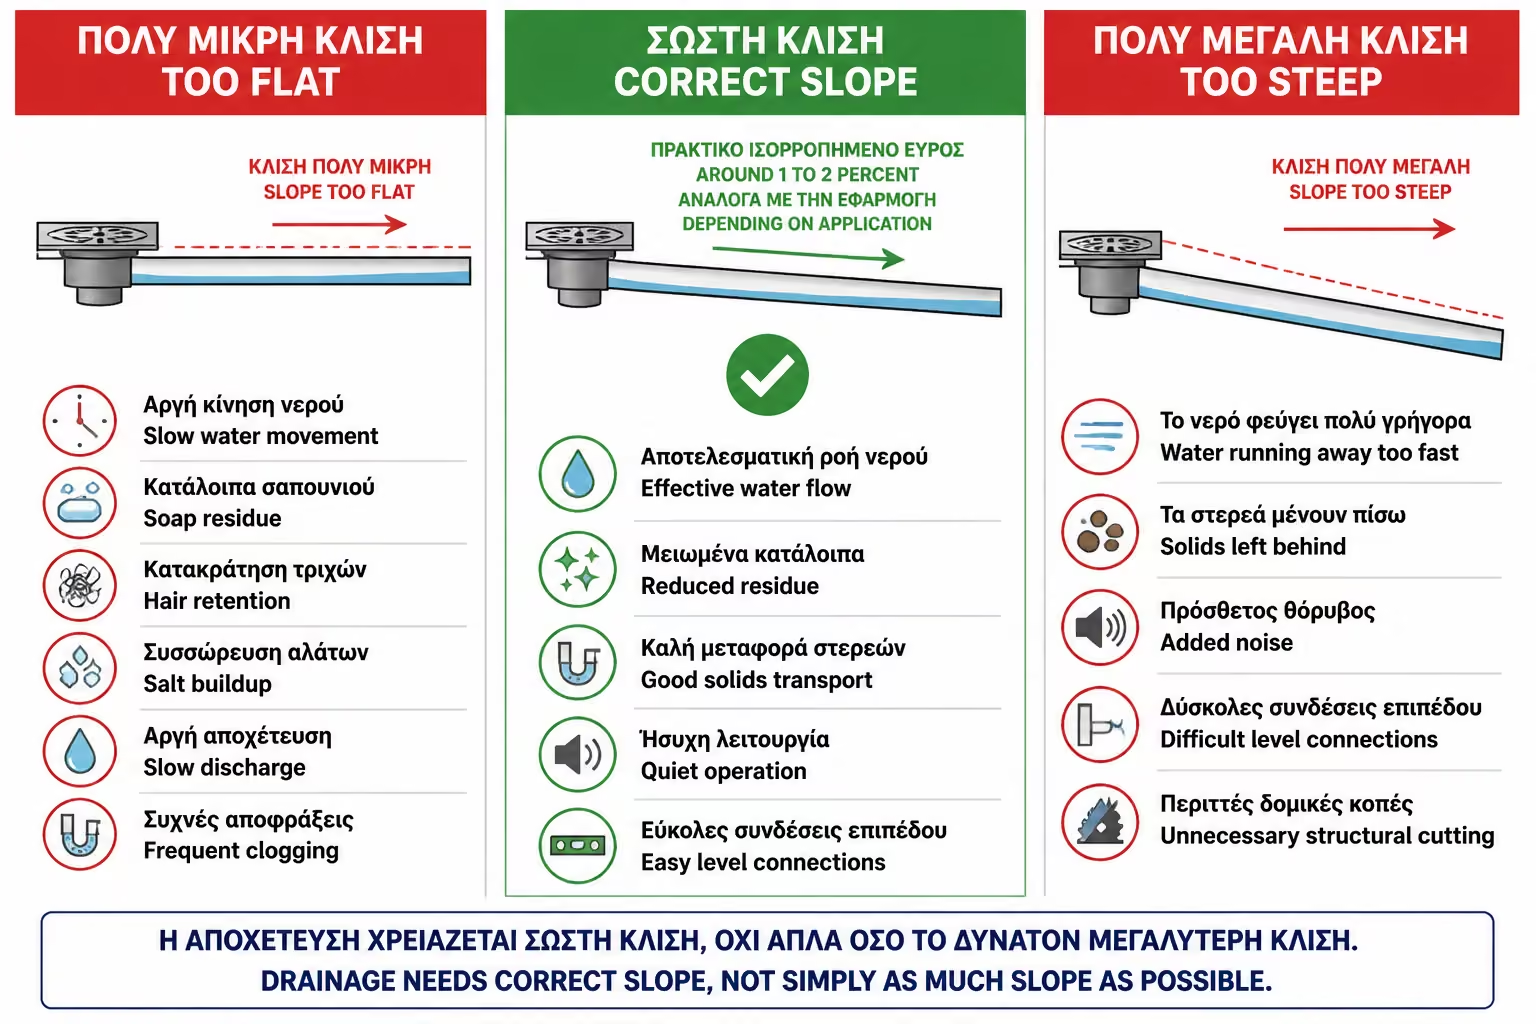
If the slope of the drain is too small, the water moves slowly.
The most common problems that follow are the following.
Slow-moving water does not clean the inside of the pipe effectively.
Residue settles more easily when the flow lacks enough energy.
The symptom appears to the user as a weak drain, but the cause is structural.
Bad slope turns maintenance into a recurring problem instead of a rare event.
In sinks and showers, the problem often appears as slow drainage.
In a toilet line, it can create a more serious problem because solid waste is involved.
Many believe that "the higher the slope, the better".
This is not always the case.
In sewage drains, if the slope is too steep, the water may run off too quickly and not carry the solids away properly. Thus, residue may remain in the pipe.
In addition, too much slope can create noise, awkward tie-ins to existing levels, installation difficulty, low-floor conflicts and the need for unwanted demolition or digging.
Drainage needs a proper slope, not just "as much as possible".
The sink drain usually has a smaller diameter and lower flow than a shower or toilet drain.
Even so, it can clog easily with hair, soap, toothpaste, shaving residue and limescale.
The pipe must have a clear route and the correct slope toward the stack or the main drain line.
At a sink, the most common mistakes and weak points are the following.
Very small or zero fall immediately makes the sink line more vulnerable to clogging.
Any local backfall traps water and debris instead of draining it away.
Frequent direction changes make a small-diameter line even more sensitive.
Improvised spiral-style connections should not replace a proper installation.
Even if the pipe is correct, a bad trap connection can still undermine the whole system.
The longer the route, the more essential proper slope becomes.
The sink does not need an excessive slope, but it does need a steady and correct flow.
The shower requires attention because it receives a continuous flow of water.
If the drain after the siphon is not properly sloped, the water may not have time to leave, even if the siphon is good.
For the shower to work properly, the following elements need to work together.
The shower drain itself has to offer real flow capacity from the start.
The downstream pipework must not throttle the drain.
The pipe after the drain must carry water away steadily and without hesitation.
A shorter and cleaner route usually improves overall reliability.
Every extra bend increases flow loss and blockage risk.
Even a perfect drain line cannot help if water never reaches the drain correctly.
If the shower has a large rain head, the drainage must be designed even more carefully.
Toilet drainage is the most demanding point.
The toilet line needs a large pipe size and a correct fall toward the stack. If the toilet is moved away from its original position, problems can arise quickly.
At this point, the most critical technical risks are the following.
The farther the toilet moves, the harder it becomes to keep the drainage reliable.
A toilet line is particularly unforgiving when the fall is only marginal.
Direction changes raise the risk of poor performance and blockage.
Limited depth often pushes the installer toward technically weak compromises.
Toilet drainage should never be altered with ad hoc site improvisation.
The proposed route should be confirmed technically before anyone commits to the layout.
Moving a toilet should never be decided on layout alone. First, it must be confirmed that the drainage can still work properly.
Pipe diameter and slope work together.
A small diameter pipe with a slight slope clogs more easily.
A larger pipe with the wrong slope can also perform badly.
Some typical pipe-size and usage combinations are the following.
It needs a clean route and correct fall because the small diameter clogs more easily.
It needs proper slope, a correct drain body and as few bends as possible.
It needs a proper fall toward the stack and not crude relocation just to satisfy the layout.
Correct cross-section does not save a wrong slope. And the correct slope does not save an undersized pipe.
A "belly" is a local low point where the pipe or the floor dips and then rises again.
On the floor, a belly traps water. In the pipework, it traps debris and waste.
The most common causes behind these low spots are the following.
A bad base makes local low spots in the floor much more likely.
If the pipe is not supported correctly, it can sag and create a belly over time.
Lack of precise level control creates local low points that retain water or waste.
With time, a weak base or weak connection detail can change the geometry of the route.
When the available build-up is inadequate, dangerous compromises often appear.
The transition from new to old drainage is a common point of technical failure.
Stomachs must be corrected before the floor closes. Then it's very difficult.
Even with the correct slope, too many bends make drainage more difficult.
Every turn is a potential debris hold-up point.
For that reason, the drainage route should follow these basic principles.
Simple geometry is always a friend to drainage performance.
Where turns are necessary, they should be as gentle as the system allows.
Every extra bend increases the chance that debris will collect.
The system should still be maintainable without destructive intervention.
The drainage path should not be twisted just to make the site work temporarily.
Drainage must be designed simply. The more complex it becomes, the greater the risk.
The owner does not need to become a plumber or tiler. But they can and should ask for some basic checks.
In practice, those checks usually fall into the following two groups.
Ask for a spirit-level or laser check, a water test, confirmation that there are no low spots and proof that the water actually runs to the drain.
Ask to see the drainage route before it is closed, a check of pipe slopes, a flow test, photos, confirmation of pipe sizes and proof that there are no reverse slopes.
These checks are much easier before the tiles go in.
The water test is one of the most practical tests.
On the floor it shows if the water goes to the siphon or if it stays.
In drainage it shows whether the runoff is fast or slow.
For the test to be meaningful, it should meet the following basic criteria.
The earlier the check happens, the cheaper any correction will be.
The test should confirm the real behavior of the formed floor, not a theoretical drawing.
It is not enough to test only the surface. The downstream line has to work too.
Once the floor is closed, any correction becomes far more expensive and disruptive.
The test should be controlled and deliberate, not improvised.
If the water doesn't drain properly in the test, it won't magically drain afterwards.
The bid must describe the work affecting the slopes.
In practice, the following points should be stated explicitly.
The quote should clearly state that the actual shaping of the falls is included.
The base and the drain location directly affect how the whole bathroom will work.
The offer should say whether the drainage network is being modified or only inspected.
The key technical dimensions should never be left vague.
Verification should be explicitly included, not treated as an assumption.
The owner should know what is included after the floor shaping and what is not.
The phrase "tile installation" does not by itself guarantee correct floor falls. The phrase "new drainage" does not by itself explain whether the slopes are correct.
The cost depends on whether the error is detected before or after the tiles.
The table below gives a few indicative cases so the difference is easier to understand.
| Case | Indicative cost |
|---|---|
| Minor correction of floor falls before tiling | Low to moderate |
| Correction of screed and falls during renovation | Usually part of preparation / waterproofing |
| Local tile removal because of incorrect floor fall | €300 – €800+ |
| Complete reconstruction of shower floor | €600 – €1,500+ |
| Correction of toilet drainage after handover | €500 – €2,000+, depending on the intervention |
| Removal of a large part of the bathroom | It can far exceed the initial cost |
Getting the slope right at the start is much cheaper than correcting afterwards.
The mistakes seen most often in practice are the following.
It looks minimal, but holds water.
Water goes to the door instead of the siphon.
The water never reaches the drain point properly.
Water reaches the siphon, but does not drain properly.
It can create problems in waste lines.
They hold debris and lead to clogs.
They increase the likelihood of blockages.
The error is only visible after delivery.
A homeowner installs a walk-in shower with large-format tile. The linear drain is placed on the back wall, but the screed is formed in a hurry. The floor looks good, but the fall is marginal and there is a small belly in the middle.
At the same time, the drainage after the siphon has a small slope and two corners.
After the first showers, the water remains in places on the floor and the drainage is slow.
The owner thinks the linear drain is to blame. In fact, the problem is the combination of incorrect floor falls and poor drainage slope.
In another renovation, the position of the siphon is decided before the screed is formed. The plumber checks the drainage route and the tiler shapes the floor falls based on the finished tile.
Before the tiles go in, the slope is checked with a laser, a water test is carried out, drainage performance is confirmed, the pipework is photographed and waterproofing is applied over a correct base.
The bathroom is delivered and the water drains properly without pooling.
This is sound engineering design.
Before the bathroom is closed up, it is worth going through the following questions one by one.
| Question | Yes / No |
|---|---|
| Has the location of the siphon been decided? | Yes / No |
| Have the floor falls been calculated? | Yes / No |
| Does the floor slope lead to the siphon? | Yes / No |
| Are there any low spots in the floor? | Yes / No |
| Has the slope been checked with a spirit level or laser? | Yes / No |
| Has it been tested with water? | Yes / No |
| Are the drain pipes sloped correctly? | Yes / No |
| Are there no reverse slopes? | Yes / No |
| Are many corners avoided? | Yes / No |
| Has the toilet connection to the stack been checked? | Yes / No |
| Are the drains photographed before they are closed? | Yes / No |
| Are the slopes mentioned in the quote? | Yes / No |
If most of the answers are “no”, the bathroom should not be closed yet.
Slopes are one of the details that must be checked before the tiles go in. After that, correction becomes difficult and expensive. Do not look only at whether the floor “looks flat”. In the shower zone there must be a proper fall, often around 1%–2%, so that the water is guided into the drain. In the drainage pipes, correct slope is equally important. Too little slope leaves water and debris behind. Too much slope can also create problems, especially in waste lines. Ask for a spirit-level or laser check, a water test and photos before the pipes are closed. If something does not drain correctly during testing, it will not magically fix itself after handover.
The slopes in the bathroom are a technical detail that determines the daily function of the space.
The floor must have proper drainage so that the water is quickly led to the siphon. Drainage pipes must be properly sloped so that water and sewage are removed without leaving residues in the network.
In practice, slopes around 1%–2% are a common technical reference, but the final application depends on the site, cross-section, length, siphon, drainage and bathroom layout.
To avoid problems, the bathroom needs real technical checking before the work is closed up.
If you keep only the essentials, these are the points that matter most.
The drainage point should be decided from the start, not as a late adjustment.
The finished floor and the hidden drainage line have to be treated as one system.
Simple and correct geometry dramatically reduces the risk of failure.
Real checking and documentation are more reliable than assumptions on site.
Waterproofing should sit on top of a floor that already has the right geometry.
A bathroom is not enough to look beautiful. It must drain properly. And that starts with the right slopes.
Return to category.
Go to categoryReturn to the central guide.
Go to guide