Hydraulic sources
Water falling in the stack, flow in horizontal pipework, toilet discharge and the operation of a built-in cistern all create noise.
Drainage noise is one of the most annoying problems in a home, especially when the bathroom sits next to a bedroom. A late-night flush is often enough for the pipework to start resonating and for the vertical stack to be heard clearly in the room next door.
Most owners discover the issue too late, once the renovation is finished and the pipes have already been closed behind tiles, drywall or masonry. At that point, the fix becomes disruptive and expensive, because the problem is not solved with a little foam or a heavier finish.
Drain soundproofing has to be planned from the start. The challenge is not only airborne sound from the water flow, but also vibration passing from the pipe into the wall, the slab, the supports and eventually the bedroom.
The right solution combines low-noise pipes, acoustic collars, decoupling from structural elements, avoidance of hard contact points and a properly detailed enclosure. When the bathroom backs onto a sleeping area, every one of those details matters.
Drainage noise does not come from one single source. It begins with falling water inside the vertical stack, continues through the flow in horizontal runs and gets stronger at bends, direction changes and toilet discharge points.
From there, the issue becomes structural. Vibration passes into the collars, the supports, the contact points with walls or slabs and even the cavity behind a service wall, until the sound is heard clearly in the next room.
The main sources of noise and the points where it gets amplified are the following:
Water falling in the stack, flow in horizontal pipework, toilet discharge and the operation of a built-in cistern all create noise.
Bends, direction changes and abrupt flow transitions increase the amount of sound the system produces.
Supports, collars and rigid contact with structural elements carry noise into the building fabric.
A shared wall with a bedroom or a hollow enclosure around the pipe makes the disturbance much more noticeable.
Simply hiding the pipe is not enough. The design has to reduce both flow noise and vibration transfer at the same time.
In drainage design, the issue is not only the noise you hear directly in the bathroom. There is airborne noise from the water flow and structure-borne noise that travels through the building itself.
The second type is usually the more stubborn one, because it cannot be solved just by wrapping more material around the pipe. It requires proper decoupling, the right collars and careful support details.
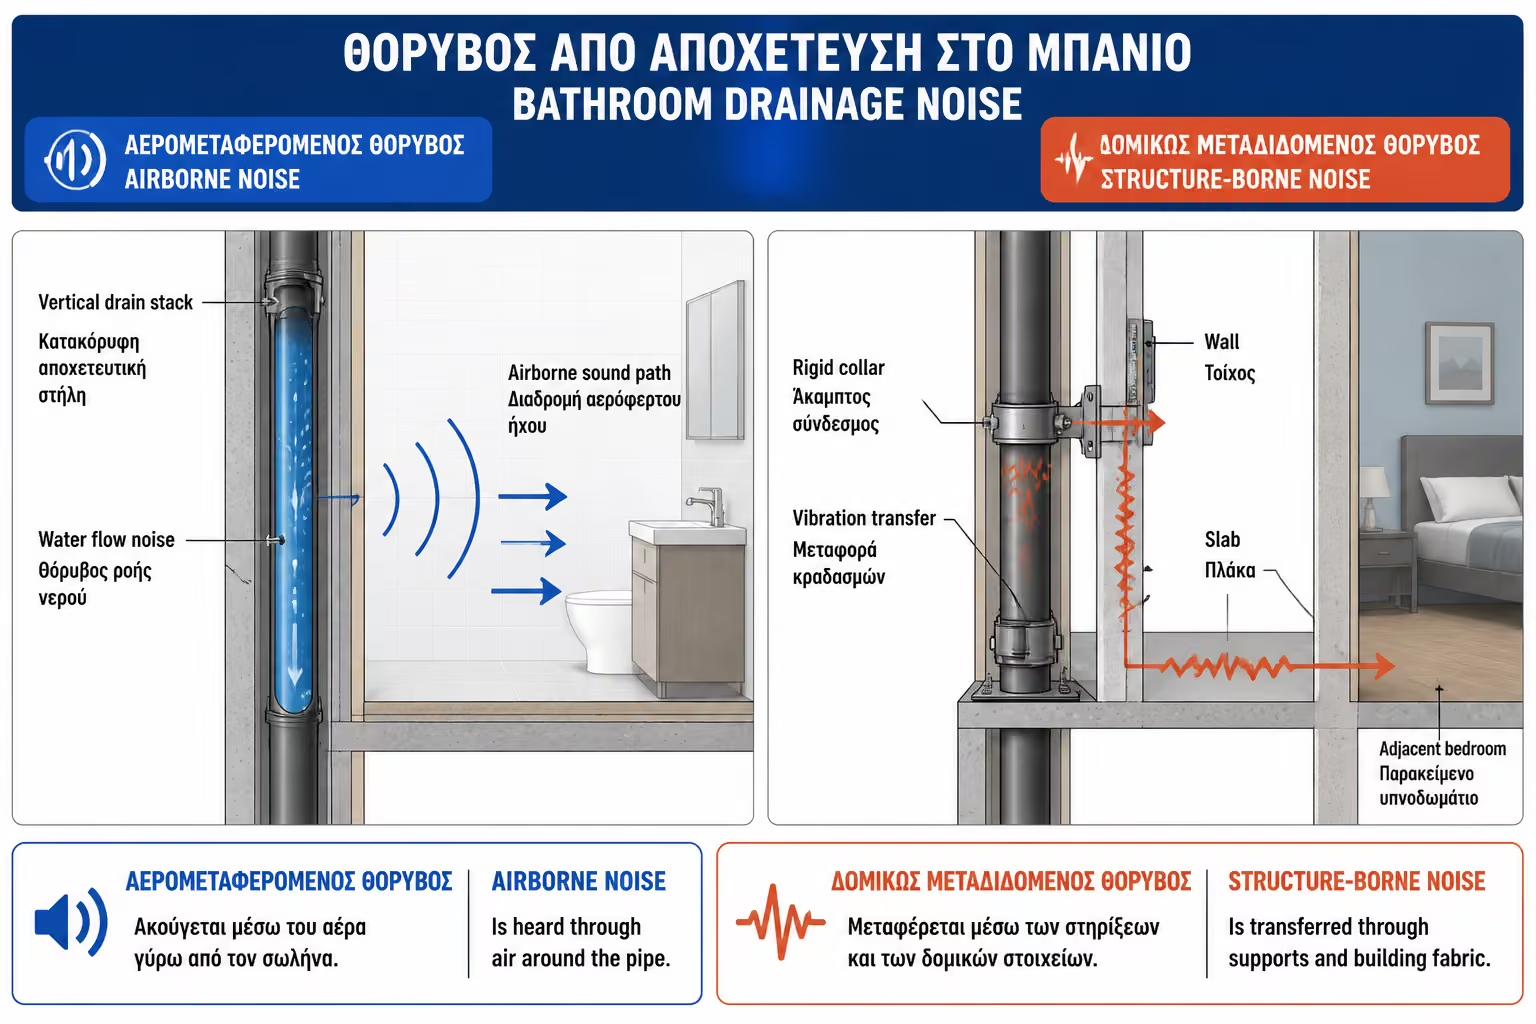
The following distinction helps clarify what kind of noise you are dealing with:
It is the sound transmitted through the air. For example, the sound of water running through a pipe and heard through a thin wall or plasterboard.
It is the noise transmitted through structural elements. For example, the pipe vibrates, the vibration travels from the collar to the wall and then is heard in the next bedroom.
The cistern creates noise in two ways. During the flush, a large volume of water leaves the toilet and enters the drain line, producing strong flow noise. A few moments later, when the cistern refills, the filling valve can create a second layer of audible sound.
If the toilet and the drain stack sit on a wall shared with a bedroom, that sound does not stay inside the bathroom. It travels into the wall build-up, the service wall and the structural elements, so it becomes annoying exactly where quiet matters most.
The problem usually becomes worse when one or more of the following conditions are present:
If the drain runs through a thin wall or the stack sits on the same wall as the bedroom, sound transfer rises sharply.
Basic PVC pipes without acoustic performance let flow noise pass much more easily.
Hard collars and direct contact with brick, concrete or drywall turn the pipe into a vibration bridge.
If the space around the pipe is left hollow and uninsulated, it behaves more like a speaker box than a barrier.
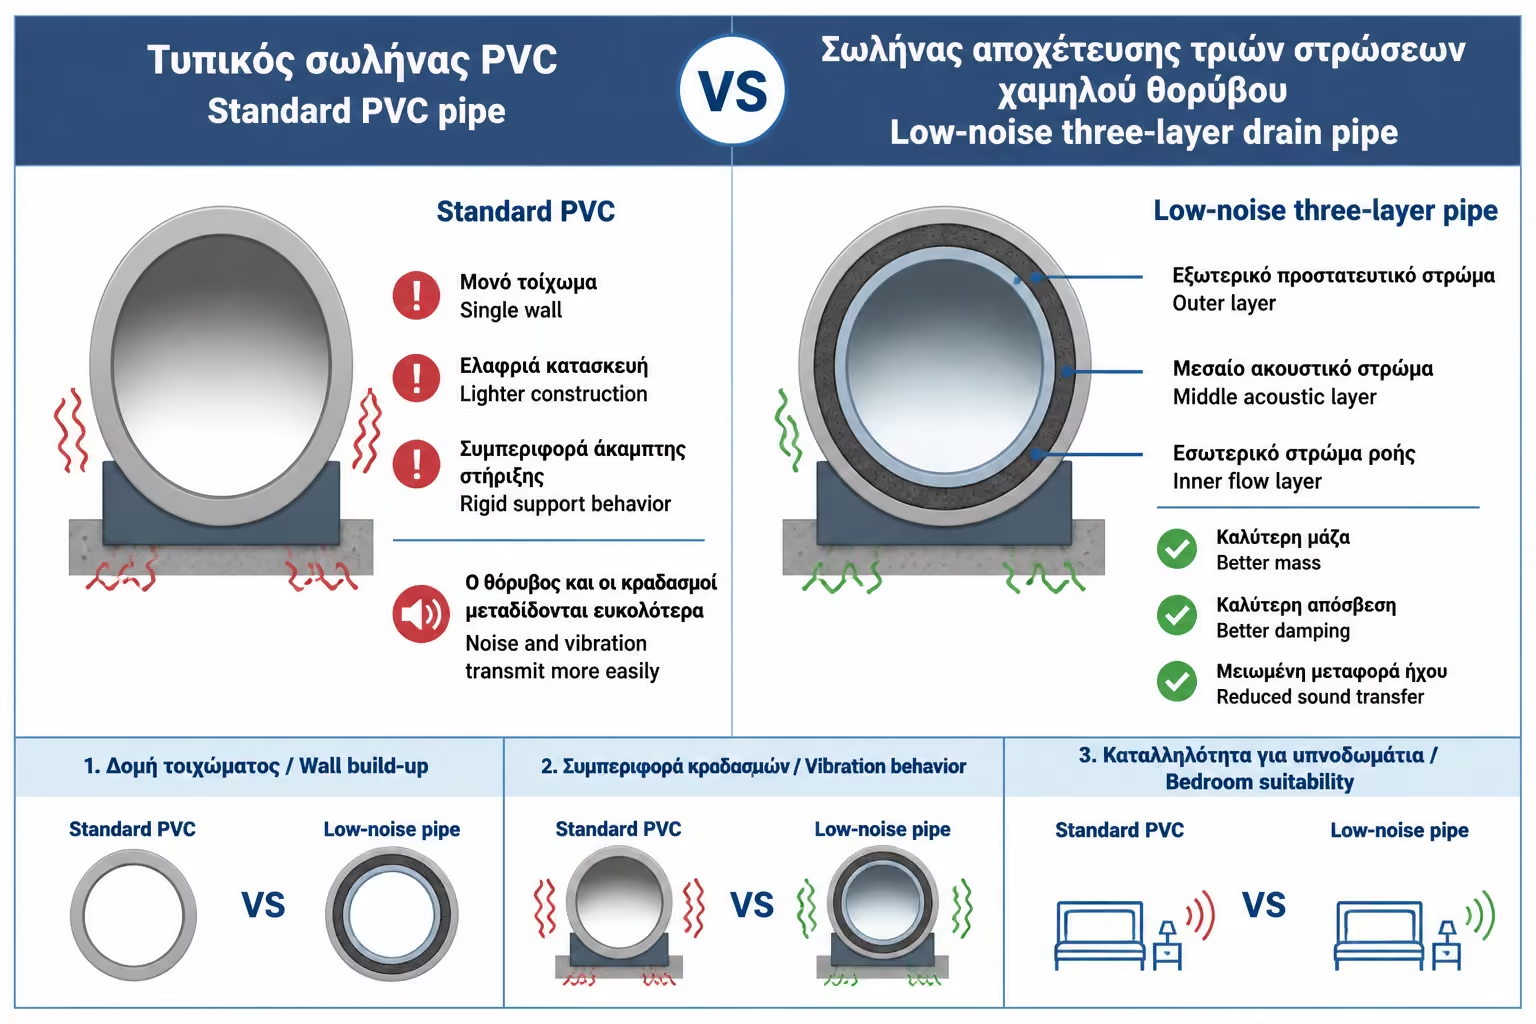
Standard PVC drainage pipes are economical and common, but they are not the best choice when the drain line sits beside a bedroom or another quiet area.
Low-noise pipes are designed to reduce both flow noise and vibration transfer, so the pipe does not “ring” as easily and does not behave like a rigid acoustic bridge.
The main differences between the two options can be summarised as follows:
These pipes are often three-layer products, heavier systems or special formulations with increased acoustic mass.
The added mass and tuned composition help reduce flow noise and limit vibration transfer into the building.
You also need matching fittings and the right collars, not just a “better pipe” installed carelessly.
Three-layer pipes are not just a thicker version of a standard waste pipe. They use multiple material layers that work together to improve mechanical strength, flow performance and acoustic behaviour.
The outer layer provides protection and stiffness, the inner layer supports smooth flow and durability, and the middle layer often has higher density or a tuned composition to help reduce noise.
That is why they usually perform much better than standard PVC when the drainage line runs beside a bedroom or inside a lightweight enclosure.
Even so, much of that benefit is lost if the pipe is fixed crudely with hard collars or packed rigidly into the wall build-up.
To understand where these pipes really perform better, focus on the following points:
They reduce flow noise, add mass and stiffness, limit sound transfer and perform especially well in vertical stacks near bedrooms.
They are most valuable in concealed drainage runs, shared bedroom walls and service walls where every vibration gets amplified.
It is not enough to install only one section of low-noise pipe. The result depends on matching bends, tees and fittings, the right collars, the right support method and the right enclosure build-up.
Collars are not just fixing accessories. They are the first point where pipe vibration can either be damped or passed directly into the wall and heard in the next room.
If a collar is rigid, overtightened or anchored to the wrong substrate, even a good low-noise pipe loses a large part of its acoustic advantage.
In a properly detailed support system, the main points to check are these:
The collar must match the pipe diameter so it supports the line without crushing it.
A rubber or anti-vibration insert helps reduce vibration transfer into the structural element.
Collars need to be placed at the proper intervals, without overtightening that increases structure-borne noise.
The anchor point and the collar itself have to work properly with both the pipe system and the wall build-up receiving them.
In other words, drain soundproofing is not only about pipe selection. It is also about how the pipe is suspended.
Decoupling means making sure the pipe does not sit hard against brick, concrete, metal framing or drywall. Every rigid contact point becomes a path for vibration to enter the building.
The principle is simple: wrapping the pipe is not enough if the installation has already turned it into an acoustic bridge to the structure.
The most common decoupling mistakes are the following:
The practices that improve the result most are these:
The goal is to stop noise reaching the building frame directly, so it dies out before it can travel any further.
The vertical drain stack is usually the noisiest line in the system. That is where falling water from upper floors concentrates and where the most persistent continuous noise is generated.
If the stack runs beside a bedroom or inside a shaft that borders a room, the disturbance becomes much more noticeable and needs a coordinated solution.
A quieter vertical stack usually depends on the following measures:
Low-noise pipes and compatible fittings reduce flow noise at the source.
Acoustic collars and the avoidance of rigid contact with masonry limit structure-borne noise.
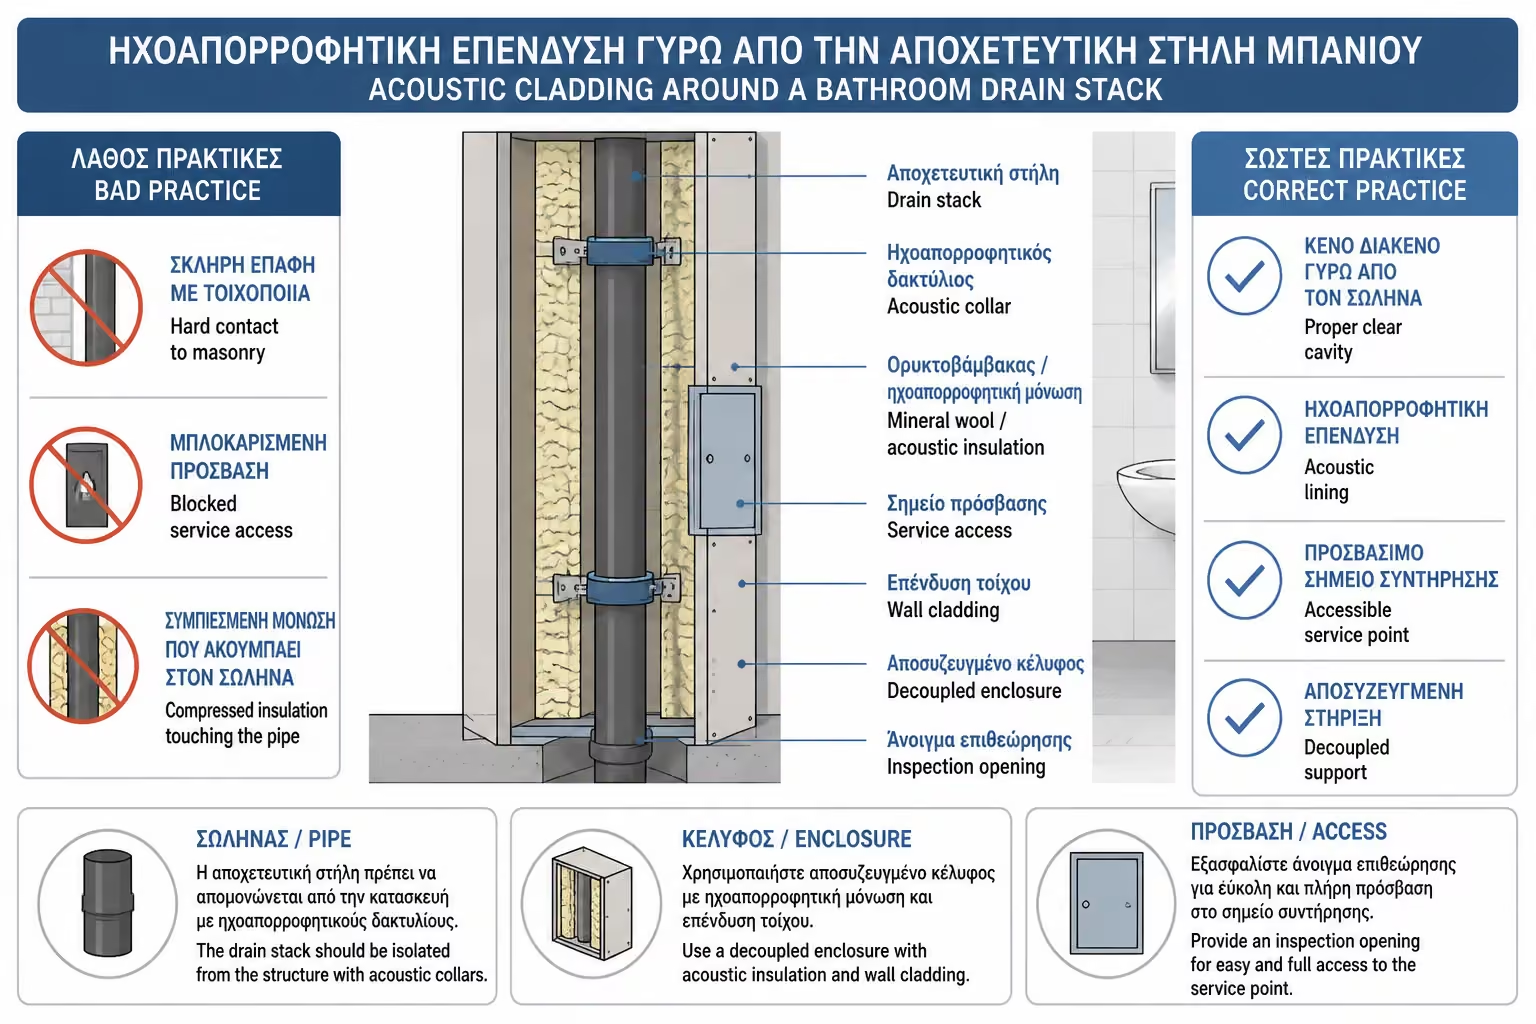
Stack lining and a carefully detailed shaft enclosure complete the acoustic protection.
If the stack is shared, any intervention has to be handled carefully and in coordination with the apartment building or property management.
The vertical stack is not the only part that makes noise. Horizontal drain runs can also become audible, especially when they pass through floors, suspended ceilings or walls close to a bedroom.
Their noise is often more subtle, which is exactly why it gets overlooked until the job is already finished.
The most common noise sources in horizontal drains are the following:
The main measures that improve the result are these:
When horizontal runs pass close to a sleeping area, they should never be treated as a minor detail.
A built-in cistern can be quieter than a poorly executed exposed installation, but it is not automatically silent. If the detailing behind the tiles is wrong, the noise will still reach the next room.
The aim is not just to hide the mechanism, but to support the whole assembly properly so it does not amplify either airborne or structure-borne noise.
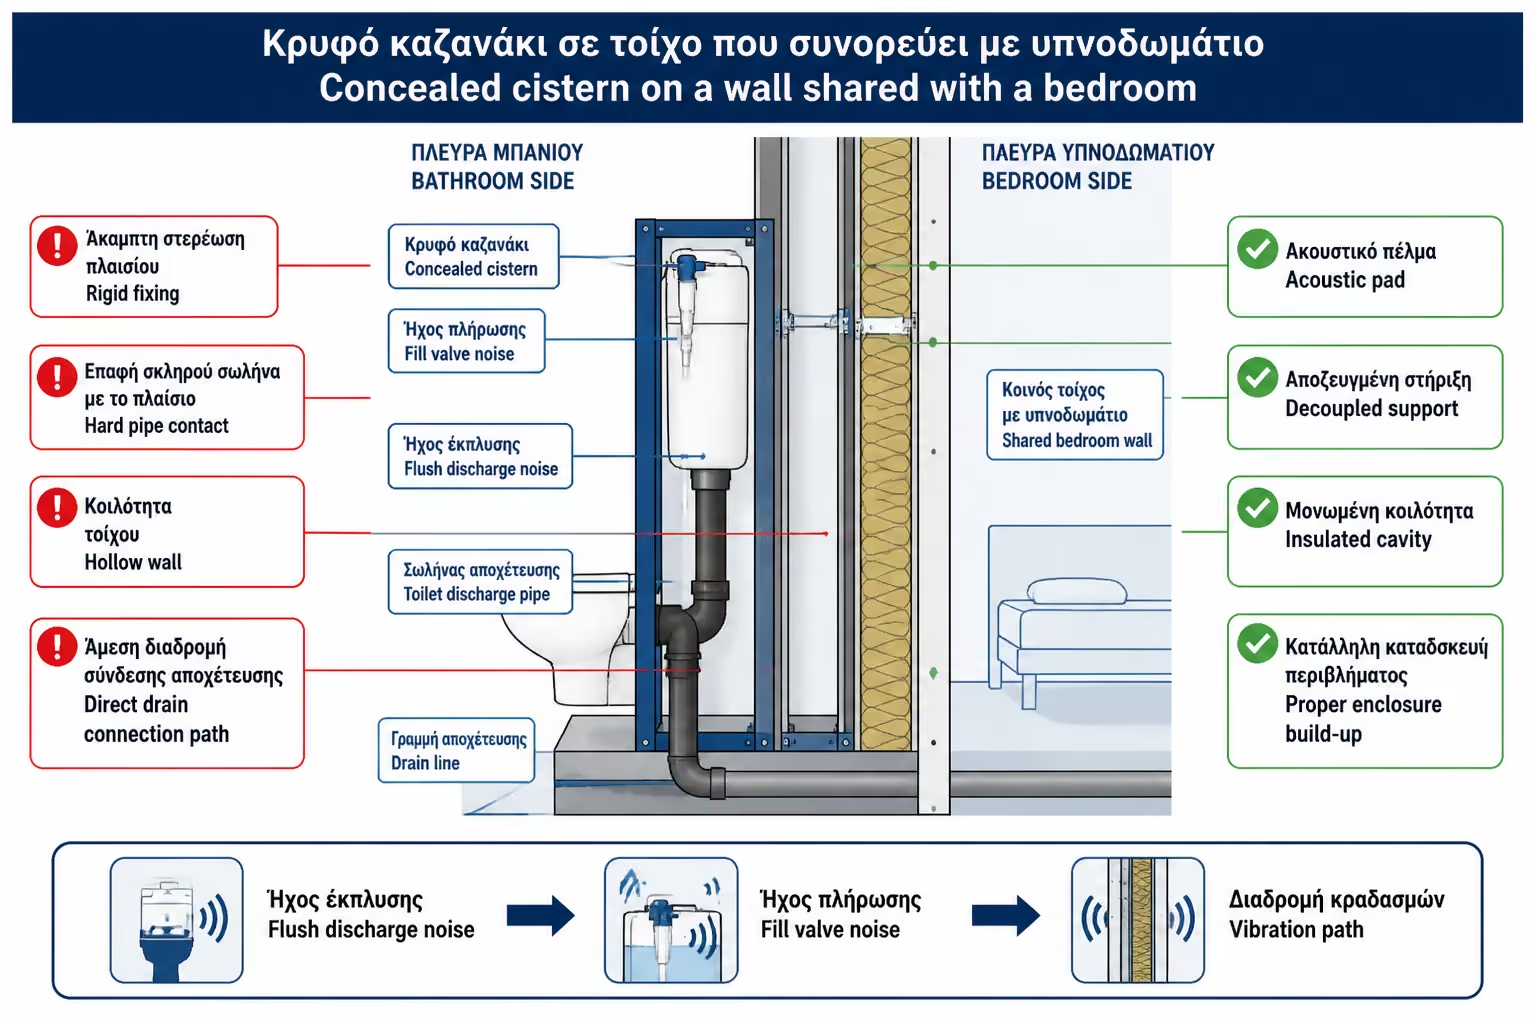
The key points that need to be planned in a built-in cistern installation are the following:
The filling valve, water supply and the flush itself can each create their own layer of noise.
The frame support, gaskets and toilet connection all need to be detailed without rigid contact points or makeshift fixing.
The wall behind the tiles needs proper acoustic treatment where required, otherwise it can behave like a resonance chamber.
In short, the soundproofing is not only in the pipe. It lies in the whole cistern installation.
If the pipe passes through a shaft or enclosed build-up, lining that enclosure can improve the final result significantly. It does not replace the right pipe and the right support details, but it can complete the acoustic strategy.
Material selection should follow acoustic logic while still respecting maintenance access, moisture conditions and any fire-protection requirements of the project.
Materials commonly used in this kind of lining include the following:
During stack lining, the following mistakes must be avoided:
In a bathroom, all materials need to be suitable for a wet environment and installed correctly.
If the bathroom shares a wall with a bedroom, that wall needs special attention. Anything installed on it has a much greater chance of being heard where silence matters most.
The best planning approach is not to concentrate every noisy service directly behind the headboard or right beside the bed when another arrangement is possible.
On a wall shared with a bedroom, the key planning decisions are the following:
Where possible, avoid placing the toilet on the bedroom wall or the drain stack directly behind the headboard.
The noisier pipe runs should be routed through a less sensitive wall rather than the shared sleeping wall.
If the layout cannot change, low-noise pipes, isolated supports and the right acoustic lining become even more important.
When the floor plan leaves no alternative, pipe choice, support details and wall construction become critical.
One of the most common mistakes is to assume that buying a more expensive pipe solves the whole problem. In reality, drainage noise is determined by the full installation, not by one material alone.
Low-noise pipes work best when they are part of a coherent system rather than dropped into an otherwise careless build-up.
For them to perform properly, they need to be combined with the following:
You need low-noise pipes, matching fittings and acoustic collars designed to work together.
Correct routing, correct falls and the avoidance of unnecessary bends all reduce turbulence and noise.
Avoiding rigid contact, supporting the pipe correctly and building the enclosure properly determine whether the system will actually stay quiet.
If a low-noise pipe is wedged rigidly into masonry with cement, the end result can be far worse than the product itself suggests.
Drain soundproofing has to be checked before the build-up is closed. Once tiles or drywall are in place, corrections become much more difficult and usually much more expensive.
Before the wall is sealed, it is worth carrying out one final check as if it were a handover inspection.
In that final check, the points worth reviewing one by one are the following:
Confirm which pipes have been installed and whether the fittings are of the matching type and system.
Check how the pipework is supported and whether the collars include elastic inserts.
Make sure the pipe is not touching the wall or slab directly and that the correct acoustic material is in place around the stack.
Review slopes, penetrations, isolation at openings and service access wherever it will be needed later.
After closure, many of these points can no longer be verified without opening the construction again.
Drain soundproofing can range from a minor improvement to a full technical provision, depending on the project and on how accessible the pipework still is.
The following costs are indicative and mainly useful for comparing the scale of each option:
| Work / Material | Realistic cost |
|---|---|
| Just rubber collars | low cost per point |
| Soundproof suspension collars | €5 – €20+ per piece, depending on type |
| Low noise pipes | more expensive than simple PVC, depending on the diameter |
| Column lining with soundproofing material | €100 – €400+ |
| Complete soundproof construction in shaft/wall | €300 – €1,000+, depending on size |
| Replace existing column | per case and by agreement of apartment building |
The cost is almost always much lower when it is planned during the renovation instead of after the wall has already been closed.
Drain soundproofing is not equally critical in every project, but there are situations where it is clearly worth planning from the beginning.
It is especially worth prioritising when one or more of the following apply:
When the bathroom adjoins a bedroom or the toilet sits on the same wall as the bed.
When the vertical stack passes through a habitable area or very close to a sensitive room.
When a full renovation is underway, the drains are being replaced or a built-in cistern and service wall are being added.
When the property is intended for comfortable living, short-term rental use or there are already complaints about noise from above.
If the bathroom sits far from any bedroom, the requirement may be lower. If it backs onto a sleeping area, it should not be ignored.
If the bathroom is already finished and the pipes have been closed in, any correction becomes much more complex. At that stage, the work is no longer preventive; it becomes a retrofit inside completed finishes.
Even when there is a willingness to fix the issue, the options are usually more limited and more expensive.
The main difficulties of retroactive corrections are usually the following:
Tile removal, opening drywall, gaining access to the stack and restoring the finished surfaces afterwards.
Changing collars, adding lining or even replacing sections of the pipework.
If the pipe sits behind a finished bathroom, the only realistic option may be treatment from the room side, with no guarantee of a complete fix.
That is why the right time to soundproof the drainage system is before the installation is permanently closed.
If you are asking for a sound-insulated drainage installation, that requirement has to appear clearly in the written quote. A generic line such as “new drainage” does not define the acoustic performance of the work.
The more specific the description, the lower the chance of misunderstanding during execution.
At a minimum, the quote should state the following clearly:
The quote should state whether low-noise pipes will be used and whether the system is a three-layer one.
It should clarify where those pipes will be installed and whether the scope covers only the bathroom or also a shared stack.
Matching fittings, the collar type and whether those collars are acoustic should all be listed clearly.
The quote should mention any stack lining, the materials to be used and whether future inspection access will remain available.
The phrase "new drainage" on its own does not mean a soundproofed drainage system.
Before the installation is closed, ask direct questions. Drain soundproofing should not be left to vague assurances such as “we will take care of it”.
The most useful questions before closure are the following:
Ask what type of drain pipes will be installed and whether they are standard PVC or low-noise pipes.
Check whether matching fittings will be used and whether the collars include a rubber insert.
Ask whether the pipe touches a wall or slab, whether the wall is shared with a bedroom and whether the stack will be acoustically lined.
Confirm whether penetrations will be isolated, whether the built-in cistern carries a noise risk and whether the installation will be photographed before closure.
If the answer is “there is no need”, ask them to explain why, especially if there is a bedroom behind the wall.
Before approving the wall closure, run through the following checklist:
| Question | Yes / No |
|---|---|
| Does the bathroom adjoin a bedroom? | Yes / No |
| Is the toilet on a wall shared with a sleeping area? | Yes / No |
| Does the drain stack run near a habitable room? | Yes / No |
| Will low noise pipes be used? | Yes / No |
| Are the components compatible with the system? | Yes / No |
| Do the collars have an elastic/sound insulation insert? | Yes / No |
| Does the pipe not rest hard on a wall or slab? | Yes / No |
| Has soundproofing been provided around the stack? | Yes / No |
| Are the transitions isolated? | Yes / No |
| Is the work listed in the quote? | Yes / No |
| Are there photos from before the wall was closed? | Yes / No |
If most answers are "no" and the bathroom sits next to a bedroom, there is a serious risk that drainage noise will be noticeable in everyday use.
An owner renovates a bathroom that shares a wall with a bedroom. A built-in cistern and new drainage are installed, but the contractor uses standard PVC pipes and rigid collars.
The stack runs through a thin service wall with no acoustic fill, and in several places the pipe touches the structure directly. Visually, the bathroom looks finished and neat, but acoustically the problem has already been built into the wall.
At night, every flush is heard clearly in the bedroom. Fixing it now means opening the construction or adding treatment from the room side, with no guarantee that the structure-borne noise will disappear completely.
In another renovation, the bathroom also adjoins a bedroom, but the design includes soundproofing from the beginning.
Low-noise pipes are selected for the toilet discharge and the stack, acoustic collars are used, rigid contact with structural elements is avoided and the service wall is filled with suitable sound-insulating material.
Before the wall is closed, the installation is photographed and checked. The finished bathroom is not only attractive; it is also noticeably quieter in use.
If the bathroom adjoins a bedroom, the drain sound insulation must be planned before the walls are closed.
Do not rely on standard PVC pipes alone when the toilet or the stack sits behind a sleeping area. Ask for low-noise pipes, matching fittings and acoustic collars with a rubber insert.
The most important point is to stop vibration passing into the wall. The pipe must be supported properly, kept away from rigid structural contact and acoustically lined where needed.
Drain sound insulation is much easier and far cheaper during renovation. After tiling and closure, corrective work becomes difficult and expensive.
Drain soundproofing is critical when the bathroom sits beside a bedroom or any other quiet room. Noise from the cistern, toilet discharge and vertical stack is not solved simply by boxing the pipe inside the wall.
For this kind of installation to remain genuinely quiet, the following points need to be secured:
Low-noise pipes, matching fittings, acoustic collars, decoupling from structural elements and the right enclosure build-up.
Avoid hard contact with walls or slabs, build the service wall correctly and make the acoustic provisions before tiling starts.
If you do not want every flush to be heard in the next bedroom, the solution has to be designed before the installation is closed. Drainage should not only work properly; it should work quietly too.
Return to category.
Go to categoryReturn to the central guide.
Go to guide