What it does
It provides thermal insulation, limits condensation, reduces losses and gives the pipe a safer passage through the construction.
The thermal insulation of the water supply pipes is one of those tasks that is not visible when the bathroom is finished, but affects the quality of the installation for years.
Many homeowners see pipe insulation as a “detail” or something that is only done in heating. In fact, in a proper bathroom plumbing, the insulation of the hot and cold water pipes is very important.
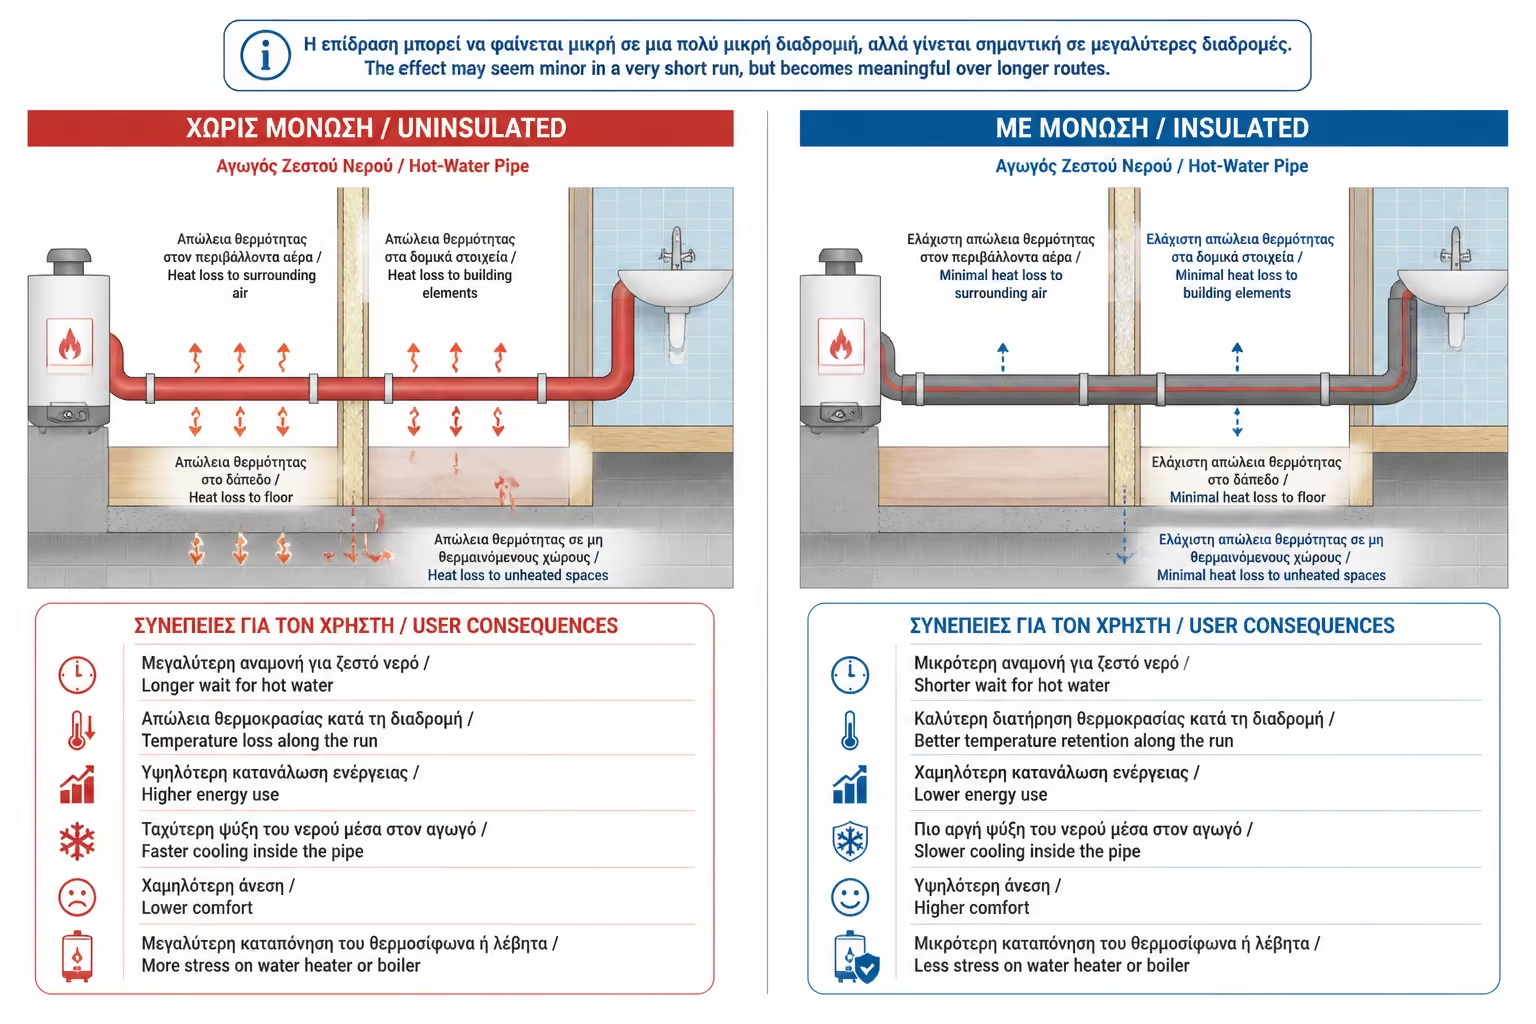
In hot water, insulation reduces thermal losses. Water loses less temperature along the way, especially when pipes pass through cold walls, floors, skylights or unheated spaces.
In cold water, insulation limits condensation — what many describe as "pipe sweating." When a cold pipe is in a wet environment, droplets may form on its outer surface. These drops, if they are inside a wall or behind tiles, can create dampness that looks like a leak.
That's why the Armaflex insulating casing is not a luxury. It is a key element of plant protection.
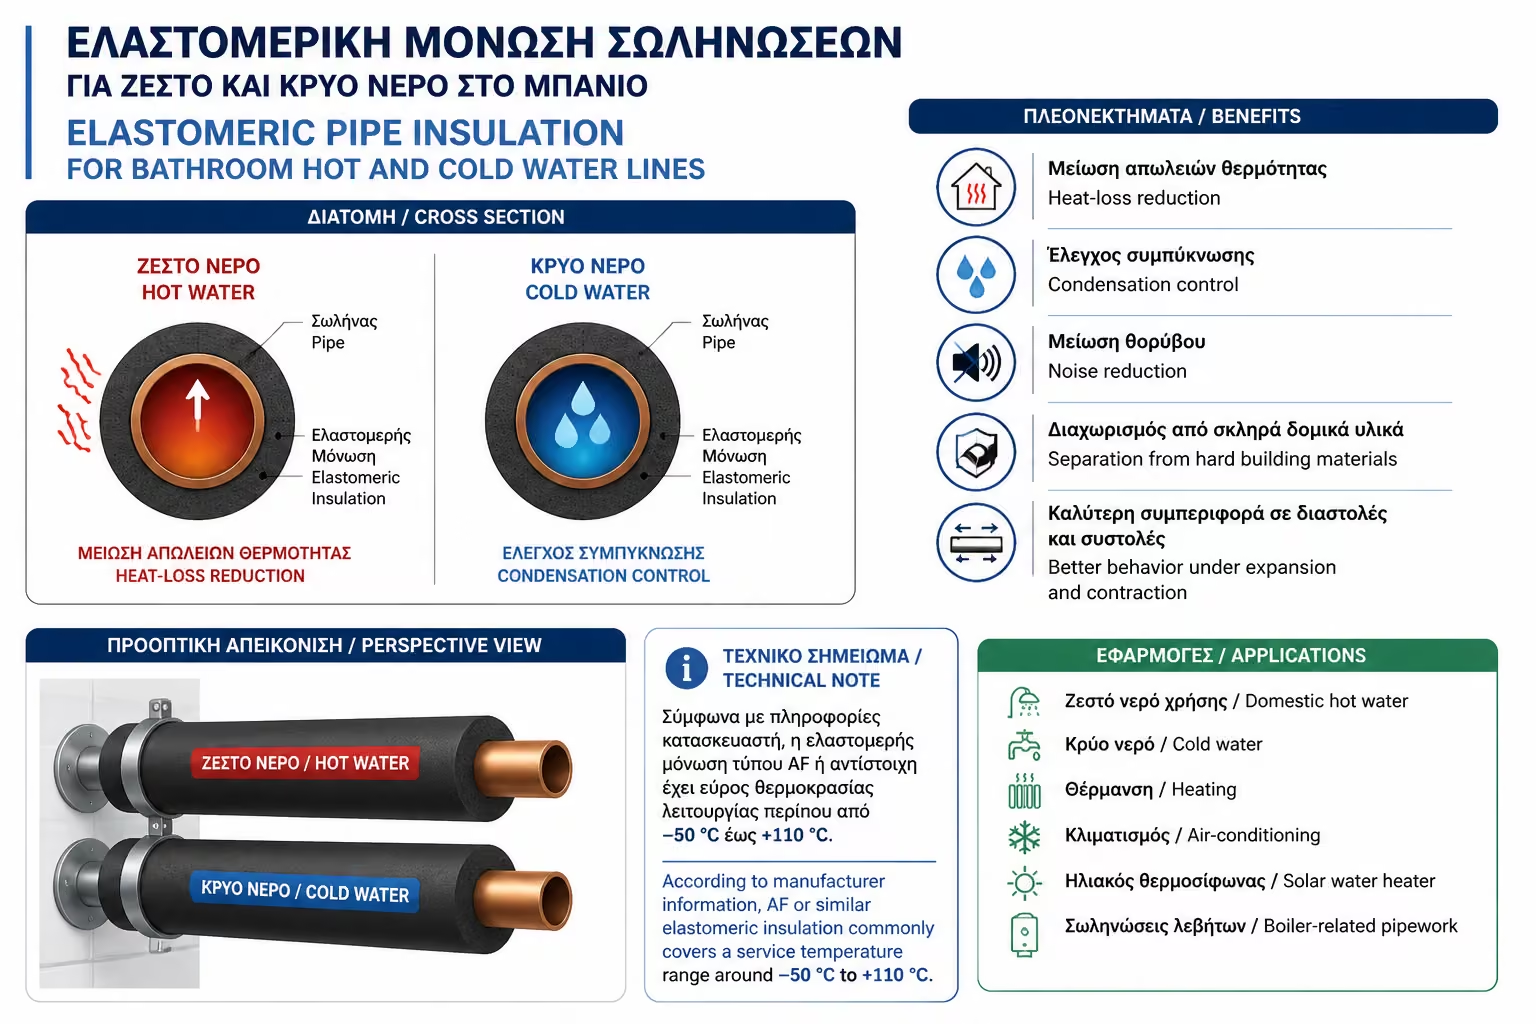
In the market, the term "Armaflex" is commonly used to describe a flexible elastomeric pipe insulation sleeve that wraps around the pipe.
In practice it is used for thermal insulation, condensation control, heat-loss reduction, limited noise control and to keep the pipe from rubbing directly against hard building materials.
You will find it on hot and cold water lines, heating and air conditioning pipes, solar water heater runs and other mechanical installations. In a bathroom renovation, the main concern is the hot and cold water pipework that will disappear behind walls and tiles.
If you want a quick summary, these are the main points worth keeping in mind.
It provides thermal insulation, limits condensation, reduces losses and gives the pipe a safer passage through the construction.
On hot and cold water lines, especially on concealed bathroom supplies and on longer runs exposed to temperature changes.
Hot water loses temperature as it passes through the pipes.
If the pipes are left bare, that heat is transferred to the wall, the floor, the air around the pipe and any colder structural element along the route.
The result is a longer wait for hot water, faster cooling inside the line, higher energy use and less comfort at the tap or shower. On very short internal bathroom runs the difference may look modest, but on longer routes insulation matters a lot.
The main consequences of leaving hot-water lines uninsulated are the following.
Longer wait times, temperature loss, higher consumption and more strain on the water heater or boiler.
On longer runs, in colder areas and anywhere one system feeds more than one bathroom fixture.
Many people think that only hot water needs insulation. This is wrong.
Cold water needs insulation mainly to prevent water vapor condensation.
When a cold water pipe passes through a hot and humid environment, its outer surface can become very cold. If its temperature drops below the dew point of the air, the water vapor condenses on the pipe and drops are formed.
This is the phenomenon we call "the pipe sweats".
But if the pipe is inside the wall or under the floor, the moisture is not immediately visible. It may appear later as:
Swollen plaster, damp patches on the wall, mold and blackened grout joints are common signs that a cold pipe is “sweating” inside the build-up.
A musty odor, drywall damage and a general moisture stain often make the problem look like a leak, even when the real cause is condensation.
And then the owner may think there is a leak, when in fact there is condensation from an uninsulated cold pipe.
That is why the practical issue usually comes down to the following point.
If the pipe is exposed, you will see droplets. If it is hidden inside the wall, the moisture may be mistaken for a leak and lead to unnecessary demolition.
Condensation can look like a leak, but it's not the same thing.
A real leak is linked to material or connection failure: a bad joint, a cracked pipe, a loose fitting, aged material or a general installation defect.
Condensation, by contrast, is caused by an uninsulated cold-water pipe, high humidity, poor ventilation, a cold network running through a warmer space or direct contact with colder structural elements.
Proper insulation significantly reduces this risk.
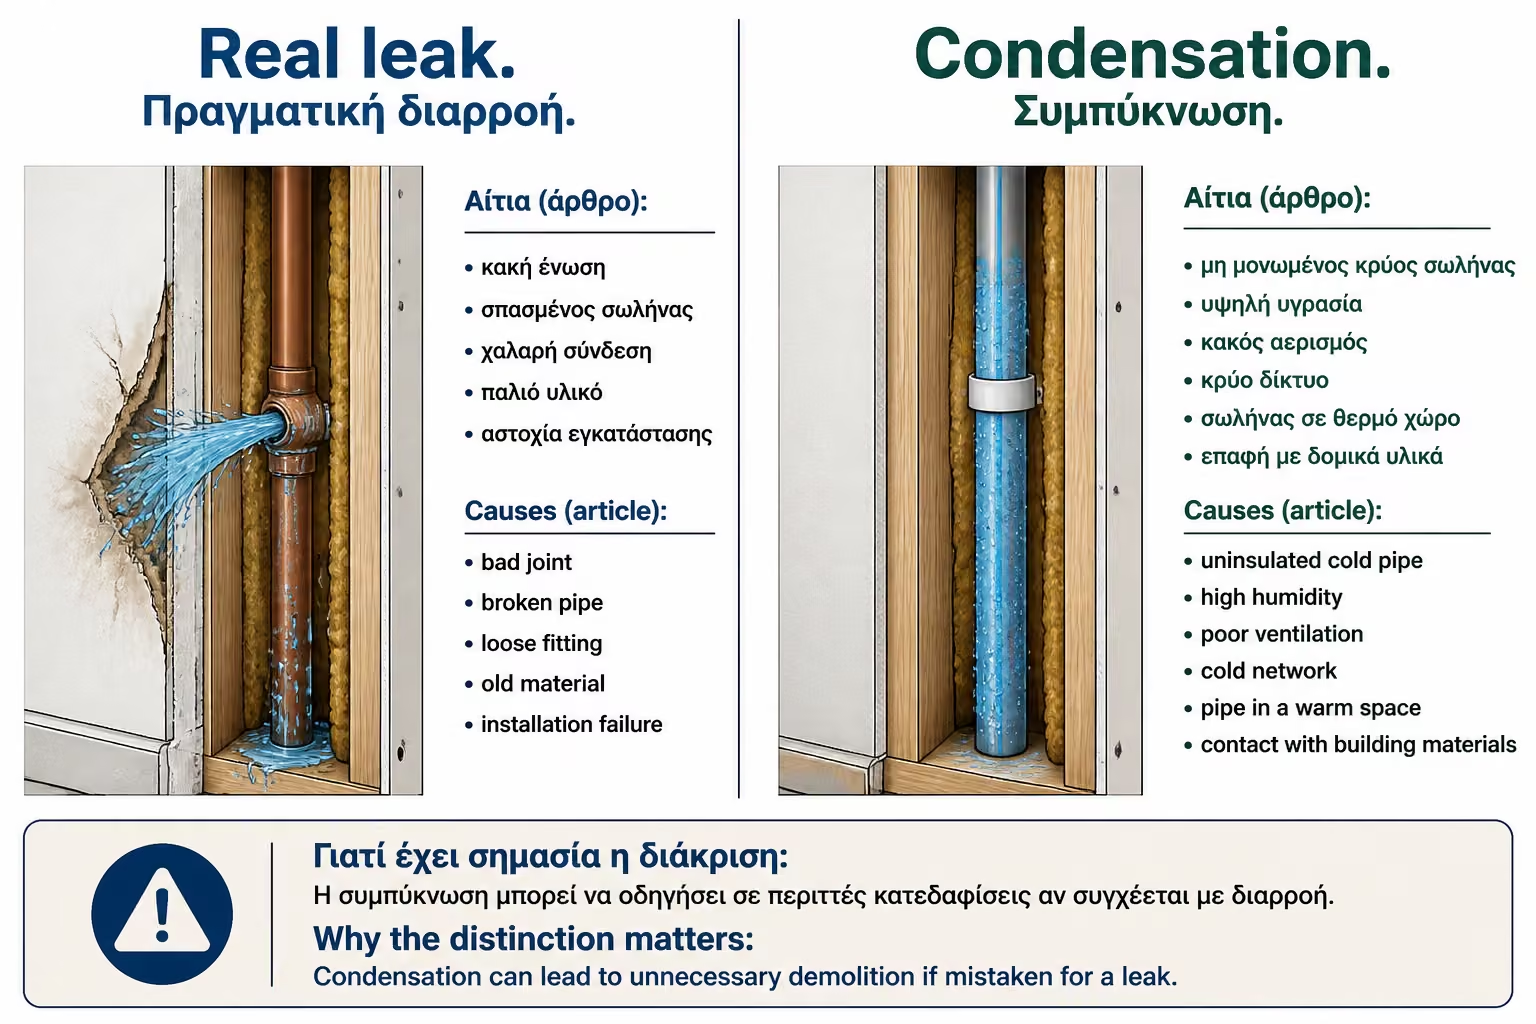
The simplest way to distinguish the two situations is the following.
In a leak, water comes out of a pipe or connection.
In condensation, the pipe is not punctured. The moisture in the air condenses on the cold surface of the pipe.
Mistaking condensation for leakage can lead to unnecessary breakages or faulty repairs.
Pipe insulation is important almost everywhere, but there are places where it is even more critical.
The more closed and humid the environment, the more important insulation is.
Extra attention is especially needed in the following route categories.
Give extra attention on external walls, in floors, in service shafts, in unheated spaces and on the route from the water heater or solar tank to the bathroom.
Focus on runs behind tiles, near the shower zone, in false ceilings, drywall partitions, closed cabinets and other humid or poorly ventilated spots.
Hot water pipes expand and contract with temperature. This means that they change dimensions slightly when hot water passes through and when they cool down.
If pipes are encased directly in hard materials without protection, they can create:
Creaks, micro-movements, stress and general pipe noise are common when the line has no room to expand and contract properly.
Over time, the contact points can wear and cracks may appear in plaster, fillings or finishes around the route.
The insulating sleeve helps the pipe to have a protective space around it.
It is not a substitute for proper design, but it helps the installation behave better.
Pipes can carry sound, and in practice the noise usually comes from a combination of flow, pressure and direct contact with the surrounding structure.
The most common noise sources and amplifiers are the following.
Water flow, sudden mixer shut-off, thermal expansion and pressure changes can all make a plumbing run audible.
When the pipe touches masonry or starts vibrating against hard surfaces, the sound is transmitted much more easily to the bathroom and nearby rooms.
Insulation can help limit some noise, especially when the pipe is not directly in contact with hard building materials.
It is not a soundproofing solution in itself, but is part of a proper installation.
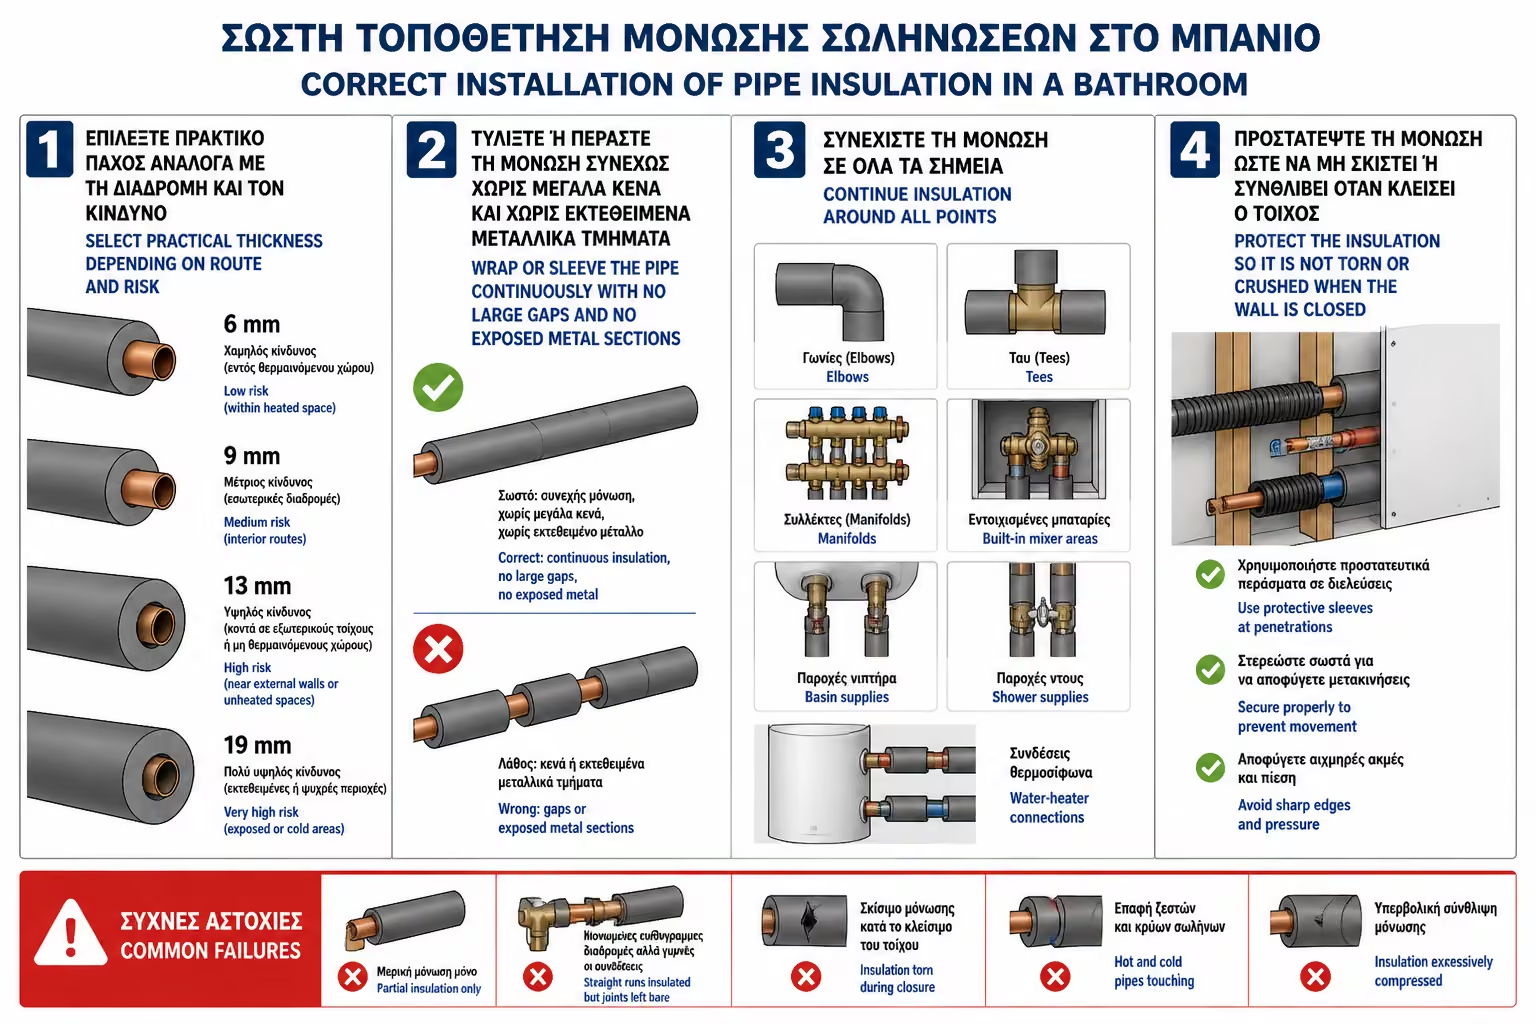
Insulation thickness should not be chosen randomly. It depends on the pipe diameter, the water temperature, the environment through which the run passes, whether the line carries hot or cold water, the condensation risk and the space available inside the wall or floor.
In many domestic applications you will see thicknesses such as 6 mm, 9 mm, 13 mm or 19 mm, but the final choice should follow the real installation and not just habit.
For hot water pipes with longer runs or pipes in colder areas, a greater thickness may be required.
For cold water pipes with a high risk of condensation, the thickness should be sufficient so that the outer surface of the insulation does not fall below the dew point.
The final choice should be made based on the actual installation.
In practice, the most useful guidelines are the following.
For small interior bathroom runs, thinner insulation is often used.
Longer runs, colder spaces and higher condensation risk usually mean thicker insulation.
A common mistake is to put insulation in some sections, but leave critical points uncovered.
The points most often forgotten are the following.
Corners, joints, branches and wall penetrations are usually the first places left exposed when the job is done in a hurry.
Areas behind mixers, near the manifold or water heater, and the end points of the runs need extra care so that the insulation remains continuous.
If spots are left uncovered, heat loss or condensation may occur there.
Insulation should be as continuous as possible.
It makes no sense to insulate the straight section and leave all the joints bare.
The correct fit is just as important as the material itself.
It must wrap the pipe properly, close without large gaps, stay unbroken and avoid excessive compression inside the groove.
If the insulation is torn during installation or squeezed into a narrow groove, it loses some of its effectiveness.
The difficult connection points are the ones most often left rough, and those are exactly the points that need the most care.
For the application to be considered correct, the following rules matter most.
Continue the insulation through joints and corners, avoid bare metal spots and protect the sleeve before the wall is closed.
Pay special attention around corners, tees, manifolds, mixers, concealed mixer bodies, basin supplies, shower supplies and the water heater.
The need for insulation does not depend on just one pipe material.
In short, pipe material affects performance, but it does not eliminate the need for proper insulation.
Some basic material-by-material differences can be seen in the following examples.
Copper conducts heat very easily. So in hot water it has losses if it is not insulated, while in cold it can show strong condensation.
It behaves better than metal in terms of thermal conductivity, but still needs insulation, especially in hot water and cold pipes with a risk of condensation.
PEX is not metallic, but that doesn't mean it doesn't need insulation. Thermal insulation helps in the hot and protects against condensation in the cold.
PPR has a lower thermal conductivity than copper, but still insulation is important in hot water, exposed runs and cold water where moisture is present.
In many installations, hot and cold pipes run close together.
If they are not properly insulated, there may be unwanted thermal interaction.
When the two runs pass close together, they need at least the following precautions.
The hot line loses heat to the surrounding space, while the cold line may warm up unnecessarily if the two runs stay too close.
The hot line can influence condensation behavior on the cold one, and if the pipes touch each other they may also create annoying noise.
It is good that the pipes have their own insulation and are not exposed next to each other in a narrow groove.
Built-in batteries are particularly demanding, because the pipes, bodies and connections are closed behind tiles.
In these cases the insulation and protection of the piping is even more important.
For concealed mixers, the main requirements are the following.
You need proper insulation on the hot and cold supplies, no direct contact with hard materials, protection against condensation and stable support for the concealed installation.
A pressure test and photos before the wall is closed are essential, because once the tiling is completed any correction becomes much harder.
If an embedded installation is shut down without proper protection, future correction is difficult.
In drywall or false wall construction, pipe insulation is even more important.
Drywall and closed structures can be affected by moisture or condensation.
If a cold pipe "sweats" inside a false wall, the moisture may not be immediately visible. But over time it can create:
Mold, swelling and a persistent musty smell are often the first signs that moisture has become trapped inside the build-up.
Over time, the gypsum board itself can deteriorate and the finished surface may also be damaged.
In such constructions, the insulation must be continuous and careful.
Piping to and from a solar water heater has greater thermal requirements, especially when passing through outdoor or unheated areas.
On these routes, insulation has to address at least the following issues.
The insulation has to withstand higher temperatures and be suitable for outdoor use when the route is exposed.
If the insulation remains visible, it also needs protection against UV exposure, weathering and mechanical wear.
It is not always enough to simply put insulation in a bathroom wall. On outdoor routes, suitable material and protection is needed.
Pipe insulation will not reduce the bill as much as a major energy intervention, but it helps the daily performance of the hot water system.
The benefit is most visible on the following two levels.
There is less heat loss along the route, hot water is felt sooner at the fixture and less water is wasted while waiting for the right temperature.
Comfort improves and the hot water production system works under less strain, so the whole installation behaves more efficiently.
In a modern bathroom, pipe insulation is a small cost relative to the overall project, but it contributes to the quality of the installation.
The cost of pipe insulation is relatively small compared to the cost of a complete bathroom renovation.
The main factors behind the price show up first in the following points.
Total pipe length, insulation thickness, insulation type and the difficulty of the application all affect the final price.
External routes, plus many corners and connections, require more care and usually more labor time.
The table below gives a few indicative cost ranges for orientation.
| Case | Realistic cost |
|---|---|
| Basic insulation of small bathroom passages | €30 – €80 |
| More comprehensive bathroom insulation | €80 – €180 |
| Longer hot water runs / water heater | €150 – €350+ |
| External routes with special protection | per case |
The amounts are indicative. The important thing is that the cost is small compared to the damage that moisture or condensation can cause inside a wall.
The most common failures we see in practice are the following.
The cold remains bare and condensation occurs.
Corners and joints are left uncovered.
If the insulation sleeve is damaged, it loses effectiveness.
Hot and cold affect each other.
If it is pressed into a very narrow groove, its performance is reduced.
Plain material can be worn by sun or weather.
Later, you no longer know where the pipes run or how they were insulated.
The offer should not simply say "new plumbing".
If the installation is being done properly, the quote should say so clearly:
It should specify the pipe material, insulation on both hot and cold lines, the insulation type and the thickness where that matters in practice.
It should also clarify whether joints will be insulated, whether the water-heater lines are included, whether there are external routes and whether photos will be taken before the walls are closed.
Pipe insulation should be job specific, not “whatever we put in”.
Before the walls are closed, do not settle for a vague “we’ll handle it”. Ask for clear answers on these points:
Ask whether both the hot and cold lines will be insulated, what insulation thickness will be used and whether corners and joints will be treated properly.
Ask how the insulation will be protected during closure, whether the hot and cold runs will touch each other and whether condensation risk has been considered.
Confirm whether there are outdoor or cold-space routes, whether the installation will be photographed before closure and whether the insulation is explicitly included in the quote.
If the answer is "no need", ask for an explanation. In many cases it is necessary.
Before the walls are closed, it is worth going through the following questions one by one.
| Question | Yes / No |
|---|---|
| Are the hot water pipes insulated? | Yes / No |
| Are the cold water pipes insulated? | Yes / No |
| Has an appropriate insulation thickness been selected? | Yes / No |
| Is the insulation continuous? | Yes / No |
| Are corners and joints insulated? | Yes / No |
| Are the pipes not touching each other bare? | Yes / No |
| Is there protection on external routes? | Yes / No |
| Has condensation risk been checked? | Yes / No |
| Is the insulation not too compressed? | Yes / No |
| Are there any pictures before the walls were closed? | Yes / No |
| Is the work listed in the offer? | Yes / No |
If most of the answers are “no”, the installation is not sufficiently protected.
An owner is doing a total bathroom renovation. The piping is changed, but for economy no insulation is put in the cold water lines. Only a small section of hot is roughly insulated.
The bathroom is delivered normally.
After a while, moisture appears in a low point of the wall. The owner fears there is a leak. When checked, it is found that the cold pipe creates condensation inside a closed point.
The problem could have been avoided with proper insulation from the start.
In another renovation, the plumber insulates both the hot water pipes and the cold water pipes.
The insulation is continuous, covers corners and critical points, does not compress excessively and is photographed before the wall is closed.
Hot water loses less temperature along the way and cold pipes are protected from condensation.
The cost is small compared to the overall project, but the quality of the installation is clearly better.
Pipe insulation is not an optional detail. It is part of protecting the installation.
On hot water lines it reduces thermal losses and improves comfort. On cold water lines it limits condensation, which is the reason pipes “sweat” and create hidden moisture inside walls or false structures.
Do not insulate only the easy straight runs. Ask for the corners, joints and passes through closed or damp spaces to be insulated as well.
Before the wall is closed, ask for photos. If moisture appears in the future, you will know where the pipes run and how they were protected.
Thermal insulation of water supply pipes is a small task of great importance.
In hot water pipes, it reduces thermal losses and improves daily comfort. In cold water pipes, it limits condensation, the “sweating” effect that can create hidden moisture in walls, floors or drywall.
If you keep only the essentials, these are the points worth checking.
Insulation on both hot and cold lines, correct thickness, continuous coverage and proper treatment of joints and corners.
No excessive compression, protection on external routes, photos before closing the wall and a clear reference to the work in the contractor's quote.
Armaflex or an equivalent insulation sleeve is not decorative material. It is part of a correct plumbing installation.
In a bathroom renovation, pipes will be hidden behind tiles. That is why they must be properly protected before closing.
Return to category.
Go to categoryReturn to the central guide.
Go to guide