
Dripping Faucet: A Guide to Replacing the Ceramic Cartridge in Mixer Faucets
A dripping faucet is one of the most common minor bathroom problems. It may drip from the spout, let a little water through even when the lever is closed, or leak around the handle.
At first it may seem insignificant. A drop every few seconds does not look dramatic. Over time, though, it means wasted water, scale in the basin, stains, wear in the faucet, and possible damage to the bathroom vanity.
In most modern mixer faucets, the cause lies in the ceramic mechanism, also known as the cartridge. This is the internal part that controls the flow and the mixing of hot and cold water.
When the cartridge wears out, fills with scale, or no longer seals properly, the faucet starts to drip.
In many cases, there is no need to replace the whole faucet. Replacing the ceramic cartridge is enough, provided the correct spare part is available and the job is done carefully.
1. What the Cartridge Is
The cartridge is the internal mechanism of a mixer faucet.
It sits below the lever and controls the following:
- turning on and off the water,
- the flow,
- the mixing of hot and cold,
- the temperature,
- the feeling of lever movement.
In most mixer faucets, the cartridge contains ceramic discs that move against each other. When they are in good condition, they seal tightly. When they are worn or scaled up, they can let water pass through.
2. When is the Cartridge to Blame?
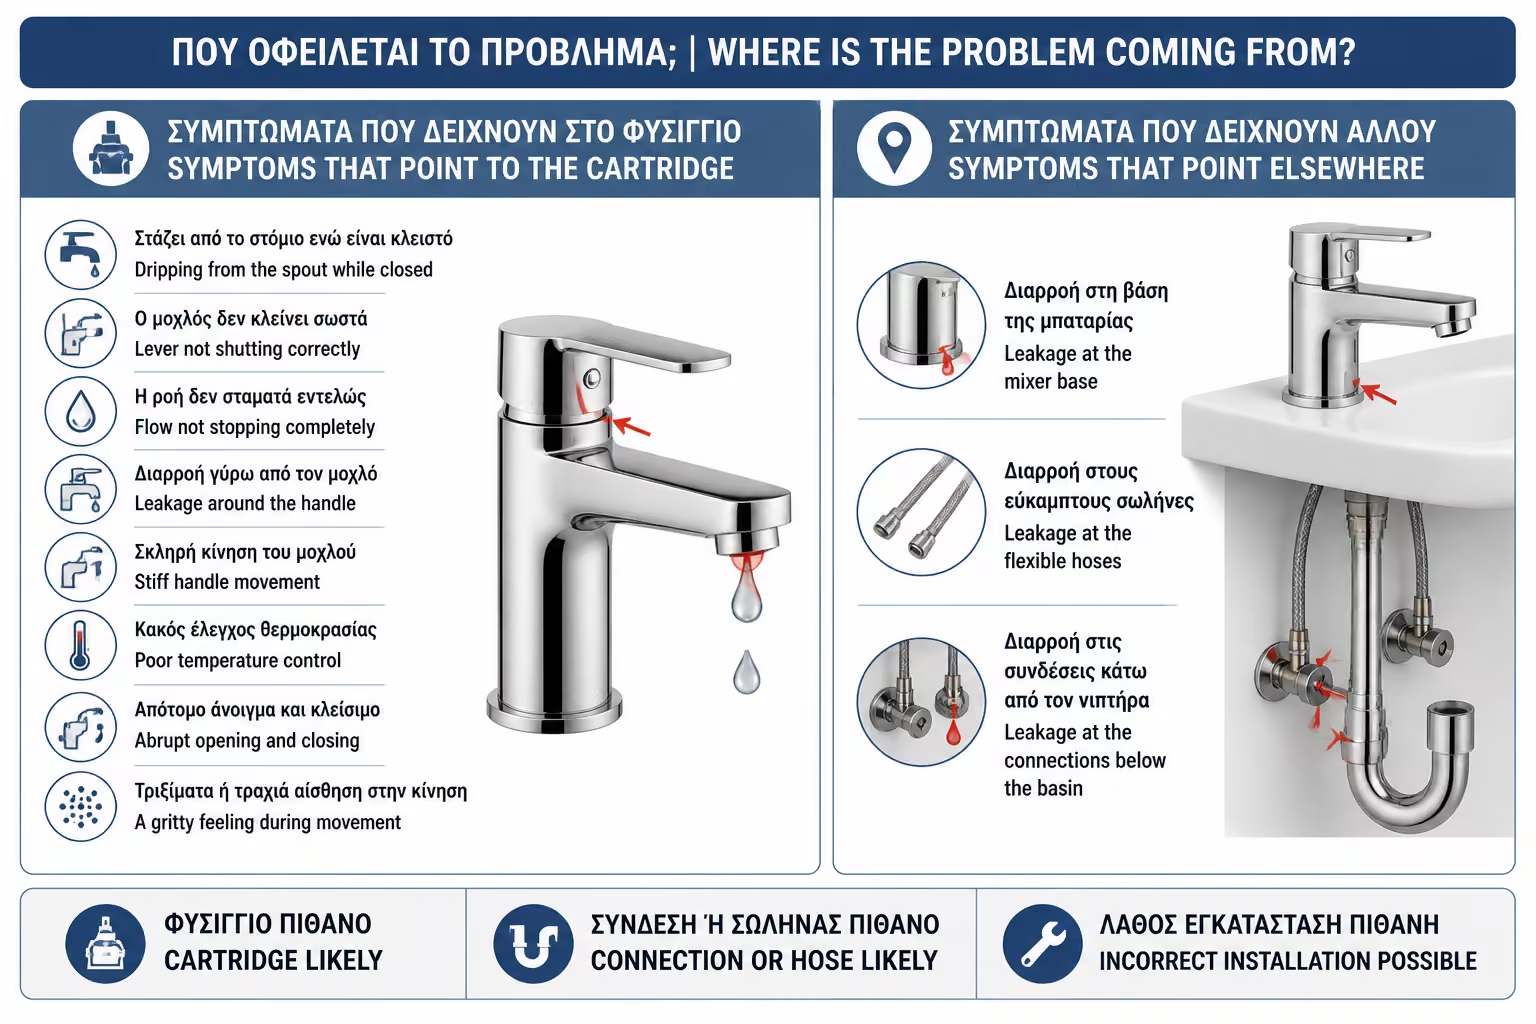
The cartridge is a likely cause when the faucet shows signs of internal wear rather than a simple leak at a connection.
However, if the leak is at the base of the faucet, in the flexible hoses, or at the connections under the basin, the cartridge may not be the cause. In that case the problem may be a seal, a hose, a fitting, or poor installation.
The most typical signs that point toward the cartridge are the following:
The lever does not close properly
The flow does not stop completely
Leakage appears around the handle
The lever has become stiff
Temperature control is poor
The faucet opens or closes abruptly
There is a gritty or creaking feel
3. Where a Faucet Can Leak
Before changing any internal part, you need to identify exactly where the leak is coming from.
| Leakage point | Possible cause |
|---|---|
| From the spout | Cartridge that does not close properly |
| Around the lever | Cartridge, clamping nut, o-ring |
| At the faucet base | Base gasket, poor tightening, water from use |
| Under the basin | Flexible hose, isolation valve, connecting nut |
| From the faucet body | Crack or body wear |
| Only when the water turns on | Connection or o-ring |
| Even when closed | Possible cartridge |
Correct diagnosis avoids unnecessary replacement of parts.
4. Why Cartridges Break
The most common causes are:
- scale buildup,
- hard water,
- fine particles from the plumbing network,
- rust from old pipes,
- excessive water pressure,
- sudden opening/closing,
- cheap internal mechanism,
- normal wear and tear,
- poor installation,
- wrong replacement part.
In hard water areas, the cartridges suffer more. If in addition there is high pressure in the network, wear is accelerated.
5. When It Makes Sense to Change the Cartridge and When to Replace the Whole Faucet
A faucet is not always worth repairing.
To decide properly, separate the cases where cartridge replacement is sensible from those where full replacement is the better option:
Changing the cartridge makes sense when:
The faucet is good quality, the spare part is available, the body is still in good condition, the leak comes from the spout or lever area, and the cartridge cost remains reasonable.
Replacing the whole faucet may be smarter when:
The faucet is very cheap or very old, the correct cartridge cannot be found, the body is worn or rusty, there are leaks from multiple points, or the total repair cost approaches the value of a new faucet.
In a good faucet, changing the cartridge is a sensible repair. In a very cheap or worn old faucet, full replacement may be the better value.
6. Before You Begin: Find the Right Spare Part
The most important step is to find the right cartridge.
They are not all the same.
The main points of difference are the following:
- diameter,
- height,
- base,
- installation guides,
- number of holes,
- retaining method,
- manufacturer,
- rotation angle,
- compatibility with a specific faucet.
Common diameters are 35 mm or 40 mm, for example, but that alone is not enough. The whole mechanism has to match.
To reduce the chance of buying the wrong part, do the following before you order:
- find the faucet brand and model,
- keep a photo,
- look for the technical sheet,
- remove the old cartridge and take it as a sample,
- buy an identical or fully compatible part.
Do not buy a cartridge that is only "similar". It may not seal properly.
7. Tools You Will Need
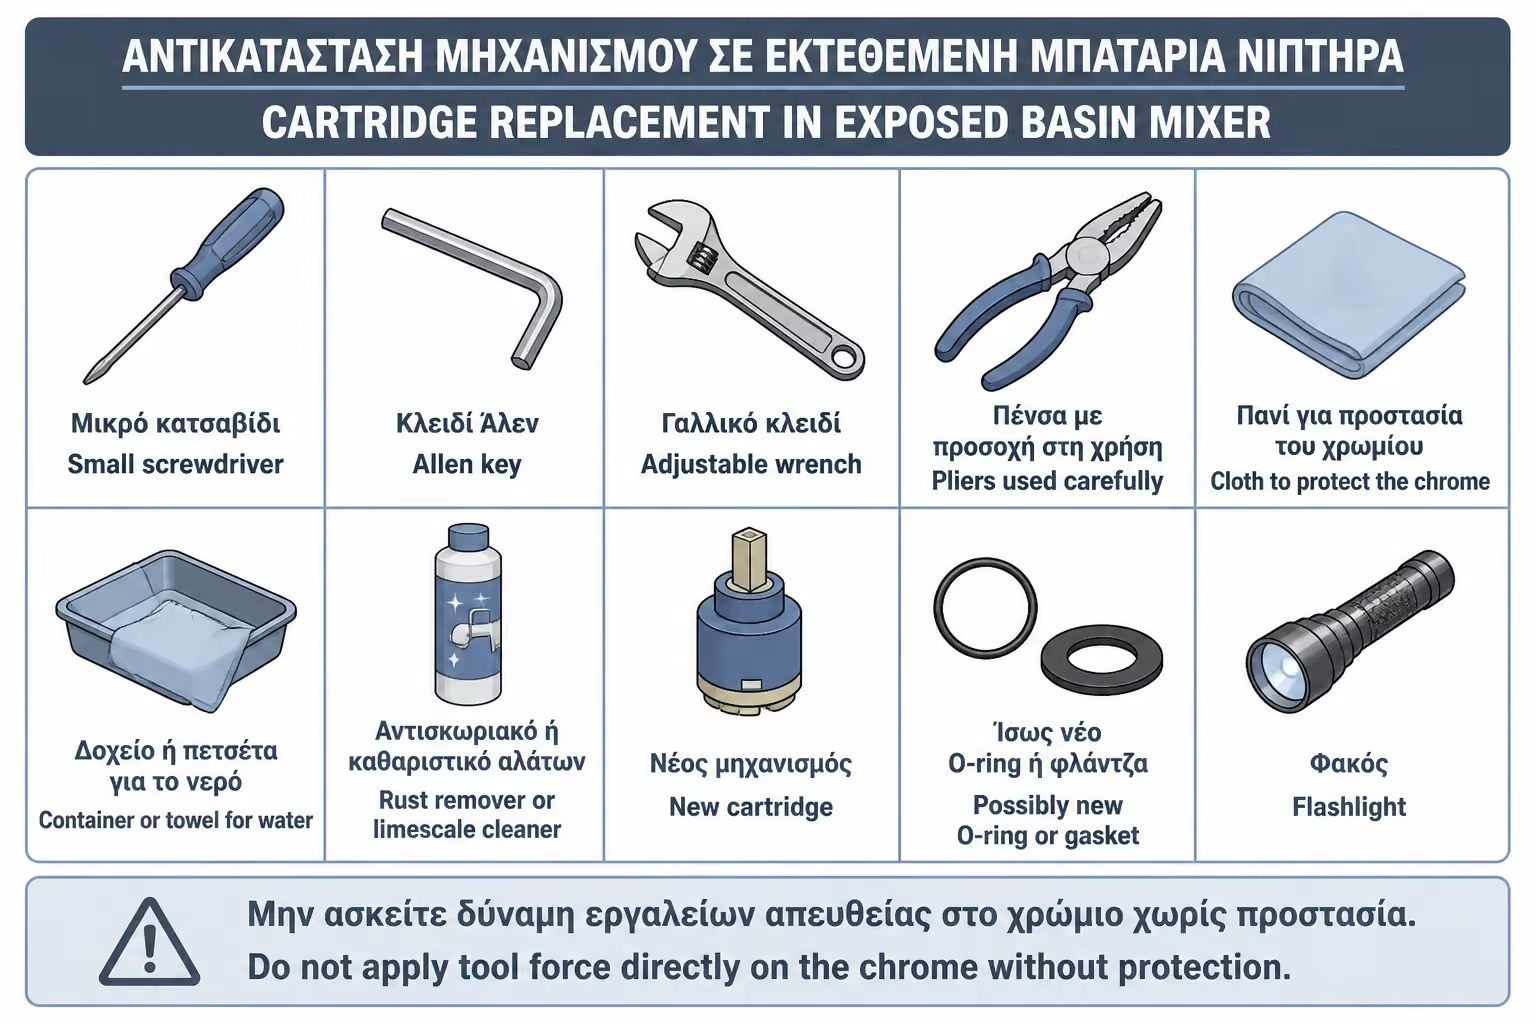
For a simple cartridge replacement in an exposed basin mixer, you may need the following:
Metal tools should never be used directly on unprotected chrome, because they can scratch the faucet finish.
The basic set of tools and materials usually includes the following:
Small screwdriver
Allen key
Adjustable wrench
Pliers used carefully
Cloth for chrome protection
Towel or container for water
Descaling cleaner
New cartridge
Possibly a new o-ring or gasket
Flashlight
8. Step 1: Turn off the water
Before touching the faucet, turn off the water.
There should be two isolation valves under the basin:
- one for cold,
- one for hot.
Close both.
Then open the faucet to release the pressure and drain the water left inside.
If that cannot be done locally, you may need the main shutoff or a plumber.
If the isolation valves do not close
If the isolation valves are stuck, leaking, or will not close, do not force them. You may cause a larger leak.
9. Step 2: Remove the Lever Cover
Most mixer faucets have a small plastic cap, often marked red and blue.
Behind this is the screw that holds the lever.
Carefully remove the cap with a small screwdriver or thin tool.
Be careful not to scratch the faucet.
10. Step 3: Unscrew the Lever Screw
The screw can be:
- Allen,
- Phillips screwdriver,
- straight screw,
- small internal screw.
Unscrew it without losing it.
Then pull the lever up or out, depending on the model.
If the lever does not come off, scale may be holding it in place. Do not hit it hard. It needs gentle movement and, if necessary, a descaling cleaner.
11. Step 4: Remove the Decorative Cover
Below the lever is usually a decorative cap or cover.
This can be screw-on or simply snap-on.
Remove it carefully.
If it's screw-on and scaled, don't grab it directly with unprotected metal pliers. Wrap it in a cloth to avoid scratching the chrome.
12. Step 5: Unscrew the Retaining Nut
The cartridge is usually held in place by a large nut or clamping ring.
Unscrew it carefully.
If the whole faucet starts turning on the basin, stop and call a plumber. The base or the flexible hoses may loosen.
Attention
Do not apply excessive force to the faucet body. If the faucet is old or full of scale, it may need cleaning before it comes apart safely.
13. Step 6: Remove the Old Cartridge
Pull the old cartridge out.
Note its position before removing it completely.
It usually has small locating guides or tabs that must fit into a specific position.
Before moving on, check the following points carefully:
- whether it has cracks,
- whether it has scale buildup,
- whether the rubber seals are worn,
- whether it has dirt,
- how its locating guides were seated,
- whether there is residue inside the faucet body.
Keep the old cartridge for comparison with the new one.
14. Step 7: Clean the Cartridge Slot
Before inserting the new cartridge, carefully clean the place where it presses.
There may be:
- scale,
- small particles,
- rust,
- pieces of old rubber seals,
- leftovers.
If the new cartridge is placed on top of dirt or salt, it may not seal properly.
If you see that the faucet body is worn or cracked, changing the cartridge may not solve the problem.
Attention
Do not scratch the sealing surface. Cleaning must be done carefully.
15. Step 8: Install the New Cartridge
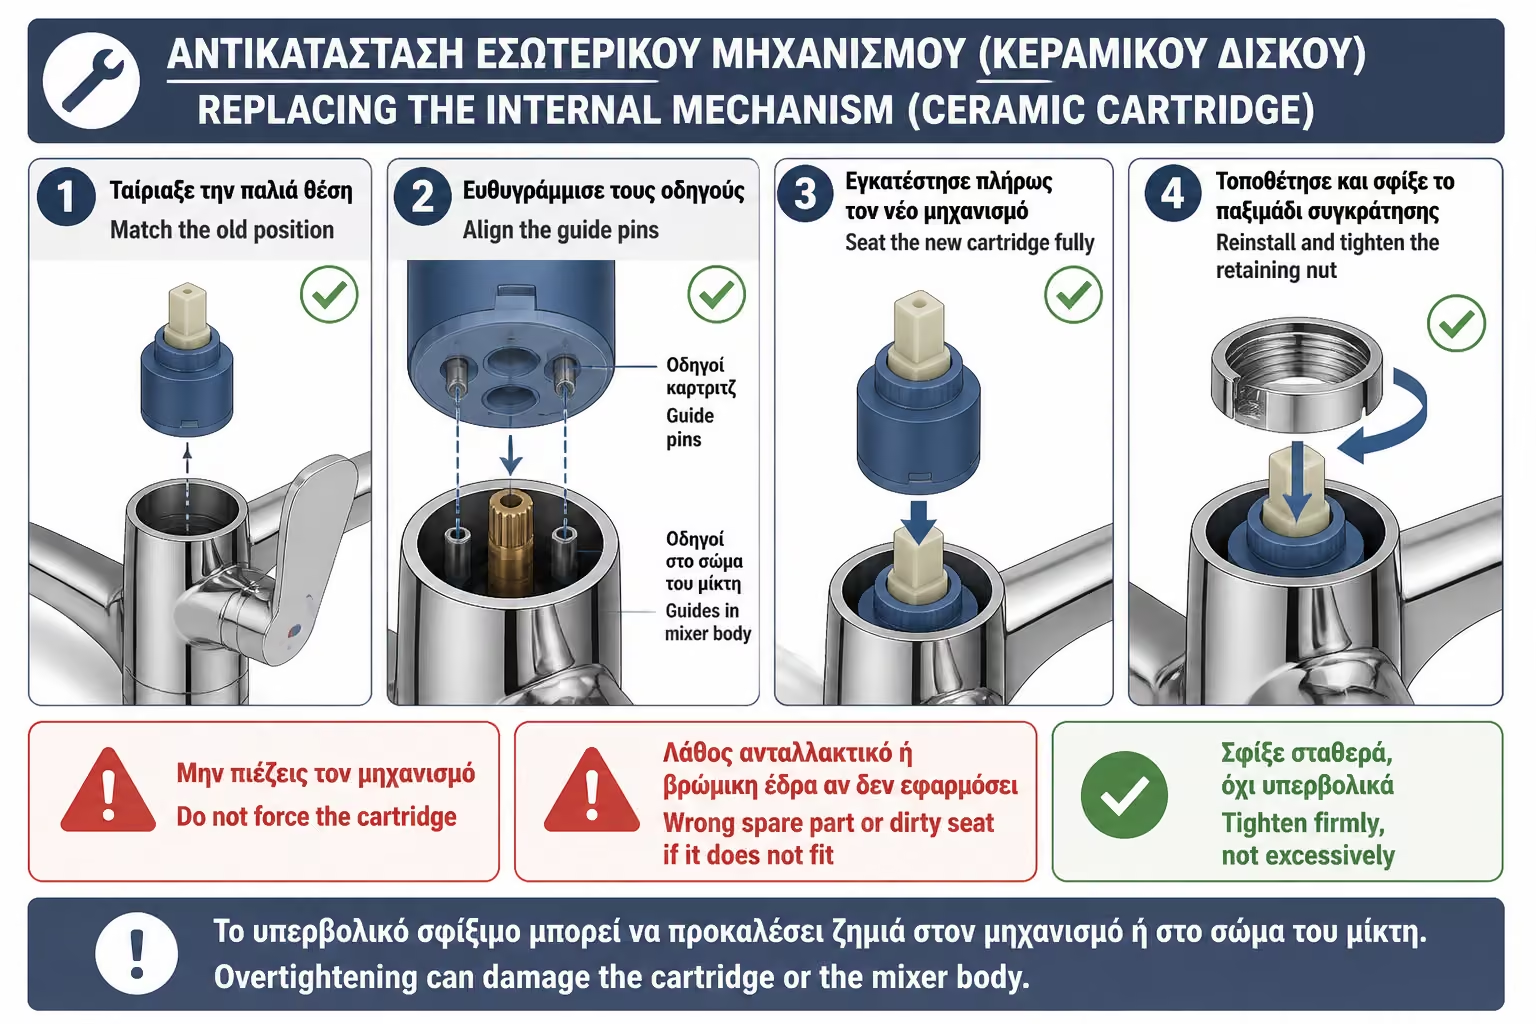
Put the new cartridge in the same place as the old one.
Make sure the locating guides sit correctly.
If it doesn't fit properly, don't force it. It may not be the correct part or the base may not have been properly cleaned.
When it is properly seated, reinstall the retaining nut.
Tighten it firmly, but do not overtighten it. Too much force may damage the cartridge or the faucet body.
16. Step 9: Reassemble the Faucet
To complete the reassembly, put back the following parts:
- decorative cap,
- lever,
- lever screw,
- small hot/cold indicator cap.
Make sure the lever moves smoothly.
It should neither be too hard nor too loose.
17. Step 10: Turn on the Water and Check
Slowly open the isolation valves.
Do not suddenly turn on the water.
During the final check, look specifically for the following:
- whether it drips from the spout,
- if it drips around the lever,
- if there is a leak under the sink,
- if the lever is working properly,
- if hot and cold are on the right side,
- if the flow is normal.
Let the faucet run for a short time, then close it and confirm that it stops completely.
18. If It Continues to Drip
If the faucet continues to drip after the cartridge has been replaced, possible causes include the following:
- wrong cartridge,
- incorrect installation,
- dirt on the base,
- worn faucet body,
- worn o-rings,
- excessive water pressure,
- a crack in the body,
- another leak point.
In that case, do not keep tightening parts by force. You may cause more damage.
The correct next step is a careful recheck or a plumber visit.
19. Concealed Faucets: Extra Caution
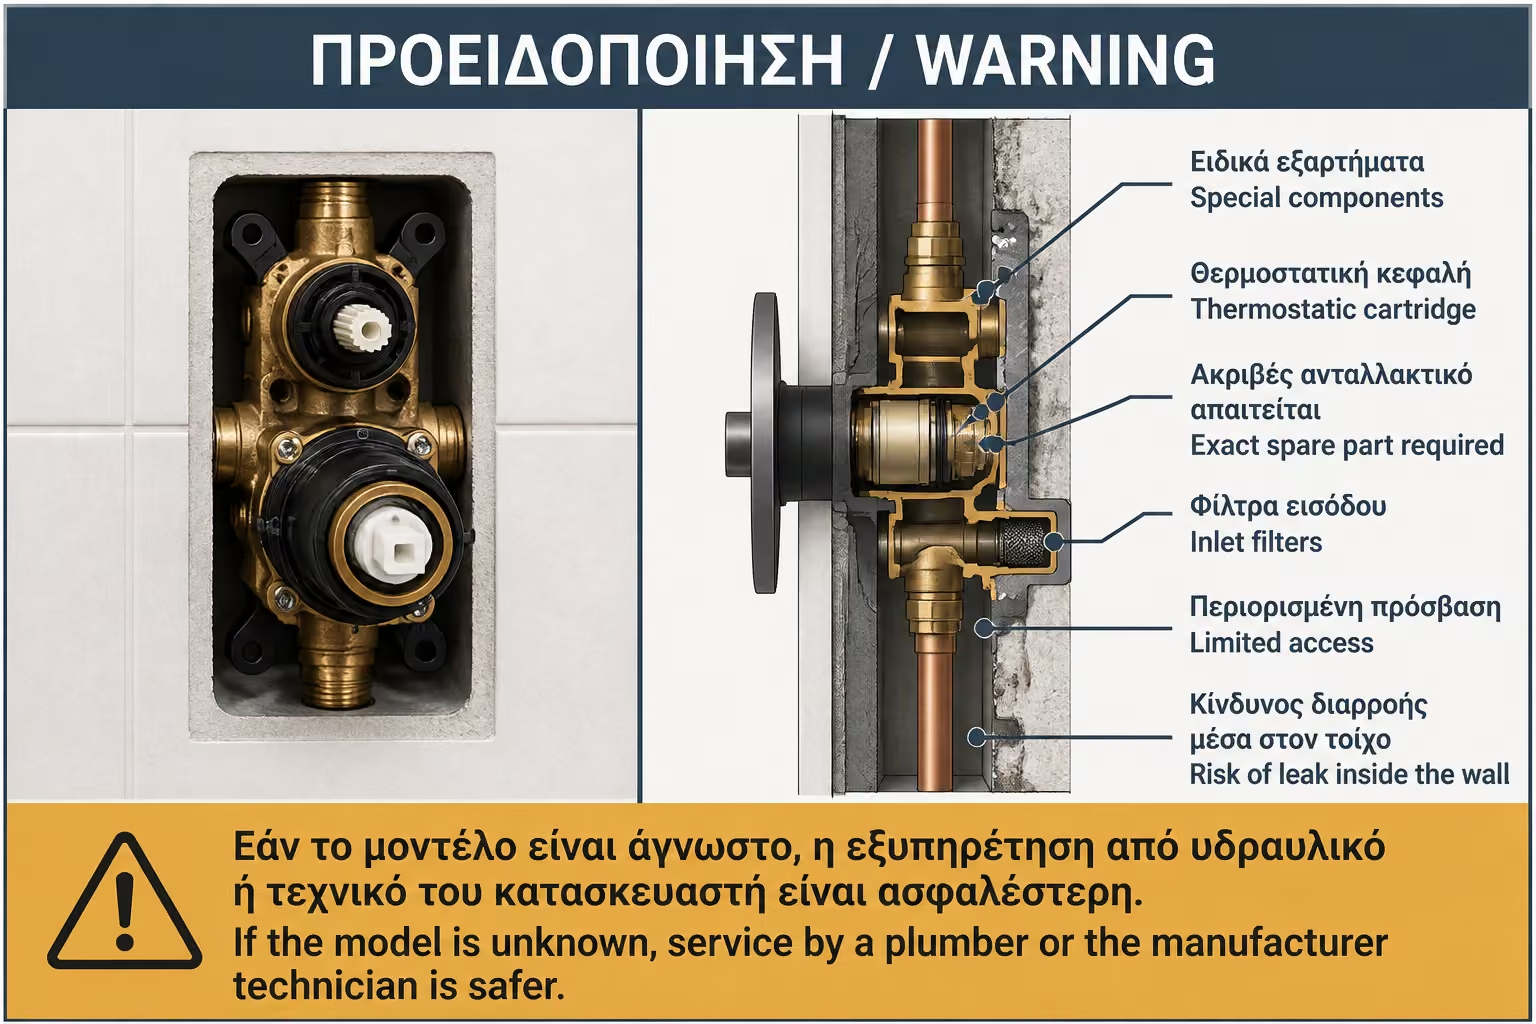
In concealed shower faucets, changing the cartridge can be more demanding.
The mechanism is located inside the wall, behind a decorative plate.
If you do not know the model, it is better to have a plumber or technician from the manufacturer take over.
The reasons why this type of faucet needs extra caution are usually the following:
There may be special components
The cartridge may be thermostatic
An exact replacement part is required
There may be inlet filters
Access is limited
Mishandling can cause a leak inside the wall
20. How to Prevent Cartridge Wear
We cannot completely avoid wear and tear, but we can reduce it.
The most useful preventive habits are the following:
- cleaning the aerator,
- installing a filter on the main supply where needed,
- checking the supply pressure,
- pressure reducer if there is overpressure,
- opening and closing the faucet gently,
- avoiding very cheap low-quality faucets,
- periodic descaling,
- correct installation from the start.
If the water is very hard, the internal mechanisms need more frequent care.
21. Indicative Cost
Cost depends on the faucet and on the spare part involved.
To set expectations realistically, the most common price ranges are roughly the following:
| Work / Material | Realistic cost |
|---|---|
| Simple general type cartridge | €8 – €25 |
| Better or branded cartridge | €25 – €60+ |
| Manufacturer's special cartridge | €40 – €120+ |
| Thermostatic mechanism | €60 – €180+ |
| Plumbing work for an exposed faucet | €40 – €100+ |
| Work on a concealed faucet | €70 – €180+, depending on access |
| Replacement of the whole faucet | depends on the product and the labour involved |
In a cheap faucet, replacing the whole unit is often smarter. In a good-quality faucet, a cartridge change is usually worth doing.
22. Common Pitfalls
The mistakes we see most often in this repair are the following:
1. Buying the wrong cartridge
Diameter is not enough. Base and guides must match.
2. Not turning off the water
This can cause flooding.
3. Forcing seized parts
The faucet may crack or the flexible hoses may loosen.
4. Not cleaning the seating surface
The new cartridge does not seal properly.
5. Overtightening parts
The mechanism may be damaged.
6. Ignoring excessive pressure
The new cartridge will wear out quickly.
7. Intervening in a concealed faucet without knowing the system
The risk of damage is greater.
23. Checklist Before Changing the Cartridge
Before you begin, run through the following points so you know whether the diagnosis and preparation are actually in place:
| Question | Yes / No |
|---|---|
| Is the faucet dripping while it is closed? | Yes / No |
| Have you identified exactly where the leak is coming from? | Yes / No |
| Have you turned off hot and cold water? | Yes / No |
| Do the isolation valves work properly? | Yes / No |
| Do you know the faucet model? | Yes / No |
| Do you have the correct cartridge? | Yes / No |
| Have you cleaned the mechanism base? | Yes / No |
| Does the lever move properly after the change? | Yes / No |
| No leakage around the lever? | Yes / No |
| Have you checked the pressure if the fault comes back? | Yes / No |
If you are not sure about the basics, it is better to ask a plumber.
24. Example of Simple Repair
A faucet drips from the spout even when the lever is fully closed. The isolation valves close properly and the faucet is of good quality.
The cartridge is removed and appears worn and full of scale. An identical replacement is fitted, the seating surface is cleaned, and the faucet is reassembled.
The leak stops.
In this case, there was no need to replace the whole faucet.
25. Example of Repair Error
In another case, an old cheap faucet drips from both the spout and the base. The owner changes the cartridge, but the leak continues.
It eventually becomes clear that the faucet body is worn out and the flexible hoses under the basin are also in poor condition.
Changing the cartridge could not solve all the problems.
The correct solution was to replace the whole faucet and its connections.
💡 The Engineer's Advice
If a mixer faucet drips from the spout while it is closed, the cartridge is one of the first places to check.
Before replacing it, make sure you have the correct part. Cartridges often look similar, but not all of them are compatible.
Always shut off both hot and cold water, clean the seating surface carefully, and do not overtighten the fittings.
If the faucet is concealed, expensive, or of an unknown model, it is usually better to call a plumber. The cost of a wrong intervention can be much higher than a simple replacement job.
Conclusion
A dripping faucet does not always mean that the whole faucet must be replaced. In many mixer faucets, the real cause is the ceramic cartridge mechanism.
Replacing it can solve the problem, provided the following things are done correctly:
- the source of the leak has been correctly located,
- the water has been fully shut off,
- the right spare part has been found,
- the seating surface has been cleaned,
- the new mechanism has been installed correctly,
- the faucet has been checked after the repair.
If the faucet is old, cheap, worn in several places, or concealed without clear model information, replacement by a plumber may be the safer option.
Proper repair is not just about changing one part. It is about finding why the faucet drips and intervening at the correct point.
Related Articles
Excessive Mains Water Pressure: How It Damages Batteries, Faucets, and When You Need a Pressure Reducer Low Water Pressure in the Shower or Sink: Causes, Control and How to Restore Proper Flow Temperature Fluctuations in the Shower: Why You Freeze or Burn When Someone Turns on the Faucet or Pulls the Faucet Salt Buildup in Pipes: How Hard Water Chokes the Network and When a Filter or Softener is Needed
Plumbing & Electrical Bathroom Infrastructure
Return to category.
Go to categoryCentral Guide
Return to the central guide.
Go to guide