
Plumbing & Electrical Bathroom Infrastructure
Return to category.
Go to categoryDampness on the wall behind a bathroom is one of those problems that rarely appears suddenly. By the time it becomes visible, it has usually been developing for quite a while. At first you may notice a slight blister in the paint, yellowing low on the wall, plaster that sounds hollow, or a musty smell in the next room. Many owners initially treat it as a cosmetic issue: "we'll scrape it, fill it, and repaint it". But when the source of the moisture is inside or behind the bathroom, repainting is only a temporary cover-up.
The tricky part about dampness behind a bathroom is that the wall surface does not always tell the whole story. A swollen patch can come from a broken water pipe, a drain leak, poor sealing at the shower joints, or water gradually passing behind the tiles. In older apartments, especially buildings from the 1970s, 1980s, and 1990s, more than one cause may be present at the same time. An old joint may be letting water through while a nearby pipe also has a small pressure leak.
The biggest mistake is rushing the diagnosis. If we assume it is "just mold" and repaint the wall with anti-mold paint, the problem will return. If we blame the joints and run a quick line of silicone over them while the real cause is a water supply leak, the wall will keep receiving moisture every day. If we start breaking tiles without checking first, we can create unnecessary damage and expense.
The right approach begins with observation. When does the dampness appear? Is it continuous, or does it show up after showering? Does it worsen when the drain is used? Is it low on the wall, or does it climb higher? Is there a pressure drop in the water supply system? Is there a sewer smell? These questions help far more than a rough guess based only on appearance.
In this guide, we look at how to distinguish the main causes of dampness behind a bathroom, which signs point to a broken water pipe, which suggest a drain leak, and which indicate failed sealing in the shower area or around the joints. We also cover when you need a plumber, when you may need a building professional or renovation technician, what you should ask before any repair begins, and why the wall should only be restored after the real cause has been fixed.
The wall behind a bathroom is often the first place that reveals a problem that is not visible inside the bathroom itself. A bathroom contains tiles, joints, silicone seals, pipework, drains, and plumbing fixtures. Many of these are hidden inside the wall or below the floor. So when there is a leak, the water does not always show up where it starts. It can travel behind tiles, into the plaster, along pipes, or through to the other side of the wall.
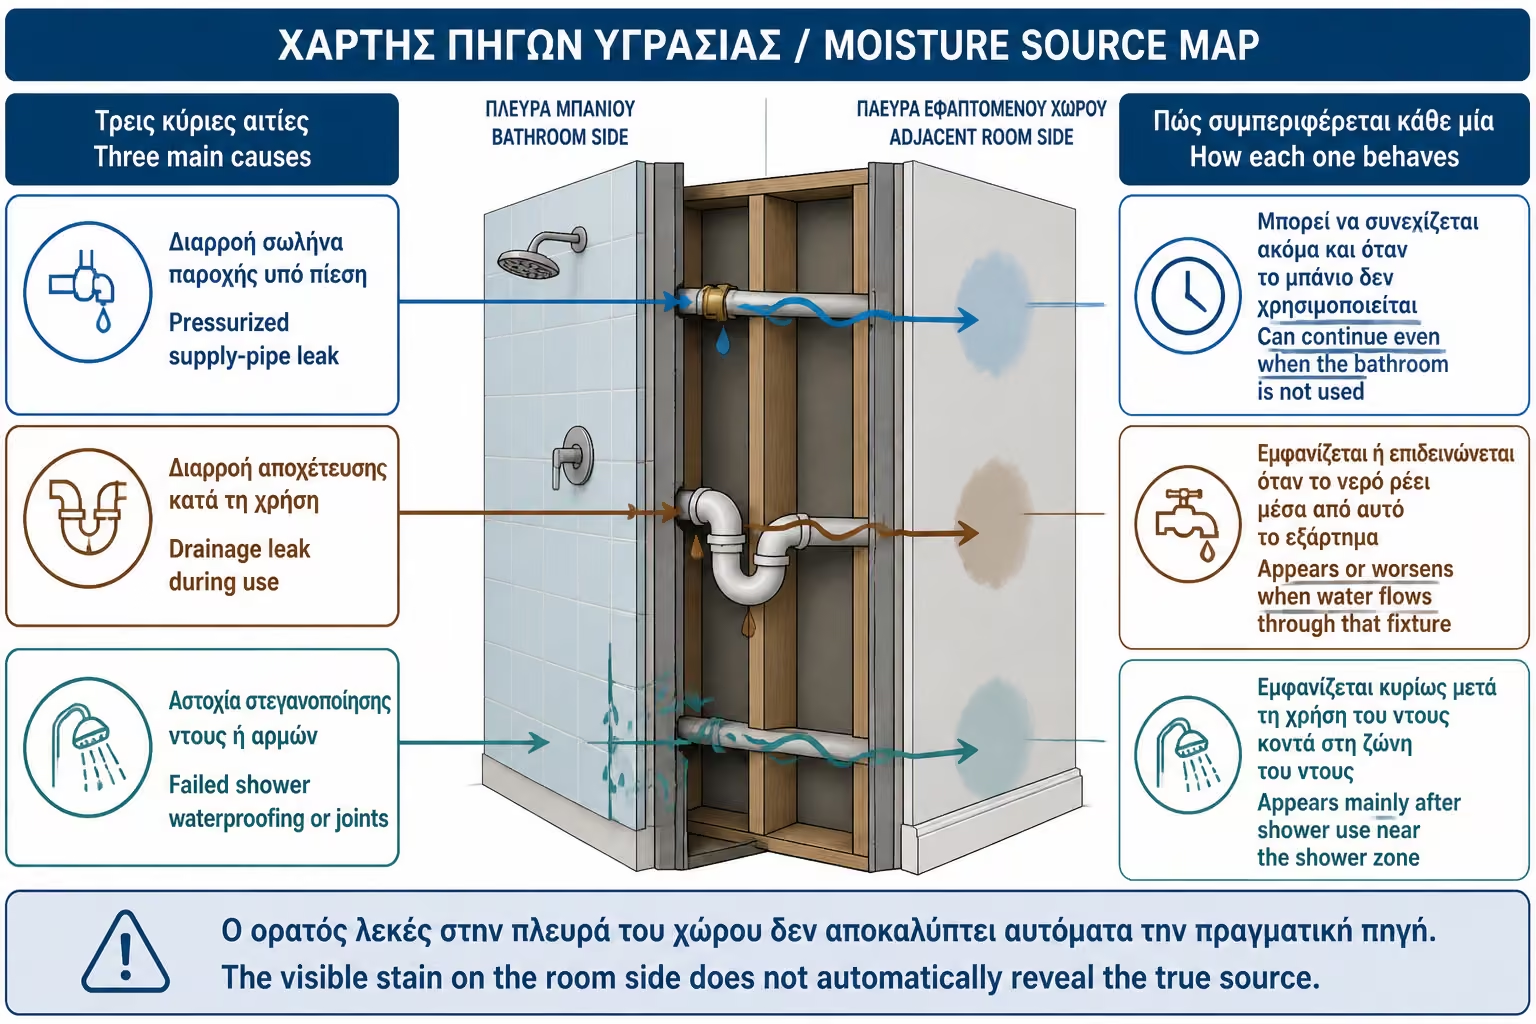
That is why we often see dampness in a bedroom, hallway, or wardrobe that backs onto the bathroom wall, while everything inside the bathroom still looks relatively clean. The owner sees the wall on the other side swelling and wonders why there is no obvious leak. The answer is that the tiles may be hiding the original path of the water, while the painted wall on the opposite side is more sensitive and shows the damage first.
Dampness does not affect only appearance. It can damage plaster, filler, paint, wooden furniture, door frames, wardrobes, and floors. Over time it can create mold, odors, and an unhealthy indoor environment. If the water reaches electrical points, sockets, or junction boxes, the issue becomes more serious and needs immediate professional inspection.
Most importantly, the longer the correct diagnosis is delayed, the more extensive the repair becomes. A problem that might initially have been solved with a targeted pipe or joint repair may, after months, require opening tiles, drying the masonry, restoring plaster, and repainting an entire area.
In practice, when we see dampness or swelling on the wall behind a bathroom, the three most common causes are these. The first is a leak from a water supply pipe, meaning a pipe that carries clean water under pressure. The second is a drain leak, meaning a pipe that carries wastewater away from the basin, shower, bathtub, washing machine, or toilet. The third is poor surface sealing, usually at joints, corners, around the shower, or where tiles meet sanitary fittings.
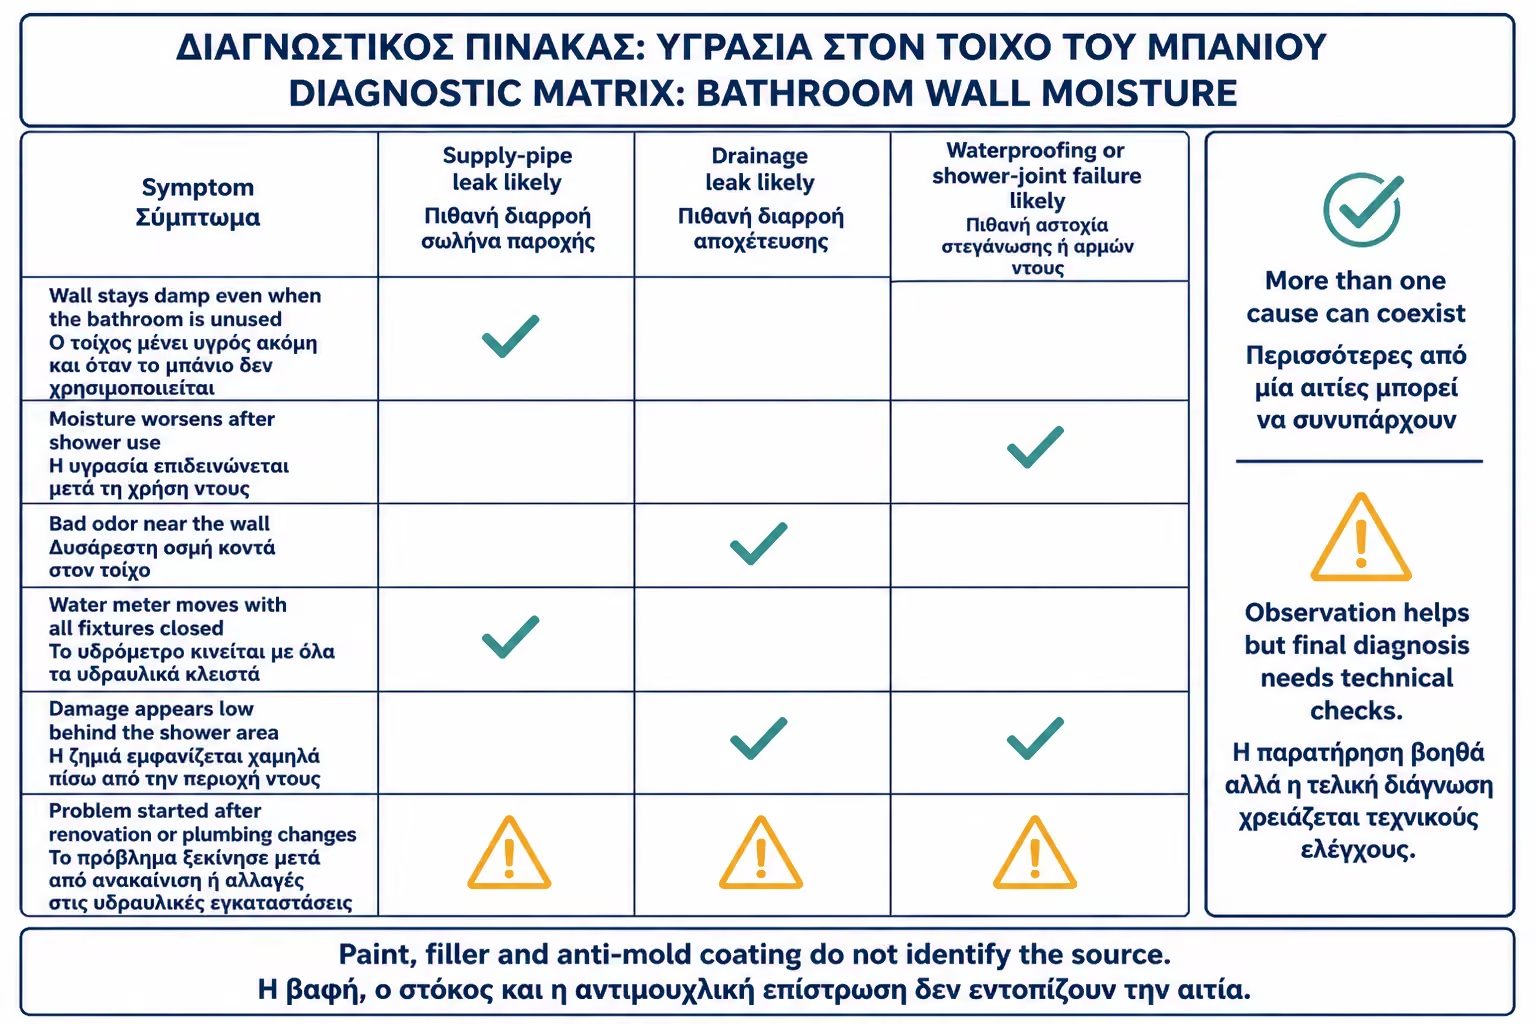
These three causes may look similar in their effect, but they behave very differently. A water supply leak continues as long as there is pressure in the system. That means it may continue even when the bathroom is not being used. A drain leak usually appears or worsens only when water passes through that specific point. Poor shower sealing shows up mainly after use, when water repeatedly hits the joints or corners.
A practical way to think about it is this: if the dampness keeps getting worse even when you are not showering, the water supply should be checked seriously. If it appears after using the basin, shower, or washing machine, the drain should be checked. If it shows up mainly after bathing and near the shower area, then joints, corners, and sealing become the prime suspects.
Of course, these are not absolute rules. In some cases, a small water leak is so slow that it seems "periodic", or a drain leaks only when a larger amount of water passes through. That is why observation helps, but the final diagnosis still needs technical inspection.
A water supply leak is one of the most critical causes because the water is under pressure. Even a small hole, a bad joint, or wear in a pipe can feed moisture continuously. There does not need to be any visibly running water. A small leak working around the clock is enough.
The signs of such a leak are often more consistent. The wall remains wet, the swelling gradually grows, the paint peels and the plaster softens. If the pipe goes through that particular wall, the damp may appear in a relatively specific zone, not necessarily low on the floor. In some cases, there may be an increased water bill or the meter may move while all the taps are turned off.
A simple example: in an apartment, the bedroom wall behind the bathroom starts swelling at roughly the height of the basin. The owner scrapes and repaints it twice, but the mark comes back. There is no water on the bathroom floor, and the joints look reasonably good. In that case, it is wrong to treat the problem as ordinary room humidity. The basin supply lines, angle valves, fittings, and pipes inside the wall should all be checked.
A suspected water supply leak needs a plumbing inspection. In many cases, a pressure test, a thermal camera check, or a moisture-meter reading can be used, depending on the installation. The aim is not to break the wall blindly, but to narrow the intervention point as much as possible.
A drain leak behaves differently. Because drain pipes are not usually under constant pressure, the problem appears mainly when the specific fixture is being used. There may be moisture after a shower, after using the basin, after emptying the bathtub, or when the washing machine is running.
Damp from drains is often accompanied by an odor, especially if there is a bad joint, crack or problem in a siphon. It's not always a strong sewer smell. It can be a heavy, "stuffy" smell that gets worse when the bathroom is used or when the space is closed.
In older drain systems, common problems include bad joints, worn pipes, broken couplings, settlement, and incorrect slopes. In renovated bathrooms, a new drain may have been connected poorly to the old network, or there may be a problem around the shower siphon.
A typical example is a wall that dries out somewhat when the bathroom is not used for a few days, but gets wet again after repeated showers. That usually points more to a use-related problem, such as drainage or failed sealing, than to a continuous water supply leak. If the dampness is accompanied by gurgling, returning odors, or slow drainage, the drain system needs serious checking.
Many homeowners assume the tiles themselves provide full waterproof protection. In reality, tiles are water-resistant, but the system is not automatically watertight. The sensitive points are the joints, the corners, the connections around the shower, the areas around mixers, and any penetrations through the surface.
If the joints are worn, if they have cracks, if the silicone has blackened and peeled off, or if there is no proper waterproofing behind the tiles, water can gradually seep behind the lining. At first nothing appears. Then moisture appears on the back side of the wall or low near the floor. This is especially common in showers without a cabin, in walk-in solutions, in bathtubs used as a shower and in old bathrooms where the joints have not been maintained for years.
A poor seal is different from a leaky pipe because it usually depends on the use. If you shower and the water hits the same angle every day, a small crack in the silicone may be allowing small amounts of water to seep back. It doesn't take a lot to cause damage. Constant repetition is enough.
A classic scenario is the bulge in the wall behind the shower area, low near the skirting board in the next room. Inside the bathroom, the joints just look "a little old". The owner sees no water running and assumes there is no problem. But every shower adds a little moisture behind the tiles, until the outer wall starts to swell.
The table below is not a substitute for technical inspection, but it helps the owner understand which direction the problem is pointing.
| Symptom | Most likely cause | What it usually means in practice |
|---|---|---|
| The wall is constantly wet, even without using the bathroom | Water supply leak | Possible leak in a pressurized pipe |
| Dampness increases after a shower | Joints, silicones or shower drain | The sealing and siphon should be checked |
| There is a sewage smell | Leak or drain / siphon problem | Possible bad connection or trap |
| Swelling low on the wall of the next room | Water from shower or bathroom floor | It is often associated with joints, corners or a siphon |
| The water meter runs with all taps closed | Water leak | An immediate plumbing check is needed |
| The problem appeared after renovation | Bad connection, wrong sealing or application failure | The workmanship needs to be checked |
| The moisture dries up when the bathroom is not in use | Use-related leakage, not constant pressure | Most likely drainage or joints |
The value of this table is that it helps avoid blind demolition. If the symptoms point to a water supply leak, we do not start with silicone. If they point to joints, we do not start breaking pipes without checking first. If they point to drainage, we do not repaint the wall and hope it will "dry on its own".
When the wall behind the bathroom starts swelling, the first instinct is often to restore the surface: scrape it, fill it, prime it, apply anti-mold paint, and repaint it. But that work only makes sense after the cause of the dampness has stopped and the wall has dried sufficiently.
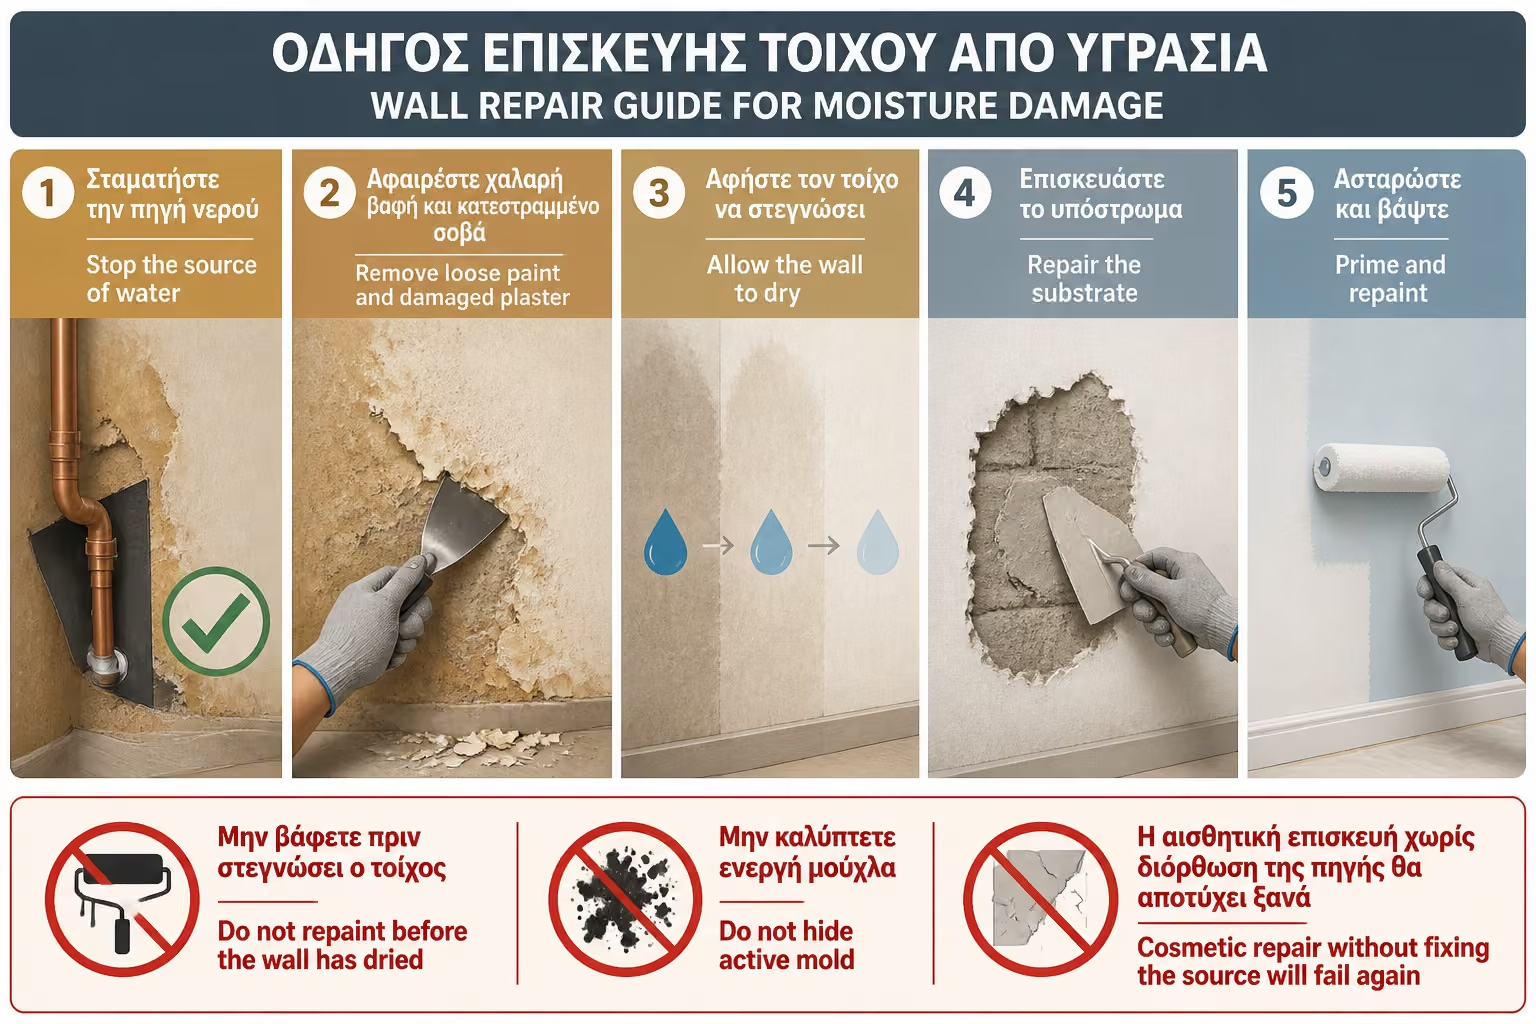
If a wet wall is painted, the new finish may look good for a few weeks. But the moisture left in the plaster will push back against the surface. Paint will blister, filler will crack, and mold may return. In some cases, the problem becomes worse because the surface is sealed before it has properly dried.
A practical example: in a hallway behind a bathroom, the painter scrapes the swelling and paints with a good insulating primer. The result looks flawless. Two months later, the color swells again in the same spot. It's not necessarily the painter's fault. It is because the source of the moisture had not been identified. The surface was repaired, but water continued to feed the wall.
The correct sequence is always the same: diagnose, stop the cause, let the wall dry, check it again, and only then restore the finish. If any of these steps is skipped, the repair is likely to be temporary.
A broken or worn water pipe is likely when moisture is not clearly related to use. If the bathroom is not being used and yet the wall remains wet or the damage is growing, the water supply should be high on the list of possible causes.
One simple check the owner can do, without disturbing the installation, is to observe the water meter when all taps are closed and no cistern, washing machine, or water heater is operating. If the meter is still moving, there is an indication of leakage. This does not identify the exact spot, but it is a serious sign that water is escaping somewhere in the system.
Visible connections should also be checked: angle valves under the basin, flexible hoses, cistern connections, mixer fittings, and washing-machine supplies. Sometimes the dampness behind the bathroom is not coming from an in-wall pipe at all, but from a small leak in an exposed fitting that runs backward and reaches the adjacent wall.
If a water leak is suspected, the work needs to be handled by a plumber. Blind use of fillers, silicone, or surface sealants will not stop water under pressure. All it does is delay the real repair.
Drainage should be checked when dampness appears after using specific fixtures. For example, if the wall gets wetter after a shower, after emptying the bathtub, or when the washing machine is running, the problem may be in a drain pipe, siphon, or connection.
A leaking sewer can be more insidious than it seems. Because there is no continuous pressure, it may not drip continuously. Thus, the wall may appear to "go dry" and then get wet again. This confuses the owner, who thinks the damp is old. In fact, each use can add a new amount of water.
In a bathroom with a shower, the shower drain and siphon are key inspection points. If the connection is not tight, if the siphon has shifted, or if it was installed poorly after renovation, water may escape under the floor or behind the wall. In older bathtubs, problems often occur around the waste fitting or overflow.
Special attention is needed if the moisture has an unpleasant smell. The smell alone does not prove a drain leak, but it is an indication that the drain system needs to be checked, not just the wall surface.
Poor sealing is very common in bathrooms that are used every day. Joints do not last forever. Over time, they can crack, absorb moisture, get dirty, or detach from the tiles. The silicone in the corners and around the shower also ages, darkens, loses elasticity, and peels away.
The problem is more pronounced in places where water hits directly. The shower corner, the floor-to-wall junction, the area beneath the mixer, and the lower tiles all take heavy daily stress. If there is no proper waterproofing layer behind the tiles, the joint becomes the first line of defense. Once it fails, water starts passing behind the finish.
In older construction, there was often no modern concept of full waterproofing in the shower area. Tiles were set on plaster or cement mortar, and that was considered sufficient. In practice, with heavy use, the joints and corners take the strain. After years, moisture can begin passing through to the adjacent wall.
The repair can be simple or complex, depending on the extent. If the problem is superficial, removal of old silicone, proper cleaning, application of new suitable silicone and local restoration of joints may be necessary. However, if water has been behind the tiles for a long time, opening, drying and resealing may be required.
Not all moisture behind a bathroom wall comes from a leak. In some cases, especially on cold walls or in bathrooms with poor ventilation, condensation is the real issue. This happens when warm, humid air comes into contact with a cold surface and the water vapor turns into liquid water.
Condensation usually appears as mold on the surface, often in corners, ceilings or behind furniture where the space is not well ventilated. It doesn't always cause deep plaster swelling like a leak, although over time it can take a toll on the paint and surface.
The leak, on the other hand, supplies the wall with water from a specific source. The swelling is often more intense, the plaster can soften and the damage has a specific course. If the problem is at the back of the bath and not inside the bath itself, a leak or water seepage from the shower is more likely than just condensation.
This distinction matters. If the problem is condensation, the solution may involve better ventilation, insulation, or changes in how the space is used. If it is a leak, the source must be repaired. Anti-mold paint may help the surface, but it is not a substitute for ventilation or plumbing repair.
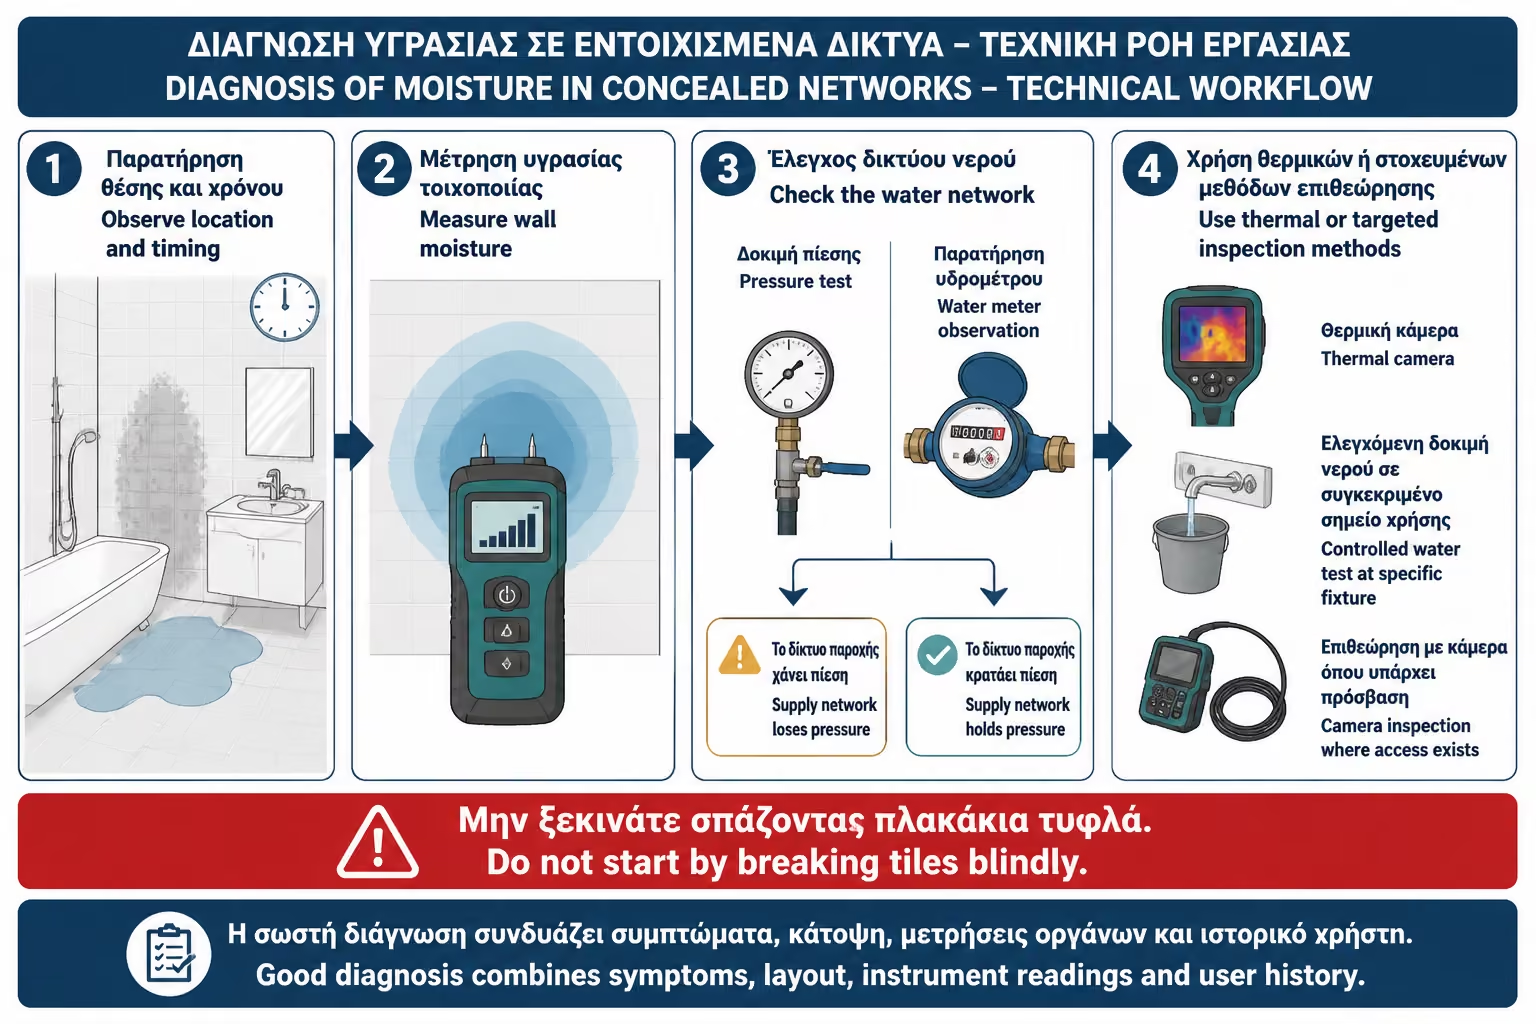
The right technical approach does not begin with breaking into the wall. It begins with inspection. The plumber or technician needs to collect clues, look at the bathroom layout, ask when the problem appears, and check the most likely points.
In many cases, moisture meters are used to show the extent of dampness in the wall. A thermal camera can also help identify colder or wetter zones, although it does not always provide a definitive answer. Pressure testing the water supply can show whether there is a leak. For drainage, local water tests or camera inspection may be used when access is available.
The technician's experience matters a great deal. A good inspection is not based on one tool alone, but on a combination of indicators: where the dampness appears, how high it reaches, how the bathroom is used, the condition of the joints, the age of the installation, whether there has been a renovation, the behavior of the meter, and any odors.
The owner should be cautious if the immediate answer is simply "we'll break here" without prior evaluation. Sometimes opening the wall is necessary, but it should be as targeted as possible, not blind.
Cost depends heavily on the cause, the access, the age of the installation, and the extent of the restoration. It is one thing to change an obvious connection under the basin and another to locate a leak inside a tiled wall. It is one thing to redo joints and silicone in the shower and another to remove part of the finish in order to waterproof the area properly again.
As a rough indication in the Greek market of 2026, a basic plumbing inspection or visit may cost around €40–80, depending on the area and the type of check. More specialized investigation using instruments, thermal imaging, pressure testing, or a drain camera may cost more, often around €80–200 or above, depending on the time involved and the equipment required.
Repair costs vary even more. A simple silicone replacement and local joint repair can be relatively economical. An in-wall pipe repair combined with opening the surface, plumbing work, closing the wall, replacing tiles, and repainting can add up quickly. If partial shower reconstruction or proper re-waterproofing is needed, the job may become a small renovation project rather than a simple repair.
Prices should always be evaluated based on what they include. Are materials included? Is tile restoration included? Is painting the back included? Is VAT included? Is there a warranty on the work? Will there be a before and after check? A low price for just “putting on some silicone” does not compare to a comprehensive repair that addresses the cause.
Before any work begins, the owner should ask for a clear explanation of the diagnosis. The phrase "it's damp from the bathroom" is not enough. What matters is where the moisture is coming from and why. If the technician believes the water supply is to blame, they should explain which signs support that conclusion. If they think the joints are responsible, they should show which points have failed. If they suspect drainage, they should explain which use is triggering the problem.
A proper quote should describe the scope of the work. For example, "leak repair" is too vague. It is better to specify whether it involves opening tiles, replacing a section of pipe, pressure testing, closing the wall, waterproofing, supplying new tiles, or only plumbing work. The same applies to joints: simply going over the surface is very different from removing the old material, cleaning, drying, and correctly applying the new one.
It should also be agreed in advance what will happen with the restoration of the wall behind the bathroom. Will the same contractor handle it, or will a painter be needed separately? When will repainting be done? Will there be enough drying time? Will loose plaster be removed? These details determine whether the result will last.
Joint and silicone repair can solve the problem when the moisture is actually from surface water infiltration and has not gone deep. If the joints are worn, but the tiles are sound, there is no hollow sound, not much water has passed back, and moisture is limited, a proper spot repair may be sufficient.
But simply applying new material over an old joint is rarely a good solution. If the old joint is loose or dirty, the new material will not bond properly. If the silicone has blackened and peeled off, it must be removed, cleaned and new suitable damp room silicone applied. If there is water behind the tiles, it must first be given time to dry.
Repairing joints is not enough when the tiles have come off, when they sound hollow, when there is a lot of moisture, when the wall behind has extensive damage or when the problem recurs after each operation. In these cases, the actual solution may require removing tiles and properly sealing the shower zone.
Once the cause has been fixed, the wall needs proper restoration. It is not enough to sand it a little and repaint it. The technician needs to remove loose paint and plaster, allow the substrate to dry, check whether moisture is still present, and then proceed with primer, filling, or replastering, depending on the extent of the damage.
Drying time is critical. Many owners are in a hurry to close the picture of the damage, especially if the space is a bedroom or a hallway. But if the wall is painted before it dries, the result is in danger of spoiling. In severe cases it may take days or even weeks, depending on wall thickness, ventilation, temperature and the amount of water absorbed.
If mold is present, it has to be treated properly before painting. It should not simply be covered up. It needs cleaning with suitable materials, protection for the user, and attention to how the space is ventilated. If the mold is widespread or there are sensitive people in the home, professional advice is advisable.
The first big mistake is procrastination. A small bulge in the wall looks harmless, but it can be the first sign of an ongoing leak. The longer the water stays inside the masonry, the greater the damage.
The second mistake is superficial repair without diagnosis. Painting, caulking and anti-mould products only have a place when the source has stopped. Otherwise, they just temporarily hide the problem.
The third mistake is the blind use of silicone. Silicone is a useful material, but not a solution for every moisture. If brushed over wet, dirty or loose surfaces, it will peel off. If the cause is a pipe or drain, it offers no substantial protection.
The fourth mistake is breaking without control. Sometimes it is necessary to open a wall or tile. But when it goes undiagnosed, it can lead to unnecessary damage, greater cost and delay.
Before deciding on repair work or demolition, it is worth going through the following points first:
| Question | Yes / No |
|---|---|
| Does the humidity rise even when the bathroom is not in use? | Yes / No |
| Does the water meter move while all supplies are off? | Yes / No |
| Does the dampness appear or worsen after showering? | Yes / No |
| Are there worn joints or peeling silicone in the shower? | Yes / No |
| Is there a sewer smell or heavy odor near the wall? | Yes / No |
| Is the moisture low behind the shower or tub area? | Yes / No |
| Did the problem occur after a recent renovation or plumbing change? | Yes / No |
| Has a pressure test or technical inspection been done before wall opening is proposed? | Yes / No |
| Is the cause stopped before painting is scheduled? | Yes / No |
| Has the wall been given enough time to dry? | Yes / No |
If the answers point to continuous dampness or meter movement, checking the water supply should be the first priority. If the problem is linked to shower use, then the joints, silicone seals, siphon, and drainage should all be checked. If there is an odor or wastewater backing up, the drain system should not be ignored.
If you see swelling on the wall behind the bathroom, do not start with repainting and do not settle for the phrase "it's just damp". First make sure the real cause is identified: water supply, drainage, or waterproofing. The most economical repair is the one done in the right place. A worn joint needs correct removal and resealing, a broken pipe needs plumbing repair, and a leaking drain needs the connection to be checked properly. If you simply cover the wall, the water will keep working behind it.
Dampness and swelling on the wall behind a bathroom are not problems to treat superficially. They may look like simple paint damage, but they are often a sign that water is reaching places it should not. The priority is not just to dry and repaint the wall, but to identify where the moisture is really coming from.
If the dampness is continuous, the water supply should be checked immediately. If it appears after use, the drainage and the shower sealing become the main possibilities. If the joints and silicone seals are worn, they should not be underestimated, because with daily use they can allow enough water to pass behind the tiles. If there is an odor or a recurring problem, a more serious technical inspection is needed.
The correct sequence is simple but critical: observe, diagnose, repair the cause, dry, then restore the wall. When this order is followed, the repair has a much better chance of lasting. When bypassed, the homeowner pays over and over again for stucco, paint, and makeshift solutions that don't stop the water.
In a bathroom, dampness does not forgive assumptions. It requires inspection, sound technical judgment, and intervention at the real cause.
Return to category.
Go to categoryReturn to the central guide.
Go to guide