
Bathroom Lighting, Ventilation & Heating
Return to category.
Go to categoryMold on shower silicone or tile grout is one of the most frustrating sights in a bathroom. It often starts with a few black dots in the corner, then becomes a dark line, and eventually looks as though it has seeped into the silicone or between the tiles. The rest of the room may be clean, but this alone can make the whole bathroom look old, damp, and neglected.
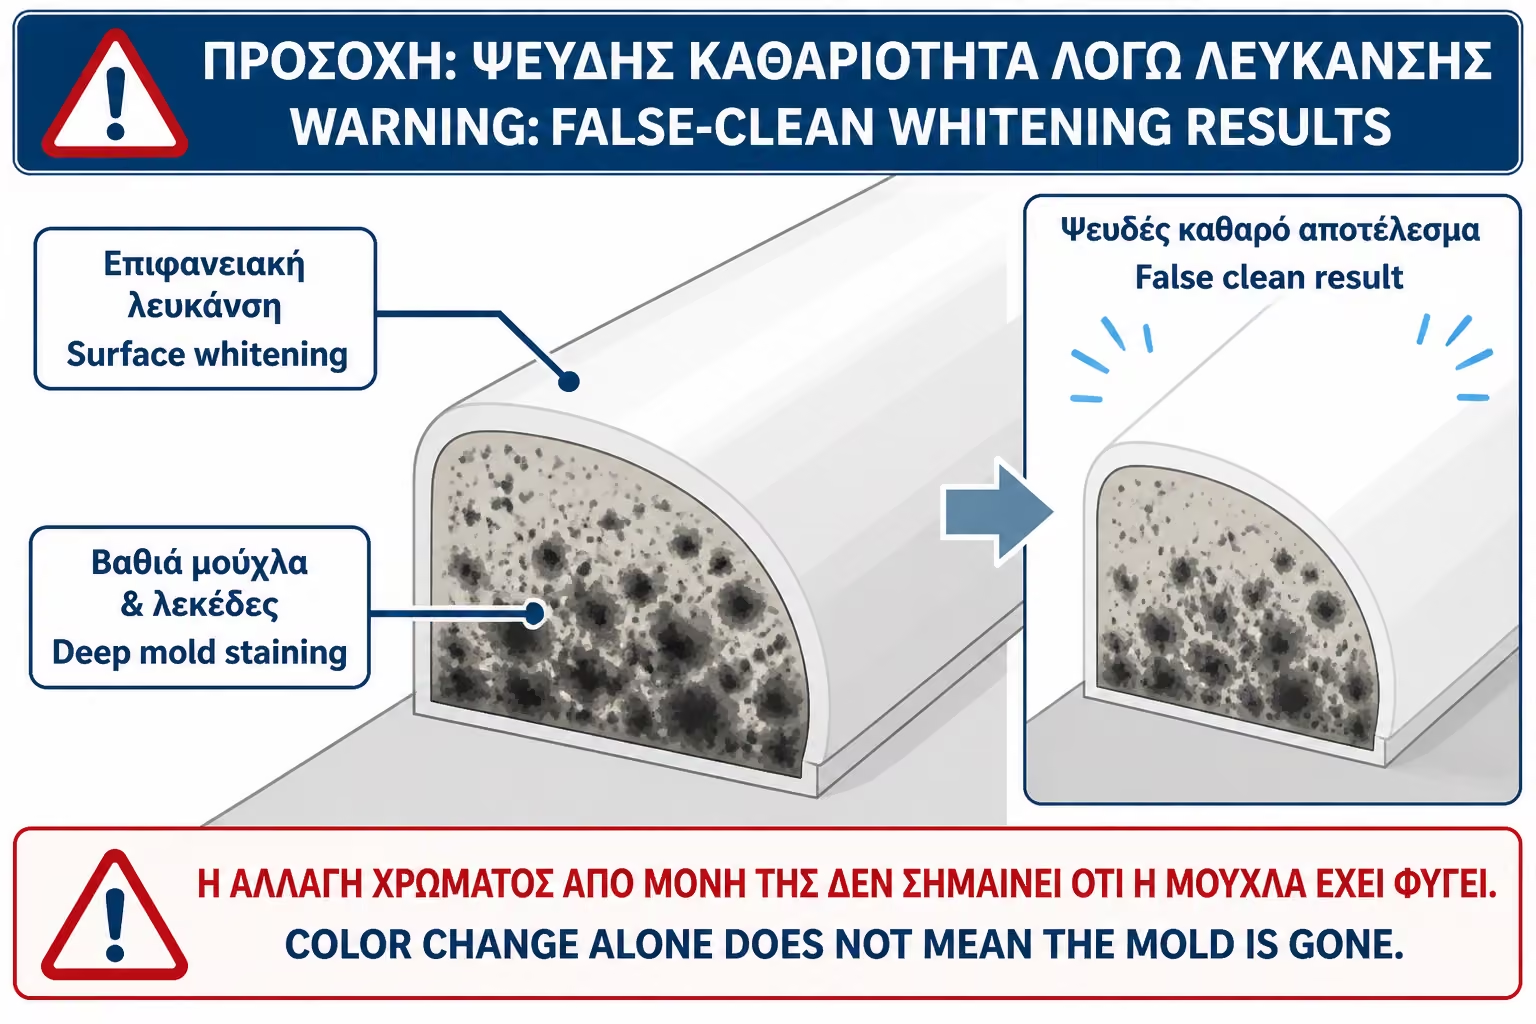
The first reaction is almost always the same: bleach. You spray, wait, scrub, watch the black stain fade, and assume the problem is solved. A few days or weeks later, however, the mark comes back. That happens because bleach can improve the appearance quickly, but it does not always address the cause and it does not work the same way on every surface. On non-porous surfaces such as smooth tile or glass, it can clean surface mold effectively. In porous grout, aged silicone, or materials the mold has penetrated, the result may be little more than surface whitening rather than true removal.
That is why many public-health organizations do not treat bleach as the first or only answer to mold. The EPA states that biocides such as bleach are not routinely recommended for mold cleanup, and instead recommends scrubbing hard surfaces with detergent and water, then drying them completely. For porous materials, the EPA notes that mold can be difficult or impossible to remove fully because it grows inside the voids and cavities of the material.
This is not to say that bleach "never does anything". It means that it is often wrong to think of it as a magic solution, especially on blackened silicones and old joints. It also means safety matters: bleach should never be mixed with ammonia, vinegar or other cleaners, as dangerous fumes can be produced. The CDC emphasizes never mixing bleach with ammonia or other cleaners and good ventilation when using cleaning products.
In this guide, we'll look at why mold gets to silicones and joints so easily, why bleach often fails, when vinegar makes sense, when hydrogen peroxide makes sense, when detergent and water is enough, when to remove the silicone, and what the real strategy is to keep the black mark from coming back every few weeks.
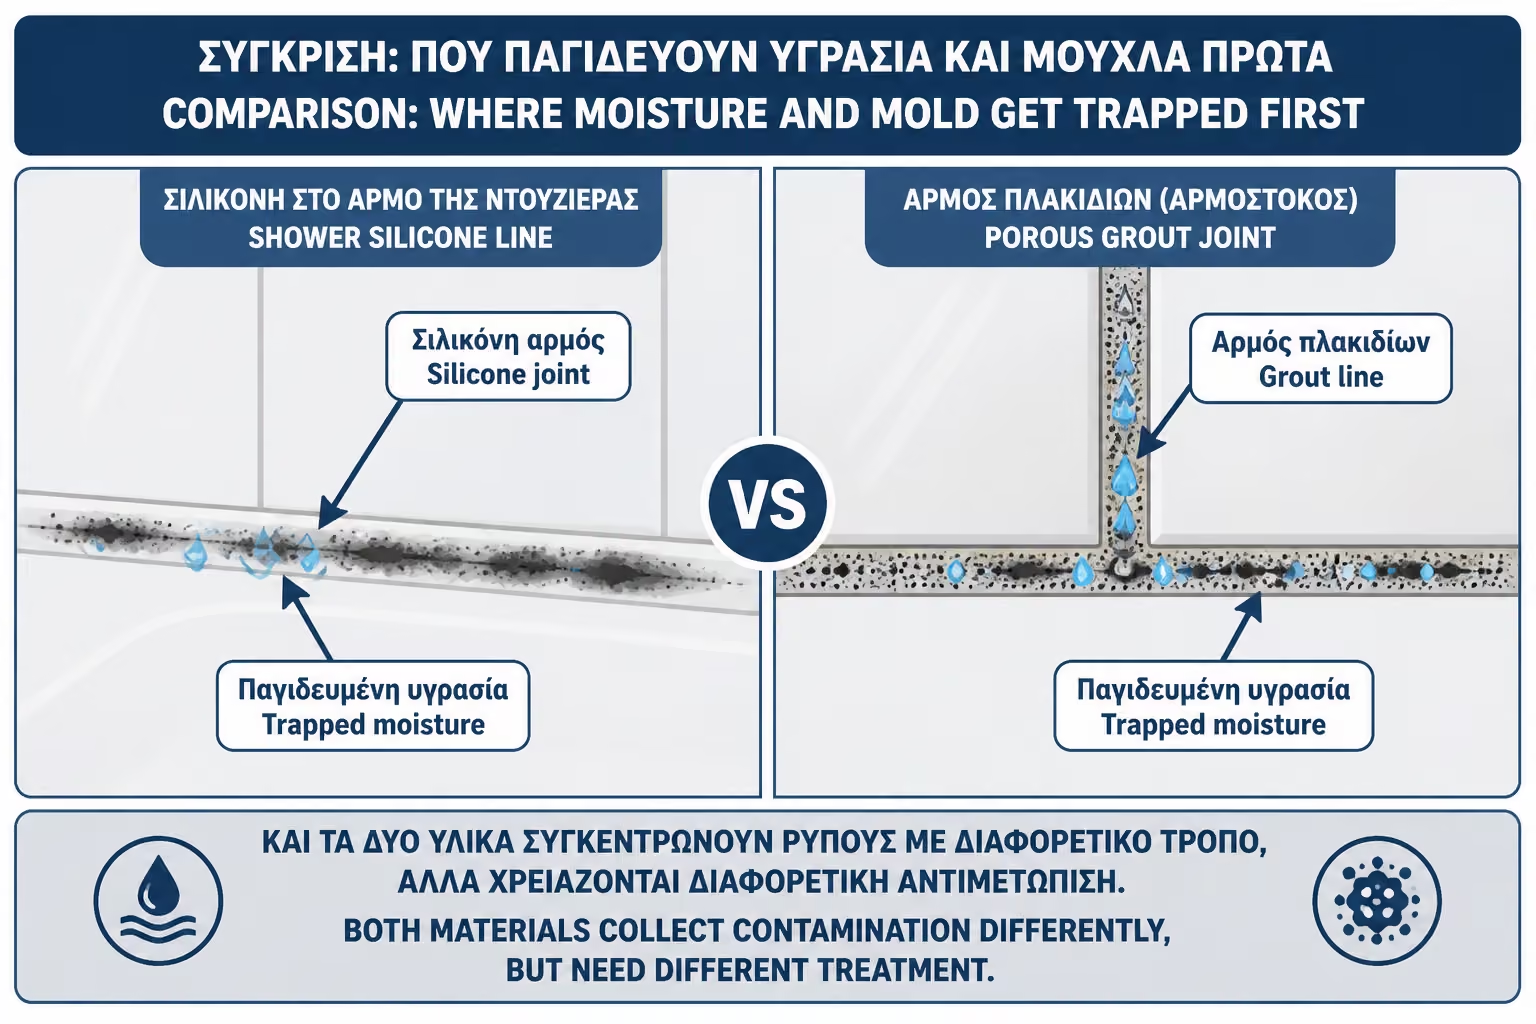
Silicones and joints are the most vulnerable parts of the bathroom because they stay wet longer than smooth surfaces. The tile is hard, smooth and non-porous. The water sits on it and is relatively easily removed. The joint, however, has a rougher and more porous texture. Silicone, especially when it ages, scratches, dulls, holds soaps and becomes an ideal surface for organic material to stick to.
Mold does not need "dirt" in the usual sense. It needs moisture, some organic matter and time. The bathroom has all of these. Water droplets, remnants of shampoo, shower gels, soaps, salts, dust and fibers from towels sit in the corners. If the surface does not dry quickly, the environment is created where fungi grow.
The corners of the shower are even more difficult. There two levels meet, water stays longer, air circulation is worse and the silicone often experiences continuous wetting. If there is a small gap behind the silicone or if the application was made on a wet or dirty surface, the mold can penetrate deeper.
This is why mold on joints and silicones is not always a simple surface stain. Sometimes it is an indication that the material is aged or deeply damaged.
Bleach has a strong whitening effect. This means it can make a black stain look lighter even if the problem has not actually gone away. You see an immediate visual improvement and assume the mold has been "killed". The bathroom looks better for a while, and then the black staining returns.
The problem is that optical whitening is not the same as deep removal. On a smooth, non-porous surface such as tile or glass, mold is mostly on the surface and can be removed more effectively by scrubbing and proper cleaning. In stained grout or silicone, mold may be in micropores, cracks, or beneath the surface.
There the bleach can make the mark look better without completely dissolving the root. Even worse, if the surface remains wet, the mold will find the same conditions again. Health Canada goes even further and advises against using bleach to clean mold, emphasizing moisture management and proper cleaning.
The first criterion of success is not whether the silicone whitened on the same day. It is if the mark does not return after 2–4 weeks of regular use.
Bleach can be used in some cases on hard, non-porous surfaces, always with care, ventilation and without mixing with other products. The CDC states that bleach or detergent can be used to clean mold in the home, with the strict warning not to mix bleach with ammonia or other cleaners, and with a concentration limitation when using a bleach solution.
Practically, bleach makes more sense on smooth surfaces where the mold is superficial: tile, glass, hard plastic, some non-porous surfaces. But there even the EPA gives as a basic guideline the scrubbing with detergent and water and complete drying, not the mandatory use of biocide.
In joints and silicones, bleach has limitations. It may lighten the color, but if the joint is porous or the silicone is deeply affected, the mold will return. Also, frequent use of strong chemicals can damage silicones, metal parts, rubbers and surfaces, especially if not rinsed properly.
The rule is simple: use bleach carefully, never as a permanent strategy. If you need to spray the same spot every week, the real problem is not the cleaner. It is the moisture or the material itself.
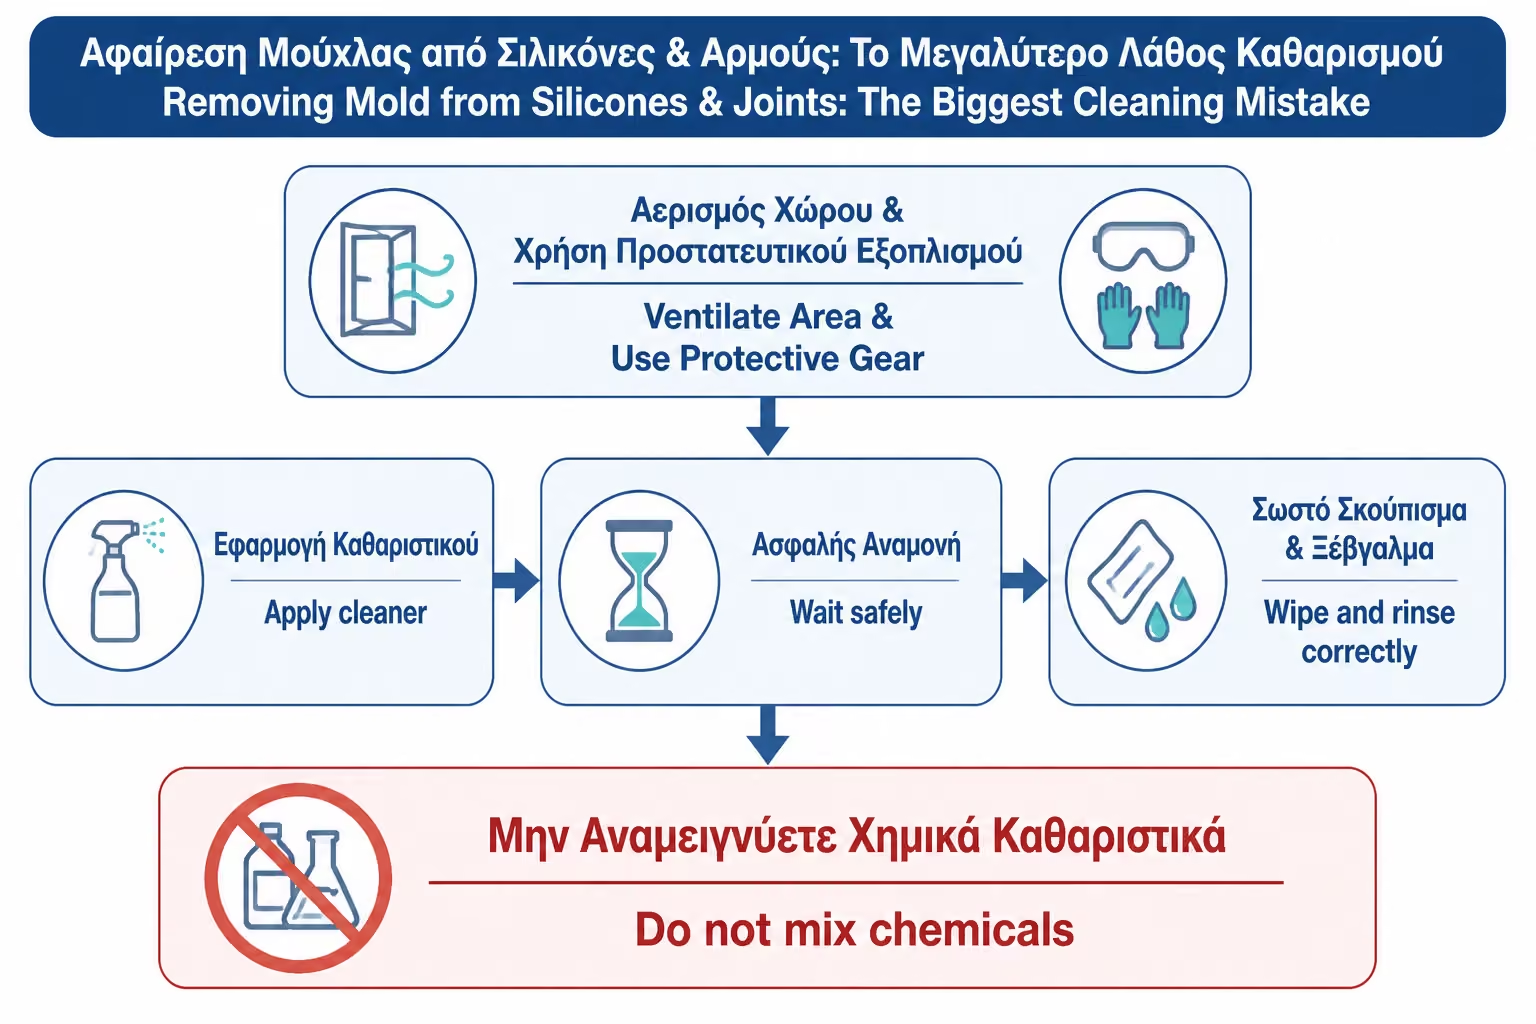
There are many cleaning products in a bathroom: bleach, descalers, acidic products, ammonia-based cleaners, vinegar, peroxide, disinfectants, and toilet cleaners. Mixing them can be dangerous. Bleach combined with ammonia or other products can create toxic fumes. Bleach mixed with acidic cleaners such as vinegar or descalers can also release hazardous gases.
That's why we don't do cleaning "cocktails". We don't put bleach first and then vinegar "for more strength". We do not put peroxide on a surface that still has bleach. We do not use scale remover and immediately after bleach. If we change the product, rinse very well, ventilate and let the surface dry.
CDC is clear: don't mix bleach with ammonia or other cleaners and open windows/doors for fresh air when using cleaners.
This is particularly important in small blind bathrooms where the air is difficult to renew. If you are cleaning mold in such a bathroom, the fan should be running, the door should be open or there should be good ventilation, and the products should be used one at a time, never mixed.
For hard surfaces, detergent and water is often the best start. The EPA suggests scrubbing mold off hard surfaces with detergent and water and drying completely. This sounds less “powerful” than bleach, but it makes sense: the goal is not only to discolor the mold, but to mechanically remove the material from the surface.
In the joints, the mild detergent helps to remove soaps, greases and organic residues that feed the mold. Before using any more special product, the surface must be cleaned of dirt. If you spray an active product on top of a layer of soap and salt, it doesn't get to the problem properly.
The process is simple: clean with a mild detergent, scrub with a brush suitable for joints, rinse, dry and then decide if a second step with vinegar, peroxide or a special anti-mold is needed. At the joints, sanding must be careful so as not to wear the material.
Detergent isn't always enough for old black mold, but it's almost always a good first step.
White vinegar is often used as an alternative to mildew, especially when we want to avoid bleach. It's acidic, helps with some stains, can reduce odors, and is less aggressive than many strong chemicals. In surface mold on silicones or joints it can help, especially if combined with mechanical cleaning and good drying.
However, it is not suitable for all surfaces. Vinegar is acidic and can damage natural stones, marble, limestone materials, some joints or sensitive surfaces. If the bathroom has marble, natural stone or special materials, we do not use vinegar without checking if it is allowed.
Also, vinegar should never be mixed with bleach. This is critical. If bleach has been used, a very good rinse and time/aeration should be done before anything acidic is used.
Practically speaking, vinegar makes sense as a milder choice for surface mold and scale on suitable surfaces, not as a guarantee that it will save old silicone that has blackened deep down.
Hydrogen peroxide is often used as an alternative cleaner/oxidizer for mold. It can help with surface stains, has a disinfecting effect and is less irritating than bleach for some users. It is usually used in low concentrations for household use, according to product directions.
But this also has limitations. May discolor some materials. It should not be mixed with vinegar, because peracetic acid can be created, which is irritating and corrosive. It should not be used over residues of other chemicals without rinsing. A small spot test should be done if there is any doubt about the surface.
In joints, it can help with surface mold, especially when cleaned from soaps and salts. In deeply affected silicone, however, the problem remains: if mold has penetrated the material, replacement may be more appropriate than repeated cleanings.
Peroxide is a tool, not a permanent cure. The treatment is cleaning, drying and correcting the cause of dampness.
There are special anti-mold cleaners for bathrooms on the market. Some are based on chloride ingredients, others on different active substances. They can be effective on some surfaces, especially when the mold is superficial. Their advantage is that they are designed for a specific use and come with instructions.
The downside is that many homeowners use them as a permanent solution without correcting the moisture. If the bath does not dry, the product will be needed again and again. Also, some products have strong fumes and require good ventilation, gloves and caution.
Before buying, read which surfaces the product is suitable for. Another tile, another natural stone, another painted surface, another silicone. Do not use hard surface products on sensitive materials without testing.
Special products are worth it when used properly, on small or medium surfaces, as part of an overall treatment. They are not worth it when they replace the diagnosis.
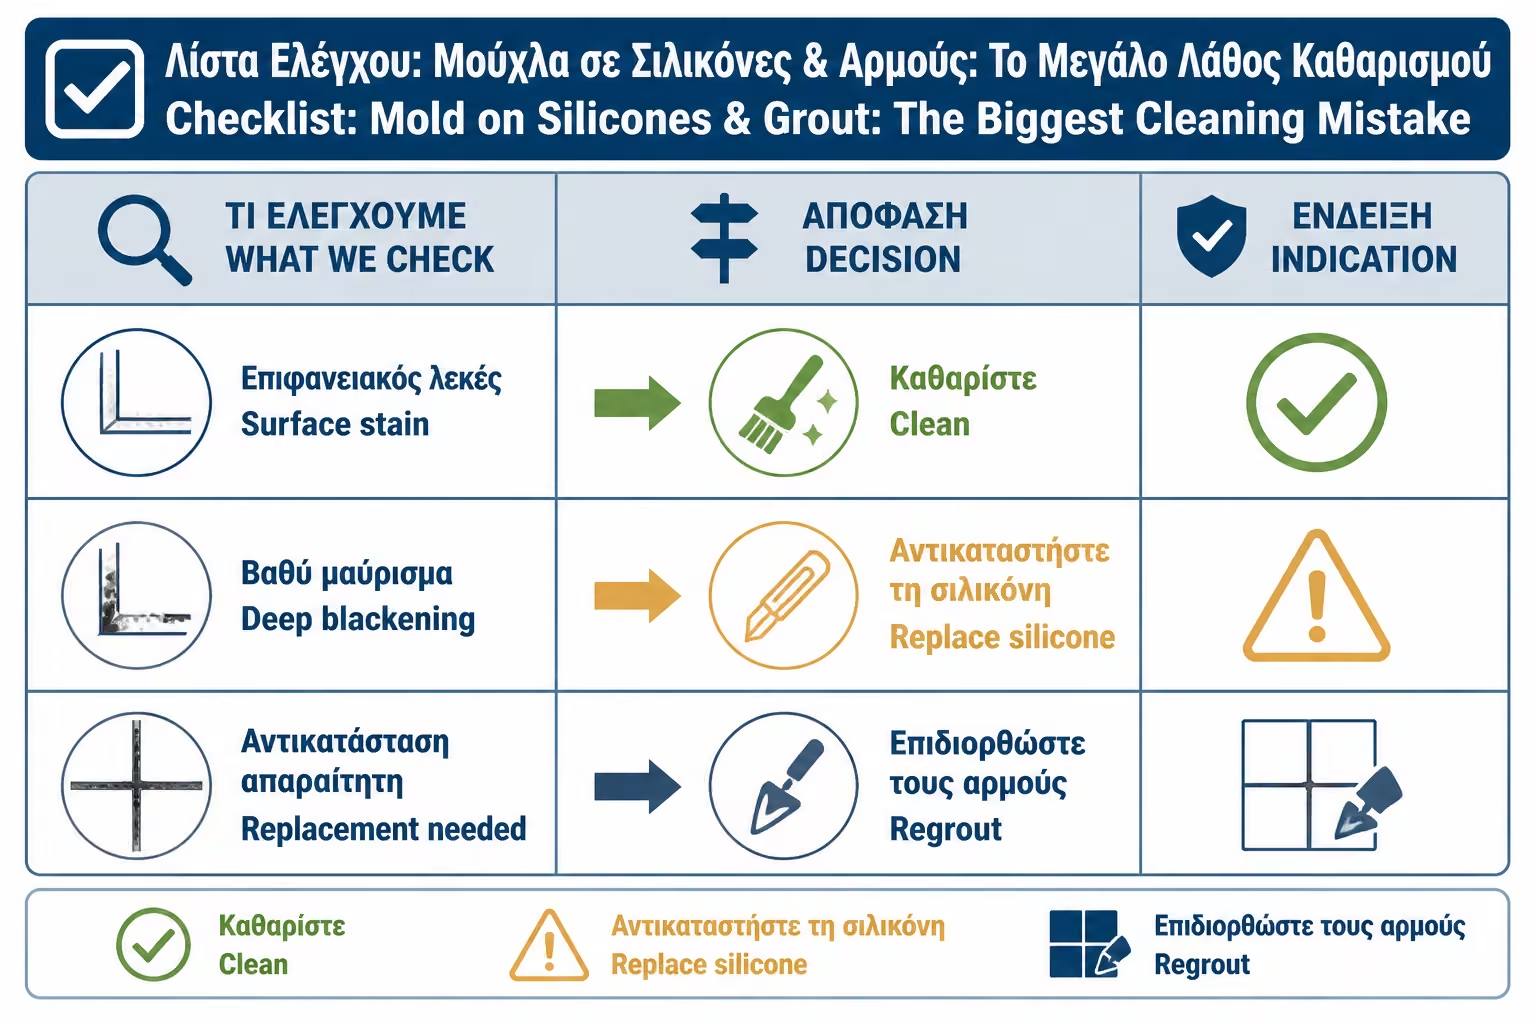
Silicone is where mold often becomes most persistent. When the black mark is only on the surface, it can sometimes be cleaned. But when the silicone is deeply stained, when the black is visible inside the material, when there are small cracks, or when the silicone has detached from the tile, cleaning is usually only temporary.
In such a case, the correct solution is to remove the old silicone. The surface must be thoroughly cleaned, debris removed, checked for moisture behind the silicone and thoroughly dried. Then a new silicone suitable for the bathroom, ideally with anti-mould properties, is applied to a clean and dry surface.
If new silicone is applied over old mold or a wet surface, the problem will quickly return. Silicone application is not just "passing a line". It needs proper preparation and drying time.
The rule is: if the silicone blackens on the surface, clean it. If it has darkened deeply, peeled off or lost its elasticity, we replace it.
Joints are more durable than silicone, but they are porous. If the mold is superficial, it can be cleaned with a mild detergent, a joint brush and a suitable product. If the joint is deeply blackened, cracked, crumbling, or holding moisture, cleaning may not be enough.
In old joints, rejoining may be necessary. That is, part of the old grout is removed and a new one is applied. This is more serious work than cleaning, but often gives a better result when the joints are old or wet. In showers, suitable grout for wet areas should be used and drying instructions should be followed.
Care is needed in the corners. Corners should not always be grouted with hard grout. They often need elastic silicone because there are micro-movements between the layers. If the wrong material is used, it can crack and hold water.
If the joints are constantly blackening, it is not enough to change the cleaner. We need to see if the shower is drying, if there is a correct slope, if the ventilation is working and if the joints are technically in good condition.
Not all surfaces are cleaned in the same way. Vinegar, acidic cleaners and many anti-moulds can damage marble, natural stone, limestone materials or delicate coatings. They can dull the surface, create marks or alter the protective layer.
If the bathroom has marble or natural stone, products suitable for the specific material must be used. A neutral cleaner and special protection/sealing of the stone is often needed. Mold on such surfaces is a more complex issue, because we don't want to solve one problem and create another.
The same applies to colored joints, black batteries, metal finishes, aluminum profiles and special surfaces. A strong product can leave marks. Always test on a small, inconspicuous spot.
The "homemade solution" is not always safe for expensive materials. In such bathrooms, preventive drying is much safer than aggressive cleaning.
The right process starts with ventilation. We open a window if there is one, operate a fan, leave the door open and wear gloves. If the surface is small and superficial, we start with detergent and water to remove soaps and dirt.
Then we choose a single active product, depending on the surface. It can be a special anti-mold, vinegar on a suitable surface, peroxide or another product. We don't mix them. Let it work according to the instructions, rub gently with a joint brush or cloth, rinse well and dry completely.
If the mold does not go away or seems to be inside the silicone, we stop repeating endless cleanings. There we look at silicone removal and replacement. If the joint is worn, consider rejoining.
After cleaning, the critical step is prevention: ventilating after showering, drying surfaces, controlling silicone, reducing humidity. If this is not done, cleaning only temporarily restores the image.
The removal of old silicone is done carefully so as not to scratch tiles, shower, bathtub or profiles. A suitable silicone remover or controlled motion cutter is used. The old silicone should be removed as completely as possible, leaving no contaminated residue underneath.
After removal, the area is cleaned of soaps, salts and debris. It must dry completely. This is critical. If you seal moisture under new silicone, you are again creating an ideal environment for mold and potential adhesion failure.
The new silicone should be suitable for bathrooms and wet areas. It is applied to a clean, dry surface, with the correct thickness and a continuous line. Then it needs a curing time according to the manufacturer before it gets wet. If the showerhead is used too soon, the silicone may not cure properly.
If the silicone is at a critical sealing point, such as joining a shower to a wall, and it is suspected that water has passed back, it is advisable to have a technical inspection. We don't want to just gloss over a problem.
Mold returns when the same conditions return. If the shower stays wet, if the fan does not work enough, if there is no vacuum under the door, if the bathroom is cold, if the joints are worn, or if the silicone is placed incorrectly, the black mark will reappear.
In bathrooms with poor air circulation, the corners do not dry. In bathrooms with hard water, salts and soaps create a substrate where dirt sticks. In bathrooms without a timer, the fan stops early. In bathrooms with a dirty vent, the supply has dropped. All of these help mold.
The solution is to reduce the residence time of water. After showering, remove water from windows and tiles with a spatula. Let the fan run. Keep the door slightly open when possible. Clean off soap scum before it becomes a layer. Check silicones and joints before they darken deeply.
Prevention is much easier than deep mold removal.
Daily habit makes more of a difference than the strongest cleanser. After showering, remove excess water from cabin windows and low tiles with a small spatula. This reduces the amount of water that evaporates and sits on the silicones.
Let the fan run long enough. If it has a timer, don't cancel it because it "sounds". If it sounds excessive, solve the noise issue with a better model or maintenance. If there is no timer, leave it on for 10–15 minutes after showering, depending on the bathroom.
If there is a window, open it briefly when conditions permit. But don't let the bathroom freeze for hours in the winter, because cold surfaces favor condensation. The goal is quick air freshening and drying, not a permanently frozen bath.
Keep silicones clear of soaps. That's where most mold starts. A quick rinse and dry in the corners makes a huge difference.
A professional is needed when the mold is extensive, when it is behind peeling silicones, when there are swollen joints, when the mold returns quickly after cleaning, when there is a possibility of leakage, or when the materials are worn. Care should also be taken if there are people in the home with asthma, allergies or severe sensitivity to mold.
The technician needs to check not only where it got blackened, but also why it got blackened. Is there a proper slope in the shower? Water pooling in the corner? Has the silicone been opened? Does moisture seep behind tile? Is the fan working? Is there an air intake? Is the joint suitable?
If the problem is only silicone, removal and reinsertion may be the solution. If they are joints, re-joining may be necessary. If it is waterproofing behind tiles, then we are talking about a more serious issue that cannot be solved with a cleaner.
The professional is not needed for every little dot. It is needed when the mold indicates that there is a technical failure or repeated dampness.
The cost depends on the area, the material, whether it needs simple cleaning or replacement, access, the condition of the joints and whether there is a deeper moisture problem. It is also affected by region, VAT, if the work is done individually or together with another renovation and if special materials are needed.
| Work / solution | Indicative range 2026 | When does it make sense? |
|---|---|---|
| Simple cleaning with household materials | €5–€30 | Minor surface mold |
| Special anti-mold product | 5–20€ per product | Topical use on suitable surfaces |
| Joint cleaning by a technician | 60–180€+ | Larger surface area or stubborn dirt |
| Removal and new shower silicone | 70–180€+ | When the silicone has blackened deeply |
| Local reassembly of joints | 120–350€+ | When the joints are worn or moisture-damaged |
| Complete refitting of shower area | Wide variation | In an old or problematic shower |
| Leakage/sealing check | Wide variation | When mold persists or there is moisture behind |
The cheapest solution is surface cleaning. The most correct solution, however, depends on the condition of the material. If the silicone has rotted or peeled off, buying cleaners over and over again is ultimately more expensive than replacing it properly.
The quote must clarify if it includes removal of old silicone, substrate cleaning, drying time, new silicone suitable for bathing, VAT and any restorations.
Cleaning mistakes are common because mold looks like a simple stain. But in a bathroom, the stain is the result of moisture, material and use.
| Error | What happens in practice | A more correct approach |
|---|---|---|
| Use only bleach each time | Whitening without a permanent solution | Mechanical cleaning and humidity correction |
| Mixing bleach with vinegar or other cleaners | Hazardous fumes | Never mix products |
| Cleaning on soaps/salts | The product does not arrive correctly | First detergent and cleaning |
| Scrubbing with a very hard brush | Joint/silicone wear | Suitable brush and gentle pressure |
| New silicone on old mold | Quick respawn | Complete removal and drying |
| Using vinegar on marble/stone | Blurs and damage | Product suitable for material |
| Peroxide with vinegar | Irritating mixture | Use one product at a time |
| Wetting new silicone early | Poor ripening | Wait as instructed |
| Ignoring ventilation | The mold is coming back | Timer, hygrostat, air intake |
| Treat spillage as surface mold | The problem is growing | Sealing/moisture check |
The most common mistake is to spray bleach on the silicone every week. The silicone whitens a bit, smells "clean", but the mold returns because the material is already affected or because the corner stays permanently wet.
| Inquiry | Yes / No |
|---|---|
| Is the mold on the surface or has it soaked into the silicone? | Yes / No |
| Has the silicone peeled off or cracked? | Yes / No |
| Are the joints hard and firm or have they disintegrated? | Yes / No |
| Has the area been cleaned of soaps and salts first? | Yes / No |
| Is the product to be used suitable for the material? | Yes / No |
| Is the mixing of chemicals completely avoided? | Yes / No |
| Is there good ventilation during cleaning? | Yes / No |
| Are you wearing gloves and eye/skin protection? | Yes / No |
| Does the bathroom dry quickly after showering? | Yes / No |
| Does the fan work after using a timer or a humidistat? | Yes / No |
| Is there a gap under the door for air intake? | Yes / No |
| If mold returns, has it been checked for possible leakage or poor sealing? | Yes / No |
If the silicone has blackened deeply, stop "chasing" it with bleach. Chances are you no longer have a simple stain, but material that has become infected or aged. The correct solution is removal, cleaning, complete drying and new bathroom silicone on a properly prepared surface. For joints, start with mechanical cleaning and a suitable product, but if the joint has disintegrated, re-grouting is required. And in any case, solve the cause: moisture, poor ventilation, standing water or leakage. Otherwise the black mark will return.
Removing mold from silicones and joints is not just a matter of "strong" cleaner. The biggest mistake is to see mold as a stain that needs to be whitened. Bleach can give a quick visual improvement, but in porous joints and old silicones it often does not solve the problem at its root. In addition, misuse or mixing with other cleaners can become dangerous.
Alternatives such as vinegar, hydrogen peroxide, detergent and special anti-mold products have their place, but not everywhere and not in the same way. Vinegar is not suitable for marble and natural stone. Peroxide can discolor delicate materials and does not mix with vinegar. Detergent and scrubbing is often the right start on hard surfaces. Special products help, but do not replace ventilation and drying.
On deeply blackened silicone, replacement is often the best solution. Joints that are worn may require re-jointing. For mold that keeps coming back, the cause must be checked: condensation, poor ventilation, closed door without air intake, standing water, thermal bridge or leakage.
Real success is not whitening silicone in one day. It is to stay clean for months. And this is only achieved when cleaning is combined with proper drying, good ventilation and technically correct application of the materials.
Return to category.
Go to categoryReturn to the central guide.
Go to guide