
Bathroom Lighting, Ventilation & Heating
Return to category.
Go to categoryMold on the bathroom ceiling is one of the most common signs that the space is not drying properly. It usually starts subtly: a few black dots in a corner, a gray cloud over the shower, a dark border around the vent or a dull spot near the window. If left, it spreads. The ceiling looks dirty, the place smells damp and the owner starts thinking "I should paint it with an anti-mould".
Mold-resistant paint, however, is not a magic solution. If it goes over active mold, a damp surface, or a ceiling that continues to sweat after every shower, the problem will return. It may take a while, it may look nice for a few months, but if the surface is not properly cleaned and the cause of the moisture is not addressed, the mold will re-emerge through the paint or around the same cold spots.
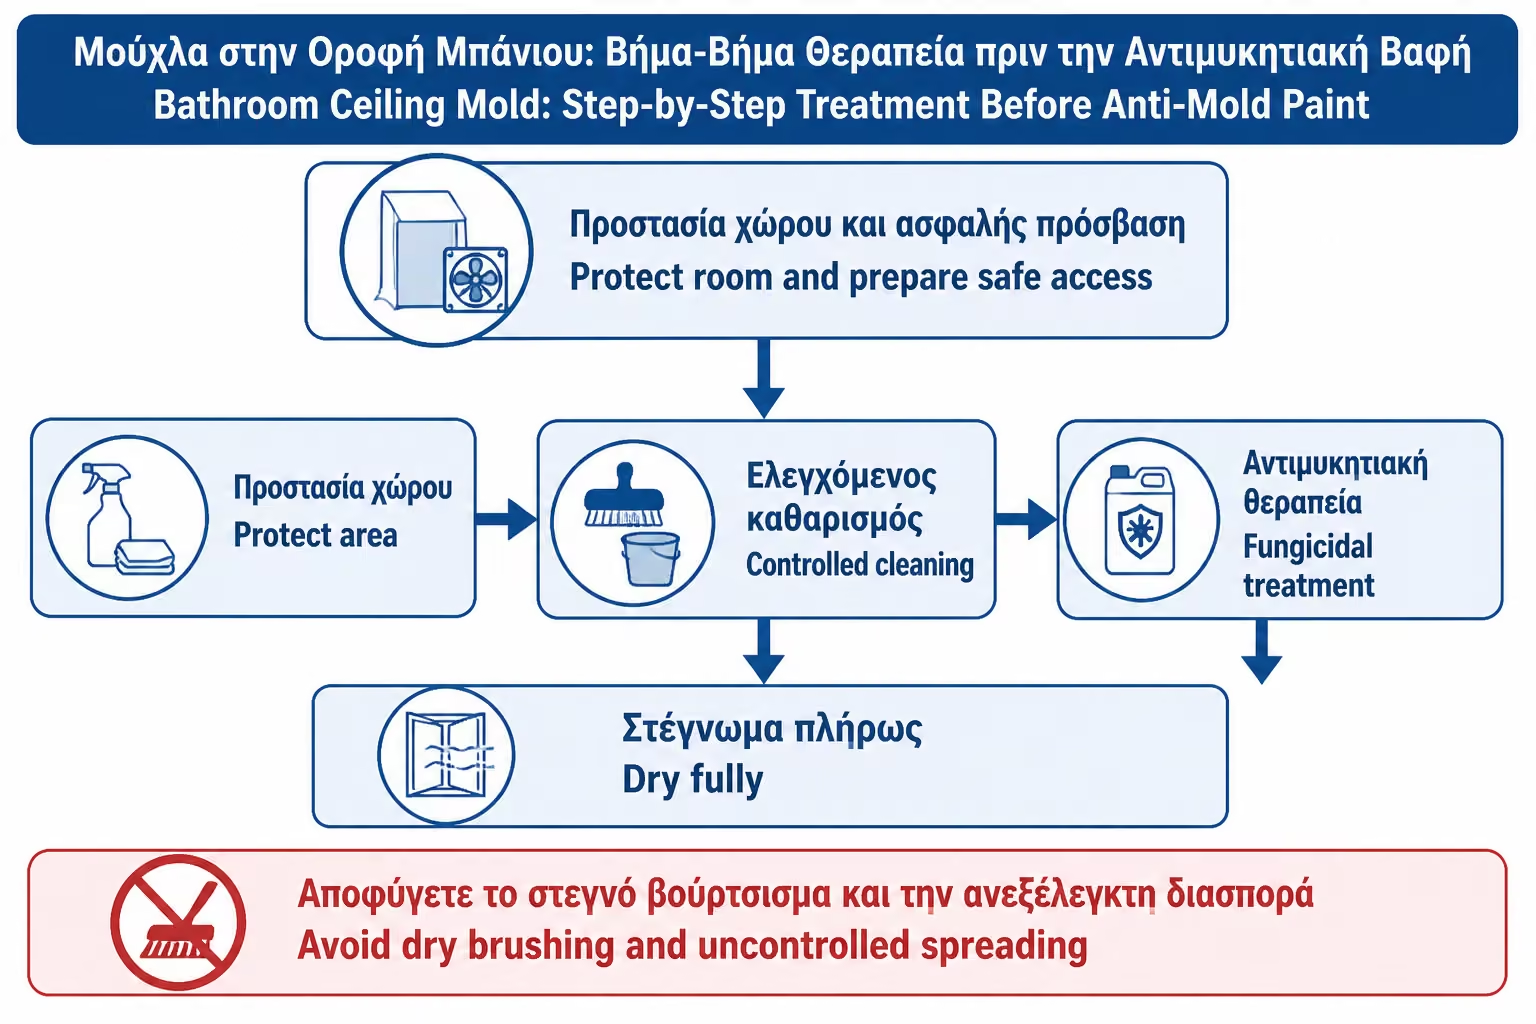
The correct process is in order: first identify why the mold appears, then clean safely, then disinfect/apply appropriate fungicide where necessary, allow the surface to dry completely, prepare the substrate, prime properly and only finally paint with a special bathroom paint. If we skip a stage, we're just covering up the problem.
A distinction must also be made between minor surface mold from condensation and more serious dampness. Small dots on the ceiling above the shower may be due to water vapor and poor ventilation. A stain that grows, swells, drips, or stays wet regardless of showering may indicate an overhead leak, a roof, pipe, or adjacent bathroom problem. In this case, we do not paint before a technical inspection is done.
Mold is not just an aesthetic issue. It can affect air quality and irritate the respiratory system, especially in people with asthma, allergies or sensitivities. NHS Inform says that mold produces allergens and irritants and that inhaling or coming into contact with spores can cause allergic reactions and can trigger asthma attacks. That is why the treatment must be immediate, but also correct.
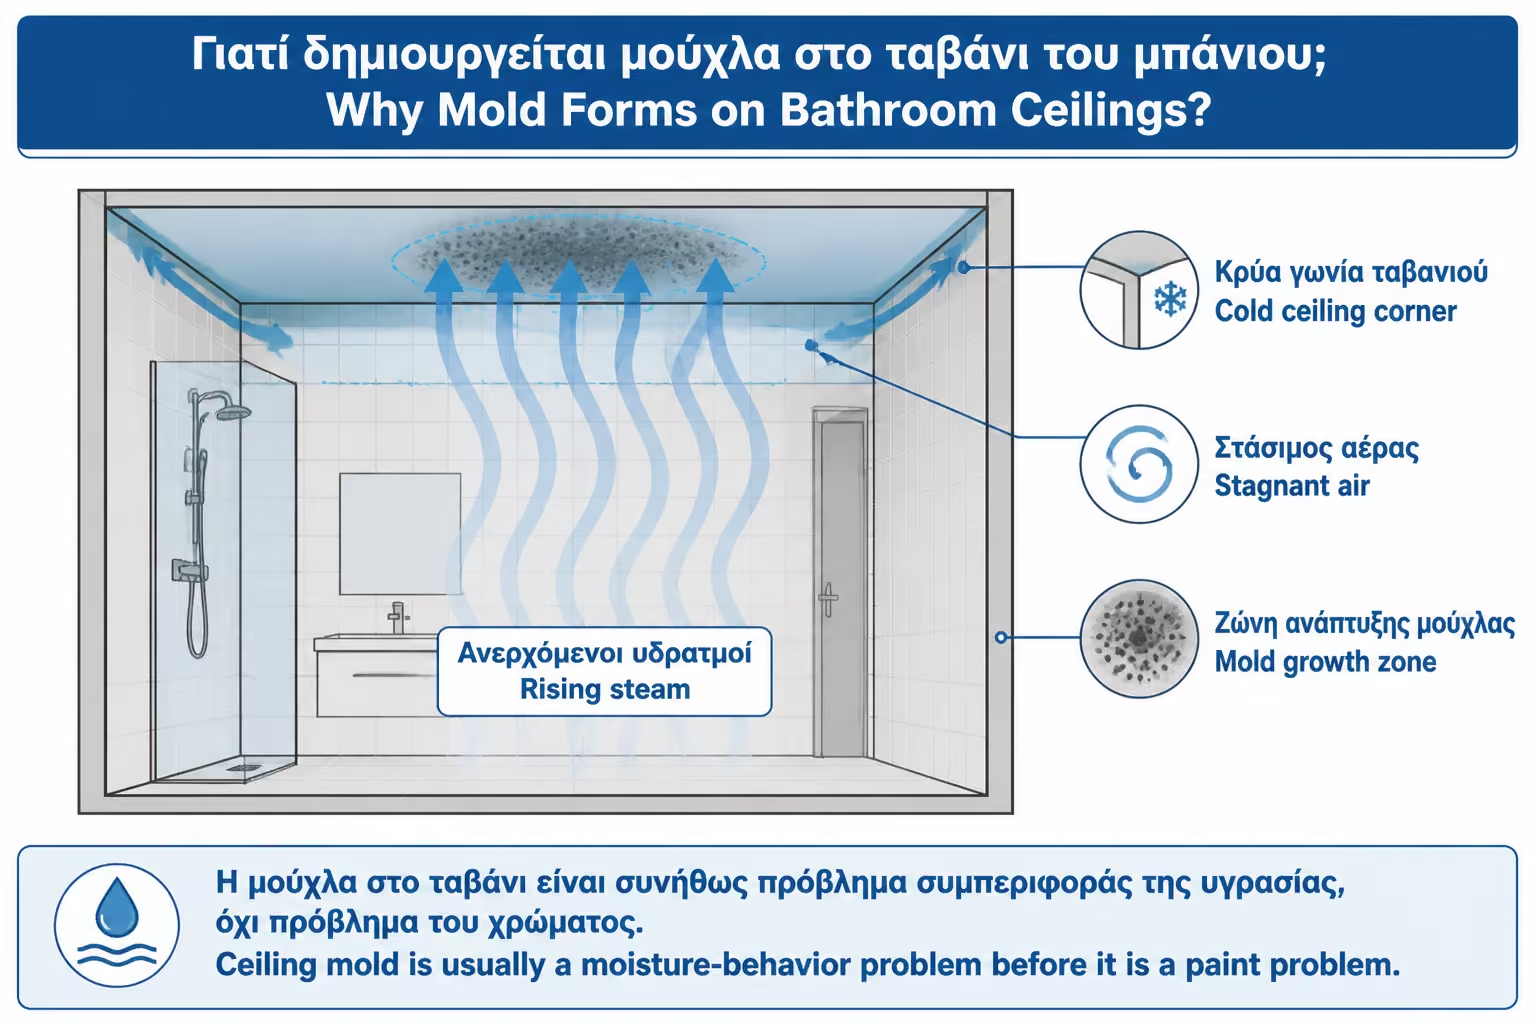
The ceiling is where the warm moist air rises from the shower. The steam moves upwards, meets the surface of the roof and if it is colder than the dew point, the water vapor condenses. In simple words, the ceiling "sweats". If this is done often and the surface does not dry quickly, conditions for mold are created.
The problem is more pronounced in bathrooms without a window, in bathrooms with a weak ventilator, in areas where the fan turns off immediately with the light, in ceilings under a roof or cold space, and in corners with thermal bridges. Mold often appears first in the wall-ceiling corner, because that is where the surface is coldest and air circulation weakest.
Color also plays an important role. A simple matte interior color is not ideal for a bathroom with a lot of humidity. It holds stains more easily, is more difficult to clean and does not hold up as well as a paint suitable for wet areas. But if the ceiling sweats every day, even the best paint will strain.
Mold on the ceiling is therefore a symptom. Painting corrects the image only if the humidity is reduced first and the surface stops being wet for hours.
Before you pick up a cleaner or brush, you need to understand what you're looking at. Is it surface mold from condensation or a moisture stain from a leak? The answer changes the whole process.
If the mold appears mainly after a shower, in many small dots, in corners, above the shower or around cold surfaces, it is most likely condensation. If there is a particular stain that is growing, if the paint is bubbling, if the ceiling remains wet even without using the bathroom, or if there is a drip, then a leak should be checked.
| Indication | Possible condensation | Possible leakage |
|---|---|---|
| Black dots in corners | Yes | Not always |
| Appearance after shower | Yes | Not necessarily |
| It fogs mirror/window together | Yes | No |
| A growing stain | Not usually | Yes |
| Blistering or peeling paint | It can | Possible |
| Wet spot without shower use | Suspicious | Possible |
| Improvement by ventilation | Usually yes | Not really |
If there is a suspicion of leakage, we do not proceed with painting. First the cause is identified and repaired. Anti-mildew paint does not stop water coming from above or behind the surface.
Small surface mold in the ceiling, without swelling, without active moisture and without strong odor, can usually be carefully treated by the owner. This applies to small surfaces, limited dots and cases where the cause is obviously condensation from a shower.
A professional is needed when the mold is extensive, when it comes back quickly after cleaning, when there is damage to the substrate, when the ceiling is wet drywall, when there is a potential leak from above, or when there are people in the home with severe asthma, immunosuppression or a strong sensitivity to mold.
The EPA states that mold on porous or absorbent materials may be difficult or impossible to completely remove because it can grow within the voids of the material. This is especially important for plasterboard ceilings or deeply worn surfaces. It is not always enough to clean and paint the surface.
If you are not sure whether the surface is simply dirty or moisture-damaged, it is best to have it inspected. The worst-case scenario is covering the mold with new paint while it continues to grow underneath.
Before cleaning begins, the area must be ventilated. Open a window if there is one, leave the door open and run the fan as long as it is safe and you are not cleaning near the appliance. If the bathroom is blind, make sure there is as much air renewal as possible from the door and the ventilator.
Wear gloves, safety glasses and a mask suitable for dust/particles, especially if you will be scrubbing an overhead surface. Ceiling cleaning has a practical drawback: everything that falls, falls towards your face and eyes. Also protect the floor, sanitary ware, batteries and furniture with nylon or old cloths.
Remove towels, mats, cosmetics and items from the area. You don't want any spores or cleaners to fall on them. If there is a light fixture or vent near the mold, be extra careful. We do not spray liquids on electrical devices.
The CDC warns never to mix bleach with ammonia or other cleaners and recommends fresh air when cleaning products are used. This warning is critical in a small bathroom, where fumes accumulate quickly.
For hard non-porous surfaces, the EPA recommends scrubbing the mold with detergent and water and drying completely. On the ceiling, however, the surface is usually painted and may be porous or sensitive. That is why a more careful approach is needed.
For small surface mold on a solid painted ceiling, start with a mild cleaner or mold-specific product suitable for painted surfaces. Pre-paint fungicide liquids are often more suitable than random household mixes because they have application instructions, action time and compatibility with subsequent paint.
Bleach can whiten the surface, but is not always ideal for painted or porous substrates. It can also leave residue or affect the next paint job if not rinsed/dried properly. If a chlorine-based product is used, the manufacturer's instructions must be strictly followed, there must be ventilation and no mixing with other cleaners.
For a professional result before anti-mildew paint, a suitable fungicidal cleaner/surface preparation solution is usually preferable, not a homemade mixture.
We do not actively clean a wet ceiling and we never paint over damp. If the ceiling is wet from a recent shower, allow the area to dry completely. Run a fan, open a door/window and, if necessary, use gentle heating. The surface must be dry to the touch before serious treatment begins.
If the paint is blistered or peeling, do not just press it back down. Loose areas must be removed until a firm substrate remains. If there is soft plaster or plasterboard that has absorbed moisture beneath the paint, this is no longer a simple cleaning job. The substrate needs repair.
If the mold is near a light fixture or vent, isolate the power before working in the area. We do not spray or rub wet surfaces next to electrical without safety.
Proper preparation begins with a firm and dry substrate. If this is not there, the color will not last.
The goal is not to scrub the mold dry and fill the air with dust. It is better to clean the surface in a controlled manner with a suitable liquid product in order to limit dispersion. Spray or apply product as directed, without excess and without dripping into eyes, floor or electrical.
Use a soft sponge or cloth for initial removal. If light sanding is required, use a non-abrasive tool. On a painted ceiling, too much scrubbing can remove paint and open the substrate. This is not always a bad thing if it is going to be repaired anyway, but it should be done in a controlled manner.
Do not use the same dirty cloth surface over and over again. Rinse or change the cloth so you don't spread the mold. Disposable cloths are a practical solution. After use, they are sealed in a bag and discarded.
On a small surface, the goal is to visibly remove the mold, not just lighten its color. If deep black spots remain after cleansing, a second application or more serious preparation may be needed.
After the initial cleaning, a suitable fungicidal liquid or special mold treatment solution is applied, if required and as long as it is compatible with the surface and the paint that will follow. Here the manufacturer's instructions must be followed: dilution, action time, if rinsing is needed, how long it should dry before priming.
The mistake is to apply fungicide and immediately after to paint. Many products require action time and drying time. If this time is not given, we can lock moisture or chemical residues under the paint.
Also watch out for product repetition. Do not apply fungicide over bleach, vinegar, peroxide or other cleaners without proper rinsing/drying, unless product instructions allow. Mixing chemicals is one of the most dangerous mistakes in bathroom cleaning.
In professional application, the fungicidal stage is the "disinfection" before the paint system. It does not replace primer and does not replace anti-mould paint.
Depending on the product used, it may need to be rinsed or simply dried. This is set by the manufacturer. If rinsing is required, it is done with a controlled fresh cloth, not with water running on the ceiling. Then the surface must dry completely.
Drying is critical. Do not rush to paint the same day if the ceiling is still wet. In a bathroom with poor ventilation, it may take longer. If there is a hygrometer or surface hygrometer, even better. In simple practice, the surface should be dry, without a cold wet feeling and without signs of active moisture.
After drying, check if there are still any black spots, faded color, swelling or a stain that seems to come from the inside. If there are, don't just cover them up. Maybe it needs a second treatment, sanding, puttying or technical inspection.
Painting is the last stage. If the surface is not clean, firm and dry, the paint will fail.
After the surface is cleaned and dried, loose paint, swelling and peeling are removed. This is done with a spatula and light rubbing. The goal is to leave a stable substrate, not to unnecessarily open the entire ceiling.
Sanding must be done with protection, because it can pick up dust and old mold residue. Use mask, goggles and cover the area. If the old paint is very loose, or if the ceiling has multiple old layers that are peeling, the job can become more extensive than a simple spot cleaning.
If there are small imperfections, they are plastered with a material suitable for wet areas. Putty must be completely dry and sanded before priming. We don't use cheap materials that absorb moisture and then swell.
Surface preparation is what separates a rough paint job from a proper restoration. Anti-mould paint cannot hide loose substrate.
The primer helps to stabilize the surface, the correct adhesion of the paint and the uniform absorption. On a ceiling that has been cleaned of mold, sanded or plastered, the primer is very important. It should not be omitted because "the color is good".
The type of primer depends on the substrate and the paint system. In a bathroom, choose a product suitable for wet areas and compatible with the final anti-mould paint. If there is a stain that can "come through" the paint, a special sealer/stain primer may be needed, but this must be chosen correctly.
Attention: if there is active moisture from leakage, the primer will not solve the problem. It may temporarily block stains, but the moisture will return. The primer works on a clean, dry and stable surface.
After the primer, the drying time given by the manufacturer is observed. In bathrooms, times may be affected by humidity and temperature. Do not paint over fresh primer.
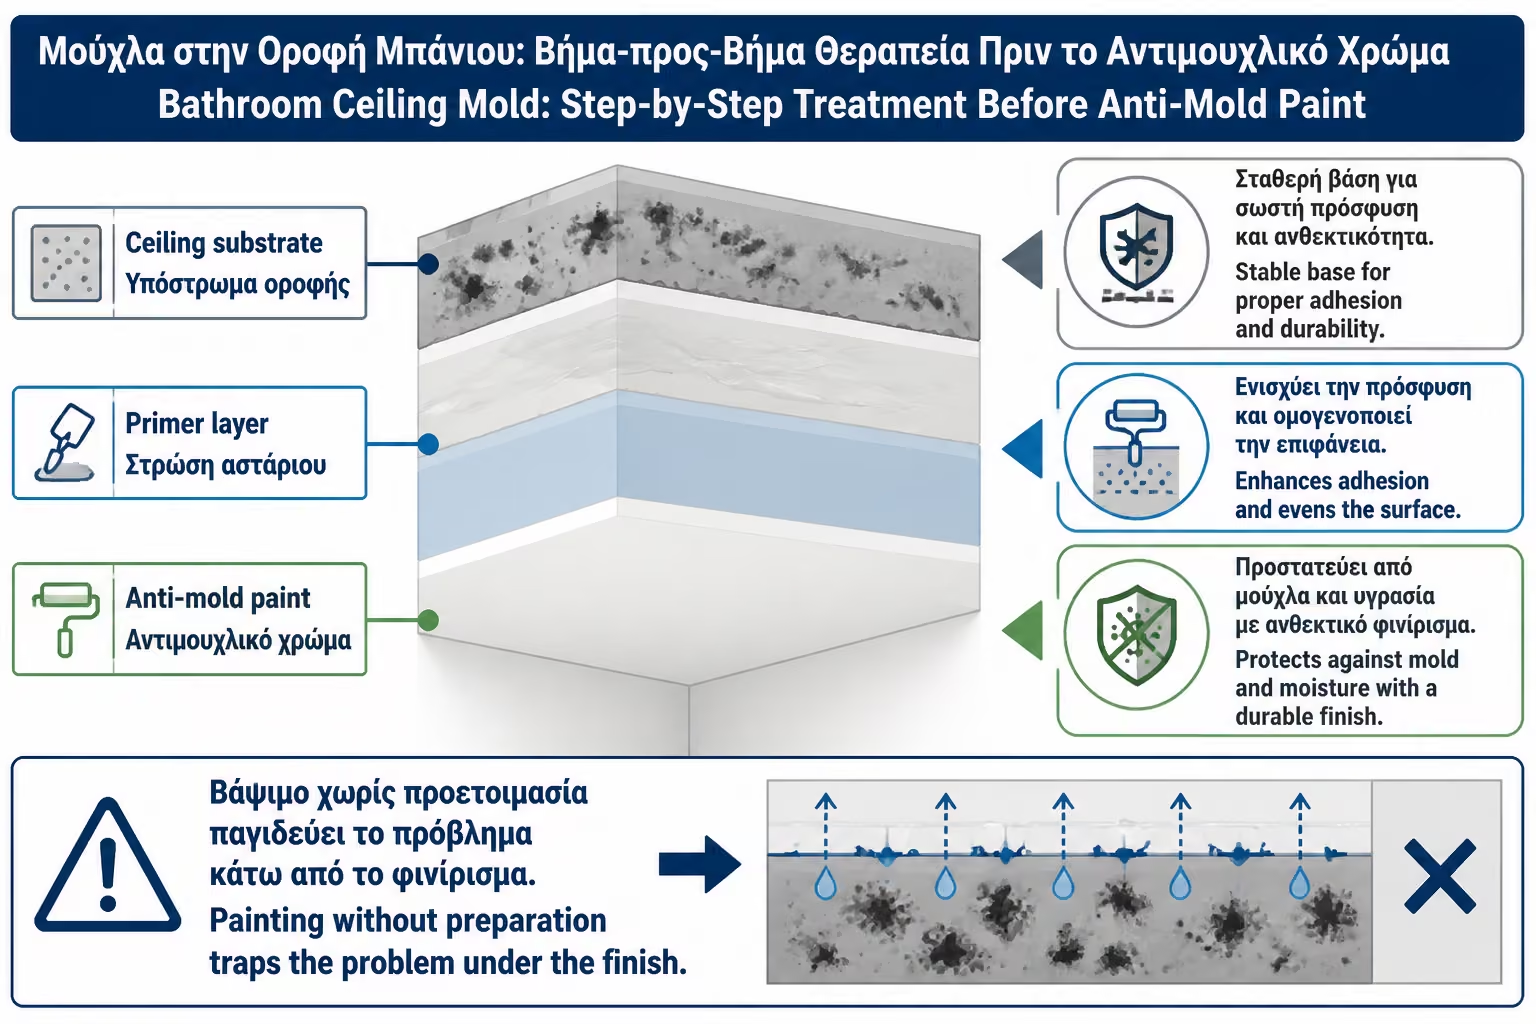
The final color must be suitable for a bathroom. We usually look for paint with moisture resistance, cleanability and anti-mold protection. The finish matters. Very matte surfaces can hold dirt more easily and be more difficult to clean, while satin or special finishes for wet areas are often more practical.
Anti-mold paint does not kill mold left below the surface. It is not a "medicine" that goes over a problem. It is a protective final layer that helps make re-occurrence difficult as long as the surface is properly cleaned and the area dries.
Two hands are usually applied, with the correct waiting time. A fat hand is no substitute for two proper hands. Painting must be done with good ventilation, but not with excessive humidity in the room. Ideally, the bathroom should not be used for showering until the paint has dried and cured according to the instructions.
Color selection should be done along with the overall moisture solution. Otherwise, even the expensive paint will be pressed.
After painting, we should not consider the matter over. The new ceiling needs proper use in the first few days. Avoid heavy showers and high humidity until the paint is fully dry/cured. The times depend on the product, the temperature and the humidity of the space.
Next, the conditions that created the mold must be changed. The fan should be running during and after the shower. If it doesn't have a timer, it's worth entering. If the bathroom is blind or heavily used, the hygrostat is very useful. If the door does not have a gap for air intake, the fan will not pull properly.
Also, keep the ceiling clean. Dust and moisture together create a substrate for mold. If small spots appear, treat them early, before they spread.
Paint is a fresh start. If conditions remain the same, the same problem will return.
A fan is the key to preventing new mold in the ceiling. It must have an adequate supply for the volume of the bathroom, be clean, properly vented and run long enough. If it is full of dust or if the tube is kinked, the actual performance drops.
In a bathroom with a history of ceiling mold, a fan that turns off immediately with the light is usually insufficient as a rationale. A timer or humidity sensor is needed so that the moist air is removed after the shower. Running 10–15 minutes after use is often a practical baseline, but in blind bathrooms longer or a humidifier may be needed.
Position also plays a role. If the vent is next to the door and mold appears above the shower, there may be poor flow. Air enters through the door and leaves immediately, without sweeping the wet area. In such a case, a different location or in-line solution may be needed.
If the ventilation is not corrected, the best anti-mold paint will only delay the reoccurrence.
The ceiling gets moldy more easily when it's cold. If the bathroom is under a roof, unheated space or poorly insulated, the inner surface of the roof can fall to a low temperature. Then the water vapor condenses more easily and the mold returns to certain places.
Heating the bathroom helps because it raises the temperature of the surfaces. A towel rail, radiator or underfloor heating can reduce condensation. But heating without ventilation is not enough. The warm moist air must be removed.
If the mold always appears in a certain corner, around a beam or at the wall-ceiling connection, there may be a thermal bridge. Thermal insulation intervention or a special technical solution may be needed there. The paint itself does not change the temperature of the surface.
In stubborn cases, the right question is not "what color should I put?". It is "why does this surface stay cold and wet?".
Plasterboard in a bathroom must be suitable for wet areas and properly protected. If the mold is superficial, it can be cleaned and repainted as long as the substrate is stable and dry. However, if the plasterboard has absorbed moisture, softened, swollen, or developed a strong odor, surface cleaning is not enough.
EPA notes that porous materials may need to be disposed of when they become moldy because mold can grow inside the pores and be difficult or impossible to completely remove. This is particularly relevant to plasterboards that have absorbed moisture.
If there is a false ceiling, what is happening above must also be checked. There could be condensation inside the false ceiling, a pipe leak, a bad vent that is dumping wet air into the void, or an in-line vent that isn't properly sealed. If you only clean the bottom surface, the problem will return.
In severely infested drywall, section replacement may be more appropriate and safer than repeated repainting.
The cost depends on the extent, the cause, the type of ceiling, whether there is active moisture, whether only cleaning/painting or substrate repair is needed. It is also affected by area, height, access, VAT, paint quality and whether the work is done individually or within a renovation.
| Work | Indicative range 2026 | When needed |
|---|---|---|
| Local DIY cleaning of small mold | 10–40€ materials | Small surface dots |
| Fungicidal liquid / special cleaner | 5–25€ per product | Preparation before painting |
| Cleaning and preparation by a technician | 80–200€+ | Larger area or difficult access |
| Primer + anti-mould ceiling paint | 150–500€+ | Depending on m², materials, condition |
| Repair of blown plaster/stucco | 100–400€+ | When loose substrate is present |
| Replacing a section of plasterboard | Wide variation | When moisture-damaged or softened |
| Improved ventilation | 100–500€+ | If the cause is poor air renewal |
| Leak check/repair | Wide variation | If there is a suspicious stain or moisture on top |
The cheapest job is simple cleaning and painting. But it is not always the right one. If there is a leak or thermal bridge, the cost of the actual fix is more, but it is what stops it from happening again.
The quote must clarify whether it includes mold cleaning, fungicide application, primer, anti-mould paint, renders, VAT and possible ventilation work. A quote that simply says “ceiling painting” is not enough for a mold problem.
The most common mistakes are made because the owner wants to quickly disappear the black mark. But mold in the ceiling needs a process, not a simple cover-up.
| Error | What it causes in practice | A more correct approach |
|---|---|---|
| Painting on the mold | Reappear under/over color | Cleaning and fungicide before painting |
| Cleansing without drying | Moisture lock | Completely dry before priming |
| Use of plain interior color | Low moisture resistance | Color suitable for bathroom |
| Omission of primer | Poor adhesion and stains | Suitable primer |
| Treat spillage as mold | The problem is growing | Technical control before painting |
| Mixing cleaners | Hazardous fumes | One product at a time |
| Sanding of dry mold without protection | Dispersal of spores/dust | Liquid controlled cleaning |
| Ventilator bypass | The humidity returns | Timer, hygrostat, impeller cleaning |
| Closed door without air intake | The fan is not working | Door gap or blind |
| Ignoring thermal bridging | Mold in the same spot | Control of cold surfaces |
The most typical mistake is to apply anti-mold paint to a ceiling that was casually cleaned the same day after a shower. The surface may look good at first, but moisture and debris will bring the problem back.
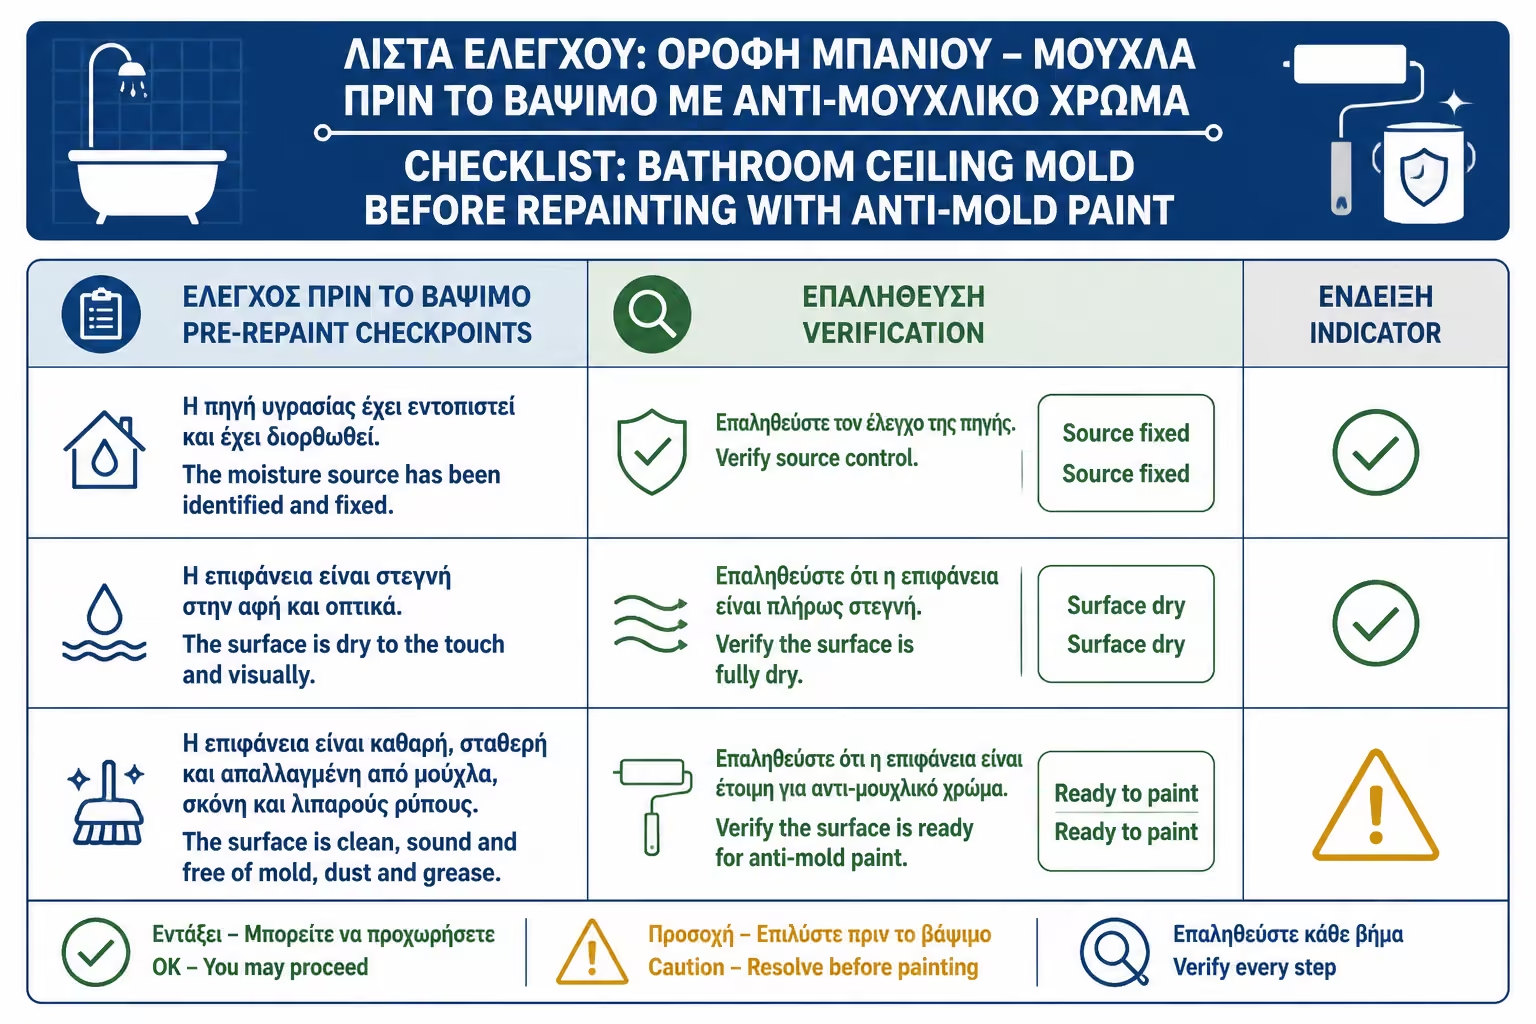
| Control | Yes / No |
|---|---|
| Is a top or pipe leak blocked? | Yes / No |
| Is the mold superficial and not deep in drywall/plaster? | Yes / No |
| Is the ceiling dry before cleaning begins? | Yes / No |
| Have gloves, mask and goggles been used? | Yes / No |
| Are cleaners not mixed together? | Yes / No |
| Was the mold cleaned before the fungicide? | Yes / No |
| Was the fungicide applied according to product directions? | Yes / No |
| Was the surface completely dry before sanding/priming? | Yes / No |
| Were the dull colors removed? | Yes / No |
| Was it putty where needed? | Yes / No |
| Was proper primer used? | Yes / No |
| Is the final color suitable for bathing and humidity? | Yes / No |
| Does the fan work properly after showering? | Yes / No |
| Is there an air intake under the door? | Yes / No |
| Is the bathroom heated and dried adequately? | Yes / No |
If there is mold on the ceiling, don't start with the paint. Start with the cause. If the ceiling sweats after every shower, you need better ventilation, a timer or humidifier, a clean vent and air intake through the door. If the stain stays wet or grows, a leak check is needed. Only after the surface has been cleaned, disinfected, dried and stabilized does the anti-mould paint make sense. Color is the ultimate protection, not the cure of the cause.
Mold on the bathroom ceiling is only properly treated in sequence. First diagnosis, then safe cleaning, then fungicide/disinfection where necessary, then complete drying, preparation, primer and final anti-mould paint. If you skip diagnosis or drying, the problem will return, no matter how good the color is.
Safety is critical. We don't mix cleaners, we don't work without ventilation, we don't scrub dry mold without protection, and we don't work near electrical without isolation. If the mold is extensive, if the ceiling is swollen, or if a leak is suspected, a professional inspection is needed.
Anti-mildew paint is useful when applied to a clean, dry and stable surface. It doesn't replace the fan, it doesn't fix thermal bridges and it doesn't stop leaks. To keep the ceiling clean, the bathroom must be dried after each use.
Success is seen after months, not on the day of painting. If the ceiling remains clean in the winter, after daily showers, then the treatment was done correctly.
Return to category.
Go to categoryReturn to the central guide.
Go to guide