
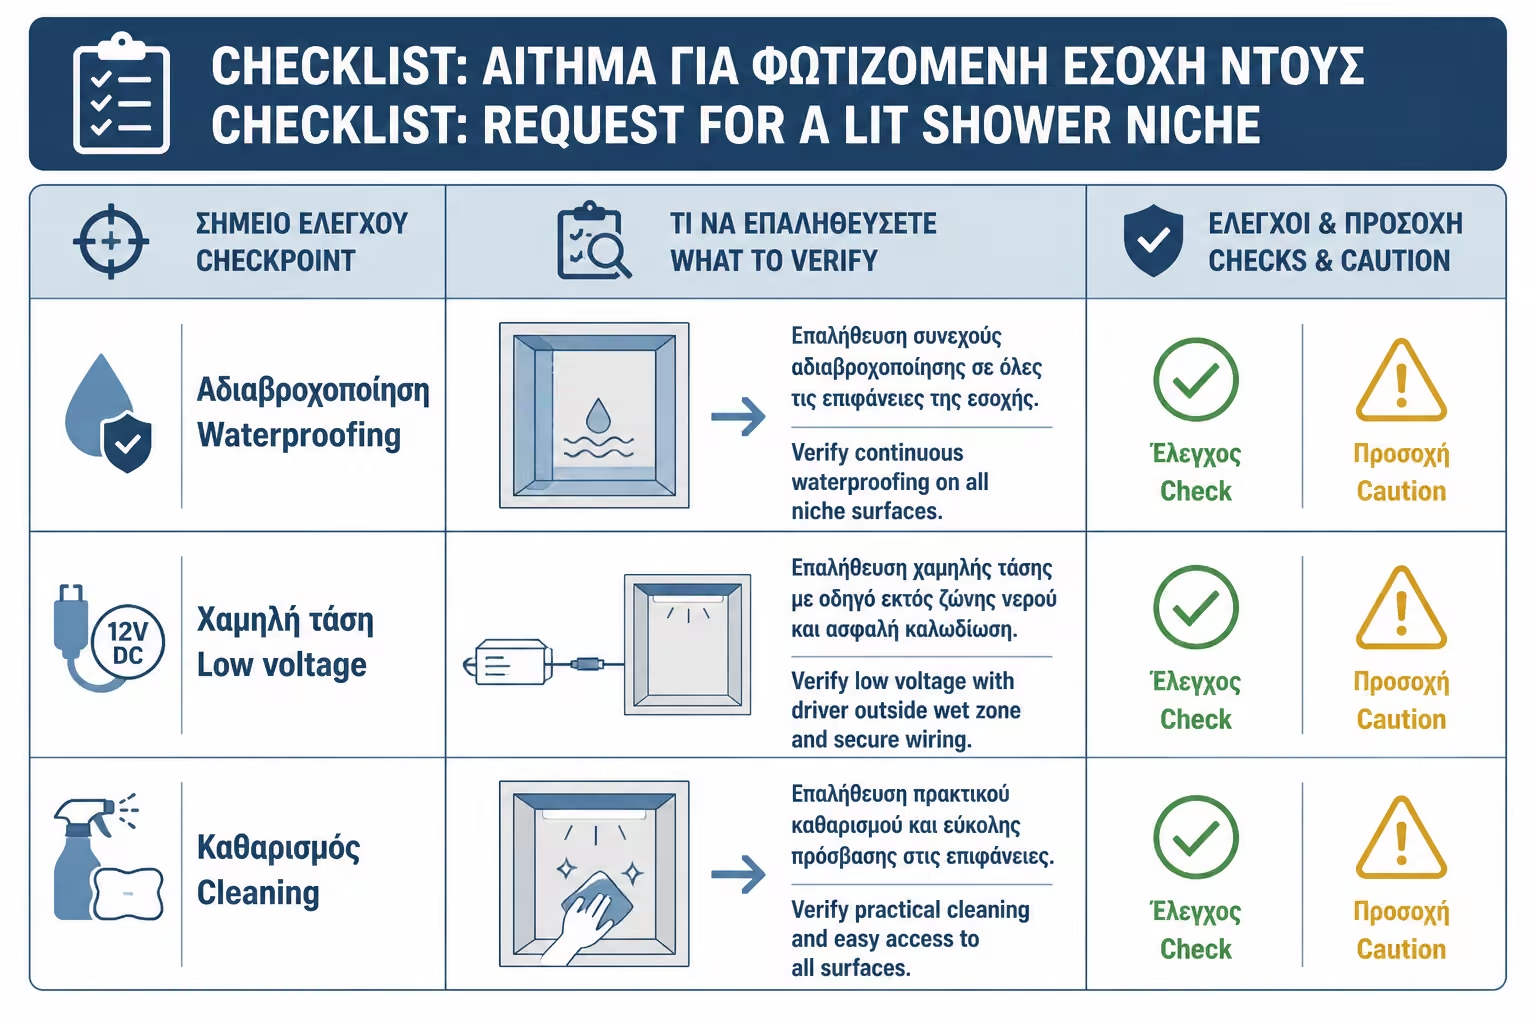
Bathroom Lighting, Ventilation & Heating
Return to category.
Go to categoryIlluminated recesses in the shower are among the details that can dramatically change the image of a bathroom. A simple shampoo alcove, when designed correctly and subtly lit, immediately gives the impression of a neat, hotel-like space. The light highlights the tile, creates depth and makes the shower area look more thoughtful and luxurious.
But this application is one of the most technically demanding. We are not talking about an LED strip behind the mirror or under a piece of furniture. We are talking about lighting in or very close to the water zone, to the point where it receives water vapor, splashes, cleaners, shampoo, salts and frequent daily use. Here, "we put a waterproof tape" is not enough.
IP67 is often heard as the magic solution. In reality, however, the IP indicator refers to the product under specific conditions and does not mean that the entire installation is automatically safe or permanently protected. If the tape is cut, if the joints are made rough, if the profile holds water, if the driver is inserted in the wrong place or if the niche does not have a proper sealing, the result can become problematic despite the "good IP" on the package.
The illuminated recess in the shower must be planned from the beginning of the renovation. Before the tiles are put in, before the waterproofing is done, before the walls are closed and before the electrical supplies are run. If requested in the end, the solutions are limited, more expensive and often less clean aesthetically.
In this guide we will see how to properly design an illuminated alcove in the shower, what IP67 means in practice, what you should pay attention to in sealing, profile, LED strip, driver and access for maintenance, what mistakes are made most often and when such a choice is really worth it.
The shower niche is a recess in the wall of the shower, designed to accommodate shampoos, shower gels and care products. Instead of installing plastic shelves, metal hangers or external cases that spoil the image of the bathroom, the storage is built into the wall itself.
This solution has two major advantages. First, it's practical. Products are where they need to be, without taking up floor space or creating clutter. Second, it's aesthetic. A properly tiled alcove makes the shower look more custom and neat.
When lighting is added, the alcove takes on even more presence. The light emphasizes the depth of the recess, highlights the textures of the tiles and creates an image reminiscent of a spa or boutique hotel. Especially in bathrooms with large tiles, stone, mosaic or a different tile inside the alcove, lighting can make a big difference.
The problem is that the alcove is not just a decorative opening in the wall. It is a technical construction in a wet zone. If not done correctly, it can create dampness, standing water, broken joints, sealing problems or lighting damage. The more impressive the result we want, the more seriously the technical side must be treated.
Lighting in a shower recess does not have the same requirements as a hidden light behind a mirror. In the shower, the LED is in an environment with direct or indirect contact with water. Water vapors are strong, temperatures change quickly and cleaning products can affect materials, covers and joints.
In addition, the alcove is a point that is used every day. The user touches bottles, changes products, pours water, cleans salts and often accidentally hits surfaces. So the lighting system doesn't just have to be watertight in theory. It must be mechanically protected and properly positioned.
An LED that looks good on day one can start to dim, flicker or change color if the installation is not correct. This often happens when the tape is inserted without a proper profile, when the joints are not properly sealed, or when the niche holds water.
Recess lighting must be treated as a complete system: sealed construction, correct tilt, appropriate LED profile, protected connections, safe power supply and future maintainability. If a link is missing, the result can become problematic.
IP67 is a protection index that indicates high protection against dust and temporary immersion in water under certain test conditions. In practice, for applications in the shower, it is considered much more suitable than simple solutions of lower protection. But it should not be presented as "absolutely waterproof forever".
The critical point is that IP is about the product as manufactured and certified. If an IP67 LED strip is cut on site and the edges are not properly protected, the actual protection of the installation may be reduced. If the profile is good but the cable comes out of the wrong place, a weak point can be created. If the driver is in a wet or inaccessible place, the system remains problematic.
Also, protecting the film is one thing and protecting the entire lighting system is another. For an illuminated recess in the shower it is not enough that the tape says "IP67". The profile, cover, plugs, joints, cables and installation must also be suitable.
The owner should think of IP67 as a necessary basis for demanding wet applications, not as a license for rough mounting. Water does not forgive omitted details.
Before we discuss LEDs, we need to discuss the niche itself. If the recess is not properly sealed, lighting is a secondary problem. The shower is one of the most demanding parts of the bathroom and every recess in the wall creates additional corners, edges and places where water can pass.
The alcove must be properly sealed before tiling. The inside corners, edges, back and bottom shelf need special attention. If the bottom is not properly sloped outward, water can pool inside the alcove. This creates scale, stains, joint wear and stress around the LED profile.
A common mistake is to treat the alcove as a simple shelf. The craftsman opens a recess, tiles it, and finally an LED is added. But the right niche in the shower must be part of the sealing system. It must be designed together with waterproofing, tiles and slopes.
If there is even a small seal failure, lighting can temporarily hide the problem, but it doesn't solve it. The luxurious image must rest on a sound technical foundation.
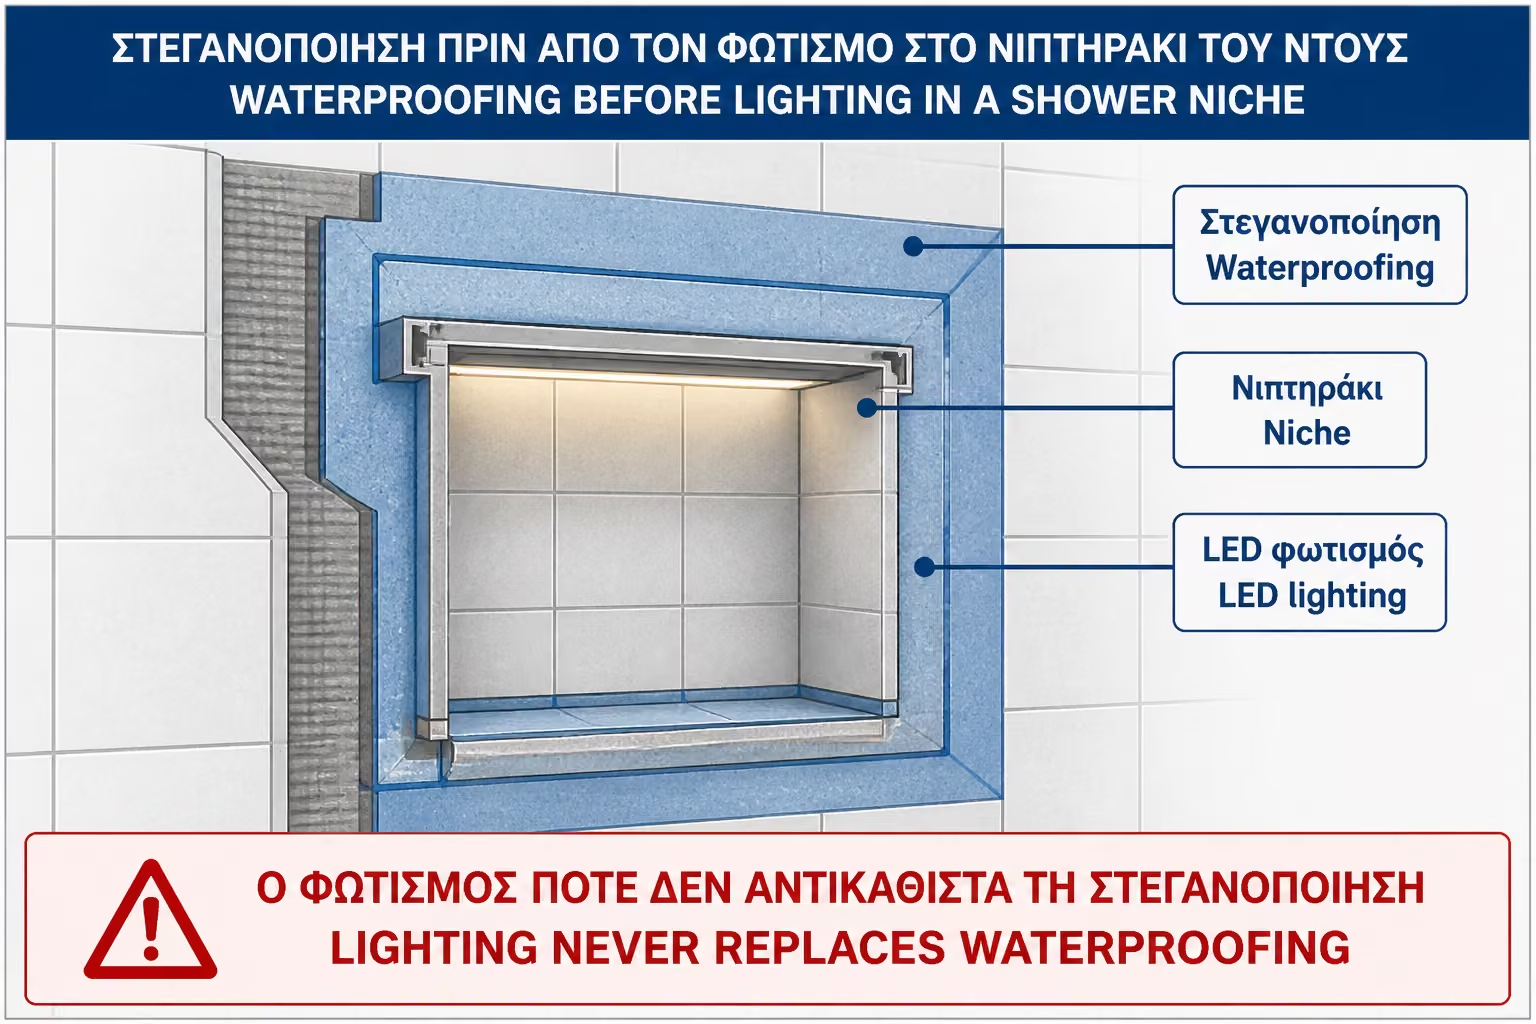
The position of the LED inside the socket affects both the image and the durability. The most common options are at the top of the alcove, on the back, under a shelf, or on a vertical side. Each solution has a different effect.
The LED on the top lights down and highlights the bottles and tile. It is discreet and usually more practical, because it is not at the bottom where water collects. If designed correctly, the light source is not immediately visible and the result is clean.
The LED on the back can give a more theatrical effect, but care must be taken not to glare or show the tape line. The LED at the bottom of the niche is usually more exposed to water and cleaning, so it's not always the most practical solution.
In larger recesses or double niches, each shelf can be lit individually. This looks impressive, but adds complexity, cables, connections and potential points of failure. In small bathrooms, a well-placed LED at the top of the alcove is often enough.
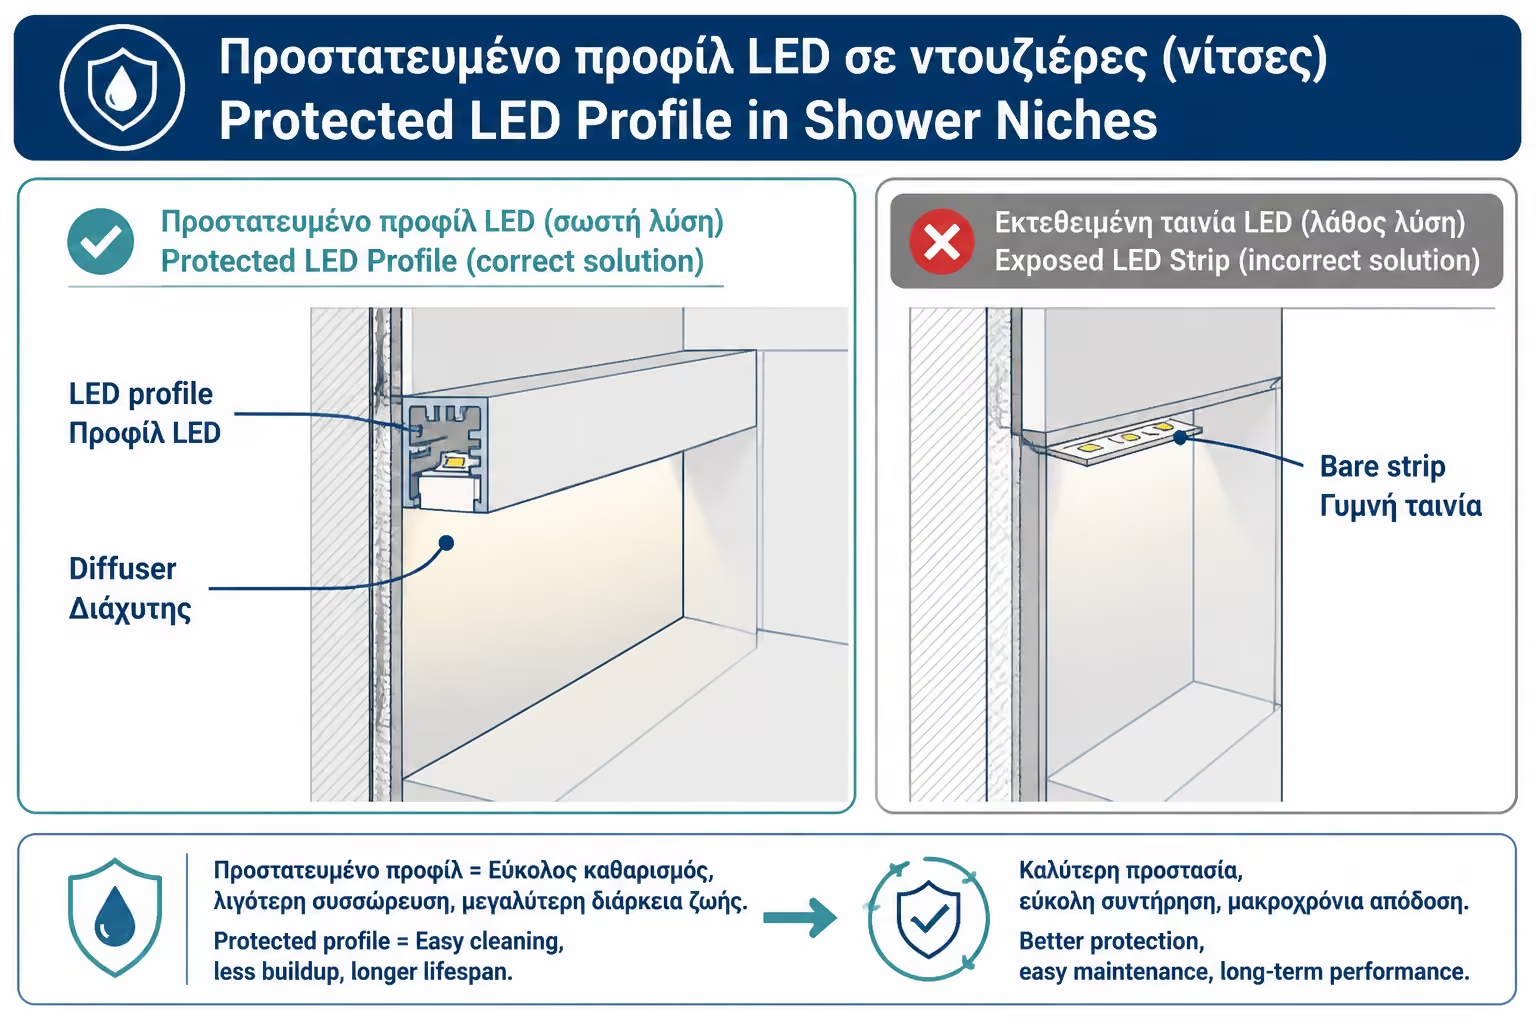
In a lighted shower niche, bare LED strip is wrong logic. Even if the tape is listed as waterproof, it needs a proper profile. The profile protects, supports, helps diffuse light and gives a clean final result.
The ideal is to use a profile designed for wet applications, with a suitable cover, plugs and mounting method. The profile must be integrated into the alcove without creating points where water remains. It should be easy to clean and not stick out in a way that is annoying to use.
The diffuser is also important. Without it, the LED dots can be seen and the result looks cheaper. At a short distance from the tiles, the dots are even easier to see. That is why a correct choice of LED density and profile is required.
The profile is not a decorative component. It is part of the technical solution. If it's missing or inappropriate, lighting can look sketchy and last less.
Most LED strip applications operate on low voltage, such as 12V or 24V, via a driver or power supply. This is important in wet zones, but does not mean that the installation can be done casually. Low voltage reduces certain risks, but the power supply, connections and driver still require proper electrical installation.
The driver must not be placed inside the shower or in a place that receives moisture, unless it is specifically suitable and the installation has been designed accordingly. It is usually placed in a safe, dry and accessible place, such as in a false ceiling with a hatch, in a cupboard, in a technical room or in another place approved by the electrician.
The big mistake is locking the driver behind tiles or inside a closed construction without access. If it breaks, it will need excision. Also, if it is not properly ventilated or in the wrong environment, its life can be shortened.
Installation must be done by a licensed electrician. The owner can choose the image he wants, but he must not improvise on power supplies, connections, bath zones or wiring inside the shower.
In a well-lit recess, no wires should be visible. However, this does not mean that the cables should be casually "lost" inside the wall. There must be a predetermined route, proper protection and control where required.
The wiring must be planned before closing the wall and before waterproofing. If the craftsman remembers the LED after the alcove is already tiled, the solution will almost always be a compromise. Drilling into tiles, external channel or rough cable exit may be required.
Special attention is needed at the point where the cable exits the slot or passes to the driver. This point is a possible weak point of tightness if not done correctly. It is not enough to just run a cable through the wall. It must be protected in a manner compatible with the waterproofing system and the electrical installation.
In practice, pure aesthetics emerges from prediction. Not by trying to covertly hide something that wasn't planned in time.
For lighted shower recesses, color temperature plays a big role in ambiance. The warm light around 3000K gives a more relaxed, spa feeling. It suits bathrooms with beige, earth, wood or stone shades and makes the light more pleasant in the evening.
Neutral light around 4000K gives a cleaner, modern image. It suits gray, white, black or more minimal bathrooms, especially when we want the alcove to be illuminated in a way that does not yellow the materials. It can also be more easily combined with general bathroom lighting at 4000K.
Very cool light, like 6000K or 6500K, needs attention. In photos it can look sharp and "clean", but in everyday use it can give a hard, cold image, especially in a small bathroom or on shiny tiles.
In practice, for a spa look, 3000K is often preferred in the alcove and 4000K in the mirror or general lighting. So the shower gets atmosphere, but the bathroom remains functional where precision is needed.
If the alcove has a special tile, mosaic, stone or marble look, the quality of the LED is of great importance. It is not enough that it is watertight. It must render the colors correctly. This is where the CRI index comes in, i.e. the color rendering index of the lighting.
A low quality LED can make the tile look poorer, duller or the wrong shade. A good LED with a higher CRI brings out textures, colors and details better. In an application that has a primarily aesthetic role, this is not insignificant.
If the owner has invested in a special tile in the alcove, it makes no sense to light it with the cheapest LED strip. The difference may not be visible on the product box, but it will be visible every time the lighting is turned on.
For most homes, no exaggeration is needed. But a quality LED with good color rendering is a better choice than an anonymous tape that just promises "waterproof use".
The shape of the alcove also affects the lighting. A large horizontal niche can give a very impressive effect, especially in a walk-in shower. It is beautifully lit from above or from within and acts as an architectural line on the wall.
Two smaller recesses, one above the other, are more practical when there are many products or when we want separation. But if both are lit, the complexity of the installation increases. More LED points mean more connections, more cable runs and more potential points of failure.
In small bathrooms, a clean, well-lit alcove is often better than many small illuminated details. In larger bathrooms, a more complex solution can also work, as long as there is space, proper waterproofing and careful design.
The important thing is that the alcove is designed based on the objects it will accommodate. If the shampoos are high and the recess is low, the use will be uncomfortable. If the recess is too deep, it can hold moisture. If it is too shallow, it cannot hold practical products. Lighting doesn't fix bad ergonomics.
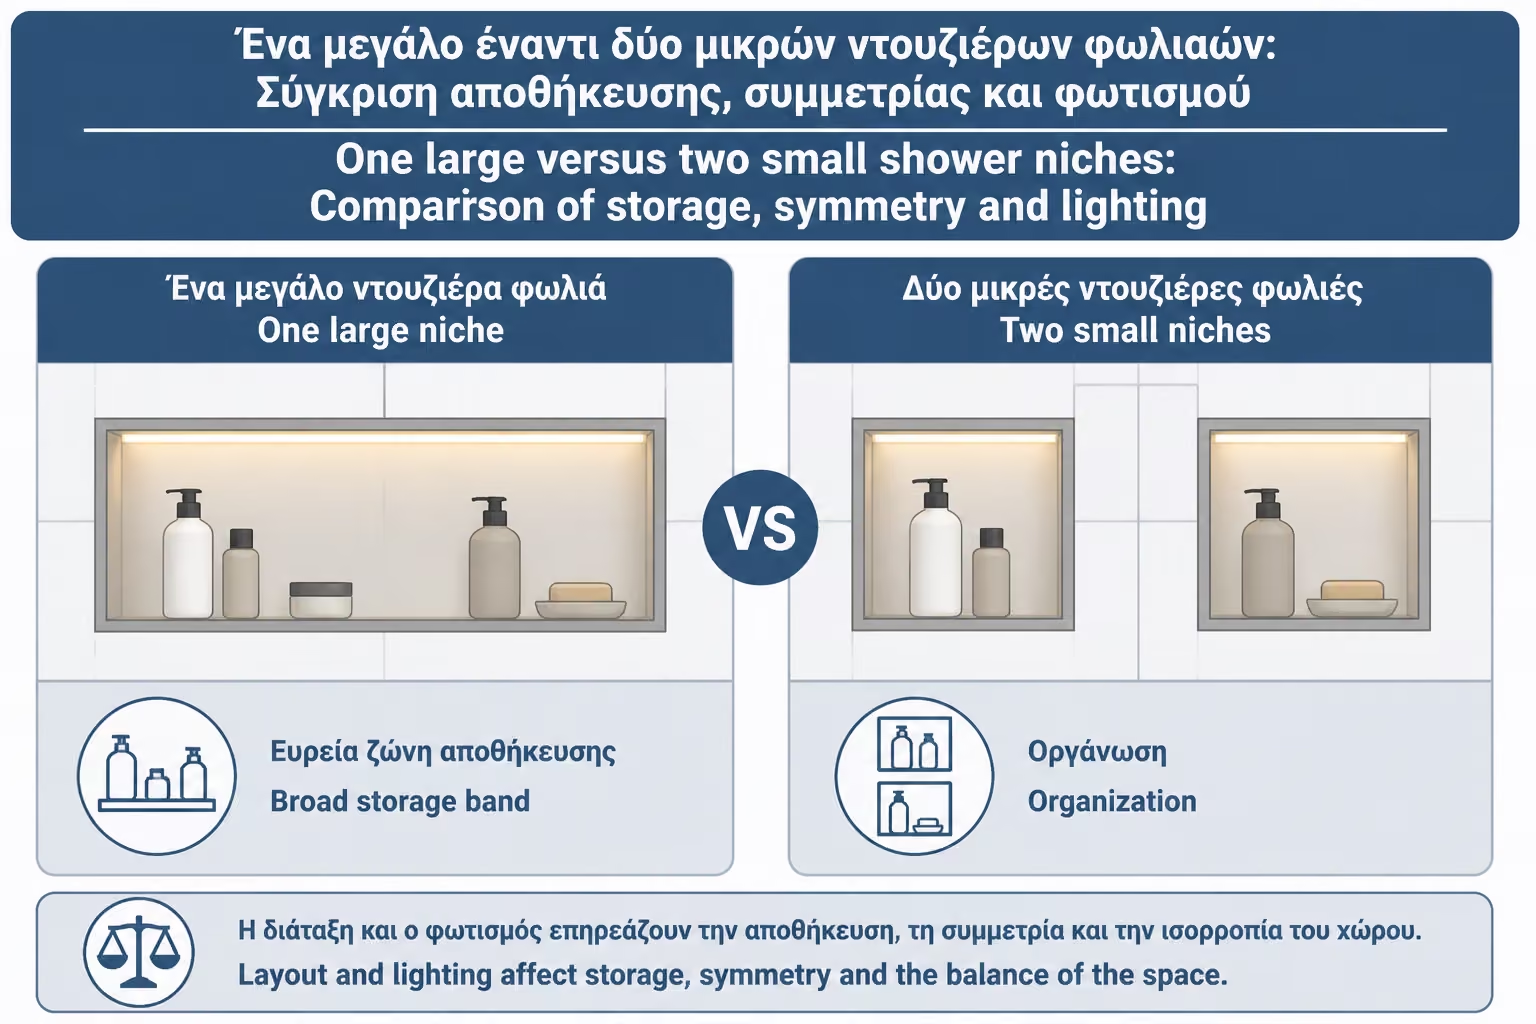
The alcove should be beautiful, but it must first be useful. If it doesn't fit the products the family uses, it will end up with additional shelves and all the aesthetic advantage will be lost.
Usually, a shampoo alcove needs to be tall enough to accommodate large bottles. It must also be placed at a height that is convenient for the user inside the shower. If it goes too low, it will be uncomfortable. If it goes in too high, it will not serve children or shorter users. If it is directly under the phone or shower head, it will receive more water.
The depth should be sufficient for the products, but not so deep as to create a dark, difficult-to-clean recess. The bottom shelf should have a slight slope towards the shower, so that no water remains. This detail is critical, especially when there is a profile LED nearby.
A common mistake is to design the alcove only based on the tile. For example, "exactly two tiles high". This may be pretty visually, but if the bottles don't fit, the alcove will be a practical failure. The right design combines joints, dimensions, use and lighting.
The lighting in the alcove highlights the materials, but also highlights the imperfections. If the tile cuts are not clean, if the joints are not straight, if the corners are not well detailed, or if the profile is not placed correctly, the LED will make them more visible.
This is especially important in niches with top-down lighting. The light "licks" the surfaces and emphasizes reliefs, small deviations and shadows. In a simple dark niche, a small imperfection may not be seen. In an illuminated niche, it is immediately visible.
That is why the selection of tiles and finishes must be done with care. Large tiles can give a very clean result, but require precise cuts. Mosaics hide some imperfections, but have more joints and require attention to cleaning. Corner profiles must match aesthetically and technically.
The illuminated alcove is not a spot for rough tiling. It is an eye-catching point. So it requires better execution than a simple surface.
An illuminated recess in the shower should be easy to clean. Water, shampoos and salts leave residue. If the LED profile has spots where water collects or if the cover has hard edges, maintenance becomes more demanding.
The bottom of the socket must have a proper slope. Joints must be properly applied. Profiles must not create water traps. If materials that are easily scratched or dulled by cleaning agents are used, the result will wear off quickly.
The owner should also be aware that "tight" does not mean "maintenance free". Even a proper IP67 system needs reasonable use and cleaning. Salts can dull diffusers and surfaces. Aggressive cleaners can affect plastic covers or silicones.
In areas with very hard water, as is the case in many areas of Greece, this is even more important. The lighted alcove is beautiful, but it must remain practical and clean.
Alcove lighting can work in a number of ways. It can be turned on together with the general lighting of the bathroom, have a separate switch, connect to the hidden lighting or be controlled by a dimmer or smart system.
The most practical solution is often separate control. So the alcove lights up when we want atmosphere or when the shower is used, without necessarily being lit every time someone enters the bathroom. If it's too intense, a dimmer can help a lot.
The motion sensor in or near the shower requires attention and is not always necessary. In night lighting under furniture it makes more sense. In the niche, usually a simple switch or smart script is a cleaner solution.
The compatibility of the LED, driver and dimmer must be checked. Not all systems dim properly. If the combination is wrong, flickering, noise, reduced life or unstable operation may occur.
The cost of an illuminated recess is not only the LED strip. It includes niche construction, waterproofing, tiling, cutting, LED profile, tape, driver, wiring, switch or dimmer and electrical installation. If the indentation is requested after the fact, it can be significantly increased due to considerations.
| Work / material | Indicative range 2026 | What affects the price? |
|---|---|---|
| Construction of simple niche without LED | 120–350€+ | Wall, dimensions, tiles, waterproofing |
| Tiling and niche cuts | Wide variation | Tile size, corners, profiles, joints |
| Waterproof LED profile for shower | 60–180€+ | Length, quality, cover, caps |
| High protection LED tape | 40–150€+ | IP, Kelvin, CRI, power, quality |
| Driver / power supply | 30–120€+ | Power, quality, dimmable function |
| Electrical supply and connection | Wide variation | Distance, access, digging, switches |
| Dimmer or smart control | 40–200€+ | Compatibility, component quality |
| Fully illuminated alcove | 250–800€+ | Size, tightness, custom details |
Prices depend on the area, floor, access, condition of the existing facility, whether the work is being done in conjunction with a total renovation or on a finished bathroom, whether VAT is included and whether the quote is for materials only or a complete fit-out.
A higher price is justified when there is proper sealing, quality profile, reliable driver, safe electrical installation and clean tiling detail. It is not justified simply because it "has LEDs". Accordingly, a very low price should be carefully checked: does it include tightness? Does it include drivers? Does it include profiles? Does it contain protected compounds? Does it include VAT and labour?
The illuminated alcove is worth it when the bathroom has an overall design that supports it. If a careful renovation is done, with a good shower, the right tiles and hidden lighting, then the niche can become the point that raises the whole image of the space.
It is also worth it in walk-in showers, in large bathrooms, in bathrooms with a spa aesthetic or in areas where the shower is a visually central element. If the alcove is located opposite the bathroom entrance, its lighting can act as an impressive focal point.
It is not always necessary in very small or economical bathrooms. If the budget is tight, it may be better to spend money on proper waterproofing, good mirror lighting, a quality battery and a proper floor slope. An illuminated alcove above an otherwise sketchy bathroom does not save the effect.
It is a highly aesthetic detail, not a basic necessity. But when done right, it offers a real upgrade.
There are situations where a lighted alcove is not a good idea. If the wall does not allow for easy recess construction, if there are pipes passing through, if there is a limited thickness of masonry or if the waterproofing cannot be done properly, it is better to consider another storage solution.
Also, if the renovation is low-budget and there is pressure to do everything "as economically as possible", the illuminated alcove can lead to dangerous compromises. It's better not to do it at all than to do it with the wrong LED, sloppy connections or questionable sealing.
Also avoid it if there is no way to place the driver in an accessible and safe place. Maintenance access is not a luxury. It is a key element of a proper installation.
In small bathrooms with many already bold details, the niche lighting may be overkill. Sometimes a simple, clean niche without LEDs is more elegant and more timeless.
Mistakes in such applications are often expensive, because they appear after the bathroom is complete. Fixing may require removing tiles, opening a wall or replacing special fittings.
| Error | What it causes in practice | A more correct approach |
|---|---|---|
| Bare LED strip inside niche | Draft image, reduced stamina | Tight profile with diffuser |
| Trust only the “IP67” of the film | Fragile joints and cut ends | Complete waterproof system |
| Niche without proper inclination | Stagnant water and salts | Slope to the shower |
| Driver without access | Difficult or expensive to repair | Accessible safe spot |
| Decision after the tiles | Contingencies and compromises | Design before waterproofing |
| Very cool LED | Hard, no spa image | 3000K or 4000K depending on style |
| Light that dazzles the wearer | Annoying use | Concealed position and proper diffusion |
| Bad tiling | LED highlights imperfections | Careful cuts and joints |
| Rough joints in wet zone | Risk of harm and safety | Installation by an electrician |
| Too many illuminated details | Fatiguing effect | A clear focal point |
A typical example is the niche where the LED enters the bottom, without a proper slope and without a profile that removes water. In the first few days it looks impressive. Then the scales, blurring, small damages and difficulty in cleaning begin to appear. The same concept, with the LED on the top and a proper profile, could be much more durable.
| Inquiry | Yes / No |
|---|---|
| Has the alcove been decided before caulking and tiling? | Yes / No |
| Has it been checked that the wall allows recess without affecting piping? | Yes / No |
| Is the lower shelf of the alcove provided with a slight slope towards the shower? | Yes / No |
| Has a waterproof LED profile suitable for a wet zone been selected? | Yes / No |
| Does the LED strip and its compounds have proper protection, not just theoretical IP on the product? | Yes / No |
| Will the driver go into a safe and accessible place? | Yes / No |
| Has it been decided whether the light will come on with a separate switch or dimmer? | Yes / No |
| Is correct color temperature selected for spa look, usually 3000K or 4000K? | Yes / No |
| Won't the LED dazzle the user in the shower? | Yes / No |
| Has de-salting and shampooing been considered? | Yes / No |
| Will the installation be done by a licensed electrician? | Yes / No |
| Does the offer detail niches, sealing, profiles, LEDs, drivers, labour, VAT and incidentals? | Yes / No |
If you want an illuminated recess in the shower, don't think of it as "an LED strip for beauty". See it as a technical construction in a wet zone. First the alcove, waterproofing and slope are drawn. Then the appropriate waterproof profile, the LED strip, the protected joints and the driver point are selected. IP67 is important, but it is not enough by itself. True safety comes from the whole system and proper installation by a professional.
Illuminated recesses in the shower can give a bathroom a truly luxurious image. They create depth, highlight tiles, practically organize products and add a spa feel that is difficult to achieve with simple accessories.
But it is an application that does not forgive sloppiness. The alcove is located in an area with water and water vapor, so it needs proper waterproofing, proper slopes, proper profile, quality LED, protected joints, safe driver and professional installation. IP67 is useful and often necessary in such applications, but should not be treated as an absolute guarantee if the rest of the system is not correct.
The best decision for the owner is to design the light alcove from the beginning of the renovation. To decide on dimensions, location, lighting, electrical supplies and maintenance before the tiles are laid. If done this way, the result can look clean, subtle and expensive for years. If done sloppily at the end, the same element that was meant to give luxury can become a source of damage, dampness and rotting.
Return to category.
Go to categoryReturn to the central guide.
Go to guide