
Bathroom Lighting, Ventilation & Heating
Return to category.
Go to categoryElectric underfloor heating is one of the quietest luxuries in a bathroom. It is not visible, does not take up space on the wall, does not spoil the design, does not have bodies or pipes in plain view. But you feel it immediately: you get out of the shower and instead of an icy tile you step on a warm floor. The sensation changes the whole bathing experience.
In bathrooms, the most common electrical solution is heating mats, i.e. thermal grids with a resistance cable attached to a grid, or free thermal cables that are laid on the floor with a certain density. They are placed under the tiles, usually in a layer of flexible tile adhesive or self-leveling mortar, and are controlled by a thermostat with a floor sensor.
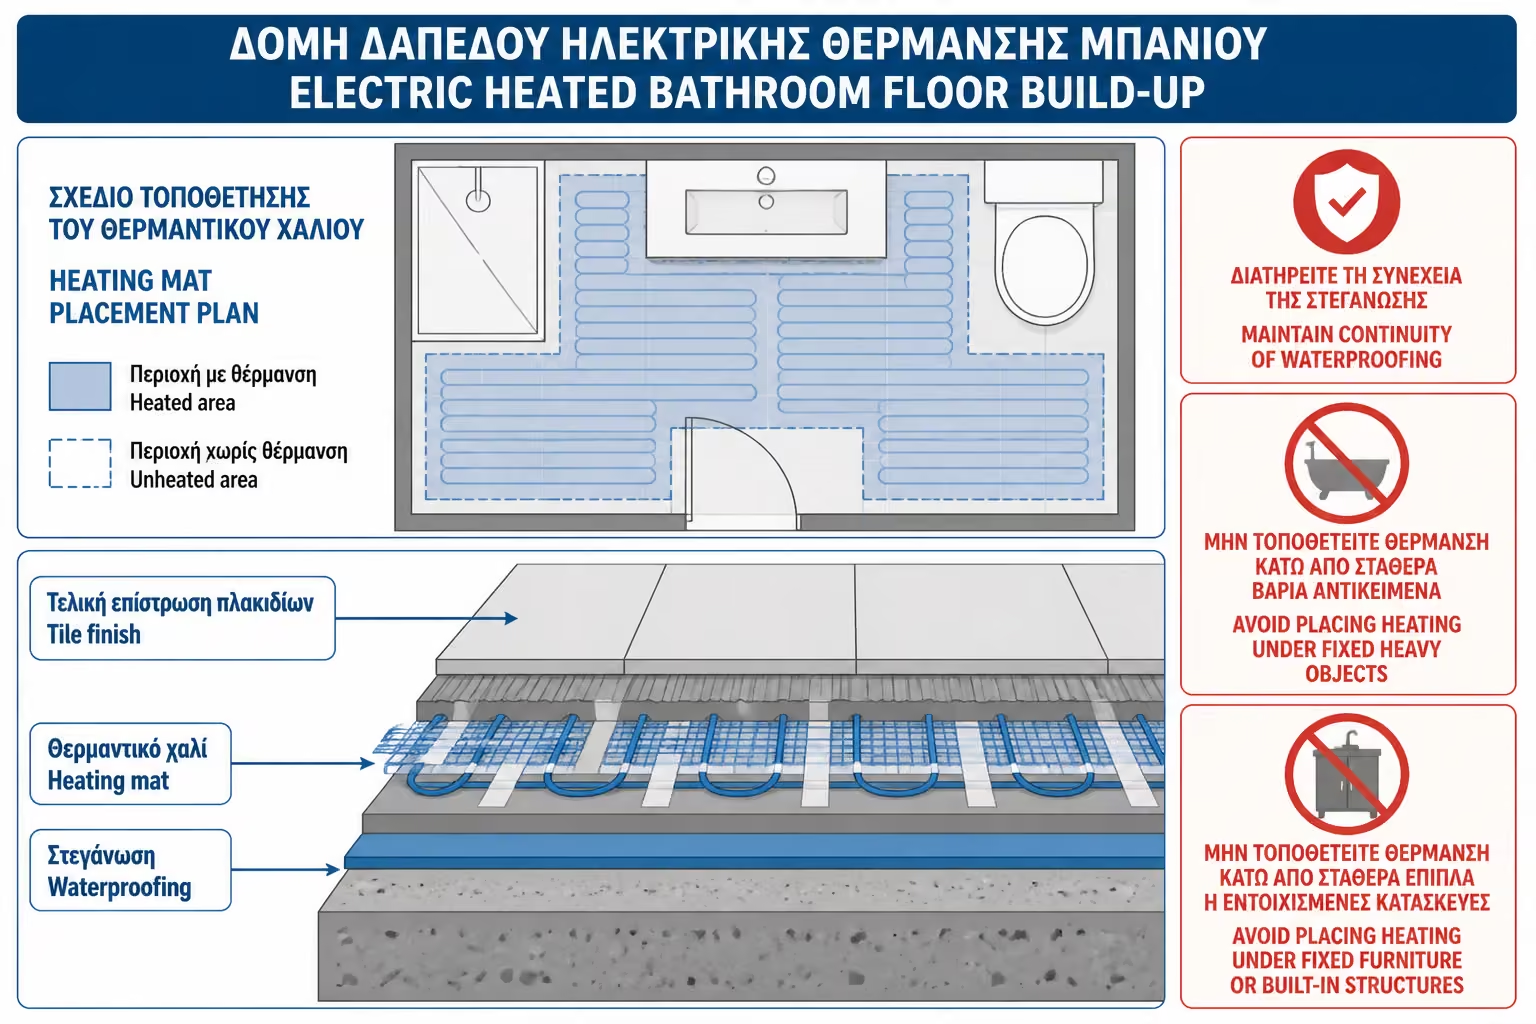
Their big advantage is that they can be integrated relatively easily into a bathroom renovation, especially when the tiles are being removed anyway. There is no need for a boiler, hydronic pipework or a heat pump. But the sequence of work must be correct: stable substrate, insulation where required, heating mat, sensor, adhesive or self-leveling compound, compatible waterproofing and final tiling. If the sequence is wrong, you may end up with either a heating problem or a waterproofing problem.
The most critical point in the bathroom is compatibility with waterproofing. The bathroom is not just a tiled room. It is a wet area with a shower, drains, joints, corners and possible leaks. The electric underfloor system must not compromise the waterproofing. Nor should waterproofing be casually applied over cables without a defined system and installation instructions. Success depends on the right combination of products: heating mat, adhesive, waterproofing membrane, primer, tile and grout must all be compatible.
There is also the issue of electrical safety. The bathroom floor is near water, the user is often barefoot and wet, and the system is electrical. That is why the installation must be designed and connected by a licensed electrician, with a suitable thermostat, sensor, leakage relay protection and control according to the requirements for rooms with a bathtub or shower. ELOT HD 60364-7-701:2024 specifically concerns low-voltage electrical installations in areas containing a shower or sprinkler.
Electric heating mats are thin grids on which a thermal cable is already attached. The craftsman unrolls them on the prepared floor, cuts them only to the grid — never to the cable — and adjusts them to the shape of the space. The wire heats up when powered and transfers heat to the tile.
Hydronic underfloor heating, by contrast, uses hot-water pipes inside the floor. It is excellent in new construction or full renovations, especially with heat pumps, but it needs more build-up height, a manifold, plumbing design and a different floor assembly. The electric version is simpler for small bathrooms because it is thinner and fits under tiles more easily.
The electrical system is quick to install and ideal for a small area. But it has higher operating costs if it is used for many hours as the main heating of a large space. That is why it is mainly suitable for bathrooms, WCs, zones in front of a sink or walk-in shower, and not necessarily as the main heating of the whole house.
Its main value in the bathroom is the comfort and quick drying of the floor. If you want to heat an entire bathroom with large losses, the power must be calculated and not taken for granted that "once it heats the floor, it heats the whole space".
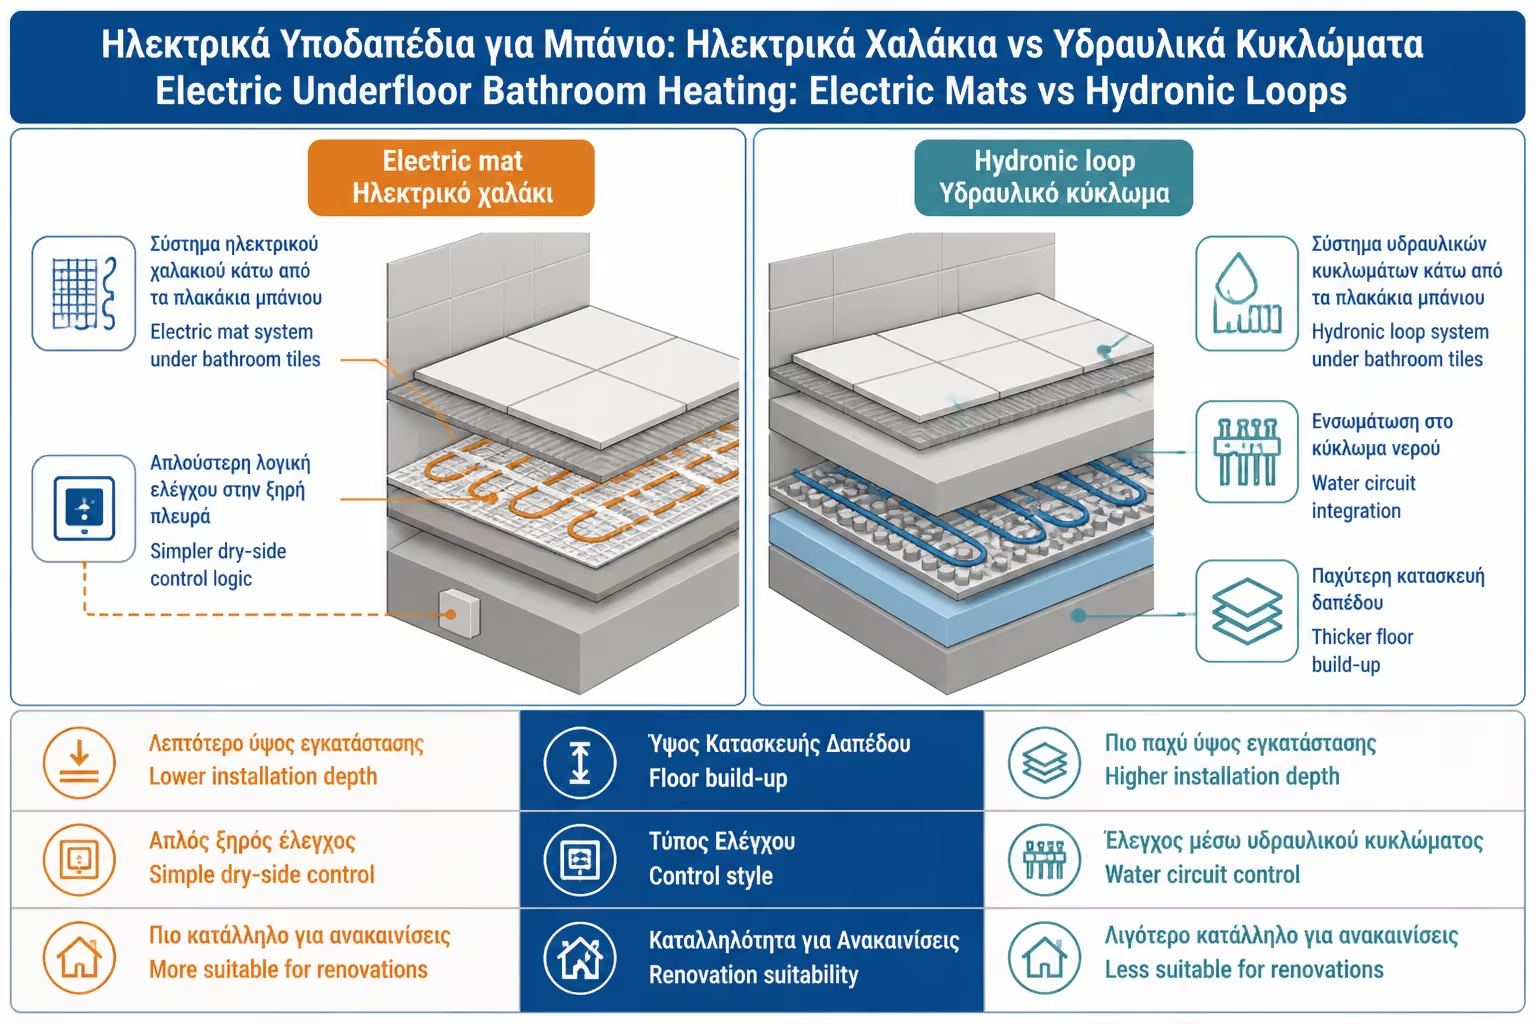
In typical applications under ceramic tile, the thermal grid is placed over a clean, stable substrate and embedded in a flexible tile adhesive or self-leveling mortar. Weber describes an application where flexible tile adhesive is first spread, the heating mat is placed within the fresh layer of adhesive, and then embedded so that tiling can follow.
The order may vary by system. Some manufacturers recommend thermal insulation board first, then cable or mat, then self-leveling compound, then a waterproofing membrane, then tile. Others have systems where the decoupling and waterproofing membrane also acts as the cable carrier. So there is no universal layer sequence for every product. There is only the sequence required by the specific system being installed.
The mistake is to bury the mat carelessly in tile adhesive, with no thickness control, no sensor, no resistance test and no waterproofing strategy. If the cable sits too high, tiling becomes difficult. If it is left with air gaps around it, it can overheat. If it is damaged with a trowel, repair after tiling is difficult and expensive.
Electric underfloor heating is a thin build-up, but it is not a rough improvised job. It needs a clean, disciplined installation sequence.
Ready-made grids are easier and faster. They have predetermined wire spacing, so the power per square meter is more consistent. They are ideal for rectangular surfaces and for small bathrooms where we want quick installation.
Loose heating cables offer more flexibility. They can move more easily around obstacles, in irregular shapes, in front of a washbasin or in narrow zones where a mat is inconvenient. But they require careful spacing. If the runs are too close, hot spots can form. If they are too far apart, heating will be uneven.
| Selection | Advantages | Disadvantages |
|---|---|---|
| Heating mat / grid | Fast, constant power/m², easy on simple surfaces | Harder in irregular bathrooms |
| Free cable | Flexibility in shapes and obstacles | Needs careful spacing and experience |
| Membrane with cable on guides | Good solution in decoupling/sealing systems | More expensive system, needs compatible products |
For a small standard bathroom, a heating mat is usually the most practical choice. For a bathroom with many recesses or a special layout, the cable can provide better coverage.
In any case, we do not heat under fixed furniture without legs, vanity units, bathtubs, shower trays with a closed base or anywhere heat cannot dissipate. The heated area is the free floor surface where people actually walk and where heat can escape safely.
This is the most critical question in the bathroom. The answer depends on the system. In many applications, the waterproofing must sit above the heating system or above the mattress enclosing it to protect the substrate from water. In other certified systems, a special membrane is used that functions simultaneously as a decoupling, sealing and cable base, with specific tapes and joint seals.
The mistake is to treat the waterproofing as "a material that will pass somewhere". Waterproofing must be continuous, without punctures, with correct angles, tapes, cuffs on siphons/pipes and compatibility with tile adhesive. If a heating mat is put in and then someone tries to pass sealant without being able to properly cover around wires, weak spots are created.
In instructions for laying tiles with electric underfloor it is stated that, in applications where waterproofing is required, the joints/joints must be sealed with a suitable sealant according to the manufacturer's instructions. This shows the bottom line: it is not enough to have "some" membrane; it must be completed as a system.
For a bathroom, ask the handyman and supplier to give you the order of layers in writing. Not verbally. You need to know where the heating mat fits in, where the waterproofing fits in and which products are compatible.
A common stratification logic in a bathroom renovation can be: stable substrate, primer, thermal insulation/decompression plate where necessary, heating mat, formwork with self-leveling or flexible adhesive, waterproofing film or spreadable sealant, tile adhesive, tile, grout and elastic corner seals.
But this series does not apply to every product. Some systems want the membrane before the cable. Some have a special membrane that accepts the cable inside. Some require self leveling prior to sealing. Some allow direct installation of tiles over the cable with a specific adhesive.
| Layer | Role |
|---|---|
| Substrate | Stability, level, bearing base |
| Primer | Adhesion of glue/mortars |
| Thermal insulation plate | Downward loss reduction, faster response |
| Heating mat / cable | Heat generation |
| Self-levelling or glue | Cable enclosure without gaps |
| Waterproofing | Substrate protection from water |
| Tile glue | Final floor welding |
| Tile / joints | Final surface |
The correct stratigraphy is not decided on the construction site "by eye". It is decided by the technical brochures of the products and the logic of the system.
On an old floor, especially over an unheated space or over a heat-trapping slab, thermal insulation under the electrical system can make a big difference. Without insulation, some of the heat escapes downwards and the floor is slow to warm up. With insulation, heat is directed more efficiently to the tiles.
This has two practical benefits. First, the system responds faster. Second, operating time is reduced to achieve comfort. In a small bathroom, the difference in feel can be big. You step on a floor that heats up faster, instead of waiting for the entire slab to heat up.
The downside is the added thickness and cost. In a renovation, every millimeter counts: doors, closets, siphons, gutters, tile height and transitions to the hallway. If a thermal insulation plate is inserted, the entire final level must be calculated.
In a bathroom, the thermal insulation board must also be compatible with wet areas and with the waterproofing system. We do not put any "insulation board" under a shower or in a wet zone without approval.
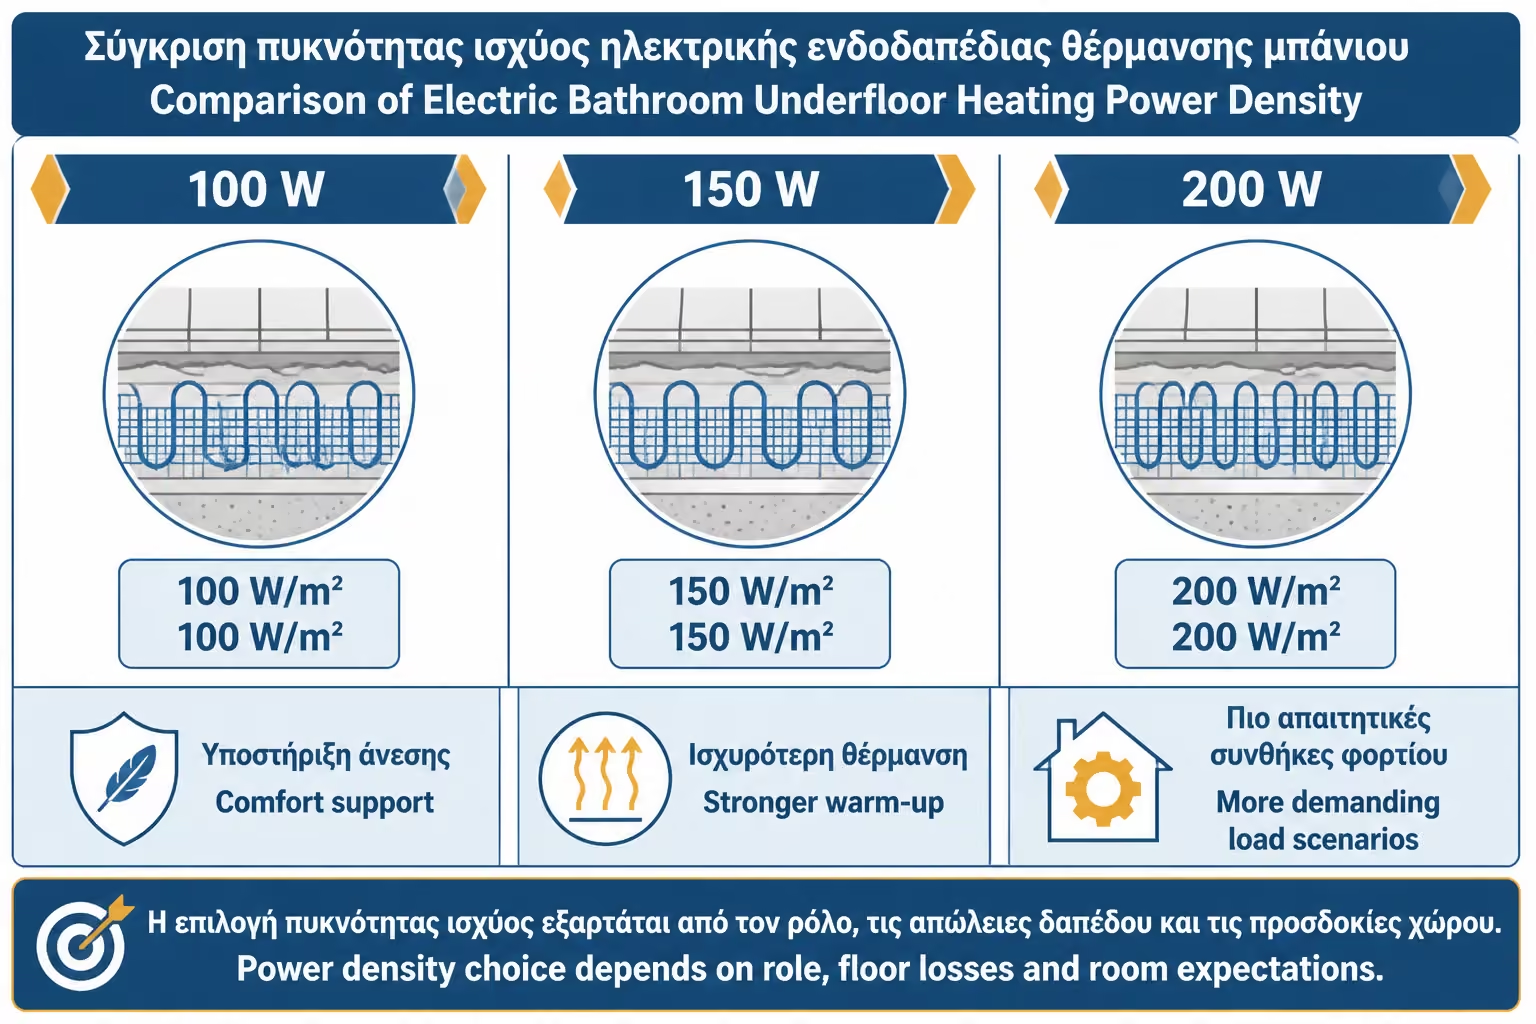
Electric heating mats come in various wattages, often from around 100 to 200 W/m². The choice depends on whether you want simple floor comfort or real space heating assistance, on the insulation, on whether the bathroom is cold and on the type of tile.
For bathrooms, systems around 150 W/m² are often used as a practical basis for quick comfort under tiles. In very well insulated floors or small WCs a lower power may be sufficient. In cold floors or areas with greater losses, a higher power can be selected, always according to the manufacturer's instructions.
| Power mat | Use |
|---|---|
| 100 W/m² | Soft comfort, well insulated floors, small spaces |
| 150 W/m² | A common choice for bathrooms under tiles |
| 200 W/m² | Faster response/cold spaces, with care to the manufacturer |
| Over 200 W/m² | Special applications, not arbitrarily in a bathroom |
The choice of power is not made with the logic "the more the better". Too much power on the wrong substrate, without the right sensor and thermostat, can create overheating or unpleasant operation. The system must be controlled by a floor thermostat so that the tile temperature remains safe and comfortable.
For a bathroom that already has a towel rail or other body, the heating mat can be mainly for comfort. For a bathroom without other heating, a total power calculation must be made.
It can, but only under certain conditions. If the bathroom is small, well insulated and the heated surface is enough, the electric underfloor can make a significant contribution or even cover the space. However, if the bathroom is large, has external walls, a window, a roof or a small free floor area due to furniture and a shower, it may not be enough.
The problem is that in the bathroom the actual heated surface is often less than the total square footage. We do not put a mat under a sink, cabinets that step on the floor, bathtub, stationary shower or places where it is not allowed. So a bathroom of 5 sq.m. it may only have 2.5–3 sq.m. active heating. If the mat is 150 W/m², the total power is 375–450W. This can be comfortable for underfloor heating, but not always enough for main space heating.
Example:
| Shared bathroom | Free heated surface | Mat 150 W/m² | Total power |
|---|---|---|---|
| 4 sq.m. | 2.5 sq.m. | 150 W/m² | 375W |
| 5 sq.m. | 3 sq.m. | 150 W/m² | 450W |
| 6 sq.m. | 3.5 sq.m. | 150 W/m² | 525W |
| 8 sq.m. | 5 sq.m. | 150 W/m² | 750W |
If the room needs 700–900W to heat up and the floor gives 450W, a towel rail or other body is also needed. So electric underfloor heating is great for comfort, but it shouldn't be called "main heating" without calculation.
The heating mat should not just work with a simple switch. It needs a thermostat and a floor sensor. The thermostat regulates when to turn the system on and off. The floor sensor measures the temperature near the tile and protects against overheating.
The sensor must be placed inside a protective tube, between two cable lines, not on the cable, and in a place where it can theoretically be replaced if it breaks. Many heating mat installation guides mention the need to provide a channel/tubing for the sensor and cold tail so that no bumps are created under the tiles.
The thermostat can be simple, programmable or smart. For a bathroom, planning is very helpful. It can heat the floor before the morning shower and turn off afterwards. He doesn't have to work all day. In a small bathroom, 30–60 minutes of warm-up may be sufficient, depending on the system and insulation.
"Smart" is not necessary. What is necessary is control. Without a thermostat, the system is wasteful and less secure.
Running costs are simple in theory: power x hours x kWh price. If you have 3 sq.m. heating mat at 150 W/m², the total power is 450W, i.e. 0.45 kW. If it works for 2 hours at full power, it consumes 0.9 kWh. At €0.25/kWh, this costs around €0.225.
The actual bill may be lower, because the thermostat does not let the system run continuously at full power after warm-up. Some operating cost guides state that a 100–175 W/m² electric underfloor can after warm-up operate with a duty cycle and that the cost depends on power, area, hours and electricity price.
| Heated surface | Power mat | Total power | 2 hours of full operation | Cost at €0.25/kWh |
|---|---|---|---|---|
| 2 sq.m. | 150 W/m² | 300W | 0.6 kWh | €0.15 |
| 3 sq.m. | 150 W/m² | 450W | 0.9 kWh | €0.225 |
| 4 sq.m. | 150 W/m² | 600W | 1.2 kWh | €0.30 |
| 5 sq.m. | 150 W/m² | 750W | 1.5 kWh | €0.375 |
| 6 sq.m. | 150 W/m² | 900W | 1.8 kWh | €0.45 |
The electric floor is economical when it works on a small surface and with a program. It becomes expensive when operating for long hours, over a large area or as the main heating without good insulation. So the secret is not just power. It is the thermostat, the program and the insulation under the system.
The cost depends on the surface, the type of mat, the thermostat, the need for a thermal insulation board, waterproofing, the condition of the substrate, the electrical line and whether it is done in a total renovation. In a small bathroom, the material may not be overly expensive, but proper installation and layering add up to the overall cost.
| Work / material | Indicative range 2026 | Comment |
|---|---|---|
| Heating mat / cable | 40–90€/m² material | Depending on the brand and power |
| Simple/programmable thermostat | 50–180€+ | Smart models more expensive |
| Thermal insulation plate | 15–40€/m²+ | Optional/recommended on a case-by-case basis |
| Self-leveling or extra glue | 8–25€/m²+ | For formwork and flat surface |
| Bathroom waterproofing | 15–45€/m²+ | By system, tapes, corners, cuffs |
| Electrical connection/line | 100–300€+ | Depending on table and position |
| System placement | 20–50€/m²+ | By workshop and difficulty |
| Complete addition to bathroom renovation | 400–1,500€+ | For small/medium bathroom, big variation |
The prices are indicative. In a small bathroom 4–5 sq.m. with 2.5–3.5 sq.m. heated surface, the system can be relatively affordable when put in together with new tiles. If a finished floor has to be removed just to install heating, the cost becomes much higher.
The most important thing is that the offer should write in detail what is included: mat, thermostat, sensor, resistance tests, waterproofing, adhesives, labor, electrical connection and VAT. If it just says "underfloor heating", it's not enough.
Ceramic and porcelain tiles are among the best finishes for electric subfloors because they conduct heat well and withstand the bathroom. But the glue must be suitable for heated floors. A flexible adhesive with good deformability is usually required to withstand micro-expansion from thermal cycling.
The grout must also be suitable for wet areas and thermal changes. In the corners we do not use hard grout but elastic sealing, because there are movements there. If the floor is heated and cooled daily, the rigid points are strained.
The finished surface must have full contact with the adhesive. Gaps under tiles are a bad sign on any floor, but on a heated floor they are even worse, because they create uneven heat transfer and potential stresses.
Do not use random tile adhesive. Ask for an adhesive that states suitability for underfloor heating and wet areas, according to the waterproofing system.
In a bathroom with a walk-in shower or linear faucet, the floor has wrinkles. Placing a heating mat on a surface with wrinkles requires care. The mat must not create bulges, disturb the gradient to the siphon or prevent sealing. Also, it must be confirmed by the manufacturer whether installation is allowed inside the shower area or only outside.
In many cases, the heated floor is installed in the "dry" zone of the bathroom and not inside the shower itself. In other cases, with special systems and proper sealing, the shower area can also be heated. This is not something you decide arbitrarily. It requires a system that explicitly allows it, correct electrical design, and watertight execution.
The cable should not pass too close to siphons, drains or places where future operations may be needed. If the floor ever needs to be drilled, there is a risk of cutting the cable. That is why we keep a plan/photos of the installation before the tiles are closed.
In bathrooms with jets, the experience of the crew is decisive. It's not just a flat living room surface.
Before covering the cable, the circuit resistance and insulation should be measured according to the manufacturer's instructions. Measurements should usually be taken before, during and after installation to detect any damage before the tiles are inserted. If a wire is cut or injured and you find out after soldering, the repair is difficult.
The electrical connection is made by a licensed electrician. It needs a suitable line, leakage relay, thermostat, sensor and connection according to the zones of the bathroom. The thermostat must not be placed in a position where you touch it with wet hands in a wet zone. It is often placed outside the bathroom or in a secure location, depending on the product and regulation.
ELOT HD 60364-7-701 concerns special requirements for rooms with a bathtub or shower, so every bathroom electrical installation must be treated as a special and not a simple room line.
Ask to keep the measurement sheet and photo documentation of the cable layout. They are valuable should there be a future breakdown or renovation.
We do not open the subfloor immediately so that the "glue dries". This is a serious mistake. Adhesives, mortars, sealants and grouts all have curing times. If heated prematurely, cracks, delaminations, stresses or sealing problems may occur.
The waiting time depends on the products. Some manufacturers require several days or weeks before first operation, especially when self-leveling or cementitious materials are used. The first start should be done gradually, raising the temperature with a program, not suddenly to the maximum.
This should be written in the delivery instructions. The owner must know when the system can be turned on and at what temperature. If the craftsman delivers the bath and the user immediately lights it up "to try it out", it can create damage.
Patience in the first startup protects the entire investment.
The first advantage is comfort. The heated floor makes the bathroom feel more luxurious, even if the air temperature has not risen much. The heat from below reduces the feeling of a frozen space.
The second is drying. A warmer floor dries faster after a shower, especially if there is water from a walk-in shower or children. This is not a substitute for proper rains and ventilation, but it helps keep moisture out for hours.
The third is aesthetics. No extra body is needed on the wall, so there is room for furniture, a mirror, storage or a cleaner design. In small bathrooms this is a big advantage.
The fourth is control. With a thermostat, you can only heat the bathroom when you need it, instead of turning on all the central heating for a few minutes of comfort.
The first disadvantage is that the repair is difficult after tiling. If the cable is injured or if the sensor is damaged and is not inserted into a tube, it may need to be disconnected. That is why the installation must be done correctly from the beginning.
The second is the operating cost. In a small bathroom with a timer it makes sense. On a large surface or many hours of daily use, the current can be felt. Electric underfloor heating does not have the COP of a heat pump. It is direct electric heating.
The third is floor height. Even a thin system adds layers: mat, glue/mortar, possible insulation board, waterproofing, tile. This affects doors, shelters and transitions.
The fourth is waterproofing. If it is not designed correctly, there is a risk of losing the continuity of the waterproofing. In a bathroom, this is a bigger problem than the heating itself.
| Error | What does it cause? | A more correct approach |
|---|---|---|
| Installation without layer design | Incompatibility with waterproofing | Written system series |
| Thermal cable cutting | Circuit failure | Only the mesh is cut, never the cable |
| Mat under furniture/basin | Overheating or useless heating | Free surface only |
| No floor sensor | Poor control/overheating | Thermostat + sensor in a tube |
| No resistance measurements | No damage is detected before the tiles | Measurements before/after installation |
| Early first function | Cracks/detachments | Waiting for materials to mature |
| Simple glue without suitability | Fissures/detachments | Flexible adhesive for sub-floors |
| Waterproofing "where convenient" | Risk of leaks | Continuous certified system |
| Without thermal insulation plate on a cold floor | Slow response and losses | Insulation where it fits and is provided for |
| No before tiling photo | Difficulty in future repair | Photographic documentation |
The most serious mistake is to place the heating mat as a simple "extra" on the tile adhesive, without anyone knowing how the waterproofing continues. In the bathroom, the subfloor must belong to an integrated system.
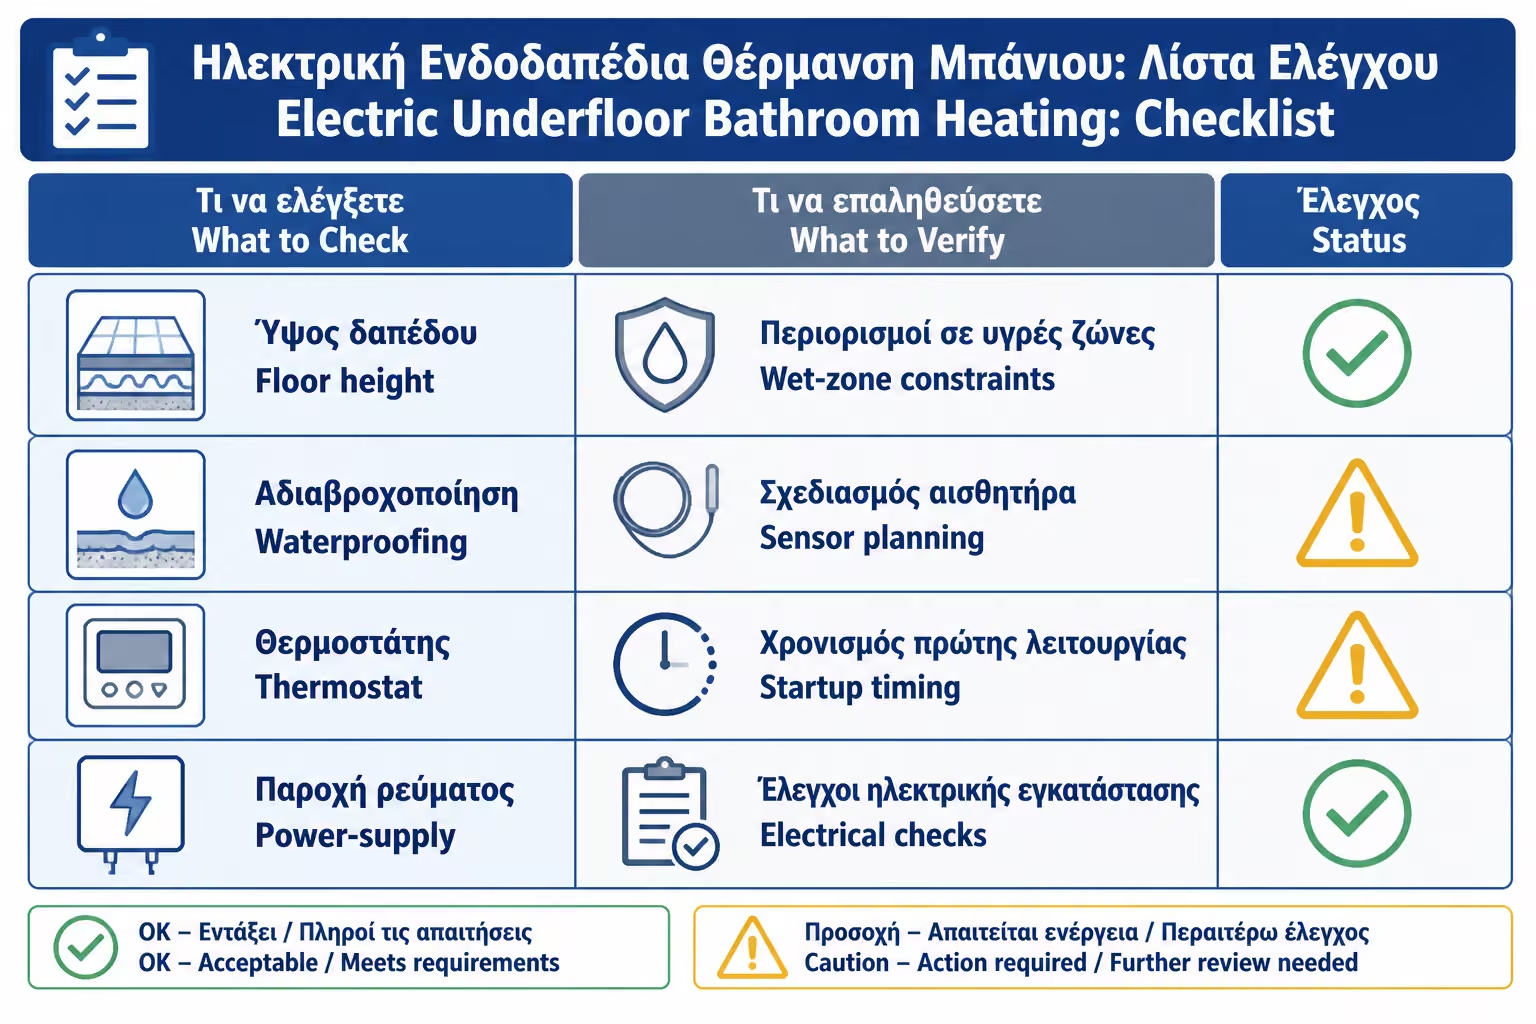
| Control | Yes / No |
|---|---|
| Is the floor being renovated or will the tiles be stripped? | Yes / No |
| Has the free heated surface been calculated? | Yes / No |
| Do you know if the system will be underfloor heating or main heating? | Yes / No |
| Is the power W/m² selected according to the bathroom? | Yes / No |
| Is there a floor sensor thermostat? | Yes / No |
| Will the sensor fit into a replacement tube? | Yes / No |
| Has the waterproofing and heating mat order been defined in writing? | Yes / No |
| Is the adhesive/membrane/primer compatible with subfloors? | Yes / No |
| Are leakage relays and proper electrical wiring provided? | Yes / No |
| Will resistance measurements be taken before and after installation? | Yes / No |
| Is there a drawing or pictures of the cable route? | Yes / No |
| Has the final floor height been calculated? | Yes / No |
| Do you know when the first boot is allowed after the tiles? | Yes / No |
Electric underfloor in the bathroom is excellent when designed as a system, not as "wire in glue". Always ask for three things before installation begins: layer plan, waterproofing compatibility and cable measurements. If it is not clear where the waterproofing goes in relative to the heating mat, stop before tiles go in. A warm floor is a luxury; watertightness and electrical safety are a must.
Electric underfloor heating with heating mats is one of the most enjoyable upgrades in a bathroom renovation. It offers a warm floor, a better sense of comfort, faster floor drying and a cleaner design without extra bodies on the wall. In small bathrooms, with the right timer, it can have reasonable operating costs and great daily value.
But it is not a simple addition. It needs proper installation under the tiles, suitable adhesives, floor sensor, thermostat, electrical protection and — above all — compatibility with waterproofing. The bathroom is a wet place. If the waterproofing is broken, punctured or misapplied due to the heating mat, the resulting problem can be much more serious than a cold floor.
Running costs are easily calculated from Watts, hours of use and kWh price. For 2–4 sq.m. heated surface, program use usually makes sense. For a large area or main heating of several hours, a more careful calculation must be made. Thermal insulation plate and the right thermostat can make a big difference in response and consumption.
The correct electrical subfloor is not visible after the renovation. But it shows in the feel, the comfort, the dry floor and the absence of problems. If designed correctly from the ground up, it is one of the upgrades that the owner remembers every morning.
Return to category.
Go to categoryReturn to the central guide.
Go to guide