
Bathroom Lighting, Ventilation & Heating
Return to category.
Go to categoryThe bathroom ventilator is one of the devices that work in a difficult environment. It pulls air full of moisture, dust, fibers from towels, small particles from paper, fumes from cleaners and, in several cases, air from light fixtures or outside outlets. All of this goes through the front, the impeller, the return and the air duct. Over time, dust sticks to the plastic parts and creates a layer that reduces performance.
The problem is not only aesthetic. A dirty fan draws less air. The impeller loses its balance, the grille reduces the free cross-section, the return can stick and the engine works more stressed. The result is more noise, less absorption, slower bathroom drying and more stress on the device.
Many owners understand that something is wrong when the fan starts to hum more than before, when the mirror stays foggy for a long time or when black fluff is visible from the lid. At that point, the first thought is often "broke the motor". Sometimes it's actually worn out. But very often it just needs cleaning.
Ventilator maintenance is not difficult, but it does require attention. We are talking about an electrical device in a wet area. We do not spray water, we do not put liquids inside the motor, we do not violently pull cables and we do not open a device that has permanent power unless we have isolated the current. Especially in ventilators with a timer, hygrostat or in-line motor, there may be current in the device even when the bathroom light is off.
In this guide we'll look at how to properly clean a typical bathroom vent, how to remove the cap, what to do with the impeller, when not to do it yourself, how to check for backflow, what applies to in-line vents and when maintenance should be done.
The fan draws air from a room with increased humidity. The dust that remains dry in other areas, in the bathroom sticks more easily to the surfaces, because it mixes with water vapor. This creates a gray or black layer on the face, on the impeller and around the mouth.
Fibers from towels, mats and toilet paper are easily carried by air flow. When the fan is running, these small fibers are drawn towards the grill and gradually collect. If the room has a dusty light fixture or if the outer grille is not well protected, dirt may also enter from the opposite side when the fan is off.
Humidity makes the problem worse. The impeller is not just filled with dry dust that easily leaves. Often a sticky layer is created that needs careful cleaning with a dry or slightly damp cloth, always without getting moisture into the motor.
The more often the bathroom is used and the longer the fan runs, the more often it needs to be checked. A fan in a blind family bathroom will get dirty faster than a fan in a small guest WC.
Dust reduces the free cross-section of the grille. That is, it leaves less space for air to pass through. This means the fan has to work against more resistance. The actual output drops, even though the motor continues to spin.
In the impeller, the dust changes the shape of the blades. The impeller is designed to move air in a certain way. If the blades become covered with fluff, they do not "cut" the air properly. Also, if the dust collects unevenly, the impeller can lose its balance and create vibrations or noise.
The return can also get stuck. If the flap does not open fully, the air is not coming out properly. If it does not close properly, odors or cold air enter from the light fixture or outside outlet. So the fan can have a double problem: when it works it doesn't work and when it's off it leaves returns.
Over time, dirt strains the motor. It does not mean that it will "burn" immediately. But it means that it works in worse conditions, with more resistance, more temperature and possibly more vibration. Cleaning helps the device work more quietly and more efficiently.
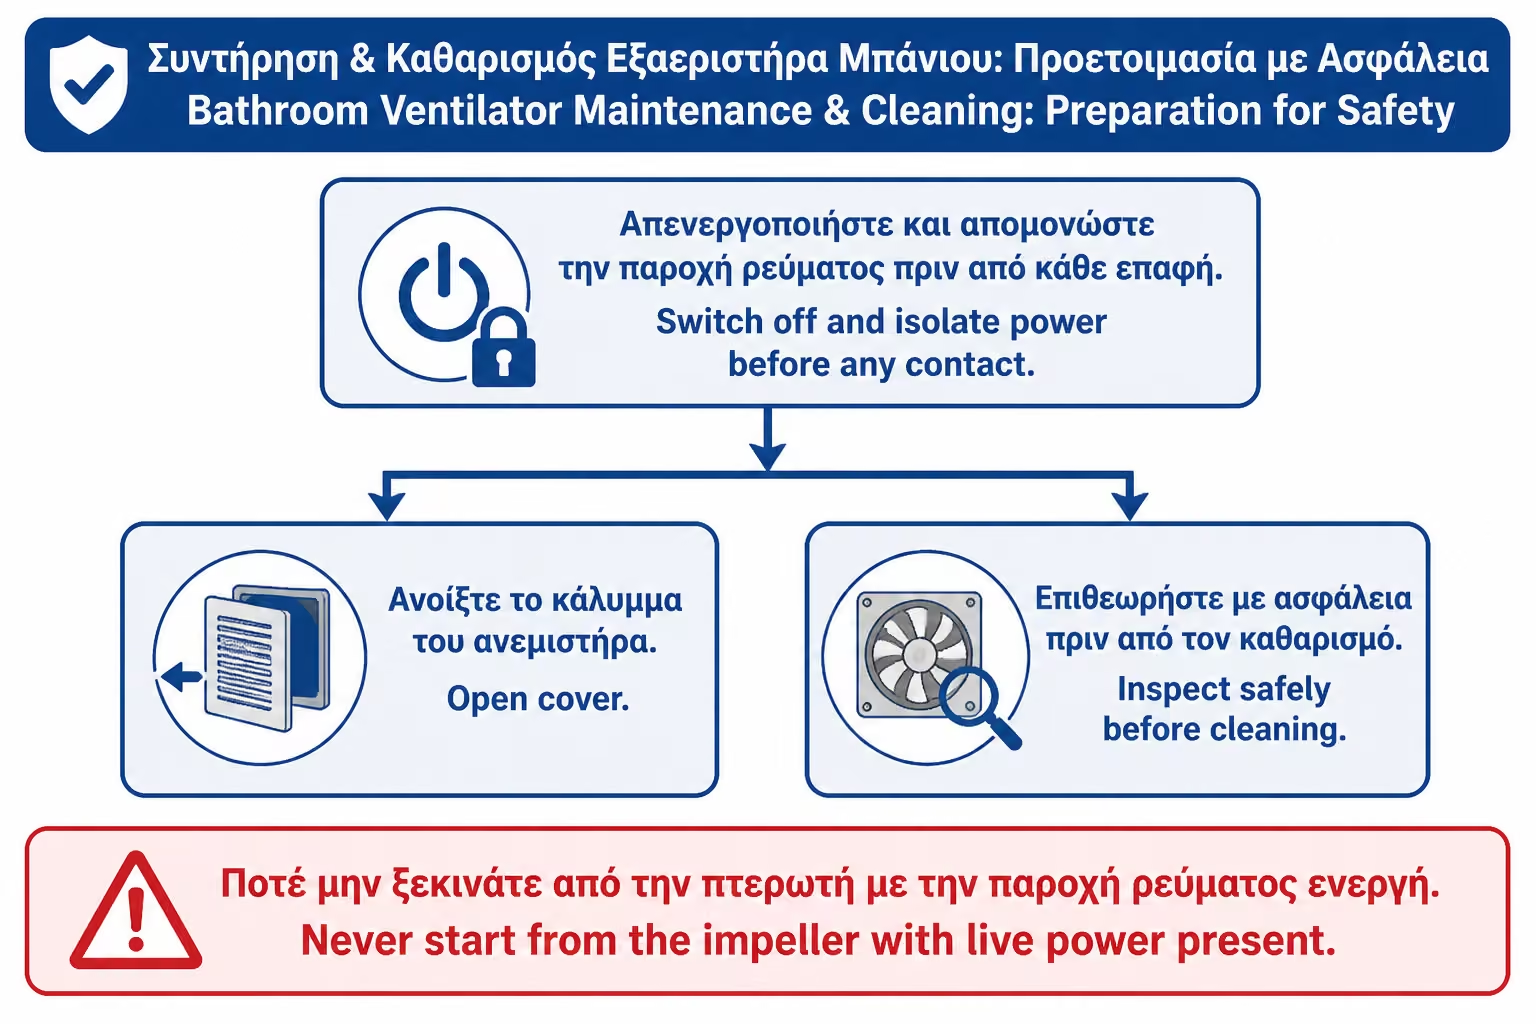
Before removing cover, screws or faceplate, power must be isolated. It's not always enough to turn off the bathroom light. Many ventilators with a timer or hygrostat have a permanent power supply. This means that there may be current in the device even when the light switch is off.
The safe approach is to blow the corresponding fuse in the electrical panel or use the ventilator isolation switch, if present and properly located. If you do not know which fuse corresponds to the bathroom or the vent, do not test with the appliance open. Call an electrician.
After isolation, you can check if the fan does not start when you turn on the light or when you turn on the switch. In any case, if in doubt, stop. Maintenance is not worth the risk.
This rule is even more important in bathrooms, because the space has moisture, tiles, metal parts and many times the user is touching conductive surfaces. The fan may seem like a small appliance, but it remains an electrical appliance in a wet room.
A simple cleaning does not require many tools. You usually need a small screwdriver, soft cloth, small paintbrush or brush, fine nozzle vacuum cleaner and if necessary a slightly damp cloth for the plastic cap. It's a good idea to have a small container for the screws so they don't get lost.
We do not use a lot of water, compressed air with excessive force, spray cleaners inside the device, chemicals that can attack plastics or lubricants if not provided by the manufacturer. Many small fans have motors that do not require lubrication by the user. Spraying oil "to make it spin better" can collect more dust or cause damage.
For the faceplate, if it is completely removed and has no electrical parts, it can be cleaned more easily with mild soap and water, as long as it is completely dry before reinserting. If the lid has a sensor, light or electronic part, we do not wet it.
The logic is simple: we clean dust and fluff, not the inside of the motor with fluids.
Each model has a different removal method. In some, the lid fastens with a clip. In others, there are small screws. In others, the faceplate is carefully pulled out and held in place by springs, as in some roof grills. In models with a design front, there may be a hidden clasp.
We do not forcefully pull the cap. If it doesn't come out, we look for screws, clips or instructions. A broken clip can cause the lid to not stay on properly afterwards, squeak or leave gaps. If the facade has a cable for a sensor or lighting, do not remove it abruptly.
The right movement is gentle. First the visible screws are removed, if any. Then we pull the lid gradually, keeping it close to the device. If we feel resistance, we stop and check. In old ventilators, the plastics may be dry and brittle.
If the cap is stained around from old paint, it may be stuck to the wall. There you need very careful cutting of the paint around the facade with a chisel, without scratching tiles or cables. If you are not sure, it is better to have a technician do it.
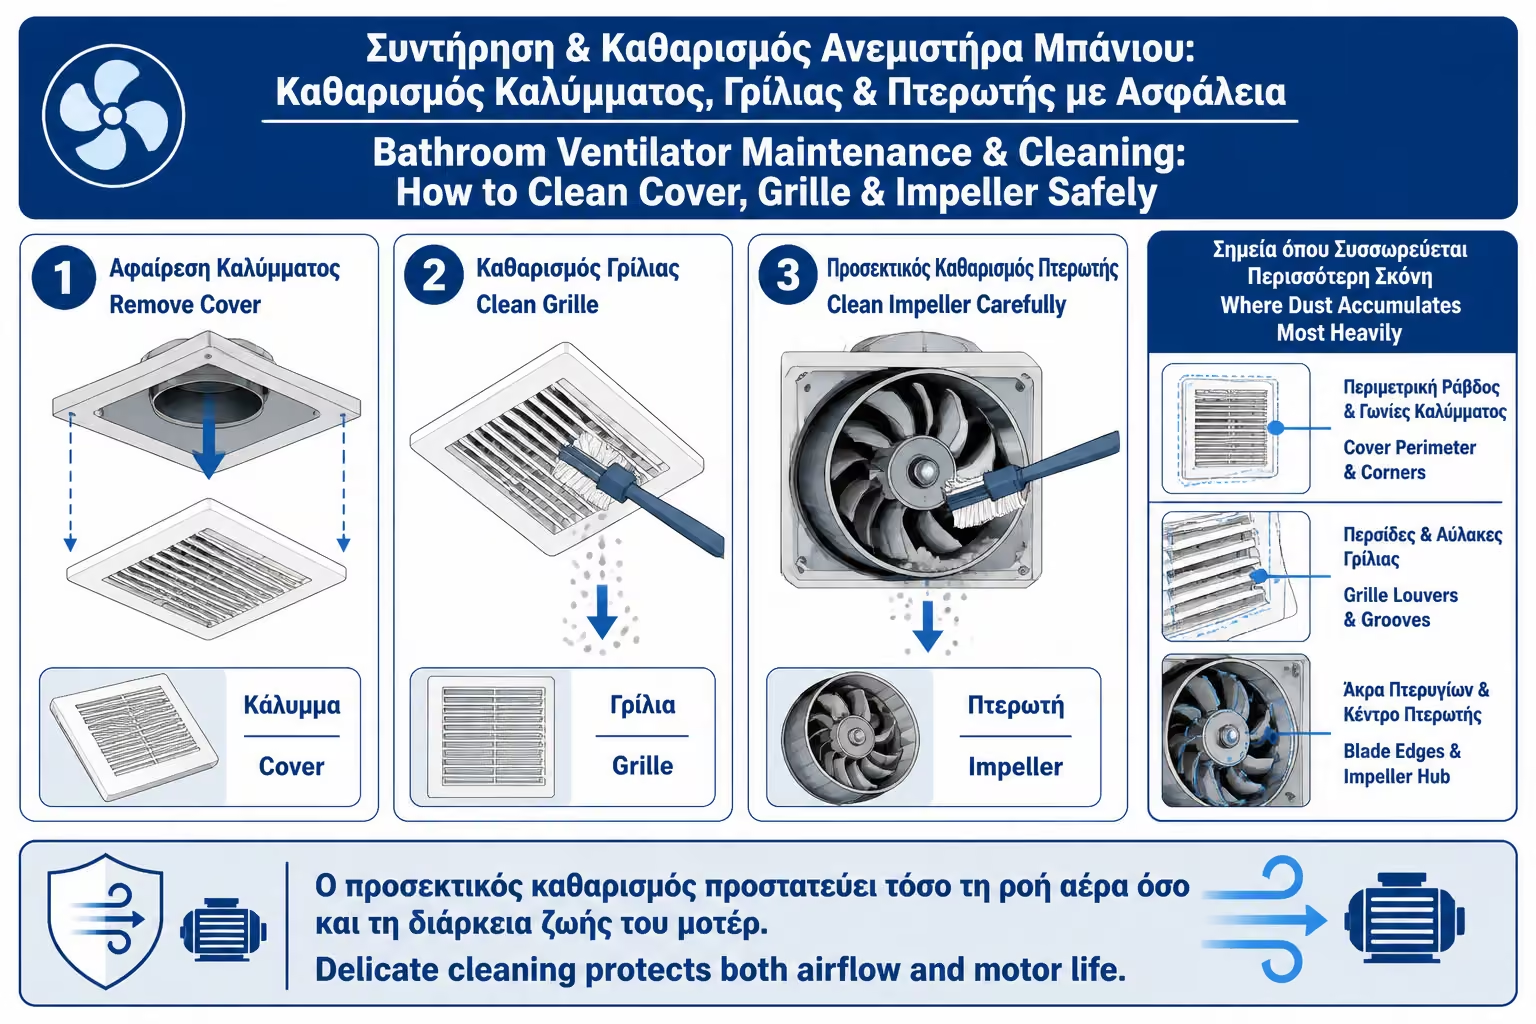
The cap is the first filter of the ventilator. This is where most of the visible dust collects. If the grille is clogged, the air does not flow easily to the impeller. Even if the motor is strong, performance drops at the first hurdle.
After the cap is removed, first clean the coarse dust with a vacuum cleaner or a soft brush. Then, if the cap has no electrical parts, you can wash it with warm water and mild soap. Rinse thoroughly and allow to dry completely before refitting.
If there are small blinds, clean between the openings. Lint sticks there and significantly reduces the flow. Do not use hard wires or sharp tools that can break plastics.
If the cap is discolored or has broken clips, it may be worth replacing. A cap that doesn't fit well can create noise, vibration, or gaps where air passes the wrong way.
The impeller is the part that moves the air. If it has dust, performance drops and noise increases. Its cleaning must be done carefully, without distorting the fins and without pressing the motor shaft.
With the power isolated, use a soft brush to loosen the dust on the fins. Keep the vacuum cleaner nearby so it picks up any lint that falls. If the dust is stuck, use a slightly damp cloth or cotton swab, but not too much water. No moisture should drip onto the motor.
Do not turn the impeller with force. Do not pull it out unless removal is provided by the manufacturer. In some models the impeller is removed for cleaning, in others it is not. If you are not sure, do not disassemble it.
Clean all the fins as evenly as you can. If a lot of dust remains on only one side, the vibration may continue. After cleaning, the impeller should turn freely, without catching on plastic or wire. If it does, something has moved or is worn and needs to be checked.
We do not spray cleaner inside the motor. We don't pour water. We do not use a steam cleaner. We do not add lubricant unless the manufacturer provides it. We don't pull wires. We do not unscrew the electrical connection unless we are electricians. We do not turn on the device while it is open to "see if it turns".
Also avoid blowing hard with compressed air, especially if it pushes the dust deeper into the motor or air duct. If air is used, it should be done gently and controlled, not like cleaning a tool in a workshop.
Do not push the impeller in or out. A small shift can cause rubbing or noise. If the motor already has bearing noise, cleaning may improve the condition, but will not repair a worn motor.
If you see signs of burnt plastic, a burning smell, blackening around wires or unusual heat, stop and call an electrician. These are not simple cleaning issues.
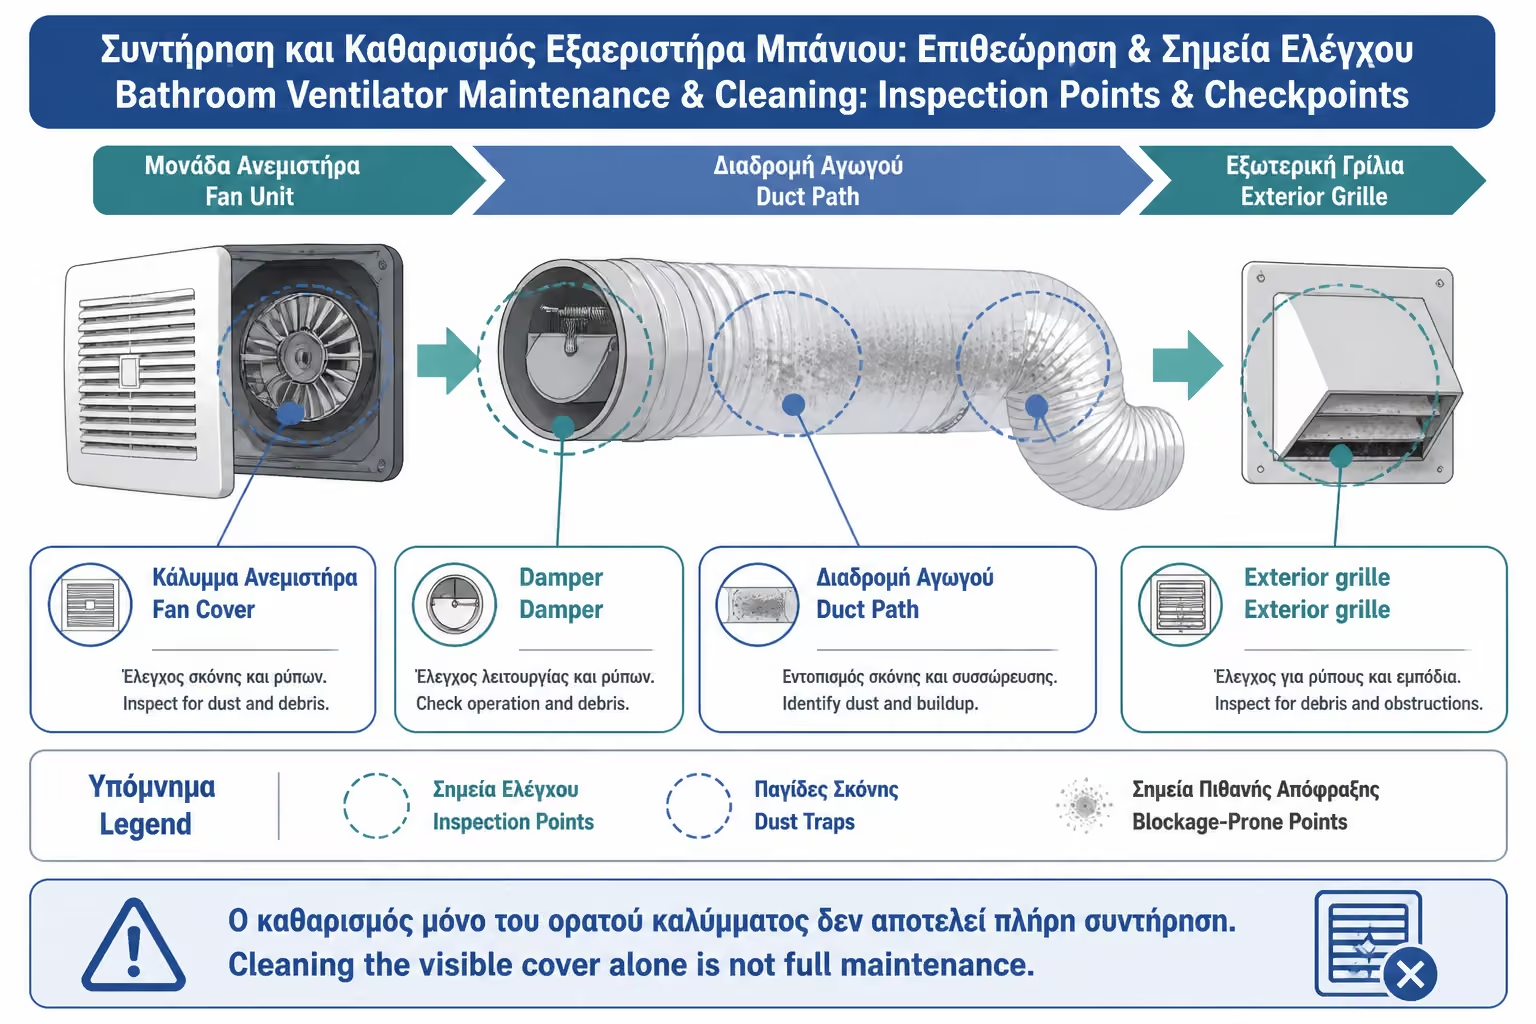
The check valve is the flapper that prevents air from flowing back when the fan is off. If it collects dust, it may stick. If it gets stuck closed or half closed, the fan is not blowing air properly. If it gets stuck open, smells, cold air or insects can get in.
With the cap removed, as long as the valve is accessible, check that it moves freely. Do not break it, do not force it. Clean the dust from its ends with a brush or soft cloth. If there is lint on the joint, carefully remove it.
On some fans, the return is located further back or on the outer grill and is not easily accessible from the inside. In in-line systems it can be inside the air duct. There you need access from a ticket office or a technical point.
After cleaning, when power is restored and the ventilator is operating, the valve should open without knocking and close when stopped. If there is a loud ticking sound or if the supply seems low, it may need replacement or a better adjustment.
Cleaning the faceplate and impeller helps a lot, but it's not enough if the vent is clogged. If there is a pipe with dust, insect nest, bent aluminum flexible pipe or dirty outer grill behind the fan, the performance remains low.
If accessible, visually inspect the vent. Don't put tools deep inside where you can't see. There may be wires, valve or hose that will be injured. But you can clean the first part with a vacuum cleaner and a fine nozzle, without pressure.
The exterior grille is often neglected. If it is in a light fixture, it may have dust and lint. If it is on an outside wall, it may have insects, leaves or dirt. A grate with a very dense screen can clog and greatly reduce the flow.
If the exterior grille cannot be safely accessed, do not attempt to clean windows, stairs or skylights without a qualified technician. Access is part of maintenance and must be done safely.
Ventilators with a timer or hygrostat have electronic parts. They may have a board, sensor, sliders and permanent power supply. This means that current isolation is even more important and that the electronics should not get wet.
The humidity sensor can be affected by dust. If it is accessible, it is cleaned very gently, usually with a dry brush or according to the manufacturer's instructions. We don't spray cleaner on it. If the fan turns on strangely, stays on all the time, or doesn't respond to humidity, it could be a setup, dirt, or electronic problem.
The timer is also not cleared by the user. If a setting change is needed, it is done carefully and with the current isolated. In many models, the setting is located behind the front panel. If you don't know which slider is which, don't mess around.
In such devices, basic cleaning by the owner can be limited to the lid, grill and visible impeller. For a deeper check, better a technician.
In in-line ventilators, only a grille is usually visible inside the bathroom. The motor is located in the false ceiling, in the attic or in the air duct. This makes the space cleaner aesthetically and often quieter, but it changes the way of maintenance.
First the suction grill in the bathroom is cleaned. Dust collects there as in any ventilator. Then there must be access to the motor through a hatch or technical point. If there is no access, maintenance is problematic. This is one of the biggest mistakes in stealth installations.
The in-line motor may have a removable section or maintenance cap, depending on the model. Cleaning must be done according to the manufacturer's instructions. If the motor is inside a suspended ceiling with cables, lights and pipes, the work must be done by a technician who knows what he is doing.
In in-line systems the pipe must also be checked. A kinked hose, a stuck return, or a dirty outer grill can reduce performance, even if the motor is clean.
For most domestic bathrooms, a basic check every 6 months is good practice. If the bathroom is used a lot, if it is blind, if the ventilator often works with a timer or a humidistat, or if there is a lot of dust, it may need cleaning every 3-4 months. In a small WC with limited use, once a year may be sufficient.
You don't have to wait until the grill is completely full. Cleaning is easier when dust is not deeply embedded. If you leave the device without maintenance for years, cleaning becomes more difficult and may require a technician or replacement.
| Space usage | Indicative cleaning frequency |
|---|---|
| Guest WC with little use | 1 time a year |
| Standard bathroom with shower | Every 6 months |
| Blind bathroom with daily use | Every 3–6 months |
| Family bathroom with multiple showers | Every 3–4 months |
| Bathroom with in-line system | Grid often, motor/network based on access and usage |
The frequency also depends on the environment. If you have a pet, lots of towels, an open light fixture with dust, or an outdoor grill in a difficult spot, the build-up can be faster.
The most visible sign is dust on the cap. If the grill has fluff, if it turns black around the slots, or if fibers are visible on the faceplate, it needs cleaning. You don't have to wait for performance to drop noticeably.
Other signs are increased noise, buzzing, vibration, hissing, slow steaming and the feeling that the fan is "running but not pulling". If the mirror fogs more slowly than before, while the use is the same, the fan or air duct may be dirty.
A simple test is with tissue paper near the grill when the fan is running and the door has adequate clearance. If the paper used to be easier to hold and now falls out, the supply may have dropped. It's not an exact measurement, but it gives an indication.
If after cleaning the performance does not improve, then the problem may be in the duct, the return, the position, the air intake from the door or the motor itself.
If the motor makes a loud metallic noise, if it stops and starts on its own, if it smells burnt, if it overheats, or if the impeller has broken blades, the cleaning is not enough. There it needs a technical check and possible replacement.
Also, if the ventilator is very old, non-return, non-timer, high noise and low flow, it may not be worth investing much time in its maintenance. A new silent fan with the right flow, timer or hygrostat can significantly improve the bathroom.
If the plastic cap is yellowed, cracked or won't snap, only the face can be replaced if a spare is available. If not, an entire device might be in order. If the vent is kinked or blocked, changing the motor alone will not solve the problem.
The clean or replace decision should be based on the age of the device, the condition of the motor, the noise, the supply, and whether the installation as a whole is correct.
Simple cleaning by the owner costs almost nothing, other than time and basic tools. When a technician is needed, the cost depends on access, fan type, whether it is a simple wall or in-line, whether it needs disassembly, if there is a backflow problem, and if electrical testing is required.
| Work | Indicative range 2026 | What affects the price? |
|---|---|---|
| Simple lid cleaning by owner | 0–10€ | Cloths, brush, time |
| Cleaning of a single ventilator by a technician | 40–100€ | Access, condition, area |
| Backflow control/clearance | €40–€120 | Valve position, access |
| In-line system cleaning | 80–200€+ | Chest of drawers, loft, air ducts |
| Single fan replacement | €50–150 labor + device | Wiring, diameter, access |
| Replacement with a timer/humidifier | Greater variance | Permanent power supply, wiring |
| Duct or Grille Improvement | 80–300€+ | Length, false ceiling, details |
The prices depend on the area, floor, access, VAT, if the work is done together with another renovation and if there is a need for a new electrical connection. In many cases, a basic cleaning can save unnecessary replacement. In others, cleaning reveals that the device is now worn out.
The correct quote should clarify if it is cleaning only, if it includes an electrical check, if the vent will be checked, and if the return will be cleaned or replaced.
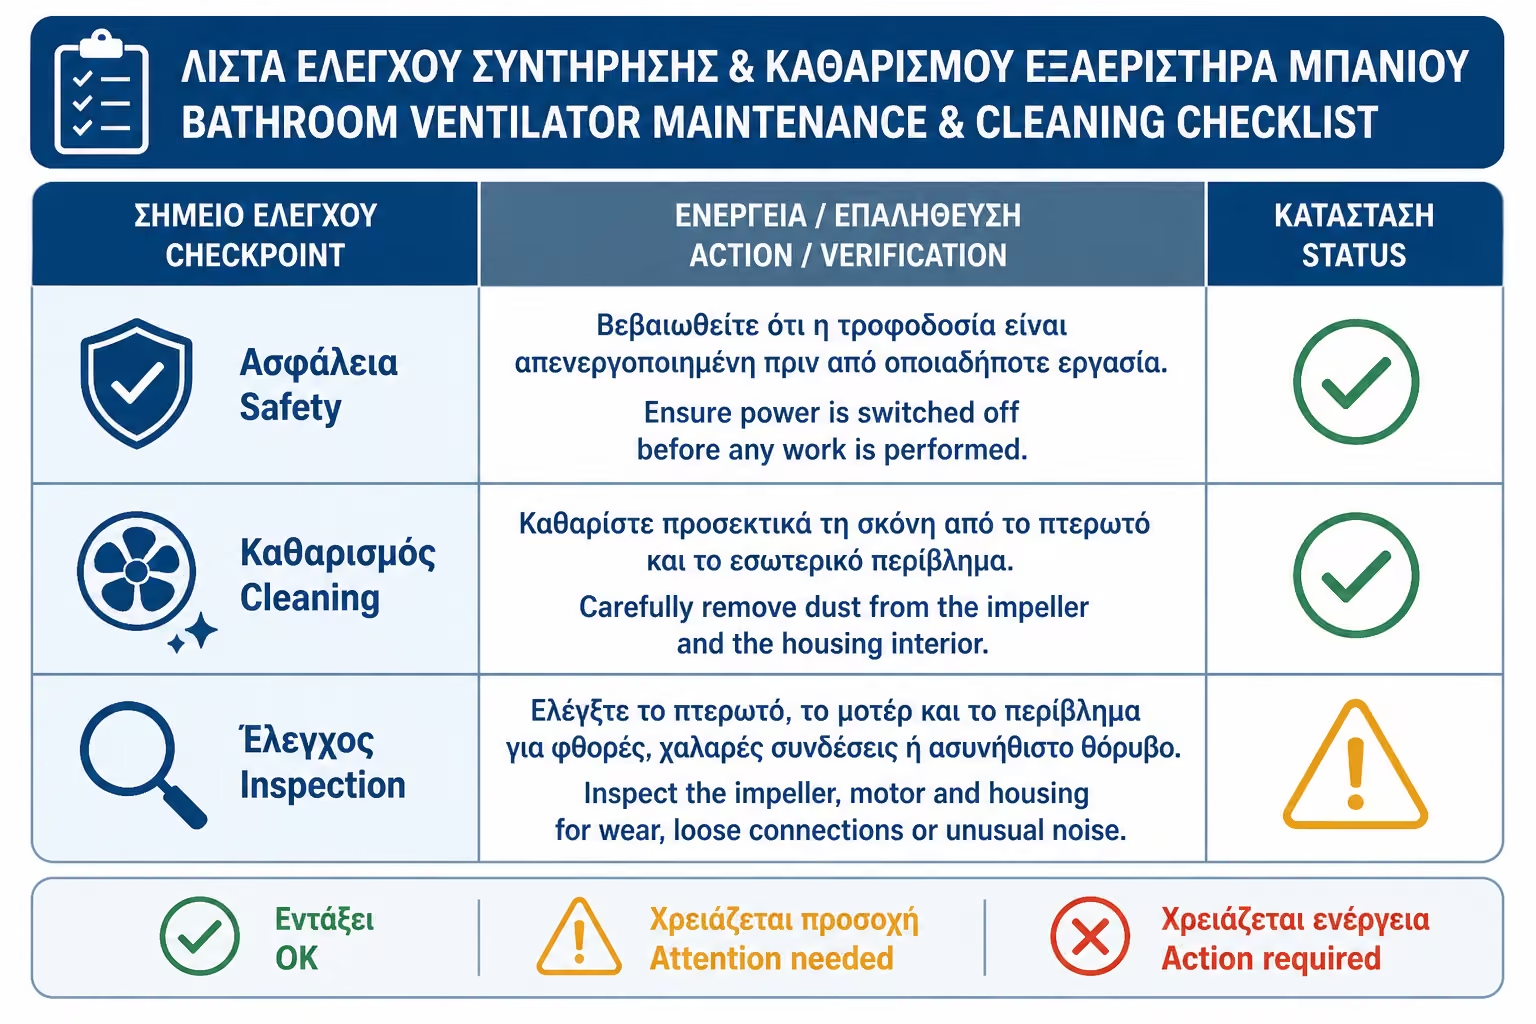
For a typical single fan, the safe logic is this: first isolate the current from the fuse or isolation switch. Then carefully remove the cap, without violent movements. Clean the lid and grill. Clean the impeller with a brush and a vacuum cleaner. Check the return, if it is accessible. Visually inspect the first section of the airway. Allow all parts to dry completely if a slightly damp cloth was used. Replace the cap and turn the power back on.
After assembly, you test the function. The fan should start normally, not rub, not make new noise and pull better. If it has a timer, check that it starts and stops correctly. If it has a hygrostat, check its behavior after use.
If something doesn't sound right after cleaning, don't ignore it. It could be that the cap didn't snap on properly, the impeller found, the recoil moved, or there was wear that was visible after the dust was removed.
Cleaning should make the fan quieter and more efficient. If it makes him noisier, he needs control.
Cleaning mistakes usually come from haste. The owner sees dust, pulls off the cap, cleans it up and puts it back in without checking for power, impeller, backlash or proper fit.
| Error | What can it cause? | A more correct approach |
|---|---|---|
| Cleaning without current isolation | Risk of electric shock | Safety lowering / isolation switch |
| Cap pull with force | Broken clips or wires | Gentle removal, screw control |
| Part washing with electronics | Timer/sensor failure | Dry cleaning in electronics |
| Engine spray | Short circuit or wear | Brush, broom, slightly damp cloth only where permitted |
| Impeller pressure | Crooked shaft or rubbing | Gentle cleaning without force |
| Lubrication without instructions | More dust or damage | No lubricants unless provided |
| Lid cleaning only | It remains a dirty fender | Control and internal part |
| Ignore return | Odors or low flow | Flap control |
| Reinstalling liquid cap | Moisture in the device | Complete drying |
| No testing after | Possible rubbing or poor fit | Operation check |
A typical example is the fan that is cleaned externally but the impeller remains full of lint. The owner sees a clear cap, but the performance does not improve. Actual flow is judged by the impeller and vent, not just the faceplate.
| Control | Yes / No |
|---|---|
| Is the power isolated before the cap is removed? | Yes / No |
| Was the cap removed without breaking clips or screws? | Yes / No |
| Has the grille been cleaned of lint and dust? | Yes / No |
| Was the impeller cleaned evenly with no stress on the shaft? | Yes / No |
| Wasn't water or spray used on the motor? | Yes / No |
| Does the return open and close freely? | Yes / No |
| Was the first section of the air duct checked for dust or obstructions? | Yes / No |
| Is the outer grill clean and free of insects or clogs? | Yes / No |
| Did the cap dry completely before putting it back on? | Yes / No |
| After the test, does the fan work more quietly? | Yes / No |
| Does the timer or humidistat work normally after cleaning? | Yes / No |
| If there is a noise or burning smell, has an electrician been called? | Yes / No |
Do not wait until the grill is completely full to clean the vent. Dust doesn't just detract from looks; it cuts off supply, loads the impeller and stresses the motor. Every 6 months, especially in a bathroom with a daily shower, do a basic cleaning with an isolated current. Clean cap, impeller and return without water in the motor. If after cleaning the noise persists or the performance does not improve, then the problem is probably not just dust; it could be the duct, return, door or motor wear.
Bathroom ventilator maintenance is a small task with a big effect. A clean fan draws better, makes less noise, dries the bathroom faster and puts less stress on the motor. Conversely, a device full of dust may appear to be working, but in practice may have lost a significant amount of absorption.
The most important thing is safety. Before any cap is removed, the power must be isolated. Especially in models with a timer or hygrostat, turning off the light is not always enough. Cleaning must be done without water on the motor, without spray on the electronics and without violent movements on the impeller.
Basic maintenance includes cleaning the hood, grille, impeller, return and, where accessible, the first section of the air duct. In in-line systems, there must be access to the motor. If not, the facility was poorly designed for maintenance in the first place.
A ventilator needs not only the right choice and the right placement. It also needs periodic cleaning. It is a simple habit that protects the bathroom from moisture, smells, noise and premature wear of the device.
Return to category.
Go to categoryReturn to the central guide.
Go to guide