
Bathroom Waterproofing & Moisture Protection
Return to category.
Go to categoryWhen there's a bathroom leak, especially when the water appears downstairs, the hardest question isn't always whether there's a problem. The problem is visible: stain on the ceiling, blown paint, drips, smell of moisture or salts. The hard part is figuring out where it starts. From the shower faucet? From the drain? From the joints? From the corners? From the tub-to-tile joint? From the benefits of the battery? Or from a shared pipe of the apartment building?
Dye testing, also known as dye testing, is a simple but very useful diagnostic method. Its logic is to add a special, water-soluble and suitable color to the water of a particular test, so that if the water appears elsewhere, we can see if it comes from the place we tested. If, for example, we only pour colored water into the shower faucet, and then the same color appears on the downstairs ceiling, we have a strong indication that the path is related to the drain or faucet. If it does not appear, but appears when we wet the joints or corners with colored water, then the suspicion goes more to the sealing of the surface.
The great advantage of dye testing is that it helps distinguish between different scenarios without immediate demolition. We don't need to break the whole shower or the ceiling from the first moment. We can test controlled one water route at a time. First the drain. After the floor. After the walls. After the battery area. This reduces uncertainty.
But it has to be done right. Dye testing does not mean that we pour color everywhere and flood the bathroom. Suitable pigments are used, in a small and controlled quantity, with protection of the surfaces, notification of the lower floor where there is a leak and monitoring. We do not use paints, inks, colored bleaches or products that may stain tiles, joints, natural stones or sanitary ware.
This guide explains how dye testing works, when it makes sense, how to distinguish a drain from a shower seal, what mistakes to avoid and how it fits into a comprehensive diagnosis along with a water meter, thermal camera, hygrometer and hydraulic test.
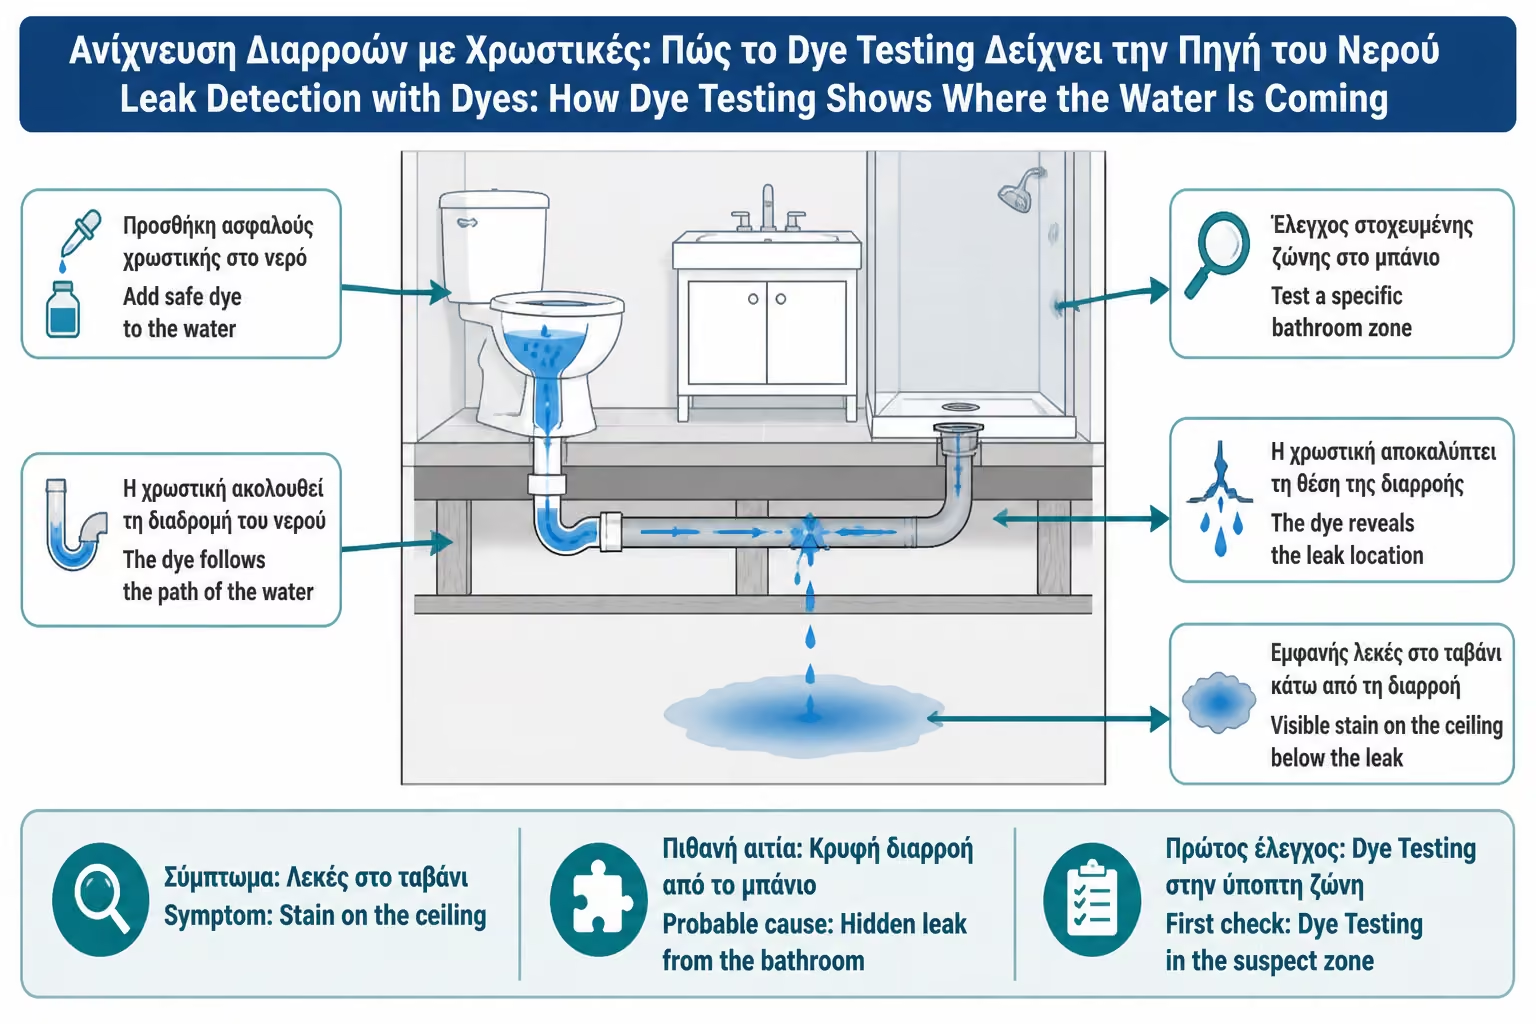
Dye testing is a method of tracing water. We add a special dye to water that passes through a certain point and observe if this colored water appears at another point. If it appears, then we have an indication of a connection between the tested path and the point of the leak.
The method is often used in drains, siphons, showers, roofs, balconies and generally in places where we want to see if the water finds a way to another surface. In the bathroom it is particularly useful because many possible causes are activated only by using water.
The basic idea is isolation. We don't pour colored water everywhere at once. If we do, we won't know where it passed. We test one point at a time: only the faucet, only the corner, only the faucet wall, only the bathtub connection, only the sink. So if color appears, we have a clearer indication.
Dye testing does not always tell the exact point of damage. But it does show which water path communicates with the damage. This alone can greatly reduce unnecessary breakages.
For such tests, special water-soluble dyes, suitable for tracing water, are used. In professional applications, intense pigments or fluorescent substances may be used which are best seen in appropriate lighting. The point is that they dissolve in water, are safe for application and do not stain surfaces permanently.
We do not use wall paints, inks, pigments of unknown composition, confectionery colors without a compatibility check, strong products that can stain joints or natural stones, nor chemical cleaners with paint. The bathroom has porous joints, silicones, natural stones, old plasters and plastic parts that can absorb paint.
On white joints, marble, pressed cement mortar, porous tiles or old surfaces, the choice of pigment needs even more care. Before using any substance, it is advisable to test in an inconspicuous spot or use a professional product by a technician.
The dye should aid in diagnosis, not create secondary damage. This is the first rule.
Dye testing makes sense when leakage only occurs using water. For example, when the downstairs sees a stain after a shower, when there is moisture behind the shower, when we suspect a siphon, drain or joints, or when we want to distinguish whether the water is coming from the surface or from the pipe.
It is not the first tool for continuous leaking water under pressure. If the water meter reads while all the taps are closed, then the water supply network is examined first. In such a case, the color in the shower water may not help, because the leak is coming from a pipe that is under pressure, not from water that we pour on the surface.
It is very useful when we do not know whether the fault is drainage or waterproofing. If we pour colored water directly into the siphon and the color appears on the floor below, then the drain or the body of the siphon becomes suspect. If it does not appear, but appears when we wet the floor or corners, then the waterproofing becomes more suspicious.
So dye testing is not a universal solution for all leaks. It is a targeted tracking tool.
Before dye is used, a basic observation must be made. When does moisture appear? Does it continue without use? Does it appear after showering? After the sink? After the cistern? After the washing machine? These answers determine which test makes sense.
The water meter test is also important. If the meter moves while all faucets are closed, there is an indication of a water leak. In this case, the priority is hydraulic control, line isolation and possibly a thermal camera or pressure control. Dye testing can be used later for other routes, but is not the primary initial response.
If the watch does not write and the moisture only appears with use, then the dye test makes more sense. There we can test drainage, siphon, joints, corners or specific surfaces.
The correct sequence is: observation, water watch, isolation of possible cause, then dye testing. Not the other way around.
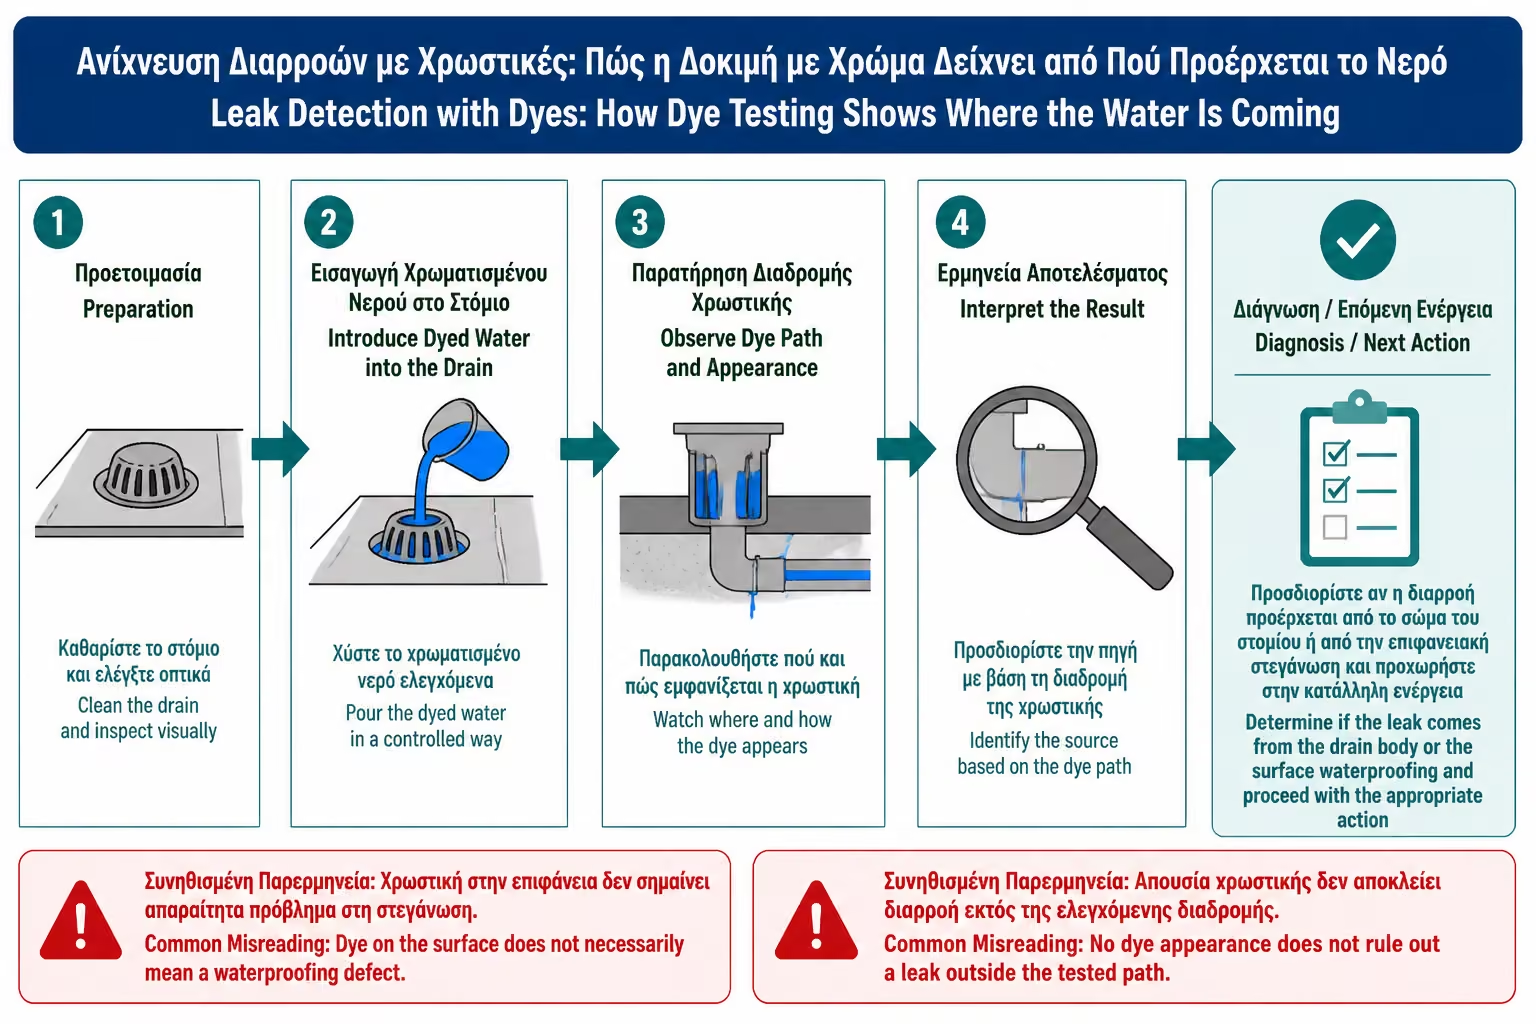
The cleanest use of dye testing is in sewage. We want to see if the water coming through the siphon or drain pipe is showing up downstairs or somewhere else. To check this, we pour colored water directly into the drain, trying not to wet the floor, joints and walls.
This is important. If colored water gets all over the shower, we don't know if it went down the drain or through the joints. For drainage testing, the water should be directed directly into the siphon, as far as possible without contact with other surfaces. Canister, tube or controlled flow can be used.
The lower floor is then monitored. If colored water appears, the drain, siphon or connection becomes highly suspect. If it does not appear, drainage is not completely ruled out, but the reading is reduced, especially if the test was done with sufficient water and observation time.
Testing should be done with caution in quantity. We don't flood the downstairs to prove the leak. We use a controlled amount and stop if color appears.
If the drain shows no problem, the next possible test is the shower surface. Here the point is to see if the water passes through joints, corners, silicones or tiles. Colored water is used in specific zones, not all over the bathroom at once.
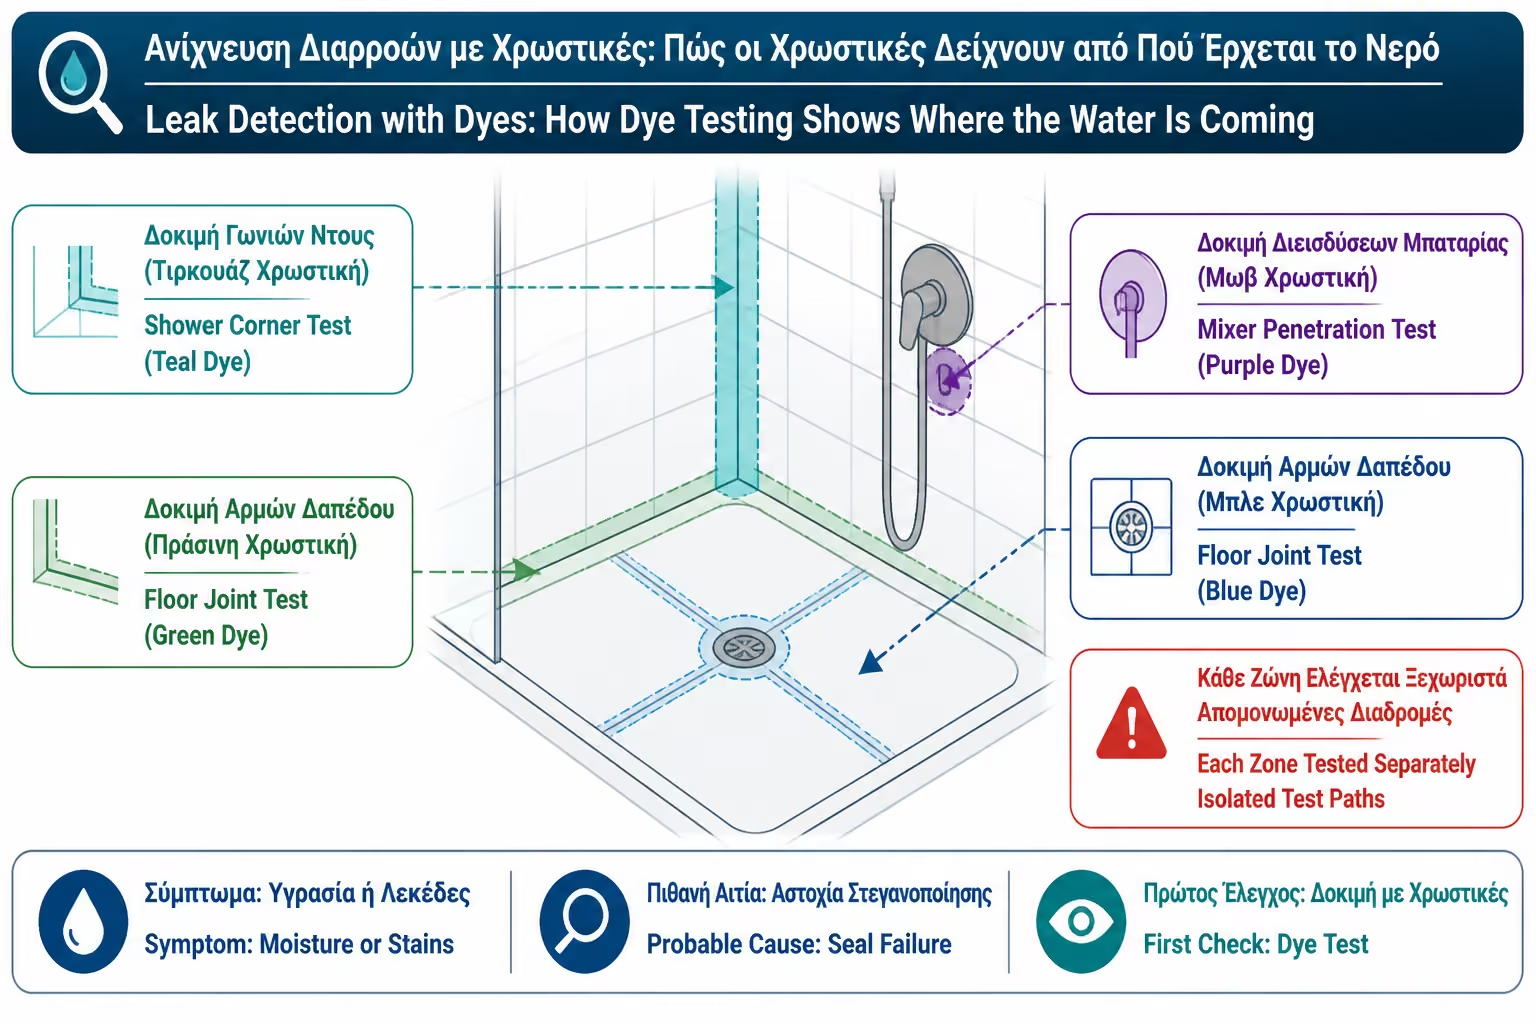
For example, the floor-to-wall angle can be tested first. Then the area around the siphon. Then the floor joints. Then the battery wall. If we use a different color each time or do the tests at a different time with cleaning/waiting, we can distinguish the route better.
In this test it must be remembered that tile joints are not waterproofing. Water can pass through the finished surface. The crucial question is what lies beneath. If there is proper waterproofing underneath, the water should not reach the lower floor. If it reaches, then there is a system failure.
The appearance of paint on the lower floor after wetting joints or corners is a strong indication that the shower seal is in trouble, not just that "joints need cleaning".
A common leak point is the shower faucet area. Water splashes around rosettes, fittings and pipe passages. If there are no proper cuffs behind the rosettes or if the holes around the pipes are open, water can seep into the wall.
With dye testing, we can specifically test this zone. Colored water is applied around the rosettes and in the area of the battery, without wetting all the other surfaces at the same time. If color then appears on the adjacent wall or on the floor below, the passage area becomes very suspicious.
This test needs great care, because we don't want to send large amounts of water into the wall. Also, if the rosettes already have voids or bad silicone, the condition should be recorded before testing.
Water behind rosettes is one of the more insidious problems, because it can run down the wall and appear low, away from the original entrance.
In more complex cases different colors may be used for different routes. For example, green for the drain, blue for the floor joints, red for the battery area. So if color appears on the bottom floor, we can relate the result to that particular test.
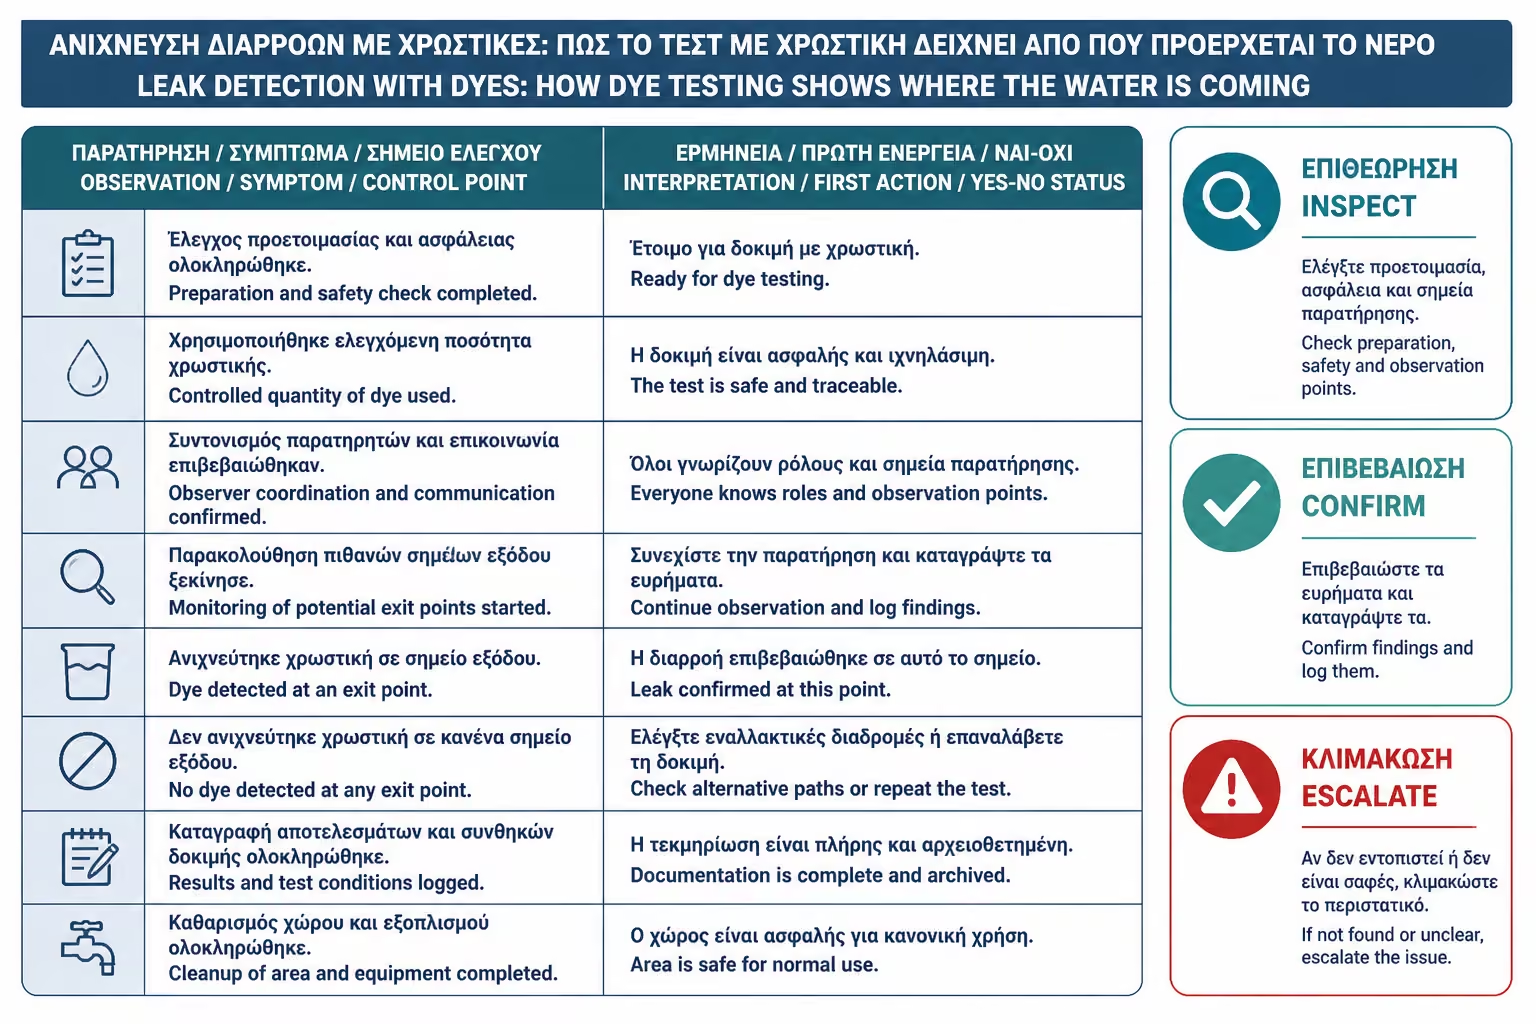
But this must be done in an organized manner. We don't use multiple colors at once without recording. It should be noted which color was used where, at what time, in what quantity and when it appeared or did not appear. Otherwise, the test loses its value.
In some cases it is preferable to use one color at a time, with a time interval between tests. This reduces the risk of confusion. If the water is slow to appear, the many colors can be confused.
Dye testing is simple to conceive, but its value is in the recording. Color without a test log is half a diagnosis.
The amount of water is critical. If we use too little, a leak that only occurs with normal use may not be seen. If we use too much, we may cause more damage to the lower floor or create artificial conditions that do not correspond to normal use.
The amount should be controlled and depend on the type of test. For drainage, it may take enough flow to temporarily fill the pipe and cause damage. For joints and corners, a smaller and more targeted amount is needed, because we don't want to flood the surface. For battery and rosettes, even more care is needed.
If there is an active leak downstairs, the test should be done with someone watching below. As soon as color appears or leakage increases, the test is stopped. We don't go on to "make sure" by causing more damage.
The goal is the indication, not the flood.
Water does not always appear immediately. If the path is direct, colored water can be seen on the lower floor within minutes. But if it passes through cement mortar, joints, glue gaps or layers of materials, it can be delayed. Sometimes the moisture appears after an hour.
That is why observation time is needed. We don't test for two minutes and conclude that there is no problem. Depending on the case, monitoring may be required for some time. In complex cases, the tests are done consecutively on different days so that the results are not confused.
The delay is diagnostic information. If the color appears immediately, the path is probably more direct. If it occurs slowly, it may pass through materials or concentrate before exiting. If it doesn't appear at all, that path is less likely, but not always completely ruled out.
Proper testing has a schedule and time. No rush.
If colored water appears on the lower floor, we have a strong indication that the water we poured has followed a path there. This is very useful, but must be interpreted correctly. If the paint was only used in the drain, the leak is likely related to a siphon or drain pipe. If it was only used in the joints or corner, then the problem is most likely related to surface ingress and sealing.
The color display does not always show the exact hole. Water can enter from one point and exit elsewhere. It can pass under tiles and move up to the slab. It can follow pipes, voids or construction joints. So the result says "this path communicates", not always "break right here".
After a positive result, the technician must decide the next step: local opening, drain camera, siphon repair, shower zone stripping or further testing. Pigment gives direction. Technical repair requires diagnosis of the cause.
A positive dye test is a strong point, but must fit into the overall picture.
If no color appears, it does not always mean there is no leak. It could be that the test didn't have enough water, didn't last long enough, tested the wrong spot, or the leak only occurs under different conditions. It may also be that the water is moving but has not yet reached the point of observation.
But if the test was done correctly, with sufficient quantity and time, and no color appeared, then that route becomes less likely. For example, if the colored water in the drain never appears, but the leak occurs when the corners get wet, then the drain loses potential and the seal goes up.
The negative effect has value when it is well designed. If the test was sketchy, it doesn't rule out much. That is why it is necessary to record: what was tested, how, how much water, how long, what was observed.
In the diagnosis, "did not appear" is also information, as long as we know exactly what did not appear and under what conditions.
In an apartment building, dye testing can be very useful but should be done in consultation. The down owner must be aware that testing will be done and monitor the leak site. The upper owner must limit the use of other components so as not to confuse the effect. If there is a possibility of shared piping, it is a good idea to inform the management as well.
The test must be recorded. What color came in, at what point, what time, who was present, when it appeared downstairs. In liability disputes, this record can be very helpful. It does not replace a technical report, but supports it.
If the color appears on the lower floor after testing a private siphon or shower, the responsibility lies with that particular apartment. If testing private components shows nothing and the leak occurs using a shared column or other partitions, then there is a shared network issue.
Dye testing can reduce conflicts, as long as it is done transparently and not as a "trap" between neighbors.
The pigment shows water path. The thermal camera shows thermal anomalies. The hygrometer shows zones of increased humidity. When these are combined, the diagnosis becomes much stronger.
For example, the hygrometer may show high readings around the siphon. The thermal imager may show a cold or wet zone in the same spot. Dye testing can confirm that water passing through the siphon appears on the lower floor. Then the diagnosis has a much better basis than a simple hypothesis.
Conversely, if the hygrometer shows moisture in a corner, the thermal imager shows spreading on the wall, and colored water only appears when the corners get wet, the suspicion goes to the corner seal, not the siphon.
Non-destructive testing is not a tool. It is a combination of observations. Pigment is one of the most practical pieces of this puzzle.
| Error | What can happen | Correct approach |
|---|---|---|
| Use of inappropriate pigment | Stains on joints, stone or silicones | Only suitable water-soluble pigments |
| We pour color everywhere together | We don't know where the water came from | One zone at a time |
| Excessive amount of water | More damage on the bottom floor | Controlled quantity and monitoring |
| No one is watching from below | The moment of appearance is lost | Upstairs and downstairs coordination |
| We don't take notes | The tests are messed up | Record time, color, point |
| No previous meter check | We confuse irrigation with water use | First we rule out continuous leakage |
| We draw a conclusion from a negative two-minute test | Incorrect cause exclusion | Adequate observation time |
| Test without technical supervision in severe leakage | Risk of more damage | Plumber/technician in difficult cases |
Dye testing is simple, but not sloppy. The difference is significant.
If there is an active drip downstairs, water near electrical, a blown ceiling, severe damage to an apartment building, or a potential insurance claim, testing should be done by a technician. The owner can cause more damage if he pours too much water or uses the wrong dye.
Also, if there are natural stones, pressed cement mortar, light-colored joints, old porous surfaces or wooden elements, there is a risk of stains. In such cases professional material selection and testing is needed.
If there is a dispute with a neighbor, the test must be done with the agreement and presence/information of those involved. Otherwise the result may be disputed. In serious cases, it is better to have a written technical report.
Diagnostic testing should help with resolution, not create new conflict.
A proper report should state what spots were tested, what dye was used, what amount of water, what time each test was made, who watched the bottom floor, if color appeared, when it appeared, and at what point. It must also be accompanied by before and after photos.
The conclusion should be cautious. For example: "When testing with colored water directly in the shower faucet, matching staining appeared on the downstairs ceiling after approximately X minutes. The indication is consistent with a leak from the faucet or drain connection." This is more correct than an absolute "it's the siphon" without opening or further checking.
If no color appeared, it should also be written: "No colored water was observed during the test." This doesn't rule out everything, but it documents what happened.
In apartment buildings, such a report is very helpful in negotiating liability and repair costs.
| Inquiry | Yes / No |
|---|---|
| Has a continuous water leak been ruled out with the water meter first? | Yes / No |
| Do we know which point we want to test? | Yes / No |
| Is a suitable, water-soluble and safe dye used? | Yes / No |
| Has it been tested in an inconspicuous spot if sensitive materials are present? | Yes / No |
| Is one zone tested at a time? | Yes / No |
| Is there a person watching downstairs? | Yes / No |
| Is time, color and amount of water recorded? | Yes / No |
| Is the amount of water controlled? | Yes / No |
| Does the test stop if color appears or leakage increases? | Yes / No |
| Are there before and after pictures? | Yes / No |
| Is the result combined with a hygrometer, thermal camera or hydraulic control? | Yes / No |
| Is there a technical interpretation and not just color observation? | Yes / No |
If most of the answers are “no”, the test risks being more cursory than diagnostic.
> If you have to keep only one thing, keep this: dye testing is not "drop dye and see what happens". It is controlled water tracking. We test one run at a time, with suitable dye, small and controlled water, tracking from below and clean recording. This way we can distinguish whether the problem comes from drainage, siphon, joints or corners, without breaking blindly.
Dye detection is one of the simplest and most practical methods of finding out where the water is coming from in a bathroom leak. It doesn't replace hydraulic control, thermal camera or hygrometer, but it offers something very specific: it traces a route. If the paint we poured into the siphon appears on the lower floor, the drainage becomes suspect. If it only appears when we wet the joints or corners, the waterproofing of the shower comes into focus.
The value of the method lies in isolation. One test at a time, one point at a time, one record at a time. When everything comes together, there is no diagnosis. When each path is tested separately, the result has real technical value.
But it needs attention. The pigment must be suitable and safe for the surfaces. The amount of water must be controlled. The lower floor must be watched. And in serious leaks or apartment buildings, testing should be done by a professional so it can be used as documentation.
For the owner, the right question is not "should we throw in some paint?". It is "which water path do we want to check and how will we record the result?". If the answer is clear, dye testing can save unnecessary demolition and lead the repair to the right place.
Return to category.
Go to categoryReturn to the central guide.
Go to guide