
Bathroom Waterproofing & Moisture Protection
Return to category.
Go to categoryThe idea that a hidden leak can be detected without breaking tiles sounds almost ideal. In a bathroom, where every opening means dust, cost, tile damage and possible rework, non-destructive testing is valuable. A thermal camera, or infrared camera, is one of the most useful tools in this process, especially when a leak in a hot water pipe, hidden moisture behind tiles, or a thermal anomaly within a wall or floor is suspected.
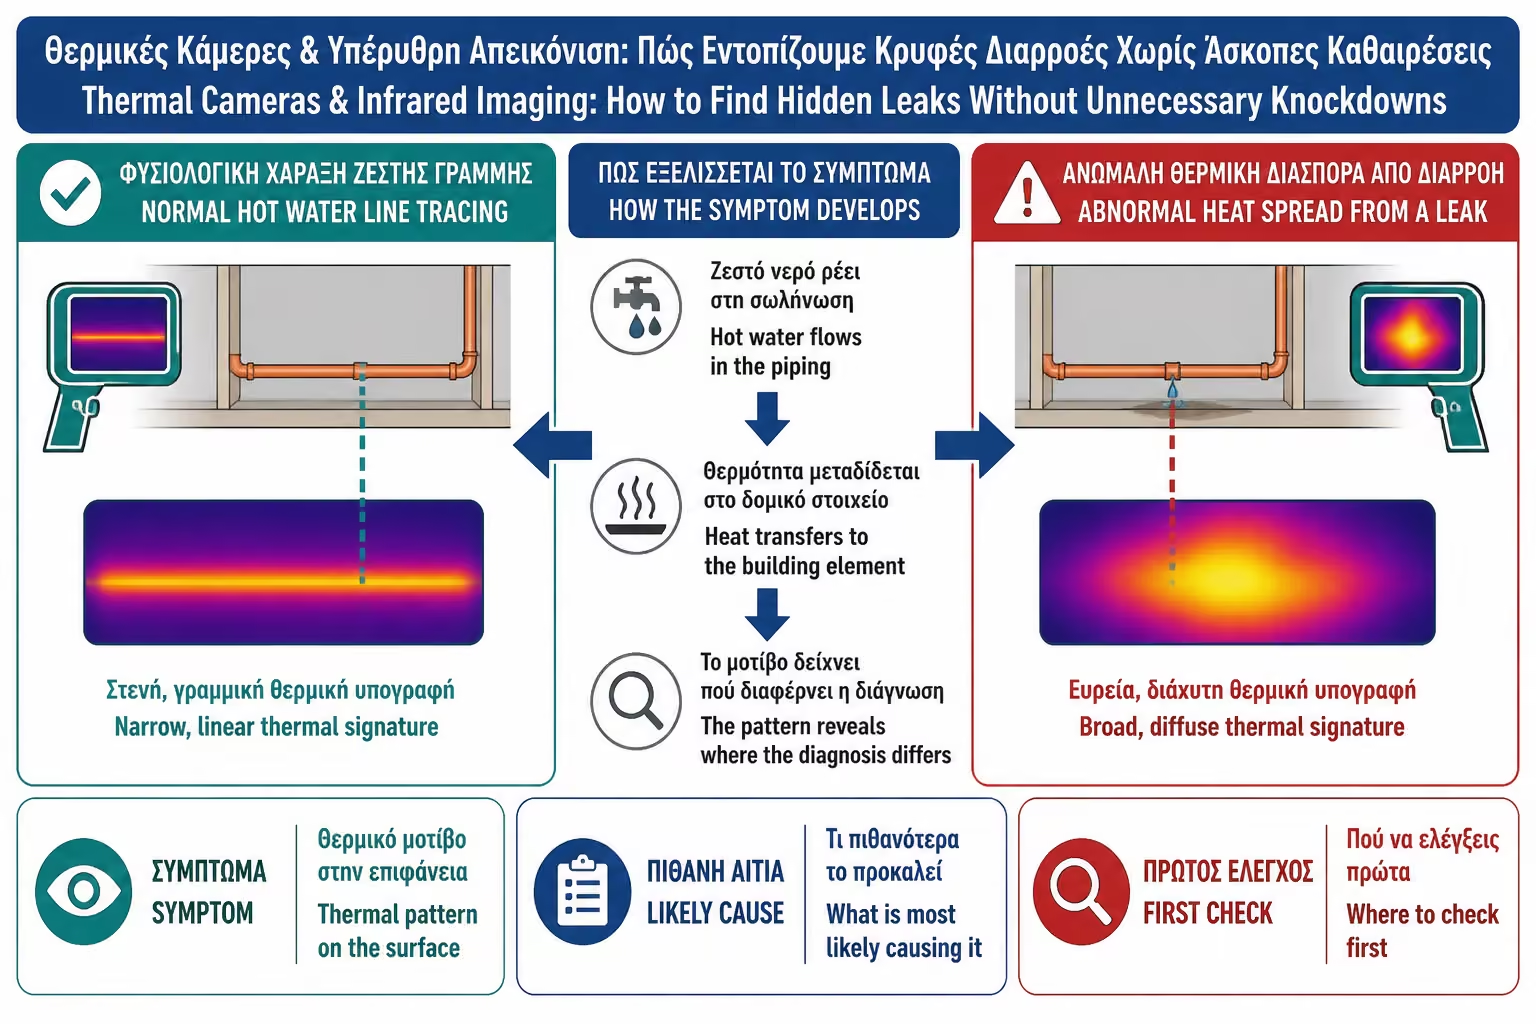
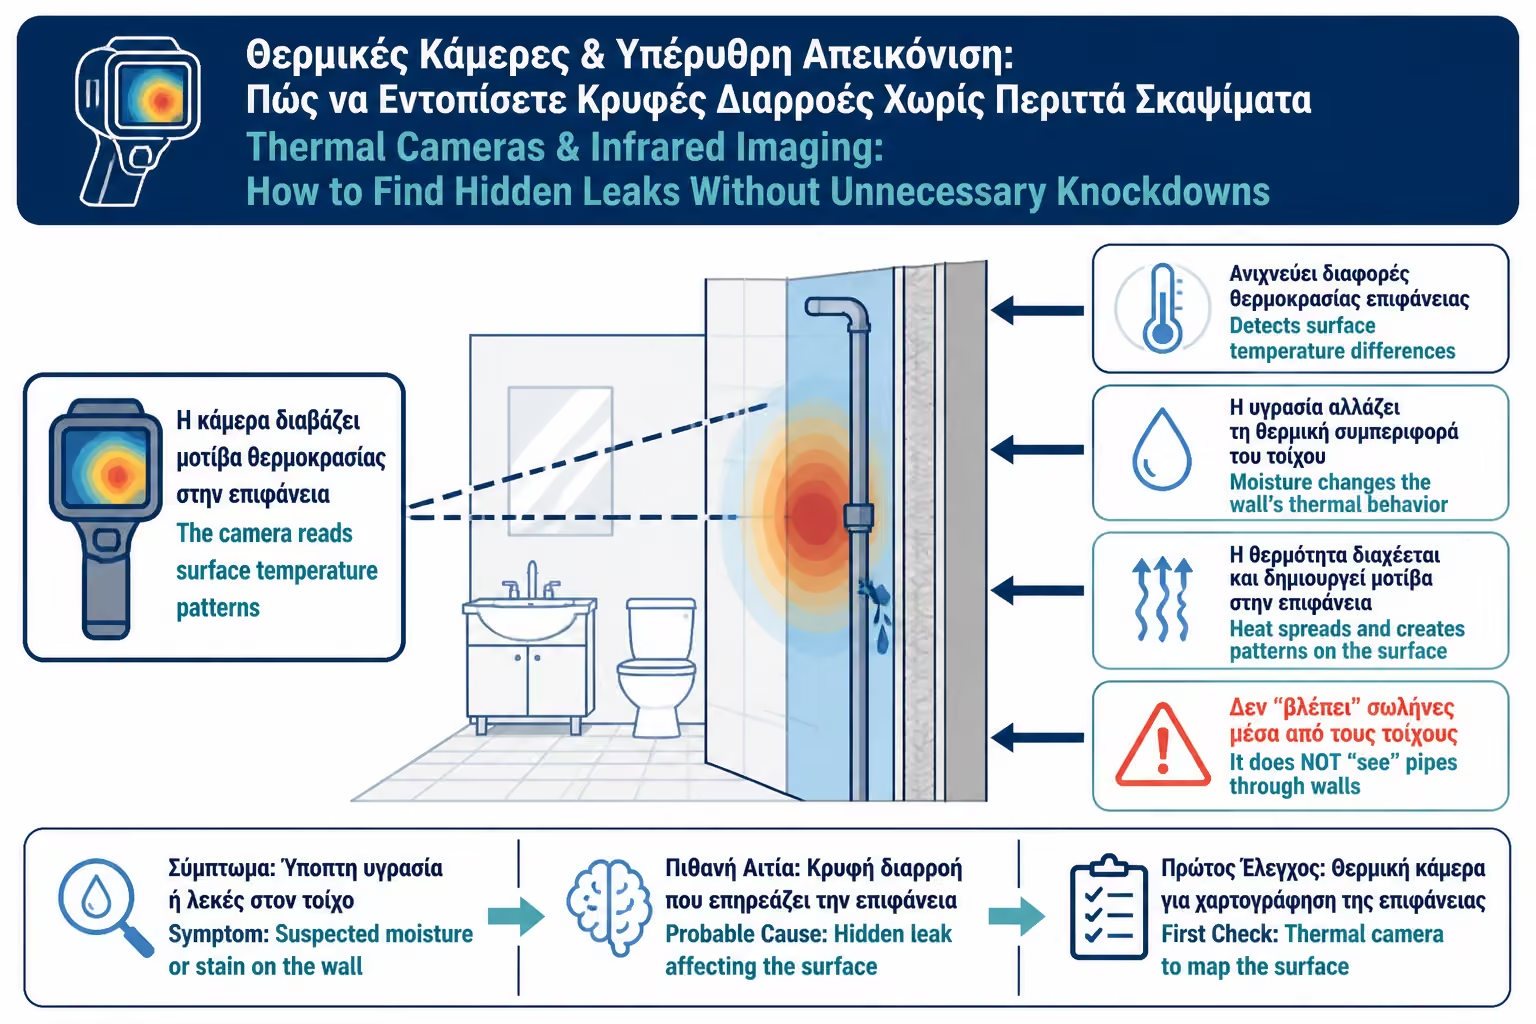
But we have to make something clear from the beginning: the thermal camera does not literally "see" through the tiles and walls like an X-ray. It does not magically appear the pipe inside the masonry. What it records are the temperature differences on the surface. If a hot water pipe leaks into the wall, the heat can be transferred to the surface and create a heat trace. If moisture is present, it can change the thermal behavior of the material and appear as a cooler or warmer area, depending on the conditions.
This means that the thermal imager is an excellent diagnostic tool, but it needs proper use and interpretation. It can direct the technician to a very specific area, reduce unnecessary breakage and help identify the potential source. But it doesn't always replace a hydraulic check, pressure test, water meter check, drain camera or targeted opening when needed.
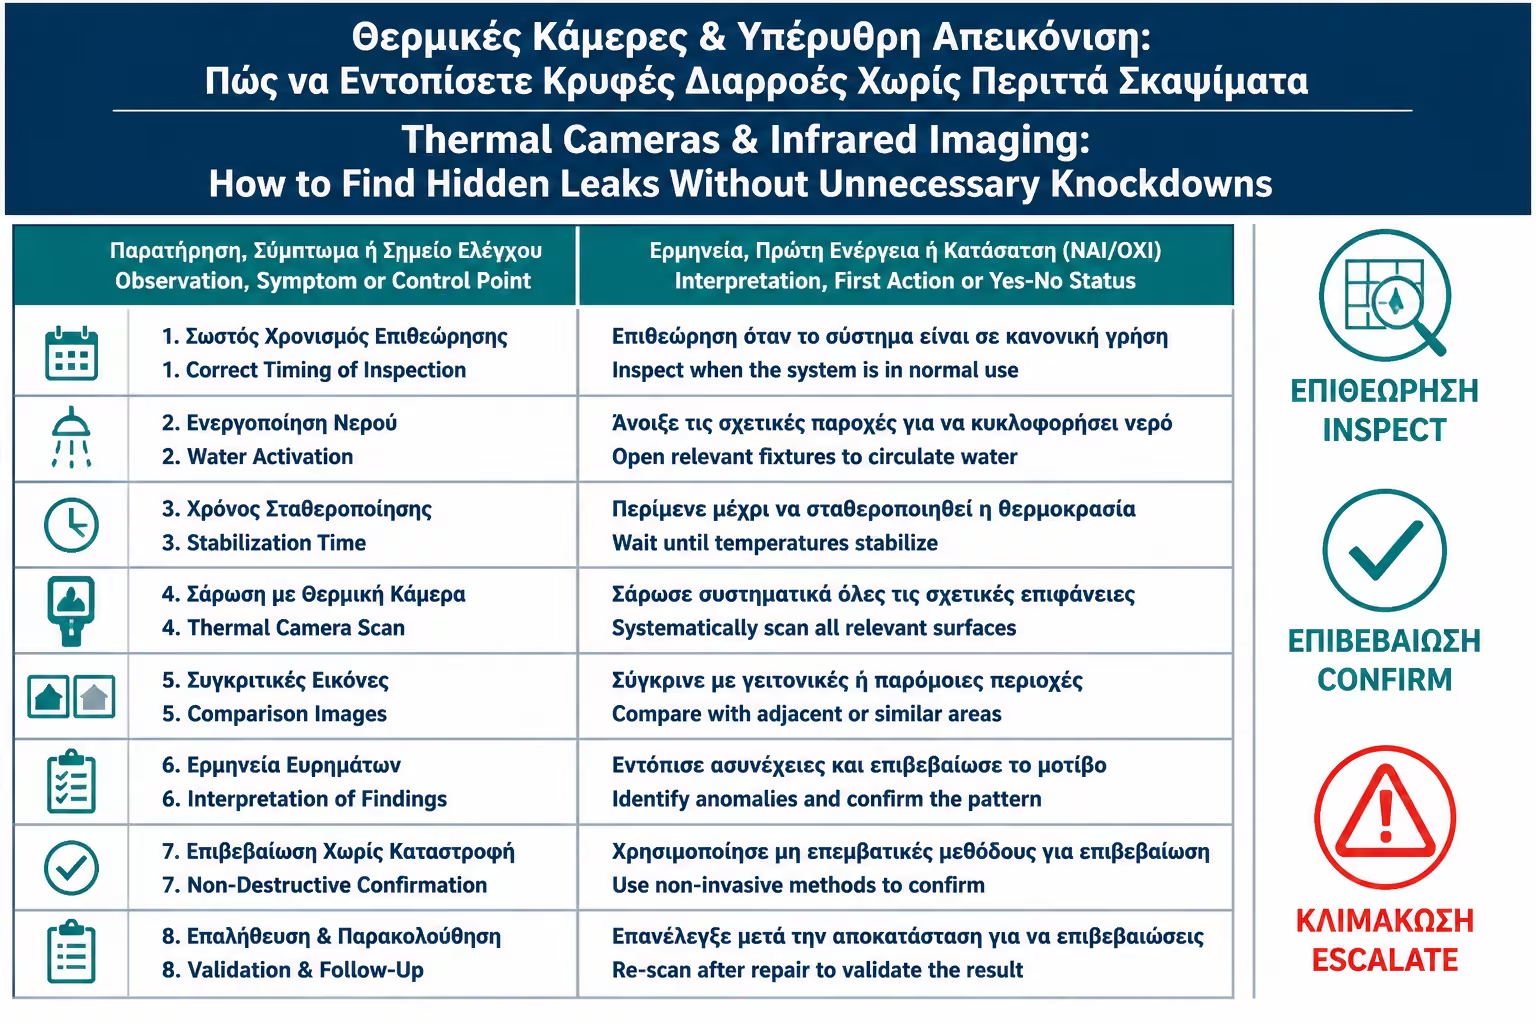
The greatest value of thermography is seen when combined with proper methodology. First we notice the symptom. Then we check if the leak is continuous or appears only with use. Then we use a thermal camera in suitable conditions, often turning on hot water or monitoring changes over time. Finally, we confirm the case with a technical check. In this way blind excision is avoided.
This guide explains how the thermal imager works, when it's useful for bathroom leaks, why it's particularly helpful for hot water pipes, what its limitations are, and what a homeowner should look for in a professional non-destructive inspection.
The thermal camera records infrared radiation and converts it into a thermal image. In simple words, it shows temperature differences on the surface it "sees". A spot may appear warmer or cooler than its surroundings. This thermal difference can come from a hot water pipe, humidity, air gap, thermal bridging, external influence, or even different material below the surface.
In the bathroom, the thermal imager can show a thermal trace of piping, a zone of moisture behind tiles, a spot where water is spreading into the grout, or an area that remains at a different temperature than the rest of the surface. This helps a lot when the leak is not visible to the naked eye.
But the picture is not always self-evident. A cold spot does not always mean a leak. It can be an external wall, a cold corner, an air current, a shadow, a different substrate or a material with a different heat capacity. A hot spot does not always mean a leaky pipe. It could just be a hot water pipe running normally.
That is why the thermal camera should not be read like a photograph. It should be read as a diagnostic tool that shows clues. The experience of the technician is just as important as the quality of the instrument.
Hot water pipes are often easier to spot with a thermal camera because they create a thermal footprint. If hot water passes through the pipe, the heat is transferred to the surrounding material and eventually to the surface. The thermal camera can show the path of the pipe or an area where the heat is spreading abnormally.
If there is a leak in a hot water pipe, the hot water can heat a larger area around the point of damage. This may appear as a "spot" or hot zone that does not simply follow the line of the tube. In such cases, the thermal camera can significantly limit the search area.
In cold water pipes, the diagnosis is more difficult. A cooler area may appear, but the contrast is often less and depends on the temperature of the room, water and materials. If the leak is small or if the substrate is thick, the thermal signal may be weak.
That is why, in practice, the thermal camera is particularly useful when there is a suspicion of a hot water line, underfloor heating, pipes that have a thermal difference from the environment or moisture that clearly affects the surface temperature.
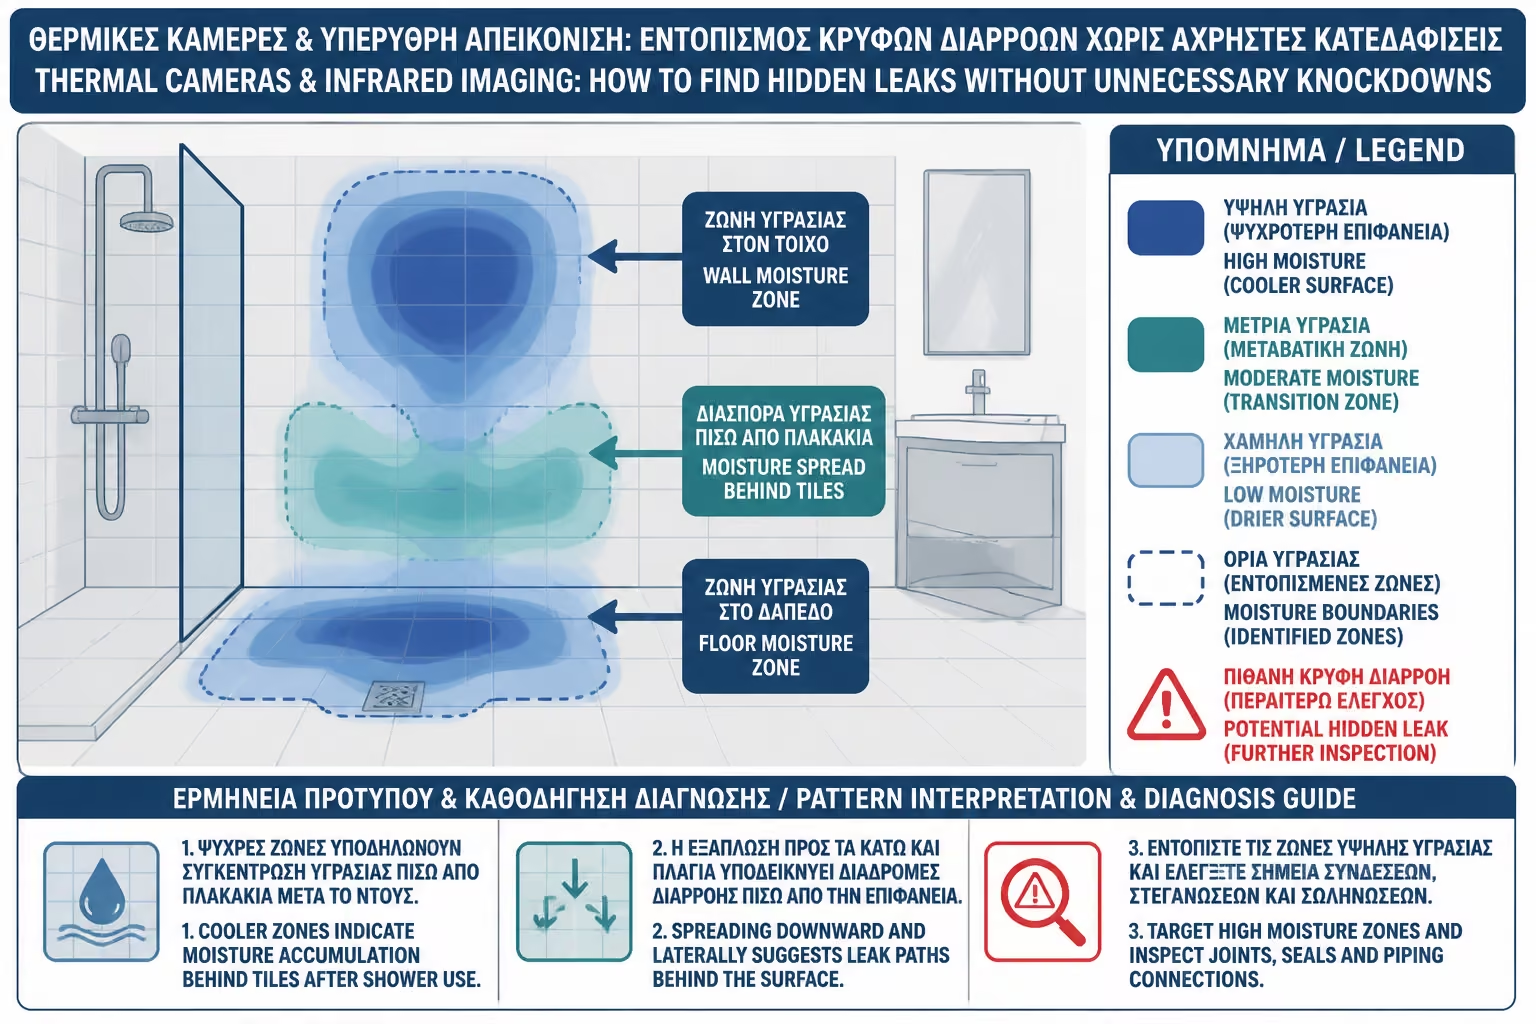
Moisture behind tiles can change the thermal image of a surface. Wet materials often cool differently due to evaporation, retain heat differently, and appear as regions with different thermal behavior than the dry substrate. This can help locate moisture under tiles, behind walls or within cement mortar.
For example, if a shower has a corner failure, water can move under the tile and collect low. With a thermal camera, a colder zone can be seen that follows the path of the moisture. If there is water around the siphon, a different thermal signature may appear compared to the rest of the floor.
But special attention is needed here. The thermal camera does not distinguish by itself whether the moisture comes from a broken pipe, from drainage, from poor waterproofing or from condensation. It shows that something thermally different is going on. The cause should be linked to the usage history, watch test, drainage tests and visual inspection.
In other words, the thermal camera can show where there is potential moisture. It doesn't always say by itself why it exists.
In the market it is often heard that the thermal camera finds the leak "with centimeter accuracy". In some ideal cases, the detection can actually be done very close to the actual spot: for example when a hot water pipe is leaking strongly, it is close to the surface and there is a clear thermal trace. But it should not be presented as a guarantee for every case.
Accuracy depends on many factors: pipe depth, wall or floor thickness, type of tile, pipe insulation, amount of water, temperature difference, time since use, ventilation, room humidity, adjacent piping and technician experience. If the water has moved away from the source, the thermal imager can show the area where moisture collected, not exactly where it started.
Also, the thermal image is a two-dimensional surface image. It does not show the depth of the leak accurately nor the exact layer through which the water is moving. That is why the final decision to open must be made with a combination of indications.
The correct wording is: the thermal camera can greatly limit the search area and in many cases lead to a very targeted opening. However, one should not promise absolute accuracy on every leak.
The thermal imager is particularly useful when there is a suspected leak in a hot water pipe, moisture behind tiles, a leak in underfloor heating, thermal bridges that create condensation, moisture around windows, or a difference between dry and wet sections of wall. It is also useful when we want to avoid a large dislocation and locate the zone with the greatest potential for trouble.
In apartment buildings, it can help when there is a stain on the downstairs ceiling and we need to see if the moisture is spreading under the shower, near the faucet or along a pipe. It can also show if the stain is active or old, if there is still a thermal difference, or if the area has dried out.
In bathrooms, the thermal camera helps a lot when combined with controlled use. For example, we run hot water into the battery or piping and monitor the surface. Or we use the shower and see if any zone changes thermally. Thus the image acquires a diagnostic value.
If the leak is small, cold, deep, or only occurs in a drain without thermal contrast, the thermal imager may be of less help. You may need another tool there.
The thermal imager can be misleading when the operator is not familiar with the building or when the conditions are not suitable. An exterior cold wall may appear as a wet zone. A shade, a draft, a different tile adhesive or an old repair can give a thermal difference. A hot water pipe that is working normally can look like a "hot leak trail".
Also, if he has just showered, the entire surface may be warmed or wet, making interpretation difficult. If the room is very humid or has strong ventilation, the exhaust can change the image. If the tiles are shiny, there may be heat reflections from bodies, lights or the operator himself.
That is why the thermography must be done in a methodical way. The technician must know what he is looking for, check the conditions, compare adjacent surfaces and not draw conclusions from a single image. Before and after water use pictures are often needed.
The thermal imager is a powerful tool, but in the wrong hands it can lead to a false opening.
Before or together with the thermal camera, the water meter test remains very important. If the meter reads while all faucets are closed, there is an indication of a pressurized water leak. Then the thermal imager can help locate the line or area, especially if it's hot water.
If the meter doesn't read, the thermal imager may still be useful, but the diagnosis changes. Then we look at a drain, shower seal, siphon or moisture that only appears with use. The thermal imager may show the wet zone, but we should not assume that there is a broken water pipe.
The combination is much more reliable than either tool alone. The watch responds if there is continuous consumption. The thermal camera shows thermal anomalies. Hydraulic testing confirms the cause.
In a serious diagnosis, these steps must be put in a logical sequence and the thermal camera should not be used as an impressive "photograph" without a frame.
For sewer leaks, the thermal imager can help, but has more limitations. Drainage usually leaks when water passes through. If the water is hot, it can leave a heat trace. If it is cold or if the leak is small, the trace may be weak. If water moves through slabs or gaps, it can appear far from the point of damage.
For example, if hot water runs into the sink and there is a leak in the drain, the thermal imager can show a hot or cold change in a certain zone. However, if the water passes quickly and the leak is small, it may not be clearly visible. In such a case, a drain camera or controlled test may be more useful.
In showers, the thermal imager can show moisture around the faucet or under the floor, but it doesn't always tell if it's the drain body or the seal around the faucet. This distinction needs testing: water directly in the siphon versus water on surfaces.
So, in drainage, the thermal imager is an auxiliary tool, not always the main one.
When the cause is poor shower sealing, the thermal camera can show where the moisture has gone. It can show a zone behind tiles, low moisture in a wall, water around a siphon or moisture passing into the next room. This is especially helpful when the stain appears downstairs or behind the wall.
But the thermal camera does not always tell which point of the waterproofing has failed. It may indicate that the area around the siphon is wet, but the cause may be the siphon flange, corners, water passing through the battery or worn joints. Image shows result, not always source.
For correct diagnosis, the thermal camera must be combined with controlled water use. Do we only wet the floor? Only the walls? Just the battery area? Do we pour water directly into the siphon? Each test can change the thermal picture and lead to a safer conclusion.
The thermal camera helps not to break the entire shower. But the final diagnosis must explain why the system failed.
The thermal imager is also very useful for non-leak problems such as condensation. In a bathroom or on a wall behind a bathroom, it can show cold corners, thermal bridges, cold spots around windows or areas where water vapor condenses. This helps not to confuse mold from condensation with a leaking pipe.
For example, if a corner of the bathroom ceiling is darkening, the thermal camera can show that the corner is much cooler than the rest of the room. This means that water vapor condenses there. The solution then may be better ventilation, thermal improvement or change of use, not opening pipes.
Conversely, if the thermal imager shows a localized wet zone associated with water use or piping, the diagnosis goes elsewhere. The value of the thermal imager is that it helps distinguish a thermal/ventilation problem from an active leak.
Condensation is very common in bathrooms and is often misunderstood. Thermography can save unnecessary trouble when the problem is in the atmosphere and not in the pipe.
A proper review doesn't start straight away with photos. It starts with a background. When did the damp appear? Does it grow without use? Is it shower, sink, faucet or rain related? Is there a water meter that reads? Is there a downstairs? Has it been renovated recently? Are there old signs?
Then a visual check is done. The technician looks at joints, silicones, corners, siphons, supplies, thresholds, windows, cisterns and places where pipes pass. The thermal camera comes to complement the observation, not to replace it.
A thermographic test is then performed under suitable conditions. You may need to run hot water to show the piping, wait for the spread to show, or compare before and after use. Images must be saved and interpreted along with the conditions of capture.
At the end there must be a conclusion with a degree of certainty. Not just "it's red over there". It should explain what the picture means, what the likely cause is, and what the next step is to confirm.
A serious thermographic report should include details of the site, date, test conditions, points tested, thermal images, visible photographs for comparison and technical interpretation. Ideally, it should also state what tests were carried out: with closed taps, with hot water, after using a shower, after waiting or with a meter check.
It is not enough to simply deliver thermal images with colors. The colors of the thermal imager are an imaging scale, not a diagnosis in themselves. A red area does not always mean a leak and a blue area does not always mean moisture. It needs a description.
The report must also distinguish between what is indicated and what is confirmed. For example: “Thermal anomaly consistent with possible hot water leak detected in zone X. Pressure check and targeted opening recommended.” This is more correct wording than "broken pipe found" without confirmation.
In apartment buildings or insurance cases, a proper report helps avoid disputes.
The cost of an inspection with a thermal camera depends on the area, the size of the space, the difficulty of diagnosis, whether a written report is required, whether it is combined with a hydraulic inspection and whether it is a simple visit or an expert opinion. Controlling a small bathroom is not the same as a complex leak in an apartment building.
In a bathroom renovation or repair, the cost of non-destructive testing can be small compared to the cost of unnecessary stripping. If we break ten tiles without a diagnosis and the leak is elsewhere, the cost goes up a lot. If the thermal imager narrows the operation area, it can save materials, labor and time.
In apartment buildings, the value is even greater because documentation reduces disputes. If thermography shows that the thermal anomaly is in a private line or near a shared column, it helps organize the next move.
The important thing is not to just pay for "a photo with colors". The value is in the diagnosis, not the image.
| Error | What can happen | Correct approach |
|---|---|---|
| We believe the thermal camera sees through the wall | Wrong expectations | Reads surface temperature |
| We draw a conclusion from an image | Incorrect detection | Comparison, history and tests |
| We ignore the water meter | We confuse water supply with drainage | First check continuous consumption |
| We don't run hot water when we look for a hot line | No heat trace is displayed | Controlled piping activation |
| We confuse thermal bridge with moisture | Pointless wall opening | Ventilation and condensation control |
| Visible photos are not saved together with thermals | Documentation difficulty | Always compare thermal and optical image |
| A promise of absolute accuracy in every case | Misplaced confidence | Probability formulation and confirmation |
| No technical inspection follows | We stick to the indication | Pressure, line isolation or targeted opening |
The thermal camera reduces the risk of wrong operation. It does not remove the need for technical judgment.
The thermal imager is not the only non-destructive testing tool. Water leaks may require pressure testing or acoustic detection. A pipe camera may be needed in drains. A hygrometer may be needed for wall moisture. In apartment buildings, an engineer's technical report may be required.
If the thermal imager shows a possible zone but there is no clear cause, the plumber can isolate lines from a manifold or pressurize a specific section. If the indication is related to drainage, a flow test or camera can be done. If related to waterproofing, controlled water testing of specific surfaces may be required.
Proper non-destructive testing is often a combination of methods. Not one man with one device that gives an infallible answer to everything.
The point is to reach documented probability before opening. Not to forever avoid every opening, even when it is necessary.
Before booking an inspection, ask if the technician will only do a thermal scan or a full diagnosis. Will it do a background check? Will there be a test with the watch? Will hot water run? Will drains be checked? Will there be a written report or just an oral opinion?
Also ask what experience he has with bathrooms and plumbing leaks. Heating a building for thermal insulation is one thing, and detecting a leak in a bathroom is another. An understanding of piping, siphons, waterproofing and construction details is required.
Ask if he will provide you with thermal images along with normal photos. Ask if he will explain what is likely and what needs confirmation. If he promises absolute detection without any reservation before seeing the space, keep small basket.
Good control is not based on exaggeration. It is based on method.
| Inquiry | Yes / No |
|---|---|
| Has the water meter been checked first? | Yes / No |
| Do we know if the moisture occurs all the time or only with use? | Yes / No |
| Will it be checked before and after a hot water run? | Yes / No |
| Will suspect zones be checked: siphon, battery, corners, piping? | Yes / No |
| Will thermal and normal photos be taken? | Yes / No |
| Will there be technical interpretation and not just pictures? | Yes / No |
| Will the degree of certainty of the conclusion be reported? | Yes / No |
| Will a next confirmation step be suggested? | Yes / No |
| Are there blocked drains or obvious leaks? | Yes / No |
| Have condensation and thermal bridges been considered? | Yes / No |
| Can the report be used for condominium or insurance? | Yes / No |
If most of the answers are "no", then we are not talking about serious non-destructive testing, but about simple thermal photography.
> If you have to keep only one thing, keep this: the thermal camera is not a wall X-ray. It does not see the tube directly. It sees surface temperature differences and, when used correctly, can indicate where there is a potential leak or moisture. It is a great tool to avoid unnecessary knocks, especially on hot water pipes, but needs expert interpretation and confirmation with a hydraulic check.
Thermal cameras and infrared imaging have significantly changed the way we approach hidden leaks. Instead of breaking tiles blindly, we can observe thermal anomalies, identify potential wet zones, follow the path of a hot water pipe and limit the area of intervention.
But technology must be used with the right expectations. The thermal camera does not always give absolute centimeter accuracy. It does not distinguish itself whether the cause is water supply, drainage or waterproofing failure. It does not replace a meter test, pressure check, drain camera or technician experience. It gives strong clues that must be put into a proper diagnostic sequence.
Its greatest value is seen when testing is done methodically: problem history, observation, meter checking, controlled use of hot water, thermography, interpretation and targeted confirmation. In this way, unnecessary breakages are avoided, costs are reduced and the probability of opening only the point that is really needed is increased.
For the owner, the right question is not "do you have a thermal camera?". It's "how are you going to use it to prove where the moisture is coming from?". If the answer includes methodology, comparison, testing and technical interpretation, then the thermal imager can become a valuable tool. If the answer is simply "we'll see on camera", then caution is warranted.
Return to category.
Go to categoryReturn to the central guide.
Go to guide