
Bathroom Waterproofing & Moisture Protection
Return to category.
Go to categoryWhen moisture appears in a bathroom, on an adjacent wall or in the ceiling of the lower floor, the first problem is that we cannot see what is happening inside the structure. There may be water under the tiles, in the grout, behind the plaster, in the plasterboard, around the drain or in a corner. The eye sees only the final symptom: stain, swelling, mold, scale or detachment. However, the actual moisture may have spread very differently from what appears on the surface.
This is where hygrometers come in. They are special instruments used to estimate moisture in materials such as plaster, cement mortar, wood, plasterboard, masonry or surfaces behind tiles. They are not magical tools that show themselves "there's the broken pipe". They are instruments of measurement and comparison. They help the technician see where there is increased moisture, how it spreads, if it decreases over time, and which spot has the highest readings.
There are two main categories of practical interest to us: contact hygrometers, also known as non-invasive or pinless, and pin hygrometers, known as pin-type. The first rest on the surface and give an indication without piercing it. The latter use two small pins that go into the material and measure electrical resistance or moisture-related behavior. Each type has advantages and limitations.
In the bathroom, their use is particularly useful when we want to map the spread of moisture. For example, if there is a stain behind the shower, the hygrometer can show if the moisture is only in a small spot or if it has spread low down the entire wall. If water is suspected to be passing through the siphon, we can compare indications around the drain, in the corners and on the adjacent wall. If there is a bulge in the downstairs ceiling, we can see where the "wettest" spot is and how it relates to the bathroom above.
This guide explains how contact and spike hygrometers are used, what they actually measure, how to map correctly, what mistakes lead to wrong conclusions and why measurements should be combined with a thermal camera, meter test, use tests and technical expertise.
The hygrometer does not see "water" as we see a drop. It measures a physical property of the material that is affected by moisture. Depending on the type of instrument, it may measure electrical resistance, dielectric behavior, or another parameter that changes when the material has more moisture.
This means that the reading should not always be read as an absolute percentage of water. In many building materials, especially plaster, cement mortar, tile adhesive or brick, the measurements are mainly comparative. That is, we are not only interested in whether the instrument reads "X", but whether this point reads much more than a neighboring dry point of the same material.
For example, if the wall behind the shower shows a much higher reading low near the floor than high in a dry zone, this is important. If the entire wall has a similar reading, we may be talking about general humidity, material with high conductivity or incorrect setting of the instrument. If the reading is high only around the siphon or battery, then we have a more targeted reading.
So the hygrometer does not replace thinking. It gives data. The diagnosis comes from the pattern of the data.
The contact hygrometer rests on the surface and gives a reading without drilling a hole. It is very useful as a first mapping tool, especially when we don't want to damage tiles, painted walls, tread surfaces or wood. In bathrooms, it can be used on tile, wall, plaster, plasterboard or floor, depending on the instrument and surface.
Its main advantage is that we can get many measurements quickly. So we create a map: low, high, right, left, around siphon, near corners, behind the battery, on the next wall. If the readings are increasing towards a point, this may lead us closer to the focus of the moisture.
The downside is that the measurement can be affected by many things: subsurface metals, pipes, reinforcement, salts, different substrate, tile thickness, adhesive materials, gaps, and even the pressure with which the instrument rests. That is why we should not rely on a single measurement.
The contact hygrometer is great for seeing "where to look more". It's not always enough to say "that's exactly where the leak is".
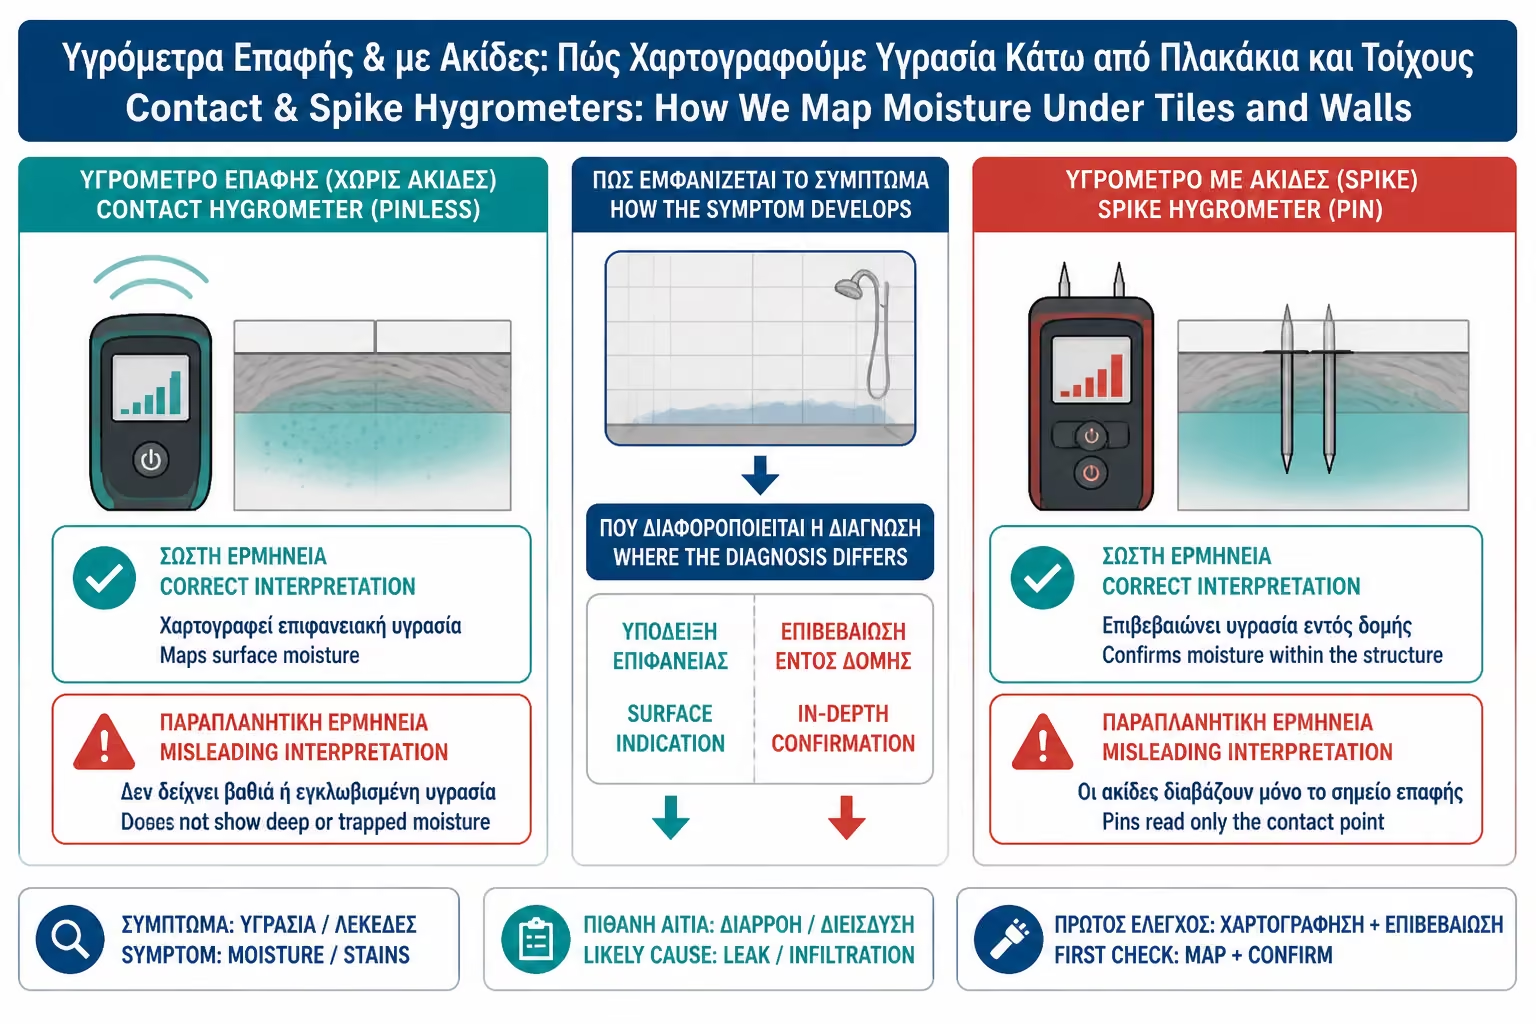
The spike hygrometer uses two small spikes that penetrate the material. It measures more directly the behavior of the point where the pins are inserted. It is very useful in wood, plasterboard, plaster or soft substrate, because it can show if the material has moisture in that particular spot. On wooden floors, crates, MDF or OSB, it is often more useful than a simple contact hygrometer.
The downside is that it leaves little marks. We don't want to drill exposed tiles, waterproofing membranes or surfaces where any hole could become a problem. That is why its use must be targeted. It can be used on the back side of a wall, on plaster that will be repaired, on a wooden frame that already has wear or where minor intervention is acceptable.
On a wall behind a bathroom, spikes can help determine whether the moisture is superficial or has penetrated deep into the plaster. In drywall they can show if the board has gotten wet enough to need replacement. In wood they can show if the moisture is just superficial or has gone into the material.
The spike hygrometer is a more "surgical" tool. We don't use it everywhere. We use it where we want a more specific indication and small drilling is allowed.
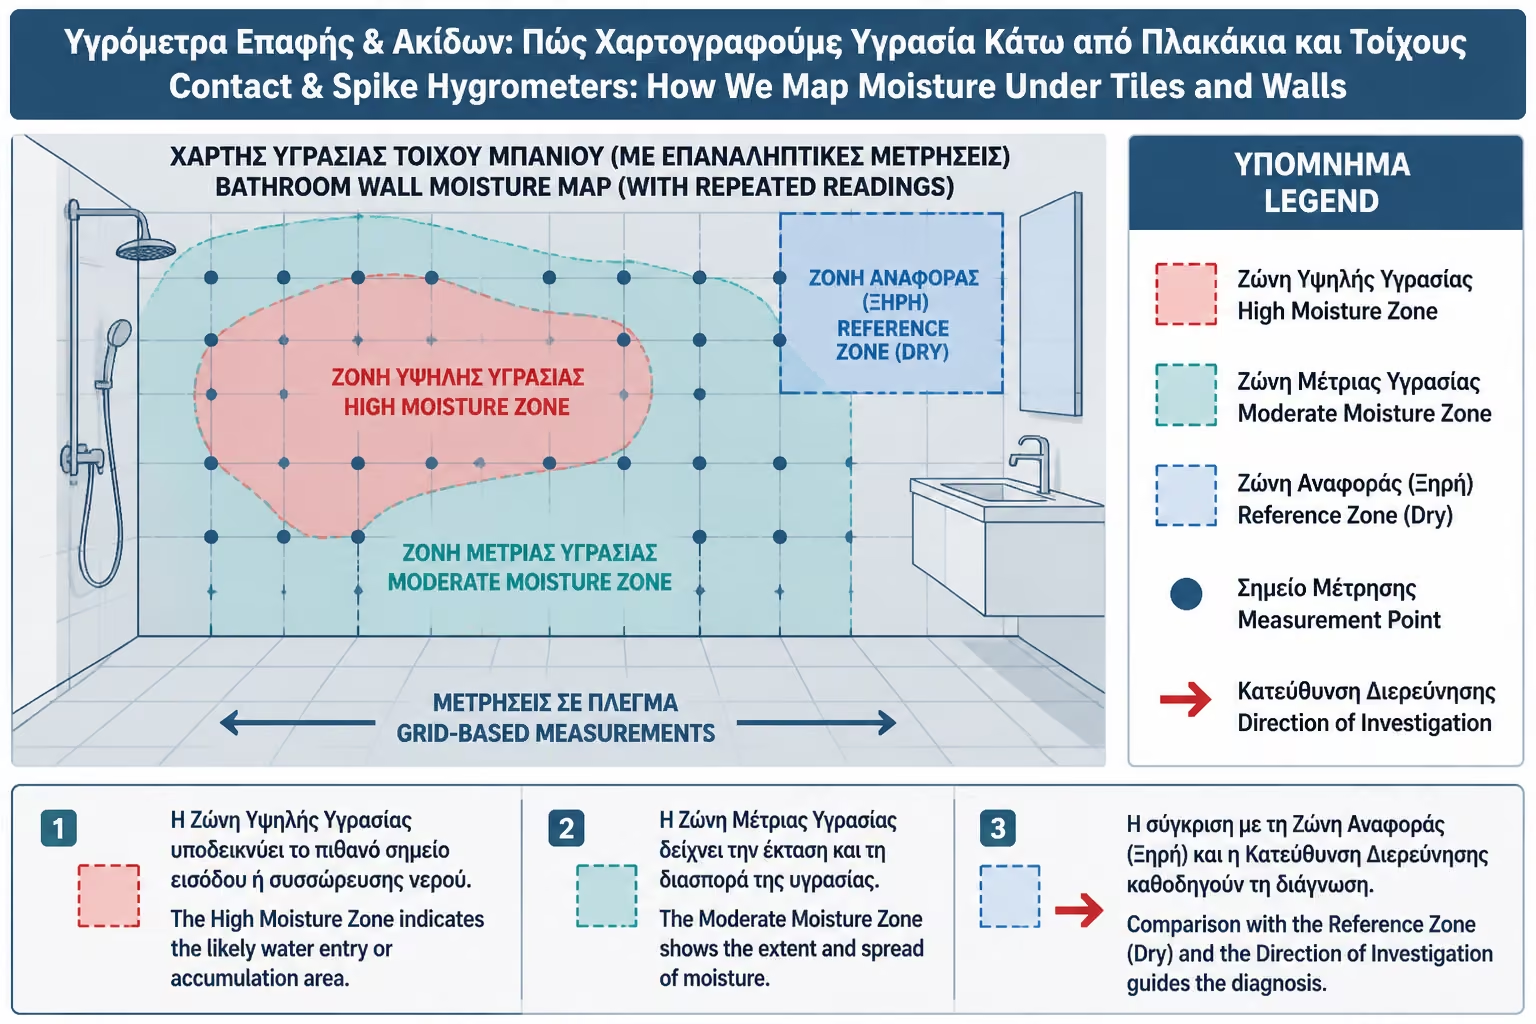
The biggest mistake in using a hygrometer is to take one reading and jump to conclusions. Humidity doesn't read like that. Needs mapping. That is, many measurements in an organized pattern, so that we can see how the water spreads.
On a wall behind a bathroom, we measure low, medium and high. We measure near the corner of the shower, near the faucet, near the faucet, near the floor and at a point we consider dry as a reference. If all the high values are low and near the shower, we have a different picture than if the high values are at the height of the battery.
On a ceiling below a bathroom, we measure the center of the stain, around the stain, in one direction and the other, and ideally relate the location to the bathroom above. If the maximum reading is directly below the siphon, the runoff becomes more suspicious. If it extends to an angle, it may be waterproofing or a water path.
Mapping gives us pattern. The pattern leads to the diagnosis. The single indication can be misleading.
The simple method is to divide the surface into zones. On a wall, we can measure every 20–30 cm horizontally and vertically, depending on the extent of the damage. We mark the prices on a sketch or on a photo. It doesn't have to be a perfect design. We need to know which value corresponds to which point.
We always use a reference point. That is, an area of the same material that is considered dry. If the suspect wall reads much more than the benchmark, the difference is worth it. If all the points read similarly, perhaps the hardware or instrument is giving a general indication that needs attention.
It is good to repeat the measurements after using water or after a few days of non-use. If values rise after showering, the relationship with use is strong. If they fall off when use is stopped, this helps the diagnosis. If they stay high all the time, there may be an ongoing leak or deep damp.
Mapping is not just for the technician. It is also very useful for insurance, apartment buildings or owners, because it shows the evolution of the damage in a more objective way.
Under tiles, the measurement is more complex. The tile is usually non-absorbent or low-absorbent, but there is an adhesive, joints, cement mortar or substrate underneath. The contact hygrometer can give an indication that there is different moisture under the surface, but the interpretation depends on the thickness and type of materials.
If, for example, on a shower floor the readings are very high around the faucet and lower at further points, this is important. If high readings follow a corner, they may indicate water moving along the corner. If the signs are scattered, they may be related to glue gaps, old moisture or a different substrate.
The instrument cannot always distinguish whether the water is in the glue, in the cement mortar or under the membrane. But it can show that a wet zone is present and help decide where to check further.
In such cases, hygrometer mapping is ideally combined with a thermal camera and controlled water use. This is how we see thermal behavior and humidity indication.
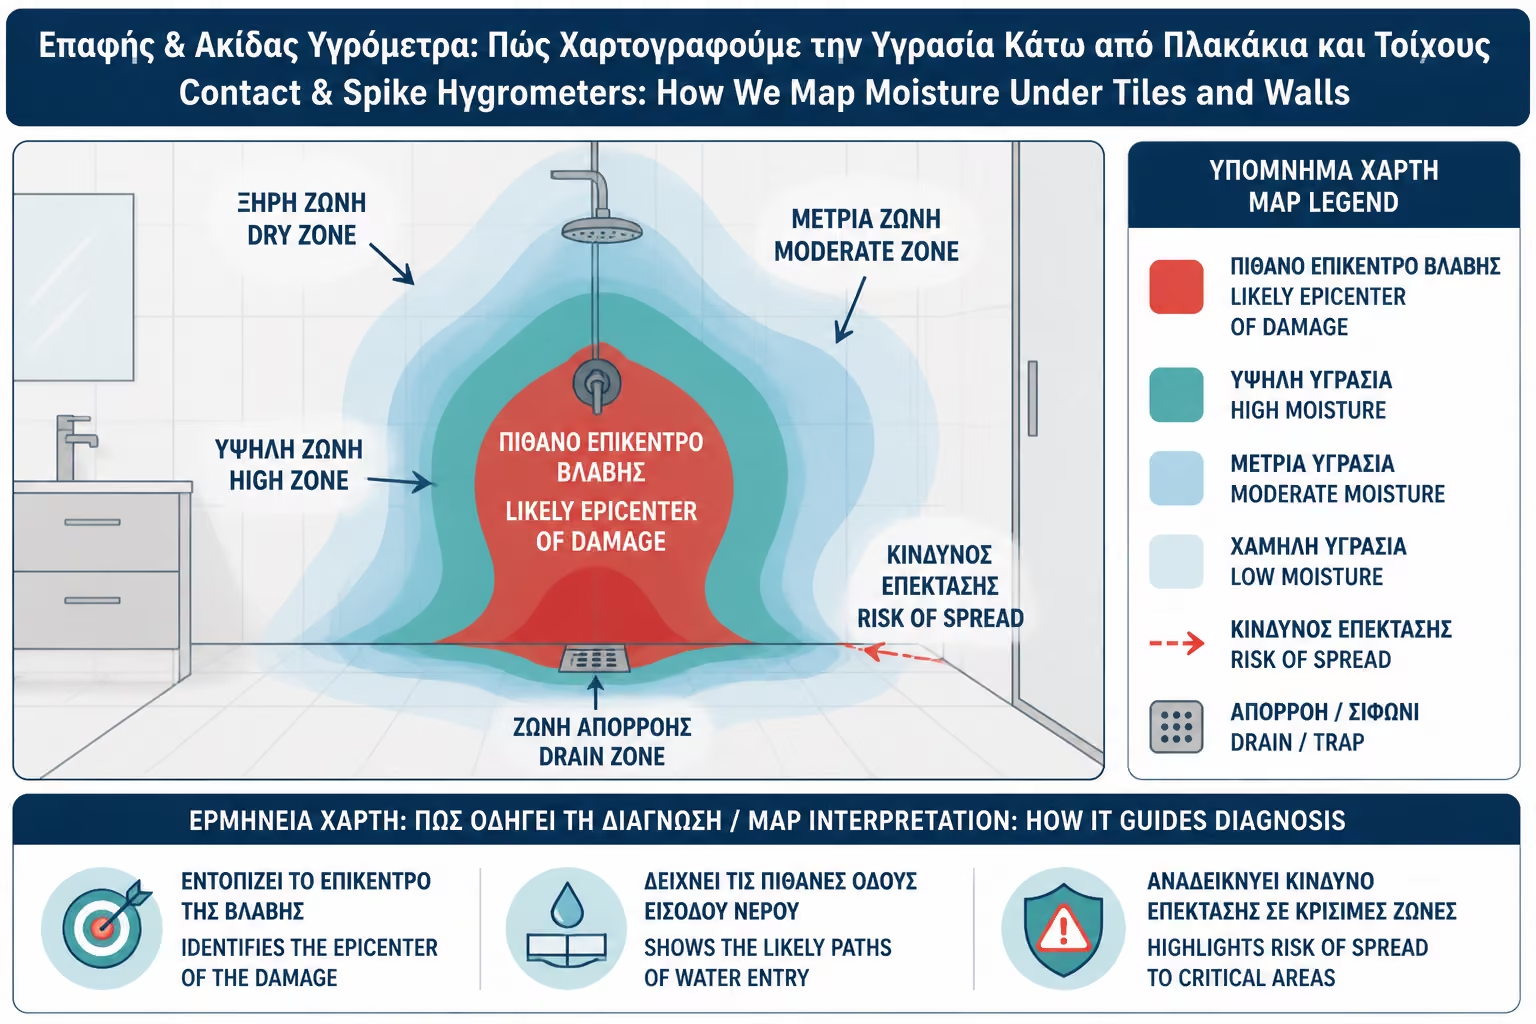
When we say "focus" of damage, we don't always mean the exact hole in the pipe. We mean the point or zone where the readings are highest and where moisture appears to originate or accumulate. This is very useful for targeted opening.
If the readings increase as we get closer to the battery, there may be a problem with the supplies or pipe passages. If they increase as we approach the siphon, the drain or flange becomes suspect. If they rise low across the corner, the floor-to-wall waterproofing may be the issue. If they are high in a horizontal ground floor zone, rising damp can also be considered.
But the focus must be confirmed. Water can travel and collect at a point other than the source. For example, a leak from a battery can run down the wall and appear low. So the wettest point may be below, while the source is higher.
That is why the hygrometer shows "where the water is" or "where the water has gone". The technical diagnosis must also answer "where did it start".
In wood, OSB, MDF, crates and wooden floors, spike moisture meters are especially useful. The wood is directly related to its moisture and the indications can help to understand if it is wet in depth. This is critical in bathrooms with wooden flooring, wooden door frames, parquet outside the bathroom or furniture that has come into contact with water.
If the wooden floor outside the bathroom has swelled, the hygrometer can show whether the moisture is limited to the edge near the threshold or has spread deeper. If a case has blackened low, the measurement can show whether it is simple surface wear or whether the wood has absorbed moisture.
In OSB below a bath, the measurement is important because if the material has become very wet, it may have lost stability or swelled. It is not enough to dry the surface. We need to know if the substrate remains technically safe.
In wooden materials, moisture is not only a matter of mold. It is a matter of deformation and mechanical strength.
Drywall and drywall are sensitive to moisture detection. If they get wet, they can lose strength, swell or develop mold inside. A spike moisture meter can help determine if moisture has penetrated the board or is just on the surface.
On a wall behind a bathroom, if there is dry construction, the high reading should be taken seriously. Drywall does not behave like a cement plaster. The affected area may need to be replaced, not just dried and painted. Especially if there is a musty smell or if the slab has softened, the repair should be more radical.
The contact hygrometer can help map the area without many holes, while the spike hygrometer can confirm targeted points. Use should be done with care, because any hole in wet zone or finished surface must be repaired.
In dry construction, the question is not only "where is the moisture", but whether the material needs to be replaced.
Salts can affect readings. In old walls, in areas with scale efflorescence or in substrates where water has moved for a long time, the electrical behavior of the material can change. Thus a hygrometer can show high values due not only to moisture, but also to salts left in the material.
This is very important in old bathrooms, ground floors, walls with rising damp or places where white salts appear in the joints. If we don't take this into account, we may think that an area is still too wet when part of the reading is due to salts. Or we may overestimate the extent of active leakage.
The solution is to compare and repeat. We measure at various points, watch if the values drop over time, combine with a thermal camera and visual cues, and assess whether there is an active water source. If the values remain high but there is no progress and the wall looks dry, perhaps a more careful interpretation is needed.
Hygrometers are delicate tools. Their sensitivity is an advantage, but it can become a trap if we ignore the salts.
Hygrometers are also very useful after repair. When the leak stops, the wall or substrate does not dry immediately. It may take days or weeks, depending on the amount of water, materials, ventilation and temperature. If we paint or seal the wall before it dries, moisture can be trapped.
With periodic measurements we can see if prices are falling. This is more helpful than just looking to see if the stain looks dry. Plaster may appear dry on the surface but hold moisture deeper down. Drywall may have dried on the outside but still be problematic on the inside.
Monitoring is done at the same points each time, with the same instrument and similar conditions as possible. This is how we see a trend. If the values are steadily decreasing, drying is progressing. If they remain high or rise again, there may be an active source or insufficient ventilation.
Restoration should be done after the cause has stopped and the material has dried sufficiently for the next job.
The thermal camera and hygrometer work very well together. The thermal camera shows thermal anomalies on the surface. The hygrometer gives an indication of humidity in specific places. Although both show the same zone, the indication becomes stronger.
For example, the thermal camera can show a cold zone low on a wall behind a shower. The hygrometer can confirm that the same zone has higher humidity than the rest of the wall. If after discontinuing use the prices drop, the relationship with the bathroom becomes even more likely.
If the thermal camera shows an anomaly but the hygrometer does not show increased humidity, it may be a thermal bridge or a different material. If the hygrometer shows high values but the thermal imager does not, there may be moisture without a strong thermal difference or affecting salts/materials.
The combination reduces errors. No single method is infallible.
A serious moisture mapping should include a drawing or photograph with measurement points, values, date, conditions, type of instrument and conclusion. It is not enough for someone to say "it has moisture". It must show where, how much in relation to the rest of the points, and how it is interpreted.
Ideally, there should be a point of reference. For example, measurement on a dry wall of the same material or an unaffected area of the same wall. Without a benchmark, the numbers are harder to interpret.
The report must also distinguish indication from cause. It may say: "High moisture readings low on the wall behind the shower, with maximum values near the floor-wall corner. Image is consistent with possible inflow from the shower zone. Siphon and seal check recommended." This is better than the absolute "it's the siphon" with no confirmation.
In multi-family or insurance cases, written mapping helps a lot with communication and documentation.
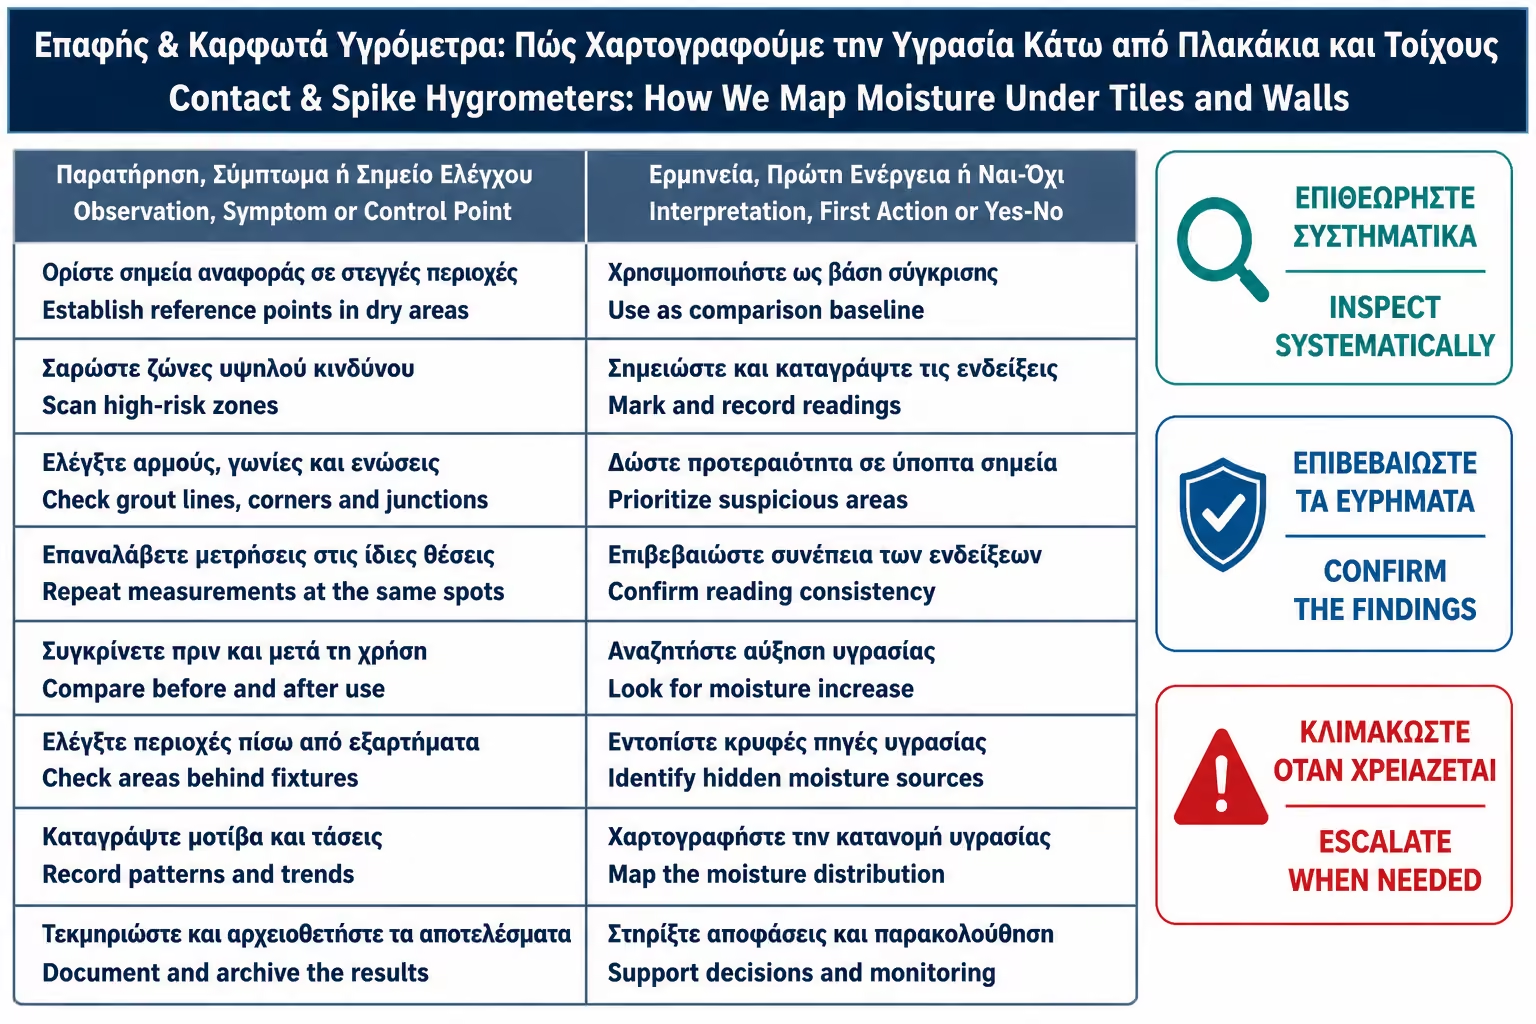
| Error | What can happen | Correct approach |
|---|---|---|
| One measurement and immediate conclusion | Misdiagnosis | Lots of measurements and mapping |
| No reference point | Numbers don't make sense | Comparison with a dry area of the same material |
| Ignoring salts | Moisture overestimation | Combine with visual inspection and repetition |
| Using a spike on a sealed surface | Membrane injury | Pins only in appropriate places |
| Measurement on metal or pipe | Falsely high reading | Check for metallic elements |
| Comparing different materials as if they were the same | Wrong interpretation | We compare like with like |
| Measurements are not repeated after use | The relationship with the problem is lost | Measurements before/after water use |
| Absolute diagnosis without confirmation | Pointless opening | Confirmation by test and technical control |
The hygrometer is very useful when used systematically. It is dangerous when used as a "divining" tool.
Testing with a hygrometer is usually more economical than an unnecessary wall or floor opening. The cost depends on whether it is a simple visit, full mapping, written report, combined with a thermal camera or an inspection in an apartment building/insurance case.
In a bathroom where there is moisture behind tiles, on an adjacent wall or in the basement ceiling, mapping can significantly reduce the risk of a wrong operation. If we know the highest humidity is around the siphon, we don't start at the battery. If the high prices are equal to the benefits, we don't break the floor first. If the values show high surface condensation, we don't unplug the shower for no reason.
In bathroom renovations in Greece 2026, where even a medium repair can result in significant costs due to tiling, labor and restoration, non-destructive testing is of great value. It doesn't solve the problem, but it helps to avoid making the wrong moves.
The value of the instrument lies in the correct interpretation. Not just in its existence.
Before accepting a hygrometer diagnosis, ask how the measurements were made. How many points were measured? Is there a benchmark? Was a contact or spike hygrometer used? Is there a map with prices or just a verbal conclusion?
Ask if measurements were taken before and after using the bathroom. If a shower leak is suspected, this is important. Ask if the water meter has been checked for pressurized water. Ask if a thermal imager was used for comparison or if hydraulic pressure control is needed.
Also ask what the high reading means. Is it active humidity? Is old damp with salts possible? Is it material with a different composition? Is it necessary to repeat the measurement after drying? A serious technician will explain the limits of measurement.
If the answer is simply "the machine writes, so we break here", ask for a more substantiated explanation.
| Inquiry | Yes / No |
|---|---|
| Were multiple measurements taken and not just one? | Yes / No |
| Is there a reference point in a dry area? | Yes / No |
| Were the measurements noted on a drawing or photo? | Yes / No |
| Was an appropriate type of hygrometer used for the material? | Yes / No |
| Avoided using a pin on a sealed surface? | Yes / No |
| Were possible metal elements that affect the reading checked? | Yes / No |
| Were measurements taken before and after water use where appropriate? | Yes / No |
| Was the measurement combined with a water meter test? | Yes / No |
| Combined with a thermal camera or visual inspection where appropriate? | Yes / No |
| Is there a conclusion with probable cause and not just numbers? | Yes / No |
| Suggested next confirmation step? | Yes / No |
| Can measurements be repeated to check drying? | Yes / No |
If most of the answers are “no”, then no real mapping was done. A simple measurement was made.
> If you have to keep only one thing, keep this: the hygrometer does not find the cause of the leak on its own. It shows where there is increased moisture and how it spreads. Its real value is in mapping: many measurements, comparison with dry spot, repeat after water use and combined with thermal camera, water meter and technical experience. This way we can approach the center of damage without breaking blindly.
Contact and spike hygrometers are valuable tools in diagnosing leaks and moisture in the bathroom. They can show where there is increased moisture, how it spreads under tiles or inside walls, whether the problem is superficial or deeper, and whether a repair has actually started to dry out. Without these, diagnosis is often based on eye and hypothesis alone.
The contact hygrometer is ideal for first non-destructive mapping. The spike moisture meter is useful for more local measurements in plaster, wood, drywall or OSB when minor drilling is permitted. But both need proper interpretation. Numbers alone don't always tell the cause. They can be affected by salts, metals, different materials or old moisture.
Correct usage is based on comparison. We measure many points, keep a reference point, note the values, monitor the progress and combine the results with the history of the problem. If the humidity rises after showering, the waterproofing or drainage becomes more suspect. If there is a continuous indication and the meter reads, we are looking at a water supply. If prices drop after the repair, we know the drying is progressing.
For the owner, the right question is not "do you have a hygrometer?". It is "will it be mapped or just a measurement?". The difference is big. A measurement can be confusing. A proper moisture map can lead to the right spot, limit tears and make the repair more targeted.
Return to category.
Go to categoryReturn to the central guide.
Go to guide