
Bathroom Waterproofing & Moisture Protection
Return to category.
Go to categoryIn bathroom waterproofing, the material chosen is of great importance. But even more important is how it is applied. A good cementitious, acrylic liquid membrane, or polyurethane spreader can fail if it is applied too thinly, if it is not allowed to dry between coats, if it is hastily covered with tile adhesive, or if it is applied in conditions that do not allow for proper curing.
This is one of the most common problems in bathroom renovations. The owner sees that "insulation was inserted", but does not know if it was inserted at the correct thickness. He sees that the material has changed color and looks dry, but he doesn't know if it has matured enough. He sees the plaque starting the next day, but he doesn't know if the system allows such a quick continuation. And since the waterproofing will be hidden under the tiles, the mistake will no longer be visible.
Drying times and layer thickness are not details. They are basic technical parameters. If the material is applied too thin, it may not form a continuous sealing film. If applied too thick in one layer, it may crack, slow to cure or trap moisture. If the second hand is passed too early, it can disrupt the first. If the tiles are bonded too early, adhesion may be reduced or moisture may be trapped under the final coating.
There is no one time that applies to all materials. Some fast systems allow paving after a few hours. Others require 24, 48 or even 72 hours before accepting further work or water testing. In liquid film guides and technical brochures we see great variation: there are products that state repainting in 1–2 hours and tiling after 3 hours in certain conditions, while other systems talk about full cure or testing after about 72 hours.
So the right driver cannot say "always wait this many hours". But he can explain the logic: how the thickness is calculated, why we apply two layers, why we often "cross" our hands, when a second layer is allowed, when tiles are inserted and what the owner should check before the waterproofing is closed forever under the glue.
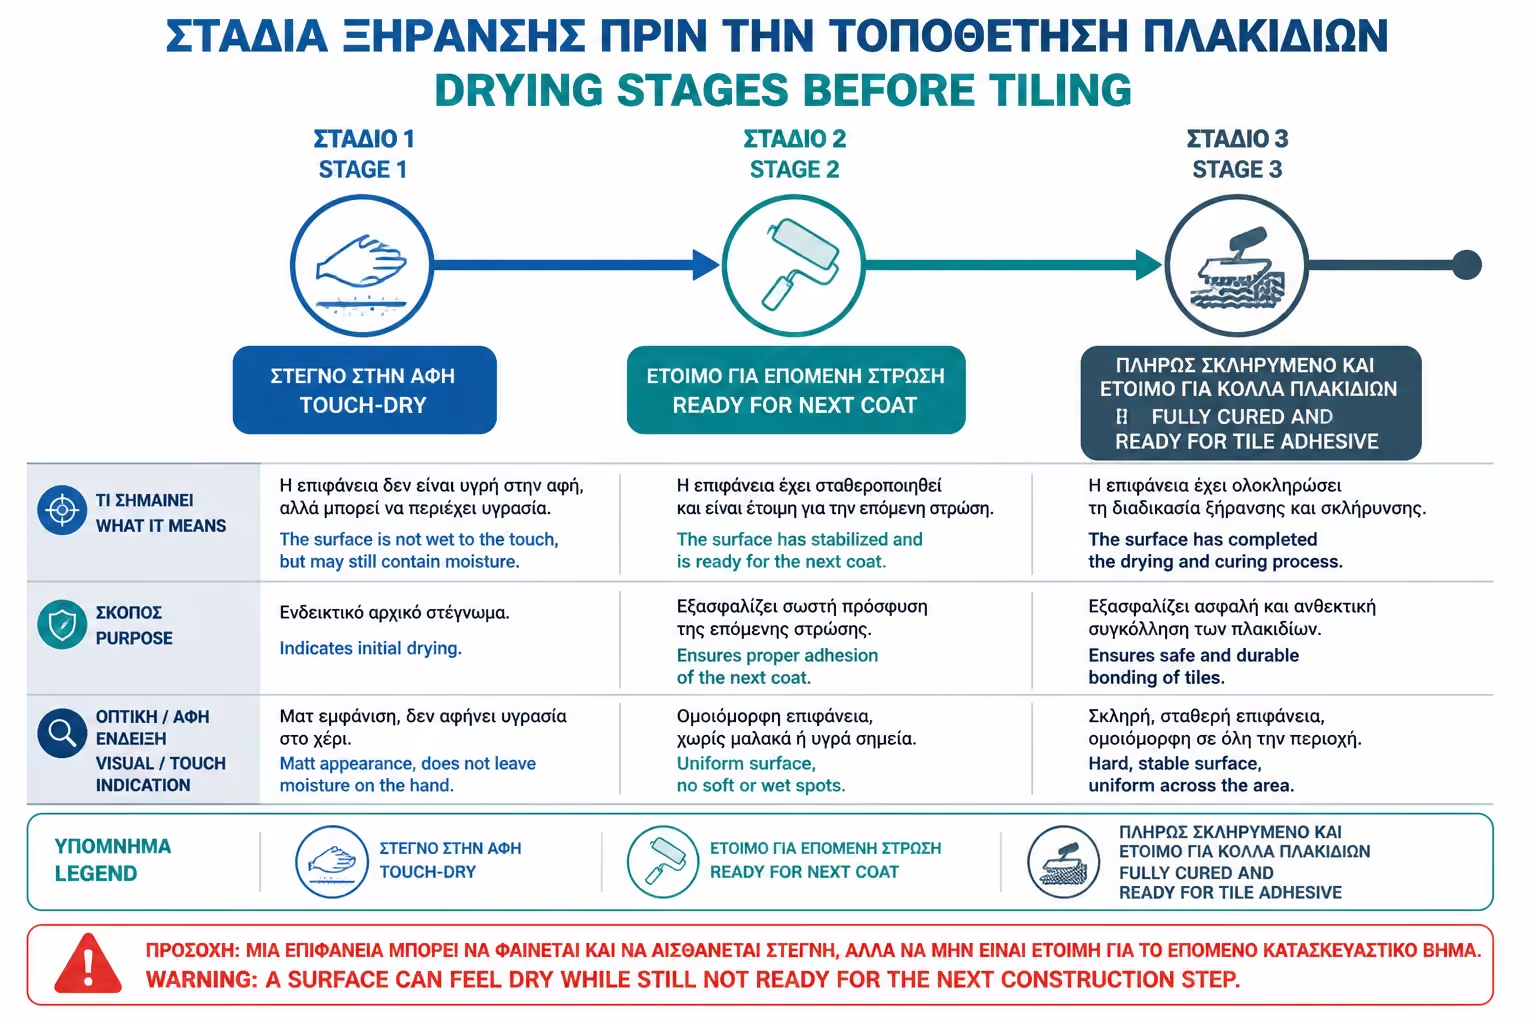
In everyday language we say that a material has "dried" when it does not stick to the hand or when it has changed color. In waterproofing, this is not enough. There are at least three different stages that must be distinguished: the surface drying, the repainting time and the final curing.
Surface drying is the first stage. The material looks dry, not very sticky, maybe it has changed color and one might think it is ready. But this does not mean that it has acquired its final properties. There may still be moisture inside the layer or the chemical curing process has not been completed.
The repaint time is the point in time where the next coat is allowed to go through. This time varies by product. If the second coat is applied too soon, it can "pull" or soften the first coat. If it goes too slowly on some systems, it may need cleaning or conditioning before the next coat.
Final maturation is the stage where the material has acquired the required strength for the next severe stress: paving, water testing, walkability or normal use. In many systems, it is one thing when a second hand can be put in and another when a flood test can be done or tiles can be glued. Some technical brochures, for example, state that a second coat can be applied in a few hours, but full cure for testing or heavier use after several days.
This is why "keep it dry, let's move on" is a dangerous phrase. In waterproofing, the right question is: "Dried for what stage? For second hand, for tiling or for normal use?"
Layer thickness is the amount of material that ultimately remains on the surface and creates the waterproofing membrane. It is not enough to "paint" the substrate. A layer must be created with the thickness provided by the system. This is one of the points where most mistakes are made in practice.
On many spreadable sealants, manufacturers give consumption per square meter or minimum final dry film thickness. In wet film guides we often see requirements such as a final dry thickness of at least about 1.0–1.2 mm in certain systems, while more demanding applications or different products may call for greater overall thickness or more layers.
We must distinguish the fresh fat from the dry fat. When the material is applied, it contains water, solvents or liquid components that evaporate or react. The final thickness after curing may be less. That's why it's not enough for the craftsman to say "I've had a hard time". The consumption of the product must be followed.
A practical example: if a container or bag is intended to cover certain squares in two layers and ends up "taking out" much more, the material may have been applied thinner than it should be. This may not be visible to the eye, but it reduces the security of the seal.
On construction sites with cost pressure, there is always the temptation to spread the material further. By roller or brush, a spreadable sealant can visually cover a large area, even if the layer is very thin. This is one of the most insidious mistakes, because the surface looks insulated.
The problem is that a very thin layer can have micro-voids, reduced elasticity, lower ability to bridge small imperfections and less wear resistance. In corners, around faucets, over drains and on shower floors, this can become critical. Water does not need a large opening. It takes a small weak point that repeats the strain daily.
Correct application is indirectly controlled by consumption. If the product provides a specific amount per square meter, the workshop should use approximately that amount. Of course, the absorbency and roughness of the substrate affect the consumption, but the actual consumption cannot be too far from the specification without explanation.
The owner can simply ask: "How many square meters does this material cover in the intended layers?" He doesn't need to do a technical measurement, but the question shows that thickness is not a matter of estimation by eye.
The opposite mistake is to put too thick material in one layer, with the logic "to be sure". This can create other problems. A very thick hand may dry out on the surface but remain moist on the inside. It can crack, create wrinkles, blisters or unevenness. It can also take a long time to cure before accepting tile adhesive.
Spreadable materials are designed to be applied in specific layers. Two proper coats are usually better than one too many. The first provides a base and adhesion, the second completes the thickness and covers minor imperfections. In more demanding applications, a third layer or reinforcement may be needed, but this must be provided for by the system.
In corners, excess material can create "bunches" and weak areas. Around siphons can distort levels or prevent a clean connection. Under large tiles, an uneven sealing surface can make bonding difficult.
The correct technique is neither "as thin as possible" nor "as thick as possible". It is as much as the system predicts, in correct layers and with correct time between them.
Two hands is not standard procedure to make it look like more work was done. They are technically important. The first layer creates adhesion with the substrate, covers the surface and incorporates tapes, grids or special pieces where necessary. The second layer completes the sealing thickness and covers any weak points of the first.
If only one coat is applied, micro-gaps, fine spots or discontinuities are more likely to remain. This is especially true on rough screeds, corners, repaired substrates and areas with a lot of detail. The eye may not see the void, but the water will find it.
The second coat also helps to even out the application. If the first hand had small irregularities, the second covers them. If there are bands or mesh, the second layer encloses them better. So the waterproofing works as a single layer and not as a simple painting.
In several products, the technical instructions provide two layers as a minimum system. Some express or specialty products may have different instructions, but this should be documented by the product, not decided on site to save time.
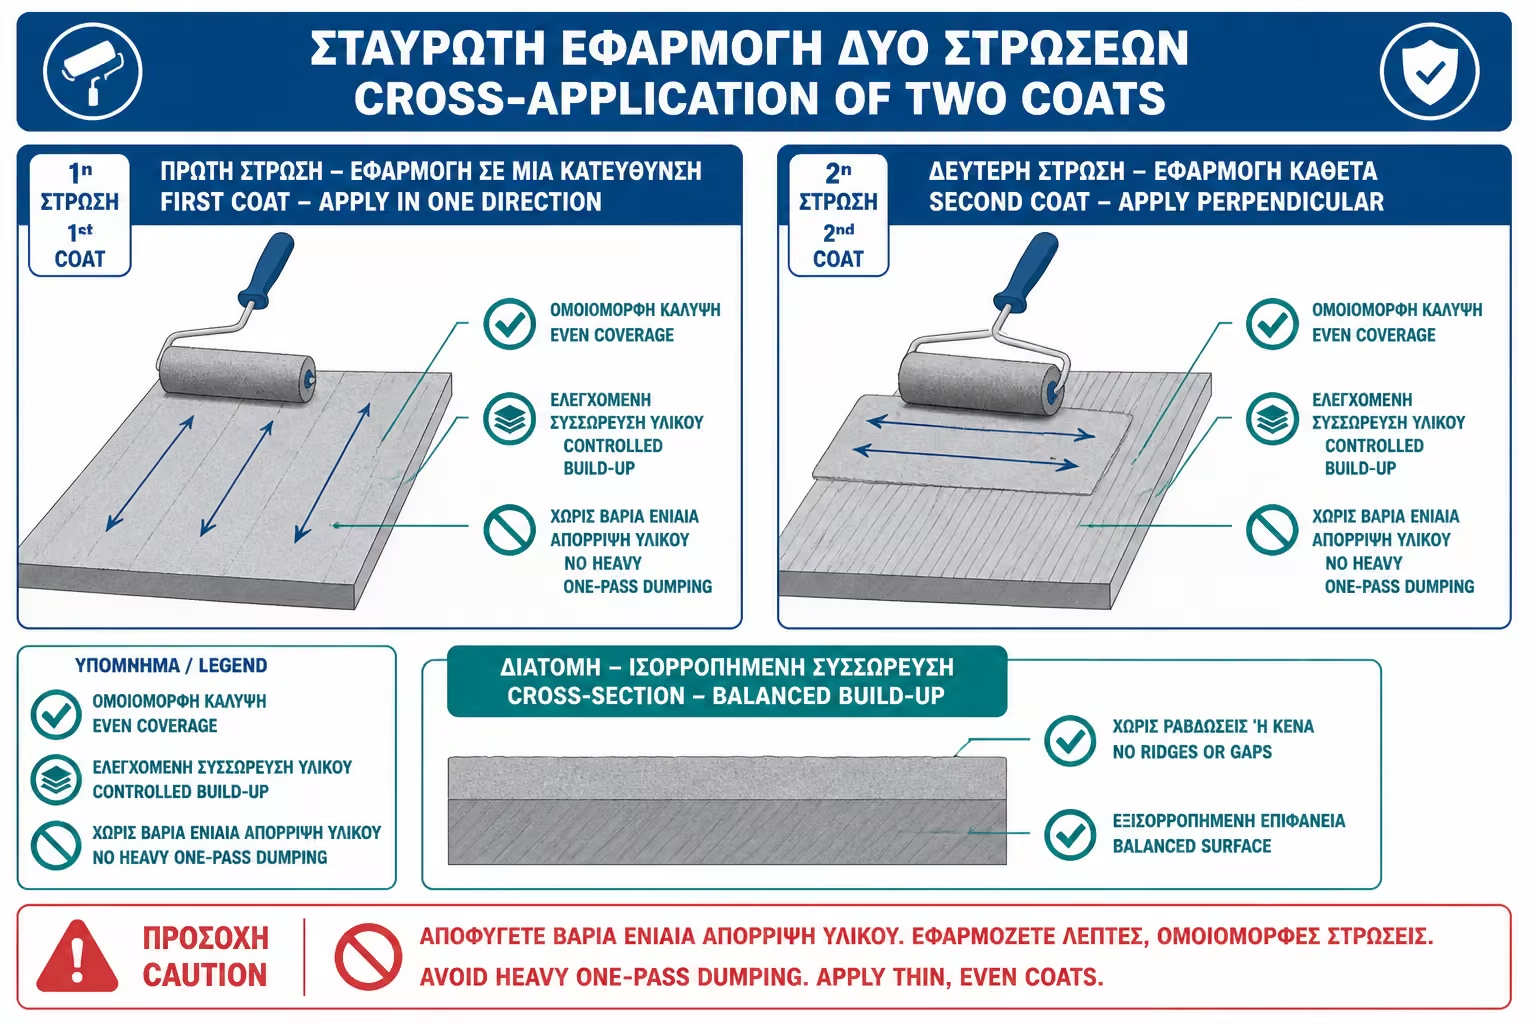
The "crossing" of the layers means that the second layer is applied in a different direction from the first. For example, if the first coat was passed horizontally with a brush or roller, the second is passed vertically. The aim is to better cover small lines, pores, grooves or spots that the tool may have left on the first application.
This technique is especially useful on spreadable materials, because the roller or brush leaves a direction of application. If both hands are rushed through at the same time, the same fine points may be repeated. With the cross-over, the second layer works more complementary.
On shower floors, the crossing must be done without breaking the connection with the siphon and without creating thick clumps near the corners. On walls, it helps to get more even coverage. In corners and facilities, a brush is often needed regardless of the direction of the roll.
Crossing does not replace required consumption. It is not enough to pass two very thin hands at different times. We want both the right technique and the right amount of material.
The second coat is applied when the first has dried or stretched as much as the product requires. This can be after a few hours on fast systems or after a longer time on slower materials. There is no one time for everything. In the technical brochures of different films we see repainting times from about 1–2 hours in express products to much longer times in other systems, depending on temperature, humidity and substrate.
If the second coat is applied too soon, it can disturb the first coat, create uneven curing or trap moisture. If it goes too slowly on some systems, cleaning or light surface preparation may be required before the next coat. That is why the manufacturer's times must be observed.
Bathroom conditions play a huge role. A bathroom without a window, with high humidity and low temperature, does not dry like a ventilated bathroom in summer. If the craftsman always follows the same time regardless of the conditions, there is a risk.
In practice, the first coat must have acquired enough stability for the second coat to be applied without "lifting" it or dissolving it. But the safe answer is given by the technical brochure of the product.
Corner strips, pipe cuffs and glass mesh are usually incorporated into the first coat or a special fresh coat of sealant. That is, they do not stick dry to the substrate or simply stay under the second layer. They must be embedded within the material.
At the floor-wall corners, material is first applied, the tape is placed and pressed to press without gaps. Then it is covered with another layer. Around fittings, cuffs should hug the pipe or opening and be incorporated into the membrane. In floors that require reinforcement, the glass mesh is placed over the fresh layer and completely covered.
If the tapes are applied to already dry material without proper bonding, they may not work. If the mesh is left exposed or wrinkled, it can become a weak point. If the cuffs around pipes are not properly integrated, water can pass behind the battery rosette.
These components are not decorative details. It is part of the thickness and continuity of the seal. That's why they should be entered at the right stage, not at the end.
The time before tiling depends on the material. In some express systems, paving may be allowed after a few hours, under certain temperature and humidity conditions. In other systems, the wait can be 24 hours, 48 hours or more. Some wet film technical brochures suggest curing for about 72 hours before water testing or fuller stress.
For the owner, the safe logic is to ask that the time given by the product for paving be respected. Not the time that "suits the schedule". If the material says a specific wait is needed, that must be built into the renovation schedule.
Tiling over immature waterproofing can create adhesion problems, trapped moisture or adhesive incompatibility. Especially when large porcelain tiles with low absorbency are placed on top, the moisture has difficulty escaping.
Rushing is usually not immediately apparent. The tile will stick and the bathroom can look right. The problem may show up later with hollow tiles, flaking, blackened joints or a damp smell.
Water testing, when feasible and meaningful, is done after the membrane has matured sufficiently. We must not fill or wet a fresh waterproofing before it acquires the required properties. In some systems, the instructions state a flood test after a certain curing time, while other systems have different instructions or do not provide for a practical test in a small domestic bathroom.
On built-in showers, especially walk-in or linear showers, a controlled test can be useful, but it must be done properly. It does not mean that we uncontrollably flood the bathroom. It means that we check that the system holds, that the siphon works and that there are no obvious failures before the tiles go in.
In high-rise apartments, the test should be done with great care. If in doubt, a technical inspection is needed, not an impromptu test by the owner. The point is to confirm the seal, not to cause damage.
Testing is not a substitute for proper application. If the material is inserted too thin or no ribbons have been inserted, a short test may not immediately show the problem. Quality is judged by the system, not just by a quick wetting.
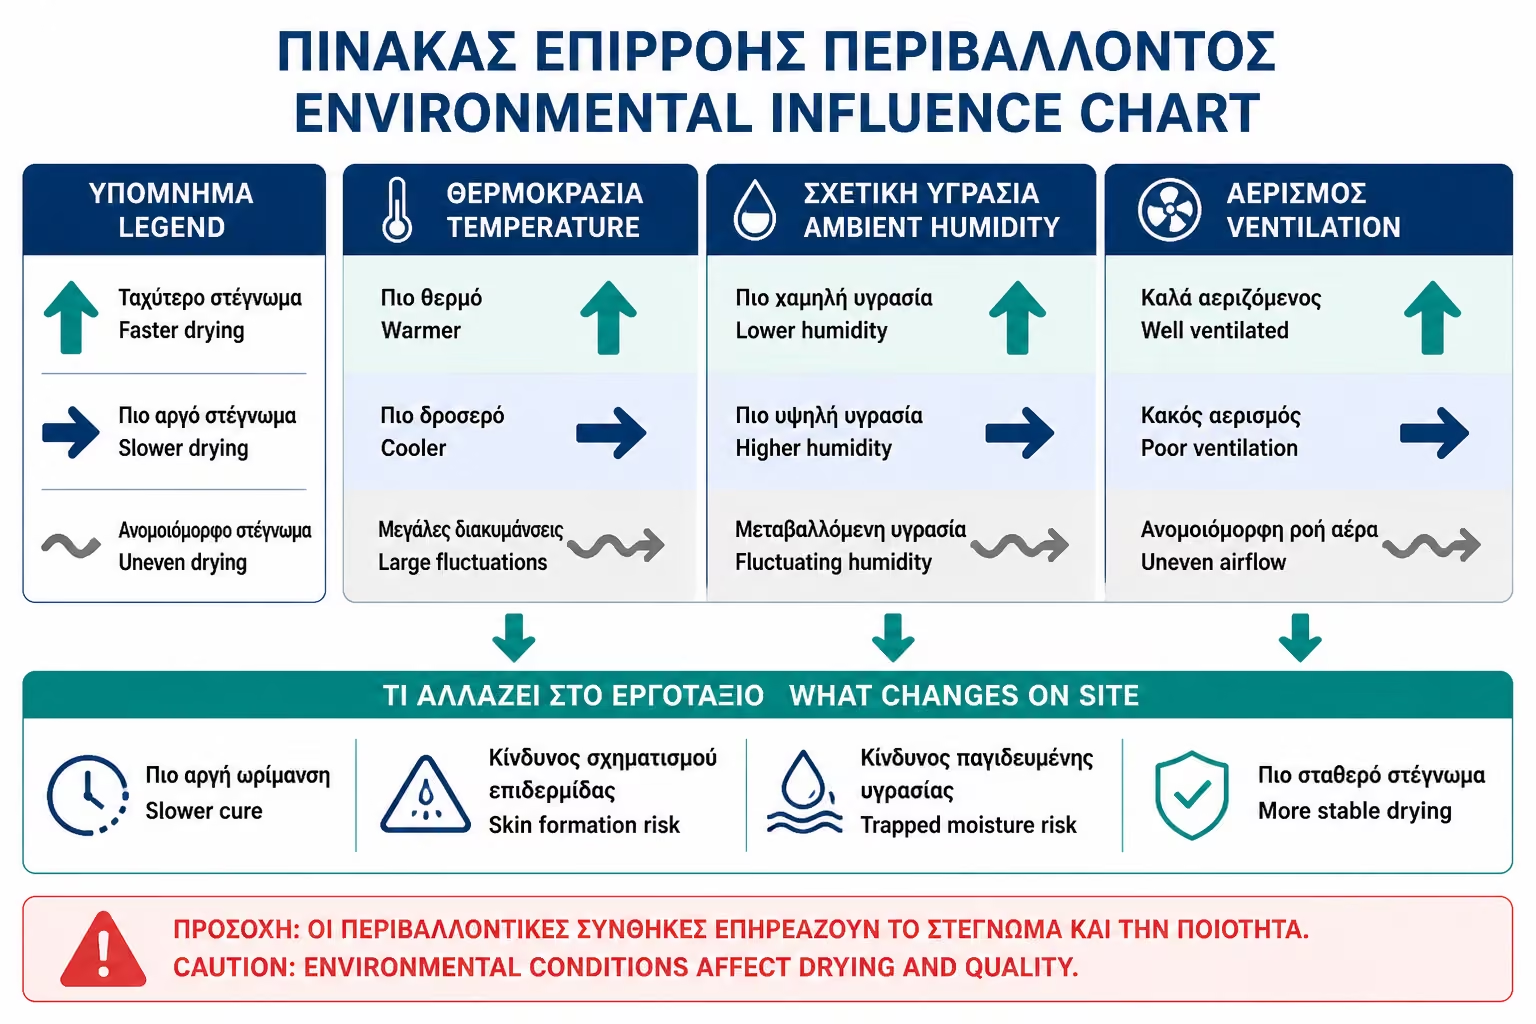
Drying times listed in technical brochures are usually given for specific conditions, such as around 20–23°C and around 50% relative humidity. In reality, a construction site bathroom can have very different conditions. It can be winter, there is no heating, there is no window or there has been work with water.
Low temperature delays drying. High humidity too. Poor ventilation can keep moisture in the room and significantly extend times. Conversely, too high a temperature or strong air flow can cause some materials to pull on the surface quickly, without being properly cured in depth.
In small bathrooms without a window, artificial ventilation or longer waiting time is often needed. The project should not proceed based on the "ideal" time of the brochure if the conditions are worse. These times are not magic numbers. They are indicative under specific conditions.
The owner can ask: "Do the times you say apply to today's conditions in the bathroom?" This question is especially useful in winter renovations or in bathrooms without ventilation.
Cementitious sealants, especially two-component sealants, have their own curing logic. They don't just dry like a paint. They develop strength with hydration and chemical processes. They need proper mixing, proper thickness and time before covering.
Acrylic liquid films are usually dried by evaporation of water. This means that humidity and ventilation greatly affect the time. If the bathroom is wet and closed, they can take quite a while. If they are too thick, they may dry out on the surface but remain soft on the inside.
Polyurethane systems may have different curing mechanisms depending on the product. Some are sensitive to substrate moisture, some require a special primer and some have strict coating time windows. That is why in polyurethanes the observance of technical instructions is particularly important.
The practical consequence is that the craftsman cannot apply all materials with the same habit. Some concrete, some acrylic, some polyurethane. Other times, other thicknesses, other requirements.
On the construction site, the most practical control is consumption. If we know how many square meters will be sealed and how much consumption the product gives for the required thickness, we can see if the amount used is reasonable. It's not an absolute metric, but it's a very useful check.
In more demanding applications, there are special wet thickness control tools or inspection techniques, but in a typical renovation they are rarely used. That is why the consumption and visual continuity of the layer have practical value. The surface must appear uniform, without holes, voids, very thin spots, dry "pulls" or spots where the substrate is visible.
In the corners and around siphons, it should appear that the tapes and special pieces are fully incorporated. If dry edges, wrinkles or gaps are visible, there is a problem. If the mesh is strongly visible after the final coat, it may not have been covered properly.
The owner does not need to do a technical inspection like an engineer. But he can ask to see the stage before the tiles are put in and ask if the prescribed amount of material was used.
Mistakes are almost always the result of haste or poor organization. The bathroom needs to be finished, the crews are pushing, the owner wants to move in quickly, and the waterproofing becomes the stage that gets squeezed.
| Error | Possible consequence | Correct approach |
|---|---|---|
| Very thin layer | Insufficient sealing, micro-gaps | Compliance with consumption and minimum thickness |
| Too fat a hand | Cracks, slow ripening, blisters | More proper layers, not one too many |
| Second hand too soon | First layer disruption | Waiting for repaint time |
| Tiles too early | Poor adhesion, trapped moisture | Observance of time before paving |
| The layers are not crossed | Recurring thin spots | Different time of application where provided |
| Room humidity is not calculated | Drying time is not taken into account | Control of conditions and ventilation |
| Films on a dry or poor base | Weak joint at corners | Integration at the right stage |
| Use of glue before curing is complete | Insulation-adhesive interface failure | Waiting according to product and conditions |
A typical example is a shower where liquid film was applied to two hands in the same day, in a bathroom without a window, and the next morning tiling began. On the surface everything looked dry. After time, hollow tiles and blackened joints appeared. The problem wasn't necessarily the product. It was the time he was not given to work properly.
In a renovation, time is a cost. But in sealing, waiting is not delay without reason. It's part of the app. If a system requires 24 or 48 hours before tiling, those hours should be factored into the schedule just like plumbing or electrical.
Pushing the garages to move forward can lead to more expensive problems. If the waterproofing does not mature properly and then tiles need to be removed, the cost will be many times higher. Proper waiting is a small cost compared to a failed shower.
In a typical bathroom renovation in Greece in 2026, where a 5 sq.m. bathroom can run around €3,200–€5,500 for a simple/medium solution and more demanding options reaching €6,000–€7,500+, the cost of an extra day or two of programming is small compared to the risk of failure. This is even more true in walk-in showers, linear faucets and large tiles.
The owner should be wary of overly quick promises. There are fast systems, but they have to be real and applied in the right circumstances. Not all material is "quick set" because it pushes the schedule.
A proper quotation should not simply state “bathroom waterproofing”. It should describe the system and, where possible, the implementation steps. How many layers will go in? Will it be primed? Will there be movies? Will mesh be used? Approximately how long will we wait before paving? Which glue will follow?
He doesn't have to write every minute of the time, because circumstances can change. But it should show that the application times have been calculated. If the offer promises complete stripping, plumbing, cement mortar, waterproofing and tiling in a suffocating time, caution is needed. Some stages require waiting.
For demanding projects, it is good to mention that the times will follow the manufacturer's instructions and the conditions of the project. This protects both the owner and the technician. Proper sealing should not be sacrificed to meet an unrealistic schedule.
The offer must also separate materials, labor and VAT. If someone gives too low a price, they may not have calculated proper material consumption, second layer or waits.
The owner can ask some simple but crucial questions. First, what material will be used and how many layers it provides. Then, what is the consumption per square meter. Then when will the second coat be done and how long will we wait before tiling.
Also ask if the layers will be applied crosswise. If there will be films in the corners and when. Whether the siphon will be connected to the insulation before or after the layers. If the bathroom has poor ventilation, ask if this changes the times.
If the answer to everything is "quick, don't worry", ask for a more specific explanation. No conflict needed. Clarity is needed. Sealing is a hidden stage and clarity before application is the only way to check.
It's also a good idea to ask for photos of the stadium before the tiles go in. There you can see the layers, the bands, the siphon and the general continuity of the application.
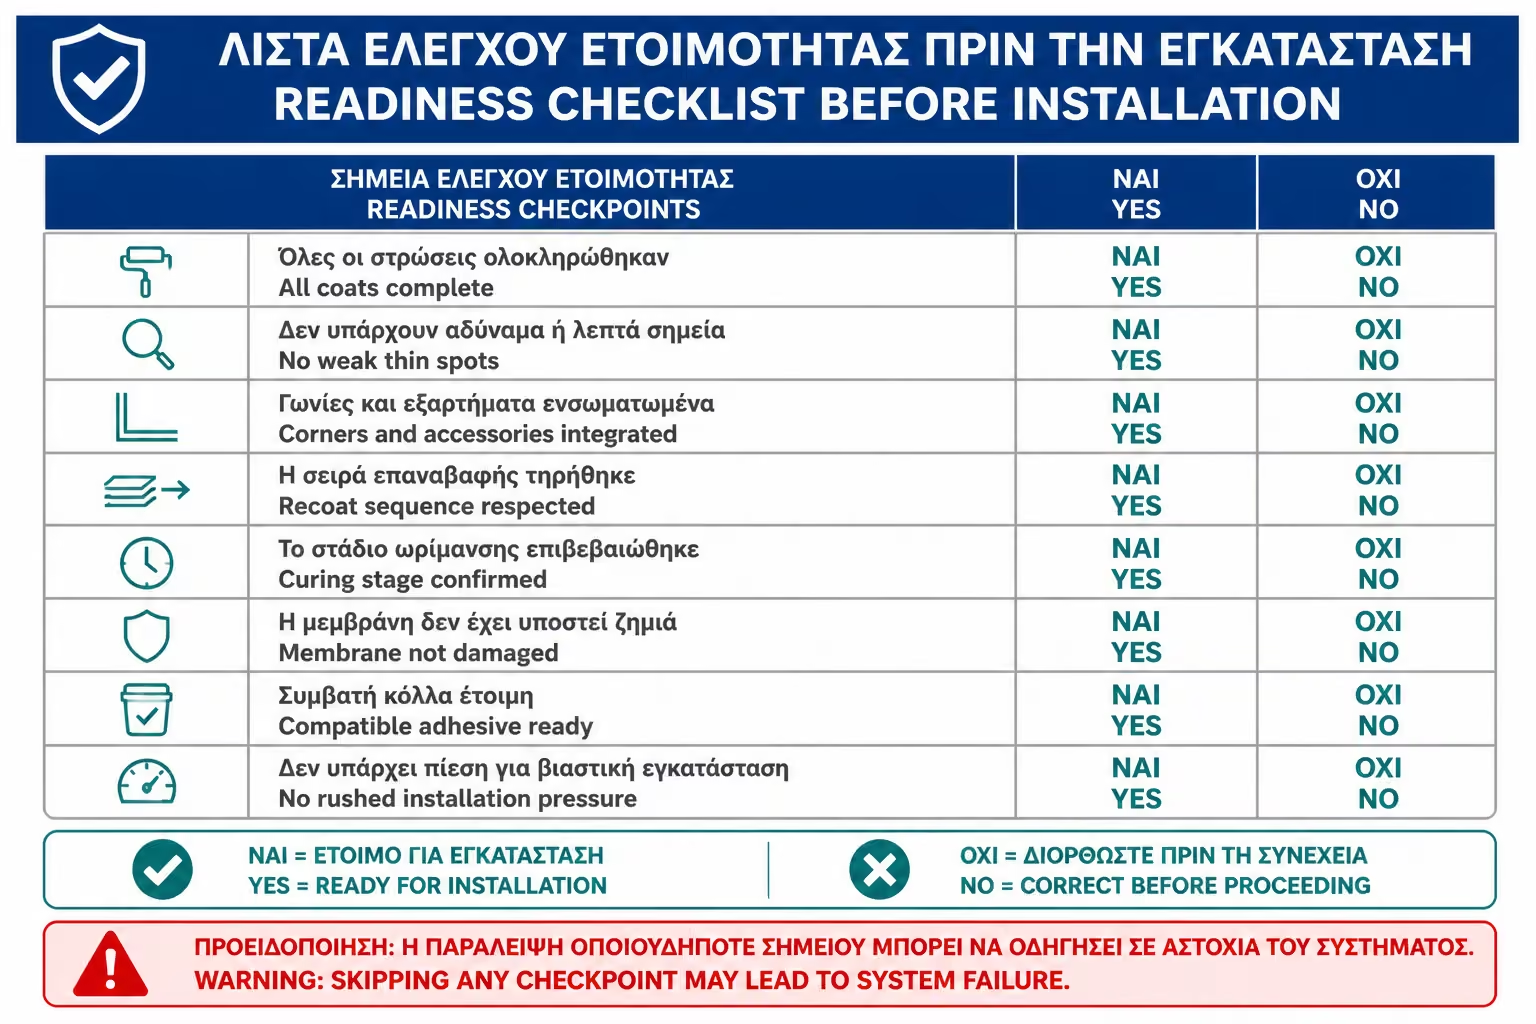
| Inquiry | Yes / No |
|---|---|
| Has primer been applied where required? | Yes / No |
| Was the sealant applied in two coats or as prescribed by the system? | Yes / No |
| Has the intended material consumption been met? | Yes / No |
| Are the layers applied crosswise where intended? | Yes / No |
| Did the first coat dry enough before the second? | Yes / No |
| Were the corner tapes embedded into the fresh coat? | Yes / No |
| Are the supply cuffs and siphon connection properly covered? | Yes / No |
| No substrate visible, gaps, holes or very thin spots? | Yes / No |
| Has the final coat dried/cured as directed? | Yes / No |
| Have humidity and ventilation conditions been considered? | Yes / No |
| Is the tile adhesive compatible with the waterproofing? | Yes / No |
| Has paving over an immature membrane been avoided? | Yes / No |
| Does the offer mention materials, layers, labour, VAT and technical stages? | Yes / No |
If several answers are "I don't know", paving should not be started in a hurry. After tiling, it won't show if the thickness was correct or if the times were met.
> If you have to keep only one thing, keep this: waterproofing is not judged by whether the surface is "painted". It is judged by whether it was applied in the right thickness, in the right layers and with the right wait. Don't let the crew pull the material too thin for economy or stick tiles before the membrane has cured. Ask for two correct hands, crossing of the layers where provided, tapes in the corners and drying time according to the product and the actual conditions of the bathroom.
Drying times and layer thicknesses are among the most critical but least visible elements of a proper waterproofing. The owner only sees that "insulation was inserted". But the real question is whether enough material was put in, whether it was applied in the correct layers, whether the layers were crossed, whether the tapes were boxed in correctly, and whether the system was given time to cure before tiling.
There is no universal time for all products. Some systems are fast, others take longer. Some conditions dry quickly, others delay. A bathroom without ventilation in winter cannot be treated like a dry construction site at an ideal temperature. That is why the product instructions and the judgment of the experienced technician are essential.
The thickness should also not be left to the eye. The consumption of the material, the uniformity of the surface and the complete coverage of the details are points to be checked. A very thin layer may look right, but not protect. An overly thick layer can create its own problems.
Proper sealing is not a quick pass. It's a process. And as in any serious technical process, times and thicknesses are not an obstacle to the progress of the project. It is part of the quality that will keep the bathroom safe after years of daily use.
Return to category.
Go to categoryReturn to the central guide.
Go to guide