
Bathroom Waterproofing & Moisture Protection
Return to category.
Go to categoryThe tightness test, known internationally as a flood test or water test, is one of the most serious verification techniques in a shower or a wet room. The logic is simple: before the waterproofing is covered with glue and tiles, the floor is flooded with water in a controlled manner for a certain period of time to see if the waterproofing layer holds or if there is a leak somewhere.
It sounds simple, but in practice it requires a lot of attention. It's not a run-of-the-mill "we throw some water in and see if it goes away" type of test. It's not even playing with a rubber band in an unfinished bathroom. It is a controlled process that should only be done when the waterproofing has matured sufficiently, the siphon can be blocked safely, the temporary barriers are correct and there is supervision. Done wrong, it can cause damage rather than prevent it.
The value of testing is that it is done at the right point in time: before the tiles go in. After paving, the waterproofing is no longer visible. If there is a failure at a corner, at a band, around the siphon, or at a membrane joint, repair afterwards may mean stripping. With flood testing, the error is detected when it can still be corrected without damaging the final investment.
But it must be clearly stated: no test should be presented as a “100% guarantee forever”. A properly performed flood test can confirm to a very large extent that the seal is not visibly leaking at the time of the test and under the specified conditions. It does not guarantee that it will not be damaged later by a cabin puncture, wrong glue, poor grouting, substrate movement or mechanical wear. That is why it is a valuable control tool, not a substitute for proper construction.
In international shower systems guidelines, water testing before tiling is often recommended as a way to verify sealing. Schluter, for example, states that a water test is recommended prior to tiling and typically takes 24 hours, and suggests waiting at least 24 hours after installing the KERDI membrane before testing to allow the grout to set at the joints. Other manufacturers or technical standards may provide different times depending on the system. That's why the right guide doesn't say "always do the same", but explains the process and its limits.
The flood test is a controlled filling of the sealed zone with water, before the installation of the tiles. The aim is to see if the waterproofing, corners, joints, siphon and connection points keep the water from leaking. Essentially, the "basin" created by the seal is tested.
In a built-in shower, this basin includes the floor, floor-to-wall corners, the connection to the faucet and, in many cases, part of the low walls. In a level walk-in shower or wet room, the zone can be larger because the water is not restricted by a step or prefabricated base. There the flood test becomes even more important, but also more difficult.
The test mainly checks if there is obvious water loss or moisture in places where it shouldn't be. It doesn't check the quality of the tile adhesive, because the tiles haven't gone in yet. It does not test future resistance to punctures or abuse. It does not check whether the drains are comfortable to use, although the general behavior of the floor when the water is drained can be seen in the process.
A successful flood test does not mean "there will never be a problem". It means that the waterproofing layer has passed a very important check before it is covered. This is already a great safety in relation to a project where the tiles are entered without any intermediate control.
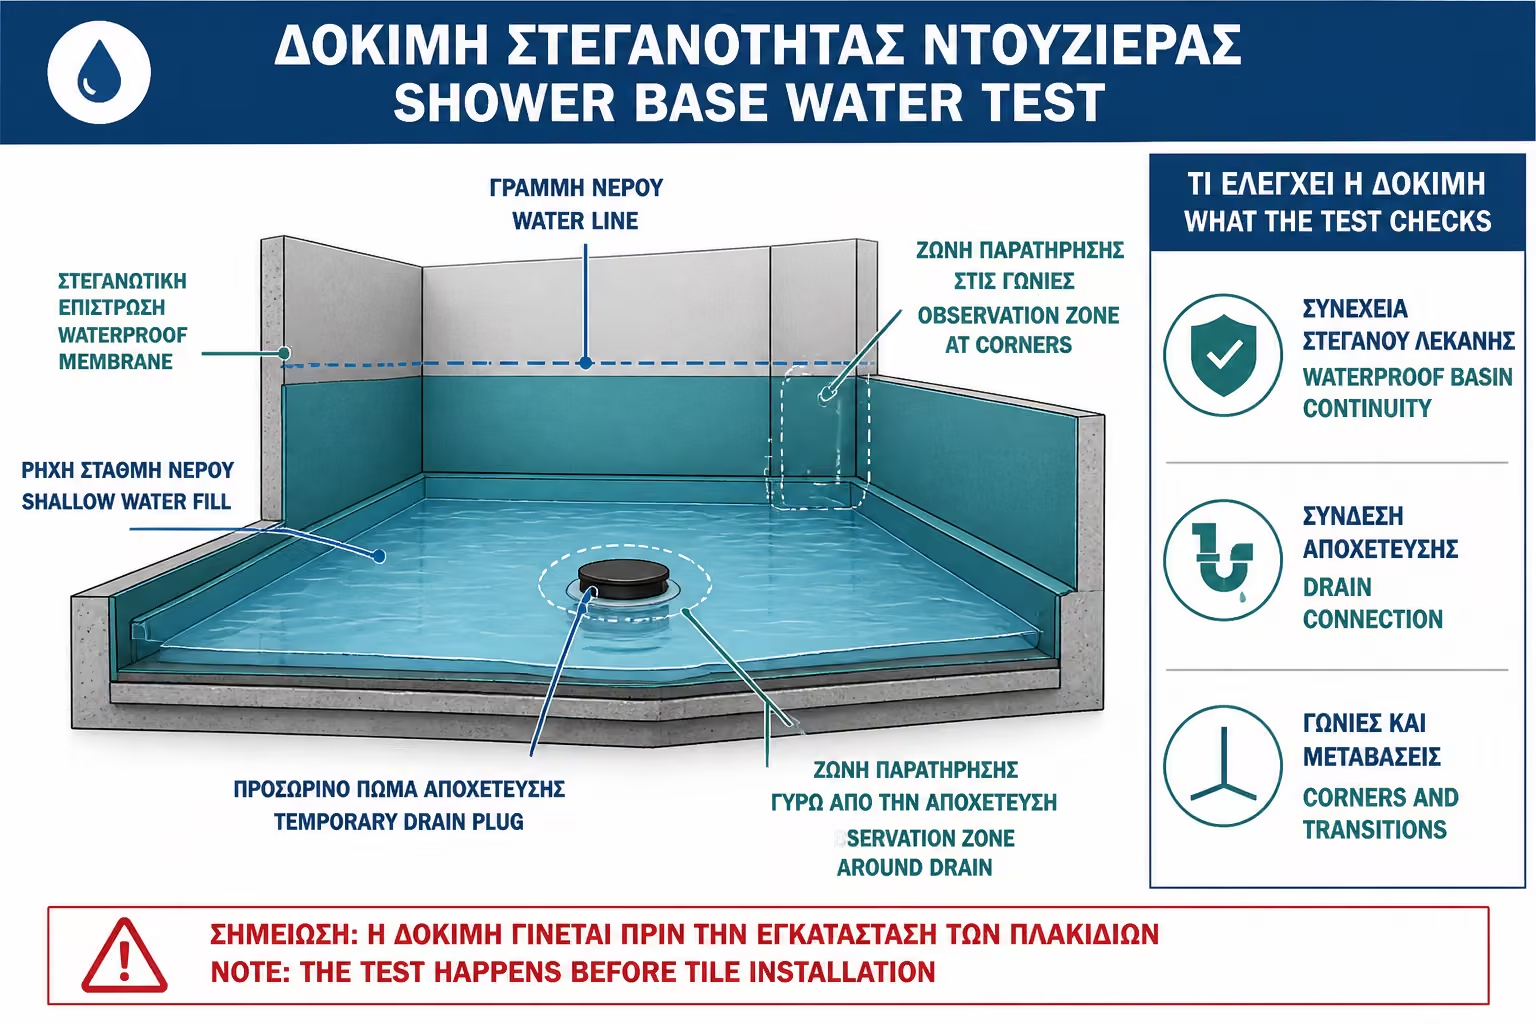
The test is done after the waterproofing is completed and after the system has matured as required by the manufacturer. This is critical. Flooding a film that has not dried or cured sufficiently can destroy it or create failures that were not there.
Waiting times are not the same for all products. Some membrane sheet and mortar systems, such as KERDI, state a wait of at least 24 hours before water testing.
The test is done before the tile adhesive. If the tiles are already in, the test no longer checks the membrane directly, but a more complex system. The right time is between the completion of the waterproofing and the paving.
Practically all waterproofing must be finished: floor, corners, tapes, siphon, cuffs, reinforcements and any temporary details. There is no point in testing a half-finished application. Also, no people, tools or debris should step on the membrane after the test and before tiling, as this may damage the surface.
The tightness test seems easy: you close the siphon, add water, wait. But in an apartment building bathroom or unfinished construction, a mistake can cause real damage. If the temporary barrier doesn't hold, water can seep into the rest of the house. If the siphon is blocked incorrectly, it may leak down the drain or cause injury. If the membrane is not matured, it may fail the test.
That is why the test must be done by a professional or at least under the supervision of a technician who knows the system. In apartments, special care must be taken because any leakage can affect the floor below. We don't flood a bathroom "just to see what happens" without a plan.
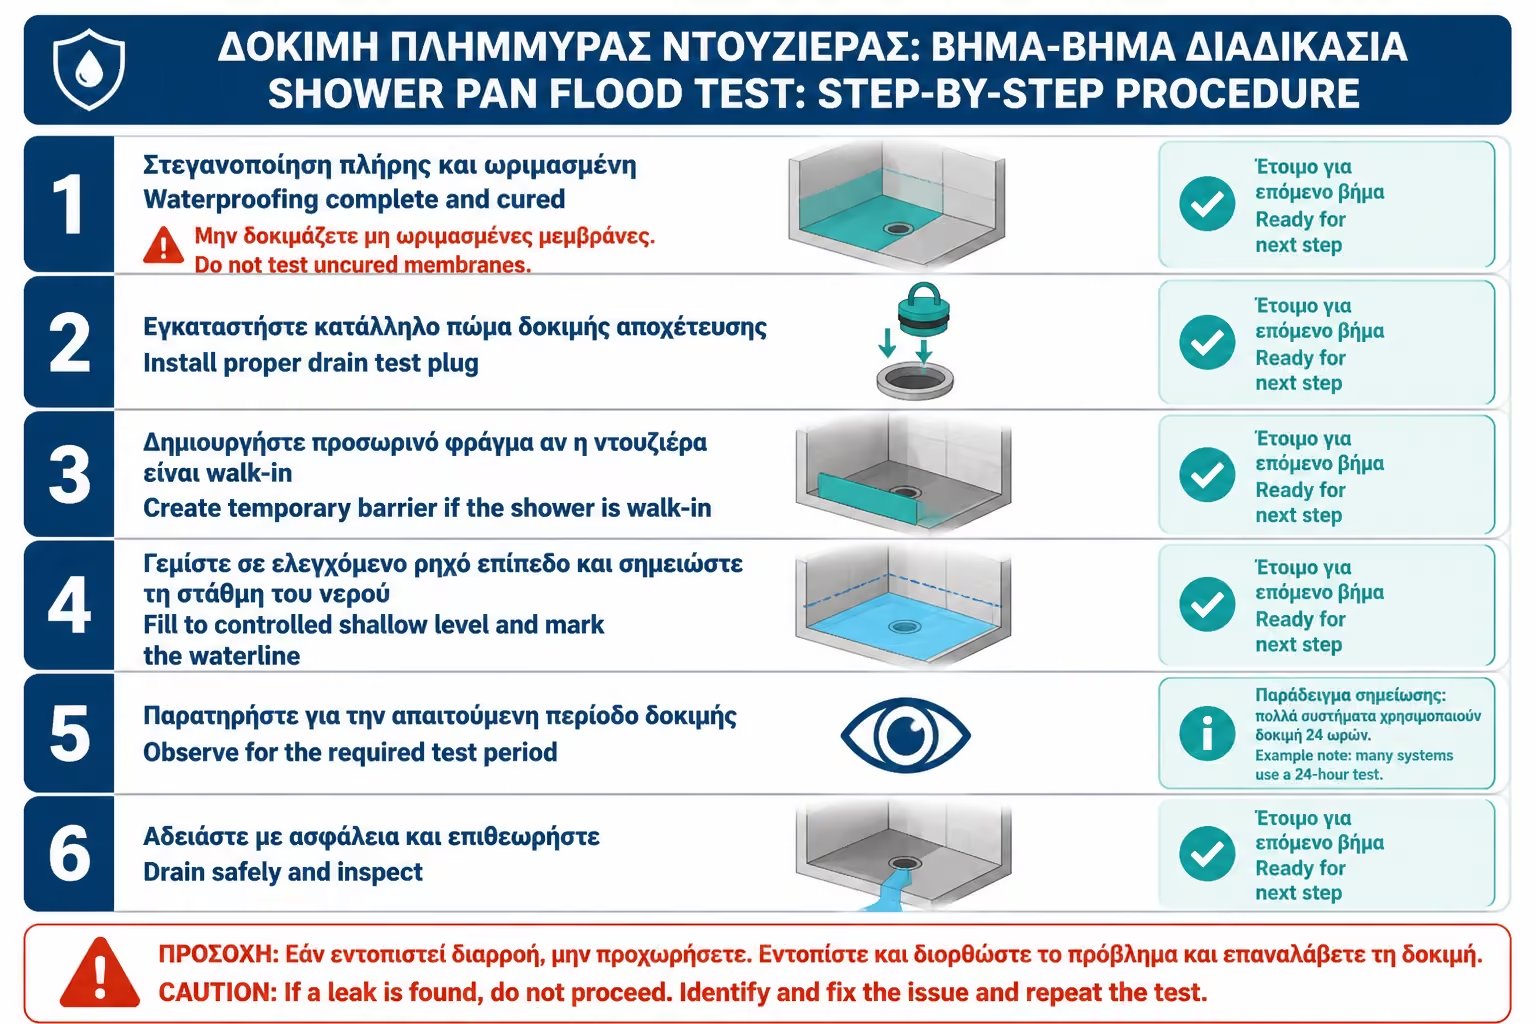
The test requires a proper plug in the siphon, not a rough cloth or bag plug. It requires a temporary barrier at the entrance to the shower or wet room, especially if there is no step. It requires level marking, monitoring and safe draining of the water at the end.
The owner can and should request the test, be informed of the result and keep photos. However, he should not perform it casually by himself in an unfinished bathroom.
To do the test properly, you first need a suitable cap or test plug for the siphon. The plug must plug the drain securely without damaging the siphon or sealing connection. Some siphons may require a special balloon or mechanical stopper. Rough closing is not reliable.
A temporary barrier is also needed where there is an open entrance. In walk-ins without a step, a temporary dam must be created to keep water in the test zone. Even Schluter, in its barrier-free shower guidelines, states that a temporary barrier, such as wood and sealant, is required to hold the water in during the test.
A way to measure the level is needed. This can be done with a mark on the wall, a ruler, tape or other fixed reference point. The level should be recorded at the beginning and checked at the end. In more demanding applications, more than one measurement point can be used.
Finally, it takes time and follow-up. The test is usually not a matter of a few minutes. In many shower systems, 24 hours is considered a standard duration for a water test.
The height of the water should be sufficient to check the sealed zone, but not so high as to create an unnecessary weight or risk of overflow. In typical shower tests, a depth of a few centimeters is often used, enough to cover the low point and critical floor joints. MAPEI states in a related technical article that a typical shower needs at least a few inches of water for about 24 hours to assess if the membrane has been properly applied.
In a domestic bathroom, one should not uncontrollably fill the entire surface. He must know the height of the temporary barriers, the position of the door, the joints with the walls, whether there are openings and whether the floor can take the weight. Water is heavy: every centimeter of water over a large surface adds significant weight.
For a small shower floor, the depth is more easily controlled. For the whole wet room, the test is more demanding and should be done with more care. In old buildings or wooden substrates, even more attention is needed to the load and the risk of leakage.
The correct depth must agree with the system and the logic of the construction. We don't need to "choke" the bathroom. We need to check the sealing in a safe and controlled way.
The process begins with a visual inspection of the waterproofing. Before water is introduced, the technician should check for obvious gaps, tears, holes, weak corners, poor siphon connection, or uncovered spots. There is no point in testing a surface that already looks problematic.
Then the siphon is blocked with a suitable plug. If there is a walk-in without a step, a temporary barrier is created at the entrance. The barrier must be tight and stable, but not injure the membrane. The zone is then filled with water to the agreed height.
The level is accurately marked. A mark can be made on the wall or a temporary reference point. It is a good idea to photograph the initial level with time and date. The test is left for the required time, usually 24 hours on many shower systems, unless the product or specification requires otherwise.
During the test the sub-floor, adjacent walls, skirting boards and any places where moisture could appear are checked. At the end, the level is measured again. If there is no substantial drop and no signs of leakage, the test is considered successful for the given conditions. If there is a drop in water level or moisture, paving should not proceed until the cause is found and corrected.
Water levels can drop for more than one reason. The most serious cause is leakage. But there are also factors such as evaporation, absorption from a surface if the membrane is not completely closed or a small change in temperature. Therefore, the interpretation must be done with caution.
In a proper system, the level should not drop noticeably. If there is a large drop, especially if it is accompanied by moisture elsewhere, the test has failed. If there is a small questionable change, a repeat, plug check, or use of a second measurement point may be needed. The siphon plug itself can be a source of false failure if it is not properly closed.
That is why the test must also check the plug. If water is lost through a bad plug to the drain, it does not mean that the membrane has failed, but the test is not reliable. Conversely, if the plug holds and moisture appears in an adjacent spot, the problem is serious.
In professional testing of larger surfaces, the level can be monitored by markings or gauges. Guidelines for flood testing of membranes in other applications mention level monitoring at multiple points and controlled water depth. In a bathroom, the same principle applies more simply: clean start mark, clean end mark, leak check.
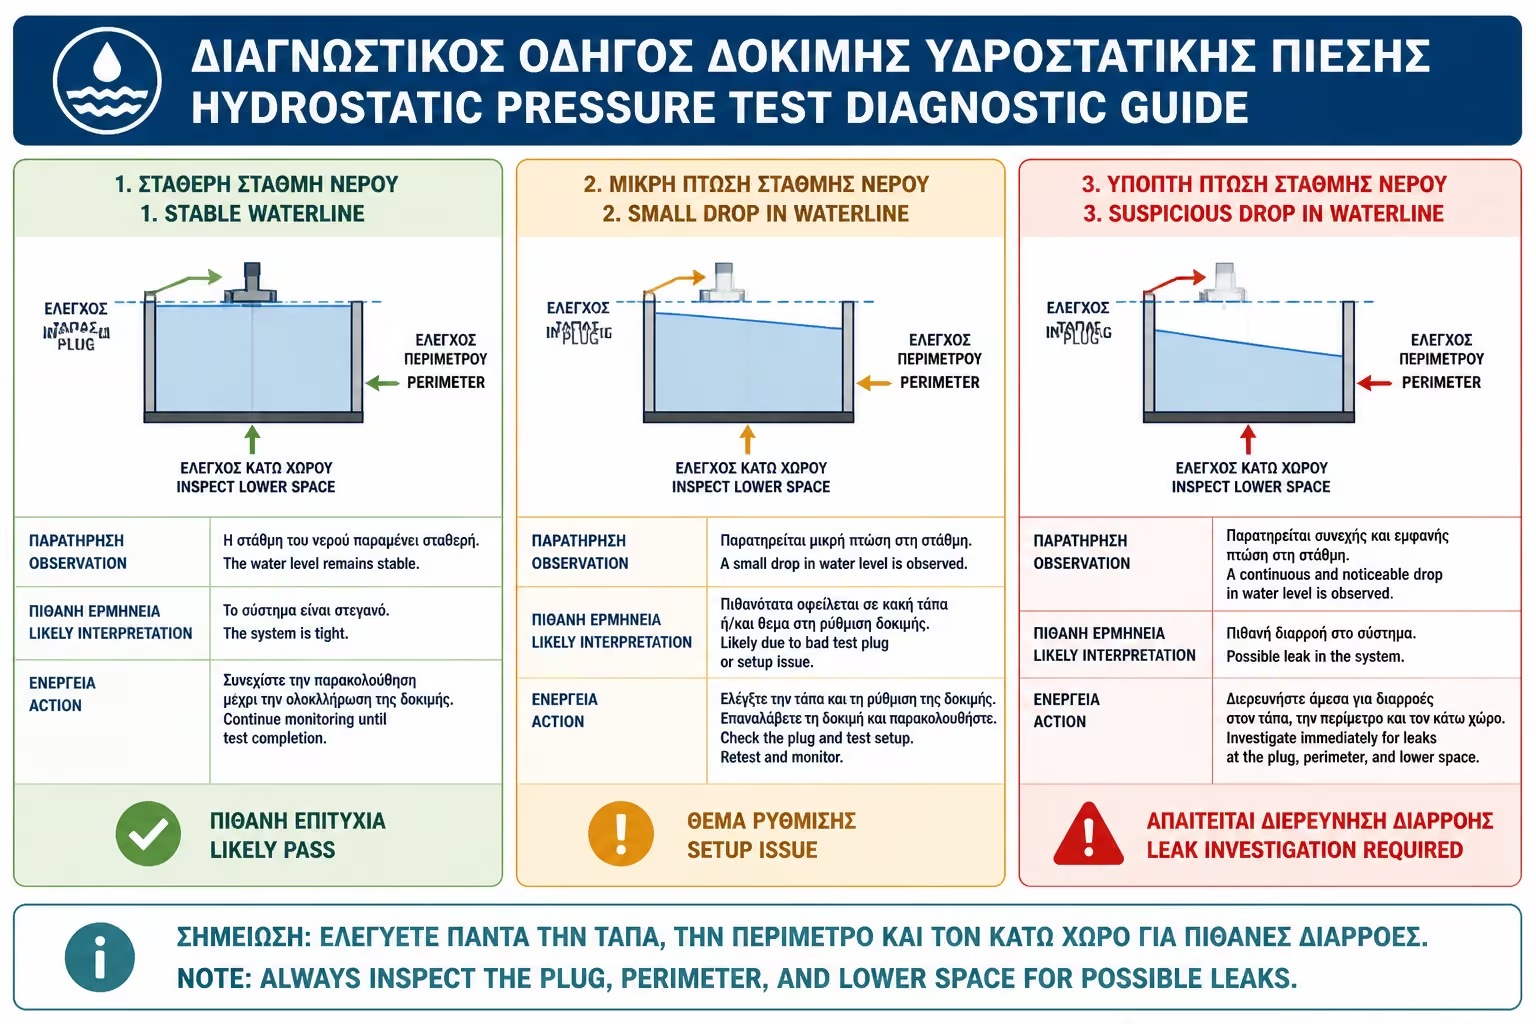
During the test we don't just look to see if the level drops. We also check the critical points of the construction. First is the siphon. Around it the water gathers and there are often compounds of different materials. If bubbles, moisture or strange behavior appear near the siphon, it needs to be checked.
Second are the floor-wall angles. That's where the movies have to be. If there is a weak joint, water can move behind the waterproofing and show up low on a wall or on the floor below.
Third is the temporary barricade line in a walk-in shower. If water passes through the temporary dam, it does not necessarily mean that the insulation has failed, but the test is not well controlled. The barrier should be part of the test, not its weak point.
Fourth is the lower side or adjacent space. In an apartment, the lower floor should be checked if there is access. In a detached house, the underside of the slab or the basement can be checked. In any case, the test is not only judged by the floor we see, but also by whether water appears where it should not.
In walk-in showers without steps, the test is more demanding because there is no physical boundary to hold the water. A temporary barrier is needed at the shower entrance. This barrier must be temporarily sealed, but in a way that does not injure the membrane and can be removed without damage.
In flat structures, it must be decided which area will be tested. Just the shower zone? A larger bathroom section? The whole floor? The answer depends on what is waterproofed and what area can realistically get wet. If only the shower is sealed, it cannot flood the entire bathroom without creating a hazard.
The walk-in test is very useful because it checks exactly where failures are common: the continuity of the seal in an open zone, the connection to the siphon and the corners. But it must be done with professional logic. Water should not reach areas not designed for testing.
After emptying, leaks should also be checked. The flood test mainly checks for tightness, but when the plug is removed and the water is drained, it can be seen if the floor is holding ponds or if it is properly directing water to the siphon.
On wooden substrates or OSB, the tightness test needs even more attention. The wood should not get wet. If the seal fails, water can cause swelling, distortion or damage much faster than on a mineral substrate.
Before a flood test is carried out on such a construction, the rigidity, the complete waterproofing, the joints and the connection to the walls must have been checked. Water load must also be considered. A large surface with several centimeters of water adds weight. In questionable constructions, there must be a technical assessment.
In some cases, a more limited or different screening process may be preferred, depending on the system. If the manufacturer of the wet room system for a wooden substrate provides a specific test method, this must be followed. We do not mechanically apply the logic of a concrete floor to a wooden structure.
The message is simple: in wood, the flood test is useful but higher risk if done sloppily. It wants a professional, cargo control and a safe process.
If the level drops significantly or moisture appears, we do not proceed with tiles. This is the basic rule. Failing the test is exactly why we did it: to find the problem before it closed.
First, the possibility of a bad plug must be ruled out. If the water left the drain because the plug did not hold, the test must be repeated with a correct plug. If the plug was correct, check the corners, joints, siphon, tapes, membrane points, cuffs and any minor damage.
The repair can be local if the problem is clearly identified and the system allows local repair. For example, additional tape, membrane overlay, repair around siphon or recoating may be required. If the problem is generalized, a larger reconstruction of the waterproofing may be needed.
After repair, the test must be repeated. It is not enough to fix something "roughly" and proceed with the paving. The failure is a warning that the system needs confirmation before being covered.
A successful flood test does not prove that the tile adhesive will be correct. It does not prove that the wicks will dry quickly in daily use. It does not prove that later the glass cabin will not puncture the membrane. It does not prove that the grout will be of good quality or that the silicone will be applied correctly.
It mainly proves that the waterproofing, as it was at the time, held water for the duration of the test. This is very important, but it is a part of the overall quality. After testing, the membrane must be protected until the tiles are installed. It should not be stepped on with dirty shoes, injured by tools, or drilled for parts.
Also, a shower can pass a flood test and later have a problem if the tiling is done with the wrong adhesive or if holes are drilled for an unsealed cubicle. That is why the flood test is not the end of quality. It is a critical intermediate point.
The correct approach is to see it as a technical verification of the hidden layer before the next task. Not as a "magic guarantee" that allows sloppiness in the next stages.
Errors in flood testing can give false security or cause damage. Most often the test is done before the membrane is matured. Thus the material can be stressed prematurely. Another frequent mistake is the casual clogging of the siphon, which leads to water loss from the plug and not from the seal.
| Error | Possible consequence | Correct approach |
|---|---|---|
| Test before the film matures | Damage or weakening of the waterproofing | Waiting according to the product |
| Draft clogging of siphon | False failure or uncontrolled water loss | Suitable test plug |
| Excessive water height | Unnecessary load and risk of overflow | Controlled depth |
| Bad temporary barrier in walk-in | Water in the rest of the bathroom | Correct temporary dam |
| No level marking | There is no objective control | Clear sign and photo |
| The bottom space is not checked | A leak that is not detected in time | Control around and below the belt |
| Advance tiles after failure | It hides the problem | Repair and retest |
| Membrane injury after the test | New failure before paving | Surface protection |
A typical example is a shower that passed the 24-hour test, but then the craftsmen stepped on the membrane with tools and pieces of tile before the glue. If the membrane is damaged after the flood test, a successful result is no longer guaranteed.
Leakage testing is not a big material cost. It is mainly a cost of time, supervision and organization. It needs to be waterproofed, wait for the right time, properly dam the runoff, fill the zone, monitor and then drain carefully. On many projects, this means paving is delayed by at least a day.
In a bathroom renovation, where the total cost for a standard bathroom of 5 sq.m. in Greece in 2026 it can move around 3,200–5,500€ for a simple/medium solution and 6,000–7,500€+ for a more demanding walk-in solution, the time of a correct check is short compared to the cost of a possible failure. If a leak is found after tiling, the repair can cost many times as much.
| Factor | How it affects cost / time |
|---|---|
| Type of waterproofing | Other waiting times for sheets, others for wet films |
| Test zone size | Another small shower, another whole wet room |
| Walk-in without steps | A temporary barrier is needed |
| Access to lower floor | It helps control but requires coordination |
| Test failed | Adds repair and redo time |
| Film protection after | Needs organization before paving |
If an offer promises very fast completion without leaving room for maturation and testing, the owner should ask if flood testing is included or omitted.
A complete offer for a walk-in shower or demanding waterproofing should mention whether a leak test is provided. It does not always have to be done in the same way in every small project, but in built-in showers, wet rooms and level solutions it is a very useful forecast.
The quote must say who is doing the testing, when it will be done, based on which system and what will happen if it fails. It must also take into account film curing times. If the test requires 24 hours, this must be included in the schedule.
If a specific sealing system is used, the test should follow the manufacturer's instructions. For example, in systems that require a wait before the water test, the bid and schedule must account for this.
The offer should also be clear about the next steps: after the test is successful, how is the membrane protected until tiling? What glue will be used? Will there be photographic documentation? These help to not nullify the success of the test by a cursory follow-up.
The owner can ask simple but very important questions. First: "Is there a flood test before the tiles are put in?" If the answer is no, ask to know why. There may be a technical reason, but in a built-in shower the omission must be justified.
Then ask, "When is the test allowed based on the material we put in?" It should not be done before the membrane has matured. Also ask how long it will take. In many systems, 24 hours is standard, but product instructions should be followed.
Ask how the faucet will be blocked and how the temporary barrier will be made if the shower is a walk-in. Ask who will check the level and if there will be before and after photos. Finally, ask what will happen if the test shows water loss. The correct answer is not "it won't happen". The correct answer is "we will detect, repair and retest".
A serious technician will not be bothered by these questions. The flood test protects him too, because it documents that the waterproofing was tested before it was covered.
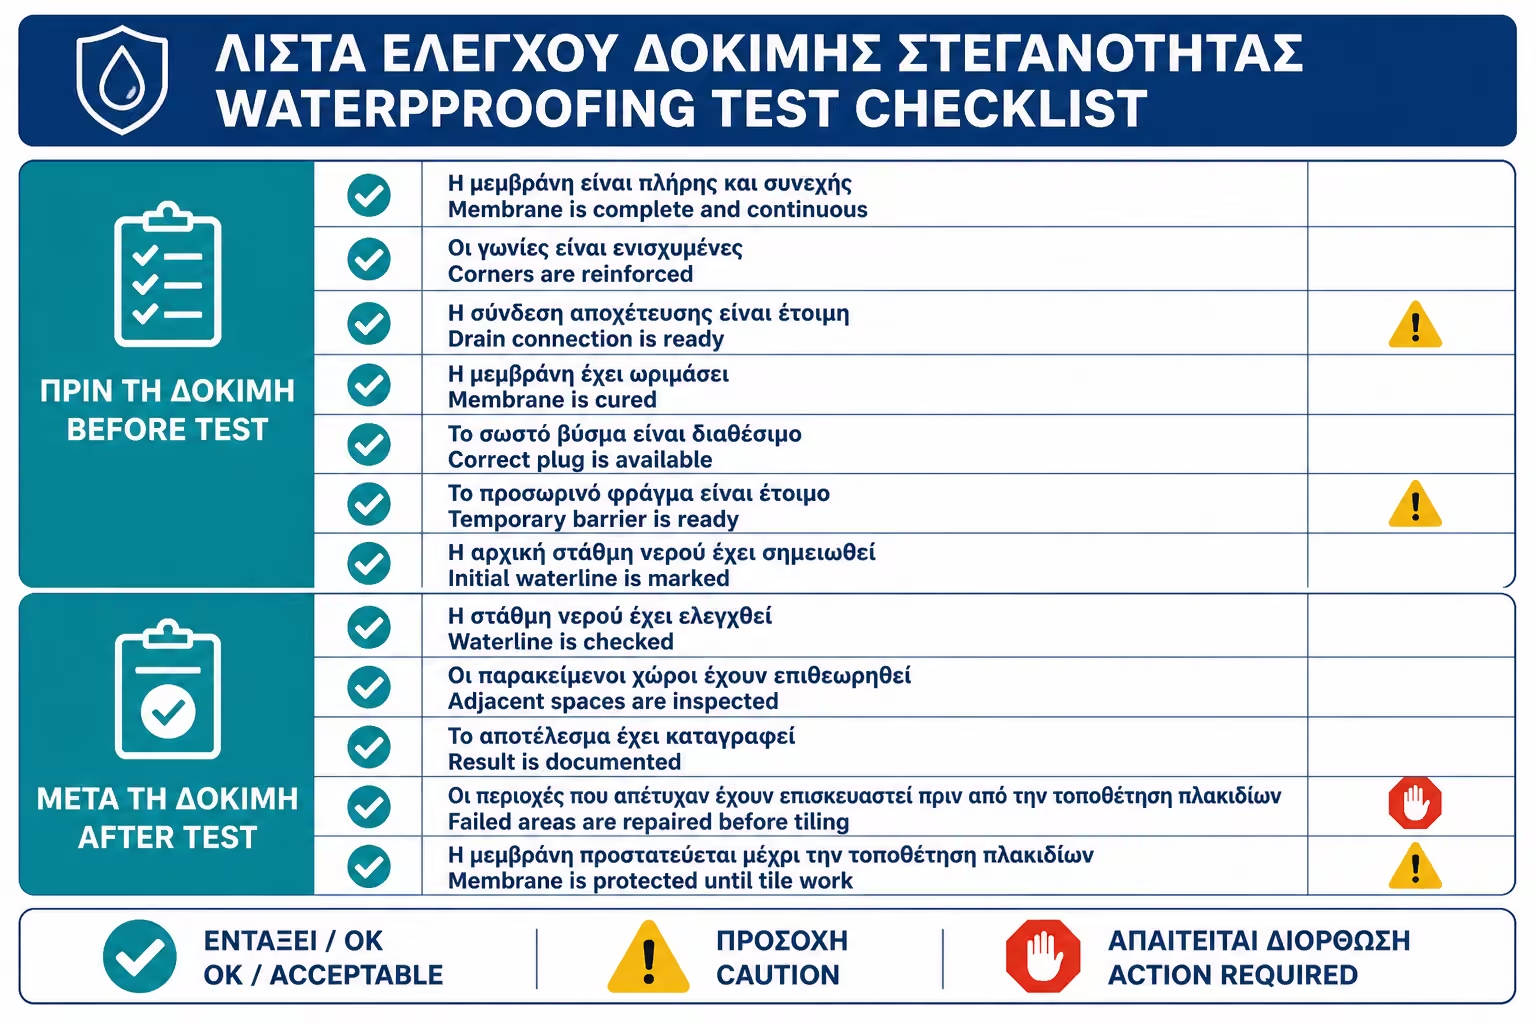
| Inquiry | Yes / No |
|---|---|
| Has the waterproofing been fully completed? | Yes / No |
| Are the corners taped and cuffed on the fittings where appropriate? | Yes / No |
| Is the siphon properly connected to the membrane? | Yes / No |
| Has the film matured as required by the product? | Yes / No |
| Is there a suitable test plug for the siphon? | Yes / No |
| In walk-ins, has a safe temporary barrier been erected? | Yes / No |
| Is the initial water level clearly marked? | Yes / No |
| Are there any start photos with time/date? | Yes / No |
| Will the test take the time the system predicts? | Yes / No |
| Have adjacent areas and downstairs where possible been checked? | Yes / No |
| Has the level remained stable with no signs of leakage? | Yes / No |
| If there was a loss, was the cause identified before tiling? | Yes / No |
| After emptying, is the membrane protected until tiling? | Yes / No |
| Does the offer state testing, time, responsibility and next steps? | Yes / No |
If several answers are "don't know", the test should not be done casually. And if the test fails, paving should not begin until the problem is corrected.
> If you have to keep one thing, keep this: the flood test is one of the best checks you can do before the waterproofing is closed under the tiles, but it has to be done correctly. Wait for the membrane to cure, use a suitable plug, make a secure temporary barrier, mark the level and allow the required time. If water is lost, don't accept "it's okay, the tile will cover it". The tile does not fix a failed seal.
The leak test is a valuable professional tool, because it checks the waterproofing before it is lost under the tiles. In built-in showers, walk-in solutions, level wet rooms and demanding bathrooms, it can prevent serious damage and expensive repairs. If there is a leak, it is better to see when the membrane is still visible and repairable.
Proper testing is not a flash flood. It needs mature waterproofing, proper drain closure, controlled water depth, clear level marking, waiting time and control of the surrounding areas. It also requires professional judgement, because a drop in level could mean a leak, but it could also be due to a bad plug or the test being run incorrectly.
Flood testing does not guarantee that there will never be a future problem. It does not protect against wrong glue, cabin holes, poor maintenance or later interventions. But it does confirm that the basic waterproofing basin holds water when it should: before it's covered.
For the owner, the practical direction is simple. Ask for the test to be factored into the schedule, especially in a built-in or walk-in shower. Ask for before and after photos. And if the test shows a problem, don't proceed with tiling until it's fixed and tested again. In waterproofing, the most economical repair is the one done before the tile is installed.
Return to category.
Go to categoryReturn to the central guide.
Go to guide