
Bathroom Waterproofing & Moisture Protection
Return to category.
Go to categoryIn every bathroom there are places where the waterproofing is necessarily interrupted. Mixer pipes come out of the wall. The basin or washing-machine drain passes through the finished assembly. The concealed cistern, the shower hose outlet, the angle valves, and the service penetrations all create holes in a surface that should ideally remain continuous and watertight. These points may look small, but technically they are major weak spots.
The most common mistake is to treat pipe penetrations as a finishing detail. The plumber leaves the pipe outlets ready, the tiler cuts around the pipe, an escutcheon is fitted, and the point is considered "closed". In reality, the escutcheon we see at the end is not a seal. It is a decorative and protective cover. The actual sealing has to be done underneath, at the level of the waterproofing, before the tiles are installed.
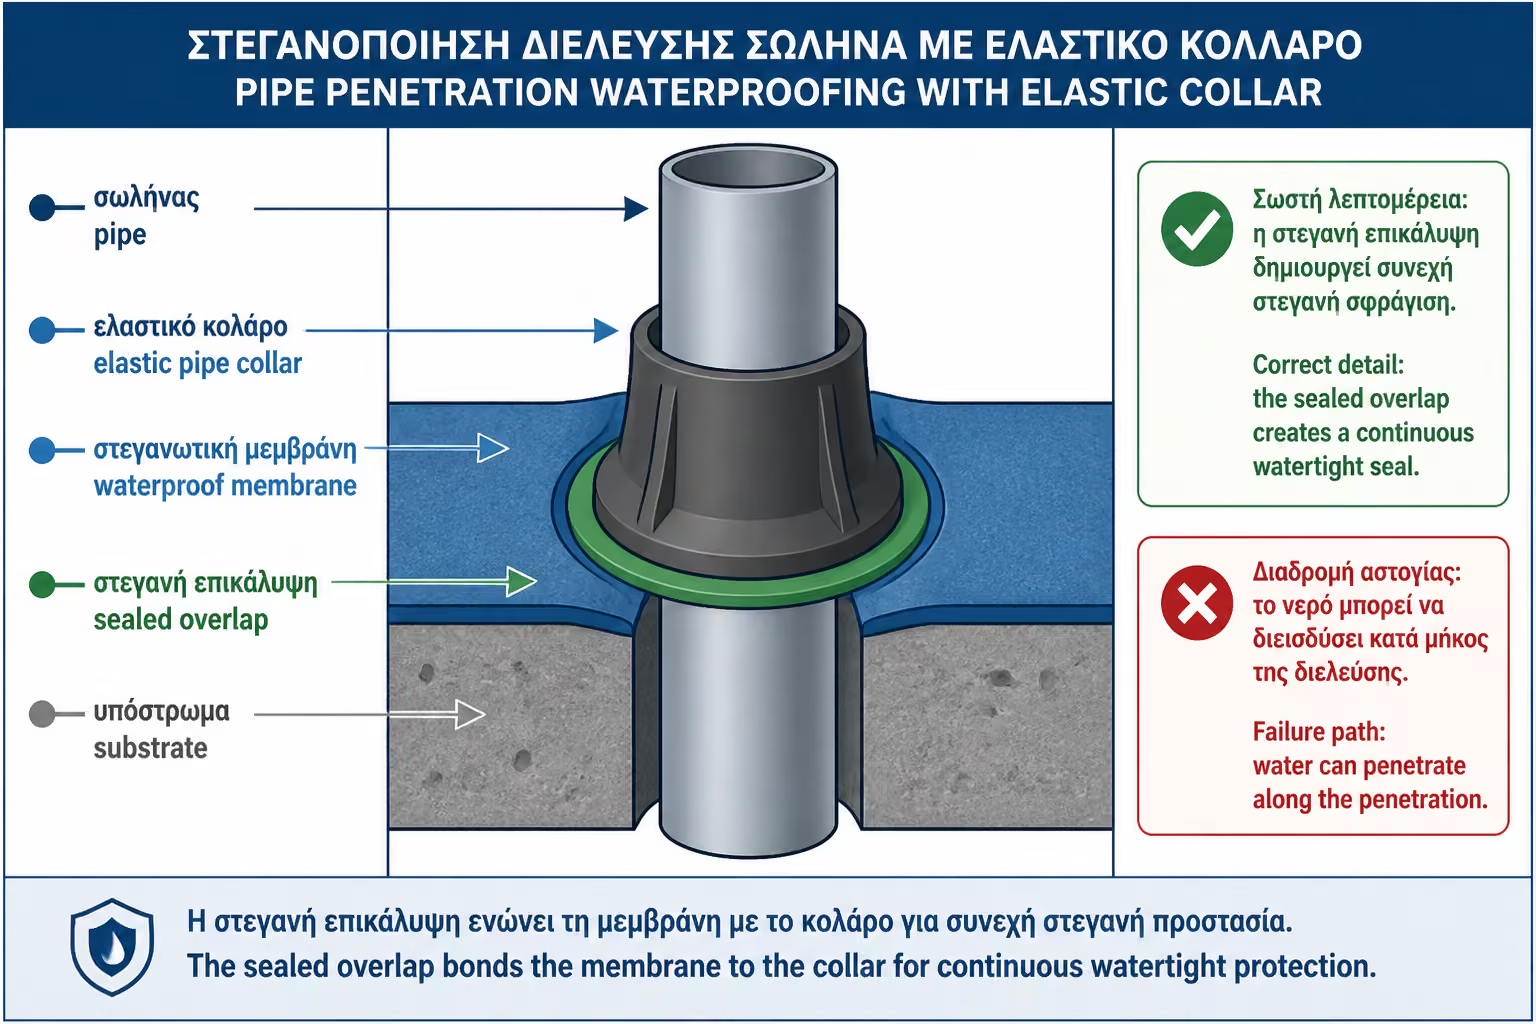
This is where special rubber collars come in, also known as pipe collars, pipe seals or pipe cuffs. They are small but critical sealing pieces that hug the pipe and are incorporated into the spreadable sealant or membrane. Their role is to bridge the gap between a rigid or semi-rigid element, such as a pipe, and a surface that must remain watertight. Without them, the waterproofing stops around the hole and leaves one of the most vulnerable parts of the bathroom exposed.
The difficulty is that pipes are not static "dots" on the wall. They may move slightly, expand and contract with temperature changes, connect to mixers that are tightened and loosened over time, sit inside imperfect openings in plaster or cement board, and lie in areas that receive daily splashing. In the shower zone, especially around the mixer, every hole is a potential entry point for moisture behind the tiles.
This guide explains why pipe passages are so vulnerable, how rubber collars work, where they should be used, what common mistakes are made and what the home owner should check before tiling the wall.
Waterproofing a bathroom is only valuable when it is continuous. Where there is a break, there is a potential water path. A pipe sticking out of the wall creates just that: a hole in the sealing surface. If this hole is not properly sealed, water can seep behind the tile, move into the wall, and resurface much later elsewhere.
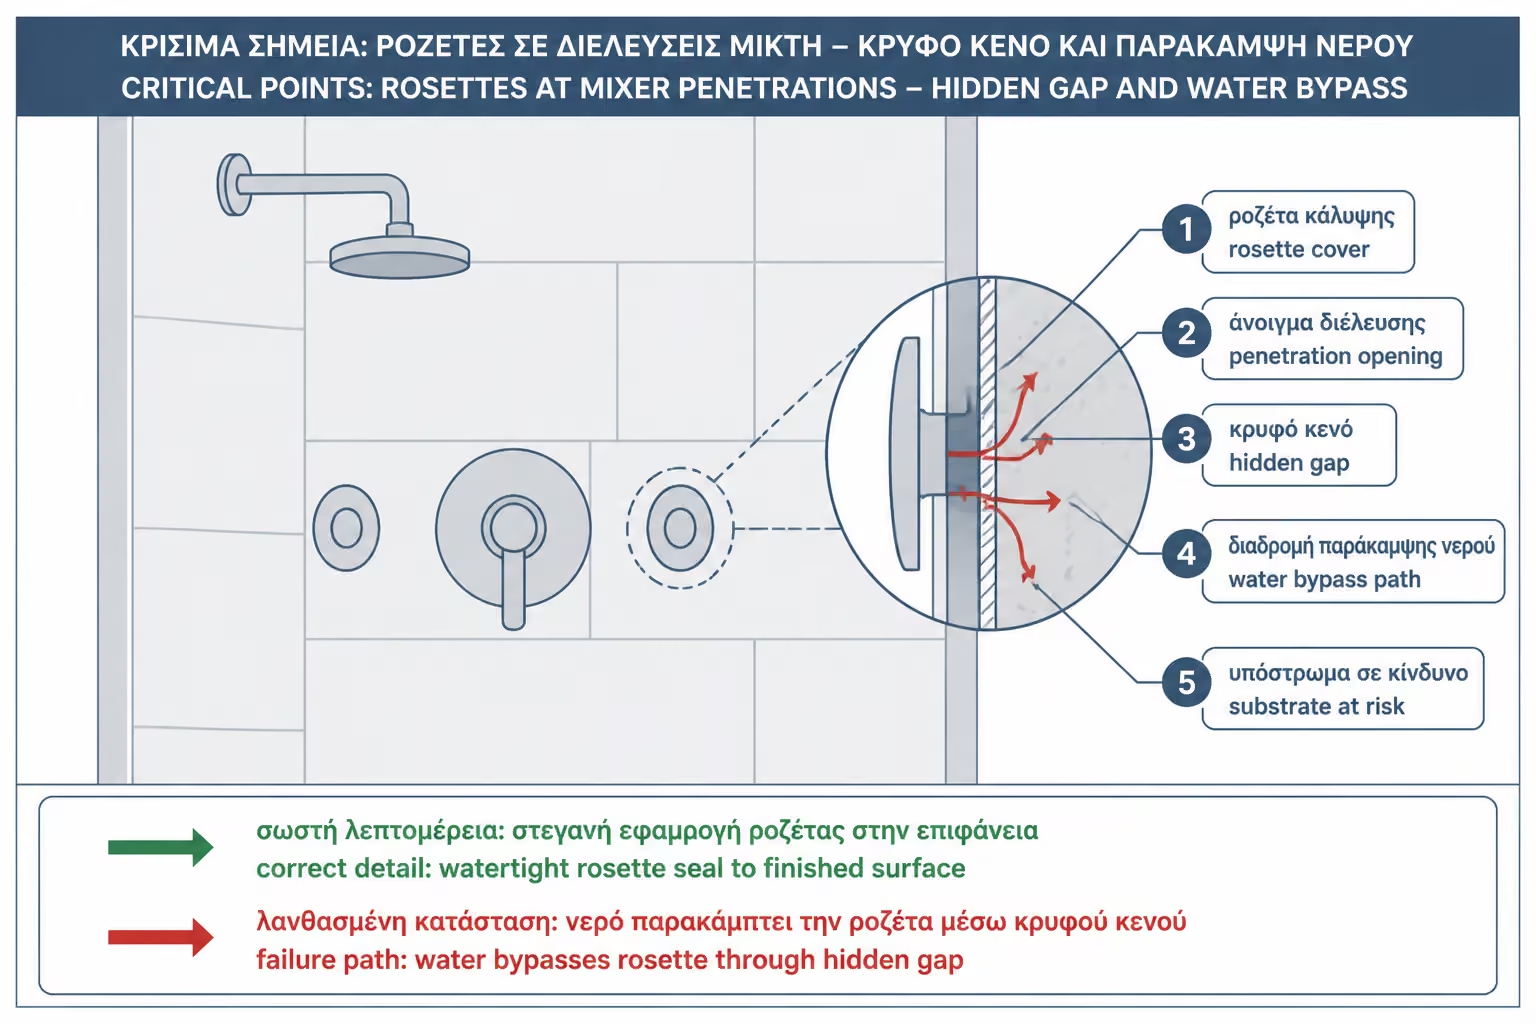
In the shower mixer area, the problem is even more serious. Water often hits the wall, runs around the escutcheons, and can seep behind them. If there is only a crude hole in the tile and a gap around the pipe behind the escutcheon, the point is weak. There may not be a direct plumbing leak, but service water can still get behind the lining.
Water outlets, angle valves, washing-machine connections, sink drains, and penetrations around concealed systems each have different requirements, but the principle is always the same: where the waterproofing is punctured, continuity has to be restored with a dedicated sealing piece. Simply "filling" around the hole is not enough.
In a well-designed bathroom, pipe passages are not dealt with at the end. They are foreseen from the waterproofing phase, just like the corners and the siphon.
The word "escutcheon" is often misunderstood. In everyday language, when people say that an escutcheon will be fitted around the pipe, many assume the point is sealed. But the metal or plastic escutcheon we see on the finished surface is mainly an aesthetic piece. It covers the tile hole and gives a clean finish. It is not the wall's actual waterproofing.
If the escutcheon does not have a dedicated sealing detail and does not integrate with the waterproofing system, it should not be treated as protection. It may reduce direct splashing into the hole, but it does not reliably stop water from passing behind it. Over time, cleaners, salts, temperature changes, and small movements can open tiny gaps.
The actual waterproofing has to be behind the tile, at membrane level. That is where the cuff or pipe collar comes in. This special piece wraps the pipe and integrates into the wall waterproofing. Only after that come the adhesive, the tile, and finally the visible escutcheon.
The visible escutcheon is just the cover. The pipe collar is the real seal. If those two roles are confused, the bathroom is left exposed exactly where the pipes pass through the wall.
Pipe collars are special sealing pieces with an elastic hole in the center and a side surface that is integrated into the membrane or spreadable sealant. The elastic opening grips the pipe or outlet, while the flat part of the collar is bonded and embedded against the wall. This creates a watertight transition between the pipe and the surface.
There are different sizes and types. Some are made for small water-supply outlets, others for larger drains, and others for special penetrations in showers, cisterns, or dry-construction systems. Some have fleece around the elastic center so they integrate better with liquid-applied materials or adhesives. Others belong to complete membrane systems.
Their main function is elastic bridging. The tube may have slight movement or thermal expansion. The wall may behave differently. The collar allows the system to remain watertight without relying on rigid padding around the hole.
No random piece of rubber or improvised solution should be used. The pipe collar must be compatible with the waterproofing system, correctly sized for the pipe diameter and able to be fully boxed prior to paving.
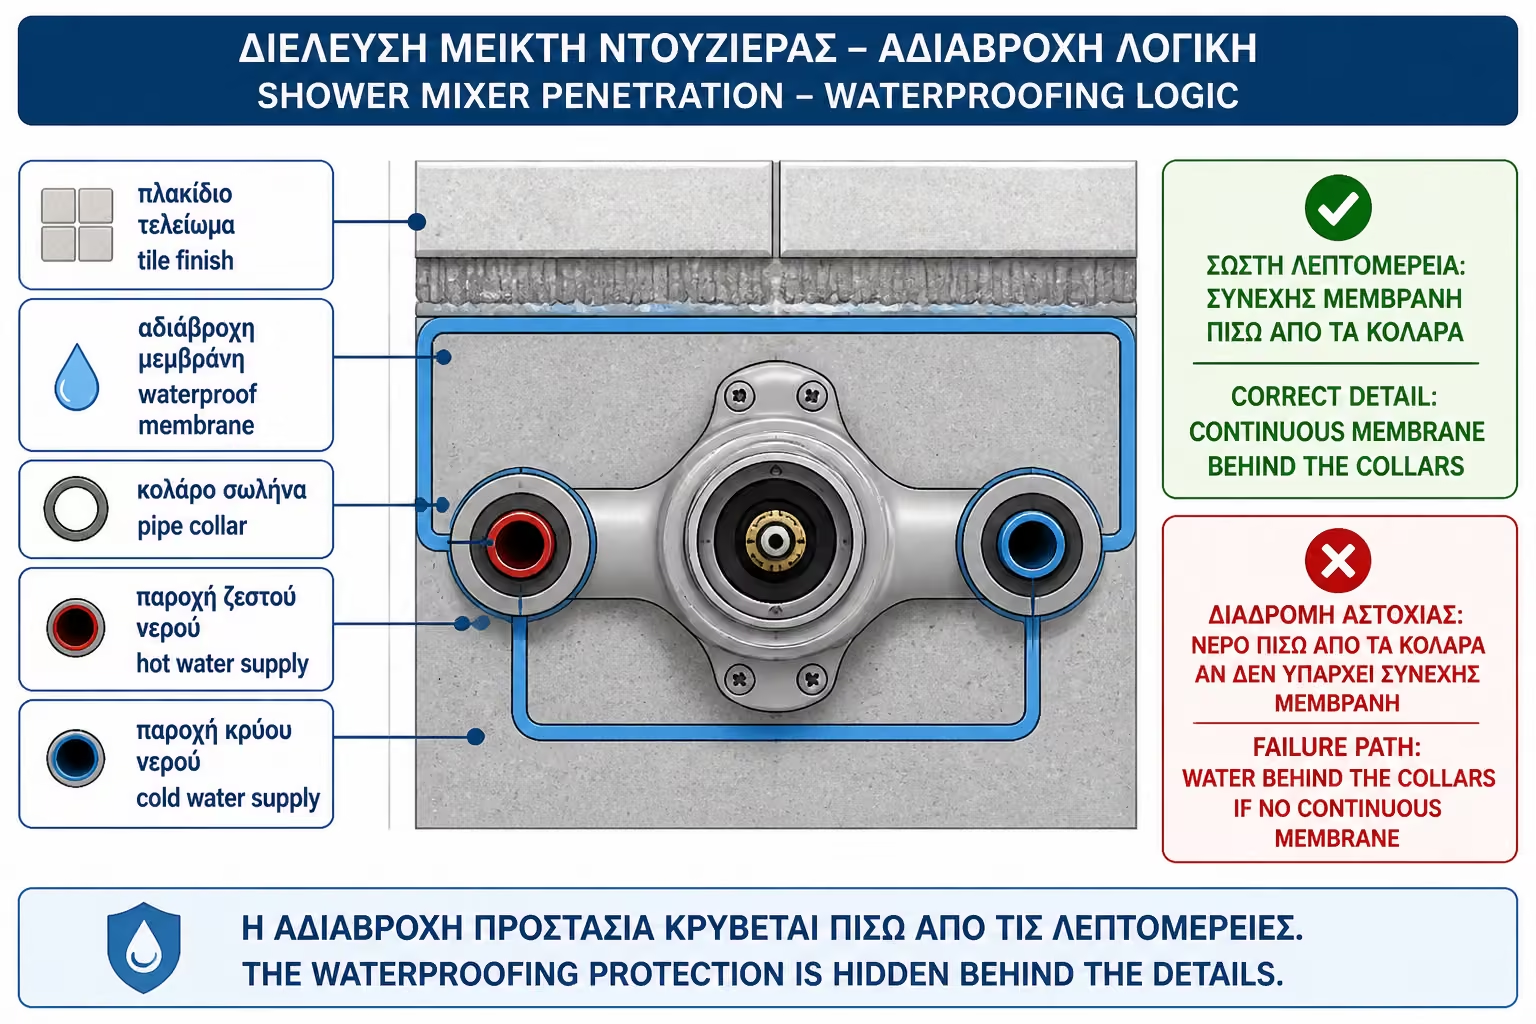
Cuffs are needed at any point where a pipe or stand penetrates the sealed zone. The most obvious example is the shower mixer. The hot and cold water outlets sit directly inside the wettest part of the wall. There, pipe collars have to be treated as an essential part of the system.
They are also needed around concealed mixers, where the supplies and the in-wall body create more penetrations and joints. In those cases, special cuffs or sealing elements provided by the mixer manufacturer or waterproofing system may be required.
In the sink, the supplies and drains do not always receive direct water pressure like the shower, but are in a wet environment. If the wall behind the sink is tiled and sealed, the passages must be properly sealed, especially in small bathrooms where splashes are common.
In utility areas, washing-machine drains, and service outlets, the need depends on the zone and the expected exposure. If they sit inside a waterproofed wall or near a floor that may get wet, proper detailing helps prevent future failures.
The shower mixer is where pipe penetrations receive the greatest daily stress. Water hits the wall, users touch and clean around the mixer, escutcheons collect salts, and temperatures change constantly. If the seal behind the escutcheons is weak, water can slowly but steadily pass behind the tiles.
The correct process starts before waterproofing. The pipe outlets must be stable, properly aligned, and set at the correct depth. They should not move when the mixer is installed. Any gaps around the pipes have to be repaired with suitable material so the cuff can sit on a firm surface.
Then the first layer of sealant is applied, the pipe collar is passed around the pipe and pressed into the fresh layer. The hole should fit snugly around the pipe, but not tear. The sides of the collar must be fully boxed. They are then covered with a second layer so that the collar becomes part of the waterproofing of the wall.
Only after that come the adhesive, the tile, the final escutcheon, and the mixer trim. If the collar is omitted, the supply opening remains one of the most dangerous points in the shower.
Concealed mixers look clean, but they are technically demanding. The in-wall body sits inside the partition and, after tiling, access is limited. In this case the sealing does not concern only two short outlets. It has to cover the entire area around the body, the supply penetrations, the outlet points, and the trim plate.
A hydraulic test must first be performed before the wall is closed. This is not negotiable. If there is a small leak at a connection inside the wall, no external sleeve will solve the problem. Pressure control and proper body support are necessary stages.
The mixer manufacturer's instructions then have to be followed. Many concealed bodies have specific depth limits, protective boxes, perimeter gaskets, or recommended sealing methods. If the wall is closed incorrectly, or if the waterproofing simply stops around the box without continuity, a vulnerable point is created.
In such applications, simple generic cuffs may not be sufficient. A special sealing detail, tape, spreadable system or combination of materials around the body may be required. But the logic remains the same: every passage and every interruption of the surface must be included in the waterproofing layer.
Sewer crossings are larger in diameter and often more difficult to implement aesthetically and technically. The sink drain, washing machine stand, or other piping that runs through the wall may be in places less directly exposed than the shower, but they should not be ignored.
In a wall that is waterproofed and tiled, the large drain hole must be clean, firm and properly sealed. If there are large gaps around the drain, it is not enough to hide them with the tile or the drain cover. There must be a suitable waterproofing detail before lining.
For larger diameters, correspondingly sized collars or special tape/membrane formed around the pipe are required. The application must allow micro-movements, but not allow water to pass behind the surface. In drains, movement can result from siphon connection, washing machine vibration or small displacements during use.
The area behind a washing machine is often underestimated because it is not "visible". But a small leak or overflow can wet the wall and floor. If the passages are properly sealed, the bathroom has a much better defense against such incidents.
In plasterboard, wet plasterboard, cement board or Aquapanel, pipe passages need special attention. The plate is drilled for the pipe to pass through and there may be cut edges, dust, loose spots or small gaps around the hole. If these are not properly prepared, the pipe collar will not sit on a secure base.
The tube must be stable and not transfer movement to the slab. If a supply moves when the mixer is fitted, the cuff will be stressed. Drywall construction needs reinforcement wherever plumbing components are installed so that normal use does not simply load the panel itself.
The substrate around the hole must be primed where required and integrated into the general waterproofing system. The sleeve must be embedded in the same system that covers the wall. It shouldn't just put some silicone around the supply and then tile.
In dry construction inside the shower, proper sealing of the passages is even more important because if water passes behind the tile, it can enter the wall gap and create moisture that is not immediately visible.
When sealing over old tiles, pipe passages are one of the most difficult areas to fix without stripping. Old escutcheons, silicone, limescale, and cuts around the pipes all need checking. If the spot is already wet or poorly sealed, it shouldn't just be covered over.
First, old failed silicones are removed and salts, soaps and dirt are cleaned. If a new system will be installed over the tiles and then new paving, new waterproofing must be provided around the transitions, with suitable collars or a special detail that works with the primer and the membrane.
If the goal is transparent surface protection, things are more limited. A normal pipe collar cannot be placed under the tiles without stripping. There we are mainly talking about surface repair, new silicone, special transparent systems and careful control. This solution can help with surface problems, but is not a substitute for complete waterproofing at the membrane level.
If around facilities there is an active leak or suspicion of water behind the old lining, the solution without stripping should be treated with caution. Local opening may be required for proper repair.
Proper application begins with a clean and stable surface. The area around the tube must be free of dust, loose materials, oils, old silicones and debris. If there are large gaps, they must first be repaired with a suitable material, so that the collar does not "float".
If the system requires a primer, it is applied before the cuff and allowed to dry. Then the first layer of sealant is passed around the passage. The collar goes over the tube, with the elastic eyelet fitting snugly. It is pressed into the fresh layer so that its sides sink without bubbles.
It is then covered with another layer of sealant. The flat part of the collar must be fully overlapped and incorporated into the wall membrane. The elastic area around the tube should not be rigidly filled with material that will impede its movement or tear it.
Before the tiles are put in, it should look like the pipe collar is part of the waterproofing and not an independent piece that just rests against the wall.
Silicone has a role in final sealing. It can be used around visible escutcheons, material transitions, end caps, and any point where a flexible visible joint is needed. But it should not be the primary protection around a pipe penetration in the shower zone.
The problem with silicone is that it is applied to the finished surface and ages over time. It can peel, blacken, cut during cleaning or lose adhesion from salts and soaps. If there is no pipe collar behind, then the only defense of the wall is a material that is exposed and maintainable.
The correct logic is twofold. First sealing at the level of the membrane with a pipe collar. Then final aesthetic and elastic closure where necessary. If the final silicone wears away, the system underneath remains protected until serviced.
The phrase "we'll seal it with silicone at the end" is not the right answer when we're talking about waiting for water in the shower. The correct answer is "a cuff will be inserted into the seal and then a final closure will be made".
Installation mistakes are common because these spots look small and are easily hidden by escutcheons. But precisely because they are hidden, they have to be done correctly before the final finish goes in.
Before you finalize the choice or installation, review the following points first:
| Error | Possible consequence | Correct approach |
|---|---|---|
| No pipe collar around shower fittings | Water behind escutcheons and tiles | Elastic cuffs integrated into the membrane |
| Reliance only on the visible escutcheon | False sense of tightness | Escutcheon as a finish, not as waterproofing |
| Silicone instead of cuff | Temporary protection, aging and peeling | Pipe collar under tiles, silicone only at the end |
| Large gaps around the tube | Movement, poor adhesion, moisture ingress | Substrate repair before the cuff |
| Wrong collar size | Loose or torn fit | Collar of suitable diameter |
| Collar on dust or old silicone | Detachment | Cleaning and priming where required |
| Loose pipe outlet | Seal stress and tear | Fixed hydraulic support before closing |
| Concealed mixer installed without checks | Hidden leak inside the wall | Pressure check before the wall is closed |
A classic example is a new shower where the corners and floor were done correctly, but no cuffs were installed around the mixer outlets. Over time, water seeped behind the escutcheons and down into the wall. The waterproofing had not failed everywhere. It had simply been left open in two small holes.
The cost of pipe collars is small compared to the total cost of a bathroom. Even when quality cuffs and custom pieces are used, the amount is usually negligible compared to the cost of tile, plumbing, fixtures and labor. However, their value is enormous, because they protect points where waterproofing is necessarily interrupted.
In a typical bathroom of about 5 sq.m. in Greece in 2026, where a simple to mid-range renovation may run roughly €3,200-5,500 and more demanding solutions with a walk-in shower, linear drain, concealed mixers, and a custom shower enclosure can reach about €6,000-7,500 or more, omitting cuffs to save money makes no technical sense.
Before you finalize the choice or installation, review the following points first:
| Point | What does it usually require? |
|---|---|
| External shower mixer | 2 cuffs for hot/cold |
| Concealed mixer | Special cuffs, bands or pieces depending on the body |
| Washbasin | Cuffs in supplies and attention to drainage |
| Washing machine | Sealing of services and drains where in wet zone |
| Large drains | Larger collars or special sealing configuration |
A quote that mentions waterproofing but doesn't mention cuffs around fixtures is incomplete, especially when talking about a shower zone.
A correct quote must explicitly mention the sealing of pipe penetrations. It is not enough to say "wall waterproofing". It should state that rubber collars or cuffs will be installed around water outlets and, where required, that special pieces will be used for drains or concealed bodies.
It must also state the system of application: primer where required, first coat of sealant, incorporation of pipe collars, second coat and drying time prior to tile adhesive. If a specific manufacturer's system is used, it is good that the cuffs are compatible with it.
For concealed mixers, the quote should also include the inspection before the wall is closed. Waterproofing must not be used to hide plumbing uncertainty. First the connections are checked, then the surface is sealed.
Finally, it must be clear whether materials, labour, VAT, hydraulic tests and photographic documentation are included before paving. The clearer the offer, the less likely the small critical pieces will be "forgotten".
Before tiling starts, ask whether cuffs have been fitted around the mixer outlets. Ask to see the penetrations before they are covered. If there is a concealed mixer, ask whether it has been pressure-tested and how the in-wall body was sealed.
Also ask if the cuffs are compatible with the sealant. If the bathroom has drywall, ask if the area around the holes has been stabilized. If there are large drains in the wall, ask how they will be sealed, not just how they will be aesthetically covered.
It is a good idea to ask for photos. The pipe collars will be hidden behind the tiles and the escutcheons, and after that there will be no easy way to confirm whether they were installed. A simple photo before tiling can be very useful later.
If the answer is "no need, we'll close it with the escutcheon", ask for a more technical explanation. An escutcheon is not equivalent to a pipe collar.
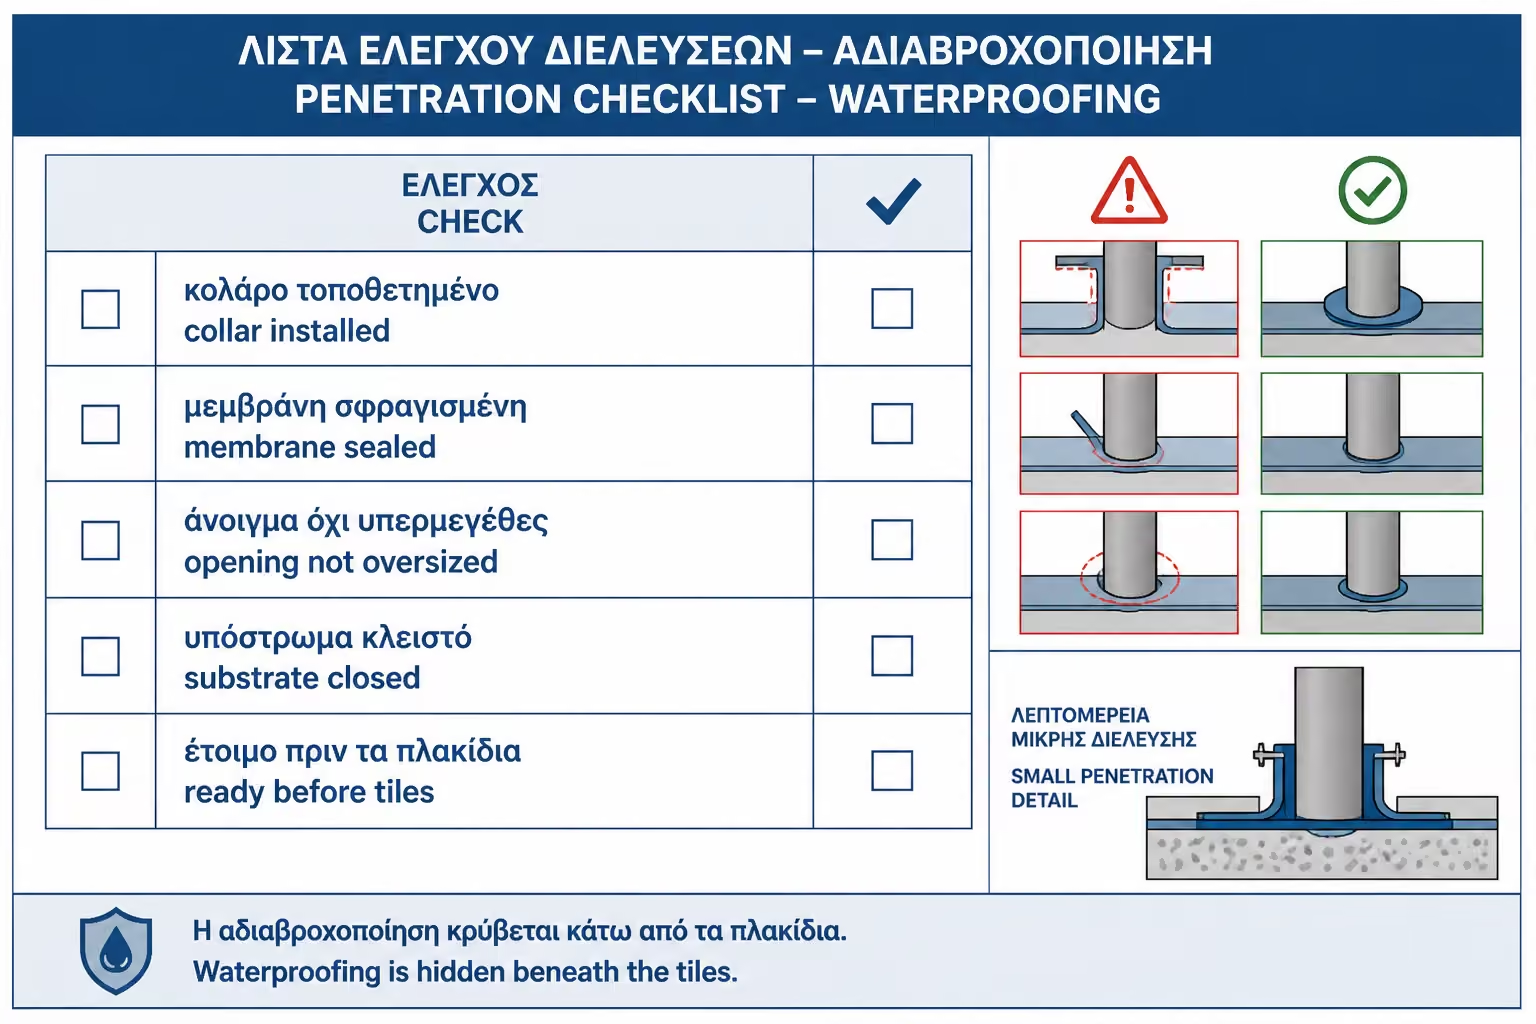
Before you finalize the choice or installation, review the following points first:
| Question | Yes / No |
|---|---|
| Do the shower mixer outlets have pipe collars? | Yes / No |
| Do the cuffs fit the pipe diameter correctly? | Yes / No |
| Is the area around each pipe clean and stable? | Yes / No |
| Has primer been applied where required? | Yes / No |
| Are the collars boxed into the seal? | Yes / No |
| Are there no wrinkles, tears or gaps in the cuffs? | Yes / No |
| Are the pipe outlets stable and secure? | Yes / No |
| Have the concealed mixer penetrations been checked before the wall is closed? | Yes / No |
| Do wall drains have special sealing detail where required? | Yes / No |
| Is the visible escutcheon treated as a cover rather than the main seal? | Yes / No |
| Has the waterproofing dried before the tile adhesive? | Yes / No |
| Are there any pictures of the crossings before they were covered? | Yes / No |
If several answers are "I don't know", paving should not be rushed. Pipe crossings are small points, but they can cause a lot of damage.
If you have to keep one thing, keep this: every pipe that passes through a waterproofed wall creates a hole in the system. The escutcheon you see at the end is not enough. The correct sealing happens before the tiles go in, with an elastic pipe collar or cuff that wraps the pipe and integrates into the membrane. If that step is skipped, water can pass behind the lining without you noticing immediately.
Pipe penetrations are among the most vulnerable points in bathroom waterproofing. They may look small, but technically they are breaks in the membrane. Every supply outlet, every mixer penetration, every drain, and every concealed fitting needs careful sealing before the tile goes in.
Pipe collars and pipe cuffs exist to do exactly that job. They create elastic continuity between the pipe and the wall, protecting the substrate from water that can pass behind escutcheons, joints, or tile cuts. They are not decorative accessories. They are basic technical elements of waterproofing.
Silicone and the final escutcheon have a role, but not as the primary line of defence. The actual protection must sit below them, at the waterproofing layer itself. Especially in the shower zone, where water hits the wall every day, missing cuffs are a serious technical error.
The owner must ask to see the penetrations before they are covered. Ask whether the cuffs have been installed, whether the outlets are stable, whether any concealed mixer has been checked, and whether the drains are properly detailed. After tiling, all of this disappears behind the finished surface. In waterproofing, though, a beautiful finish is worthless if the hole behind it has been left open.
Return to category.
Go to categoryReturn to the central guide.
Go to guide