
Bathroom Waterproofing & Moisture Protection
Return to category.
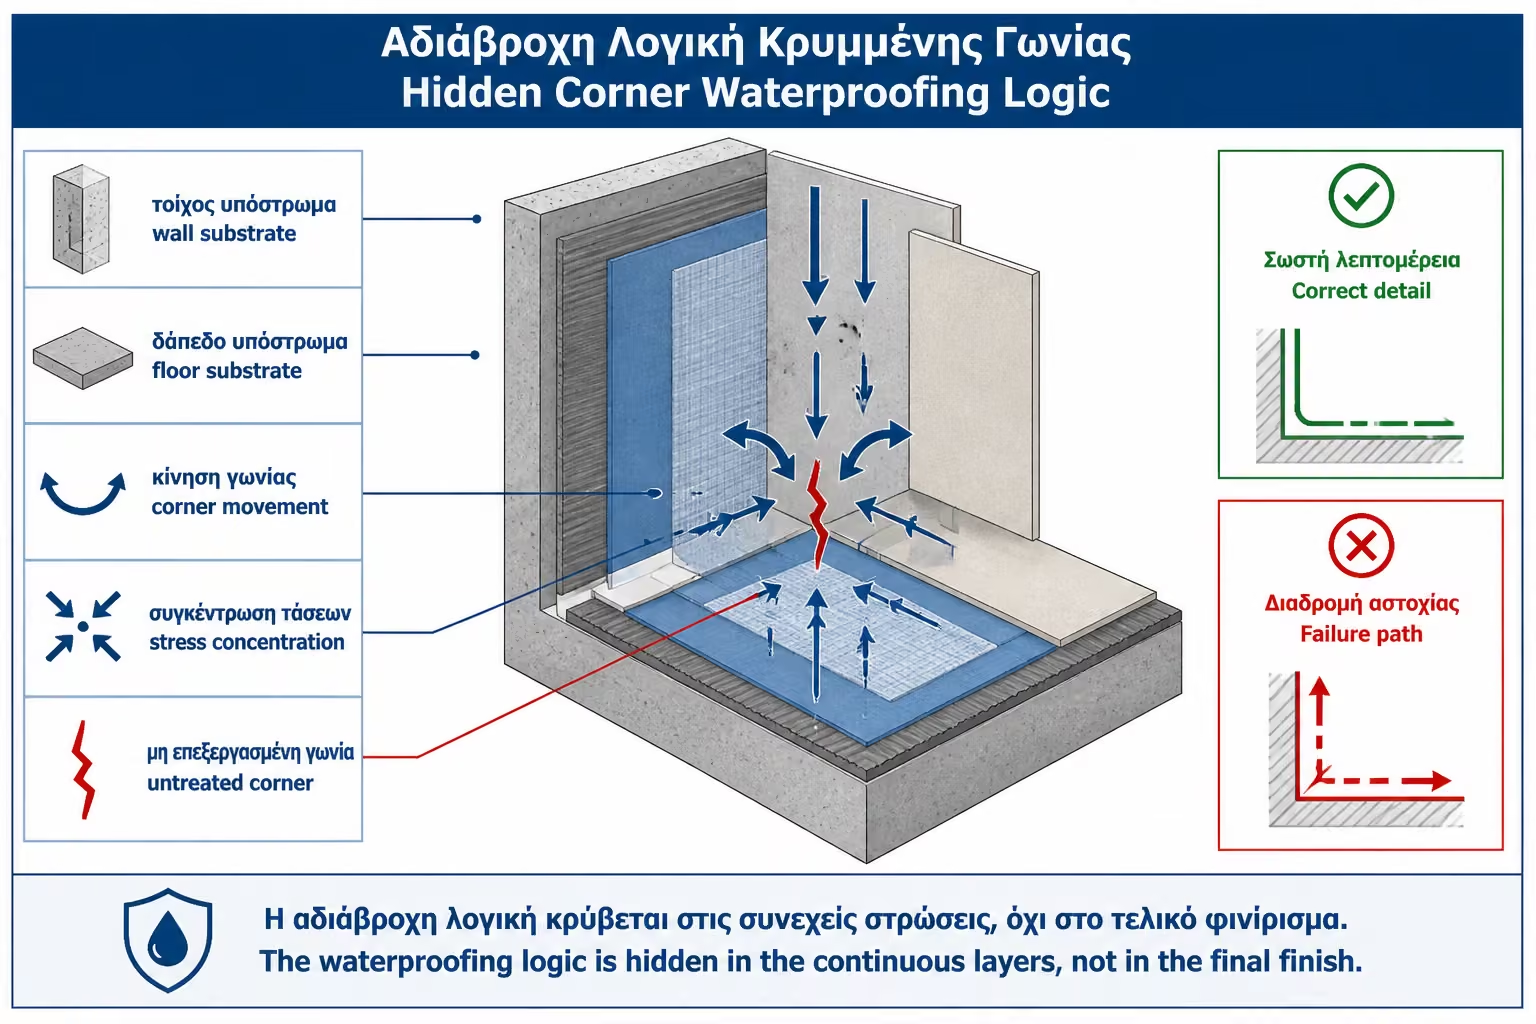
Go to categoryIf there is one place in the bathroom where waterproofing is tested every day, it is the corners. The wall-to-floor joint, the wall-to-wall joint, the inside corners of the shower, the corners of a shampoo recess and the low spots behind the cubicle are areas where water, movement and construction discontinuity meet at the same point.
The big mistake is that many treat the corner as a simple surface. They brush or roll on the spreadable sealant, maybe a little thicker, and consider the corner insulated. In reality, the corner is not a flat surface. It is a point of level change, a meeting point of different materials and often a point of micromotion. That's where the simple spread, no matter how good it is, can get tiresome.
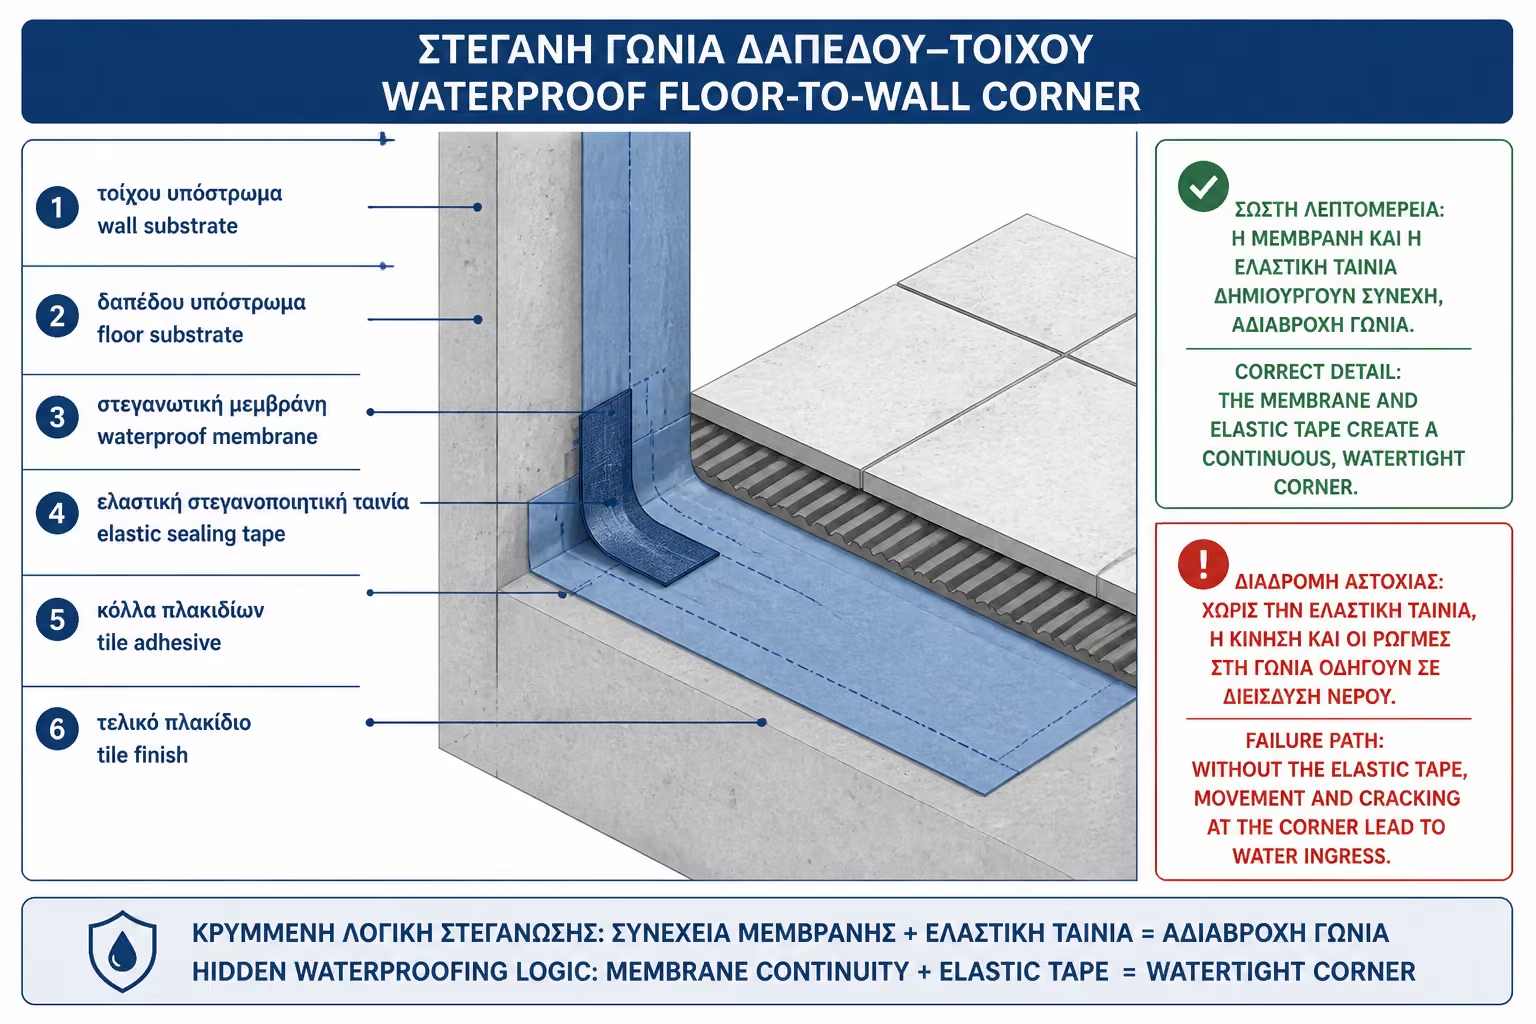
That is why special elastic sealing tapes, also known as sealing tapes, are used. They are not "extras" for overly demanding jobs. In the right shower applications it is a key part of the system. The tape is integrated into the seal and creates an elastic bridge at the corner so that the system can better withstand micro-movements, contractions and constant contact with water.
In practice, many leaks in new bathrooms start from corners that appeared to be "painted" with insulation but were not properly reinforced. The grout may look clean, the tile flawless, the silicone fresh, but behind them there is a small crack in the corner of the waterproofing. Water does not need a large opening. It only takes a discontinuity that repeats the strain every day.
This guide explains why corners are so vulnerable, why simple spreadable materials can 'pop', how elastic bands work, when they should be inserted, what mistakes are often made and what the home owner should check before tiling.
On a flat surface, such as the center of a wall or a floor, waterproofing has relatively favorable conditions. The material is spread evenly, the thickness can be better controlled and there are no geometry changes. Around the corner, however, things change. There, two levels with different behavior meet.
The connection of wall to floor is a typical example. The floor may have grout, while the wall may be plaster, cement board, wet room plasterboard or old masonry. These materials do not contract, expand or charge in the same way. The floor is stepped on, receives water and has slopes. The wall receives splashes, batteries, supplies and different temperature stresses.
At the wall-to-wall junction, especially in the shower, the corner receives water that flows vertically and collects low. If the two walls are of different substrate or if one of them has been repaired, the micromovements may be different. Even in a new bathroom, the corner is a point where trends are concentrated.
This is why the corner should not be treated as "a spot that just needs a little more material". It wants elastic continuity. He wants detail. He wants sealing tape.
Spreadable sealants, whether cementitious or acrylic or polyurethane membranes, can provide very good protection when applied correctly. But in the corners they operate in a more difficult environment. The material is not laid out in a flat field, but must be turned at an angle, cover a change of plane and withstand movements.
If the corner moves even slightly, the single layer can be stretched, i.e. "pulled". If the material does not have enough elasticity or if it has been applied too thinly, a capillary crack can form. If applied too thick in one coat, it may crack from shrinkage or poor curing. If the substrate is dusty or not properly primed, it can peel off locally.
In floor-wall corners, the problem becomes more pronounced because water often remains there, especially in walk-in showers or in bathrooms with poor drainage. Waterproofing does not only accept occasional moisture. It withstands daily stress, cleaning agents, hot and cold water, and micro-movements from use.
The sealing tape works like an elastic bridge. Instead of the spreader trying to hold the angle on its own, the tape takes over the critical joining. Thus, the stresses are better distributed and the risk of the insulation "bursting" in the corner is significantly reduced.
Rubber sealing strips are special pieces that are placed at corners, level joints and critical joints before the final paving. They usually have an elastic central section and sides that are incorporated into the sealing material. Depending on the system, it can be made of a special elastomer, fleece, rubber or composite materials.
Their role is not just to "cover" the corner. Their role is to maintain sealing continuity at a moving point. The tape is placed inside the first layer of the spreader or film, pressed to fit properly without gaps, and then covered with the next layer. That's how it becomes part of the system.
There are tapes for internal corners, external corners, floor-wall joints, as well as special ready-made corner pieces. In more demanding systems there are also cuffs for piping, pieces for siphons and accessories for joints with fleece membranes. The logic is the same: where there is a break, level change or crossing, a resilient sealing detail is needed.
The tape does not replace the basic sealant. He works with him. The coating material protects the surfaces and encases the film. The tape protects the corner from movements. Together they create a system.
The connection between the wall and the floor is one of the most important points in every bathroom, especially in the shower. That's where water ends up from the wall, that's where water flows from the floor, that's where there are often leaks, and that's where the waterproofing has to act like a basin. If this angle fails, water can pass under the tiles and move towards the sub-floor, wall or sub-floor.
In a built-in shower, the floor waterproofing should go up the wall and join the wall waterproofing. This is not reliably done with a simple brush pass. Needs corner tape, properly boxed. The tape must have sufficient overlap on both sides so that it "grips" both the floor and the wall.
In a walk-in shower without steps, the importance of the angle is even greater. Water can move in a larger zone and the waterproofing must work as a unit. If there is a discontinuity in the low corner, the leak may not be immediately visible in the bathroom, but appear as dampness in an adjacent room or downstairs.
In practice, before the tiles are put in, the owner must clearly see that the floor-wall joint has been reinforced. If the corner looks just "painted" with sealant, without tape or special detail, there is a technical gap.
Vertical corners inside the shower are also vulnerable. Water hitting the wall flows down and often passes right through these corners. If there is a small crack in the waterproofing, water can pass behind the pavers and travel down to the floor.
Wall-to-wall corners also have a special constructional feature. One wall may be old masonry and the other dry construction. There may be repairs, old piping or different materials. This means that the corner is a point of possible differentiation and micro-movement. Simple spreadable material may not be enough.
The sealing tape in the vertical corners must be placed before tiling, inside the waterproofing system. It should continue properly from the low corner to the top, without gaps, wrinkles or interruptions. In the area where the vertical and horizontal tape meet, the overlap must be correct so that no weak point is created.
In high tiled showers, the waterproofing should rise to a practical height, often at least around 2m or more depending on the layout. Vertical angles within this zone must follow the same protection logic.
In the bathroom there are not only simple interior corners. There are external edges, low parapets, built-in shelves, seats, recesses, level changes and points where the tile turns from one surface to another. Each such point needs different attention.
The inner corners gather water and movements. External corners are more exposed to bumps, cuts, mechanical stress and material discontinuity. In a shampoo recess, for example, there are internal corners at the depth and external edges at the opening. If all are dealt with by simple material passage, the system is weak.
For this there are special corner pieces or ways to cut and overlap the strips. The tape should not crumple, wrinkle, or leave a gap at the edge. It must integrate properly so that it creates continuity.
On built-in seats or parapets, the top should have a slight slope towards the shower zone. Corner tape helps, but doesn't correct wrong geometry. If the water stays on a horizontal surface, the seal will be more stressed.
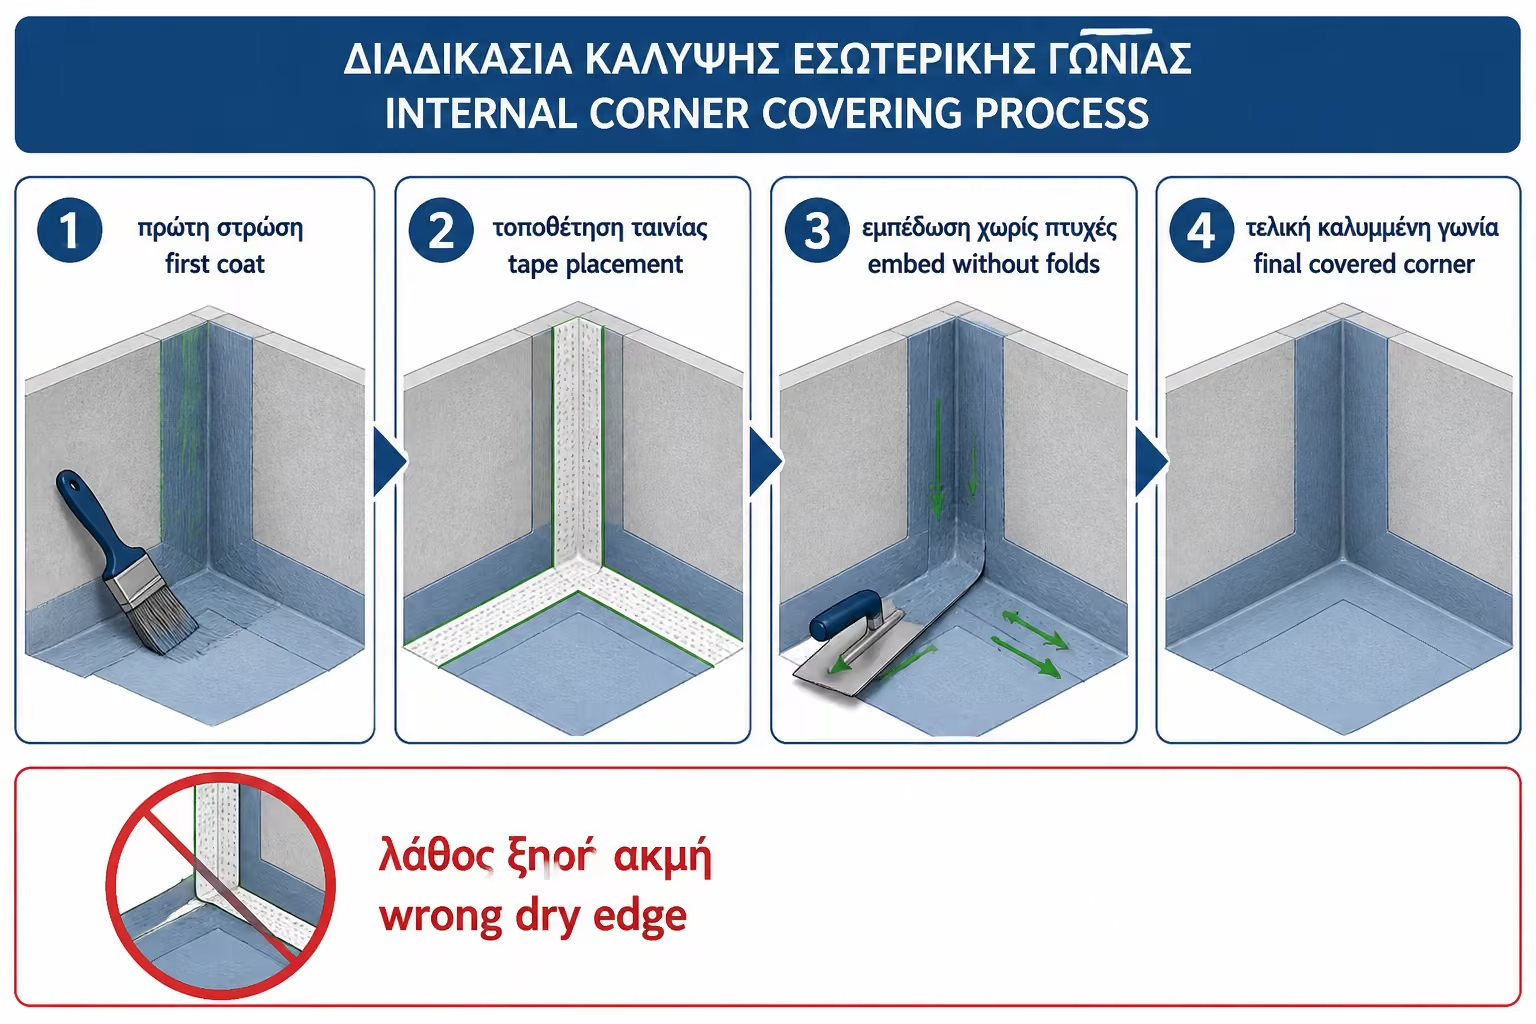
Proper placement starts with the substrate. The corner must be clean, firm, free of dust, loose spots and free of old silicones or residue. If the system requires a primer, this must be preceded and dried as necessary.
The first coat of sealant is then applied to the corner, wide enough to accept the tape. The tape is placed while the material is still fresh and pressed with a trowel or suitable tool so that it sinks in properly. There should be no bubbles, voids or wrinkles. The central elastic section should press into the corner without stretching too much.
Then the tape is covered with a second layer of sealant, according to the system. Its edges must be well boxed. If dry sides or areas without material are visible, there is a risk of detachment. If the tape is applied to a dry layer without adequate bonding, it will not work properly.
Tape to tape joints need an overlay. The strips must not meet edge to edge. There will be a weak line. The coating must follow the system instructions and be completely covered with sealant.
Glass mesh helps to reinforce large surfaces or floors, especially when there is a risk of cracking. But it is not always a substitute for special corner tape. Simple mesh can reinforce the membrane in the field, but in the corners it needs material designed for plane change and micro-motion.
If someone folds glass mesh roughly at the corner, it can create gaps, creases, or places where the mesh does not box properly. Not only does this not protect, it can create irregularities under the tile. Sealing tape is more suitable for corners because it is designed to follow the change in level.
In demanding applications, both may be used. Glass mesh on the floor or large surfaces and elastic bands in the corners. One strengthens the field, the other protects the level change joint. This is much more sound logic than trying to solve everything with one hardware.
The owner must pay attention to the wording of the offer. If it says "reinforced mesh waterproofing", it does not necessarily mean that corner tapes have been provided. They must be listed separately.
In plasterboard, wet plasterboard, cement board or Aquapanel type systems, corners need even more attention. Drywall has plate joints, screws, framing and possible micro-movements. The corner is not a monolithic construction like an old masonry. It is a system union.
In the shower area, corner tape is practically essential. It is not enough to putty the joint and apply it. Joint putty is not a sealing tape. The waterproofing must cover the entire zone and the corners must be reinforced with compatible sealing tapes.
If one wall is cement board and the other plaster or concrete, the corner has two different substrates. That's where the elastic band is even more important, because it helps to absorb the difference in material behavior.
In dry construction, it is also important that proper bracing and screwing have preceded. The movie does not save a moving wall or a moving plate. Protects a properly constructed angle, does not correct a weak frame.
When renovating without stripping and the new seal is applied over old tiles, the corners are one of the first places to check. There are usually old silicones, salts, black joints and possible microcracks. If they are not removed and cleaned properly, the new tape or membrane will not grip reliably.
In such a case, the old silicone must be completely removed from the corners. Then there is cleaning, degreasing, possibly a quartz primer or a special adhesion primer, depending on the system. Only then can a new sealing tape and spreader or film be inserted.
The mistake is to pass new material over old silicone. Silicone is a difficult surface to adhere to and often has soap residue, mold or grease. If the new corner seal presses against it, the system is weak.
The solution without excision can only work if the corner becomes technically clear again. If the old corner has an active leak or hollow tiles, the surface tape is not enough. The cause must first be assessed.
In wood sub-floors or OSB, floor-wall corners are even more sensitive. Wood moves more than a cement mortar, is affected by moisture and can have a slight bend. If the corner is sealed rigidly, there is a high risk of it opening.
In these applications, the sealing tape must be part of a fully elastic system. It is not enough to tape in if the rest of the layer is stiff or if the OSB is not stable. The stiffness of the floor must first be checked, a suitable primer applied, the joints reinforced and elastic waterproofing or a special wet room system used.
The angle must be able to handle the difference in movement between the wood floor and the wall. If the wall is dry construction, the complexity increases. There the film is not just "good practice". It is a basic condition to prevent the joint from becoming a leak point.
On a wooden substrate, any leakage in the corner is more dangerous because water can cause swelling, mold or deterioration of the base. That is why the corners must be designed with more rigor than on a conventional concrete floor.
Finishing silicone at the corners of the tile is important, but it does not replace the sealing tape under the tiles. The silicone works on the finished surface. It closes the level change joint, absorbs small movements and helps keep water out of the grout. But it is not the main waterproofing of the bathroom.
If behind the tile the corner does not have sealing tape and the insulation has cracked, silicone can delay the problem but not solve it permanently. Over time, silicone can age, peel, darken, or be cut by cleaners and mechanical use. Then the water will reach the weak point.
The right logic is double protection. Under the tiles, elastic tape and waterproofing. On the finished surface, proper rubber joint with suitable silicone or sealant. One doesn't cancel out the other.
When someone says "don't worry, there will be silicone in the corners", we have to ask what has been done underneath. If there is no sealing tape underneath, the final silicone acts as the only line of defense. This is not a secure design.
The tapes must enter the stage of waterproofing, before laying tiles. They are usually incorporated into the first layer of sealant and covered with the second. They don't go in after the tiles and aren't easy to fix later.
The correct time is after the substrate has been prepared, cleaned and primed where required, but before the final layers of waterproofing are completed. If there is glass mesh or film on large surfaces, the tape must work with them and not be haphazardly inserted on top.
In built-up showers, the tapes must be inserted before each flood test. If a leak test is performed without properly integrated corner strips, the test does not test a complete system. If the test passes but the pre-tiling corner is later injured, it must be repaired before the project can continue.
After tiling, the absence of tape cannot be corrected without stripping. That is why it is one of the stages that must be photographed before being covered.
Corner mistakes are often repeated because the corner looks like a small point. In fact, it is one of the most technical parts of the bathroom.
Before you finalize the choice or installation, review the following points first:
| Error | Possible consequence | Correct approach |
|---|---|---|
| Simple spreadable pass without tape | Crack in the corner from micro movements | Sealing tape in all critical corners |
| Film on a dusty substrate | Detachment or weak adhesion | Cleaning and priming where required |
| Wrinkles or bubbles under the tape | Gaps and discontinuity in the waterproofing | Pressure and full boxing |
| Zero tape overlap | Weak point in the union | Correct overlay according to the system |
| Use of glass mesh instead of special tape | Insufficient elasticity in the corner | Grid in the field, tape in the corner |
| Old silicone under new insulation | Poor adhesion | Complete silicone removal and cleaning |
| Support on the final silicone | Temporary protection, not full waterproofing | Tape under tiles and silicone at the end |
| Hasty paving before the system dries | Poor adhesion and trapped moisture | Compliance with drying times |
A typical example is a shower where the waterproofing was done with a good spreadable material, but the corners were passed without tape. In delivery everything seemed right. After months, moisture appeared low on the adjacent wall. The reason was not that "the insulation was not good". It was that the corner was not treated as a movement joint.
The cost of sealing tapes is small compared to the total cost of bathroom renovation. It is affected by the length of the corners, the type of tape, the special corner pieces, the waterproofing system, the labor and whether materials, labor and VAT are included.
In a typical bathroom of about 5 sq.m. in the Greece of 2026, where a simple to medium renovation can indicatively move around €3,200–5,500 and more demanding solutions with a walk-in shower, linear siphon and custom cabin can reach around €6,000–7,500 or more, corner tapes are a small but critical cost. The savings from omitting them is negligible compared to the cost of repairing a leak.
Before you finalize the choice or installation, review the following points first:
| Element | How does it affect cost? |
|---|---|
| Angle length | More angles mean more tape meters |
| Inside/outside corner pieces | They increase the cost a little but reduce the risk |
| Niches and shelves | Lots of small corners, more work |
| Waterproofing system | Another tape for cementitious membrane, another for fleece membrane or special system |
| Application quality | Proper boxing takes time and attention |
An offer that skips movies to show a lower price isn't really economical. It removes one of the most important elements of protection.
A correct quote should explicitly mention sealing tapes in the corners. The general phrase "bathroom waterproofing" is not enough. It must appear that tapes are provided at the floor-wall junction, vertical shower corners, niches, parapets and where there is a change of level.
Application system should also be stated: primer where required, first coat of sealer, tape embedding, overlay, second coat and drying time. If there are special corner pieces or cuffs, they should be listed separately.
In walk-in showers or built-in solutions, the offer must describe the waterproofing "basin" of the floor and the mounting on the walls. The corners should not be left undefined. It is one of the points that determine the success of the project.
Finally, it must be clear whether materials, labour, VAT, substrate preparation and leak testing are included where provided. Ambiguity at this stage often leads to omissions.
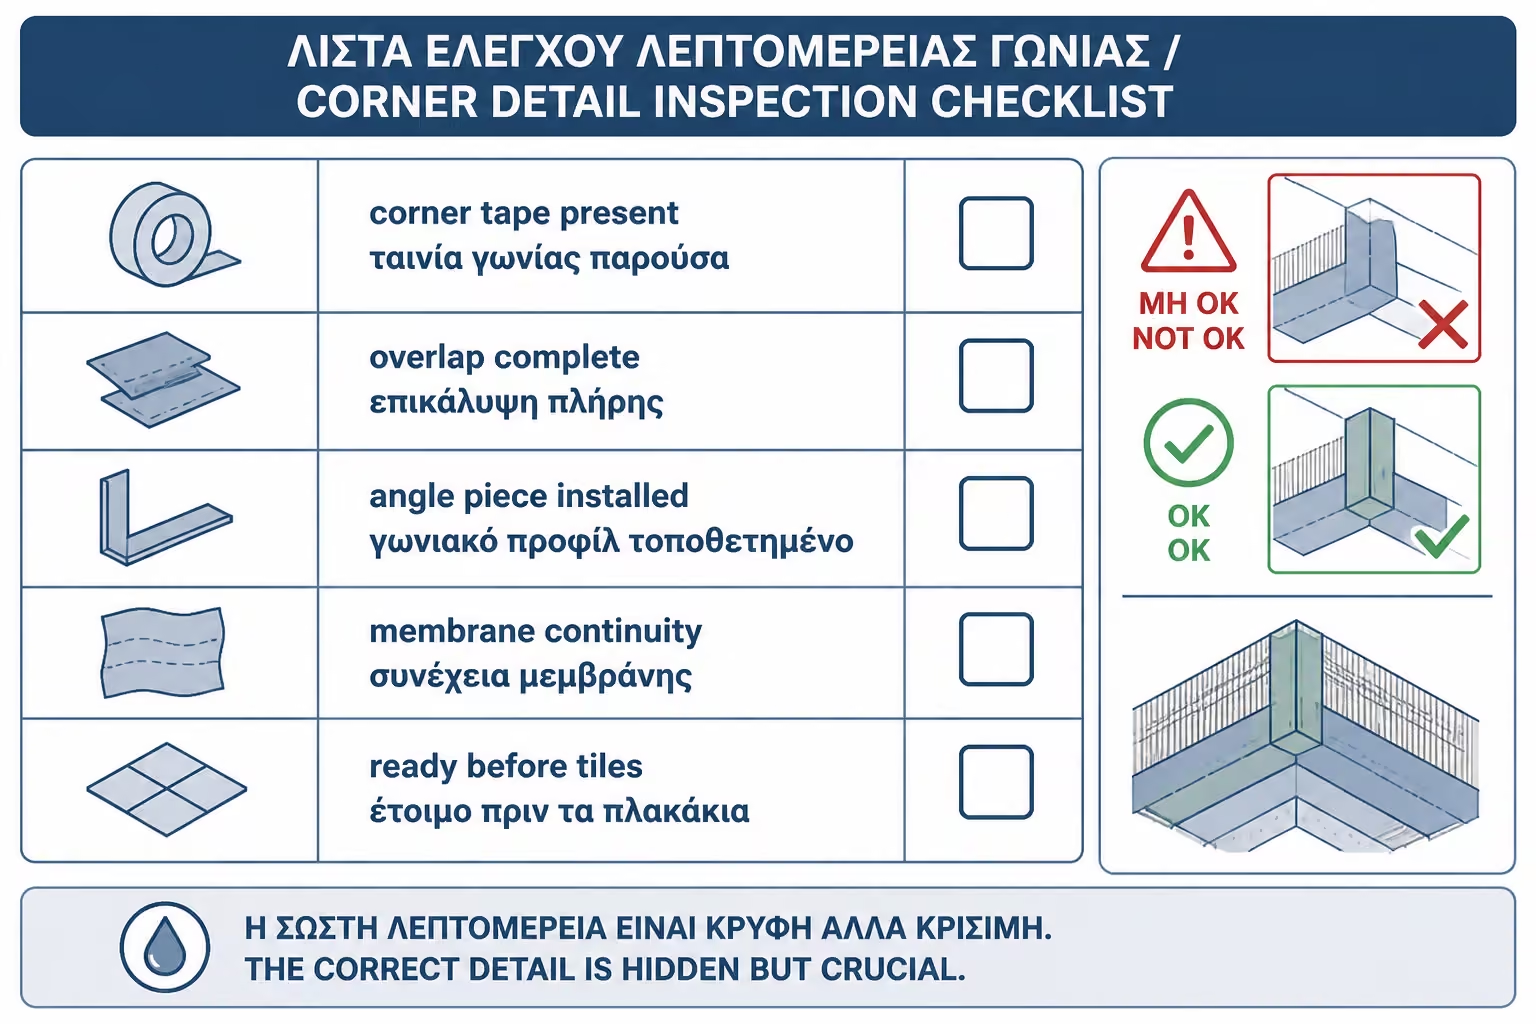
Before paving begins, ask if rubber bands have been inserted into the corners. Ask to see the corners of the shower, low and vertical. If there is a niche, ask to see its inner corners as well. If there is a parapet or built-in shelf, check that the waterproofing turns correctly at all edges.
Also ask if the tape is compatible with the sealant used. Not all films are the same, and random material should not be thrown together without technical logic. If a manufacturer-specific system is used, it is recommended that the components belong to the same system or have confirmed compatibility.
Ask if the tape went through the first layer and if it was covered by the second layer. If it's just stuck on top or looks dry at the edges, there's a problem. Also ask if the drying time was observed before the tile adhesive.
It's a good idea to keep photos. Corners will be hidden under tiles and joints. Then there will be no way to confirm what was done without dissection.
Before you finalize the choice or installation, review the following points first:
| Question | Yes / No |
|---|---|
| Do the floor-wall corners have elastic sealing tape? | Yes / No |
| Are the vertical corners of the shower also reinforced? | Yes / No |
| Are the tapes embedded into the sealant and not just resting on top? | Yes / No |
| Are there no wrinkles, bubbles or gaps under the tapes? | Yes / No |
| Are tape joints properly overlapped? | Yes / No |
| Have special corner pieces been used where appropriate? | Yes / No |
| Are the corners on niches, shelves and parapets reinforced? | Yes / No |
| Was the substrate clean and primed where required? | Yes / No |
| Is the tape compatible with the waterproofing system? | Yes / No |
| Isn't the finished silicone treated as a substitute for the tape? | Yes / No |
| Has the waterproofing dried before tiling? | Yes / No |
| Are there any pictures of the corners before they were covered? | Yes / No |
If several answers are "I don't know", paving should not be started in a hurry. The corners are one of the points that are not easily corrected afterwards.
If you must keep only one thing, keep this: the corner is not reliably sealed with "a little more insulation". The angle is a level change joint and often a micromotion joint. That is why it needs elastic sealing tape, properly embedded in the layers of the system. Finishing silicone is useful, but does not replace the tape under the tiles. If the angle is done correctly, the bathroom gets a much more secure base. If done sloppily, the leak usually starts there.
Sealing the corners is one of the most critical stages in a bathroom, because it is where most of the technical difficulties are concentrated: change of level, different materials, micro movements, water, temperature changes and final seals. The center of a floor may look impressively insulated, but if the corner doesn't have sealing tape, the system remains vulnerable.
Simple spreadable materials have a place in waterproofing, but they should not be loaded with a role that they cannot always lift on their own. The corners need a rubber bridge. It needs a tape that will be incorporated into the system and protect the continuity of the waterproofing where the single layer can break.
The owner must specifically ask for tapes in the corners, not just "waterproofing". It must check the floor-wall angle, the vertical corners of the shower, niches, parapets and joints of different materials. It should also be remembered that silicone is not the main insulation in the end. It's the final rubber seal over a system that already needs to be right.
In a bathroom, corners are not a detail. It is one of the points where it is judged whether the waterproofing will withstand daily use or whether moisture will find a way behind the tiles. And since after paving they will not be visible, they must be done right from the beginning.
Return to category.
Go to categoryReturn to the central guide.
Go to guide