
Bathroom Waterproofing & Moisture Protection
Return to category.
Go to categoryIn a new bathroom, the leak rarely starts "in the middle" of a properly applied waterproofing surface. Most problems start at points of change: where the floor meets the wall, where the membrane meets the siphon, where a pipe passes, where a cabin is bolted, where a recess or parapet is created. In other words, waterproofing does not usually fail in its simplest part. It fails in the details.
That is why the phrase "we installed waterproofing" does not say much by itself. The crucial question is where it was applied and how it was detailed. A floor may have a good screed, but if the drain is not properly connected to the membrane or the corners are not taped, the system remains vulnerable. A wall may be waterproofed over a large area, but if the mixer penetrations are not sealed, water can still find its way behind the escutcheon.
In practice, when we talk about "90% of leaks", we should not read it as an absolute statistical number. The point is technical: the vast majority of problems in a new bathroom occur in the recurring weak spots, not in the random center of a surface. If these points are designed correctly, the chance of failure is greatly reduced. If they are handled carelessly, even an expensive waterproofing material may not save the structure.
This guide acts as a practical hazard map. It shows the five points that should be checked before the tiles are put in, explains why they are vulnerable, what mistakes are often made and what the owner should ask the repair shop. Because in bathroom waterproofing, quality does not show in the finished tile. It appears in the spots that will be hidden immediately before it.
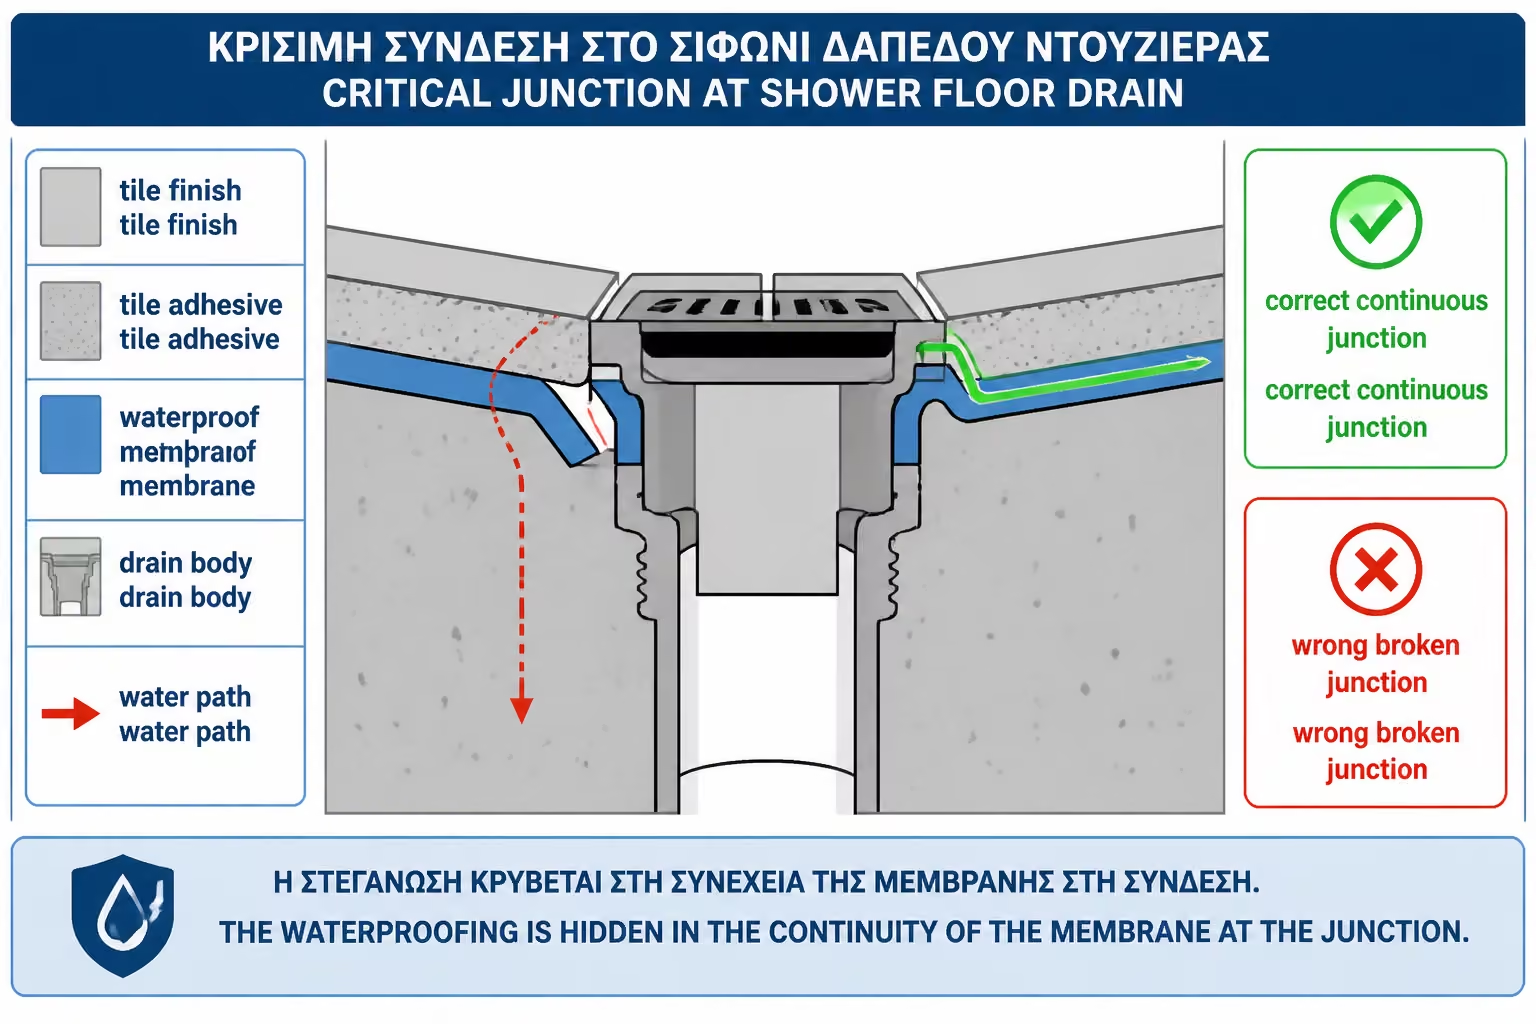
The most critical point in a shower is almost always the drain. All floor water is directed there, so the area around it takes the greatest stress. If there is one point where the waterproofing has to remain absolutely continuous and correctly connected, it is the junction between the membrane and the drain body.
The problem is that different materials meet in the siphon. Grout, plastic or metal, gasket, glue, tile, grate and waterproofing must all work together. If the waterproofing stops just next to the siphon and the joint relies on a bit of silicone or grout, the point is vulnerable. Water does not forgive such discontinuities.
In linear siphons, the risk increases. The length of the joint is longer, the tile cuts more demanding, and the connection to the waterproofing must be made with a flange, factory collar or compatible membrane system. An expensive linear siphon guarantees nothing if it is not properly integrated into the seal.
The correct solution is to choose a siphon that provides a connection to the membrane or the system to be applied. Before tiles are installed, it must appear that the waterproofing "bonds" with the siphon and does not just come close to it. In built-in and walk-in showers, this is a point that should be photographed before covering.
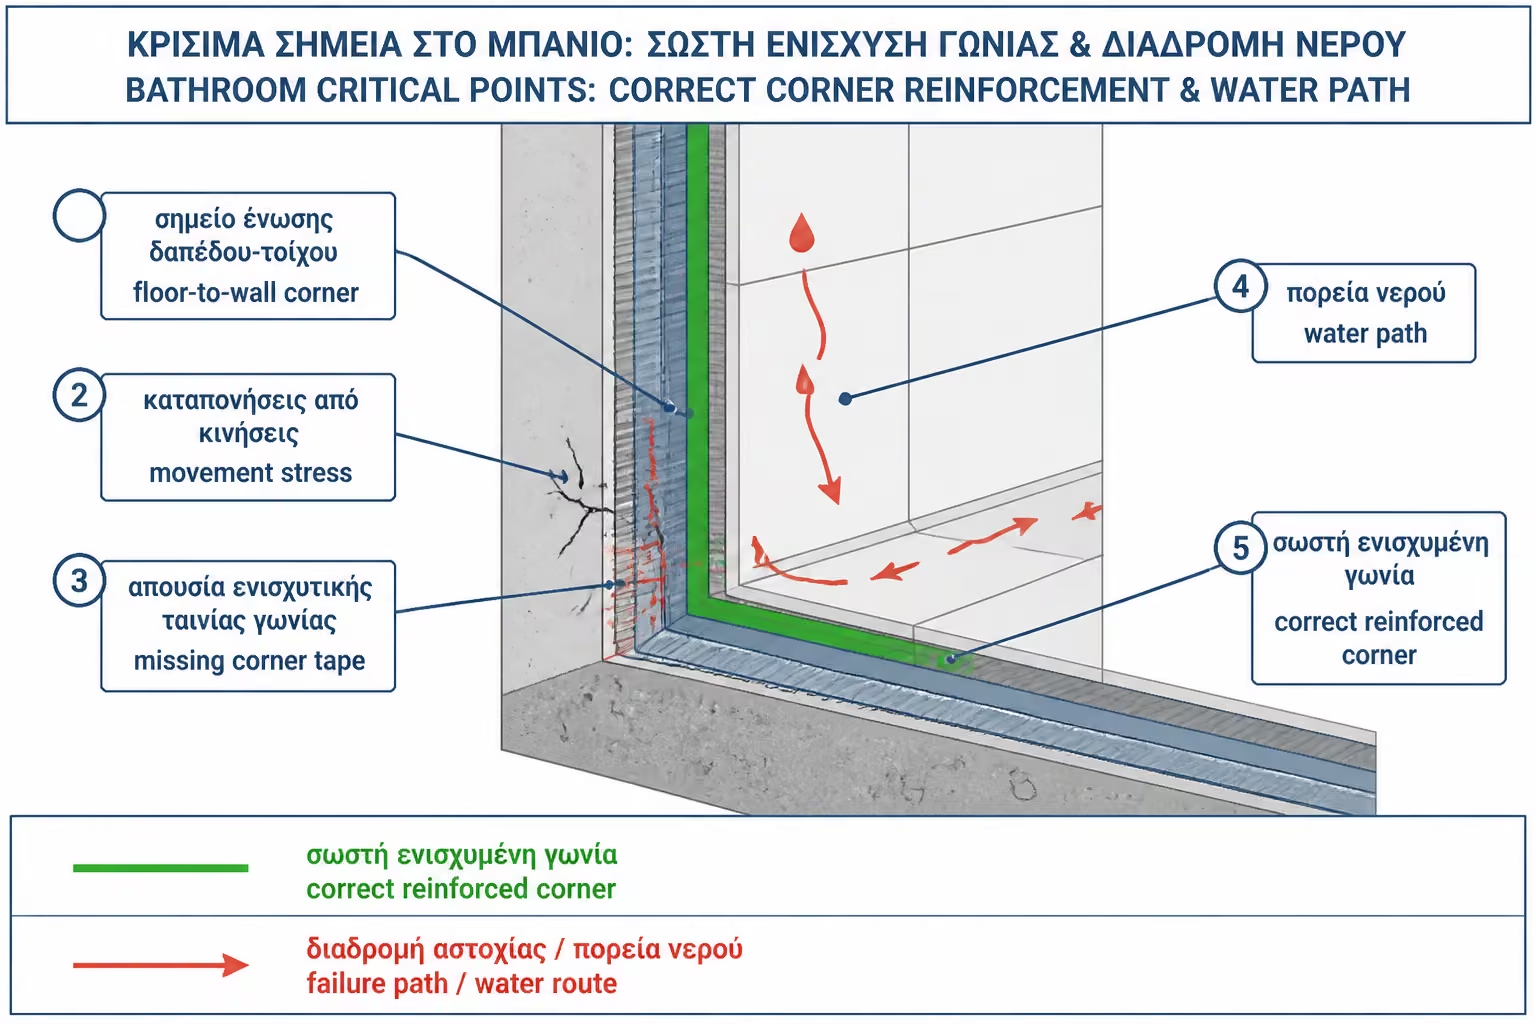
The second most vulnerable point is the corners, especially the floor-wall junction inside the shower. There, two different levels meet. The floor can have different micro-movements than the wall, cement mortar can shrink differently than plaster or cement board, and water often collects low, right on the corner.
The big mistake is to simply roll or brush on the corner, without sealing tape. The corner may look covered, but it's actually a high-voltage spot. If there is little movement, the single layer can crack. And because the crack is behind the tile, the homeowner won't see it until moisture appears elsewhere.
Corner sealing strips exist for exactly this reason. They are integrated into the fresh layer of sealant and covered by the next one. They create an elastic and continuous bond where simple application is not enough. In internal and external corners, especially in niches, parapets and level changes, special pieces or correct tape cuts are also needed.
The owner should clearly ask: "Will there be tapes in the corners?" If the answer is "no need, the material is good", attention is needed. Good material helps. But the right detail is what keeps the corner safe.
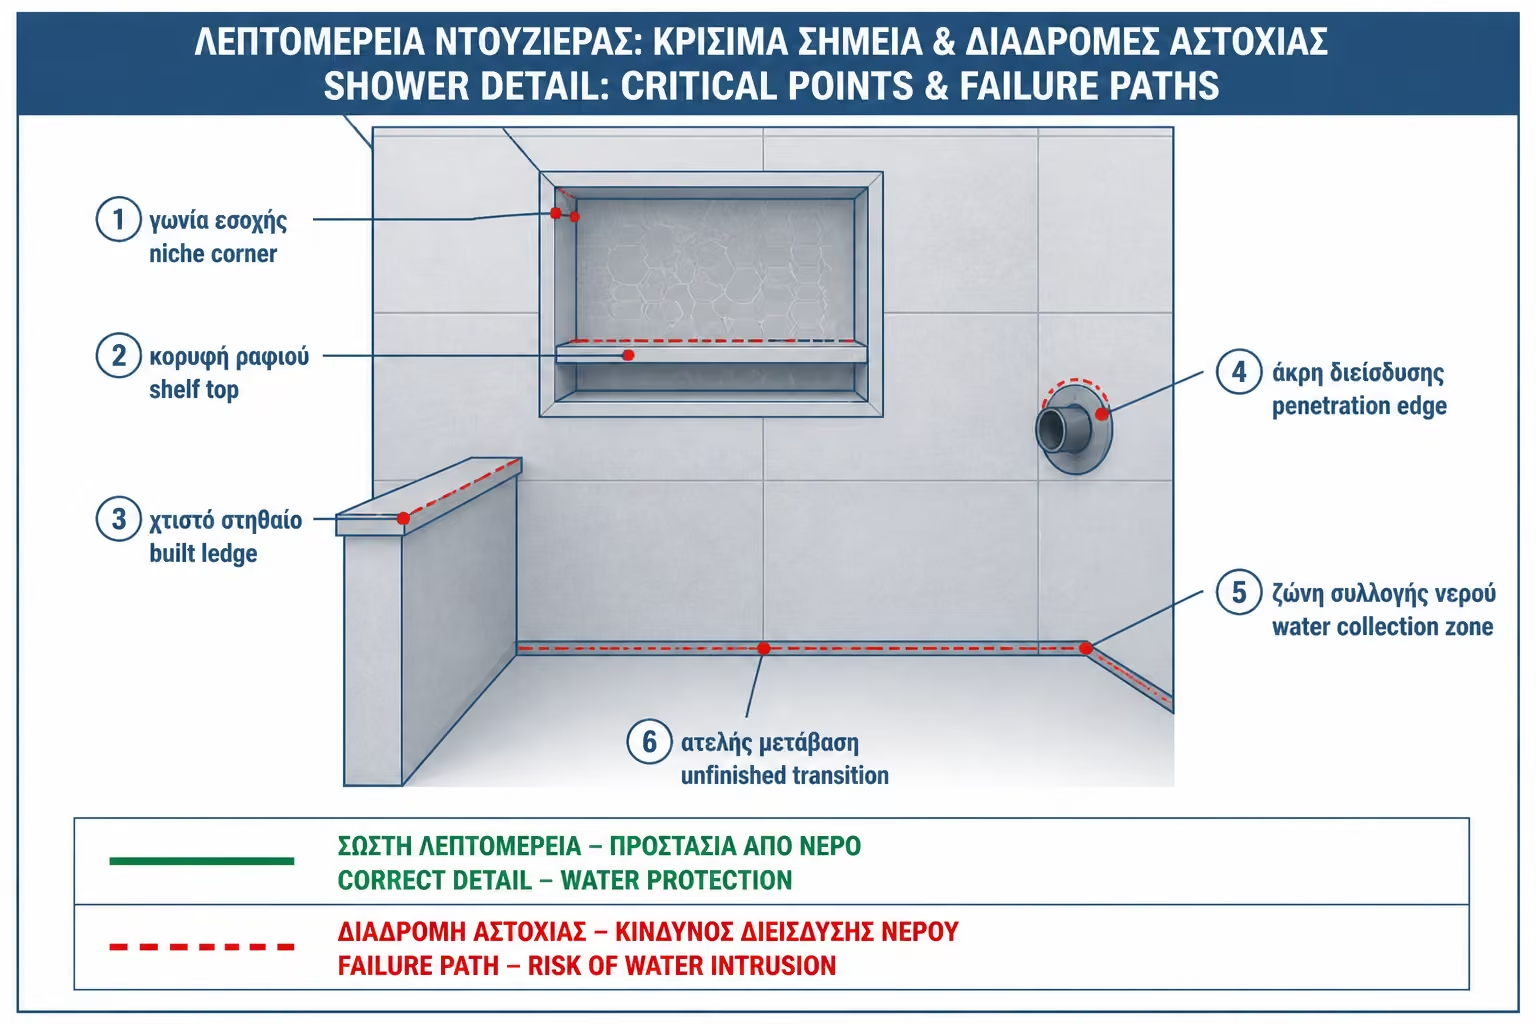
Mixer penetrations are one of the trickiest parts. The wall may be waterproofed correctly over a large area, but every pipe hole is a break in the membrane. If water gets behind the mixer escutcheon, it can travel into the wall without being immediately visible.
The escutcheon is not a seal. It is only a decorative and protective cover. The actual seal has to be behind it, around the pipe or mixer body. That is done with cuffs, collars, or special elements integrated into the waterproofing system. Simply filling around the hole with adhesive or silicone is not a serious solution.
In concealed mixers, the risk is even greater. The in-wall body sits inside the partition and the connections are not easily accessible afterwards. A leak test must be carried out before the wall is closed, the body has to be properly supported, the surrounding area fully sealed, and the manufacturer's instructions followed carefully. If this point is handled carelessly, repairs later are very difficult.
In practice, the mixer zone should be treated as a perforated part of the waterproofing. Wherever there is a hole, there has to be a dedicated sealing detail. Brushing the same material roughly around it is not enough.
Shampoo recesses, built-in shelves, seats and parapets are beautiful and practical solutions, but they greatly increase the complexity of sealing. Each such construction creates new angles, cuts, horizontal surfaces and places where water can remain.
A shampoo alcove is not just a hole in the wall that is lined with tiles. It's a little shower inside the shower. It has a back, sides, bottom shelf, top and interior corners. If the waterproofing does not cover all these surfaces with continuity and tapes, moisture can pass into the interior of the wall.
The bottom shelf of the recess should have a slight slope outwards. If it's horizontal or, worse, slants inward, it will hold water behind the bottles. This stresses joints, silicones and sealing every day. The same applies to built-in parapets or seats: the horizontal surfaces must have a slight slope towards the shower and be fully waterproofed.
On parapets where a glass enclosure sits, there is another risk: drilled fixings. If the waterproofing is punctured to screw down a profile or bracket, each hole has to be sealed correctly. Otherwise, water can pass through a single screw and compromise an otherwise good waterproofing job.
The fifth vulnerable point often appears at the end of the project, when everyone thinks the waterproofing is already complete: the installation of the glass enclosure, its profiles, and the final silicone joints. It is a mistake to think that the enclosure is separate from the waterproofing logic. If it is fixed incorrectly, placed where water pools, or sealed mainly with silicone, the whole system becomes vulnerable.
Silicone is a final rubber seal, not the basic waterproofing of the bathroom. It helps joints, absorbs micro-movements and limits water penetration at endpoints. However, it should not be the only thing that protects the substrate. If there is no proper waterproofing behind the cabin, silicone only delays the problem.
Special attention is needed on the screws. In many cabins, the profiles are screwed to the wall. If the screw goes through tile, glue and waterproofing, it creates a water path. The hole must be filled with a suitable rubber sealant before the screw is installed or according to the manufacturer's system. The same applies to mounts, supports and fixed crystals.
The enclosure also should not be designed independently of the floor slopes. If the profile lands where water pools, the silicone will be constantly stressed. If the glass directs water outside the waterproofed zone, the bathroom will still have a problem even if the main shower waterproofing is correct.
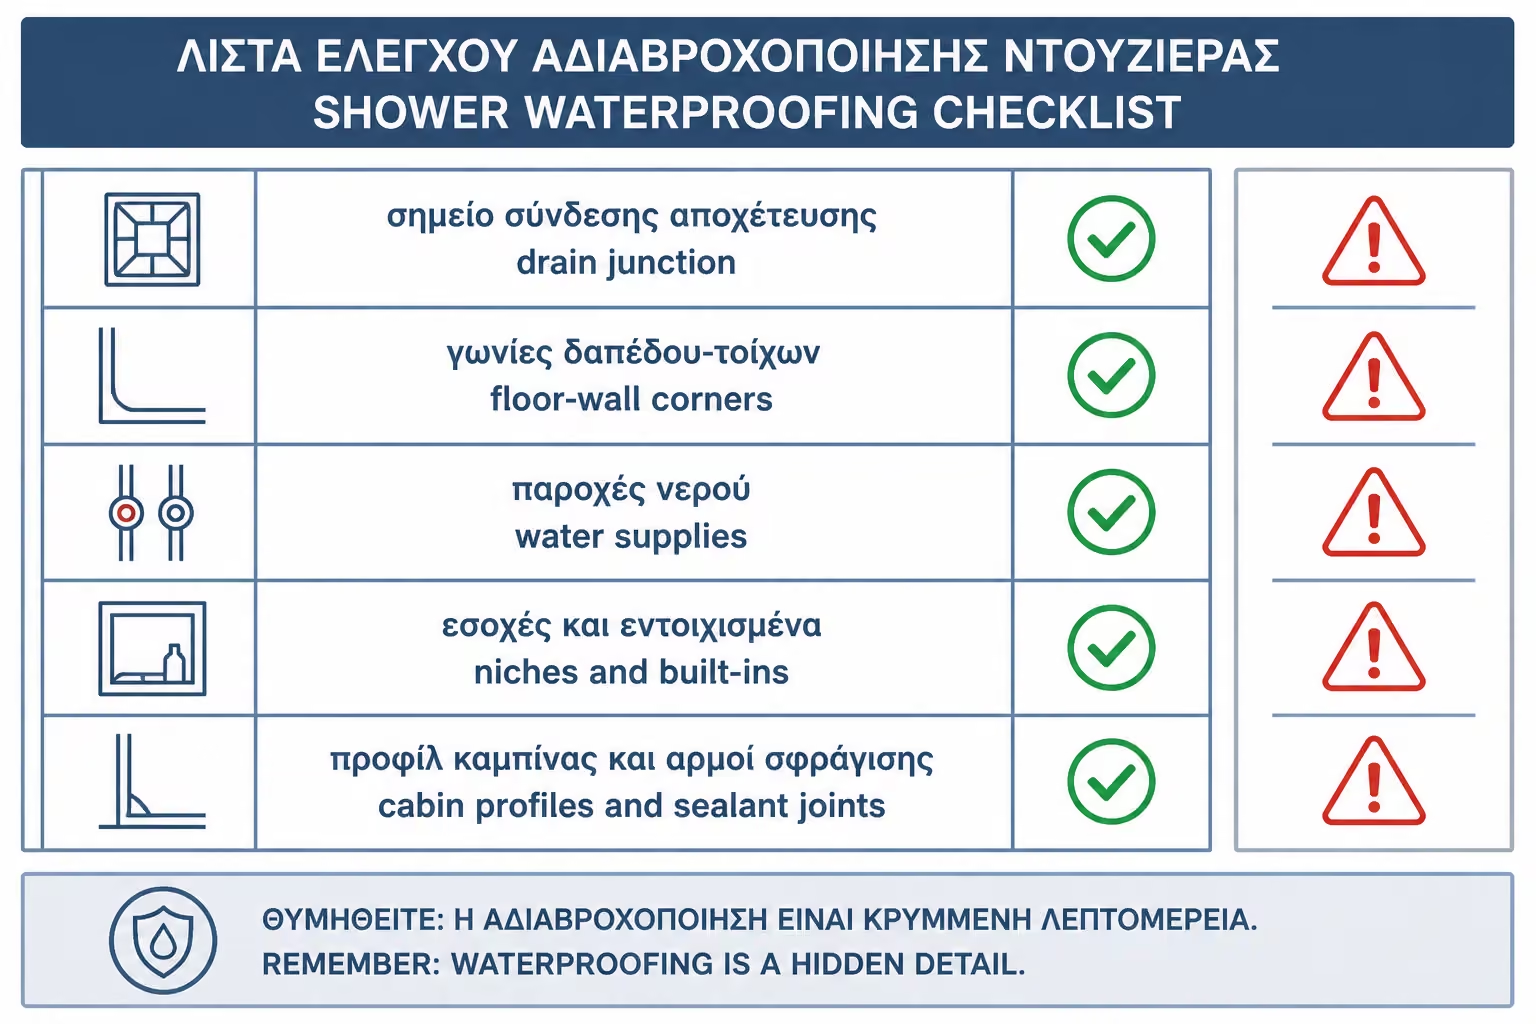
Before you finalize the choice or installation, review the following points first:
| Vulnerable point | Why does it "hurt" | What needs to be checked |
|---|---|---|
| Siphon / linear channel | It collects all the water and has a union of different materials | Flange, collar, membrane connection, correct level |
| Floor-wall corners | They accept movements and water low | Sealing tapes, full integration |
| Battery supplies | Each hole interrupts the membrane | Cuffs, leak control, not just escutcheons |
| Niches / shelves / parapets | Many angles and horizontal surfaces | Full waterproofing, slope, special pieces |
| Cabin / profile / silicones | Perforations and end joints | Hole sealing, correct profile position, elastic silicones |
If these five points are correct, the bathroom has a much better technical foundation. If one of these is done casually, the leak usually needs nothing more to start.
In a properly installed waterproofing, the center of a wall or floor is usually the easiest point. It is flat, continuous and without many interruptions. There the spreader, membrane or cementitious can be applied more evenly.
Leaks most often start where continuity is broken. Every corner, pipe, siphon, screw, niche or change of material is a potential point of weakness. That's not to say that thickness and proper center fit don't matter. It means that the technical inspection must be highly focused on details.
A bathroom can have "too much insulation" in the easy places and at the same time be exposed in the difficult ones. This is a common mistake. The owner sees a large area covered and feels safe. But the real quality is hidden in the 10-20 cm around siphons, corners, supplies and profiles.
That is why waterproofing should not be measured only in square meters. It must also be measured in details.
Before the tiles go in, there are warning signs that the application is not correct. If no tapes are visible in the corners, if there are no cuffs around the mixer penetrations, if the drain is not cleanly connected to the membrane, or if the niche has simply been "painted" without reinforcement, then the system already has gaps.
Another sign is excessive reliance on silicone. If the technician says that "the silicone will close it at the end", while we are talking about a siphon, angle or supply, this is wrong logic. Silicone is useful in the final stage, but it does not replace waterproofing under the tiles.
There is also a problem when the waterproofing does not go up enough on the walls of the shower. In a typical shower zone, the protection should rise at least to about 2 meters or as much as the layout and use requires. If the material stops low because "that's where it mostly splashes", the risk increases.
Finally, haste is a sign of danger. If the waterproofing has passed and the tiles are put in before it dries or before it is checked, many mistakes will be hidden forever under the finished coating.
The best time to check is before paving begins. The logic of the system must be seen there. The owner does not need to be an engineer. But it can see if there are key details.
On the floor of the shower, continuous sealing and proper connection to the siphon must be seen. Corners should show tapes or at least explain how they are incorporated. The facilities must have cuffs or special pieces. In recesses it should appear that all sides are sealed, not just the back.
It is good to keep photos. Not for disbelief, but for technical record. If later something needs to be drilled, a cabin installed or a repair made, the photos help. They also document that the waterproofing was done before it was covered.
If it is a walk-in or built-in shower, a leak test may also be requested before tiling, if the system and conditions allow. This is one of the best ways to confirm that the waterproofing "basin" holds water before it is closed.
Before you finalize the choice or installation, review the following points first:
| Question | Yes / No |
|---|---|
| Does the siphon have a flange or a special way to connect to the seal? | Yes / No |
| Does the waterproofing simply stop at the drain? | Yes / No |
| Do the floor-wall corners have sealing strips? | Yes / No |
| Are the vertical corners of the shower also reinforced? | Yes / No |
| Are there cuffs around the mixer penetrations? | Yes / No |
| Has a pressure/leakage test been carried out before installing built-in units? | Yes / No |
| Are the shampoo recesses sealed on all internal sides? | Yes / No |
| Do the shelves, niches and parapets have a slight slope towards the shower? | Yes / No |
| Are the future cabin screws provided and will they be sealed? | Yes / No |
| Is silicone treated as an end aid and not the primary insulation? | Yes / No |
| Is the waterproofing the correct thickness and two layers where required? | Yes / No |
| Has the drying time been met before tiling? | Yes / No |
| Is tile adhesive compatible with waterproofing? | Yes / No |
If several answers are "I don't know", the bathroom is not ready to be covered with tiles. Not because a mistake was necessarily made, but because critical points have not been confirmed.
A proper quotation should not simply say "bathroom waterproofing". It should describe the critical points. How will the connection be made with the siphon? Will there be films in the corners? Will there be cuffs on benefits? Will niches and parapets be waterproofed? Will cabin perforations be considered?
If the offer is too general, the owner cannot understand what he is buying. Two offers that say "waterproofing" can be technically very different. One may include a complete system with primer, two coats, tapes, cuffs and flood test. The other may mean a simple pass of spreader on the floor.
The quote must also clarify materials, labour, VAT, drying times, tile adhesive and final seals. Waterproofing is not just a product. It's a series of tasks. The more clearly described, the less room there is for omissions.
In demanding bathrooms, especially walk-in layouts or showers with a linear drain, it is wise to have photographic documentation before the tiles go in. It does not add much cost, but it significantly improves transparency.
If you must keep only one thing, keep this: leaks rarely start where the surface is plain and continuous. They start from the points where the waterproofing breaks, changes level or is punctured. Siphon, corners, facilities, niches and cabin are the points that must be checked obsessively before the tiles are put in. If these are done correctly, the bathroom has a real technical basis. If done haphazardly, even the best material can fail.
Bathroom waterproofing is not judged only by how many square meters were covered with insulation. It is mainly judged by how the vulnerabilities were addressed. The siphon, corners, fittings, recesses and the cabin are where the theory of waterproofing meets the actual use of the bathroom.
In a new bathroom, the water will not look for the most impressive tile or the most expensive material. It will look for the weak spot. A hole around a pipe, a corner without a tape, a siphon without a proper flange, a niche without a slope or a cabin screw without a seal is enough to start trouble.
The owner does not need to become a craftsman. But he needs to know where to look and what to ask. If before paving he asks to see the five critical points, he has already significantly reduced the risk. Because after the tiles, the waterproofing is not visible. And what is not visible must have been done correctly beforehand.
Return to category.
Go to categoryReturn to the central guide.
Go to guide