
Bathroom Waterproofing & Moisture Protection
Return to category.
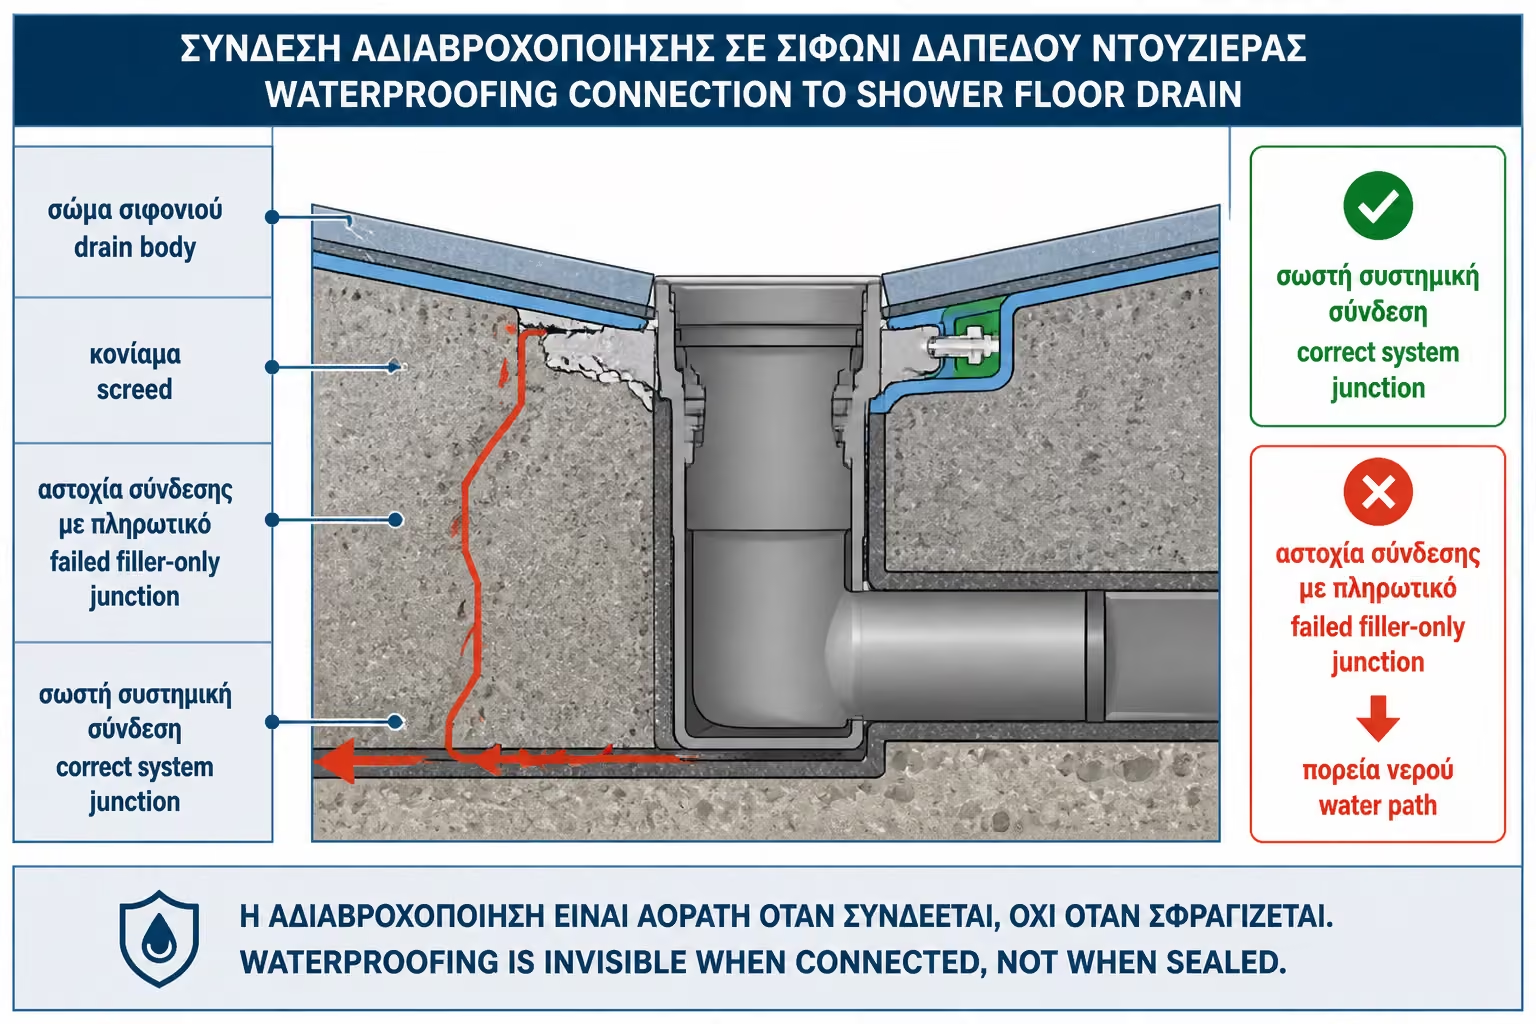
Go to categoryWhen people think about sealing a shower, they usually look at the floor, the drain, the tiles, and the final finishes. But the most critical point is not just the drain as a fitting. It is the junction between the drain body, the screed, and the waterproofing layer. That is where water ends up every day, where different materials meet, and where one of the most vulnerable parts of the whole bathroom is created.
The problem is that siphon and cement mortar do not behave in the same way. The siphon is usually plastic, stainless steel or a composite part. Cement mortar is a mineral material that dries, shrinks, creates wrinkles and can show micro-movements or micro-cracks. Between them there is a union that should not stay "around". If the waterproofing stops next to the siphon, without a flange, collar or special elastic connection, the water will find exactly that point.
Many failures in built-in showers do not start in the center of the floor. They start around the runoff. The water passes under the tile, moves through gaps in the glue or through joints, reaches the siphon area and looks for the weakest joint there. If the connection of the seal to the siphon is rough, the leak can move towards the concrete, the slab, the sub-floor or the adjacent wall.
The solution is not to put "a little more insulation" around the siphon. Nor should we rely on the silicone of the grill. A system is needed: proper siphon with sealing connection, stable installation, proper cement mortar, waterproofing flange or special collar, compatible polyurethane mastic where provided, spreadable waterproofing or membrane that bonds to the flange, and final inspection before the tiles are installed.
This guide explains why jointing a siphon with cement mortar is so critical, what mistakes lead to leaks, how to use waterproofing gaskets and polyurethane mastics, what should be done before waterproofing, and what the owner should check before tiling.
The drain is the lowest and most heavily stressed point of the shower. All floor water is directed there. Even when the floor slopes are correct, the area around the outlet gets wetter than any other point. If the slopes are wrong and water pools around the drain, the stress becomes even greater.
At the same time, the siphon is not part of the cement mortar. It is a foreign body inside her. It has different material, different thermal behavior, different stiffness and different connection method. Cement mortar can shrink as it dries. The siphon remains in place. There, between them, a small gap or small discontinuity can be created.
If the seal does not properly bridge this transition, water can pass under the membrane or past the siphon body. This is more dangerous than a simple surface failure because it is at the point where water is constantly accumulating.
In a proper system, this union should be treated as a special detail. It is not a simple passing of an anointed. It is not simple plastering around the drain. It is a connection of different materials in a permanently wet zone.
One of the most common mistakes is the use of a simple siphon that does not provide for a proper connection to the waterproofing. The siphon is placed, the grout is formed around it, and then the craftsman runs spreadable material up to the edge. Visually, the point appears covered. Technically, though, the connection is weak.
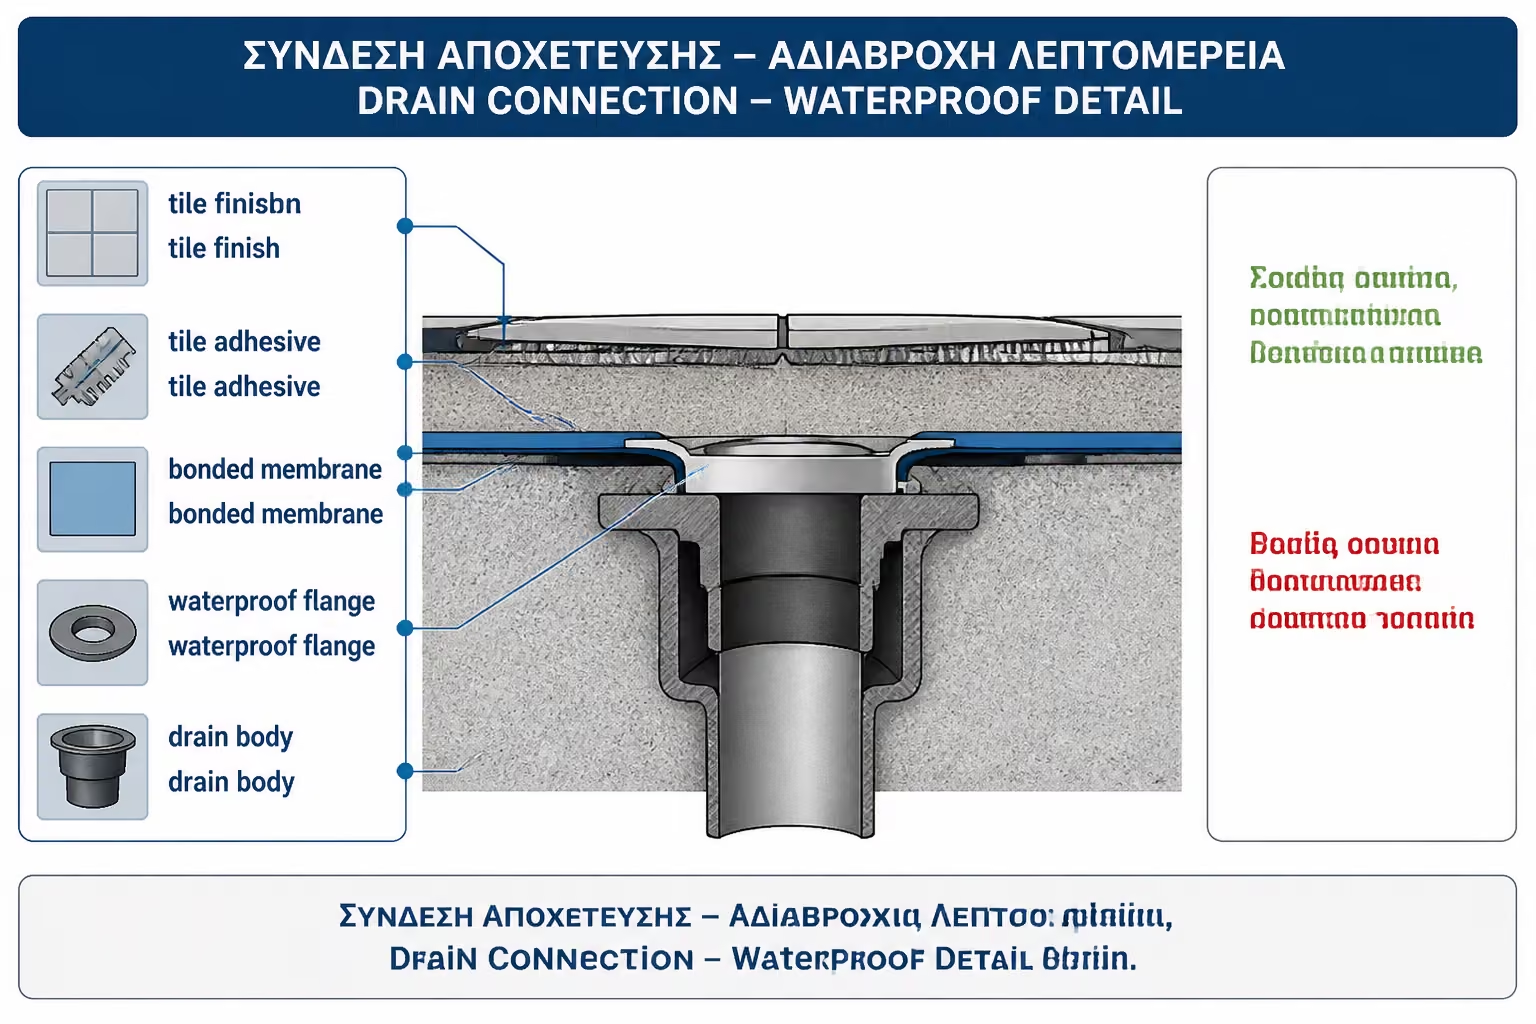
The sealing flange is the element that allows the membrane or spreadable system to "bond" with the siphon. It can be a factory gasket, special collar, fleece around the siphon, mechanical clamping with a ring or other system depending on the product. The important thing is to have a clear way of connecting the waterproofing with the drainage.
If there is no gasket, the seal ends up on a difficult surface, often plastic or metal, where adhesion may not be reliable. Even if the material sticks initially, daily stress can create micro-detachment.
Therefore, before buying or installing a siphon, it must be checked whether it is compatible with a waterproofing system. In built-in showers, this is not a detail. It is a basic condition.
The grout around the siphon must be firm, compact and properly shaped. There should be no voids, loose spots, large patches or rough fillings that will later transfer movements to the seal. If the base around the siphon is not correct, the membrane above will work on a weak substrate.
The siphon must be firmly positioned at the correct height. If it moves after cementing or if it plays when we step around it, the point will be stressed. The grout must sit properly on the flange or body of the siphon, leaving no voids where water can collect or break the layer.
Particular attention needs to be paid to the level. If the siphon is inserted too high, the spouts may not work properly and the water may pool. If it goes in too low, it can create a steep slope or a difficult connection to the end rack. Grout should be designed with the final tile, adhesive and grid in mind, not patched up at the end.
Sealing does not fix bad grout. If the substrate around the siphon is loose or not level, it must be corrected before the insulation is passed.
The waterproofing flange is the point where the waterproofing stops being just applied to the cement mortar and becomes a complete connection to the drainage. Without it, the membrane reaches the siphon. With it, the membrane is integrated into the siphon.
There are various technical solutions. Some siphons have a factory fleece gasket, onto which the spreadable sealant is encased. Others have a clamping ring that grips membrane. Other systems use a special collar around the drain. The right thing is not a specific accessory for all cases, but having a compatible connection.
The gasket must be clean, firm and at the correct level. If it is filled with dust, mud or cement residue, adhesion is reduced. If it is crooked or if the siphon is not well attached, the membrane will receive stresses. If the flange is incorrectly covered with tile adhesive before the waterproofing is complete, the system loses its continuity.
The owner can ask to see the gasket before it is covered. It is one of the most important points for photographic documentation before the tiles go in.
Polyurethane mastic is often used in critical joints because it remains elastic, has good adhesion to many substrates, and can bridge small movements. In the connection of siphon with cement mortar it can play an important role, but it must be used correctly and in the right place.
Mastic should not be treated as a substitute for gasket or membrane. It's not right to say "it's okay, we'll fill it with polyurethane". Mastic can help seal small perimeter joints, bridging between siphon and cement mortar, or specific details provided by the system. However, it does not replace a normal sealing connection.
It must also be compatible with the materials that will follow. Certain mastics should not be directly covered with specific spreaders or adhesives without a primer or without a specific curing time. If the wrong mastic is used or left exposed in the wrong place, it can create an adhesion problem.
Correct use is technically limited and clean: first stable siphon, correct cement mortar, clean gasket, then elastic sealing where provided, and then waterproofing that incorporates the detail. No mastic as a "patch" in a bad design.
Silicone has a place in elastic end seals, but is not suitable as the primary sealing material in the siphon joint with cement mortar. At this point there is water, cleaning agents, mechanical stress, possible micromotion and the need for permanent cooperation with the membrane. A simple end silicone does not have this role.
We often see siphons where the area around the grate or tile is "sealed" with silicone. This may help the finished surface, but it does not mean that the waterproofing has been connected to the siphon. If there is a gap behind the finished surface, the silicone simply delays the entry of water. When it wears down, water will find the weak link.
Silicone also ages, darkens, peels or cuts during cleaning. If it is the only protection around the most critical point of the runoff, the system is unsafe. The basic protection should be under the tiles, at the level of the flange and the membrane.
The correct phrase is not "we'll seal it with silicone". It is "we will connect the seal to the siphon and at the end the proper final sealing will be done where necessary".
In central floor drains, the challenge is symmetrical or multi-directional flow to the drain. The grout must guide the water properly without bellies, without sharp breaks and without leaving zones where water stays around the grate. The more water that pools near the siphon, the more the joint is strained.
The central siphon must have a suitable body for connection with waterproofing. The area around it must be clean and compact. If the flange is small or difficult, even more care needs to be taken in how the membrane is incorporated.
In small mosaics or small tiles, the flow around a central siphon is more easily formed. On large tiles, cuts around the drain can create difficulties. If the cuts press against the grate or if there are gaps in the glue, the point can be mechanically stressed.
Sealing must be completed prior to adhesive and tiling. The final finish should not be what "saves" the siphon. The siphon must already be watertight as a system before we even get to the paving.
In linear siphons, the joint point with the cement mortar is more extensive. Instead of a small perimeter point around a central drain, we have a long channel. This means a larger contact area, more possible micro-movements and more need for a proper gasket.
The linear siphon must be placed firmly and absolutely correctly in level. If it has a slight warp, if it is not well supported, or if the cement mortar does not hug it properly, the waterproofing will accept stresses. The gasket or factory fleece of the channel must be fully integrated into the waterproofing system.
Polyurethane mastic can be used on certain perimeter details, but should not replace the line siphon gasket. In linear channels, reliance on mastic or silicone without a normal membrane connection is particularly dangerous, because the length of the connection multiplies the risk.
The right built-in showerhead should be treated as part of the waterproofing system, not just a drain fitting that comes in at the end.
The correct order starts with siphon selection. Before grouting, a siphon suitable for a sealed shower must be selected. We need to know its height, its flange, the connection to the drain, the grate and the final thickness of glue and tile.
Then the fixed installation and the hydraulic connection are done. The siphon must be checked for proper drainage and tightness at the drain connection before it is covered. There is no point in making perfect waterproofing around a siphon that has a poor plumbing connection underneath.
Then the cement mortar is formed with the correct textures. The cement mortar must be cured as required and the surface around the siphon cleaned. Then the primer is applied where necessary, the first layer of waterproofing, the flange or collar is integrated into the system and the following layers follow.
Only after the waterproofing has been completed and cured can a leak test be carried out where provided and after paving with a compatible adhesive. If this series is messed up, the critical point of the runoff can be left weak.
Polyurethane mastic is used when elastic sealing is needed in a joint or transition of materials, as long as the system allows it. It can be used around the perimeter in a small gap between siphon and cement mortar, in details where elastic bridging is required or as a supplementary material before the membrane. But the exact location and time of application must follow the technical instructions.
We do not use mastic to fill large construction gaps that should have been solved with proper cement mortar. We don't use it to patch a gasket that doesn't fit properly. Do not use it on a wet, dusty or loose surface. And we don't use it as the final single barrier in a permanently liquid compound.
The mastic must have room to work. If it is pressed between two rigid elements without proper configuration, or if it is immediately covered with incompatible material, it may not perform. Also, it must have time to cure before accepting subsequent layers where this is required.
The right question is not "will you put mastic?". It is "exactly where will it be used, in what role and is it compatible with the gasket and waterproofing?"
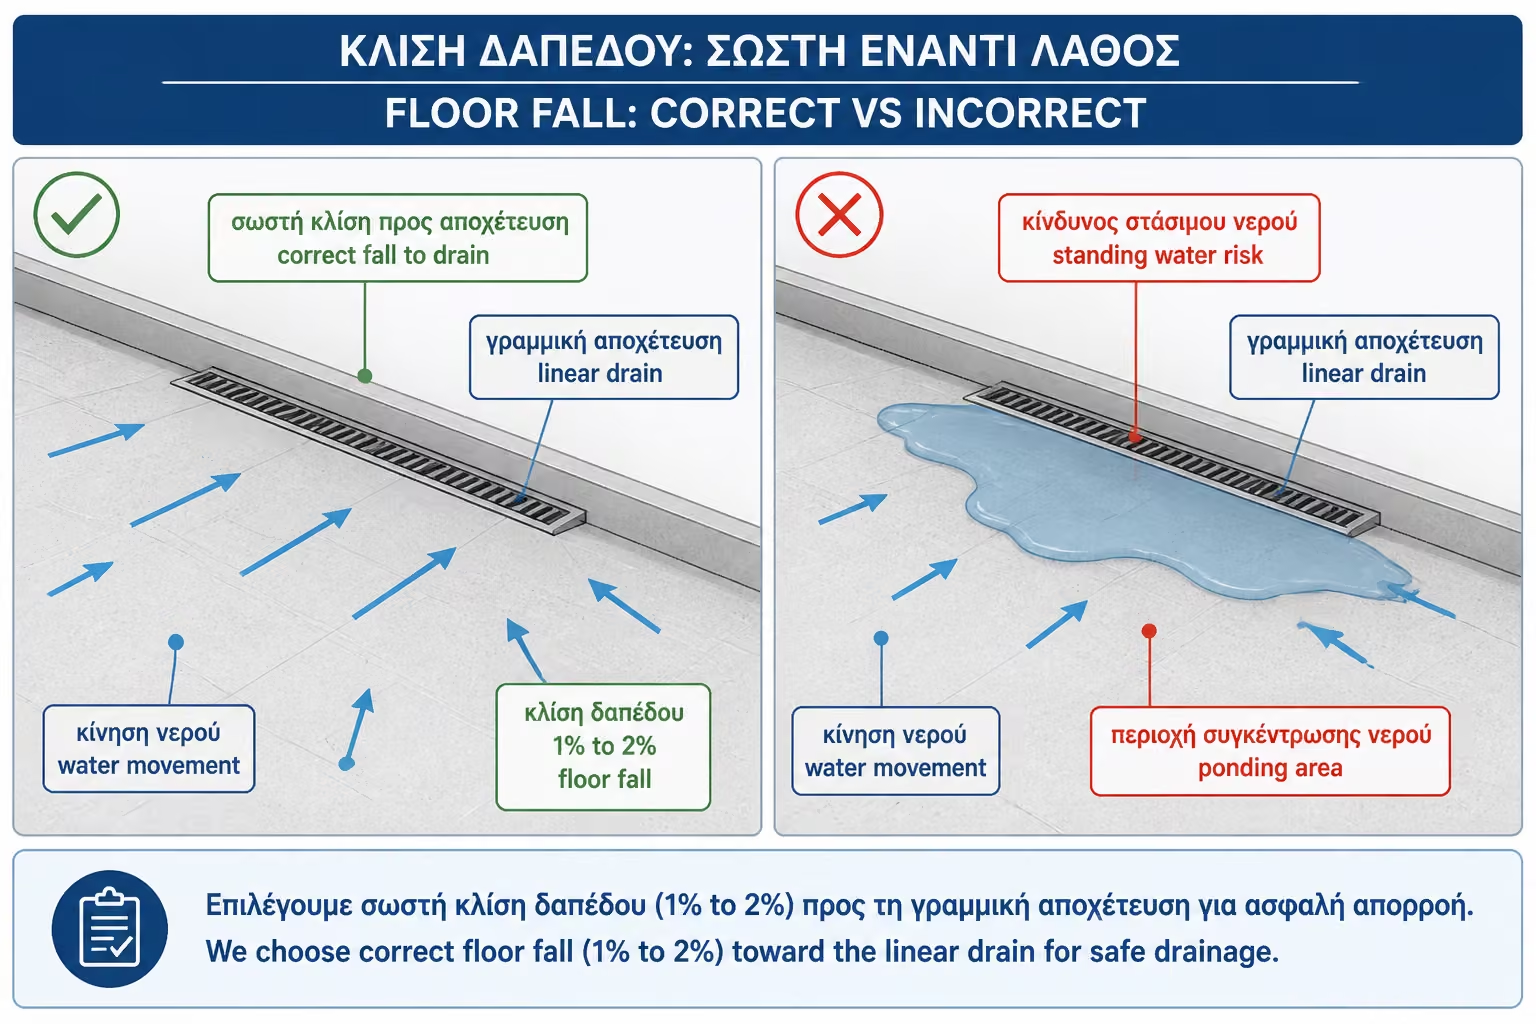
Even if the joint of siphon with cement mortar is done correctly, the drains must lead the water to the drain. If water stagnates around the siphon or in an adjacent area, the system will be constantly stressed. The seal protects against water ingress, but is not designed to correct incorrect geometry.
The slope must be formed in the cement mortar. In showers, in practice we often encounter slopes of about 1%–2%, depending on the layout, the siphon and the tile. The important thing is that the water moves towards the drain without standing still. Waterproofing follows this geometry; it does not create it.
With linear drains, the flow is often one-directional, which can be visually cleaner and easier to combine with large tiles. With central drains, the runoff is more complex and tile cuts play a bigger role. In either case, the drain level has to be coordinated with the floor slope from the start.
If the grout is wrong, adding more mastic or more spreader around the siphon doesn't solve the underlying problem.
In built-in showers, especially walk-in layouts or showers with linear drains, a flood test before tiling is very helpful. After the waterproofing has cured as required by the system, the floor can be tested in a controlled way. That confirms whether the joint around the drain holds before it is covered with adhesive and tiles.
The test must be done properly, with a suitable siphon plug, temporary dam where necessary, controlled water height and level monitoring. It's not a flash flood. It's a technical inspection. If water loss occurs, paving should not proceed.
The siphon area should be watched especially. If there is a bubble, color change, moisture in the lower space or a drop in level, it must be investigated whether the problem is in the plug connection, the flange, the joint with the cement mortar or another part of the membrane.
A successful flood test is no guarantee that future damage will never be done, but it is very important confirmation that the basic waterproofing basin and siphon area are working before the tiles are put in.
Mistakes around the siphon are often because the point looks small, but technically it is complex. The whole floor can be waterproofed well and only the drainage fails. This is enough to create a leak.
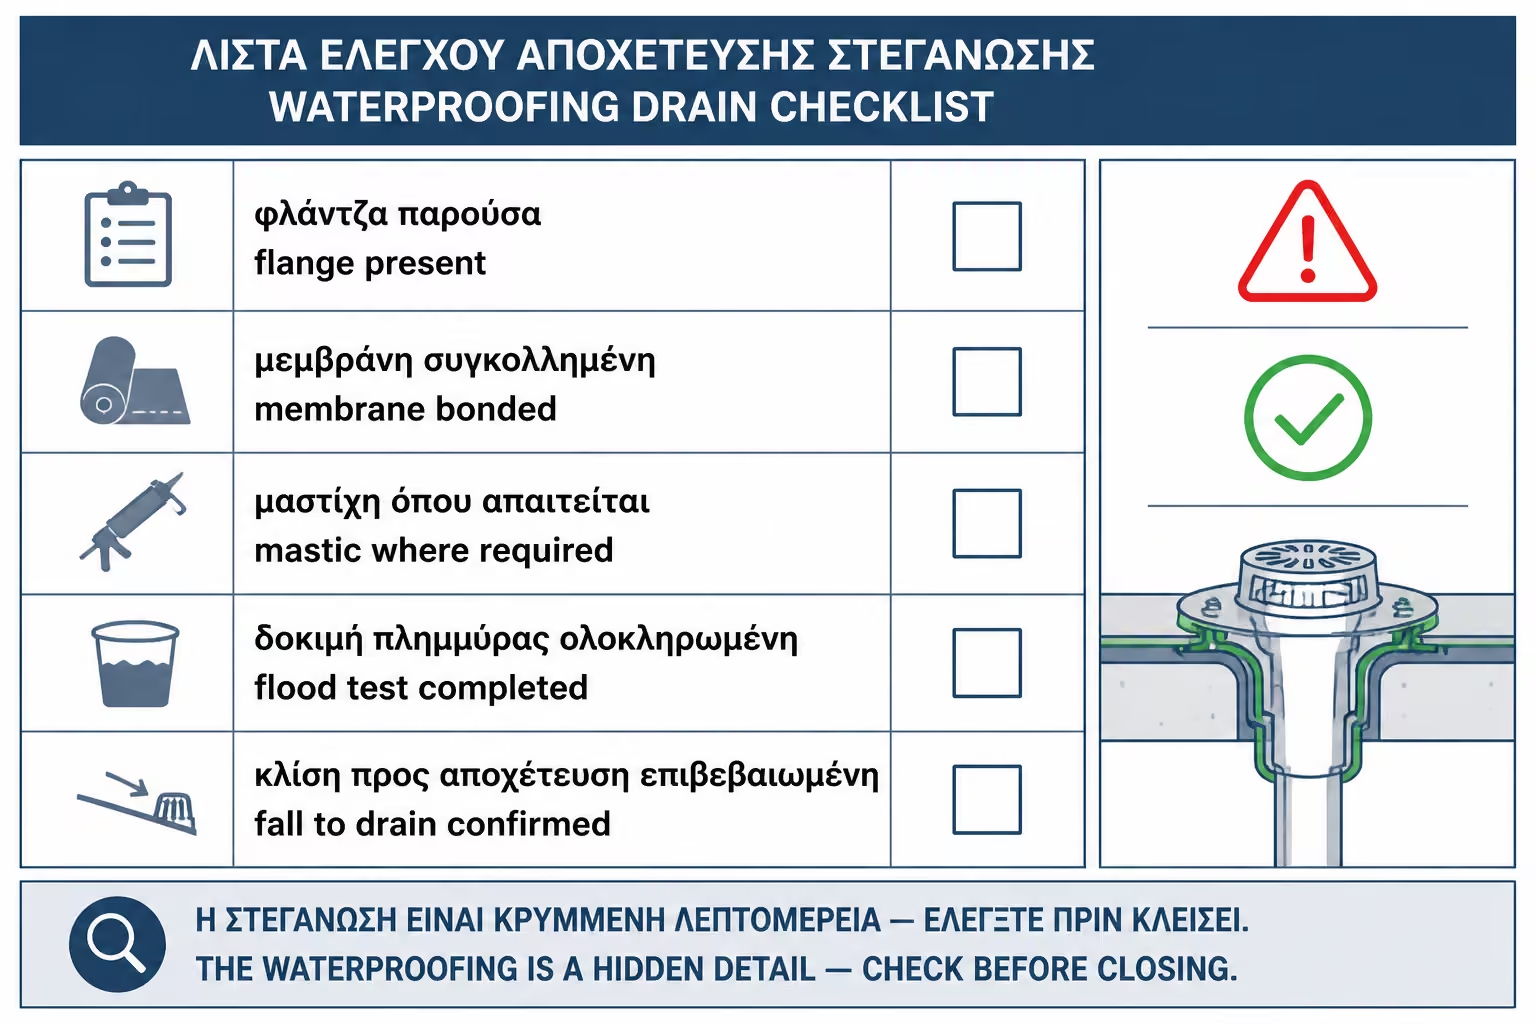
Before you finalize the choice or installation, review the following points first:
| Error | Possible consequence | Correct approach |
|---|---|---|
| Siphon without sealing flange | The membrane does not reliably connect to the runoff | Siphon compatible with waterproofing |
| Rough cement around the siphon | Gaps, cracks, micromovements | Solid base and correct level |
| Waterproofing that stops next to the siphon | Water entering the joint | Incorporation of flange or collar |
| Mastic as a unique solution | Temporary or uncertain seal | Only complementary and compatible mastics |
| Incorrect siphon height | Bad leaks or grill problems | Coordination with glue and tile |
| Paving before the insulation is cured | Poor adhesion, trapped moisture | Compliance with drying times |
| No flood test in a demanding shower | Hidden failure visible after tiling | Control where provided |
| Silicone on the grill as the main defense | Aging and possible water ingress | Basic waterproofing is done under the tiles |
A typical scenario is that an expensive linear siphon is installed, but its flange is not properly bonded to the membrane. The end result looks luxurious. Technically though, the join can be weaker than a simple but properly executed drain.
Proper grouting and waterproofing of a siphon has a cost, but it is small compared to the cost of failure. A good flanged trap, the right sealants, polyurethane caulk where needed, and extra application time cost less than a future tile peel.
In a typical bathroom of about 5 sq.m. in the Greece of 2026, where a simple to medium renovation can cost around €3,200–5,500 and more demanding solutions with a walk-in, linear siphon, custom cabin and complete waterproofing can reach around €6,000–7,500 or more, the siphon area is not a place to save money. It is the point where all the water ends up.
Before you finalize the choice or installation, review the following points first:
| Element | Because it's worth it |
|---|---|
| Siphon with flange | It allows a reliable connection with waterproofing |
| Proper cement mortar | Creates a solid base and texture |
| Polyurethane mastic where provided | Helps with smooth transitions |
| Compatible waterproofing | Bonds the flange to the floor |
| Flood test | It checks the point before it is covered |
If a quote is cheaper because it uses a simple siphon without a flange or because it does not provide for proper detailing around the outflow, the risk is high.
A proper quote for a built-in or walk-in shower should not simply say “installation of siphon”. It must describe the type of siphon, its connection to the waterproofing, the formation of the cement mortar, the flange or collar, the use of mastic where required and the continuity of the waterproofing.
It must also state the compatibility of the materials. If the siphon has a specific flange, a sealant must be used that can work with it. If polyurethane mastic is to be used, it must be compatible with the siphon, the cement mortar and the membrane. If a flood test is to be done, the time must be foreseen.
In linear siphons, the offer must be even more specific. To state support, level, flange, joint with membrane, gussets and end grill. The linear siphon is not just an aesthetic accessory. It is a long technical association.
Finally, the offer must distinguish materials, labour, VAT and possible tests. The more vague the description of the runoff, the greater the chance that the most critical point will be roughed up.
Before paving begins, ask if the siphon has a sealing gasket. Ask to see how it is attached to the membrane. If it's a linear siphon, ask if the flange is embedded the entire length and if the grout supports it properly.
Ask if polyurethane mastic was used and where exactly. If the answer is "around for security", ask to know if this is expected by the system or if it's just an empirical patch. Putty is useful when it has the right role, not when it's covering bad detail.
Ask if the gutters lead correctly to the siphon and if the final height has been calculated with the glue and the tile. Also ask if a leak test will be done before tiling, especially if it's a walk-in or built-in shower.
Keep photos. The siphon joint with cement mortar and waterproofing will be completely hidden. If it is not photographed now, later there will be no easy way to know what happened.
Before you finalize the choice or installation, review the following points first:
| Question | Yes / No |
|---|---|
| Is the siphon suitable for a built-in/sealed shower? | Yes / No |
| Is there a flange, collar or factory connection system to the membrane? | Yes / No |
| Is the siphon stable and not moving? | Yes / No |
| Is the grout around the siphon solid and void-free? | Yes / No |
| Are downspouts directing water properly to runoff? | Yes / No |
| Is the gasket clean and integrated into the seal? | Yes / No |
| Was polyurethane mastic used only where intended? | Yes / No |
| Does the waterproofing simply stop at the drain? | Yes / No |
| Has the drying time been observed before the tile adhesive? | Yes / No |
| Has a flood test been done or planned in a demanding shower? | Yes / No |
| Is the final grid/tile height calculated correctly? | Yes / No |
| Are there any pictures before the spot is covered? | Yes / No |
If enough answers are "I don't know", it's not time to put in tiles. It is time to confirm the most critical point of the runoff.
If you must keep only one thing, keep this: the drain should not simply "sit" in the screed. It has to be tightly connected to the membrane. The sealing flange or gasket is the critical link, while polyurethane mastic can only help when it is used correctly as a secondary detail. If the waterproofing stops beside the drain, the most important point in the bathroom remains open to water.
The union of the siphon with the cement mortar is one of the points where the success of a built-in shower is judged. It is not enough to have the right tile, good glue or a nice grate. If the drain is not properly connected to the waterproofing layer, the water will find its way to where it collects every day.
The right solution starts with choosing a drain that has a suitable flange or sealing system. It continues with stable placement, a sound screed, correct floor slopes, a clean connection between the flange and the membrane, and the use of polyurethane mastic only where it has a true technical role. Neither silicone nor tile adhesive should be used to hide a poor detail.
In linear siphons, this need is even more pronounced because the joint is larger and more exposed. In central siphons, attention is focused around the perimeter flange and proper flow configuration. In any case, the drain should not be treated as a simple plumbing fixture. It is part of the sealing system.
The owner should ask to see the spot before tiling. Ask about gasket, mastic, waterproofing, leaks and flood test. Because after tiling, the siphon will just look like a grate on the floor. But the real quality will be underneath, in the joint that won't be seen but will receive all the water every day.
Return to category.
Go to categoryReturn to the central guide.
Go to guide