
Bathroom Waterproofing & Moisture Protection
Return to category.
Go to categoryThe joint between the bathtub or porcelain shower and the wall tile is one of the most common places where hidden dampness begins. It's a point that seems simple: a line of silicone around the tub, clean and white at first, that gives the impression that everything is sealed. In fact, behind this fine line is one of the most critical points of the bathroom.
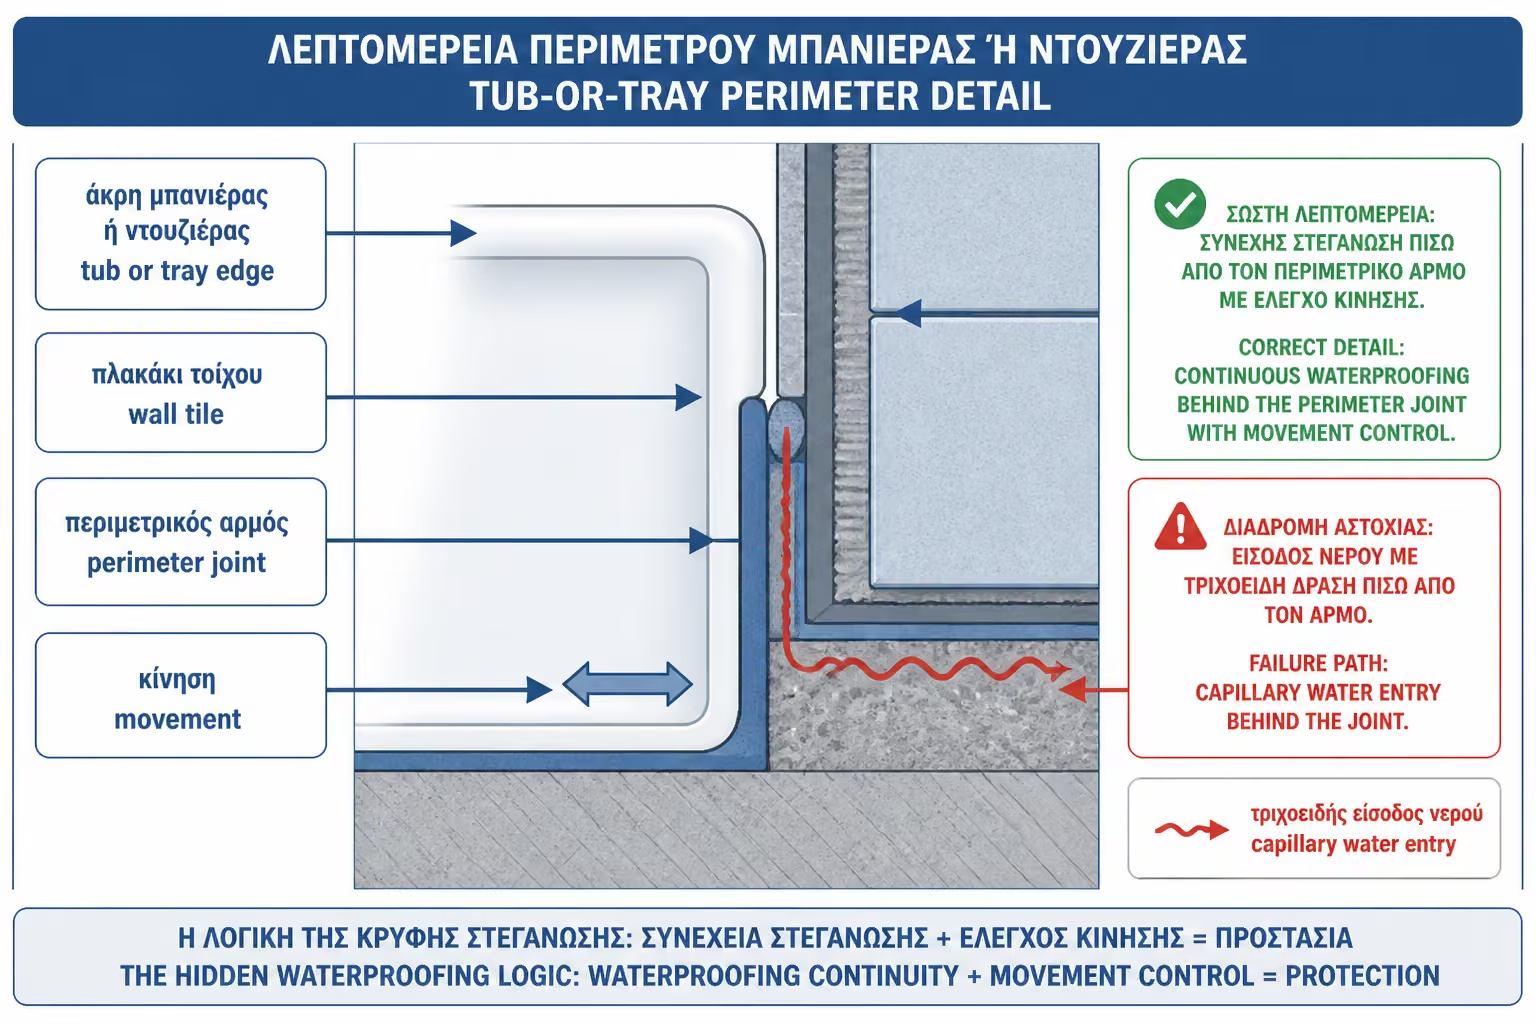
The problem is that the bathtub or porcelain shower is not part of the wall. It is a separate body, with its own micromotion, its own weight, its own support and a different material from the tiles. The wall is stable. The tub may move slightly when filled with water, when someone steps in, when it contracts or expands due to temperature. That little movement is enough to tire out a bad joint.
That is why the perimeter joint should not be treated as a simple aesthetic finish. It is a joint of material change and micro movement. If it is sloppily sealed, if the wrong silicone is put in, if the surface is not properly cleaned, or if the tub is not propped up properly, water can seep behind the silicone and sneak down the tub. From there it can reach walls, floors, neighboring rooms or downstairs.
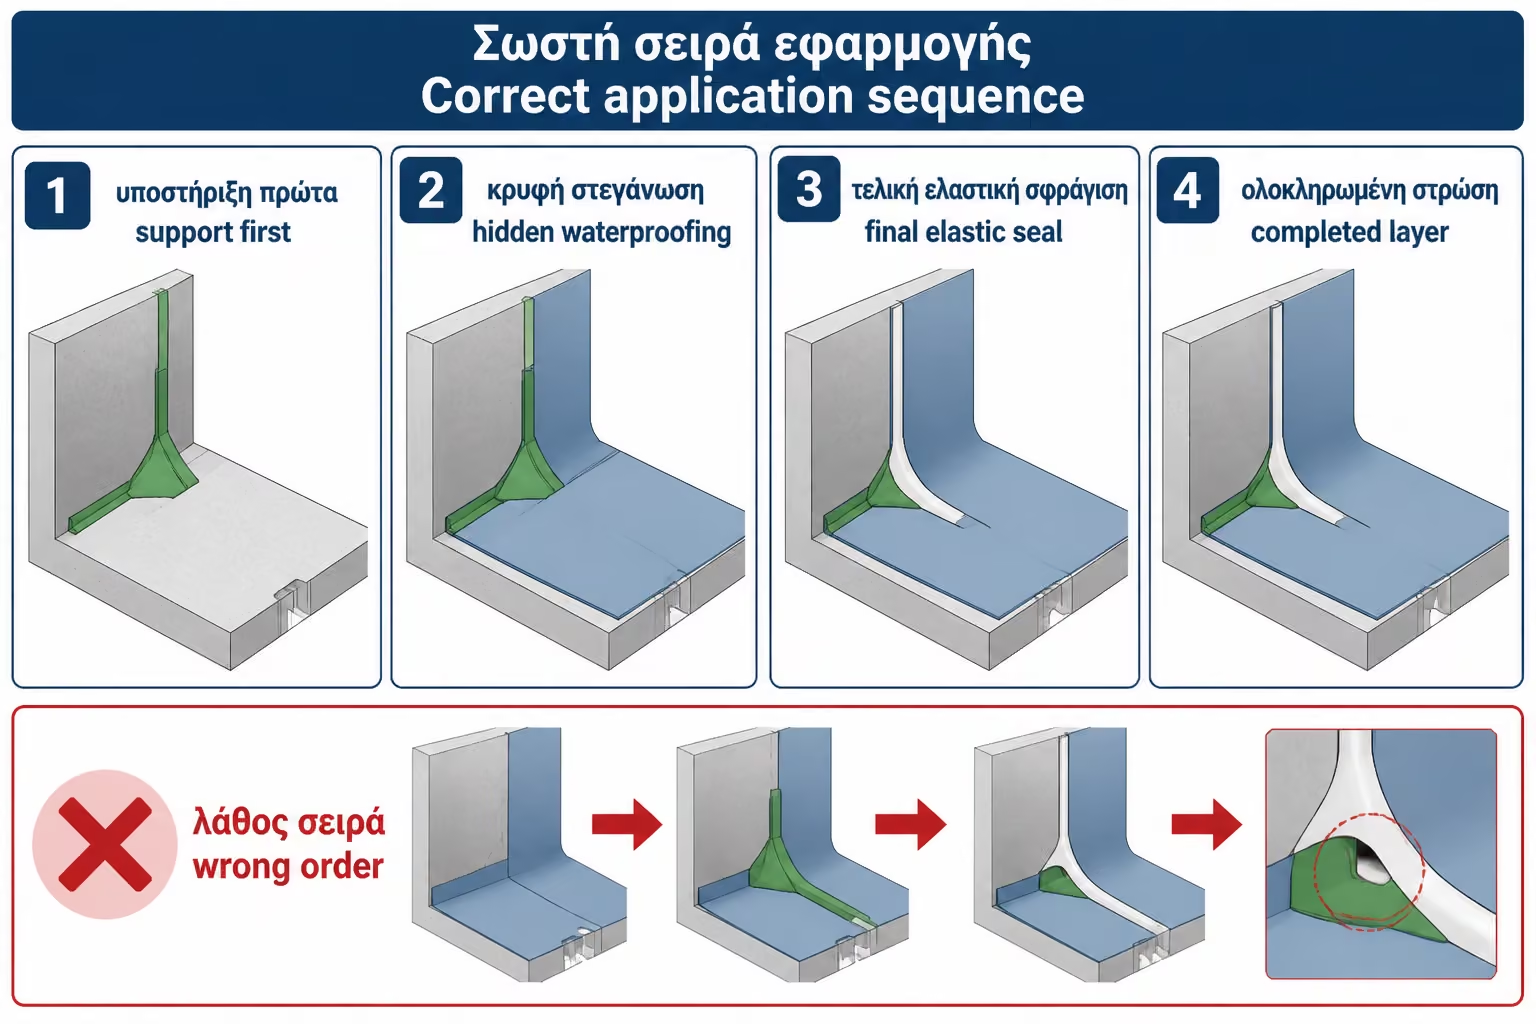
Another big mistake is the belief that "if we put good silicone, we are ok". Good silicone is essential, but not always sufficient on its own. Proper waterproofing starts before the silicone goes in: from the support of the tub, the order of installation, the waterproofing of the wall, the presence of waterproofing tape or a perimeter system where necessary, and the clean geometry of the joint. Silicone is the ultimate rubber seal, not the only defense.
This guide explains how to properly seal the joint of a bathtub or porcelain shower to the tile, why silicone often fails, when special tapes or profiles are needed, what is done in a new construction and what in a repair of an old joint, and what the owner should check before he considers the point "closed".
The perimeter joint of the bathtub is located at a point where water, movement and different materials meet. On the one hand we have the wall with the tile. On the other hand, we have an acrylic bathtub, steel, cast iron or porcelain shower base. These materials do not behave in the same way.
The tub may have little elasticity. When filled with water, it increases its weight. When someone enters, it is charged. When hot water falls, it expands very little. These movements may not be visible, but they affect the joint. If the joint is stiff or too thin, it may open.
The tile and grout on the wall are rigid. They cannot follow the movement of the tub. If cementitious grout is inserted between them instead of rubber sealant, a crack will almost inevitably appear. If silicone is put in but not to the correct depth, without cleaning or on top of old moisture, it will peel off.
Water exploits exactly this line. It flows from the wall to the tub, stays on the joint, gets behind small openings and descends into the space under the tub. Because the point is hidden, the leak can work for a long time before it is noticed.
Silicone is essential in the perimeter joint, but we need to understand its role. It is a rubber end seal. It closes the visible joint, absorbs micro-movements and prevents water from easily entering the gap. But it should not be the only technical protection.
If there is no waterproofing on the wall behind the bathtub, if the tile is installed incorrectly, if the bathtub does not sit firmly or if the joint is too large, the silicone is called upon to do a job it does not belong to. It will last for a while, but sooner or later it can open, turn black or peel off.
Proper construction must have a "second line of defense". In the area behind the bathtub or shower, the wall must be protected with a suitable waterproofing, especially if it receives direct water. In many cases, the joint can be reinforced with special perimeter sealing tape, before the final tile is inserted or before the final joint is closed.
Silicone is a maintenance consumable. Over time it may need to be replaced. Waterproofing and proper construction detail must remain behind as permanent protection.
Proper tub sealing doesn't start with the silicone gun. It starts with the correct placement and support of the bathtub or porcelain base. If the tub moves, bends, or doesn't press properly, no sealant will last long.
The bathtub must be firmly positioned, properly leveled and well supported on its legs, base or frame. If it is an acrylic bathtub, stability is especially important, because the body can be more flexible than a heavy cast iron or porcelain structure. If it is a porcelain shower, it must fit completely and have no gaps under the base.
Then the wall must be protected. The wet zone, especially around the tub when it is also used as a shower, should be waterproofed behind the tiles. The corner where the tub meets the wall should be designed as a material change joint. It should not be assumed that the grout will "save" her.
Finally comes the elastic final seal. The silicone must adhere to clean, dry and suitable surfaces, with the correct depth and geometry. If the sequence is reversed or sloppy, the point will remain vulnerable.
A critical construction issue is placement order. In many correct applications, the tub or shower base is installed first and the wall tiles are "dropped off" on top, leaving a controlled joint for a resilient seal. So the water running down the wall is directed over the edge of the bathtub and not behind it.
If the tiles are already in and the tub is just pushed in front of them, the joint may be more vulnerable. There is a greater chance of creating a gap behind the rim, difficult to seal properly. In such cases the final silicone becomes the main defense, which is not ideal.
In renovations, of course, perfect order is not always possible. Only the tub or only the base can be replaced. Then even more attention must be paid to cleaning, gap geometry and the use of a suitable sealant. If the gap is large or irregular, a profile, tape or special construction solution may be needed.
The correct mounting order is not a detail. It affects whether the water stays in front of the joint or has a way to pass behind it.
The joint between the bathtub and the tile must have the correct geometry. If the gap is zero, the tub may be pressing against the tile. With movement, creaking, cracking, or delamination may occur. If the gap is too large, the silicone will sag, have poor adhesion, or act as a bridge without proper support.
A proper elastic joint needs width and depth to allow the silicone to work. In large gaps, a joint cord, also known as a backer rod, may be needed, so that the silicone has the correct cross-section and does not stick on three sides. The silicone should ideally stick to both sides of the joint and be able to move elastically. If it also sticks to the bottom, its movement is limited and it can tear.
In small bathrooms, there are often rough tile cuts or the tub doesn't sit perfectly parallel to the wall. The result is a gap that is sometimes small and sometimes large. This makes sealing difficult and increases the chance that the silicone will open at some point.
The geometry of the joint must be checked before the sealant is inserted. Silicone should not be used to hide a manufacturing failure.
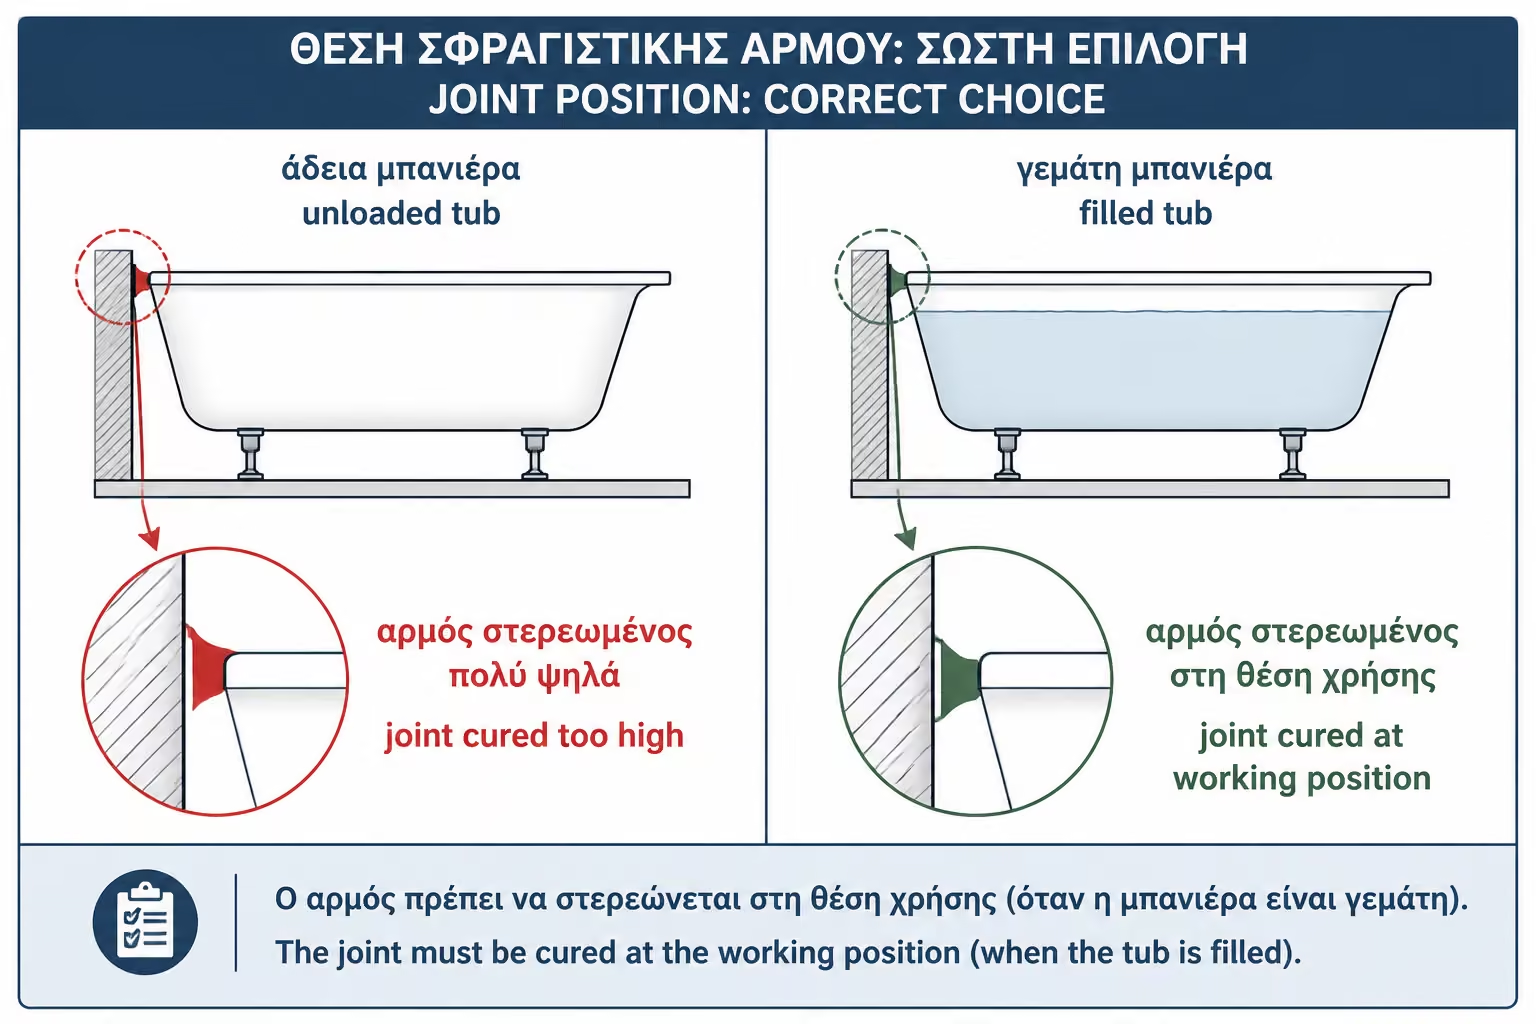
In many cases, especially in acrylic tubs, it is good practice to fill the tub with water before applying the perimeter silicone and keep it full until the sealant has cured, according to the time required by the material. The logic is simple: the bathtub takes its position under load, i.e. as it will be when in use.
If the silicone is applied when the tub is empty and then the tub sags slightly when it is full or when someone steps in, the joint is stretched. Over time it can open at the line of contact with the tile or the rim of the tub. This is especially common in bathtubs that do not have excellent support.
Filling does not correct poor support. If the tub moves a lot, it must first be properly supported. But it helps that the final seal is made in the realistic operating position and not in a theoretical unloaded position.
On porcelain or very heavy bases, the movement may be less, but the same principle applies: the joint must be applied in a fixed state, not on an element that will be moved immediately afterwards.
For bathtubs and showers, high-quality neutral or suitable sanitary silicone is needed, designed for wet areas, with anti-mold protection and good adhesion to the materials it will encounter. We do not use generic cheap construction silicone, acrylic putty, or cementitious grout at this point.
The choice must take into account the materials. Adhesion to an acrylic bathtub has different requirements, others to porcelain, others to an enameled surface, others to a ceramic tile and others to a natural stone. On natural stone, for example, a sealer should be used that does not stain the stone.
Anti-mold silicone reduces the chance of tanning, but it doesn't work miracles. If the area is constantly wet, if there is no ventilation, if there are soap residues or if the silicone has been applied over moisture, it can turn black. The quality of the material must be combined with proper application and maintenance.
Color is secondary to technical suitability. A beautiful silicone that does not adhere properly to the tub material will fail.
Silicone often fails not because it was a bad material, but because it was applied to the wrong surface. The area must be clean, dry and free from dust, salts, soaps, grease, old silicone and mould. If residue is left, the new silicone will not stick to the tub or tile. Sticks to dirt.
When repairing an old joint, the old silicone must be completely removed. It is not enough to cut the visible part and put a new one on top. New silicone does not stick reliably to old silicone. Mechanical removal, cleaning and degreasing are required, depending on the material.
If mold is present, the cause must be addressed. If the mold is only on the surface of the old silicone, replacement may solve the aesthetic issue. But if there is moisture behind the joint, the new silicone will turn black again. In this case, a check for hidden water inflow is needed.
The surface must be thoroughly dried before the new sealant is applied. Silicone on a wet substrate can peel off quickly.
In more correct and demanding applications, we do not rely only on the final silicone. A special perimeter sealing tape or sealing band system is used between the rim of the bathtub and the wall, before the tiles are installed or completed. This film acts as a second line of defense.
The tape connects the lip of the tub or base to the wall so that if water seeps through the finished silicone, it doesn't run down the back of the tub. Instead, it is driven forward or remains in the controlled zone. It is particularly useful when the bathtub is also used as a shower, when use is frequent or when we want a safer solution in a new construction.
The tape must be compatible with the tub material, wall waterproofing and tile adhesive. It's not an improvised film. It is a system component. It is installed before the final cladding is closed and then it is not visible.
If the tub is already installed and the tiles are in, adding such tape is difficult or impossible without an opening. That is why it must be foreseen from the beginning.
Porcelain or ceramic shower bases behave differently than an acrylic tub. They are stiffer and heavier, but the perimeter joint with the tile remains critical. If the base does not press properly, if there is little movement, or if the silicone is applied incorrectly, water can pass around the perimeter.
On a porcelain base, the surface is often smooth and low absorption. The silicone should have good adhesion to it. The rim of the base must be clean of salts, dust and debris. If there is a factory perimeter lip or upstand, this helps a lot, because it acts as a natural barrier to water. If not, the final join becomes more critical.
The base must be placed at the correct level and with good drainage. If the water pools on the side of the wall, the silicone will be constantly stressed. Sealing is not just about closing the joint. It is also the geometry that leads the water to the siphon.
In new installations, it is advisable to combine perimeter sealing with waterproofing of the wall behind the tiles, especially in the shower area.
A bathtub that is only used for bathing with water in the basin has a different strain than a bathtub that is used daily as a shower. When there is a shower telephone or a fixed column, the wall above the bathtub receives direct wetting. The water flows over the tiles and ends up at the perimeter joint.
In this case, the zone around the bathtub should be treated as a shower zone. The wall must have waterproofing behind the tiles, the corners must have tapes, the fittings cuffs and the connection to the bathtub a proper rubber seal. It is not enough to put in a tile and silicone.
If there is a shower curtain, water often escapes to the edges. If there is a glass panel, the mounting points and silicones of the panel must also be properly sealed. Many problems start at the edges of the bathtub, where water runs past the curtain or behind the profile.
Use as a shower changes the technical requirement. This is no ordinary bathtub. It is a wet zone with daily wetting.
Many notice the long line of silicone on the back wall, but ignore the two side edges. That's where the problem often starts. Water can run along the rim, reach the edge of the tub and run down into the space between the tub and wall or the tub and furniture.
Edges need careful shaping. If the tile ends unevenly, if the silicone does not turn properly, or if there is an open spot behind the cabinet profile or curtain, water can pass behind the tub. In many cases, the moisture appears on the adjacent wall and not directly behind the tub, because the water moves laterally.
In a bathtub with a glass panel, the point below the profile and the contact with the bathtub rim must be carefully sealed. There should not be a small "path" that leads the water to the outside. The geometry of the panel should send the water into the tub, not to the edge.
The side edges deserve a separate check before the bath is delivered.
If the old silicone is blackened, torn or peeling, the solution is not to put new on top. First the old silicone must be removed. Then the spot must be cleaned, disinfected where there is mold, dried completely and checked for moisture behind the joint.
If the mold was only on the surface, replacing the silicone can greatly improve the result. However, if when the old silicone is removed a wet void, black substrate, loose grout or a damp smell is visible, it needs investigation. There may be a hidden water inflow behind the tub.
In a repair, the new silicone must fit into the correct joint. If the gap is large, a backer rod may be needed. If the tile is broken or the tub is moving, the cause must be solved. If the tub is not properly supported, the new silicone will open again.
Silicone replacement is maintenance. It should not be used to hide an active leak.
Before you finalize the choice or installation, review the following points first:
| Error | Possible consequence | Correct approach |
|---|---|---|
| Silicone over old silicone | Poor adhesion and quick peeling | Complete removal of old material |
| Rigid grout instead of elastic grout | Cracks from micro-movements | Sanitary silicone or suitable rubber sealant |
| Bathtub that moves | Joint opening | Proper support before sealing |
| Large gap filled with silicone only | Hanging, tearing, poor tightness | Backer rod or construction correction |
| No waterproofing behind tiles | Water on the wall if the silicone opens | Waterproofing in the wetting zone |
| Poor surface preparation | Silicone release | Cleaning, degreasing, complete drying |
| The acrylic tub does not fill before the silicone | Joint stretching and opening in use | Sealing under load where necessary |
| Ignore side edges | Hidden water under the bathtub | Sealing the entire perimeter and edges |
| Support only on the final silicone | Short duration of protection | Second line of defense with tape/waterproofing where required |
A typical example is an acrylic bathtub that was sealed empty, without proper support. At first the silicone was perfect. After a few weeks of use, a thin shadow appeared on the line of contact with the tile. The tub sagged slightly with the weight and the silicone stretched until it opened. The problem wasn't just the silicone. It was the support and the wrong fit.
Sealing the perimeter of the bathtub is not a large cost in relation to the overall project, but it is of great importance. The cost is affected by whether we are talking about a new installation or a repair, by the length of the perimeter, by the need to remove old silicone, by the condition of the joint, by whether a backer rod or special tape is needed, and by the quality of the sealant.
In a typical bathroom of about 5 sq.m. in the Greece of 2026, where a simple to medium renovation can cost around €3,200–5,500 and more demanding solutions with a new bathtub, porcelain base, glass panel or complete waterproofing can reach around €6,000–7,500 or more, properly sealing the bathtub is a small but critical cost.
Before you finalize the choice or installation, review the following points first:
| Work / Material | When needed | Comment |
|---|---|---|
| Good quality sanitary silicone | At each perimeter joint | Basic final seal |
| Removal of old silicone | Under repairs | We don't pass new on top of the old |
| Backer rod | In deeper/larger joints | It helps with the correct geometry |
| Perimeter sealing tape | In new or demanding applications | Second line of defense behind the final silicone |
| Wall waterproofing behind tiles | When the bathtub is used as a shower | Basic wall protection |
Cheap sealing with a simple silicone on a bad base is one of the savings that pays off later.
A proper offer should not simply say "silicone for bathtub surrounds". It should clarify if the tub will be properly supported and leveled, if the wall behind the tiles will be sealed, if perimeter sealing tape will be used where required, and what type of final sealer will be put in.
In a new installation, the quote must state the sequence: tub or base installation, support check, zone waterproofing, tiling, final rubber sealing. If the bathtub is also used as a shower, wall waterproofing must be provided in the wetting zone, not simple tiling.
In case of repair, the quotation should mention removal of old silicone, cleaning, degreasing, drying and reapplication. If moisture is suspected under the tub, it should be mentioned that an inspection will be done before resealing.
The vagueness of "we'll close it with silicone" is not enough. Silicone is the last stage of a proper detail, not the whole detail.
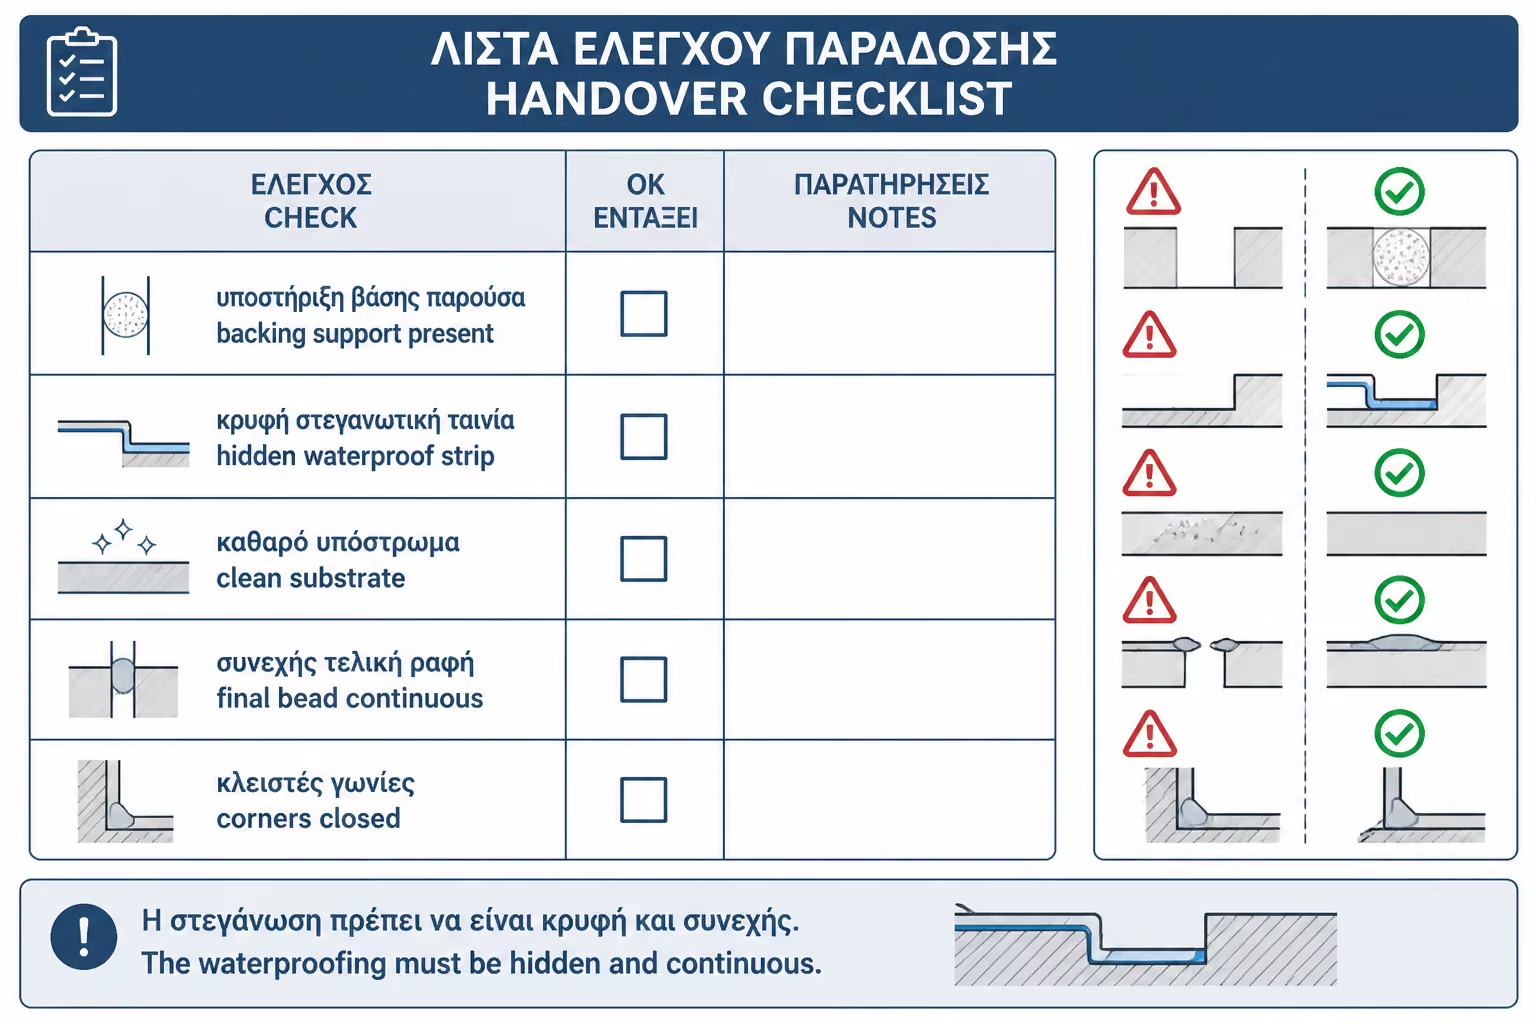
Before the final silicone is put in, ask if the tub is stable. Does it move at all when someone steps in? Has it been filled with water to set before sealing if it is acrylic or lightweight? Is there a proper gap for a rubber joint or is it too big?
Also ask what is behind the tiles. Has the wall been waterproofed? If the bathtub is used as a shower, this is critical. Ask if there is a perimeter tape or other secondary protection system. If not, ask them to explain why the solution is considered sufficient.
On repair, ask if the old silicone will be completely removed. If the answer is "we'll go over it", the repair is not correct. Also ask how long you have to wait before using the tub or shower again, because silicone needs time to cure.
Finally, check the edges. Don't just look at the big back line. Side trims are often the first places where water passes.
Before you finalize the choice or installation, review the following points first:
| Question | Yes / No |
|---|---|
| Is the tub or shower base fixed and not moving? | Yes / No |
| Is the wall in the wet zone waterproofed behind the tiles? | Yes / No |
| Is the space between the bathtub and the tile the correct geometry? | Yes / No |
| In a large/deep joint has a backer rod been used where necessary? | Yes / No |
| Is the old silicone completely removed in case of repair? | Yes / No |
| Was the surface cleaned, degreased and dried before the new silicone? | Yes / No |
| Was appropriate sanitary silicone used for wet areas? | Yes / No |
| Was the tub filled with water before sealing where required? | Yes / No |
| Does the silicone have a continuous line with no gaps, holes or breaks? | Yes / No |
| Are the side edges sealed properly? | Yes / No |
| Wasn't the silicone used to hide a construction gap or movement? | Yes / No |
| Is there a curing time given before the bathroom is used? | Yes / No |
If several answers are "don't know", the perimeter seal has not been properly tested. And if the line opens up after a few weeks, it usually means the problem was deeper than the silicone itself.
If you have to keep only one thing, keep this: the joint between the tub and the tile is not a simple beauty joint. It is a joint of movement and water. Silicone must be placed in a stable tub, clean and dry surface, with proper vacuum and suitable material. In new construction, especially when the tub is used as a shower, real safety comes from a combination of waterproofing behind the tiles, proper perimeter detailing and a final rubber seal. Silicone alone should not carry the full weight of the seal.
The perimeter union of the bathtub or porcelain shower with the tile is small in size but big in importance. That's where the water flows every day, that's where different materials meet, that's where micro-movements appear and that's where the hidden moisture under the bathtub often starts.
Proper sealing is not just a line of silicone at the end. It is the result of correct support, correct sequence of installation, waterproofing of the wall, controlled vacuum, suitable sealant and clean application. In demanding cases, perimeter sealing tape or other second defense system can provide much greater security than resting the entire bathroom on a silicone finish.
The owner must pay attention not only to whether "silicone got in", but how it got in and on what. If the tub moves, if the gap is large, if the old silicone was not removed, if the wall is not waterproofed or if the ends are left open, water will find its way.
In a proper bathroom, the tub or shower base should function as part of the sealing system, not as an independent component that is simply "sealed" at the end. The line between tile and tub seems thin. But from this line it can be judged whether the bathroom will stay dry or if it will start collecting water secretly under the finished surface.
Return to category.
Go to categoryReturn to the central guide.
Go to guide