
Bathroom Waterproofing & Moisture Protection
Return to category.
Go to categoryA leaking shower is one of the most annoying problems in a bathroom, because it rarely appears clean from the start. Usually we don't see an impressive water running. We see first signs: blackening joints, opening silicones, moisture on the back of the wall, swelling in skirting boards, musty smell or water appearing low near the shower. And then the big question begins: should the tiles be stripped or is there a solution from above?
The answer is not absolute. Yes, in some cases an existing shower can be improved or saved without a complete tear-out, using clear polyurethane films, resins, special primers, new seals and re-grouting. But this only applies when the problem comes from the surface: from worn joints, microcracks, absorbent grout, old silicones or small failures in the final layer. If the leak is from a pipe, siphon, faulty drain, broken waterproofing or trapped moisture under the tiles, the surface solution may temporarily hide the problem rather than solve it.
This is the point that needs attention. Transparent polyurethane films and resins are not a "magic varnish" that makes a problematic shower new. They are technical materials that can create a transparent protective layer over existing tiles and joints, under conditions. For them to work, the surface must be clean, dry, stable, without active leakage from the inside and without strong moisture trapped in the substrate.
In practice, a surface repair is closer to a controlled remedial solution than to a standard rebuild. It can be a very good option for a shower with superficial wear, but it is not a substitute for full waterproofing under the tiles. The owner has to understand when it is worth trying, when it is risky, and when a full tear-out is the most honest and technically correct answer.
This guide explains how the diagnosis is made, when a transparent polyurethane membrane or resin can be used, what the limits of the solution are, what matters in preparation, what the indicative cost is in Greece, and what questions you should ask before paying for a "repair without tile removal".
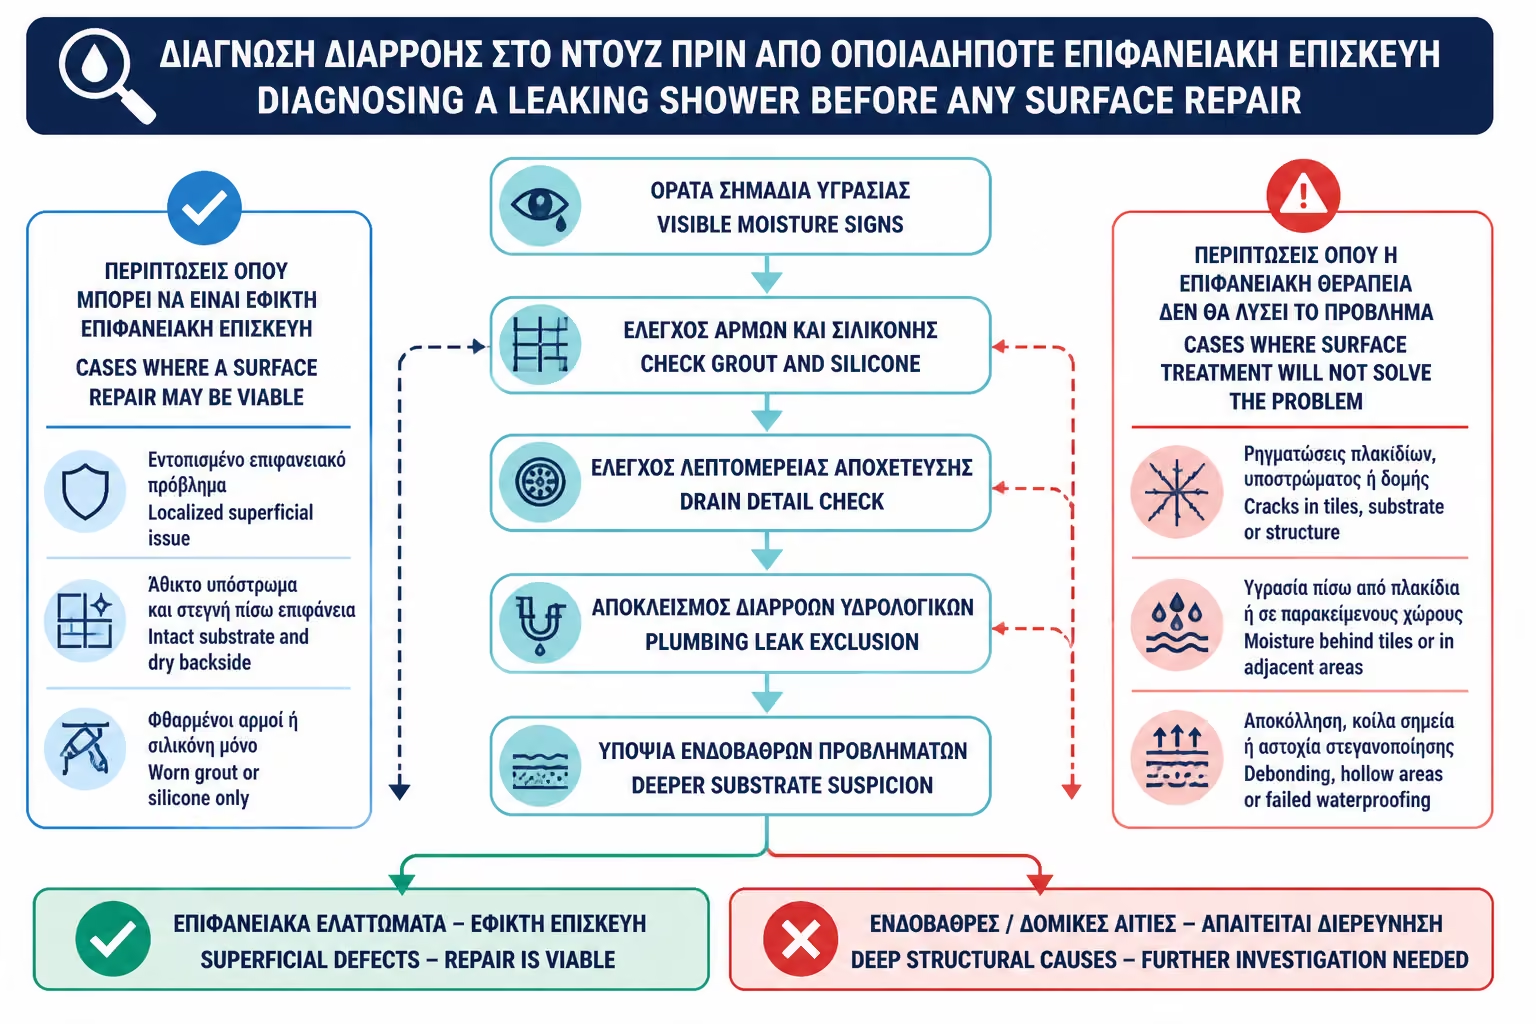
The biggest mistake in a shower leak is to begin the repair before a diagnosis is made. The owner sees moisture and immediately thinks, "let's put something over it". But dampness can have many causes. Water may be seeping through the joints, the silicone may have opened in the corner, the mixer may be leaking, the drain may have a problem, or the waterproofing may be badly connected under the tiles.
Diagnosis begins with observation. Where does the moisture appear? On the floor outside the shower? On the back side of the wall? Near the mixer? In the apartment below? After every use, or even when the shower is not in use? These details help show whether the problem is superficial or whether there is an active plumbing leak.
If the moisture only appears after using the shower and not when the pipes are under pressure but the shower is not working, it is more likely that there is a problem with the surface sealing, joints, silicones or the siphon. If moisture occurs continuously, even without use, a leaky pipe should be seriously checked.
A simple example: if the wall behind the mixer swells even after the shower has not been used for days, clear resin on the tiles is not the right first move. The plumbing must be checked first. Conversely, if moisture appears low in the corner after every shower and the joints are worn, then a surface repair may make sense.
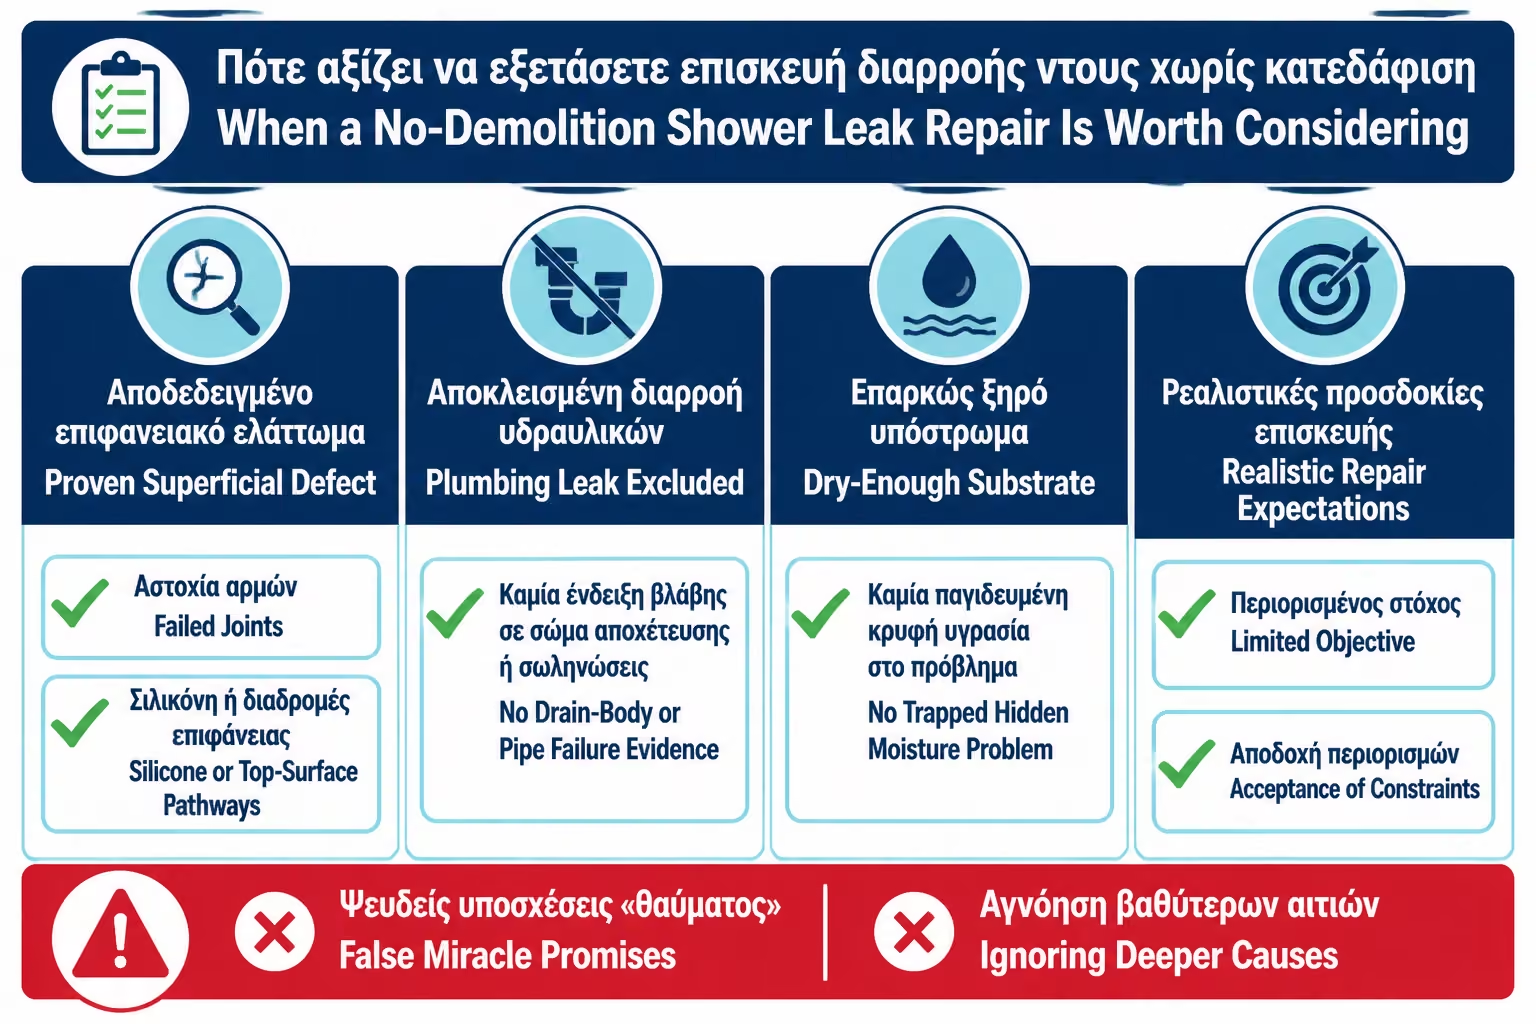
A no-removal repair can help when the basic construction of the shower is relatively sound, but the finished surface is worn. This means that the tiles do not move, do not sound hollow over a large area, there are no pronounced cracks, there is no active pipe leakage and the substrate is not already saturated with moisture.
The most suitable cases are showers where the joints have become absorbent, have microcracks or have been worn by cleaners. Also, cases where the silicones in the corners or around the cabin have opened, but the damage has not gone deep. In such situations, the correct procedure may include cleaning, removing loose joints, re-grouting, replacing silicone and applying a clear protective film.
It can also help with old showers where the owner wants to buy time before a complete renovation. For example, a 15-year-old bathroom has minor grout leaks and the owner is not ready to strip it. A properly applied clear polyurethane layer can significantly reduce water absorption and prolong use, as long as there is no deeper failure.
But it is not a solution for all cases. If the siphon has become detached from the seal, if the line siphon is not properly flanged, if the grout under the tiles is already holding water, or if there is a structural failure, the surface membrane is simply putting a “lid” on a problem that continues to exist underneath.
Transparent polyurethane films or resins are materials that are applied over existing surfaces, such as tiles, stone or joints, and create a transparent protective film. Their logic is to reduce or prevent the penetration of water from the finished surface, without aesthetically covering the tile with paint or new material.
They are usually applied in thin layers, after appropriate cleaning and priming, depending on the system. They can have a glossy or satin finish, be somewhat elastic and resistant to water and detergents if used properly. They are not all the same. Each product has its own instructions for substrate, humidity, consumption, drying time, slip resistance and maintenance.
The word "transparent" does not mean that the image will not change at all. In several cases, the surface acquires a more intense gloss, the color of the tiles may appear more "wet" and the joints may darken slightly. This should be known to the owner prior to application. It is good to test on a small spot, especially if the tiles are porous, natural stone or matte surfaces.
The main advantage is that the solution is applied without removing tiles. The main disadvantage is that it works from the top down. If the problem is under the tiles, it doesn't fix it at its root.
Transparent membranes cannot fix plumbing leaks. If there is a leaking pipe, a problem with the mixer, a leak behind the escutcheon, or a bad connection at the drain, surface resin will not solve the cause. It may temporarily reduce the amount of water passing through the surface, but the problem will continue elsewhere.
They also cannot correct mistakes. If the water is pooling because the grout or tile is sloped upside down, the resin will simply make the surface less absorbent. The water will continue to stay in the same spot. This can further stress the membrane, joints and corners.
It is not a solution for tiles that have become detached or a substrate that is loose. If you step on the shower and hear hollow tiles, if there is movement, or if the joint crumbles deeply, the base should be checked. Filming over an unstable substrate is like putting a waterproof film over a surface that is already dissolving.
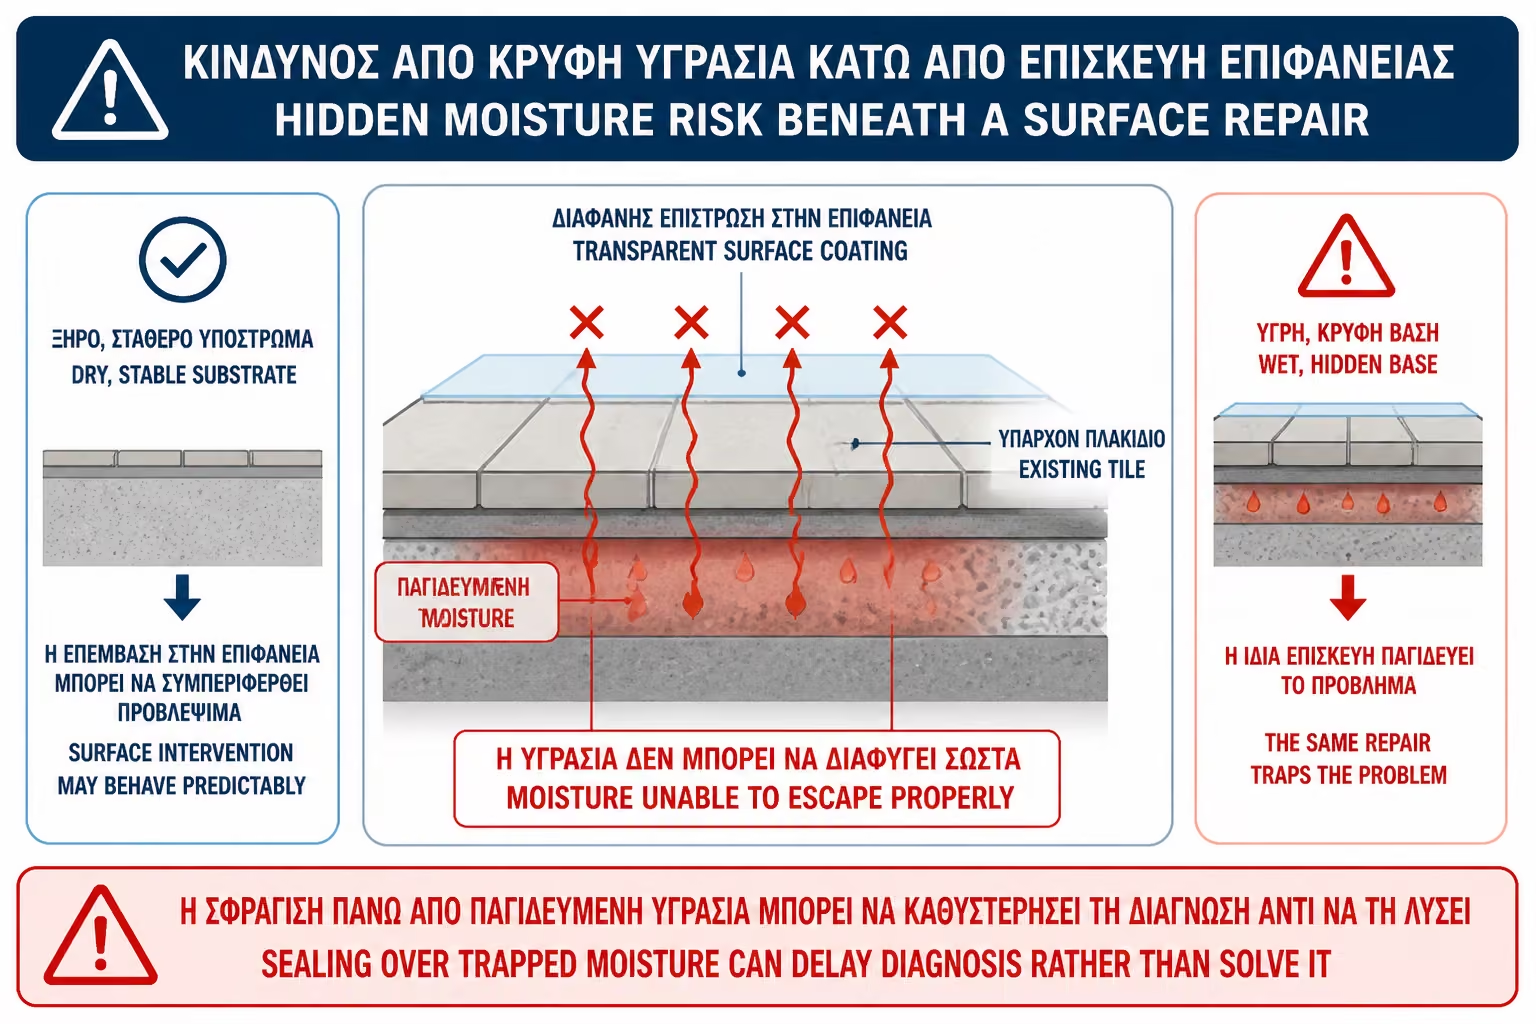
Finally, they should not be applied to moisture that has not dried. If there is trapped water under the tiles, an impermeable layer on top can trap it even more. This can make odors, mold or peeling worse.
Before deciding on surface sealing, a practical technical check must be done. First the silicones are examined in the corners, around the cabin, at the base of the glass and around the siphon. If they are opened or deeply blackened, they must be removed and replaced properly. It is not enough to put new silicone over the old one.
Then the joints are checked. If they are worn, cracked or absorbent, local or complete re-grouting may be required before any clear film is applied. The resin should not be placed on a loose joint. He must tread on a firm footing.
The siphon is then checked. If there is a removable grate, it must be checked whether the water drains properly, whether there are odors, whether there is a leak around the siphon, or whether the joint is visibly problematic. In linear siphons, the metal-plate joint is particularly critical.
Finally, humidity must be assessed. If there are strong marks on back walls or downstairs, a plumber, thermal imager, hygrometer or more organized investigation may be needed. The surface solution should be applied when we have reasonable certainty that the water is entering from the surface and not from an active damage.
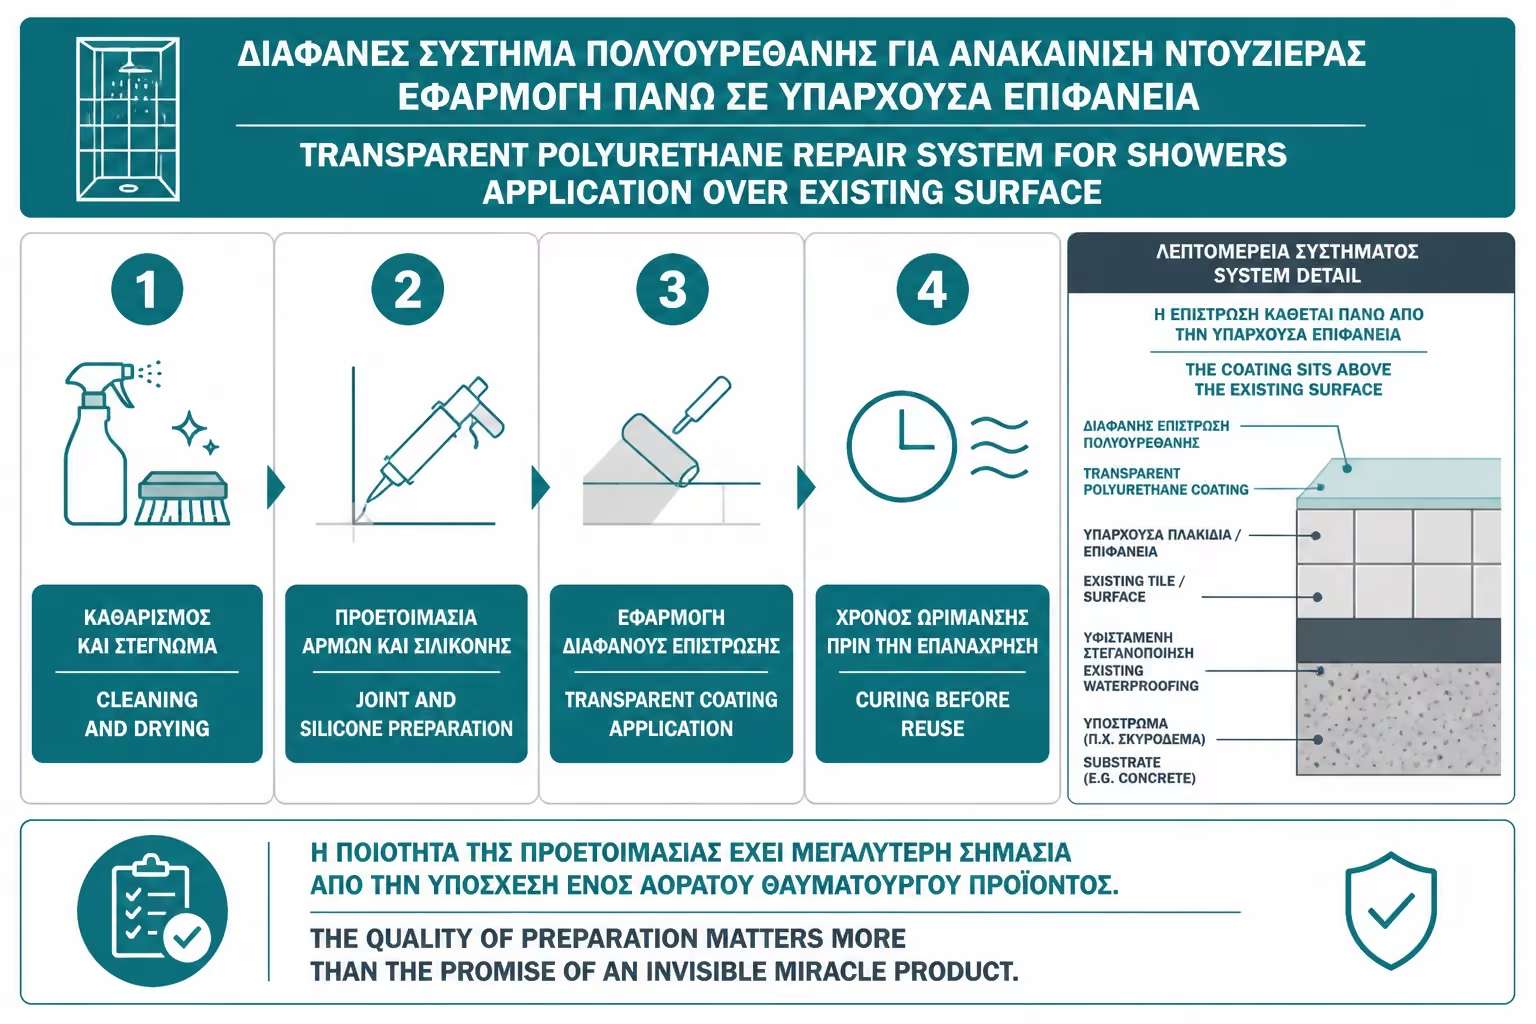
In such repairs, the preparation determines the result. A good clear film on a poorly cleaned surface will fail. The shower must be thoroughly cleaned of salts, soaps, grease, mold, old silicones and cleaning residues. The tiles must be dry and firm.
Salts in particular are a frequent problem. They can create a thin layer on the tiles and joints, preventing adhesion. The same applies to residues of soaps or polishing cleaners. The technician must know what cleaners are allowed before applying the system, because some chemicals can affect the adhesion of the resin.
Old silicones should be removed where there is failure. The new film should not be run over areas that have already peeled off. If a new rubber seal is needed, it must be done in the correct order, depending on the system. In some applications the membrane comes first and then the silicone, in others a different process is required. This should follow the product instructions.
A common mistake is to treat clear resin as a simple varnish. "We clean up a bit and move on." In the shower this is not enough. The surface has daily exposure to water and must be professionally prepared.
The exact process depends on the product, but the general logic has specific steps. First is cleaning and degreasing. Then loose joints and old problematic silicones are removed. If necessary, it is reassembled and allowed to mature. A primer or a special adhesion activator is then applied, if the system provides for it. Then the transparent film is passed in one or more layers.
The application should be uniform. If the material is left too thick in one spot and too thin in another, dullness, blistering or failure can occur. Corners, joints and siphon need special attention. The membrane must cover the surfaces that receive water, without blocking siphons, grates or functional gaps.
After application, drying and curing time is required. The shower should not be used prematurely. The fact that the surface appears dry to the touch does not always mean that it has achieved its final resistance to water and cleaning agents. Rushing here can spoil all the work.
In residential homes, odors or fumes must also be considered, depending on the product. It needs good ventilation and application by a professional who knows the protective measures. It is not a job that should be done casually in a closed bathroom without safety instructions.
Joints are often the main cause of surface water ingress. If they are in good condition but absorbent, a clear film can protect them. But if they are broken, flimsy or missing in places, they must first be repaired. Covering a damaged joint with resin can give a temporary impression of improvement, but it is not a correct technical solution.
Reassembly can be local or complete. In the case of minor damages, it is enough to remove the loose parts and fill them again with a suitable grout. Older showers with general wear and tear may require more extensive work. The new joint must be dry before being covered with clear protection.
In some cases, especially when the joints are very narrow or have microcracks, penetrating sealants or special resins are used before the final membrane. But this must be done with a system, not with a random combination of materials. Otherwise, incompatibilities, blurring, or detachment may occur.
The owner should clearly ask: "Will the joints be repaired first or will material just be put over it?" The second option may be insufficient if the joints have already failed.
The silicones in the corners, at the base of the cabin, around the profile and at the points of contact of different materials are among the first places to wear out. If they are opened, deeply blackened or peeling, they must be removed and replaced. It is not correct to put new silicone on top of the old one, because the adhesion will be bad and the problem will return.
In non-demolition repair, silicone has a dual role. First, it seals changes of plane and joints where elasticity is needed. Second, it protects areas that the clear film cannot address on its own, such as glass-to-tile or metal-to-tile contacts. But it should not be used as the sole solution to a deeper problem.
The order of tasks matters. If the film must press all the way to the corner, the old silicone may need to be removed before application. Then, once the membrane is complete and cured, a new rubber seal can be made. In other systems, the manufacturer may provide a different order. The technician must follow the instructions.
A common example of failure is to run clear resin over old half-peeled silicone. The surface looks polished for a few days, but when the silicone continues to open, so does the protection.
One of the biggest risks in surface waterproofing is to trap moisture that is already present under the tiles. If the shower has a chronic leak, the grout and walls may have absorbed water. If we pass an impermeable membrane over it without drying the substrate, moisture can be trapped.
This can cause odors, mold, peeling, blistering of the membrane or the continuation of moisture in other directions. The water does not disappear because we closed the surface. If it cannot emerge, it may move laterally or remain on the substrate.
That is why before such solutions need drying time and evaluation. Sometimes the shower needs to be left out of use for several days, with good ventilation, before the system is applied. In more severe cases, this is not enough and the damp must be investigated more deeply.
Hasty application "to immediately stop the water" may seem practical, but it is technically dangerous if we do not know what is under the tiles.
A clear resin can change the surface of the tile. It can make it shinier, smoother or more "closed". On a shower floor, this is important for safety. A surface that was previously matte or slightly anti-slip may become more slippery after application, especially when wet.
There are systems that provide anti-slip additives or a special top layer. These should be discussed before implementation. Sealing is not enough if the shower becomes dangerous to use afterwards. Especially in homes with the elderly or children, slip resistance is a key criterion.
Aesthetically, the surface can change. Tiles may appear shinier, joints darker and imperfections more apparent. In some bathrooms this is acceptable or even pleasant, because the surface looks renewed. In others, especially with high aesthetic matt tiles, the owner may not want this change.
That's why a test on a small, discreet spot is very useful. The "transparent" solution is not always invisible.
There are cases where a non-demolition repair should not be recommended as the primary solution. If there is an active pipe leak, a drain problem, hollow tiles over a large area, badly formed floor slopes, moisture that has passed into adjacent spaces, or mould behind the substrate, stripping out the shower may be the only honest solution.
The same is true when the shower was poorly designed in the first place. For example, a walk-in shower without proper slopes, with a linear siphon that was never connected to waterproofing and with water that stagnates every day. In this case, the transparent membrane can reduce absorption from the joints, but will not correct the basic geometry.
Also, if the shower has already received a lot of rough repairs—silicones on top of silicones, various sealants, improper varnishes—the surface may be so contaminated or incompatible that the new application does not have a reliable adhesion. Then it needs either very serious preparation or a complete rebuild.
Technically correct advice is not always the most pleasant. Sometimes exfoliation costs more initially, but saves repeated failed repairs.
The cost depends on the size of the shower, the condition of the joints, the need to remove silicone, the preparation, the type of clear film, the number of layers, the area, the access, the floor, whether VAT is included and whether a plumber or other technician diagnosis is required.
In general, a simple local repair of silicone and joints can be relatively economical. A complete application of transparent polyurethane membrane on the floor and low wall zones has a higher cost, because it requires preparation, materials, waiting times and attention to the application. If a non-slip top coat is added or extensive re-grouting is added, the cost goes up.
Before you finalize the choice or installation, review the following points first:
| Work | Indicative image of cost / difficulty |
|---|---|
| Silicone removal and replacement | Lower cost, but needs clean removal and proper application |
| Local joint repair | It depends on the extent and condition of the existing joint |
| Complete reassembly of shower area | Medium cost, more laborious |
| Transparent polyurethane film/resin | Higher than simple silicone, but lower than full excision |
| Leak diagnosis / hydraulic check | Necessary when the cause is not clear |
| Complete teardown and rebuild | Clearly more expensive, but often a definitive solution to deep failures |
In the Greece of 2026, if a full bathroom of 5 sq.m. indicatively moves around €3,200–€5,500 for simple/medium renovation and €6,000–€7,500+ for more demanding solutions, repair without stripping can be considerably more economical. But it must be weighed against the risk. If it is applied in the wrong case and fails, the owner will pay for both the repair and eventually the removal.
A serious offer should not simply say "transparent resin pass". It should describe preparation, joint repair, silicone removal where necessary, type of system, layers, drying times, slip resistance and limitations of the solution.
It must also state what it does not cover. For example, if there is a hydraulic leak, if the siphon has a problem or if the tiles are detached, surface application cannot guarantee a solution. A serious technician should say this from the start, not after the application fails.
It is a good idea to ask for a test to be done on a small spot, especially on matte, porous or special tiles. Also, ask in writing how many days the shower should not be used after application. If you are told that "in a few hours you can bathe normally" without considering the specific product, you need to be careful.
The offer must clearly distinguish materials, labour, VAT and object. Otherwise you cannot compare a serious technical application with a simple pass of varnish.
The owner can observe the signs, gently clean the area, temporarily stop using the shower and record when the wetness appears. He can also check if the silicones have opened, if the joints look worn and if the siphon is sucking properly.
But the diagnosis and application of transparent polyurethane systems should be done by a professional. These materials need proper preparation, compatibility, drying times, ventilation and experience. Also, if there is a possibility of a hydraulic leak, a plumber is needed. If there is extensive moisture on the walls or floors, a technical inspection by an engineer or specialist workshop may be necessary.
The most dangerous DIY practice is to buy a "clear sealant", run it over wet joints and old silicones, and think that solved the problem. It can temporarily reduce leakage, but it can also trap moisture or create a slippery surface.
In such repairs, the point is not just to pass a material. It is to confirm that the particular shower is suitable for this solution.
Before approving such work, some practical questions are worth answering. The checklist does not replace technical control, but it helps to avoid giving the wrong solution to the wrong problem.
Before you finalize the choice or installation, review the following points first:
| Question | Yes / No |
|---|---|
| Has it been detected if the damp only appears after using the shower? | Yes / No |
| Has active leakage from the pipework or mixer been ruled out? | Yes / No |
| Has the siphon and its connection been checked? | Yes / No |
| Are the tiles stable and do not sound hollow over a wide area? | Yes / No |
| Have the joints been checked for cracks or loose spots? | Yes / No |
| Will the old problematic silicones be completely removed? | Yes / No |
| Can the surface be thoroughly dried before application? | Yes / No |
| Has it been tested or evaluated for possible gloss/color change? | Yes / No |
| Has it been considered whether the finished surface will remain non-slip? | Yes / No |
| Does the quote state preparation, materials, layers and curing times? | Yes / No |
| Has the technician explained what the solution can't fix? | Yes / No |
| Is there an alternative plan if the leak continues? | Yes / No |
If the answers are vague, a repair without demolition becomes risky. The clearer the diagnosis, the more likely the solution is to succeed.
If you have to keep only one thing, keep this: clear polyurethane film can only help when the problem is superficial. It does not fix a broken mixer, a leaking pipe, bad floor slopes, or tiles that have detached because of moisture. Before paying for a "repair without stripping", ask for a diagnosis, a joint check, a silicone check, a drain check, and confirmation that the surface can dry properly. Otherwise, you risk sealing the problem inside the wall instead of solving it.
A shower that pours water does not always need immediate removal. There are cases where top-up repair, with proper re-grouting, silicone replacement and application of clear polyurethane film or resin, can significantly reduce water ingress and extend the life of the structure. This is especially true when the failure is superficial and the shower base remains stable.
But this solution has limits. It does not replace normal waterproofing under tiles, it does not correct wrong slopes, it does not repair pipes and it cannot work properly on a wet or loose substrate. If applied without diagnosis, it can provide a temporary sense of security while the real cause continues to work underneath.
The right decision starts with the question: "Where does the water come in from?" If the answer is worn joints or surface microcracks, a clear film can be a useful tool. If the answer is the siphon, pipes, poor construction, or trapped moisture, then stripping may be a more honest and technically sound solution.
The owner should avoid absolute promises such as "we'll coat it and the problem is gone". In leaks like these, success depends not only on the product, but on diagnosis, preparation, and honesty about the limits of the solution. A proper repair without demolition can be valuable. A sloppy surface treatment, however, can make a future repair more difficult and more expensive.
Return to category.
Go to categoryReturn to the central guide.
Go to guide