
Bathroom Waterproofing & Moisture Protection
Return to category.
Go to categoryThe walk-in shower is one of the most popular choices in a modern bathroom renovation. It gives a sense of space, makes the bathroom visually cleaner, facilitates access and fits very well in both small and large bathrooms. But behind the simple image — a glass, a siphon, a single floor — hides one of the most demanding constructions inside the house.
The reason is simple: in the walk-in shower the water is not limited by a classic shower basin or a high lip. The bathroom floor should work as a drainage system. Gutters, siphon, waterproofing, tiles, joints and joints with the wall must work together properly. If one of these is done casually, the problem may not show up in the first week. It usually occurs later, with moisture in the next room, browning of joints, standing water or peeling tiles.
In practice, many problems do not start with the tiles, but with what lies beneath them. An owner sees the end result: the tile, the glass, the linear siphon. But the technician knows that the quality of the walk-in shower has been judged much earlier: in the removal, in the preparation of the substrate, in the cement mortar, in the correct inclination and above all in the sealing before the surface is closed.
This guide explains step-by-step how building a walk-in shower should be approached, from underlayment to tiling. It is not a guide for doing a dangerous or demanding job yourself. It is a practical guide for the owner to understand what to ask for, what to check, when a quote is incomplete and why waterproofing is not an "extra", but the main body of the construction.
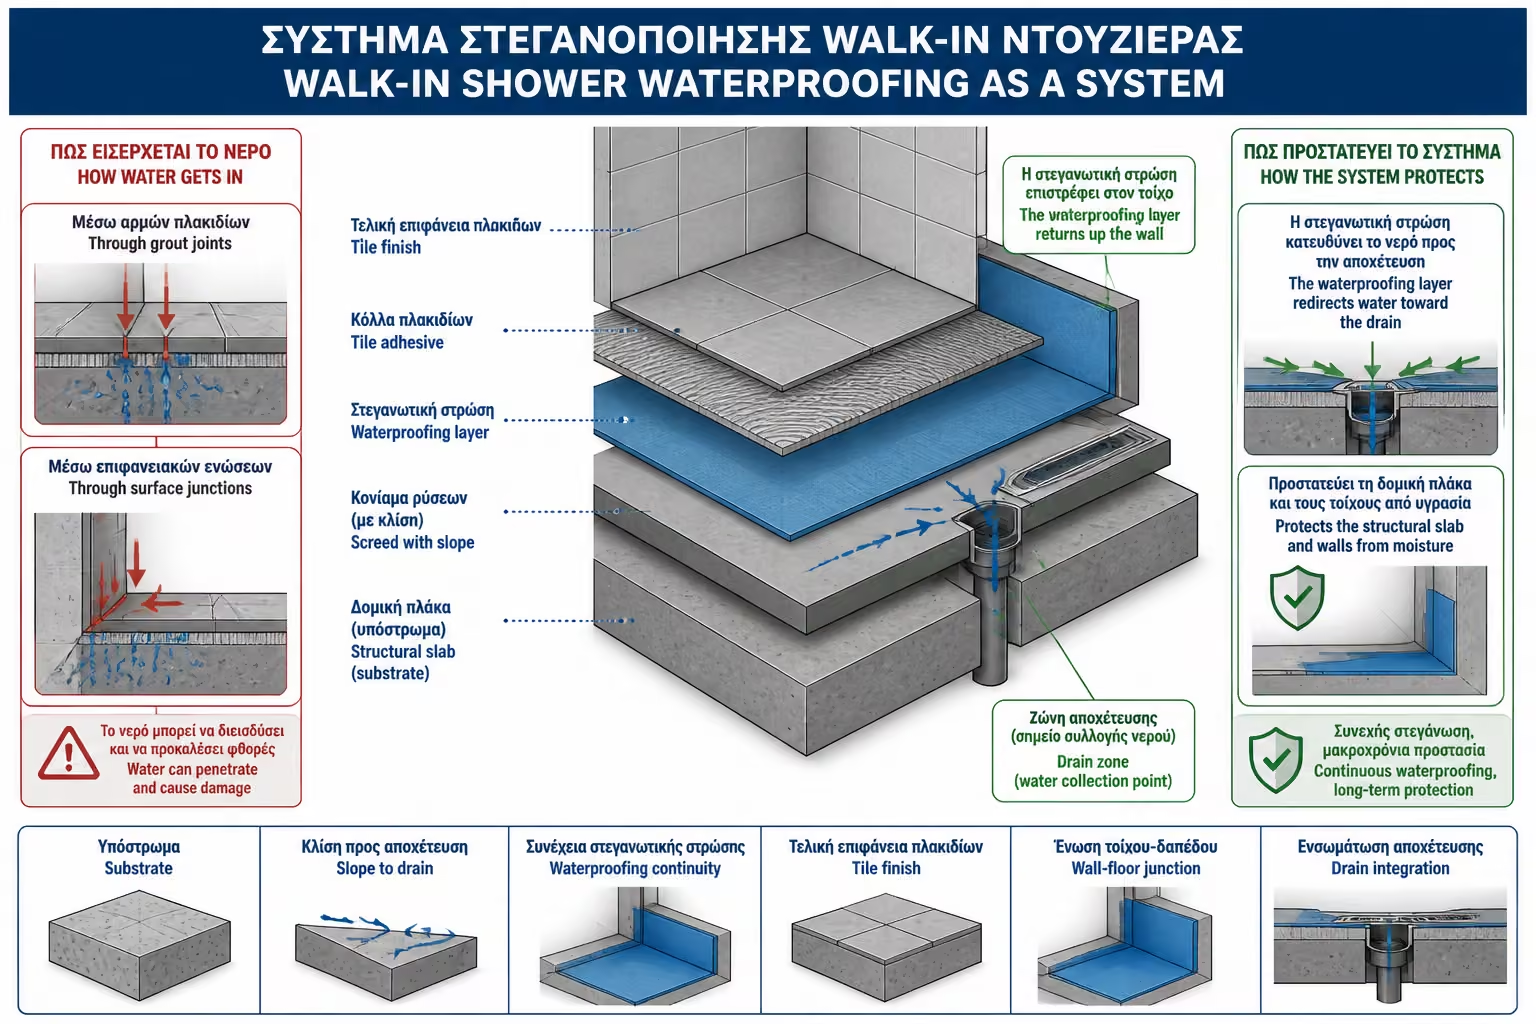
Waterproofing doesn't just mean "putting a material before the tiles". It means that I create a continuous, properly applied protection system so that water that passes through joints, micro-cracks or joints does not reach the slab, cement mortar or walls.
A common mistake is the perception that tiles are waterproof in themselves. Most ceramic or porcelain tiles have little absorbency, but the tile-joint-glue system should not be considered complete waterproofing. Joints, corners, joints with the siphon and areas around batteries and piping are places where moisture can get through.
In a classic bathtub, the water is concentrated in a ready-made body. In a walk-in shower, the floor and walls become part of the structure itself. That is why waterproofing should be treated as an independent technical work and not as something that "the tile will cover".
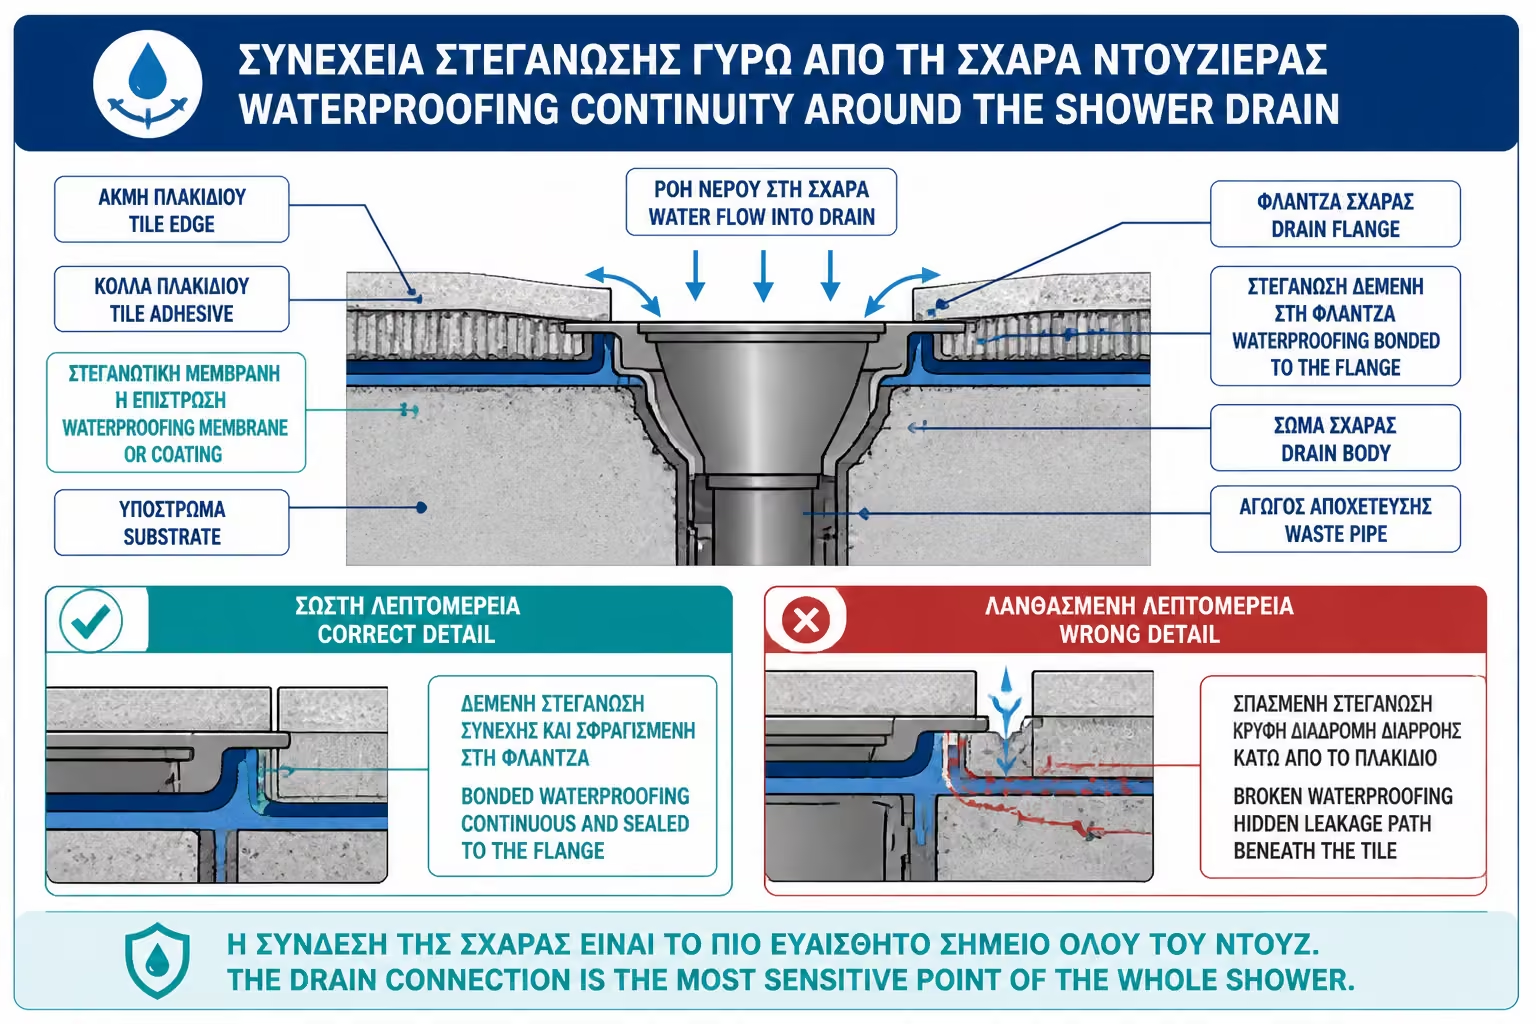
A typical example is the shower with linear siphon on the wall. If the siphon is not properly connected to the waterproofing layer, water can pass around the perimeter of the siphon frame. From the outside, everything looks clean, but under the tile it gradually begins to hold moisture. The result can be seen months later when the joints darken or moisture appears on the other side of the wall.
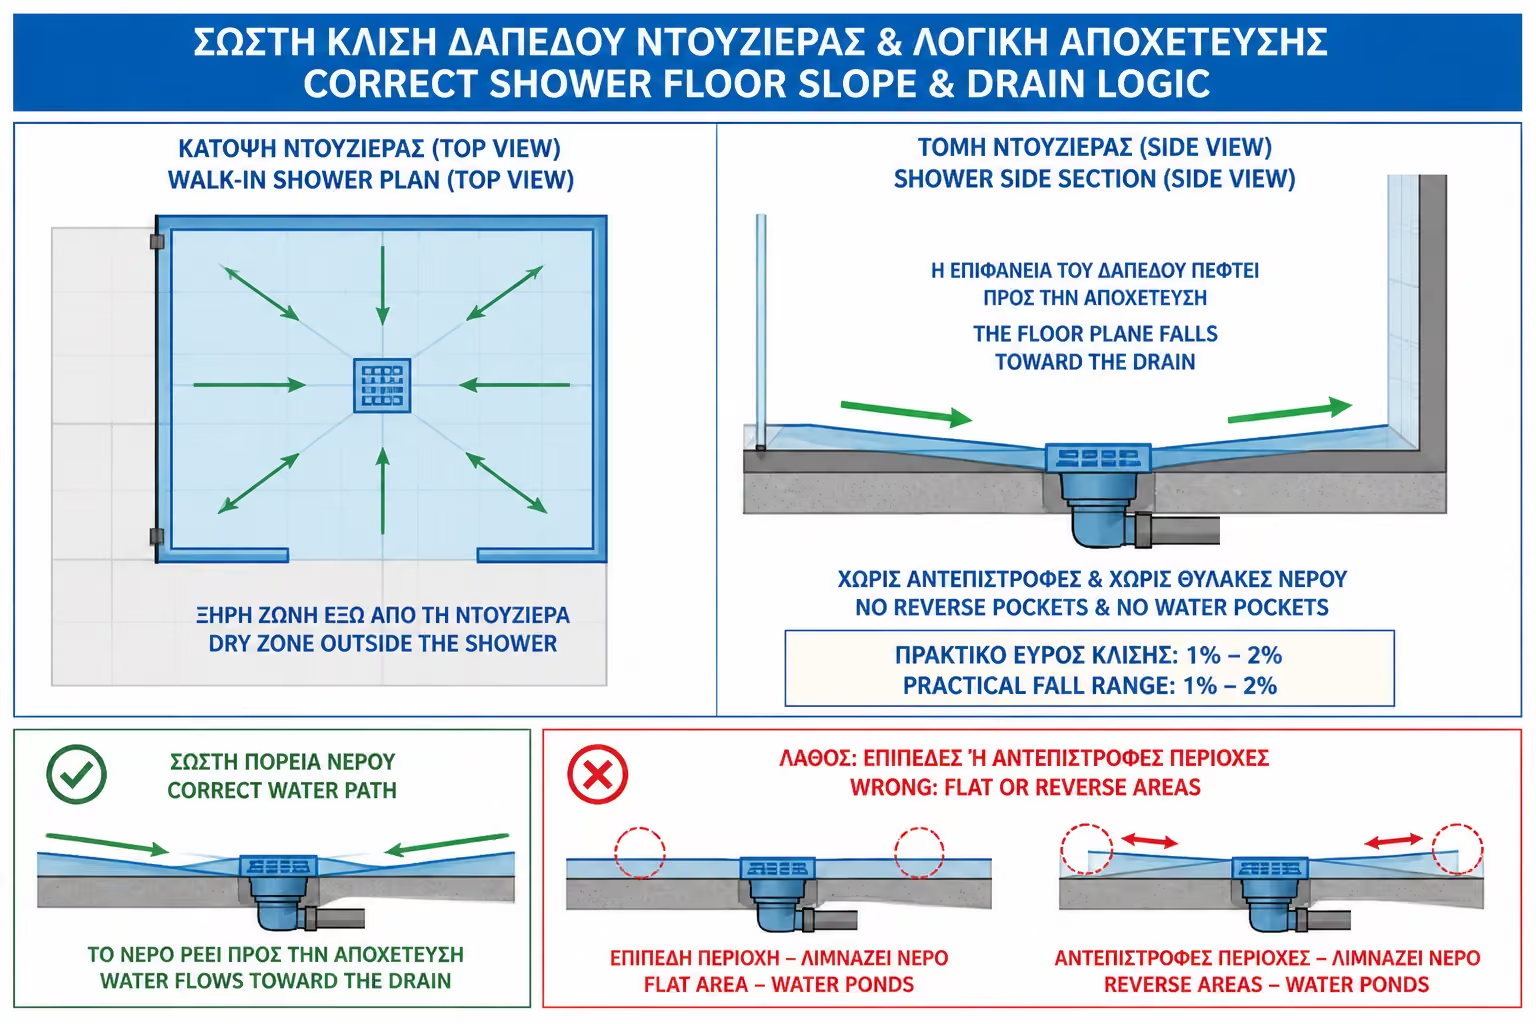
The walk-in solution has aesthetic advantages, but technically requires more precision. The absence of a classic "staircase" or deep shower means that the water must be directed correctly to the drain only with the help of the slope of the floor.
If the slope is small, the water is slow to leave. If it is steep, the floor becomes uncomfortable or unsightly. If the slope "breaks" incorrectly, the water can run into the rest of the bathroom. In small bathrooms, where the shower is next to the basin or the sink, this problem becomes even more pronounced.
The difficulty increases when the owner wants a single tile throughout the bathroom, without an obvious boundary to the shower. Technically this can be done, but it needs proper planning beforehand. It is not decided after the pipes have been laid or after the cement mortar has been made. The position of the siphon, the thickness of the tile, the height of the door, the final level of the floor and the possibility of connection to the drain must have been checked from the beginning.
In practice, a walk-in shower does not fail because it is "not a good idea". It fails when treated as a simple tiling rather than a complete drainage and waterproofing system.
Before any work begins, an inspection of the existing bathroom must be carried out. This is particularly important in older apartment buildings, where drains may have limited depth, old piping, inadequate slopes or previous sloppy interventions.
The technician needs to see where the existing drain is, what diameter it is, if the siphon can be moved, how much height is available for grouting and pouring, and if the floor can accept the finished level the owner wants. In several cases, the desire for a "completely flat" walk-in shower collides with the reality of the existing floor.
A common example is an apartment where the old bathroom had a bathtub and the drain is in a position that does not easily suit the new linear drain. If it is moved without forming the correct slope, the shower may drain slowly or smell. If the floor is raised too much just to create fall, an unwanted step can appear at the bathroom entrance.
At this stage it should also be checked if there is moisture in the walls, loose plasters or old materials that cannot accept modern sealants. Sealing over a bad substrate is like painting over powder: it may look right at first, but it doesn't have the adhesion it needs.
Proper construction begins with removal. If there is an old bathtub, it must be carefully removed, along with the old tiles in the areas that will receive water. It is not enough to "dress up" the old surface with new materials, especially when there are doubts about the situation underneath.
After removal, the substrate must be thoroughly cleaned. Dust, old adhesives, loose mortars, paint residues or dampness affect the adhesion of the new construction. If there are weak points in the wall, they must be removed and repaired. If there are cracks or gaps around piping, they must be sealed before waterproofing.
It is very important that the workshop is not in a hurry to go straight to the cement mortar. The preparation stage does not show in the final result, but determines whether the subsequent materials will work properly. A good waterproofing layer needs a firm, clean and properly primed surface.
In old bathrooms, problems may be revealed that were not seen before: rusty pipes, old cast iron or worn PVC, poor drainage connection, dampness in the slab or rough fillings. These should not be "closed" hastily. If they are closed under new tiles, the repair later will be much more expensive.
The drain is one of the most critical parts of a walk-in shower. Its choice affects drainage performance, aesthetics, ease of cleaning, and the final waterproofing result.
The central siphon is usually simpler and more economical, but requires slopes from more sides. This means that the tile must be properly "broken" around the siphon, which is easier to do with smaller tiles or mosaic. If large tiles are used, cuts may become difficult or unsightly.
The linear siphon, on the other hand, allows for a cleaner aesthetic and often a basic tilt to one side. It is popular in modern walk-in showers, especially when the owner wants large tiles. But it must be placed very precisely. The connection of the siphon to the waterproofing layer is decisive, as is the ability to clean it.
Before you finalize the choice or installation, review the following points first:
| Siphon selection | Advantages | What needs attention |
|---|---|---|
| Central siphon | Simpler solution, often lower cost, easy to adapt to small spaces | It needs correct slopes from many sides and careful tile cuts |
| Linear siphon | Modern appearance, suitable for large tiles, cleaner floor flow | It needs a correct level, a good connection with waterproofing and easy access for cleaning |
| Wall-side linear drain | Very clean aesthetic result | It requires study, proper integration and difficult repair if done wrong |
The choice should not be made only on the basis of appearance. It must suit the height of the floor, the location of the drain, the size of the shower and the type of tile to be used.
The slope of the floor is what makes the walk-in shower work daily without irritation. A small failure here is immediately visible in use: water standing in the middle, moisture near the glass, stepping on a wet spot long after bathing, or water coming out onto the rest of the floor.
Typically, a slope of about 1%–2%, i.e. about 1–2 cm per metre, depending on the arrangement, the siphon and the tile, is aimed for in shower rooms. The exact solution must be tailored to the project. An 80×120 shower with a central spout and a 90×160 shower with a linear spout on the wall are not the same.
If the slope is less than necessary, the water does not drain properly. If it is excessive, it creates an uncomfortable feeling when pressing on it and the floor may appear visually "crooked". The problem becomes greater when large tiles are used, because the large tile does not follow complex gradients easily. There you need either a clean one-sided slope or careful planning of cuts.
A common mistake is to decide on the tile without discussing the slope. The owner chooses, for example, 60×120 tile because he likes the uniform image. Then, at the construction site, it is found that the shower has a central spout and needs to be sloped from four sides. The result is many difficult cuts or poor drainage. The correct order is the reverse: first drain design, then tile selection.
The cement mortar in the walk-in shower is not a simple filling. It is the material that forms the levels and gradients. It must have the correct consistency, good adhesion, sufficient strength and dry as necessary before accepting the next materials.
In a well-organized project, the screed is not formed "by eye". The final heights have to be defined: where the drain will sit, how thick the tile is, how much adhesive will be needed, where the shower ends, and how it connects to the rest of the bathroom. If these details are not calculated, the result may be a wrong level, an unwanted step, or an insufficient slope.
Special attention is needed for drying. If the waterproofing is applied over cement mortar that still holds a lot of moisture, adhesion problems or trapped moisture may occur. The waiting time depends on the thickness, the type of mortar, the ventilation conditions and the instructions of the system to be used.
In fast-paced renovations, time pressure often occurs here. "Finishing the bathroom quickly" is a reasonable desire, but in waterproofing, haste can be costly. If a material needs time to mature, it should not be covered in haste because it pushes the schedule.
Primer is a stage that many owners do not see, do not ask and often do not understand why it is needed. In practice, however, it is very important, because it regulates the absorbency of the substrate and improves the adhesion of the sealing layer.
If the substrate is too absorbent, it can suddenly “pull” the water or the components of the waterproofing material. If it is too smooth or dusty, the material may not grip properly. The appropriate primer depends on the substrate and the waterproofing system. Not all primers are the same and not all are compatible with all materials.
In a serious application, the technician does not randomly use products from different systems without a compatibility check. Ideally, primer, sealer, tapes, tile adhesive and grout should be compatible with each other or at least selected with technical logic. Combining materials because "that's what we had" can create weak points.
A practical sign of good work is clean preparation: dust-free surfaces, properly sealed joints, primed substrates, respect for drying times. It's not an impressive stage, but it's one of those that distinguishes a rough build from a proper build.
The waterproofing of the walk-in shower can be done with various systems: spreadable sealants, cementitious materials, elastic membranes, special corner tapes and ready-made shower systems. There is no one solution that is ideal for all bathrooms. But there is one basic principle: the system must be implemented comprehensively, not piecemeal.
In spreadable sealants, two coats are usually required, with proper material consumption and adequate drying time between applications. The second layer is often applied vertically or diagonally to the first to better cover minor imperfections. If the technician "pulls" the material too far to get more squares, the layer may be too thin and not perform as it should.
Corners and joints are even more critical. There, special sealing tapes or reinforcements are needed, because the corners receive micro-movements and are places where simple application can crack over time. The same applies around the siphon, in pipe passages, at the floor-to-wall connection and where the fixed glass will touch.
A frequent mistake is to waterproof only the shower floor. In practice, the shower walls receive water, soaps, cleaners and steam every day. The waterproofing should rise to the walls of the shower zone to a sufficient height, depending on the layout and use. In small bathrooms, where water "travels" easily, protection often needs to be more generous.
If there is one point where sloppiness is unforgivable, it is the connection of the seal to the siphon. The siphon is the hole in the system. This is where the most water collects, where there are compounds of different materials and where the most insidious leakage can occur.
In good systems, the siphon has a flange, special collar or surface to connect to the sealing layer. This allows the sealant to properly “bond” with the siphon. However, if the siphon is simple, inappropriate or installed without provision for waterproofing, the technician can try to "patch" it with silicones or rough smears. This is not a correct solution.
Silicone has its place in certain applications, but should not be used as a primary seal under tiles or around critical drains. Over time it can peel off, darken or lose its elasticity. Siphon sealing should be part of the system, not an afterthought.
In a walk-in shower with a linear siphon, the correct leveling of the siphon, the final level in relation to the tile and the ability to remove the grate for cleaning must also be checked. A beautiful linear siphon that is not easy to clean or does not have a proper flow can become a daily problem.
Installing tiles over a waterproofed surface requires care. The adhesive must be suitable for the substrate and moisture conditions. We don't use any glue because "it's for tiles". The choice must take into account the type of tile, size, absorbency, application location and the waterproofing system underneath.
Large tiles, especially on a shower floor, need a very good adhesive application so that there are no gaps underneath. Gaps can hold water, create weak spots, or cause sounds and delaminations over time. In demanding applications, a double adhesive application technique—on the substrate and on the back of the tile—may be necessary, depending on the tile and materials guidelines.
The choice of tile size should be linked to the shape of the slope. For example, in a shower with a central spout, smaller tiles or pieces that can follow the slopes often give a safer result. In a shower with a linear siphon and a clear slope, large tiles can be used more easily, as long as the level is designed correctly.
Aesthetic judgment is also needed here. A technically correct shower can look sketchy if the cuts are bad, if the joints don't line up, or if the spout "falls" awkwardly into the pattern of the tile. That is why installation planning must be done before the adhesives are opened, not when the slab has already started.
Joints are one of the most stressed parts of a shower. They accept water, detergents, soaps, temperature changes and mechanical wear. A good grout improves durability and cleanliness, but does not replace waterproofing underneath.
In areas of frequent use, a better quality grout with reduced absorbency and stain resistance is worth considering. In special cases, epoxy grout can be used, but it has a higher cost and requires expert application. It is not necessary in every bathroom, but it can be justified in areas with heavy use, big humidity problems or high cleanliness requirements.
At corners, floor-to-wall joints and glass contact points, elastic sealing is usually used rather than a simple rigid joint. The reason is that different layers can have micro-movements. If they are filled with rigid material, they may crack. The silicone or suitable rubber sealant must be applied cleanly, in the correct width and on a dry, clean surface.
But it must be made clear: silicone is a final seal and maintenance, not a solution for poor waterproofing. If a showerhead relies on silicone to not leak, then the system is designed wrong.
The fixed glass is a key element of the walk-in shower, but it is often treated only aesthetically. In practice, its location affects water flow, splashes, support points and maintenance.
If the glass is placed too close to the point of heavy flow, it can trap water in corners and profiles. If it is too small, the water flows out towards the rest of the bathroom. If the support is done with holes in the wrong places, there is a risk of damaging the sealing layer behind the tile.
Ideally, the location of the mosque should be foreseen by the design. Mounting points, profiles, guides and silicones must be inserted in a way that does not invalidate the sealing. In some cases, solutions with as few holes as possible in critical zones are preferred, as long as the support system allows.
The length of the mosque is also a practical issue. In very small walk-in openings, the image can be beautiful in the photo, but in use water is thrown out. Before deciding on a "minimum" window, water pressure, shower head position, user size and bathroom layout must be considered.
Most problems with walk-in showers don't come from one big, glaring mistake. They come from small omissions that add up. A little wrong tilt, a little rough connection to the siphon, a little thin waterproofing, a little rush to dry. The end result may look good, but the construction may be fragile.
Before you finalize the choice or installation, review the following points first:
| Error | Possible consequence | Correct approach |
|---|---|---|
| Waterproofing only on the floor | Moisture on the shower walls | Waterproofing also on the vertical surfaces of the shower zone |
| Bad siphon connection | Leaking under the tiles | Siphon compatible with sealing system |
| Incorrect slope | Standing water or water towards the bathroom | Level study before cement mortar |
| Large tile in complex gradients | Bad cuts, imperfect drainage | Tile selection based on siphon and slope |
| Hasty application of materials | Poor adhesion, trapped moisture | Compliance with drying times |
| Silicone as the main seal | Temporary fix, future leak | Normal waterproofing system under the tiles |
A very common scenario is a renovation where the owner emphasizes tile and glass, but doesn't ask what waterproofing will go in. The quote says “build a tiled shower”, without mentioning waterproofing, tapes, siphon, primer or materials. If there is a problem, everyone then looks for who is to blame. The correct prevention is to request these in writing from the beginning.
The cost of a walk-in shower depends on the size, the condition of the bathroom, the type of siphon, the materials, the drains, the access, the floor, the area, whether VAT is included and whether the offer is for labor only or a complete package with materials.
For a typical walk-in shower in a bathroom renovation, the waterproofing itself is usually not the biggest cost of the project. But it is one of the most critical costs. Saving a few tens or hundreds of euros at this stage can lead to a much more expensive repair later.
As an example, for the Greek market of 2026, a serious job that includes preparation, screeding, waterproofing system, corner tapes and proper application can move to different levels, depending on the project. The linear siphon, large tiles, difficult cuts and the need for special materials raise the cost.
Before you finalize the choice or installation, review the following points first:
| Task / item | Indicative picture of costs |
|---|---|
| Simple cement mortar and flow shaping in a small shower | It is usually calculated into the total bath cost, but is affected by thickness and difficulty |
| Waterproofing system with tapes and smears | It may be a small percentage of the total cost, but it should not be omitted |
| Good quality central siphon | Usually cheaper than linear, depending on quality and supply |
| Linear siphon | Greater price variation, especially on branded or special systems |
| Placing tiles on a plain surface | About 10–15€/sq.m. for typical simple work, with low offers 6–8€/sq.m. in easy cases |
| Demanding installation with large tiles or many cuts | Higher cost, depending on size, design, substrate and accuracy |
In a full bathroom of around 5 m2, a simple to medium renovation can cost around €3,200–€5,500, while more demanding options with a walk-in shower, a linear drain, better materials, custom glass, and more complex installation can reach €6,000–€7,500 or more. These amounts are indicative and always need to be compared against the exact scope of work.
A very low price is not necessarily a bad thing, but one must consider what is included. Does it include waterproofing? Does it include tapes in the corners? Does it include a proper siphon? Does it include removals, base transfers, VAT, materials, labour, glazing? If the answer is not clear, the offer cannot be evaluated properly.
Building a walk-in shower is not a suitable job for an amateur application, especially when it involves draining, grouting, waterproofing and tiling in a wet zone. The owner can be informed, ask for correct specifications and check the logic of the offer, but the application must be done by technicians with experience in bathrooms.
This does not mean that the owner remains passive. Instead, he needs to ask for specific answers before the project begins: which siphon will be used, which waterproofing system will be applied, if the corners will be taped, how high the waterproofing will rise, which glue and which grout will be used, how the slope will be given and how the glazing will be installed.
The best deal is not always the cheapest nor the most expensive. It is the one that clearly describes what will be done, with what materials, at what stages and with what responsibility. The more vague the description, the greater the risk of misunderstandings.
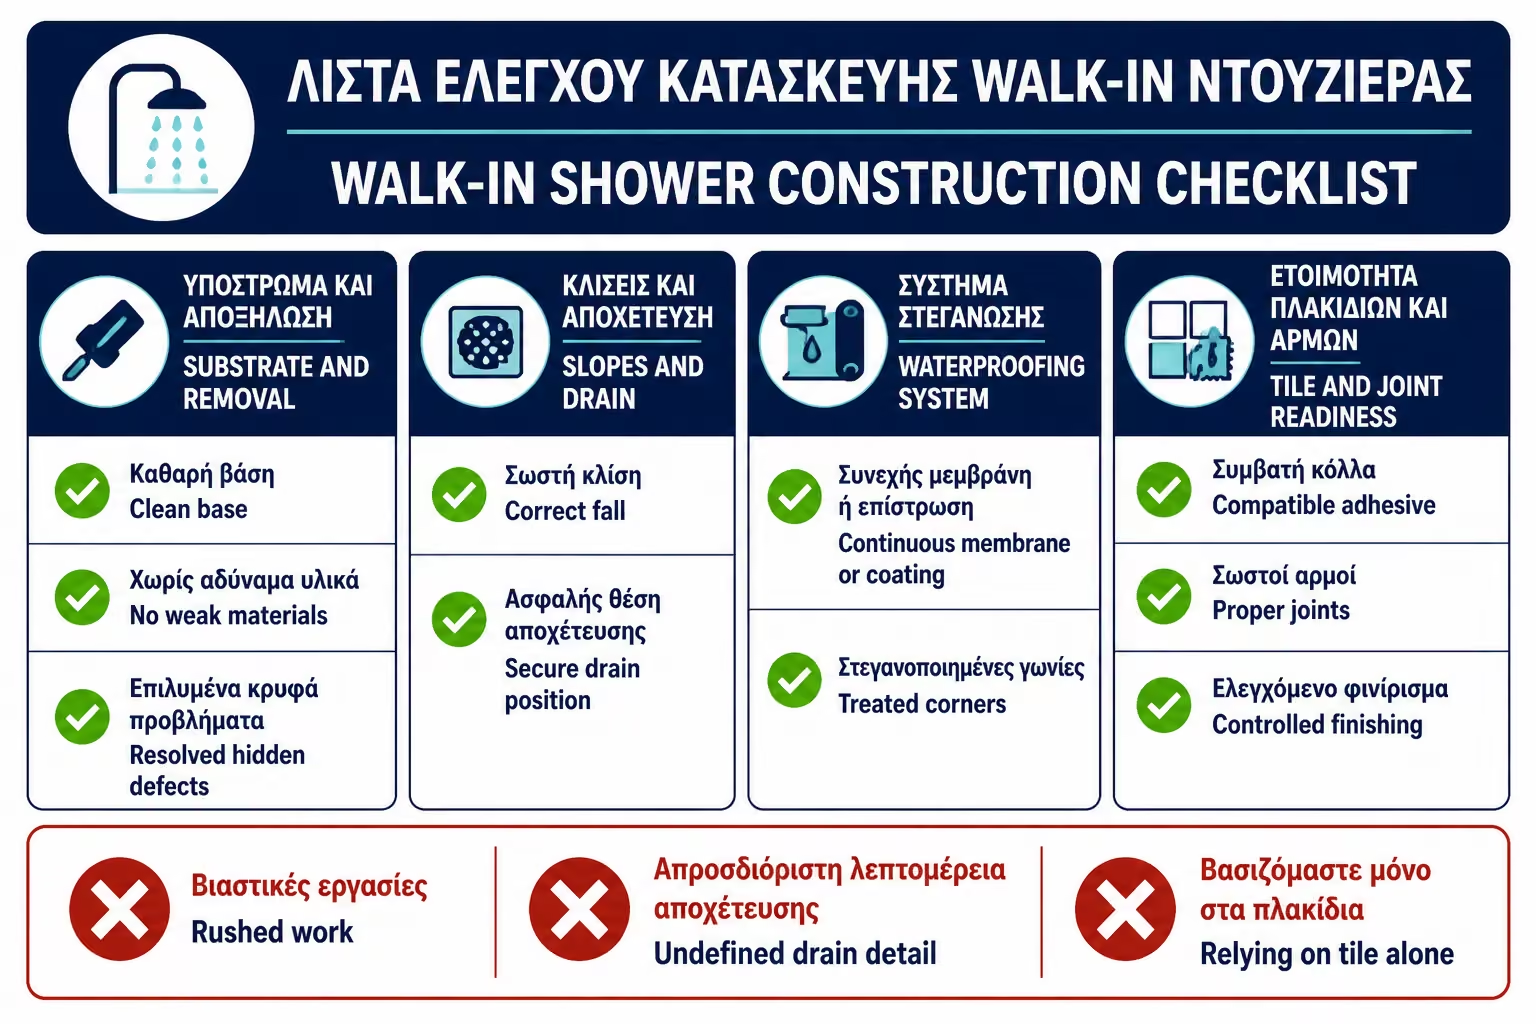
Before starting the walk-in shower, it is worth going through the offer and studying a simple but essential checklist. It does not replace technical inspection, but helps to identify gaps before they are closed under the tiles.
Before you finalize the choice or installation, review the following points first:
| Question | Yes / No |
|---|---|
| Has the location and condition of the existing drain been checked? | Yes / No |
| Has it been decided whether to put in a central or linear siphon before the cement mortar is made? | Yes / No |
| Have the final levels been calculated based on tile, glue and siphon? | Yes / No |
| Does the slope of the floor lead the water cleanly to the siphon? | Yes / No |
| Is a primer provided before waterproofing? | Yes / No |
| Does the waterproofing include the floor and walls in the shower area? | Yes / No |
| Will sealing tapes go into corners and joints? | Yes / No |
| Is the siphon compatible with a waterproofing system? | Yes / No |
| Is the tile adhesive suitable for wet zone and for this particular tile? | Yes / No |
| Has the tile size been checked to match the required floor slopes? | Yes / No |
| Does the quote clearly state materials, labour, VAT and what is included? | Yes / No |
| Has proper glazing been provided without voiding the waterproofing? | Yes / No |
If the answer to several of these questions is "I don't know", then the offer needs clarification before the project begins. Gaps in the beginning usually become problems in the end.
If you have to keep only one thing, keep it: in the walk-in shower you don't just pay for what you see. You are mainly paying for what will never be seen again after the tiles are installed. Ask the authority for a clear description of grout, grout, siphon, primer, waterproofing, corner tapes and tile adhesive. Do not accept a quote that simply says "shower construction" without technical details. A good walk-in shower looks beautiful on day one, but proper sealing is proven after months of daily use.
The walk-in shower can really upgrade a bathroom, as long as it is built with technical logic and not only with an aesthetic criterion. The final result is not only judged by the tile, glass or linear siphon. It is judged by whether the water is guided correctly, whether the sealing is continuous, whether the corners are reinforced, whether the siphon is connected correctly and whether the materials are applied in the right way and at the right time.
The owner does not need to become a craftsman to protect himself. But he needs to know what questions to ask. Before approving a bid, he must ask for a clear description of the stages and materials. He needs to understand if the solution proposed to him fits his own bathroom and not an ideal catalog photo.
The safest option is to treat the walk-in shower as a complete system: drainage, drains, waterproofing, tile, joints and glass. When all of these are designed together, the result can be both beautiful and functional. But when a step is skipped or done sloppily, the cost of fixing it is usually far greater than the cost of building it right from scratch.
Return to category.
Go to categoryReturn to the central guide.
Go to guide