
Bathroom Waterproofing & Moisture Protection
Return to category.
Go to categoryWhen waterproofing a bathroom, most people first think of the shower, the drain, the corners, and the water supply. These are indeed critical points. But there is one detail that is often underestimated, even though it can determine how far the damage spreads in a failure: the doorway threshold. That is the point where the bathroom floor meets the corridor, parquet, laminate, timber floor, or any other sensitive finished surface outside the bathroom.
On a normal day, the threshold looks like a simple finishing detail. A marble skirting, a small skirting, a profile or a floor transition line. In a leak though, it becomes the last limit before the water leaves the bathroom. If a coil breaks, if the washing machine overflows, if the supply is left open, if the siphon becomes clogged or if there is an overflow, the water will move to the lowest and most open point. Very often this is the door.
If there is tile outside the bathroom, the damage may be limited. But if there is a wooden floor, parquet, laminate or sensitive lining, a few liters of water is enough to swell, tan, peel, warp or permanently damage. That is why the marble skirting should not be treated only as an aesthetic finish. It should be designed as a small watertight barrier.
The right solution is not just to put a marble on the door. The marble skirting must have the right height, the right support, the right connection to the waterproofing of the floor, the right elastic seals on the sides and the joints with the frame, and the right relationship with the bathroom drains. If it goes in rough on top of the finished floor or if there are gaps under the screed, water can seep under or through the sides, even if the marble looks right.
This guide explains how the threshold works as a water barrier, when a marble skirting is needed, how it should be connected to the waterproofing, what should be done under the door frame and what mistakes should be avoided so that a damage in the bathroom does not become damage in the hallway.
The threshold is the exit point of the water from the bathroom. When the floor gets wet normally, the water should stay inside the sealed zone and be led to the siphon. But when there is damage or flooding, the amount of water can exceed normal use. Then the water looks for a route. If the door is at the same level or lower than the bathroom, water easily passes to the hallway.
In many apartments, there is a wooden or laminate floor outside the bathroom. These materials do not tolerate water. They may swell at the joints, lift, smell, or need replacement over a large area. The damage may be disproportionate to the cause.
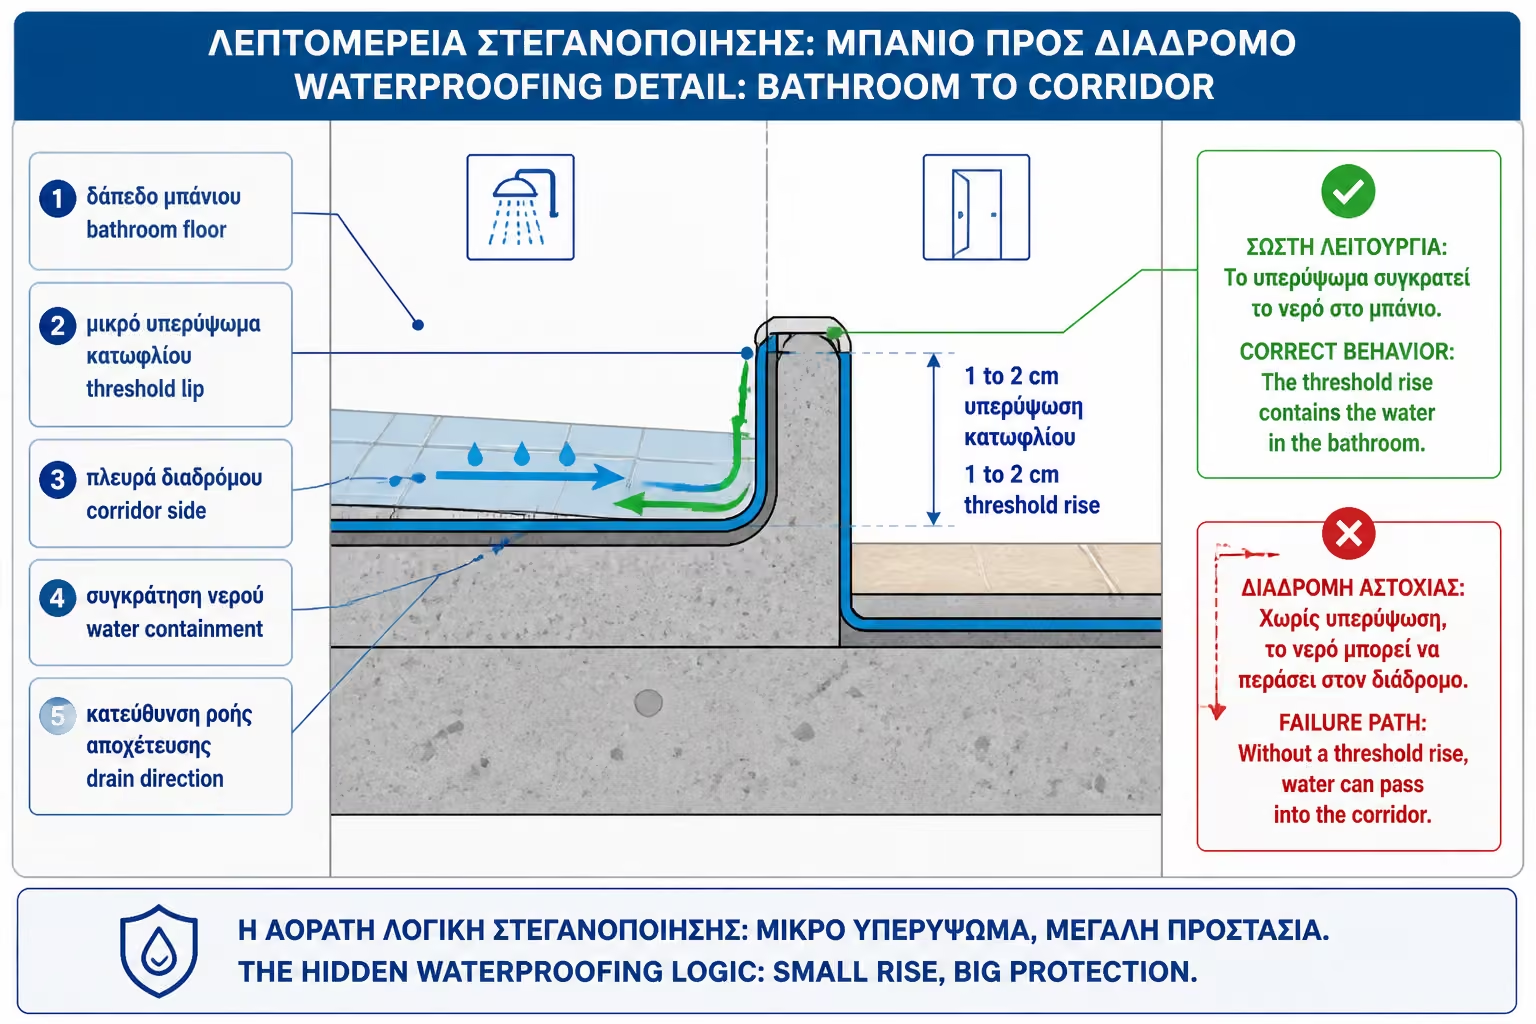
The threshold should act like a low barrier. It will not stop unlimited water forever, and it does not replace floor drains, safety valves, or proper plumbing. But it can buy critical time. It can hold the first few litres inside the bathroom, direct water toward the drain, and limit the damage until the problem is noticed.
This is why the threshold should not be designed at the end, when everything is finished. It must be included from the beginning in the logic of waterproofing the floor.
The marble skirting on the bathroom door is traditionally used as a finish between two floors. It covers the transition from tile to wood, from bathroom to hallway, from wet to dry zone. But when designed correctly, it can also act as a practical water barrier.
To do this, it must have a small height above the bathroom floor or at least such a geometry that the water does not immediately escape to the outside. If the marble skirting is placed flush with the floor, without raising, it only functions as a finish. It does not hold water. If the floor of the bathroom is inclined towards the door, then the marble skirting provides almost no protection.
Marble or artificial stone must rest on a firm base, without gaps underneath. If there is a gap, water can seep through, especially if the edge seal fails. The marble skirting should be integrated with the waterproofing of the bathroom, not simply glued onto the finished floor.
Properly designed, the marble skirting is the "lip" of the sealed bathroom basin. Wrongly designed, it is just a beautiful stone that the water passes by.
A bathroom with proper floor sealing should be treated like a shallow basin. Waterproofing should not be just a passage in the center of the floor. It should go up to the perimeter joints, connect to the corners, protect around siphons and, ideally, stop at the door in a way that does not allow water to escape under the frame.
In the shower this logic is familiar. In the general bathroom floor it is often forgotten. However, if we want protection from damage, the floor must have a rudimentary retention "basin". The marble skirt is the front lip of this basin.
This does not mean that the bathroom must have a large step in the door. It means that there must be a technically controlled level change or dam. Even a few millimeters to 1–2 cm of properly designed heave can make a difference to a small leak or initial overflow.
The point is to stop water from leaving the bathroom before it has time to reach the drain. If the threshold is lower than the drain level, or if the floor slopes direct water toward the door, the barrier cannot do its job.
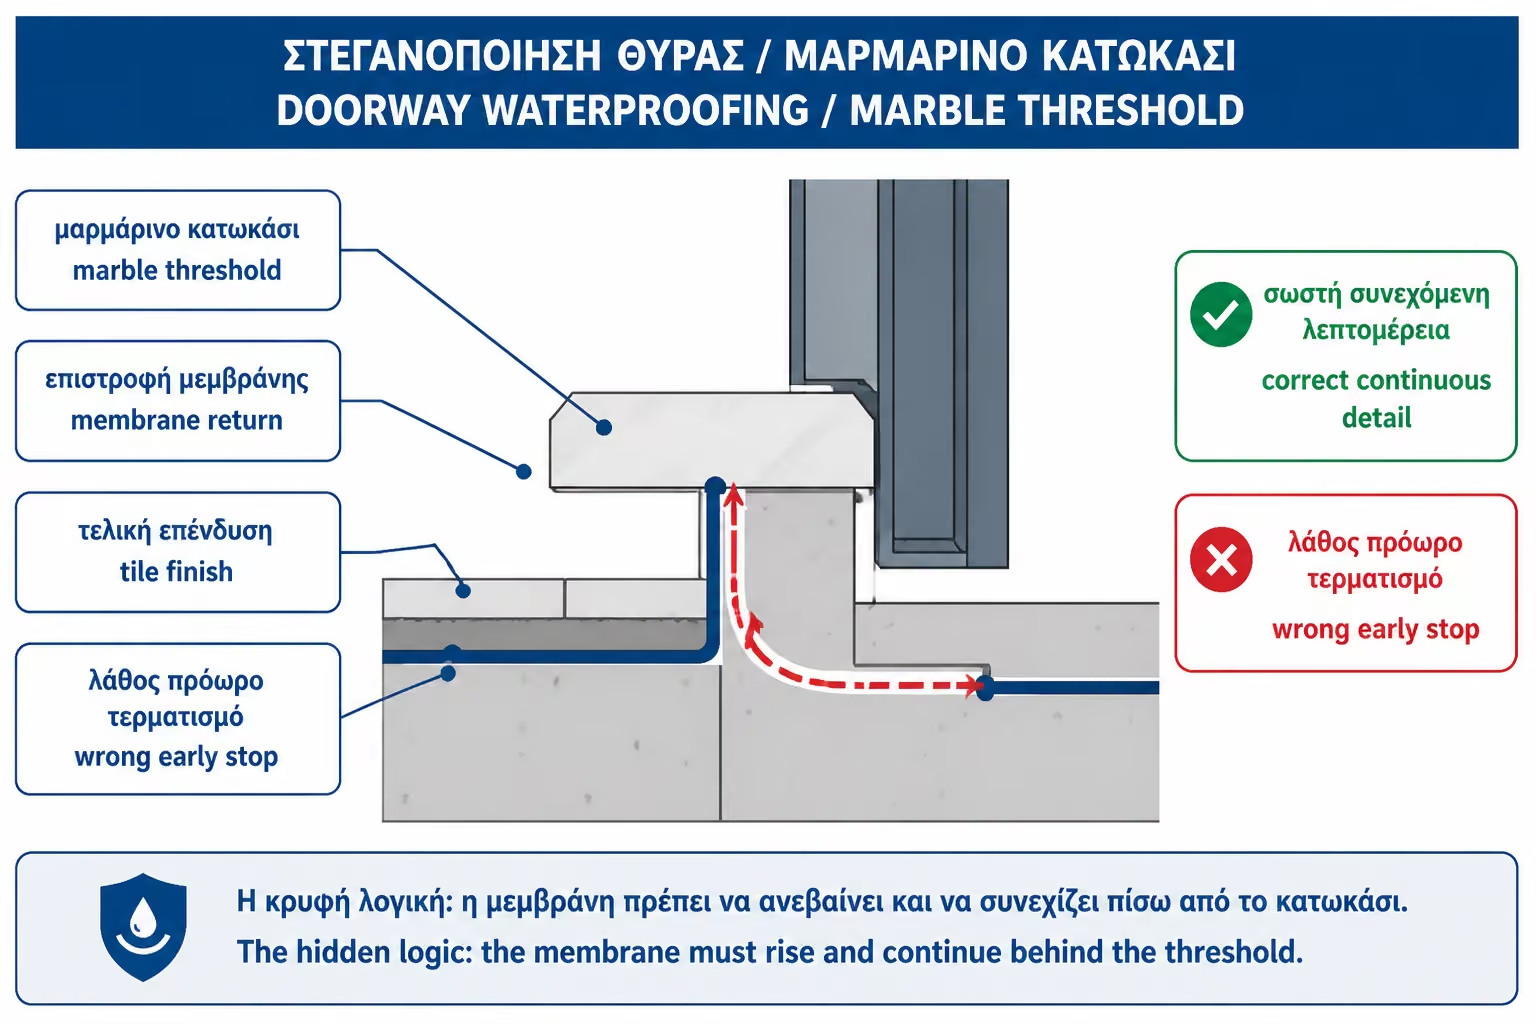
The most critical point is not marble as a material. It is the connection of the marble with the waterproofing of the floor. The waterproofing should reach the threshold and turn or rise to the point of the marble skirting so that there is no water path under it.
In a correct application, the marble apron does not come onto a "bare" substrate that interrupts the membrane. The floor waterproofing should continue to the threshold and, where possible, create a slight lift or connection to the back/bottom of the apron. If there is spreadable waterproofing, it must cooperate with the substrate and the adhesive of the marble skirting. If there is a membrane, it must be foreseen how it will turn to the threshold.
On the sides, the waterproofing must meet the frame or wall studs without gaps. Marble skirting edges are often weak points. If there is a small gap left, water can pass through the wood floor laterally, even if the center of the apron is correct.
Proper jointing looks more like a shower seal detail and less like simply installing marble. He wants a system, not just glue.
The door frame is particularly sensitive, especially if it is made of wood or MDF. If the casing rests directly on the floor and the marble skirting is inserted without proper sealing, water can pass through small side gaps. Even worse, the case itself can absorb moisture and swell.
Ideally, the casing should not be the first element that meets the water. The threshold should act as a barrier before or below the frame. If the casing is installed after the floor, a suitable gap must be left from the final floor and a controlled seal must be made. If there is already a casing, the lateral points where the marble skirting rests on the pilasters must be protected.
In new renovations, it is better to coordinate the detail of the door in advance: the plumber, tiler, mason and carpenter need to know what level the floor will end up, where the frame will go and how the sides will be sealed. When everyone does their own stage without consultation, gaps are left at the end.
Water does not always pass through the center of the apron. Very often it goes through the sides, where the marble meets the casing or the wall.
There is no one height that fits all bathrooms. The ideal height depends on the level of the bathroom, the level of the corridor, the type of floor outside, the door, accessibility and whether there is a floor drain. But the basic principle is that the threshold must offer some resistance to water flow.
In many apartments, a small rise of 1–2 cm may be practical and not cause much discomfort to use. In other cases, especially where accessibility or stair avoidance is requested, other solutions must be sought: very proper drains to siphon, linear barrier, profile or wider zone sealing.
If there is a wooden floor outside, it is worth giving priority to protection. A completely level passage may be beautiful, but it technically lets water pass immediately into the walkway in the event of a failure. If height cannot be provided, there must at least be a very well designed watertight transition and siphon that can receive water.
The threshold should not be so high that it becomes a dangerous obstacle, but neither should it be so low that it has no role. The balance is technical and practical.
The marble apron should not be the only defense. The bathroom floor should, as far as is practically possible, lead the water towards the siphon and not towards the door. If the leaks lead to the door, the threshold will take all the pressure on any leak.
In small bathrooms, the configuration of flows is difficult, especially when there is no floor drain or when the level is limited. However, reverse tilting towards the runway should be avoided. Even a slight misalignment can send water out of the bathroom before it reaches the drain.
If there is a floor drain, the threshold works best. In case of failure, some of the water can be directed to the drain, while the marble skirting delays the exit to the corridor. If there is no siphon, the threshold can only temporarily hold water, not remove it.
The right protection is a combination of: downspouts, siphon, floor waterproofing and threshold. Not one of them alone.
Marble is traditionally used because it is durable, easy to clean, looks good and can be cut to specific dimensions. Granite, artificial stone, ceramic block or other solid material can also be used. The important thing is that it is resistant to moisture and suitable for pressing.
Marble has the advantage of classic use and relatively easy shaping. But it needs proper processing and protection, especially if it is more absorbent. The edges should be slightly broken or rounded so that they are not sharp. The upper surface should not be excessively slippery, especially if it is likely to be stepped on with wet feet.
The material must be of sufficient thickness and press on a full base. A thin apron that sticks loosely over gaps can break or peel off. The adhesive or mortar must be suitable for the substrate and material.
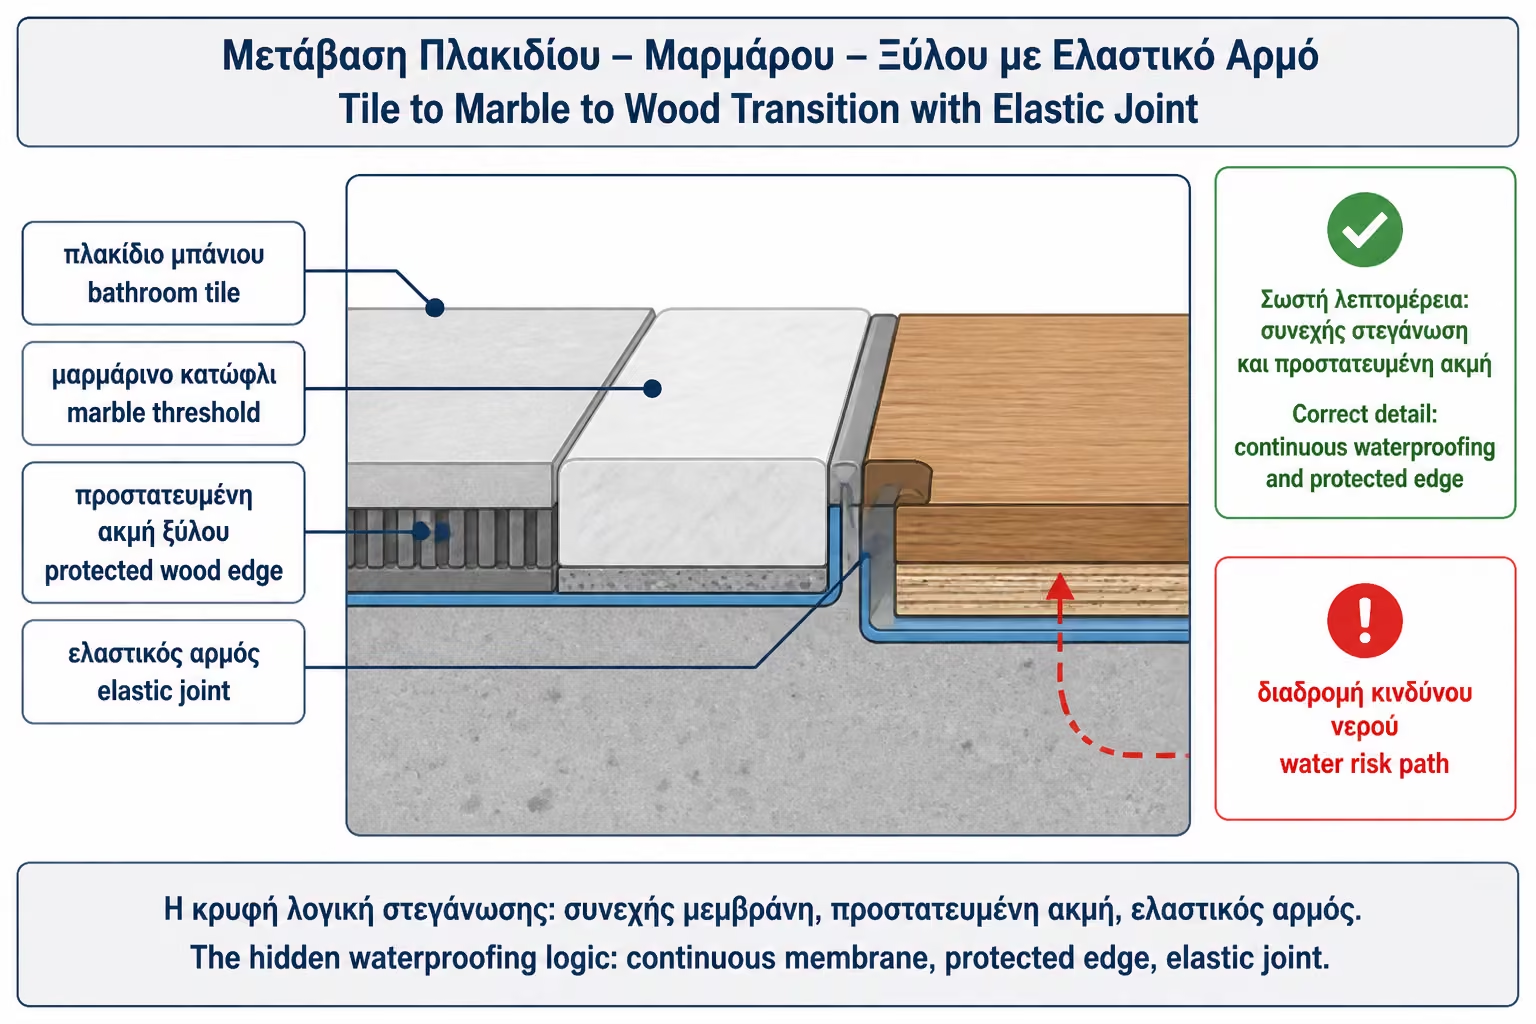
If there is a wooden floor outside, the way to transition from the marble plinth to the wood must also be foreseen. The wood should not rest tightly to the point where it can get wet or have no room for expansion.
The joint of the marble skirting with the bathroom tiles must be watertight but also suitable for small movements. If filled rigidly with cementitious grout, it may crack over time, especially if the apron and floor behave differently. In many cases, an elastic sealant is needed, such as a suitable neutral or sanitary silicone, depending on the materials.
Before sealing, the joint must be clean and dry. If there is dust from marble cutting, glue residue or moisture, the silicone will not adhere properly. If the gap is deep, a joint bead may be needed so that the silicone has the correct cross-section.
The joint should not just be a superficial line of silicone. It should really close the gap. If the apron has a gap at the bottom or if it does not fit well, the final silicone on the surface is not enough.
At the sides, where the apron meets a wall or frame, special attention is needed. These small spots are often the first routes of water into the corridor.
If there is a wooden floor outside the bathroom, the point of contact with the marble skirting must be carefully designed. Wood usually needs room for expansion and should not be rigidly sealed in a way that traps it. At the same time, there should not be an open gap through which water will pass.
The transition can be made with an elastic joint, a suitable profile or another solution depending on the type of wooden floor. If the wood rests directly on the marble skirting without protection and water gets there, it can draw moisture from the edge. The edges of wooden or laminate floors are particularly vulnerable.
In an ideal solution, the marble skirting should create a clear separation: the bath water stays on one side, the wooden floor is protected on the other. If the wood goes "all the way" into the threshold without proper stopping, the risk increases.
The carpenter or floor craftsman should know that the point is a wet transition. It is not a simple joining of two dry floors.
The case greatly affects the detail. A wooden or MDF case can swell if it draws moisture from underneath. That is why her lower extremities must be protected. They must not be stepped on unprotected where water can pool. In some cases, a small gap is left from the floor and sealed with a suitable rubber material.
In an aluminum or metal case, absorption is not as much of an issue, but there are still joints and gaps where water can get through. Sealing on the sides of the marble skirting remains essential.
In renovation, many times the old casing remains in place and the floor is replaced. This creates difficulties, because the new marble apron must be adapted to existing pilasters. If there are old gaps, loose spots or worn wood, they should be repaired before sealing.
The case should not be the weak link of the threshold. If the marble skirting is correct but the sides of the case are open, the water will pass through.
In bathrooms where level access is required, the threshold becomes a more difficult issue. A lift may hinder the elderly, people with mobility difficulties or a wheelchair. There a balance must be found between accessibility and protection from water.
In such cases, the solution may rely more on drains to the drain, waterproofing the entire floor, a linear drain near the shower outlet, or a very careful transition to the threshold. A low profile that does not create a strong obstruction but offers little resistance to flow can also be used.
If there is a wooden floor outside, the completely level transition is more demanding. It's not weak, but it needs better planning. The seal must not stop at the door abruptly. There must be a solution that protects the transition and the edge of the outer floor.
In any case, when accessibility imposes a low or no threshold, the remaining protection measures must be strengthened: proper drainage, leak sensors, easy access to valves and good waterproofing throughout the bathroom.
The levee should not promise to hold back a major flood indefinitely. If a pipe breaks and water is constantly running, eventually the water will overflow. The role of the threshold is to delay and limit escape. To keep the first waters in the bathroom. Give time for the problem to be noticed. To protect the wooden floor from direct contact with a small amount of water.
On a small leak, a proper threshold can make a huge difference. If, for example, a washing machine is dripping or some water is leaking from a fault, the marble skirting can keep the water in the bathroom until the siphon removes it or until the user sees it. If there is no barrier, the water can pass directly under the door to the wood.
In greater harm, the threshold is one line of defense among many. They also need easy-to-close valves, proper spiral connections, an overflow where available, a floor drain, and in neater homes even leak sensors.
The right marble apron does not eliminate the risk. It diminishes him and delays him.
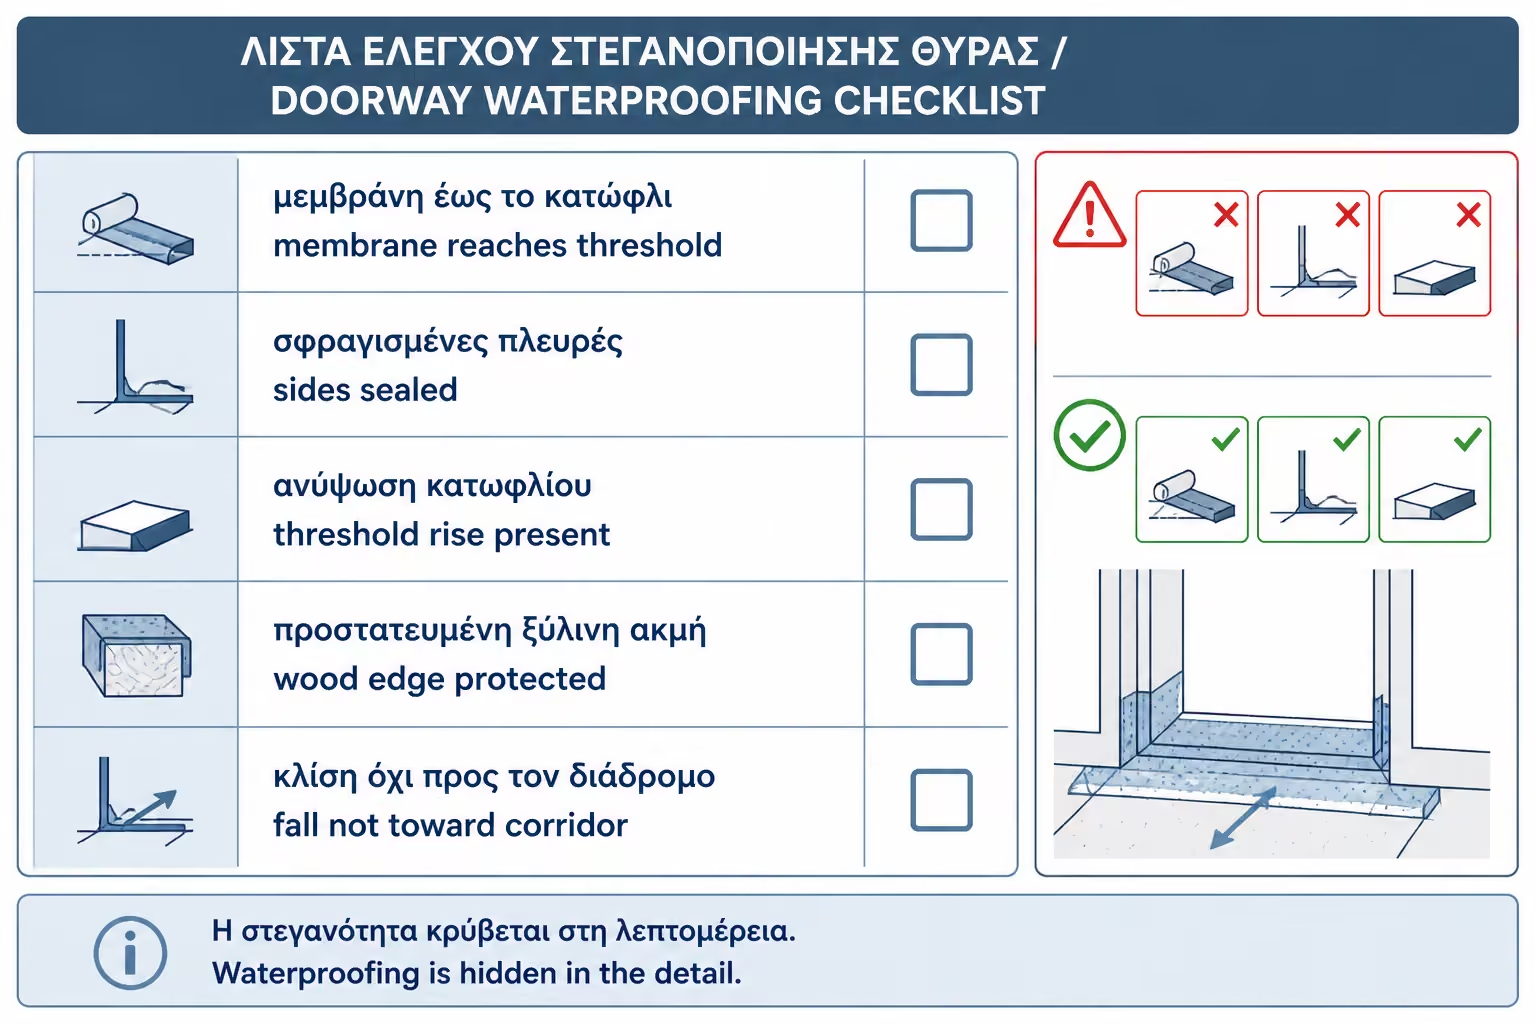
Before you finalize the choice or installation, review the following points first:
| Error | Possible consequence | Correct approach |
|---|---|---|
| Marble skirting on the same level without barrier | The water immediately passes into the corridor | Small lift or controlled watertight transition |
| Waterproofing that stops before the threshold | Water under the marble plinth | Continuity of the membrane up to and under/behind the threshold |
| Gaps on the sides of the case | Lateral leakage to wooden floor | Elastic sealing and correct edge detailing |
| Rough marble gluing with gaps | Water passes underneath | Full seating and proper adhesive |
| Wrong rushes to the door | The threshold receives all the water | Slope to siphon where possible |
| Wooden floor that rests unprotected on the marble | Acne breakouts | Protected transition and elastic joint |
| Rigid joint between marble and tile | Crack and water ingress | Rubber sealant where required |
| The threshold is designed after the case | Gaps and hard fixes | Coordinating marble, slab and carpentry in advance |
A typical example is a bathroom with a beautiful marble skirting, but without waterproofing under it. In a small leak from a washing machine, the water did not go over the marble. He went through the side gap next to the case and blew up the wooden floor of the corridor. The problem wasn't the marble. It was the detail.
The cost of a marble apron is small compared to the overall bathroom renovation, but its technical importance is great. It is affected by the material, dimensions, thickness, cuts, edge finish, placement, sealing, casing condition and connection to waterproofing.
In a typical bathroom of about 5 sq.m. in the Greece of 2026, where a simple to medium renovation can cost around €3,200–5,500 and more demanding solutions with full waterproofing, walk-in, special marble details and custom cabin can reach around €6,000–7,500 or more, the right marble plinth is a small but smart investment of protection.
Before you finalize the choice or installation, review the following points first:
| Element | How it affects cost and quality |
|---|---|
| Apron material | Marble, granite, artificial stone or ceramic tile have different costs |
| Thickness and dimensions | Stiffer piece offers better feel and durability |
| Edge finishing | Broken/rounded edges are safer |
| Connection with waterproofing | Critical engineering work, not simple placement |
| Stamping on the sides | Protects case and wooden floor |
| Adaptation to wooden floor | It wants a proper transition and room for expansion |
The cheap solution "a marble at the door" is not always wrong. But it is incomplete if it is not designed as a watertight threshold.
A correct quotation should mention not only the installation of marble skirting, but also its sealing connection. It must be seen whether the floor waterproofing will reach the threshold, whether it will turn under or behind the marble plinth, whether the sides will be sealed, and how the transition to the exterior floor will be made.
If there is a wooden floor outside, this must be mentioned. It's not the same detail as a tiled hallway. Protecting the edge of the wood, the elastic joint and avoiding direct contact with water are important.
The offer must also clarify whether the case already exists or will be installed later. If it is to be installed later, its height and position must be coordinated with the marble plinth. If it already exists, it must be foreseen how the sides will be sealed.
Finally, materials, labour, VAT, edge finishing, gluing, sealing and time before the area is stepped on or used must be listed.
Before installing the marble skirting, ask if the waterproofing of the floor reaches the door. Ask if he will turn at the threshold or if he will stop before the marble. If it stops before, there is a risk of water passing underneath.
Also ask if the threshold will have any height or be flat. If it's level, ask what else protects the wood floor in the event of a leak. Ask if there is a floor drain and if the drains lead to it or to the door.
If there is a case, ask how the sides will be sealed. If there is parquet or laminate outside, ask how its edge is protected. If the answer is "there will be some silicone at the end", ask for a clearer technical description.
It is good to keep photos before the waterproofing is covered in the threshold. It is one of those points that are not visible afterwards, but in the event of a breakdown they make a big difference.
Before you finalize the choice or installation, review the following points first:
| Question | Yes / No |
|---|---|
| Does the floor waterproofing reach the door? | Yes / No |
| Does the marble skirting act as a small barrier and not just a finish? | Yes / No |
| Is there proper seating under the marble with no gaps? | Yes / No |
| Are the sides of the marble skirting properly sealed? | Yes / No |
| Is the case protected from possible contact with water? | Yes / No |
| Does the wooden hallway floor have a protected edge? | Yes / No |
| Bathroom drains not leading the water to the door? | Yes / No |
| Is there a floor drain or other drain in case of a breakdown? | Yes / No |
| Does the tile-marble joint have a proper rubber seal where required? | Yes / No |
| Does the threshold not create a dangerous step in use? | Yes / No |
| Does the quote describe the sealing detail and not just the marble? | Yes / No |
| Are there any pictures of the detail before it was covered? | Yes / No |
If most of the answers are "I don't know", the threshold has been treated as an aesthetic finish and not as a technical barrier.
If you have to keep only one thing, keep it this: the marble door sill should not just be a beautiful transition from tile to wood. It should be the front lip of the sealed bath basin. The waterproofing must reach there, the sides must be properly sealed and the case must not be exposed to water. In a breakdown, the threshold will not stop a flood forever, but it can buy valuable time and save the wooden floor of the hallway from immediate damage.
The door sill is one of the most underrated points in bathroom waterproofing. It's not in the shower, it doesn't have a siphon, it doesn't look technically difficult. But in case of damage, it is the point that decides whether the water will stay in the bathroom or whether it will pass into the hallway.
Marble skirting can act as a real barrier only when properly designed. It must have an appropriate level, proper seating, connection to the waterproofing, careful sealing on the sides and a proper transition to the exterior floor. If there is wood, parquet or laminate outside, this need becomes even greater.
The silicone at the end is not enough if there are gaps underneath. Marble is not enough if the waterproofing stops before that. The case must not be left unprotected. Downspouts should not send water towards the door. All these together create the real watertight threshold.
For the owner, the right question is not "what marble shall we put on the door?". It is "how will the water be stopped if a fault occurs?". If the answer includes waterproofing up to the threshold, proper marble skirting, sealing of lateral points and protection of the wooden floor, then the bathroom is much better defended. If the answer is simply "we'll put on an apron", then we're only talking about finishing, not protection.
Return to category.
Go to categoryReturn to the central guide.
Go to guide