
Bathroom Waterproofing & Moisture Protection
Return to category.
Go to categoryThe linear siphon is one of the elements that changed the image of the modern bathroom. Instead of a small square spout in the middle of the shower, we now see a thin drain line, usually next to the wall or on the edge of the walk-in shower. The result is cleaner, more architectural and allows for larger tiles, simpler designs and a more unified aesthetic.
But the linear siphon is not just a prettier accessory. It is a high risk technical point. Where the metal body of the siphon meets the grout, caulking, adhesive and tile is one of the most difficult joints in the entire bathroom. On the one hand we have a metal or stainless steel body, on the other mineral substrates and sealing materials. If this joint is not done correctly, the shower may look perfect on day one, but begin to trap moisture under the tiles with use.
The problem is that failure in the linear siphon is not always immediately apparent. It doesn't necessarily mean water will leak into the downstairs ceiling from week one. More often it starts insidiously: blackening on the joints near the siphon, a damp smell, tiles that sound hollow, silicones that open, water that remains around the grate or moisture on the adjacent wall. When the owner realizes it, the siphon is already closed under tiles and the repair is difficult.
That is why the linear siphon must be treated as a special technical system and not as a simple bathroom accessory. Its choice, its placement, its connection to the drainage, its inclusion in the cement mortar and especially its connection to the waterproofing layer must be planned before the tiling begins. Not everything is fixed with a bit of silicone at the end.
In this guide we will see why the linear siphon is such a sensitive point, what it means to properly "seal" the metal-to-floor joint, what mistakes are most often made in practice, and what the owner should ask the workshop before the siphon disappears under the finished floor.
In a walk-in shower, the floor is more than just a stepping surface. It is part of the drainage system. The water must move at a controlled gradient towards the siphon, pass through the grate and quickly exit to the drain. If this is not done correctly, the water starts to pool, press the joints and find weak points.
The linear siphon collects much more linear compound than a simple square siphon. We do not have a small drain point, but a long metal element that contacts the floor along its entire length. This means more joint inches, more chance of micro-failure and a greater need for a proper connection to the seal.
The problem is exacerbated because the materials surrounding the siphon do not all behave in the same way. Stainless or metal body has a different expansion and different adhesion than cement mortar, tile adhesive or sealants. The metal-floor joint is inherently more demanding than a simple joint of two mineral surfaces.
If the siphon is treated as if it is just a piece that will "sit in the mortar", the risk increases. Cement mortar alone does not reliably seal the siphon. Tile adhesive is also not a waterproofing system. And the final silicone, as good as it is, should not be the main defense against water.
One of the most common and dangerous mistakes is the idea that the union of the linear siphon with the tile can be solved at the end with a good silicone. Silicone has its place in a bathroom. It is used for elastic perimeter seals, for joints of different materials and for final finishes. But it is not the basic waterproofing of the shower.
The water in the shower doesn't just stay on the tiles. It can pass through joints, through micro-cracks, through capillary gaps, through points around the grill or through weak joints. If there is not a proper sealing connection with the siphon under the tile, the silicone on the surface just delays the problem.
In practice, the silicone near the siphon is one of the most stressed points. It constantly receives water, soaps, cleaners, rubbing, temperature changes and mechanical wear. Over time it can turn black, peel off the metal or open at the edges. If there is no proper waterproofing underneath, then the failure of the silicone becomes water ingress.
An owner can see a very clear line of silicone around the siphon and feel that the area is protected. But the crucial question is another: what is below that line? Is there a gasket? Is there a membrane? Is there a sealing tape? Has the siphon been connected to the waterproofing system? If the answer is not clear, silicone is not enough.
Proper sealing begins before the siphon is even purchased. It should not be chosen based on length, grill design or price alone. It must be considered whether the siphon is suitable for a built-in shower, whether it has a way of connecting with a waterproofing system and whether it matches the height of the floor.
A good linear drain for a walk-in shower should have a high-quality body, adequate drainage capacity, easy cleanability, a proper trap, and most importantly a flange or sealing surface designed to integrate with the waterproofing. Some systems include a factory membrane, a special collar, or a perimeter lip that helps the system bond correctly.
If the siphon is very "bare" technically and relies only on being embedded in the cement mortar, then sealing becomes more difficult. A solution can be found, but it requires more care and compatible materials. Buying an improper siphon on the cheap can create an expensive problem later.
The height of the siphon is also important. In older apartment buildings, the available floor thickness is often limited. If the siphon is tall and the drain can't be sloped properly, the crew may have to raise the entire floor or compromise the runoff. The siphon must be chosen together with the design of the flows and not separately.
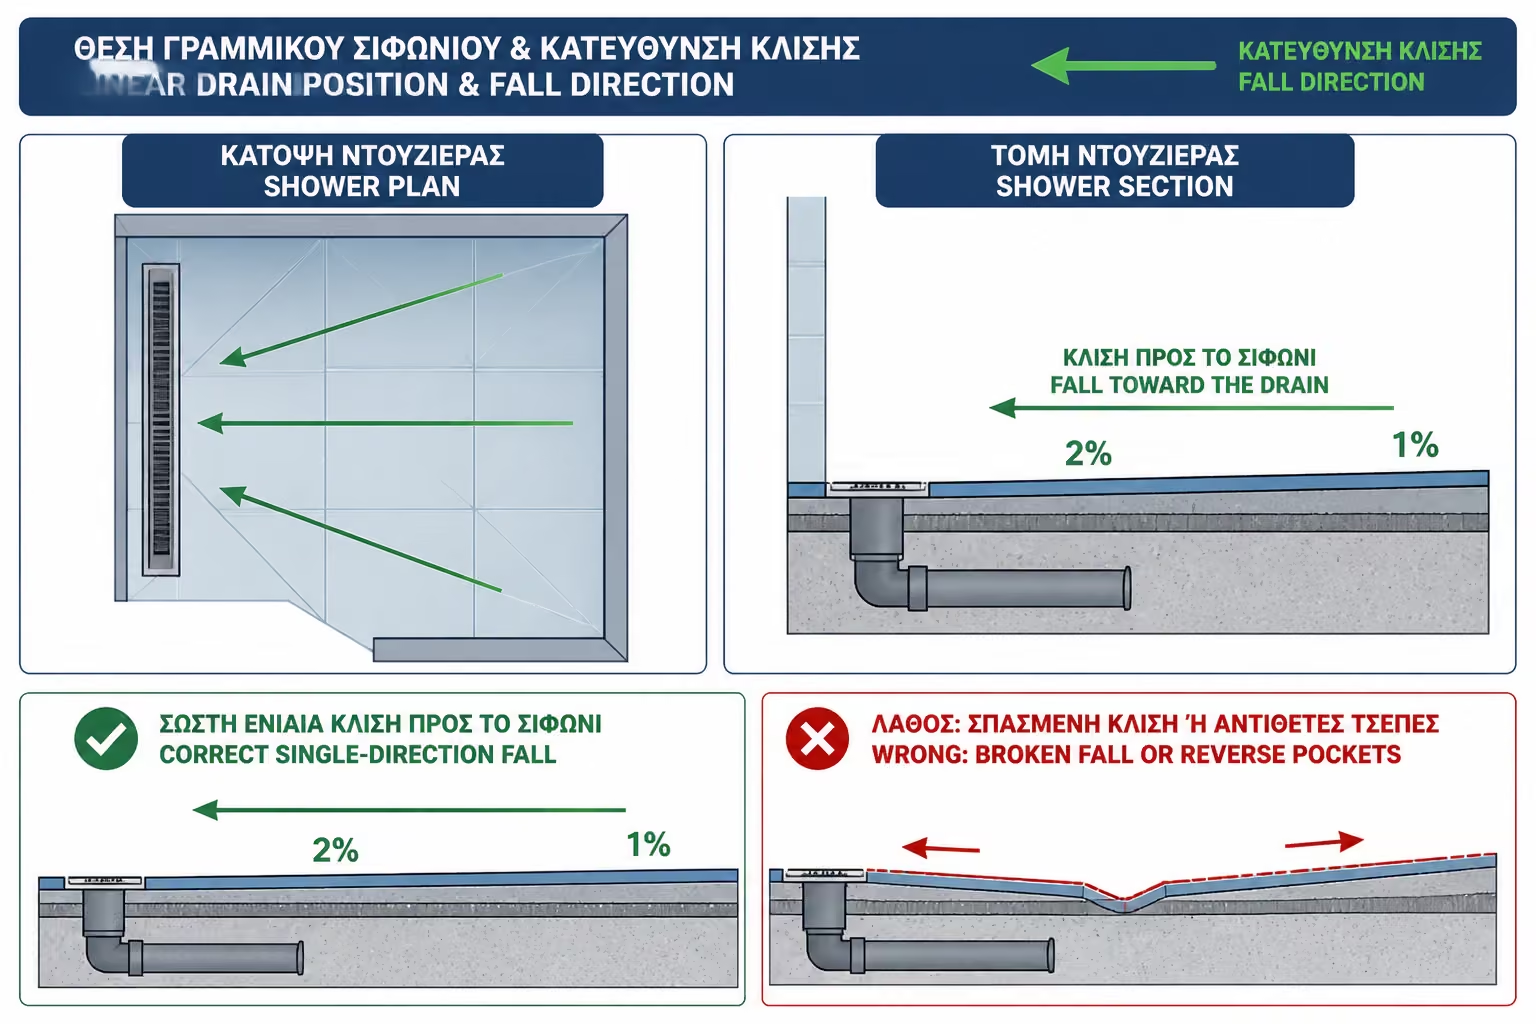
The linear siphon can be placed on the wall, at the entrance of the shower, in the center or on another side of the room, depending on the layout. The most common and practical solution is close to the wall so that the floor has a clean slope towards it. This is especially helpful when using large tiles, because complex cuts around a central siphon are avoided.
But the position of the siphon must be combined with the drainage. If the siphon is placed in a position that looks ideal aesthetically but does not allow a correct drain slope under the floor, then the problem is transferred to the hydraulic part. The shower may drain slowly, make noises or develop odors.
The slope of the floor towards the linear siphon must be clean and continuous. We usually aim for a practical slope of around 1%–2%, depending on the length of the shower, the type of tile and the location of the drain. The final level of the grate must be calculated based on the thickness of the tile and the glue. If the siphon stays up, it will hold water. If it is left low with the wrong finish, it can create unsightly or unusable acne.
A frequent construction site mistake is to place the siphon first "around" and then the tiler tries to save the result with the glue. This is not correct practice. The siphon must be set to the correct level from the start, with provision for all subsequent layers.
Connecting the metal siphon to the floor is difficult because it combines different materials and different movements. Metal does not absorb materials like a cement mortar. It has a smooth surface, different thermal behavior and can show micro-movements in relation to the surrounding mortar.
If the sealant is simply pressed against the metal without proper preparation or without a proper gasket, the adhesion may not be sufficient. If the film or spreader does not bond mechanically or chemically to the siphon as intended by the system, a line of weakness is created. From there water can pass under the tiles.
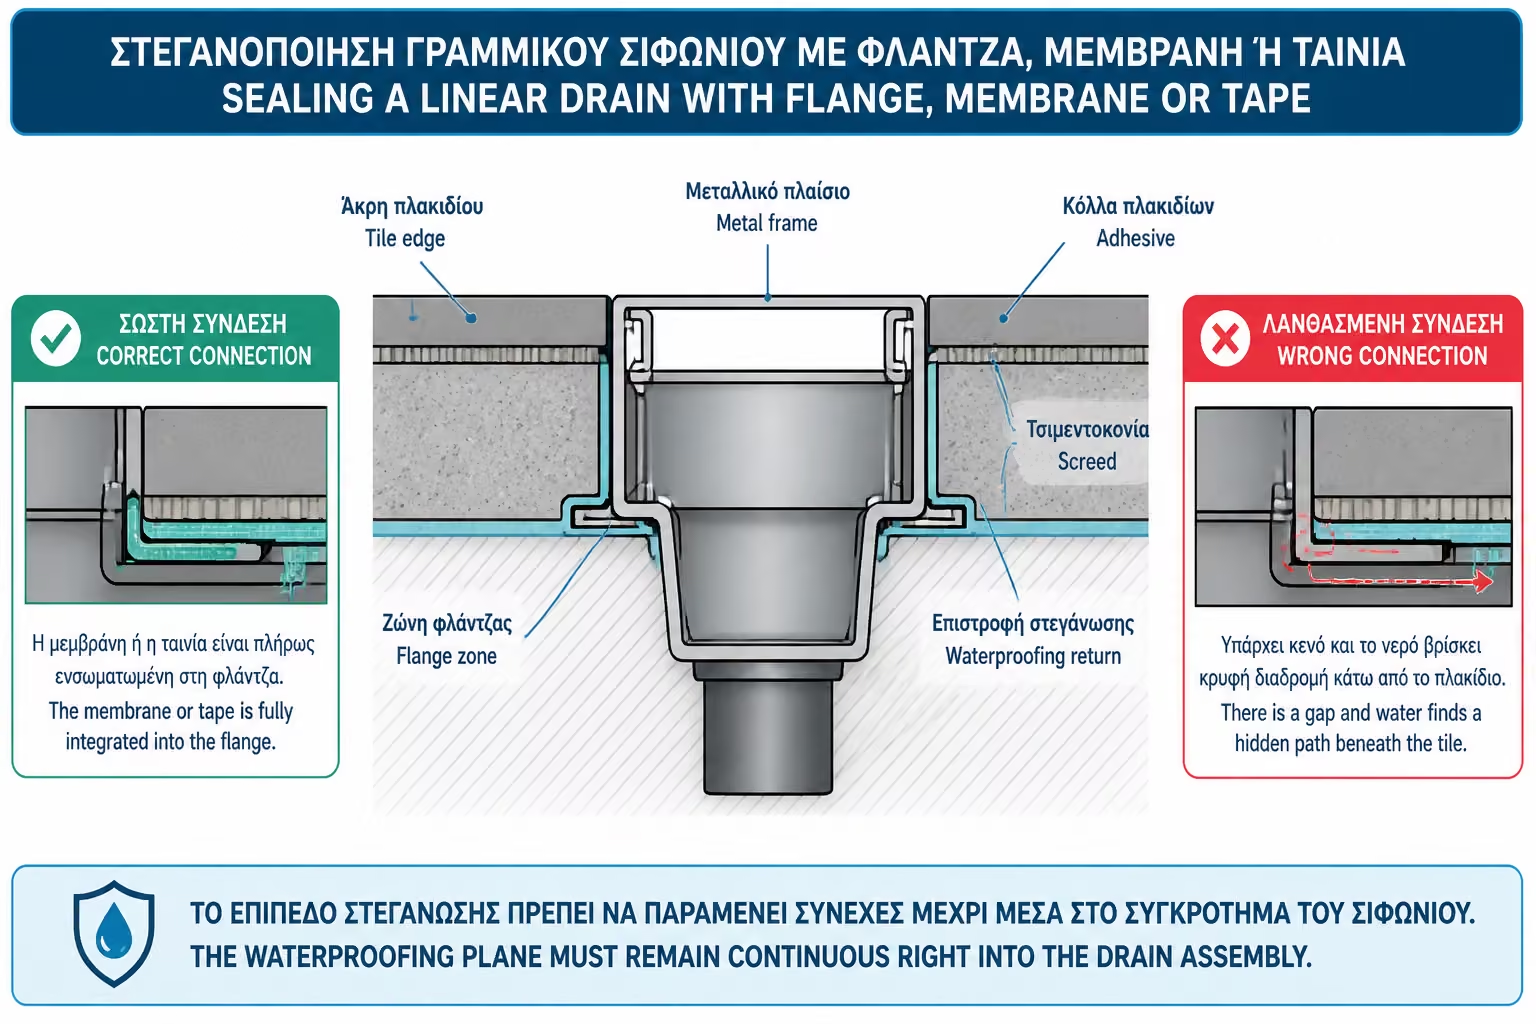
The crucial thing is not to "fill" the void around the siphon. The critical thing is to create a continuous sealing layer that terminates securely in the body of the siphon. Simply put, the water that passes under the tile should be directed towards the siphon and not find a way around it.
This is why good linear siphon systems do not treat sealing as an improvisation. They provide for flanges, perimeter lips, factory-glued membranes or special connection tapes. This detail may not be visible to the customer, but it is one of the most important differences between a simple component and a complete system.
Before talking about sealing, the siphon must be properly installed hydraulically and mechanically. It must be firmly seated, not moving, have the correct level and be connected to the drain with a sufficient slope. If the siphon "plays" or is pressed by the drain, the seal around it will be stressed.
The connection to the drain must be made with suitable fittings, not with rough joints. Point must be tested before closing. In a renovation, it is better to waste some time checking than to cover a bad joint under cement and tiles.
The siphon must also be protected during work. Mortar, adhesives, cement mortars and debris can fall in and create future runoff problems. Clean jobsite practice matters here. An expensive linear siphon can become problematic if it is used as a "hole" for work debris to fall into.
At this stage a first supply check must be done. If the drain is not draining properly or the odor trap is not working properly, sealing will not solve the problem. Waterproofing protects against leaks in the bathroom shell, it does not correct poor plumbing.
The grout around the linear siphon must form the correct drains and stabilize the system, but without canceling the possibility of a watertight connection. This means that the siphon should not be roughly buried in the mortar until the connection points are gone.
If the siphon has a flange or peripheral surface for sealing, this must remain clean and available. If it is covered with cement, dust or debris, the next layer will not stick properly. The same applies to factory membranes that come with some siphons. They must be protected until they are integrated into the system.
The cement mortar must have the correct density and strength. A loose or very weak base around the siphon can create micro-movements. These micro-movements are transferred to the joint with the tile and the waterproofing. That is why the siphon should not be supported only by the tile adhesive or the final finish. It must have a proper base underneath.
A practical mistake is to make the cement in a hurry and then "scrape" around the siphon to find the right level. This can injure connection points or leave weak gaps. The correct level must be marked in advance.
This is where the essence of sealing lies. The linear siphon must be connected to the waterproofing layer of the floor in a continuous and compatible manner. If a fleece membrane is used on the floor, it must be joined to the siphon through the provided flange, factory membrane or special tape. If a spreadable material is used, the area should be reinforced with a suitable tape or collar and the material should be applied to a sufficient thickness.
The ideal image is not to think of the siphon as a "foreign body" in the floor, but as a continuation of the sealing basin of the shower. The waterproofing of the floor must reach the siphon and connect with it. If there's a gap, a break, or questionable adhesion, that's where the water will work.
In fleece films, special attention is needed in the overlays. If the membrane is cut around the siphon, the cut must be clean and the connection made with the special components of the system. There should be no exposed edge left to rest on the grout or silicone.
In spreadable materials, the most common mistake is too thin a layer around the siphon. Because the spot has many angles and surface changes, the technician may inadvertently leave gaps or weak spots. There you need patience, reinforcement and following the instructions of the system.
Fleece membranes have a significant advantage on the walk-in shower floor because they create a more controlled waterproofing layer. Around a linear siphon, this advantage becomes even more important as long as the siphon is compatible with the system.
When the line siphon has a factory flange or a custom membrane, the technician can connect the floor membrane to a designated point. This reduces improvisation. Instead of trying to "catch" a spreader onto a smooth metal edge, it works with a special bonding zone.
The big advantage is continuity. The floor membrane, corner strips and siphon flange can create a single waterproofing field under the tiles. This is especially useful in large tiled showers where there aren't many joints to help absorb micro-movements and where the runoff is concentrated in a linear area.
The downside is that the film needs technical precision. If a wrong cut is made, if the glue is not pressed well, if the joints are not properly sealed or if the siphon is not suitable, the system loses its value. The membrane is not just "a cloth". It is part of a technical solution.
Spreadable sealants can be used around linear siphons, especially when the system provides for suitable tapes, reinforcements and compatibility with the siphon body. They are flexible and can follow difficult details, small level changes and areas around components.
The problem is that around the siphon there is no room for a rough application. The spreader must be applied with the correct thickness, in the required layers and with reinforcing tape where necessary. If a "hand" is simply passed around the metal, without proper adhesion and without reinforcement, the point remains vulnerable.
Special attention needs to be paid to compatibility with metal. Not all materials adhere equally well to smooth metal surfaces. In some cases, special preparation, cleaning, priming or the use of a connector is required. These should not be decided on the construction site with the logic of "seeing and doing".
Spreadables can be a very good solution when there is an experienced applicator and the right system. But it is not the best choice when the workshop cannot explain exactly how the metal-floor joint will be sealed. If the answer is "don't worry, we'll have a good time", more clarification is needed.
Sealing is completed before tiling, but the final finish can make or break it. The tiles around the linear siphon must be cleanly cut, properly pressed into the adhesive, and leave an adequate gap for jointing or rubber sealing, depending on the system.
The tile must not press violently against the metal body of the siphon. Different materials need little margin. If the tile rests rigidly on the metal, micro-movements and thermal changes can cause cracks or delamination at the edge. On the other hand, if too much of a gap is left, the final seal becomes difficult and unsightly.
The siphon grate must be easily removable for cleaning. This sounds simple, but is often overlooked. If glue, grout or silicone prevents the grate from being removed, maintenance becomes difficult and the siphon may clog more often.
The final level is also important. The tile must guide the water towards the grill without creating a lip that holds water. If there is a small reverse slope around the siphon, the shower will look technically complete but in use it will leave stagnant water exactly at the most annoying point.
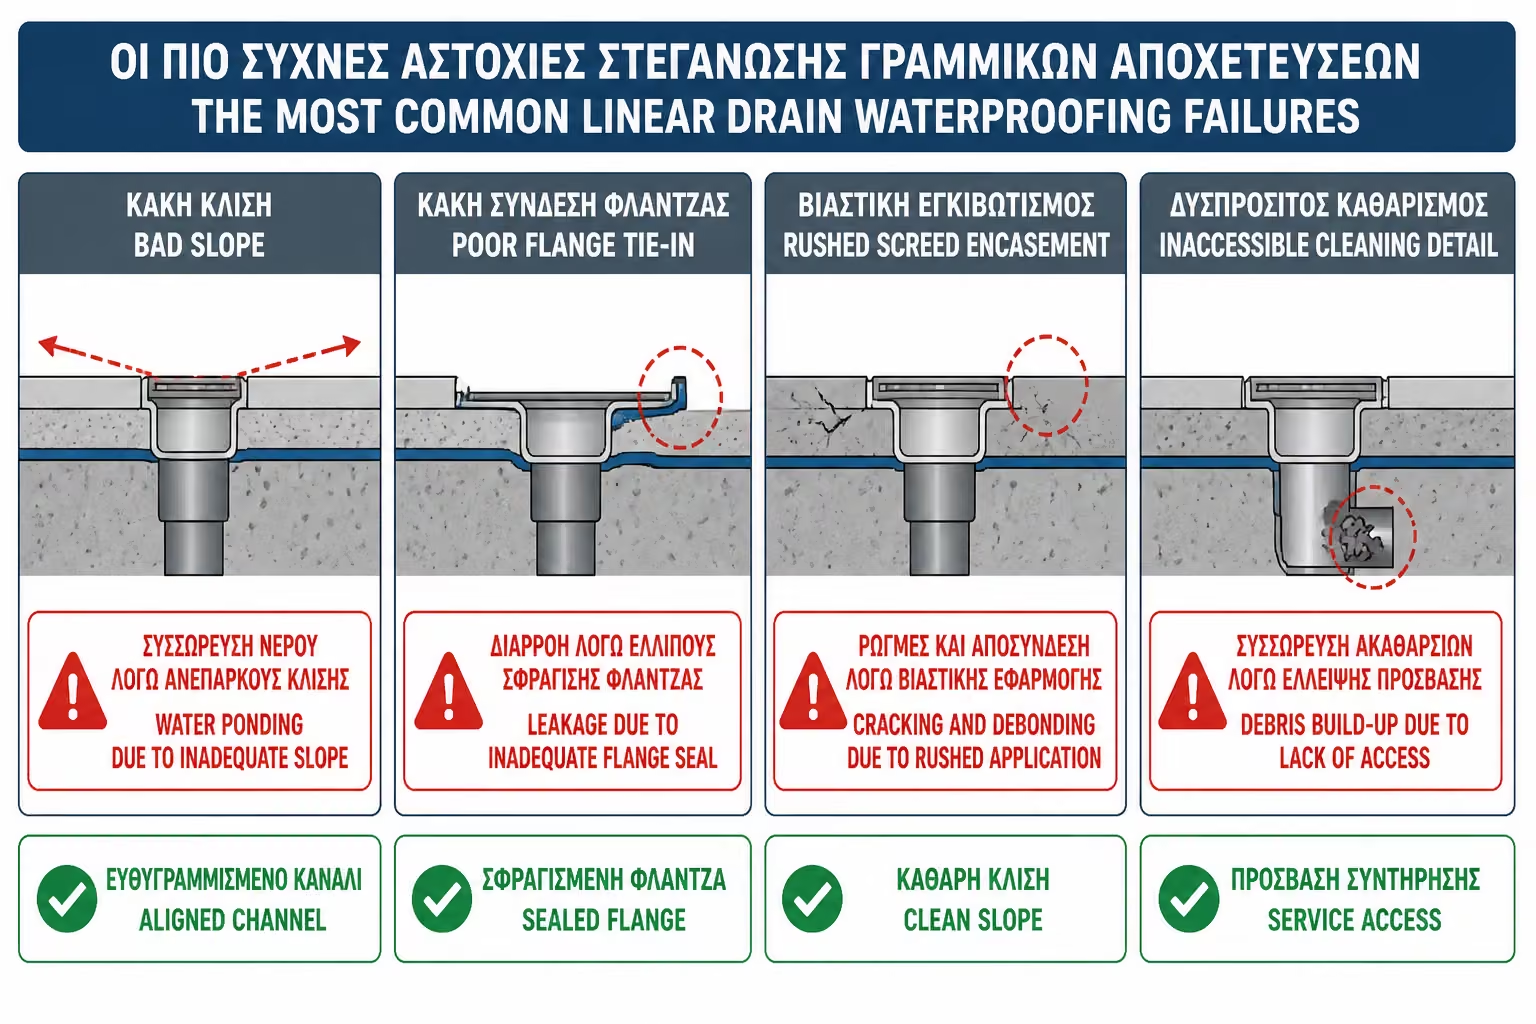
Errors around the linear siphon are usually not spectacular. These are small omissions that seem insignificant at the time of work, but later create serious problems.
Before you finalize the choice or installation, review the following points first:
| Error | What does it cause? | Correct approach |
|---|---|---|
| Buy a siphon without a sealing gasket | Difficult and uncertain connection to the floor | Choose a siphon compatible with a waterproofing system |
| Seal with silicone only | Temporary protection, high risk of leakage | Waterproofing connection under the tiles |
| Incorrect siphon level | Stagnant water or poor final finish | Calculation with tile, glue and slope before cement mortar |
| Poor adhesion to metal surface | Material detachment and water ingress | Compatible primer, gasket or special connection tape |
| Non-reinforcement of corners and joints | Cracks and small leaks | Tapes and special system blocks |
| Hasty tiling | Trapped moisture or poor adhesion | Compliance with drying and curing times |
| Poor tile cutting around the grill | Weak or unsightly finish | Careful engraving and consistent joint width |
| Not possible to clean siphon | Clogs, smells, difficult maintenance | Check removable grill before delivery |
A real-life example is the shower where the spout was placed nicely on the wall, but without a proper sealing connection. The tiles were large, the joints minimal and the picture excellent. After a few months, the joint next to the grill started to turn black. The owner changed the silicone twice, but the problem kept coming back. The cause was not the silicone. It was that the water had already passed under the tile from the siphon joint.
The best place to check is before the tiles are installed. Then the sealing is still visible, the bands are visible, the siphon flange is visible and something can be fixed without removal. After placement, control becomes much more difficult.
The owner can ask to see the stage of the waterproofing before it is covered. He does not need to do a technical inspection like an engineer, but he can confirm that the work was not done blindly or in haste. It can ask if tapes were put in, if the membrane was attached to the siphon, if the drying time was met and if the runoff was checked.
In more demanding projects, water testing may be done prior to final capping if the system and conditions permit. This should be done with care and by a professional, so as not to create damage in an unfinished stage. It is not always practical in every small renovation, but as a control logic it is correct: the system should be tested before closing.
The worst practice is to "run" the project without intermediate control and the owner only sees the finished tile. In waterproofing, the finished tile does not prove that a proper job was done underneath.
The cost of installing and sealing a linear siphon in Greece in 2026 depends on the type of siphon, the length, the quality, the sealing system, the difficulty of access, the condition of the substrate, the area, the floor, whether VAT is included and whether the work is part of a complete bathroom renovation or an individual intervention.
A simple linear siphon may seem economical on the market, but the total cost is not just the component. Proper plumbing, grouting, waterproofing, tapes or membranes, careful tiling and final finishing must all be accounted for.
Before you finalize the choice or installation, review the following points first:
| Element | What to look for in the offer |
|---|---|
| Linear siphon | Length, quality, flow, odor trap, cleanability, sealing gasket |
| Hydraulic connection | Drain slope, diameter, test before closing the floor |
| Cement mortar / pours | Correct level, single or compound slope, tile compatibility |
| Waterproofing | Membrane or spreadable, tapes, siphon connection, wall height |
| Tiles around siphon | Cuts, end gap, joint or rubber seal |
| VAT and materials | Be clear whether they are included or not |
In a full bathroom renovation, the extra cost of a proper linear drain and the corresponding waterproofing is usually not the largest part of the budget. But it is one of the most critical. If a 5 sq.m. bathroom typically lands around €3,200–€5,500 for a simple to medium renovation, while more demanding solutions can reach €6,000–€7,500+, then trying to save money on the drain and its waterproofing is a false economy.
A very low quote that includes "line siphon and fit" without reference to gasketing, waterproofing, tapes, drains and drain connection should be treated with caution. It may be economical because it concerns a simple case, but it may also be incomplete.
Even the best sealing does not eliminate the need for maintenance. The linear siphon collects hair, soaps, salts and cleaning residues. If it is not cleaned, the flow is reduced and the water stays longer in the shower zone. The longer the water stays, the more it strains joints, silicones and compounds.
The owner must know how to remove the grill, how to clean the odor trap and what cleaning agents are allowed. Very aggressive chemicals can stress sealants, metal surfaces or plastic parts, depending on the product. Maintenance should be regular but not destructive.
If the shower starts emptying slowly, it should not be ignored. Water pooling around the siphon increases stress on the most sensitive spot. Many times the problem is solved by cleaning. However, if it is accompanied by blackened joints, opening of silicone or moisture, a technical inspection is needed.
Maintenance does not correct a poor seal, but it protects a proper structure from unnecessary stress. It's the difference between a bathroom that was just delivered and one that functions properly over time.
There are signs that should not be treated as mere cosmetic wear. If the silicone around the line siphon opens repeatedly, if the joints turn black quickly after cleaning, if there is a damp smell, or if the tiles near the siphon sound hollow, it needs an inspection.
The same applies if moisture appears in a neighboring room, on a skirting board, on a wall behind the shower or on the ceiling below. In these cases, the solution is not simply to re-silicone. Local investigation, point opening or drainage inspection may be required.
The owner must avoid the rough "patches" that close the surface without identifying the cause. If water has gotten under the tiles, surface sealing can trap moisture instead of solving the problem.
In new construction or recent renovation, it is advisable to have the inspection done by the workshop that undertook the work or by an independent technician, if there is a dispute. The point is not to rush to blame, but to identify whether the problem is in the silicone, the joint, the seal, the siphon, or the drain.
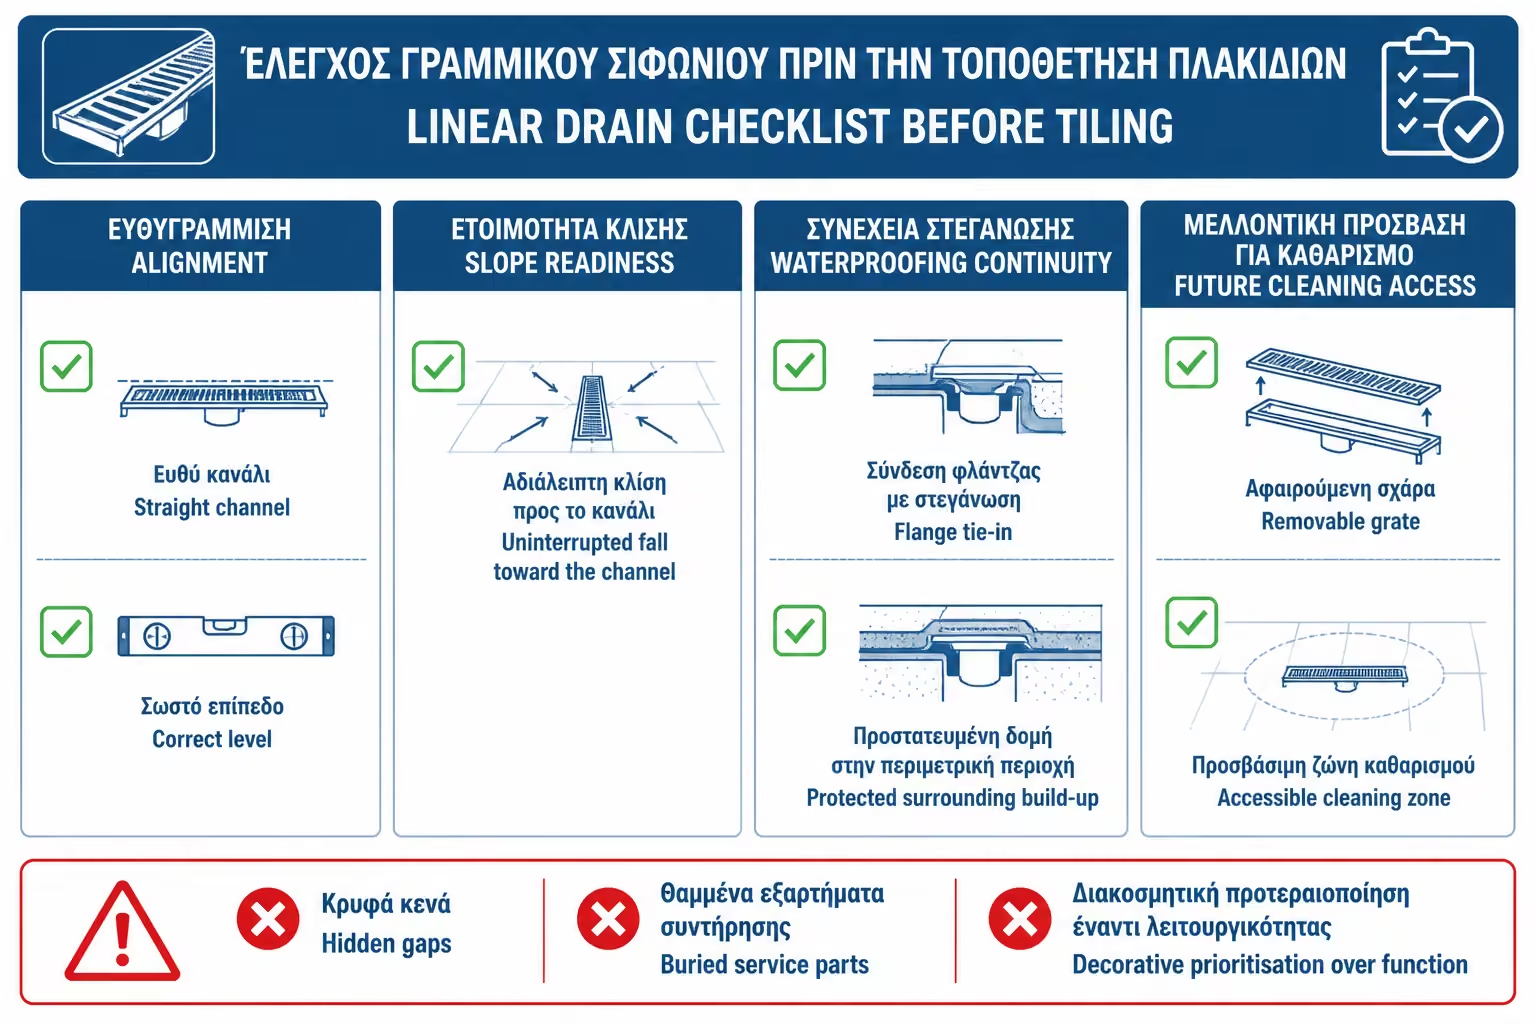
Before proceeding with tiling around the linear siphon, a simple but essential check is worth doing. It is much easier to fix something at this stage than after the bathroom is finished.
Before you finalize the choice or installation, review the following points first:
| Question | Yes / No |
|---|---|
| Is the linear drain suitable for a built-in walk-in shower? | Yes / No |
| Does it have a gasket, a membrane or a prescribed way to connect it to waterproofing? | Yes / No |
| Has the flow and slope of the drain been checked? | Yes / No |
| Is the siphon firmly in place, not moving? | Yes / No |
| Has the final level been calculated based on tile and adhesive? | Yes / No |
| Does the grout direct the water cleanly to the siphon? | Yes / No |
| Was the flange or mating surface left clean before sealing? | Yes / No |
| Is the floor waterproofing connected continuously to the siphon? | Yes / No |
| Are tapes or special pieces inserted into critical joints? | Yes / No |
| Does the waterproofing go up the shower walls properly? | Yes / No |
| Is the grill easily removable for cleaning? | Yes / No |
| Does the quote describe materials, labour, VAT and exact item? | Yes / No |
If the answer to several of these questions is "I don't know", then it is not time to put in tiles. It's time to ask for clarification. The linear siphon is not a point where it is worth proceeding with ambiguity.
If you must keep only one thing, keep this: the linear siphon must not be "sealed" at the end with silicone. It must be integrated into the shower sealing system from the start. Ask for a flanged siphon or intended waterproofing connection, correct level before grouting, clean connection with a membrane or spreadable system and reinforcement at the joints. Silicone is a last resort, not the primary defense against water.
The linear drain is one of the most attractive elements in a modern bathroom, but also one of the most demanding technical details. Its success is not judged only by whether it is stainless, thin, or elegant. It is judged by whether it has been set at the correct level, whether it drains properly, whether it works with the floor slopes, and above all whether it has been connected correctly to the waterproofing layer of the floor.
The connection of metal to the floor does not forgive improvisations. Grout is not a sealant, tile adhesive is not a sealant, and silicone should not be the go-to solution. The critical point is under the tile: in the gasket, the membrane, the tape, the spreadable system and the way it all joins the siphon.
For the owner, the right decision is not to see the linear siphon as a decorative accessory. It should be treated as part of a complete shower system. Before approving the quote, he must ask for a clear description of the seal around the siphon. Before the tiles are inserted, it must be clear that the point is properly sealed under the finished surface.
A well-installed linear drain can give an excellent result, both functionally and aesthetically. A poorly sealed drain, however, can become the most expensive detail in the bathroom. And as is often the case in renovations, the right job is not the one that shows the most, but the one that does not need to be reopened later.
Return to category.
Go to categoryReturn to the central guide.
Go to guide