
Bathroom Waterproofing & Moisture Protection
Return to category.
Go to categoryThe glass enclosure is one of the elements that visually completes a modern shower. It can be a simple fixed walk-in panel, a full enclosure with a door, a system with metal profiles, or a more minimal solution with brackets and clear glass. In any case, the result looks clean, bright, and contemporary. The bathroom feels larger, the shower more defined, and water is better contained than in a completely open layout.
But the glass enclosure is not just a decorative piece that gets installed at the end. It is a technical element that sits on tiles, floors, walls, waterproofing layers, drains, and supports. Where the glass, metal profile, and brackets meet the floor and walls, there are points that receive daily water, cleaners, limescale, and micro-movements. If they are not sealed properly, they can become water-entry points or areas of staining and wear.
The most common mistake is to treat enclosure sealing as nothing more than "a good bead of silicone". Silicone does play a key role in the final seal. But it should not be expected to correct bad slopes, wrong glass positioning, poor waterproofing under the tiles, unprotected drill holes, or metal profiles that trap water. If the underlying construction is wrong, silicone only delays the problem.
In a proper build, the enclosure is designed together with the shower, not added as an afterthought. Where will the glass touch? Will the floor be drilled, or only the wall? Is there waterproofing under the tile? How will the screws be sealed? Does the floor slope direct water away from the profile, or does it let water pool at its base? These questions determine whether the glass enclosure will work properly or become a permanent maintenance point.
This guide explains how shower glass sealing should be treated, which areas are most sensitive, how the profile differs from the supports, when holes become dangerous and what the owner should check before installing the glass.
The enclosure is the last visible boundary between the shower zone and the rest of the bathroom. Its job is to limit splashes and keep water where the showerhead and drain are meant to handle it. When it is positioned correctly, it improves how the shower works. When it is placed without technical planning, it can create new problems.
The base of the glass or profile constantly receives water. Especially in walk-in showers, the water hits the glass, rolls down and ends up at the contact line with the floor. If there is a metal profile, it can hold salts and soaps. If there is only glass with silicone, the cleanliness of the application is even more important. If the slope of the floor directs water towards the profile instead of the siphon, the spot will remain wet after each use.
On the walls, the enclosure is usually fixed with profiles, hinges or brackets. These require drilling holes in the tile and often the substrate behind it. If the hole goes through a waterproofing zone and is not properly sealed, a moisture path can be made to the wall. The screw looks small, but technically it is drilling into a wet surface.
The enclosure should therefore not be treated as an accessory that "goes in after the bathroom is finished". It must be considered part of the total system: floor, wall, waterproofing, tile, gutters, siphon, glazing and final seals.
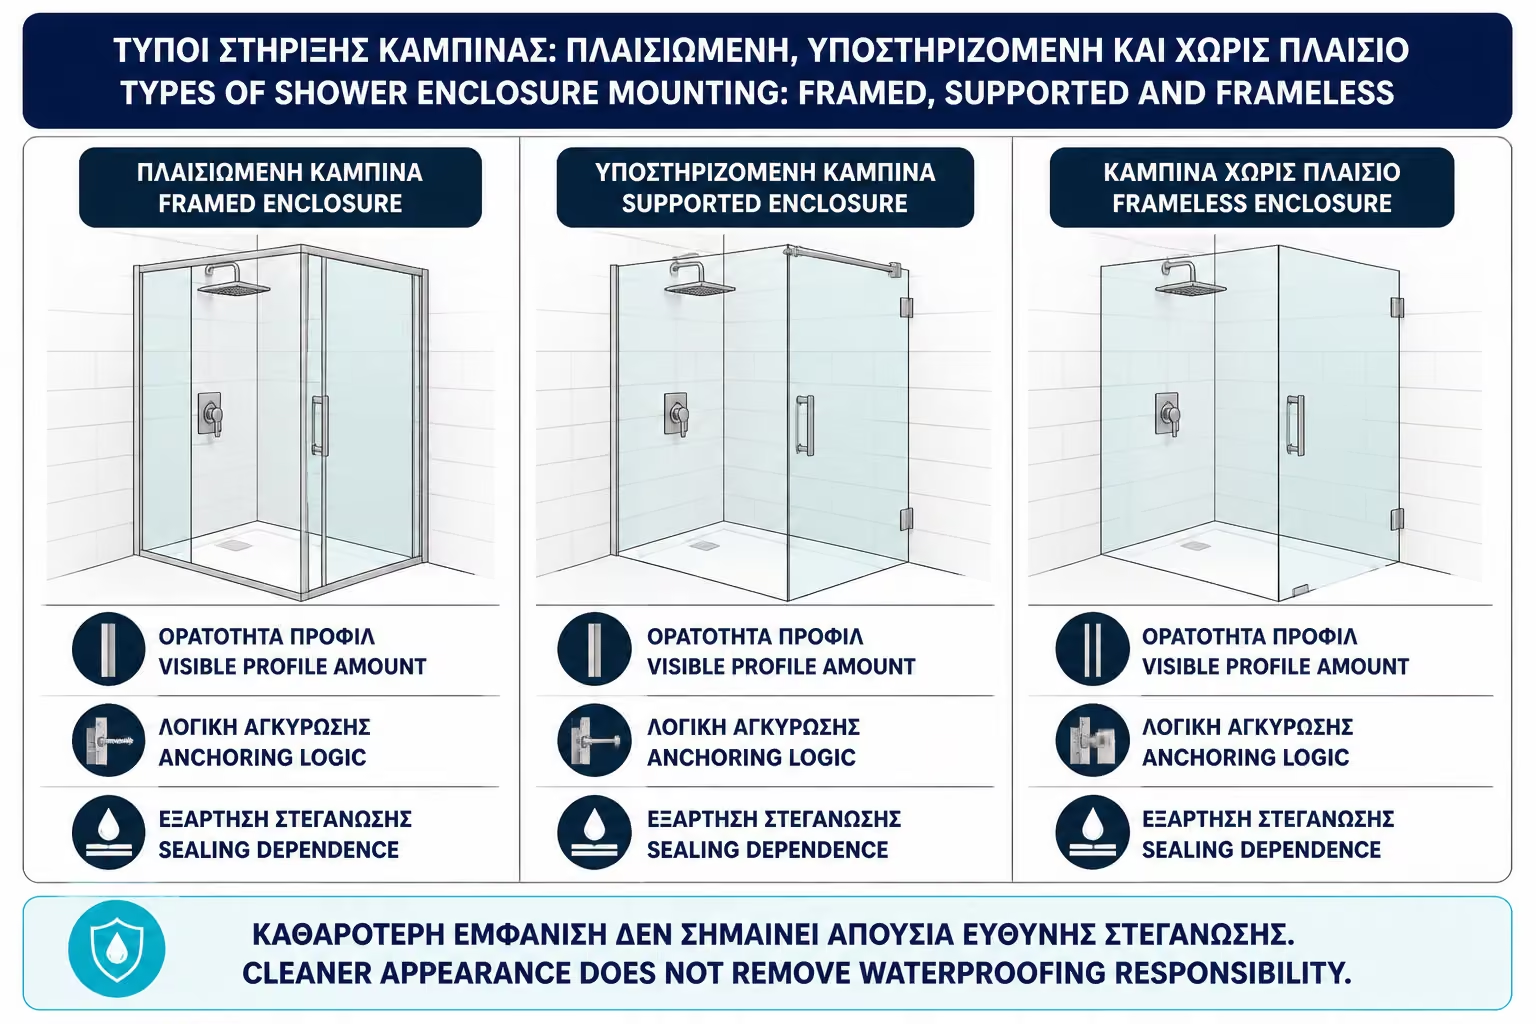
Not all glass enclosures behave the same way. A full framed enclosure works differently from a frameless fixed glass panel with small brackets. The first may look more enclosed and practical, but it also creates more contact lines where water can remain. The second offers a cleaner look, but it demands much more precise positioning and more careful sealing.
The metal profile helps support and often covers small imperfections in the walls. It is practical in older bathrooms where the surfaces are not perfectly flat. But it creates channels, edges and internal surfaces that must be properly sealed. If the profile presses on a point that holds water, its silicone will be constantly stressed.
Frameless solutions, i.e. solutions with less metal and more visible glass, have fewer places where salt can collect. On the other hand, they do not forgive mistakes in levels and alignments. The glass must be pressed and supported correctly, the distances must be accurate and the seals must be clean. In such a solution, a bad silicone is immediately visible.
There are also intermediate solutions, with thin profiles, guides, hinged doors, sliding cabins or fixed glass on a low parapet. Each has different risk points. That is why the choice should not be made only on the basis of the photo. It must be considered whether it fits the specific bathroom, the drains and the waterproofing.
The line where the enclosure touches the floor is one of the most important points. That's where water ends up from the glass, there are often silicones, that's where the profile or the driver steps, and that's where blackening can occur if the water stagnates.
In a proper shower, the floor below and around the enclosure should be sloped so water moves naturally toward the drain. If the base of the glass sits over a small low spot, water will remain there after every use. If the profile acts like a small dam, it can trap water on one side. If the enclosure crosses the wrong change in floor slope, the problem will repeat every day.
A common example is a walk-in shower with a fixed glass panel and a wall-side linear drain. The floor slopes toward the drain, but the base of the glass is set where splash water lands outside the main runoff path. If the surrounding floor is too flat, water may remain outside the glass. The owner sees "water outside the enclosure", but the issue is not the glass alone. It is the combination of glass length, water pressure, floor slope, and panel position.
The enclosure must therefore be designed on the actual floor of the shower. It is not enough to fit in dimensions. It must cooperate with the flow of water.
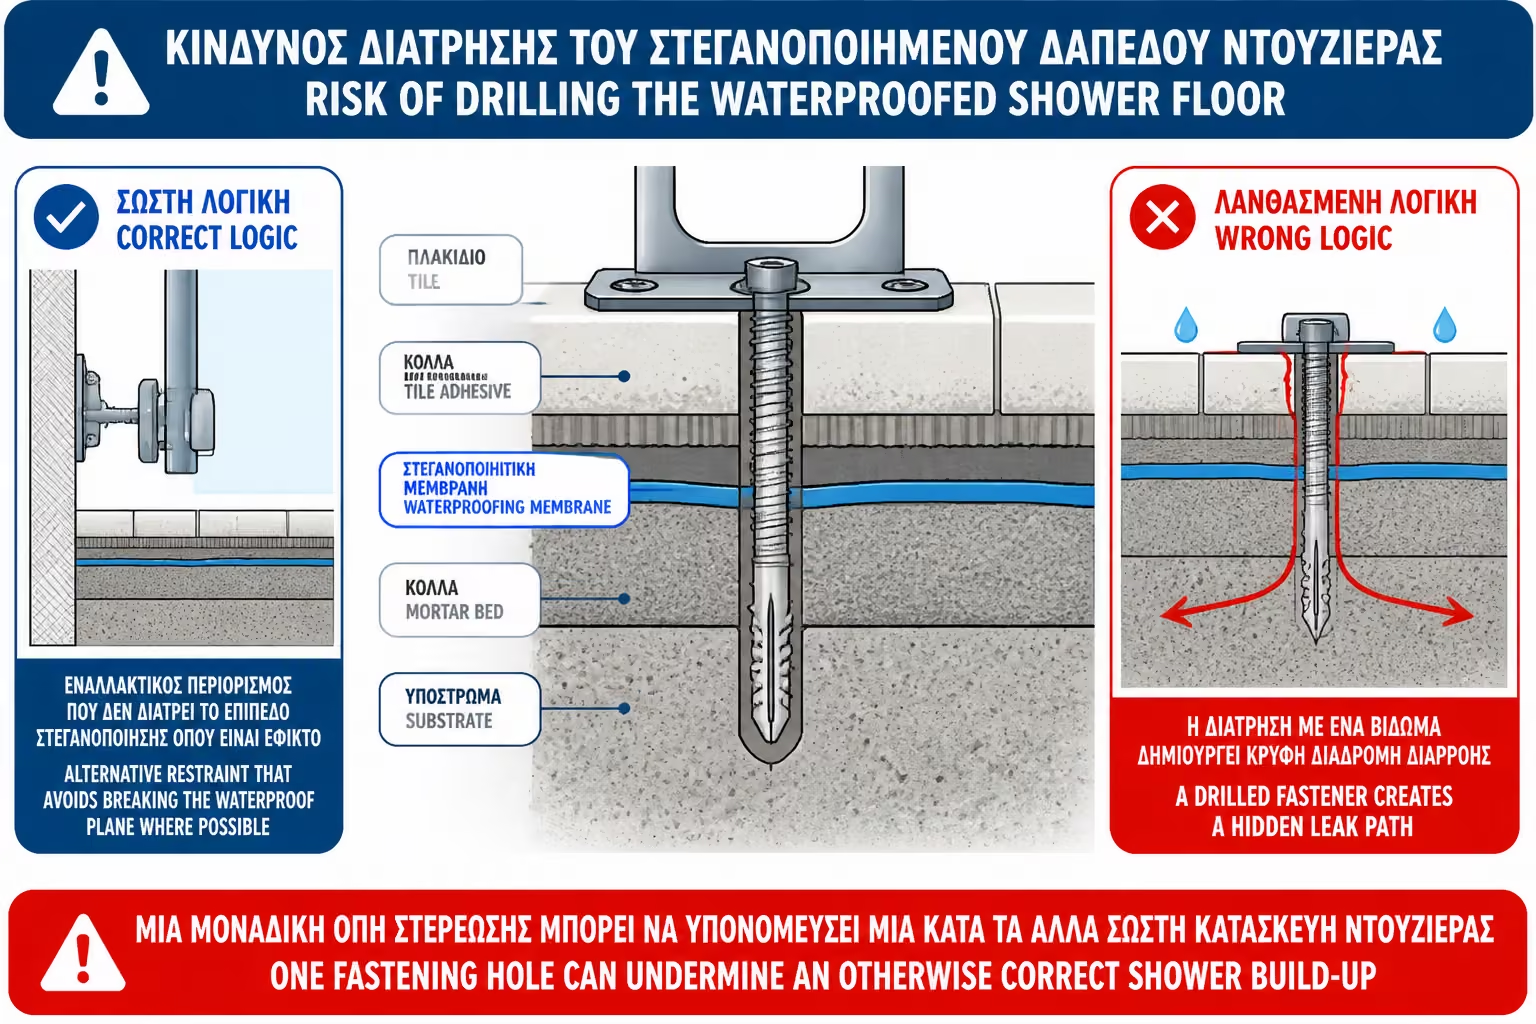
In many cases, fixing glass enclosures requires holes in walls or floors. In the shower zone, any hole is a serious matter, because it penetrates the finished surface and can approach or injure the waterproofing under the tiles.
Drilling into the floor is particularly sensitive. The floor of the shower is the place that receives the most water and often has a membrane or spreadable waterproofing under the tile. If drilled without proper sealing, a potential moisture path is created to the cement mortar. Even a small screw can locally invalidate a good sealing system.
Therefore, where it is technically possible and permitted by the enclosure system, solutions that limit or avoid perforations in the shower floor are preferred. Wall supports, special profiles, gluing or mechanical support may be used in less critical areas, always in accordance with the manufacturer's instructions and under the responsibility of a qualified technician.
If drilling into the floor is necessary, it must be done with a clear technical procedure: proper drilling without breaking the tile, cleaning the hole, using a suitable sealant in the hole, correct plugs or fittings and final sealing. It shouldn't just be drilling a hole, inserting a screw and then "a bit of silicone around".
Punching the wall is usually considered safer than punching the floor, but it's not innocent. In the shower zone, the walls must be sealed, often at least up to about 2 meters or higher, depending on the layout. If they are drilled to insert profiles, hinges or supports, the sealing is interrupted locally.
Proper installation requires care. First, we need to know what is behind the tile: pipes, cables, voids, cement board, masonry, wet-room drywall, or another substrate. We do not drill blindly in the mixer zone or near possible water lines. In older renovations especially, the piping does not always run where we expect.
The hole must be sealed. In many good practices, before the plug or screw is inserted, a suitable sealant is applied in or around the hole so that it does not act as a water passage. Metal components must also be sealed around the perimeter, without creating water traps.
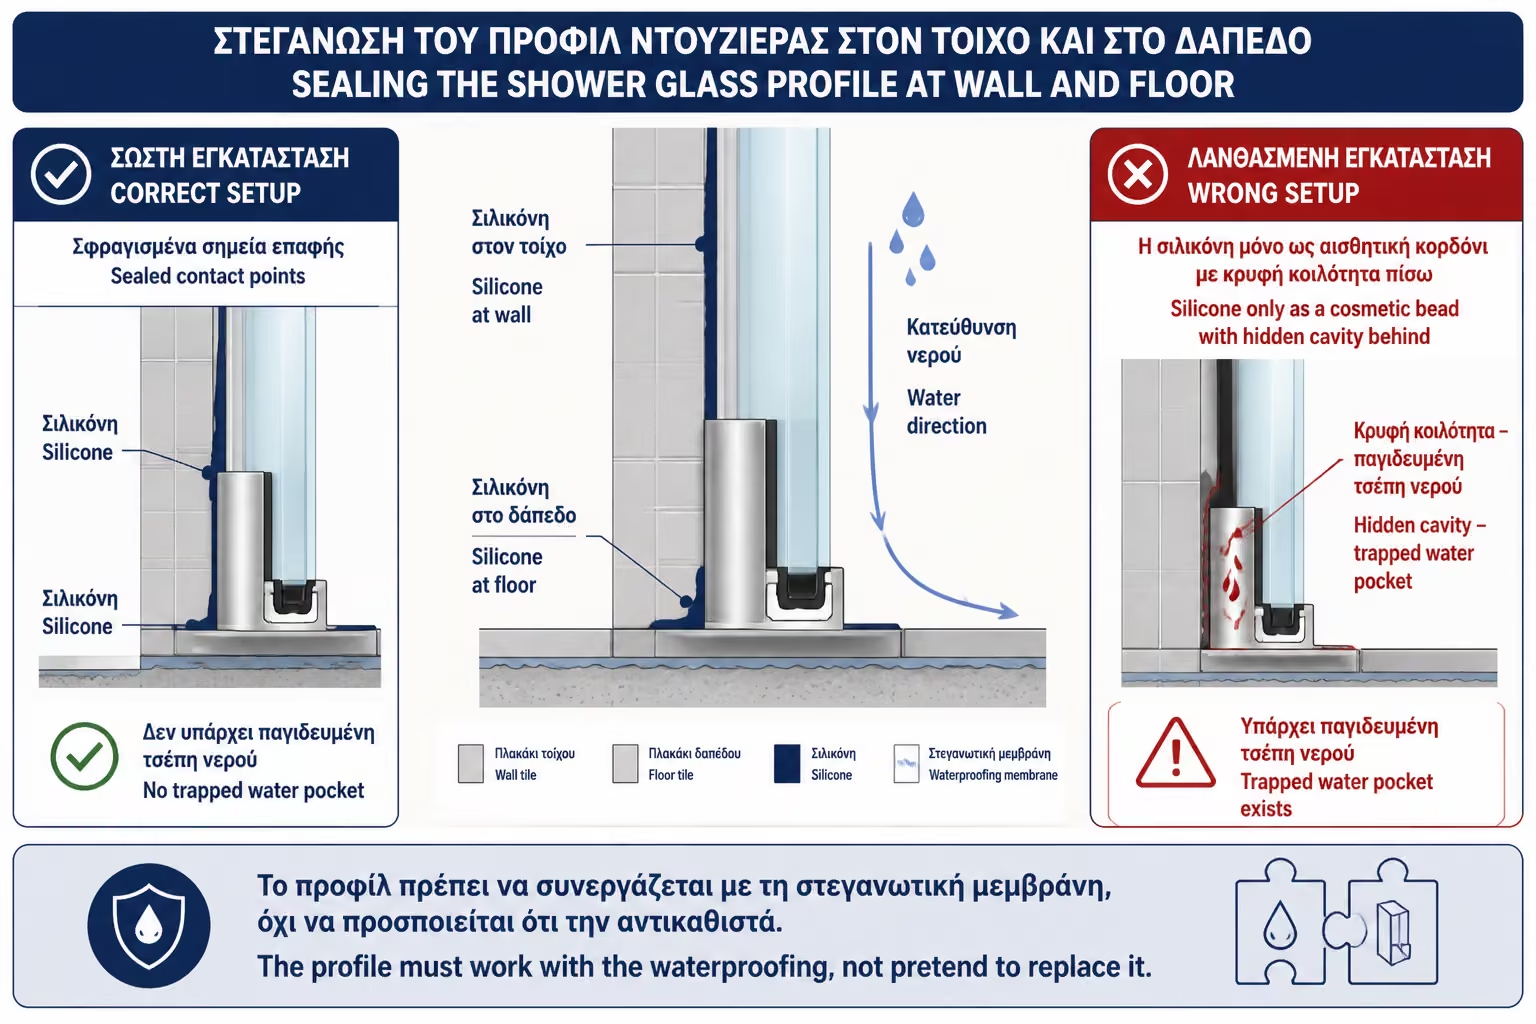
A common mistake is to place the profile first and then apply silicone only on the outside. But if the hole behind the profile is left open, water can pass through small gaps and move behind the tile. External silicone is not always enough.
The metal profile must be sealed in a way that prevents water from passing behind it, but without trapping moisture in the wrong way. The correct procedure depends on the type of profile and the manufacturer's instructions, but the general logic is constant: clean surface, proper mechanical support, sealing of holes and careful final silicone.
Before installing the profile, the tile must be clean, dry and free of dust, oil or grout residue. The holes must be made carefully and not cause cracks in the tile. If the tile breaks around the hole, the spot becomes more difficult to seal reliably.
The profile must rest on as flat a surface as possible. If the wall is crooked and the profile is pressed to "come", tensions and gaps are created. These gaps are often filled with excess silicone, but this is not an ideal solution. Silicone should not be used as a putty to correct geometric problems.
After installation, sealing must be done cleanly, at the correct thickness and with material suitable for bathrooms. The line of silicone should be continuous, with no breaks, bubbles, or spots that peel away from the tile or metal. The quality of the app shows very quickly in use.
Bottom profiles or floor guides can help retain water and stabilize the enclosure, but they can also become water traps. If they have internal cavities, if they do not drain properly, or if their silicone was not properly applied, they collect salts, soaps and moisture.
In full enclosures with sliding doors, the lower guides often receive a lot of water. If they are not easy to clean, they can blacken and quickly look dirty. If the seal fails, water can pass under the guide and reach the outside of the shower.
In walk-in solutions, it is often preferable to avoid a continuous bottom profile so the floor is easier to clean and does not create a barrier. But that means the floor slopes and the length of the glass panel must be correct. We cannot remove the bottom profile for aesthetic reasons and then expect water to stop on its own.
If there is a lower profile, it must be placed in a place where it does not create reverse flow. If the water hits the glass and stays at the base of the profile, wear will be rapid. The spot should be easy to clean and not rely on too much silicone.
In some bathrooms, the glass does not rest directly on the floor, but on a low parapet, built-up wall, or ledge. This can be a very elegant and practical solution, especially when we want to separate the shower from the rest of the space or create a stable base for the glass panel. But the parapet is another point that must be sealed correctly.
The top of the parapet is a horizontal or nearly horizontal surface. This means it can hold water. If it doesn't have a slight slope to the side of the shower, water can stay under the glass or run to the outside. The waterproofing of the parapet should cover both the top and sides, not just the base.
Crystal that rests on a parapet usually needs profiles or supports. Any perforation in the upper part of the parapet is critical, because it is in a place where water can remain. If the waterproofing is punctured without proper sealing, moisture can pass through the wall and appear later in an unexpected place.
A common mistake is to build the parapet, tile it nicely, and then install the glass as if it were a dry partition. Is not. The parapet is located within a wet zone and must be treated as part of the shower.
Silicone is a key material in sealing a glass enclosure. It is used at the glass-to-tile joint, the profile-to-wall joint, the profile-to-floor joint, and at various end points. But it has to be used correctly and for the right purpose. It does not replace the waterproofing under the tiles, and it cannot correct bad geometry.
To work properly, silicone needs a clean, dry and suitable surface. If applied over dust, salts, moisture or old silicone that was not properly removed, it will come off faster. If it goes in too thin, it can open. If it goes in too thick to cover a large gap, it may look sloppy and not work properly.
The choice of material is also important. In bathrooms, suitable silicones or elastic sealants are used for wet areas, with resistance to mold and adhesion to glass, metal and tiles. But even good material needs proper application. The "anti-mold" label does not mean that it will never turn black if there is permanent water or if the bathroom is not ventilated.
Silicone is a final sealant, not the foundation of the system. Real durability starts underneath it: proper waterproofing, correct floor slopes, correct enclosure positioning, and sealed drill holes.
A practical question that often comes up is whether the silicone should go in from the inside or outside of the enclosure. The answer depends on the enclosure system and the manufacturer's instructions, but the general logic is that no water should be trapped inside the profiles or joints.
In some systems, the outer side is mainly sealed so that any water entering the profile from the inner side can drain back towards the shower. If all sides are sealed without provision for escape, water can be trapped inside the profile and appear later as browning, smell or leakage from an unexpected place.
In other minimal applications without complex profiles, silicone is applied to the line of contact of the glass with the tile in a way that prevents water from passing under or behind the glass. Application should be clean and continuous, but not excessive.
The important thing is not to make the silicone mechanically, "where we see a joint". Each cabin has its own drainage logic. The technician needs to know if the profile needs to breathe on one side or if it needs to be completely sealed at a certain point. The wrong seal can trap water instead of stopping it.
The enclosure cannot correct wrong inclinations. If the water is not directed to the drain, it will find a way to stay or escape to the rest of the bathroom. The glass restricts splashing, but does not control the basic flow of water on the floor.
Before the enclosure is installed, it must be checked that the floor dries properly. If there is standing water in the area where the glass or profile will touch, the placement of the enclosure will make the problem more difficult to clean. The base of the profile will become a permanent wet spot.
Especially in level walk-in showers, the position of the glass should be combined with the slope line. If the glass is placed outside the sealed or properly sloped zone, water hitting it may fall into an area not designed for everyday moisture. This is a common mistake in small bathrooms, where for reasons of space the glass is reduced or moved.
The correct sequence is to finalize the drainage and waterproofing design first, then set the enclosure position, and only then install the final glass. Not the other way around.
Cabins with doors have additional technical challenges. Hinges, rubbers, magnets, guides and mechanisms receive daily movement. Any moving point is a potential source of wear and needs proper positioning.
Hinges are usually screwed into a wall or glass. If they are screwed into a wall inside the shower zone, everything mentioned about drilling applies: correct location, attention to piping, sealing of holes and a stable substrate. If the substrate is not strong enough, the door can "sag" over time and gaps can open in the seals.
The lower door rubbers are consumable items. Over time they harden, darken or lose their elasticity. They should not be considered a permanent seal. They need to be checked and replaced when they wear out. If the water gets under the door, it may not be just the rubber. It could be the tilt, the position of the door or the pressure of the shower.
Sliding cabs have guides that pick up more debris. They need easy access for cleaning. If the driver is not cleaned, the drain is blocked and water can come out.
Even a properly fitted cabin needs maintenance. Glass collects scale, profiles hold debris, silicones age and rubbers wear out. That's not to say the construction was bad. It means that the enclosure is in daily contact with water and cleaning agents.
Periodic maintenance includes descaling, checking silicone, checking bottom rubbers, cleaning guides and observing for water coming out of the shower zone. If the silicone starts to peel off, don't just put a new one over it. The old must be properly removed, the surface cleaned and dried, and then new material applied.
A frequent mistake is the use of very aggressive cleaners on profiles, silicones and rubbers. They may remove scale quickly, but they can wear down seals and surfaces. Good maintenance doesn't mean excessive scrubbing and harsh chemicals. It means regular cleaning with suitable materials.
If mold or water appears repeatedly under the profile, simple maintenance is not enough. It should be checked for stagnant water, incorrect sealing or installation failure.
The mistakes in the enclosure usually start from the idea that "the bathroom is finished, only the glass remains". In fact, the installation of the glass is one of the last critical stages and can affect the entire sealing.
Before you finalize the choice or installation, review the following points first:
| Error | Possible consequence | Correct approach |
|---|---|---|
| Drilling into the floor without sealing | Moisture ingress under tiles | Avoidance where done or complete hole sealing |
| Profile on a point that holds water | Blackening, scale, silicone wear | Leakage check before installation |
| Silicone on wet or dirty surface | Fast detachment | Cleaning, drying and proper application |
| Seal all sides without drain logic | Trapped water inside profiles | Follow manufacturer's instructions |
| Wrong window length in walk-in | Splashes outside the shower | Design based on real use |
| Screws near piping without inspection | Risk of damage to benefits | Pre-piercing inspection |
| Parapet without slope at the top | Water under the glass panel | Slight slope towards the shower area |
| Silicone replacement without diagnosis | Recurring problem | Check cause before resealing |
A typical example is a cab with a bottom driver, mounted on a floor that had a slight belly. The water did not go to the siphon, but stayed in front of the driver. After a few months, the silicone turned black and started to peel off. The problem wasn't just the quality of the silicone. It was the driver's seat over where the water pools.
The cost of a glass enclosure depends on the dimensions, thickness, and type of glass, whether it is fixed or includes a door, the type of profiles, the fittings, whether it is custom-made, the location, the site access, the condition of the floor, the installation difficulty, and whether VAT is included. Sealing the enclosure is not just the price of silicone. It also includes correct positioning, sealing of drill holes, the right fittings, and coordination with the bathroom's floor slopes and waterproofing.
In a complete bathroom renovation in Greece in 2026, where a typical 5 sq.m. can be indicative around €3,200–€5,500 for a simple/medium renovation and €6,000–€7,500+ for more demanding solutions, the custom glass enclosure can significantly affect the final cost, especially if it has a large glass, door, special components or minimal supports.
Before you finalize the choice or installation, review the following points first:
| Element | What affects cost? |
|---|---|
| Fixed walk-in glass panel | Dimensions, thickness, supports, special cut |
| Cabin with door | Hinges, rubbers, mechanisms, positioning accuracy |
| Metal profiles | Metal quality, finish, tolerances on crooked walls |
| Frameless solution | More precision, better parts, more demanding placement |
| Parapet or special base | Additional waterproofing, slope, tiling, seals |
| Perforations and supports | Time, accuracy, hole sealing |
| VAT and placement | It should be clear if they are included |
A very cheap cabin is not necessarily bad, but what is included should be checked. Does it include proper positioning? Stamping? Adapting to crooked walls? Quality tires? Parts warranty? If you compare only the price of the glass, you are not seeing the full technical object.
A proper quote for a glass enclosure should state the type of glass, the dimensions, the thickness, the type of profiles or brackets, the installation method, whether drilling is required, the sealing method, and whether installation and VAT are included.
For technically demanding showers, there must also be consultation with the renovation crew. The enclosure technician needs to know where there is waterproofing, where pipes run, if drilling is allowed in the floor, what the slope is and where the main water flow is. He should not come to the end and decide for himself where to pierce.
If there is a parapet, it must state how the glass will fit on it and how it will be sealed. If there is a floor profile, it must be clear whether the tile will be drilled or another method will be used. If there is a door, hinges, rubbers and adjustments should be listed.
The phrase “cabin placement” is very general. In the glass enclosure, the right detail is the one that prevents water from going where it shouldn't.
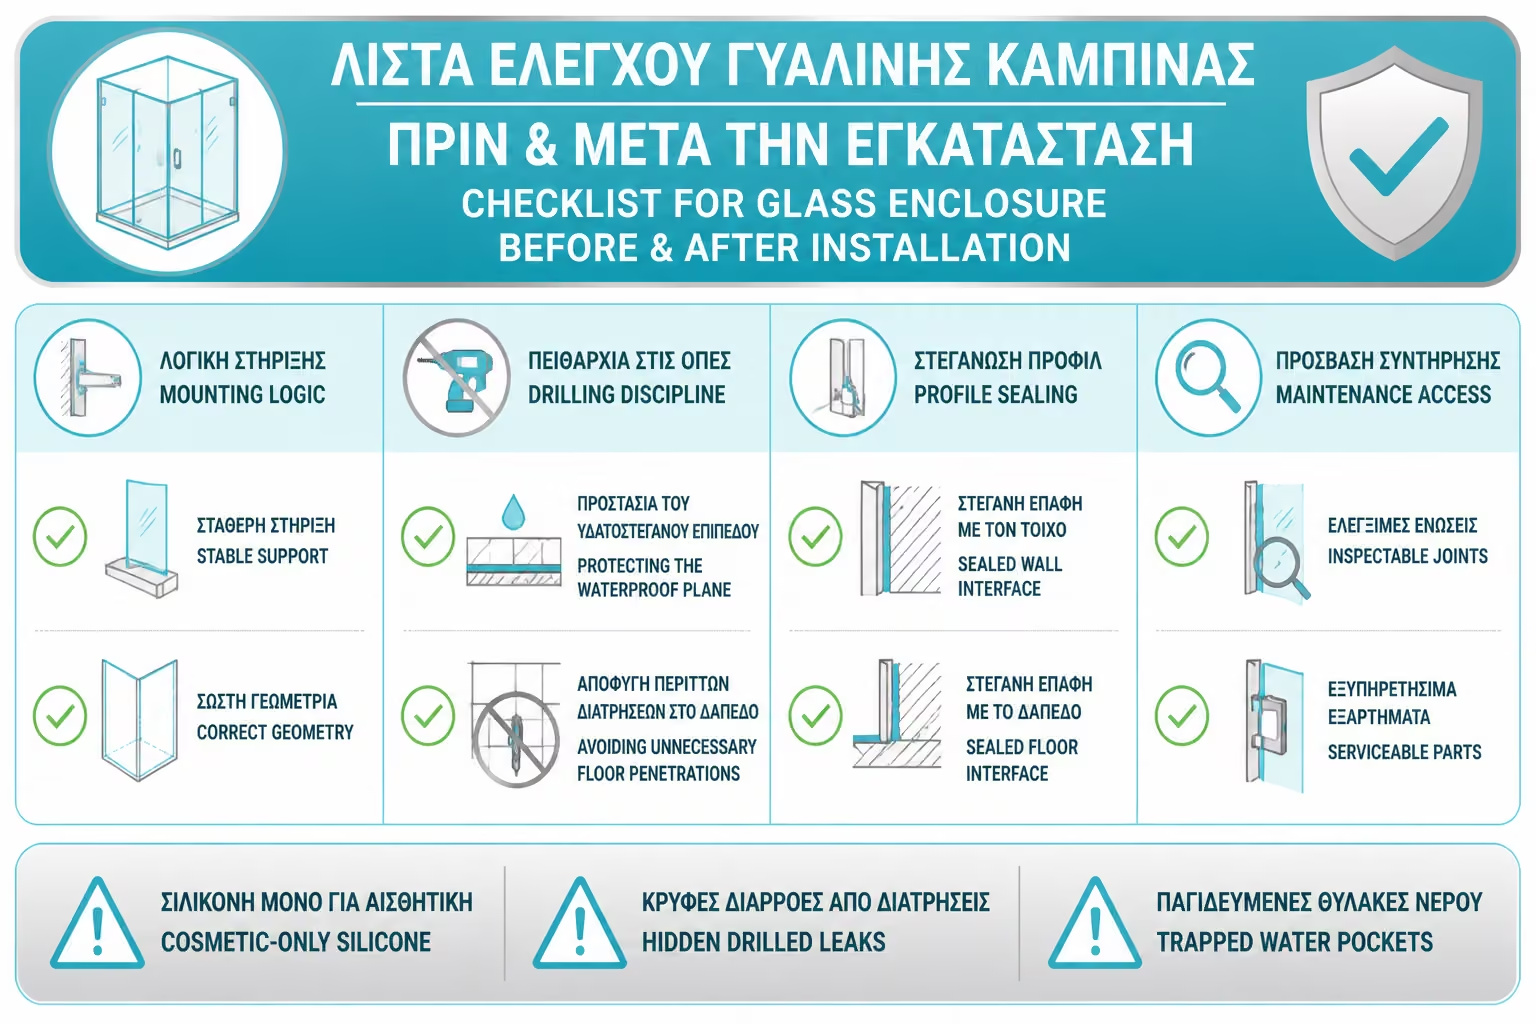
Before installing the glass enclosure, it is worth doing a practical check. It is much easier to correct floor slopes, positions, and details before drilling tiles and installing profiles.
Before you finalize the choice or installation, review the following points first:
| Question | Yes / No |
|---|---|
| Have the drains been checked to direct the water to the siphon? | Yes / No |
| Is the glass location within the properly sealed zone? | Yes / No |
| Has drilling into the floor been avoided where technically possible? | Yes / No |
| If drilling is required, is there provision for sealing the hole? | Yes / No |
| Has piping been checked behind the mounting points? | Yes / No |
| Does the profile step on a clean, dry and stable surface? | Yes / No |
| Does the top of any parapet have a slight slope towards the shower? | Yes / No |
| Is the silicone applied according to the logic of the system and not randomly? | Yes / No |
| Does the grate or siphon remain accessible for cleaning? | Yes / No |
| Do the door seals fit properly without obstructing runoff? | Yes / No |
| Was it tested with water after installation? | Yes / No |
| Does the quote clearly state the glass, profile, fittings, drilling, and VAT? | Yes / No |
If the answers are not clear, it is better to ask for clarification before placing. After the piercing, the options are limited.
If you have to keep only one thing, keep this: a glass enclosure is not properly sealed by adding a neat line of silicone at the end. Before the glass goes in, the floor slopes, waterproofing, profile position, and drilling points must already have been checked. Avoid drilling the floor where possible, seal every hole that is made, and do not place profiles where water tends to collect. Good silicone helps, but it cannot rescue a bad layout.
Sealing the glass enclosure is one of the final stages of the shower, but it should not be treated as a simple finishing detail. Crystal, metal profile, supports and silicones work together with everything that has gone before: downspouts, siphon, tiles, waterproofing and walls. If the base is correct, the enclosure completes the system. If the base is wrong, the enclosure can reveal or even exacerbate the problem.
The most critical point is not to break the seal unnecessarily. Every hole in the floor or wall inside the shower zone must be made with full awareness and properly sealed. Every profile that steps on a floor must be placed in a place where water does not pool. Each line of silicone should be applied to a clean, dry surface and have the role of final sealing, not correcting poor workmanship.
The owner should ask for coordination between the bathroom renovation crew and the glass installer. It is not enough to order a nice glass panel in the right dimensions. We need to know where it will sit, how it will be fixed, whether the floor will be drilled, how the holes will be sealed, and whether its position works with the path of the water.
A properly installed glass enclosure makes the bathroom more attractive, easier to clean, and more functional. A poorly sealed enclosure, however, can become a permanent source of leaks, limescale, and wear. In the shower, the glass is the visible element. The waterproofing and sealing behind and around it are what keep the bathroom safe over time.
Return to category.
Go to categoryReturn to the central guide.
Go to guide