
Bathroom Waterproofing & Moisture Protection
Return to category.
Go to categorySealing the shower is one of those tasks that the owner rarely sees completed. He sees her briefly, in an intermediate stage, and then disappears under glues, tiles, joints, silicones and glasses. The finished bathroom may look perfect, but the real quality has already been judged before the first tile is laid.
This is what makes sealing so critical and so insidious. If done right, no one will think about it again. If done wrong, the problem can appear months or years later: black joints, damp smell, swelling in the adjacent wall, silicones that open, standing water, tiles that sound hollow or even a leak downstairs.
The most dangerous thing is that many mistakes in sealing are not visible on the day of delivery. A bathroom can be delivered clean, modern and impressive, but beneath the surface there are weak points: a trap without a proper connection to the insulation, corners without tape, walls that were not sealed high enough, cement mortar with the wrong flow or materials that were applied hastily without drying.
That is why the owner does not need to become a craftsman, but he must know what to ask. Before the tiles are glued, there is still an opportunity to check and correct. Then every mistake is hidden. And when a repair is needed, we are usually not talking about a simple silicone change, but about loosening, cost and inconvenience.
In this guide we look at the 5 biggest mistakes in shower sealing, with a practical explanation of why they happen, what causes them and what to check or ask the handyman before tiling.
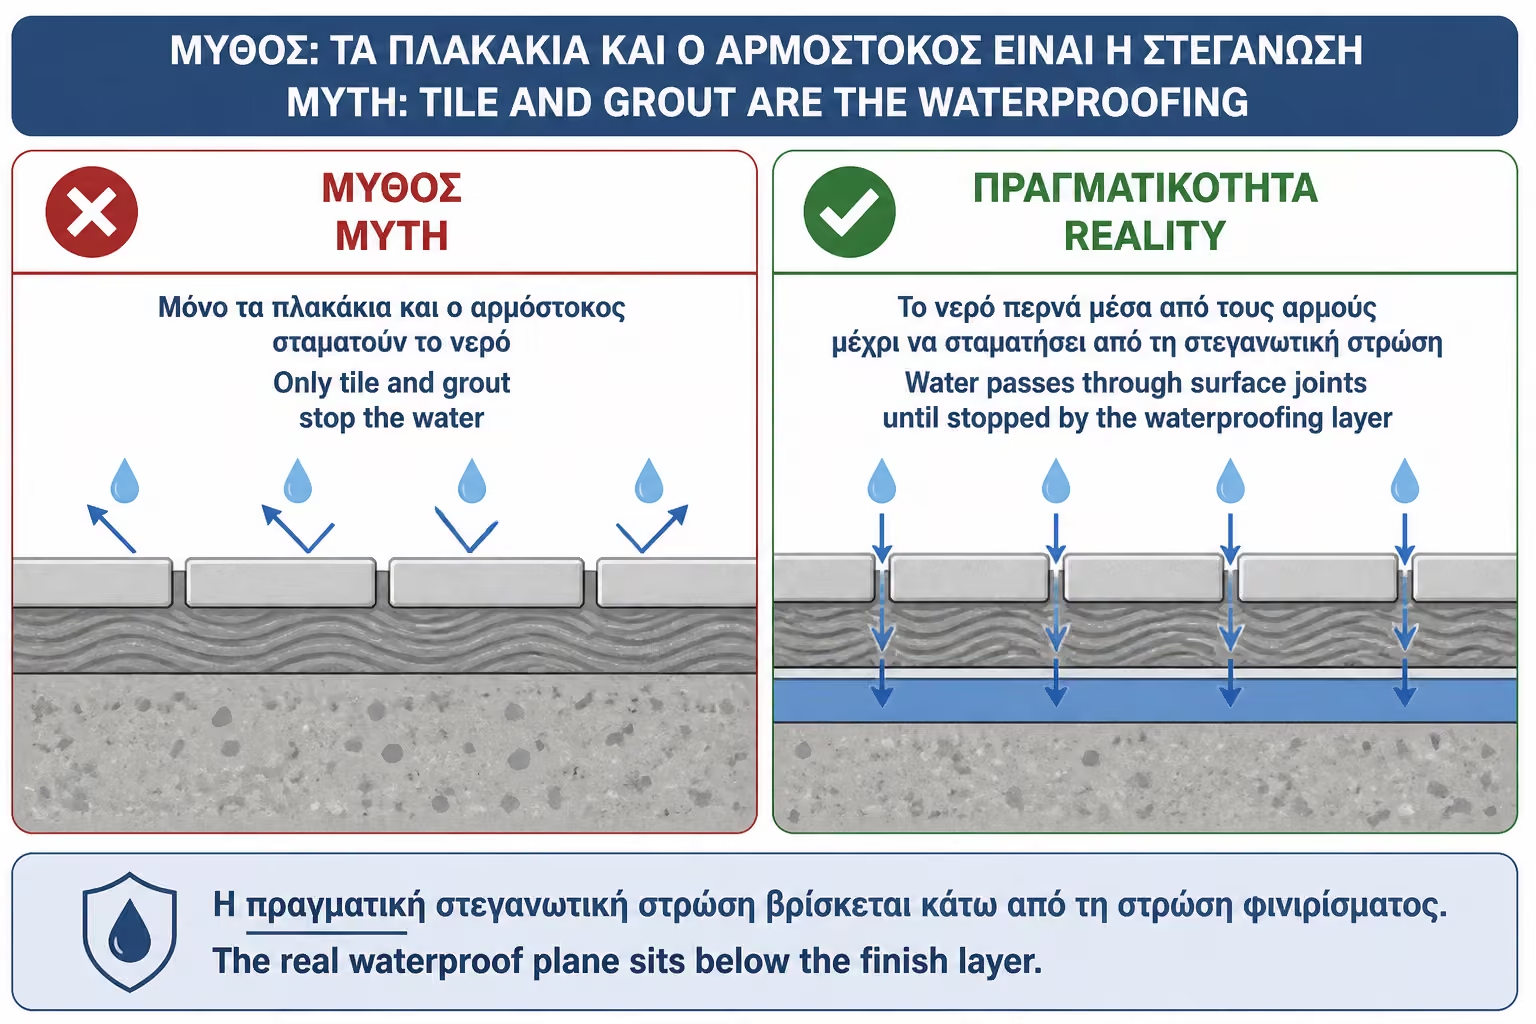
The most common mistake is the basic misunderstanding that "once the tiles are installed, the water will not pass through". Tiles do withstand water, especially when they are of good quality and low absorbency. But the system of a shower does not only consist of tiles. There are joints, corners, cuts, siphons, piping, silicones and joints of different materials.
Grout, as good as it is, should not be considered the main line of defense against water. Over time it is strained by cleaning agents, salts, soaps, temperature changes and daily use. It can absorb moisture, show microcracks or wear locally. If there is no proper waterproofing underneath, moisture can pass into the cement mortar or masonry.
A typical example is a built-in shower with a beautiful large tile and narrow joints. In the first period everything seems clear. After months, the joints near the siphon darken and the owner thinks the problem is a "dirty joint". In fact, moisture may have gotten under the tile because there was not a proper waterproofing layer or because the joint with the siphon was made sloppily.
The correct logic is reversed: tiles are the ultimate surface for use and cleaning. The waterproofing has to be underneath and work regardless of how good the tile is. If we were to imagine removing the tiles, the shower should already have a continuous protected zone: floor, corners, siphon and walls.
This is what you must ask clearly before the tiling begins: "What waterproofing system will be under the tiles?" If the answer is vague, of the type "don't worry, with the joint and the silicone it won't be a problem", more clarification is needed.
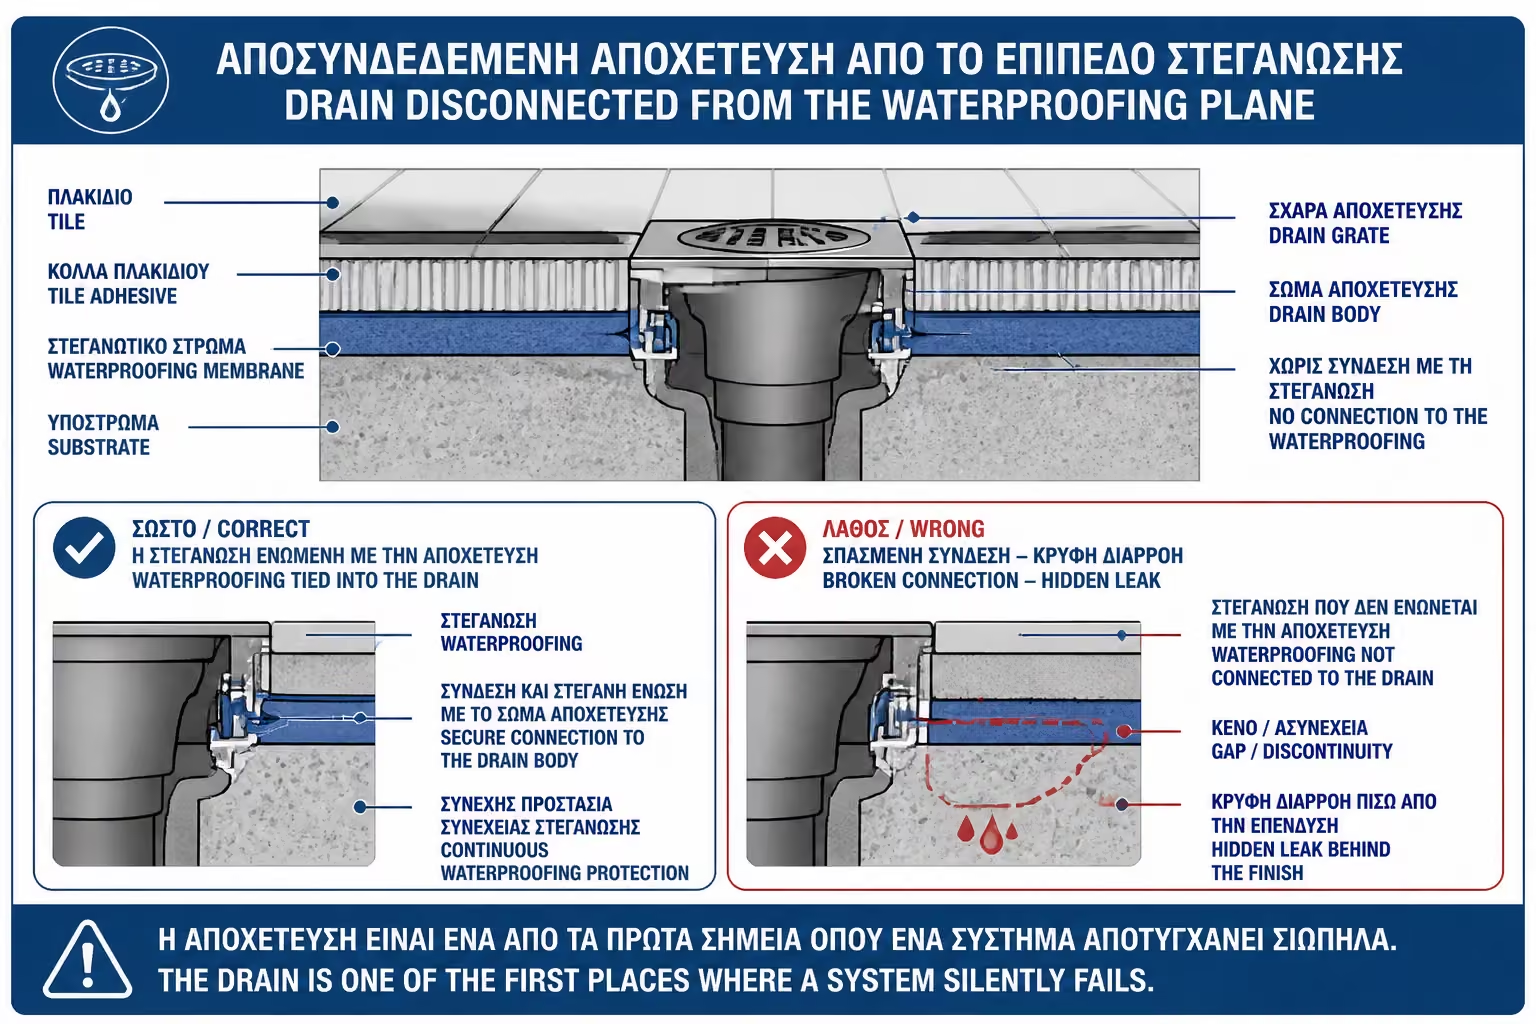
The siphon is the most critical point of the shower, because that is where the water collects. Whether it is a central siphon or a linear drain, the seal must be connected to it in a specific and reliable way. It is not enough that the siphon "sits" in the cement mortar, nor is it sealed around the perimeter at the end with silicone.
In the built-in shower, water can pass under the tiles through joints or micro-gaps. The waterproofing must prevent it from reaching the slab or masonry and guide it safely down the drain. If the sealing layer stops just before the siphon or if it does not "bond" properly with its flange, a weak point is created exactly where there is the largest amount of water.
The problem is even more pronounced in linear siphons. The linear siphon has a large joint with the floor, a different material than cement mortar and is often installed in showers without a step. If it does not have a flange or intended connection with a membrane or spreadable system, the metal-to-floor joint becomes vulnerable.
A common mistake on the construction site is to install the siphon first, make the cement mortar and then apply a sealant "around it". This may seem sufficient, but it is not always a correct connection. The point is not to have material near the siphon. The point is that the waterproofing layer of the floor is continuously connected to the siphon.
Before the tiles go in, you need to ask: "How exactly is the waterproofing connected to the siphon? Is there a gasket, collar, membrane or special tape?" If the craftsman cannot explain the detail, the point needs checking.
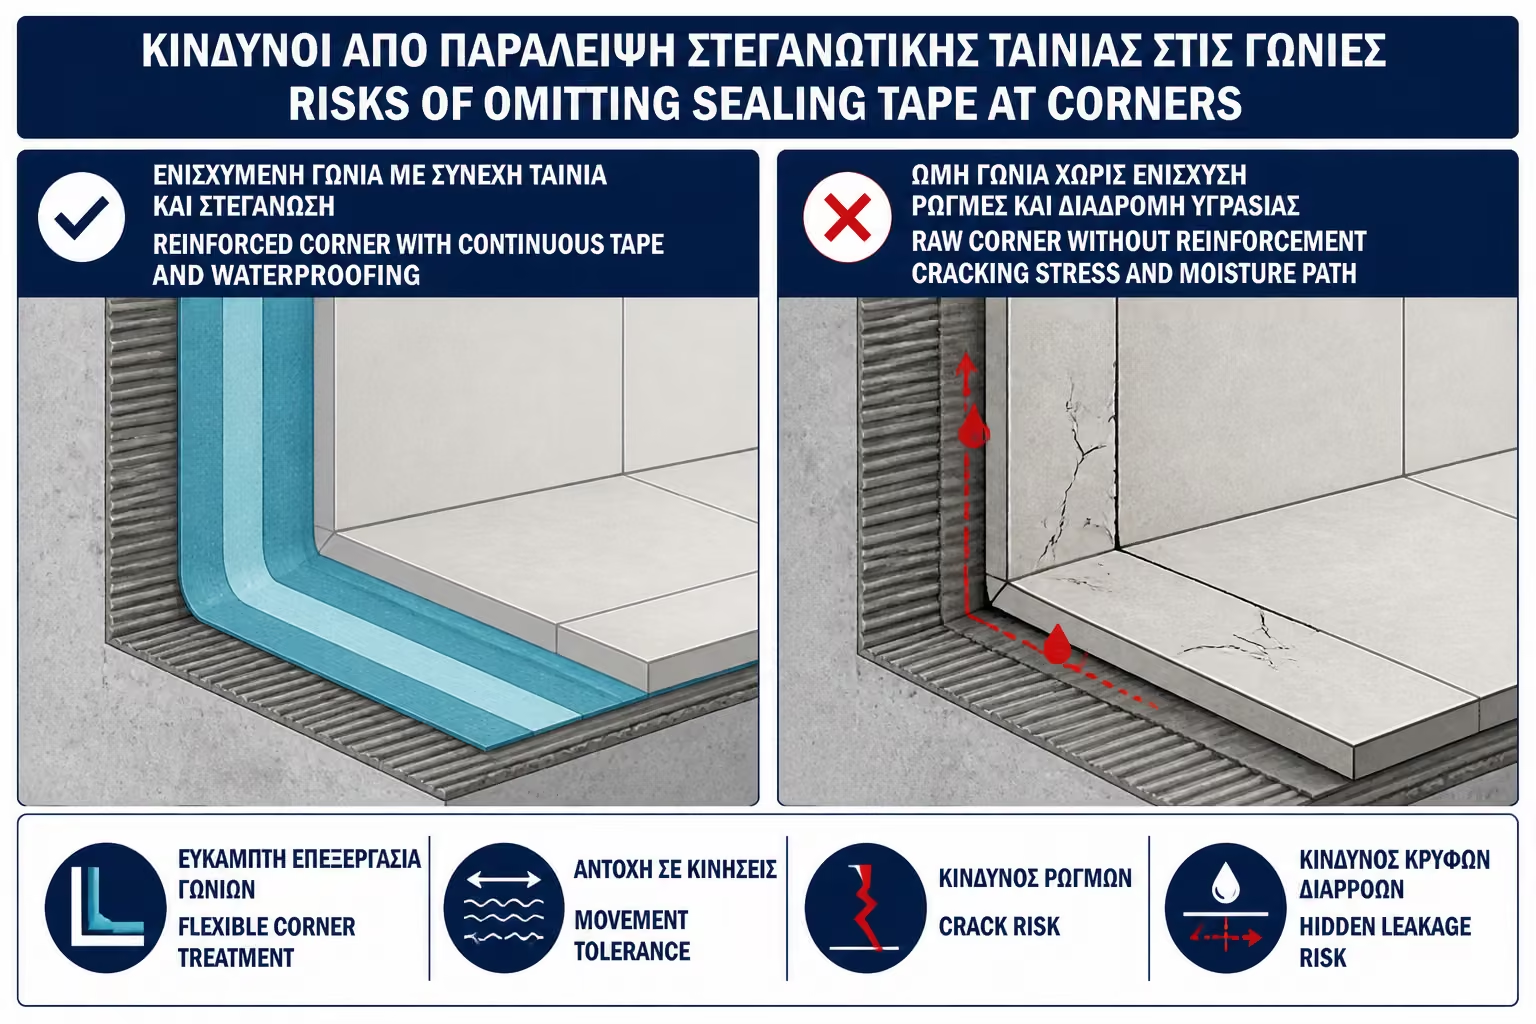
Corners are one of the most common points of failure in a shower. Different surfaces meet there: floor with wall, wall with wall, tile with tile, substrate with cement mortar. These compounds accept micro-movements, water, cleaning agents and temperature changes. If the waterproofing is done only by simple application without reinforcement, there is an increased risk of cracks or small leaks.
Sealing tapes are not a "luxury". It is a key element of a proper waterproofing system. They are placed at floor-wall joints, at vertical corners, around special points and at level changes. Their role is to provide continuity and elasticity where the simple layer of material can weaken.
In a walk-in shower, the floor-to-wall connection is particularly important. That's where water ends up, that's where moisture often starts behind the tiles, and that's where many final seals rest. If the angle relies only on the grout or silicone of the finished surface, the protection is insufficient.
The same applies to shampoo recesses, built-in shelves, seats, low walls and glass bases. The more complex the geometry, the more angles there are and the more important reinforcement becomes. A small recess can have more sensitive corners than the rest of the shower floor.
The right question for the technician is simple: "Will sealing tapes be put in the corners and joints?" If the answer is "no need, we'll have a good time", it's a good idea to ask for a more specific explanation.
Many times, rudimentary waterproofing is applied on the floor and only a few centimeters up the walls, like a low tray. That may seem reasonable if you think only about water falling downward. But in a shower, the walls receive direct water. The shower head, mixer, splashes, steam, and water running over the tiles all stress vertical surfaces every day.
In the shower zone, the waterproofing should practically rise at least to about 2 meters from the finished floor. In many cases, especially with a ceiling shower, tall column, small cabin, walk-in layout or intensive use, it is preferable to reach even higher or up to the height of the tiling.
The zone around the mixer is particularly critical. There are pipe penetrations, escutcheons, threads, and openings in the tile. If the pipes are not properly sealed before the tiles are installed, water can seep behind the escutcheons and move into the wall. Everything may look clean on the outside, but behind the surface there may already be a path of moisture.
A common example is a bathroom where moisture appears on the back side of the shower wall, at a height near the mixer. The owner suspects a pipe leak. That should always be checked by a plumber, but it is not the only possibility. Water can get through poor sealing around the fittings or through joints in an inadequately waterproofed wall.
Before the tiles go on, ask: "How high will the waterproofing go up the walls? What will be done around the mixer? Will there be cuffs or collars on the supplies?" If the quote just says "bathroom waterproofing" without height and details, it is not clear enough.
Waterproofing protects against moisture, but does not remove water. The geometry of the floor does this. If the grout has the wrong flow, if the siphon is at the wrong level or if the tile does not follow the slope correctly, the shower will hold water. And standing water is one of the biggest enemies of a sealed structure.
In a proper shower, water should flow naturally toward the drain. A practical slope of around 1%–2% is usually targeted, depending on the layout, shower length, drain type, and tile. The slope should not be so small that water remains, nor so steep that the floor becomes uncomfortable or visually awkward.
The big mistake is to treat the cement mortar as a simple filling and to assume that "it will be carried by the tile with the glue". Tile adhesive is not a flooring material. It can fix minor imperfections, but it shouldn't take on the creation of spills.
Stagnant water stresses the same places every day. If the water stays in front of the line siphon, that's where the joints will wear out first. If it stays at the entrance to the walk-in shower, it can exit to the rest of the bathroom. If it stays in the shampoo recess, it will darken the back corners. Waterproofing can reduce the risk of leakage, but should not be used to "excuse" poor drainage.
Before the tiles are put in, the cement mortar must be checked. Ask: "Are the downspouts given? Has it been checked that there are no bellies? Does the tile we've chosen match these slopes?" These questions are more important than whether the finished tile looks expensive.
Behind most problems there is often one common element: the quote did not clearly describe the waterproofing. It said "bathroom renovation", "shower construction", "installation of tiles" or "waterproofing", but without explaining exactly what will be done, in which places, with which materials and at what height.
The indefinite offer creates two risks. First, the owner thinks things are included that weren't actually agreed upon. Secondly, when a problem or additional costs arise, misunderstandings begin: "I thought that a membrane was inserted", "I thought that the insulation was only on the floor", "I thought that the tapes were extra".
A proper quote for a shower should at least mention the logic of the system: what will be done on the floor, what will be done on the walls, how the corners will be sealed, how the drain will be connected, what will be done around the mixer, and whether there are special details such as niches, a linear drain, or a level-access walk-in shower.
It doesn't have to be written like a dozen-page technical study, but it should be clear enough that the owner knows what he's paying for. If the seal is not described, it can hardly be checked.
The table below summarizes the five main mistakes and the right question to ask before laying tiles. It is useful because it turns a technical topic into a practical test.
Before you finalize the choice or installation, review the following points first:
| Error | Danger sign | What to ask before the tiles |
|---|---|---|
| Tiles are considered waterproofing | No waterproofing system is mentioned in the offer | "What's under the tiles to protect against water?" |
| Bad siphon connection | The siphon was installed without a flange or special detail | "How does the insulation tie in with the siphon?" |
| No corner tapes | Simple application to joints without reinforcement | "Are there going to be sealing strips in the corners?" |
| Low waterproofing in the walls | The insulation only rises a few centimeters | "How high will the shower walls be waterproofed?" |
| Mistakes | The cement mortar looks almost flat or has bellies | "Has it been checked that the water is directed to the siphon?" |
If the technician answers clearly and to the point, it's a good sign. If the answers are vague or defensive, it's worth asking for more technical clarification before continuing the project.
The stage before paving is perhaps the most important for the owner. There you can see the work that will later be hidden. If there is a membrane, its connections are visible. If there is smear material, the coverage is visible. If films have been inserted, they can be seen in the corners. If the siphon has a flange, the connection is visible. If the walls are waterproofed high up, the extent of the application can be seen.
It is not an exaggeration for the owner to ask to see this stage. It doesn't mean he doesn't trust the wizard. It means that the work is critical and there must be an audit before it is covered. In a serious project, the technician should have no problem explaining what he has done.
It is a good idea to take pictures before the tiles are installed. The photos help to archive the project, but also for future work. If you later need to drill a wall for a fixture or check a fault, it's helpful to know where siphons, supplies, membranes and critical joints are.
The best time to check is not when moisture appears. It's before the shower closes.
In the total cost of a bathroom renovation, proper waterproofing is usually not the largest amount. But it is one of the most critical. For a typical bathroom of about 5 sq.m. in the Greece of 2026, a simple to medium renovation can be indicatively around €3,200–5,500, while more demanding solutions with a walk-in shower, linear siphon, membranes, large tiles or custom glass can reach around €6,000–7,500 or more.
Within these amounts, the difference between a rough waterproofing job and a proper one can be much smaller than the repair cost. If you need to remove tiles, open up the drain area, dry walls, or fix a leak, the costs add up quickly. And it is not only financial. It also means time, dust, debris, disruption of bathroom use, and possible damage to adjacent areas.
Before you finalize the choice or installation, review the following points first:
| Choice that "cuts" | What it might cost later |
|---|---|
| Omit corner tapes | Cracks, moisture in joints, local loosening |
| Cheap or unsuitable siphon | Difficult connection, smells, leakage around drain |
| Waterproofing only on the floor | Moisture on the walls and around the mixer |
| Mistakes | Standing water, joint wear, possible rebuilding |
| Indefinite offer | Extra charges, omissions, liability disputes |
Proper sealing should not be treated as an “extra” that is cut to reduce the price. It is part of the basic function of the shower.
The questions don't have to be aggressive. They can be done simply, in a practical way. A serious technician will understand that the owner wants to protect the project and not make suggestions without knowledge.
You can ask:
These questions are not details. It is the core of proper construction. If the technician answers specifically, there is a better basis of trust. If he only answers "this is how we have been doing it for years", that is not enough in itself.
There are times when it is better to stop the project for a while than to rush ahead. If the waterproofing has not yet been put in but the tiler is preparing to stick tiles, a question must be asked. If the siphon just looks boxed in without a seal connection, it needs clarification. If the corners are untapered and the answer is "the joint will catch them", attention is needed.
The same applies if the cement mortar has obvious bellies or if the water in a rough test does not move towards the siphon. It makes no sense to cover a wrong slope with an expensive tile. The problem won't go away. It will become more difficult to fix.
If there is a dispute, a second opinion can be sought from an engineer, experienced boarder or technician familiar with wet areas. Not every project needs to become overly bureaucratic, but the shower is a high-risk spot. A brief clarification before paving can save a lot of damage.
Haste is bad advice in waterproofing. When a stage needs to be dried, strengthened or controlled, it should not be skipped to "finish the bath".
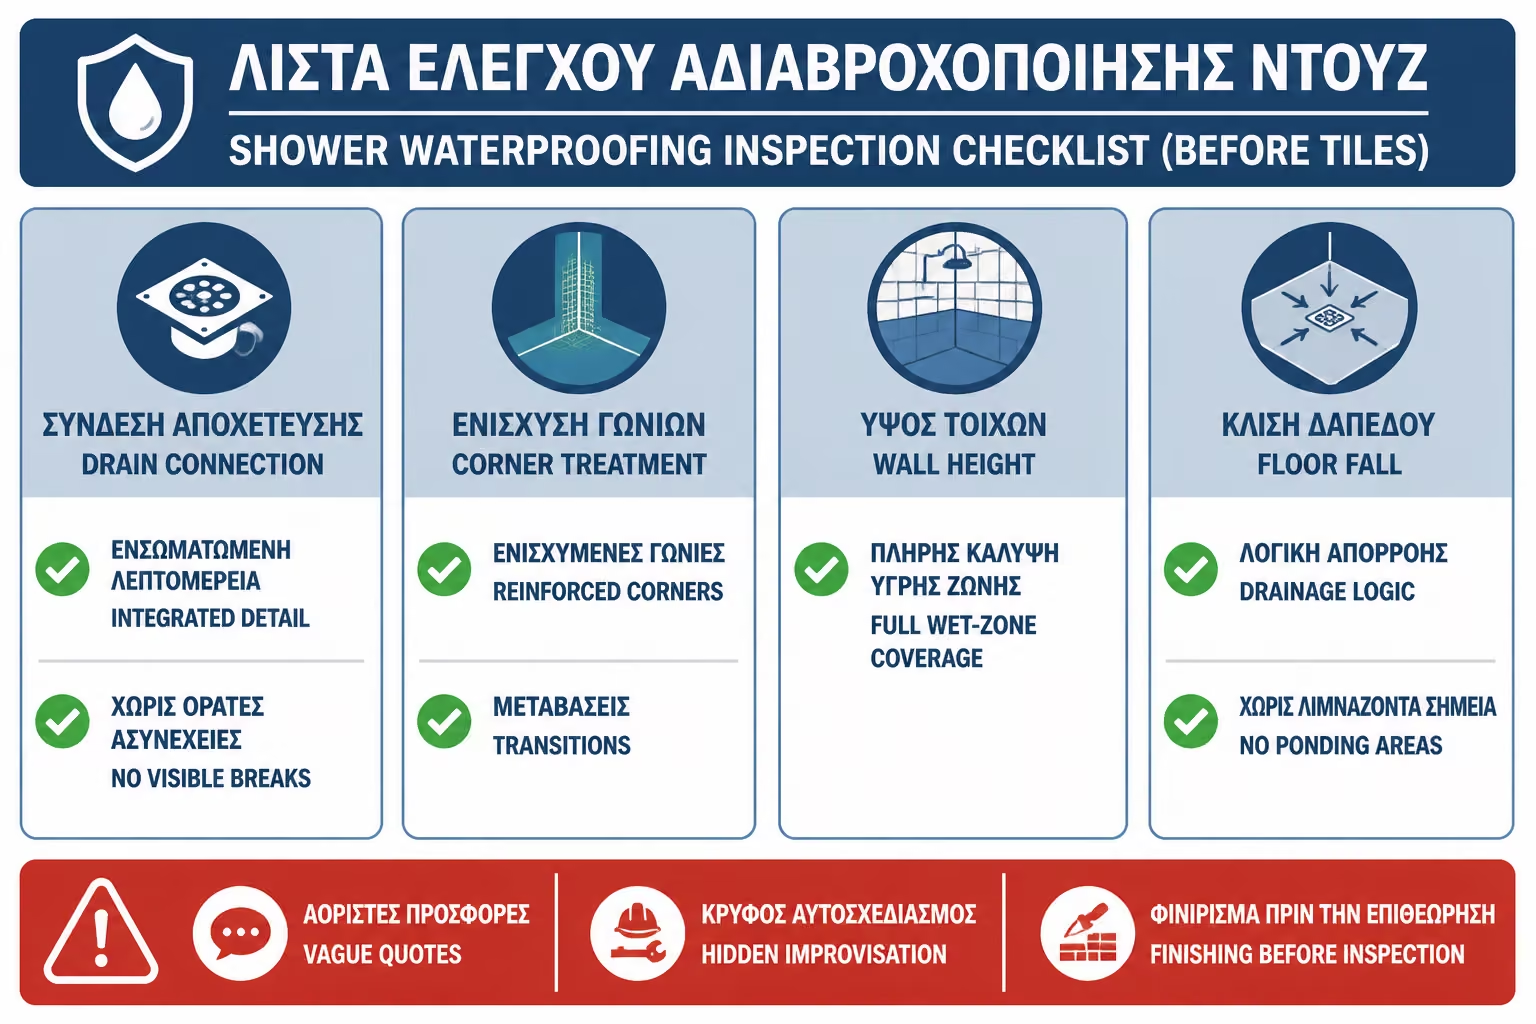
Before starting tiling in the shower, it is worth doing a final practical check. This checklist is not a substitute for a professional, but helps the owner identify ambiguities.
Before you finalize the choice or installation, review the following points first:
| Question | Yes / No |
|---|---|
| Is there a clear waterproofing system under the tiles? | Yes / No |
| Has the substrate been properly cleaned and prepared? | Yes / No |
| Has primer been applied where required? | Yes / No |
| Has waterproofing been applied to the shower floor? | Yes / No |
| Does the waterproofing go sufficiently up the walls, ideally at least about 2m into the shower zone? | Yes / No |
| Are the floor-wall corners taped? | Yes / No |
| Are the vertical corners of the shower reinforced? | Yes / No |
| Is the siphon connected to the sealant and not just silicone? | Yes / No |
| Does the area around the mixer and the supply penetrations have dedicated sealing? | Yes / No |
| Do the downspouts lead the water cleanly to the siphon? | Yes / No |
| Are there no obvious bulges or reverse slopes in the cement mortar? | Yes / No |
| Does the tile chosen match the siphon type and slopes? | Yes / No |
| Has it been agreed which glue and which grout will be used? | Yes / No |
| Does the offer clearly state materials, labour, VAT and technical stages? | Yes / No |
| Do you have pictures of the seal before it was covered? | Yes / No |
If several answers are "I don't know", this does not necessarily mean that the work is bad. But it means that it has not been sufficiently tested before closing. And in sealing, anything that closes without control becomes more expensive if it needs to be reopened.
If you have to keep one thing, keep it this: before the tiles are set, ask to see the waterproofing. The angles, the strips, the connection to the siphon, the height on the walls and the logic of the flows must be seen there. Don't judge the shower by the finished tile alone. The tile shows the aesthetics. The waterproofing shows whether the bathroom will withstand daily use.
The biggest mistakes in shower sealing are not always spectacular. Usually it's small omissions hidden under the tiles: an untaped corner, a siphon without a proper flange, a wall that wasn't sealed high enough, a poorly flowing grout, a quote that didn't describe exactly what was going to be done.
The problem is that these mistakes are not easily corrected afterwards. When the shower is finished, the owner only sees the final result. But if moisture does appear, the cause is usually below the surface. That is why the correct check must be done before paving.
The best protection for the owner is clarity. Know what system will go in, where it will be applied, how it will be connected to the siphon, how the corners will be reinforced and how the walls will be protected. He does not always have to choose the most expensive solution. But it needs to avoid the vague and sketchy solution.
A properly sealed shower does not look more impressive on the first day. But it shows in practice: it dries properly, doesn't smell damp, doesn't tan prematurely, doesn't create problems in adjacent areas, and doesn't force the owner to rip out a new bathroom to fix something that could have been checked before the tiles were installed.
Return to category.
Go to categoryReturn to the central guide.
Go to guide